Fix: Repairing Disk Errors, This Might Take an Hour [9 Ways]
Run the Check Disk command in order to fix this startup issue
7 min. read
Updated on
Read our disclosure page to find out how can you help Windows Report sustain the editorial team. Read more
Key notes
- Many users claimed that the error message Repairing disk errors. This operation may take more than an hour to complete. occurs when they start Windows 10.
- The Windows Registry could be bloated or corrupt, so you need to repair the registry.
- Also, rebuild the Boot Configuration Data by following our step-by-step guide below.
Are you getting the Repairing disk errors. This might take more than 1 hour startup error message? You are not alone; we have the solutions for this startup problem.
Many users reported getting the error alert Repairing disk errors. This might take over an hour to complete, when they boot into Windows 10, and the startup screen error still won’t go away.
If you experience this problem, the basic workaround would be to wait more than one hour for the boot process to complete. However, waiting won’t clear this problem.
Hence, the Windows Report team has compiled a list of solutions to fix this problem, so be sure to take a closer look.
How long should I wait for repairing disk errors?
The usual wait time for this procedure is around 10-15 minutes. Sometimes, you can get an error that says that it sometimes takes over an hour or even a day.
How do I fix Repairing disk errors. This might take over an hour to complete ?
1. Run CHKDSK
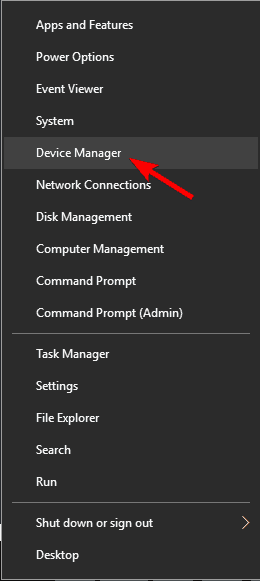
- Press the Windows Key + X, and select Command Prompt (Admin).
- When Command Prompt opens, enter chkdsk /f /r and press Enter.
- If you see a message saying that you need to restart your PC before you can scan the C partition, be sure to follow the instructions, and restart your PC.
One of the fixes that worked for those who encountered this startup problem, was to run chkdsk. If you are still experiencing the error, you might want to proceed to the next solution.
Also, if you are experiencing corrupt directories on your Windows PC, check out our dedicated guide to fix it in no time.
2. Repair PC registry
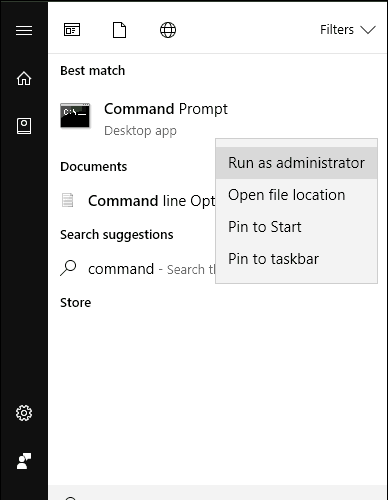
- In Safe Mode, go to Start and type cmd.
- Right-click Command Prompt, and select Run as Administrator.
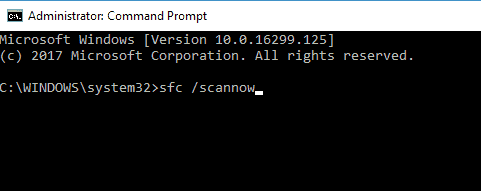
- Now, type the following command, and press Enter:
sfc /scannow - Wait for the scanning process to complete and then restart your computer. All corrupted files will be replaced on reboot.
Sometimes, the Windows Registry might be bloated or corrupted; hence, you need to repair the registry.
Meanwhile, Microsoft’s System File Checker verifies the integrity of all system files and repairs files with problems when possible.
The simplest way to repair your Windows registry is to use a dedicated repair tool that scans your PC for any errors and irregularities and fixes faulty registries and files from the moment they appear.
3. Set the boot disk at the top of the computer’s boot order in BIOS
- Power up your computer.
- Press the F1 key or any specified key to enter the BIOS (other keys such as F1, F12, or Delete may be used depending on your HP system).
- Locate your computer’s boot order under BIOS Boot.
- Select the HDD/SSD i.e. the boot disk and move it upward using the arrow key.
- Save the changes by following the screen prompts, and exit the BIOS.
Another reason for this startup problem is that the HDD/ boot disk is not at the top of the boot order. The system retrieves boot information and OS details by following a boot order.
The boot order consists of the sequence of sources that the computer searches to retrieve valid information.
However, if the HDD/boot disk is not at the top of the boot order, the computer tries to boot from another source, which results in an error message.
If you intend to set the boot disk i.e. HDD at the top of the boot order in BIOS (Basic Input/Output System), follow the above steps.
This is a simple solution, but it can help you if you’re getting a Disk read error occurred message on your PC.
4. Run Automatic Repair/Startup Repair
- Insert the Windows bootable installation DVD, and restart your PC afterward.
- Press any key to boot from CD or DVD when prompted to continue.
- Select your language preferences, and click Next.
- Click Repair your computer in the bottom-left.
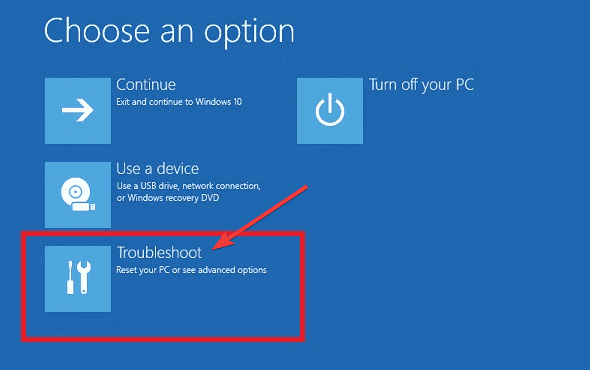
- In the Choose an option screen, click on Troubleshoot.
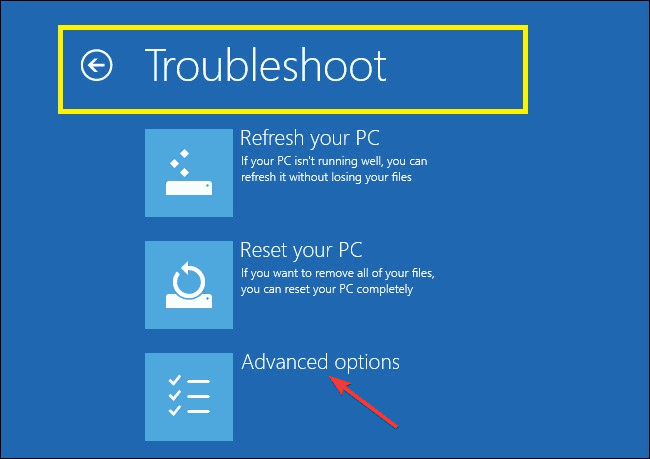
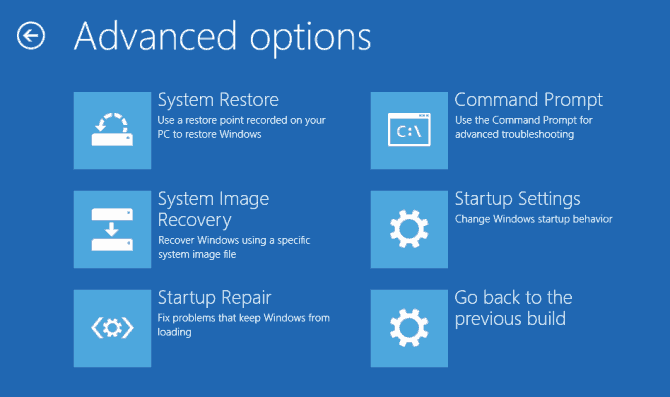
- Select the Advanced option, and choose Automatic Repair or Startup Repair.
- Then, wait for the Windows Automatic/Startup Repair to be complete.
- Restart your PC, and boot to Windows.
- Attach the second hard drive afterward.
 NOTE
NOTE
You can also fix the Repairing drive This might take more than 1 hour to complete the issue by performing automatic repair/startup repair on your system using a Windows bootable installation DVD.
5. Use System Restore
- Press down the power button until the Automatic Repair message appears.
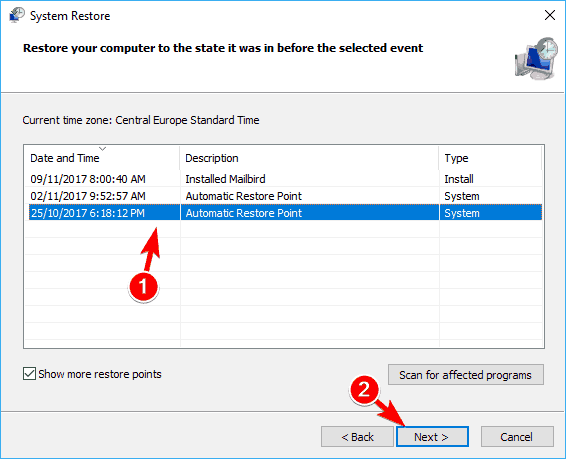
- Go to Troubleshoot, select Advanced options, and choose System Restore.
- Now, select your username and enter your password.
- Click on Next, select the desired restore point, and follow the on-screen instructions to restore your PC.
- After your PC is restored, check if the problem still appears.
System Restore reinstates your system to its previous state and fixes any recent issues, most especially related to the startup issue. Follow the above steps to run system restore on your Windows 10 PC.
6. Install Microsoft Hotfix
- Go to the Microsoft Support link.
- Now, click on the Hotfix download option.
- After downloading, install the Hotfix by following the prompts.
- Restart your PC afterward.
Some Windows users have reported great success in resolving the problem by installing Microsoft Hotfix, so it’s worth giving it a try.
However, if this method does not fix the problem, you may proceed to the next method.
7. Roll back to Windows 8.1/7
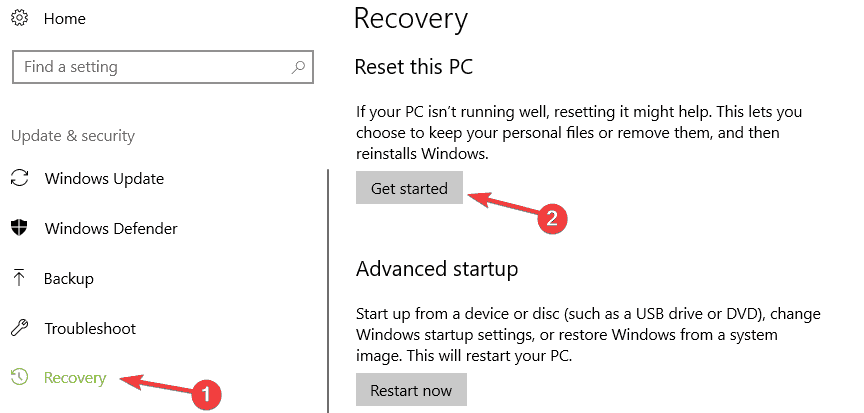
- Press the Windows Key + I to open the Settings app.
- Go to the Update & security menu.
- Select the Recovery tab, and click on the button Get started.
- Follow the prompts to finish the downgrade processes.
Sometimes, the startup problem might be related to a recent upgrade from Windows 7/8/8.1 to Windows 10.
Hence, you may consider downgrading your Windows OS back to its previous OS, besides this fix won’t take more than 1 hour to complete.
However, you may have to enter Safe Mode in order to downgrade.
8. Rebuild BCD
- Insert the Windows 10 bootable media (USB stick or DVD), and restart your PC.
- Set USB/DVD as the primary boot device. Either by entering the Boot menu (F10, F11, or F12) or from the BIOS settings.
- The loading process of the installation file should start.
- Select the language, time/format, and keyboard input of choice and click the Next button.
- Choose Repair your computer from the bottom left corner.
- Open the Troubleshoot option, and select the Advanced Options.
- Open Command Prompt. Select your account, and enter the password if asked.
- Copy-paste the following commands, and press Enter after each:
bootrec /FixMbrbootrec /FixBootbootrec /ScanOsbootrec /RebuildBcd
Although the BCD (Boot Configuration Data) is rarely affected, it still can get corrupted.
Sometimes, incomplete OS installation or frequent installation of different operating systems results in incomplete BCD, and your PC won’t be able to boot; hence, the BCD corruption.
This solution should finalize the repair procedure, and you should be able to boot your PC to Windows.
Also, if the operating system version is incompatible with Startup Repair, take a closer look at our detailed guide and fix it with ease.
9. Reset this PC
- Hard power off your PC 3 times until the Advanced Recovery environment appears.
- Choose the Advanced options, and select Troubleshoot.
- Click on the Reset this PC option.
- Choose whether you want to keep or delete your files and apps.
- Click Reset to proceed.
Finally, you can fix this problem by resetting your PC. This option is an advanced recovery option that restores your PC to its factory state.
The Repairing drive. This might take more than 1 hour to complete startup error can potentially be fixed by any of the solutions we mentioned above.
If you encounter the message Windows found errors on this drive that need to be repaired, be sure to take a look at our comprehensive guide and fix them in no time.
Also, feel free to share your experience with us and let us know how you were able to tackle the problem using our listed solutions. Comment below if you have any questions.



User forum
0 messages