5 Best Ways To Setup Your VPN On Windows 10 [2025 Tips]
Use the following methods to set up a VPN and share your network with other devices
5 min. read
Updated on
Read our disclosure page to find out how can you help Windows Report sustain the editorial team. Read more
Key notes
- Setting up a VPN server on your home PC is a great way to remotely access your Windows 10 computer from any device in the world.
- You don't need to install any software to turn your device into a VPN server. All you need is a router that supports port forwarding.

Transforming your Windows 10 PC into a VPN server to setup a VPN at home is an excellent way to stay in touch with your files and applications, no matter where you are.
For example, you can access files through the VPN from the office if you forgot to copy an important work document or need to check up on torrent downloads. It’s equally important to share files from your office to your home PC or laptop.
More importantly, it’s a much safer option than resorting to remote access software tools, which are susceptible to various vulnerabilities.
Our step-by-step guide below shows you the exact steps to setup a VPN at home on Windows 10. The best part about it is that you don’t need to install any additional software programs to make everything operational. You just need a router that supports port forwarding.
Is the Windows built in VPN free?
The Windows built-in VPN is pre-installed on Windows 10 and Windows 11 PCs. To configure it, you need to enter network information and configure your ports.
How do I setup a VPN server on Windows?
To set up a VPN server on your Windows PC, you can use the in built Network Adapters configuration panel. You can also configure your router.
1. Accept incoming connections on your home PC
- Right-click the Windows 10 Start button.
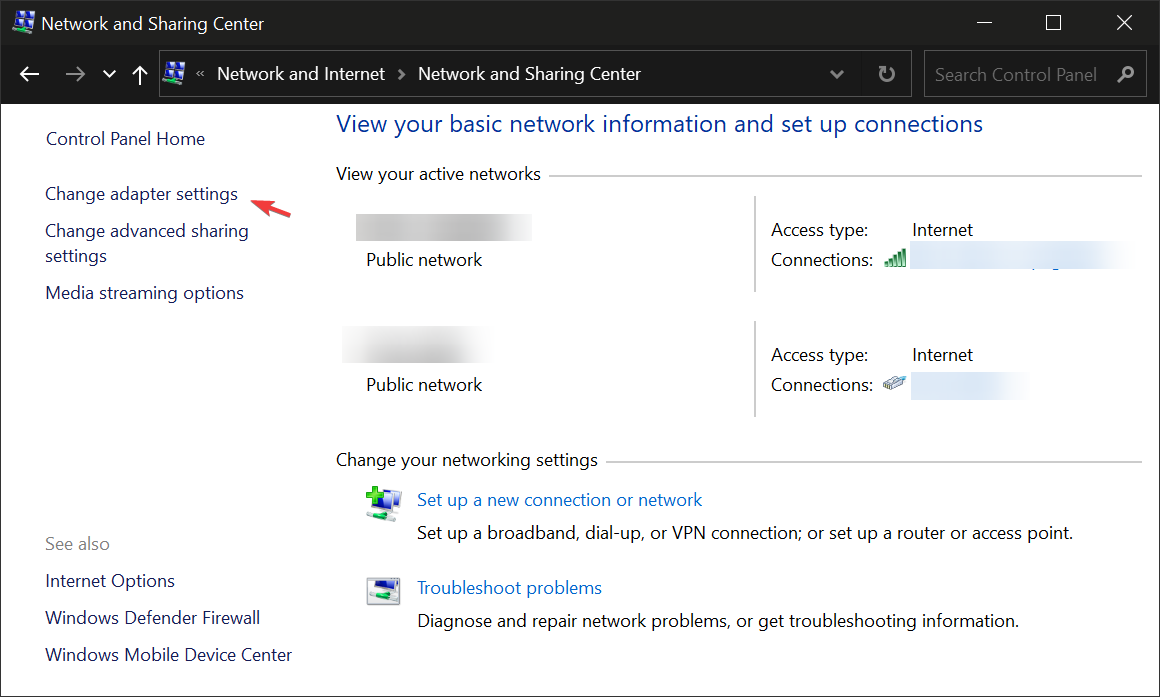
- Go to Network Connections > Change adapter settings.
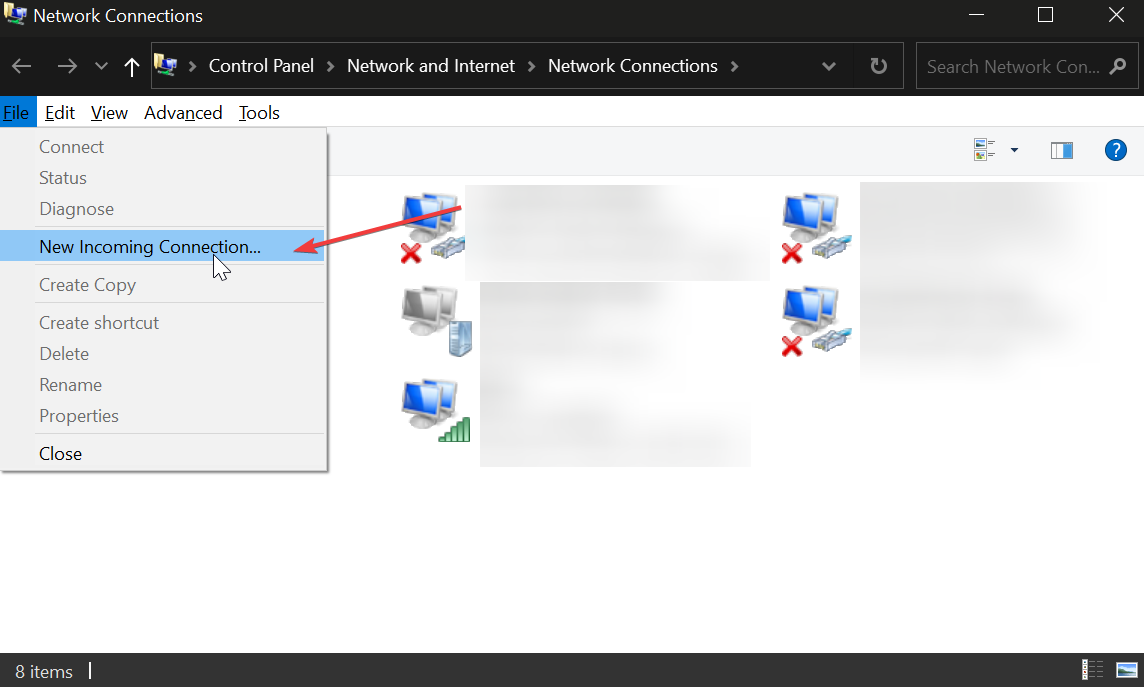
- Press Alt key, open the File menu, and click New Incoming Connection.
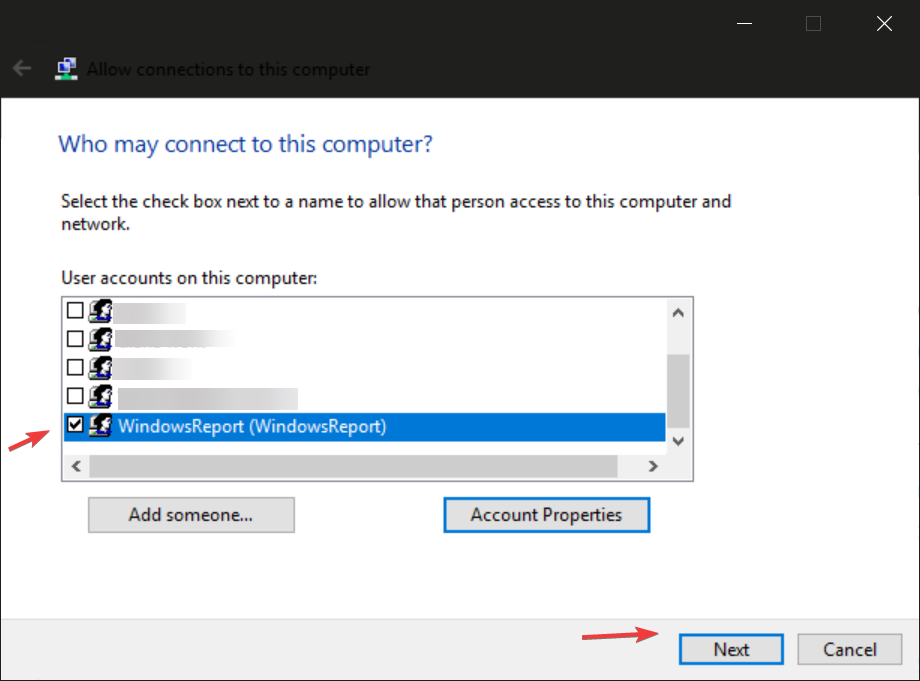
- Select the users you want to have VPN access to your PC. To create a new profile select Add someone and pick a username and password. Click Next.
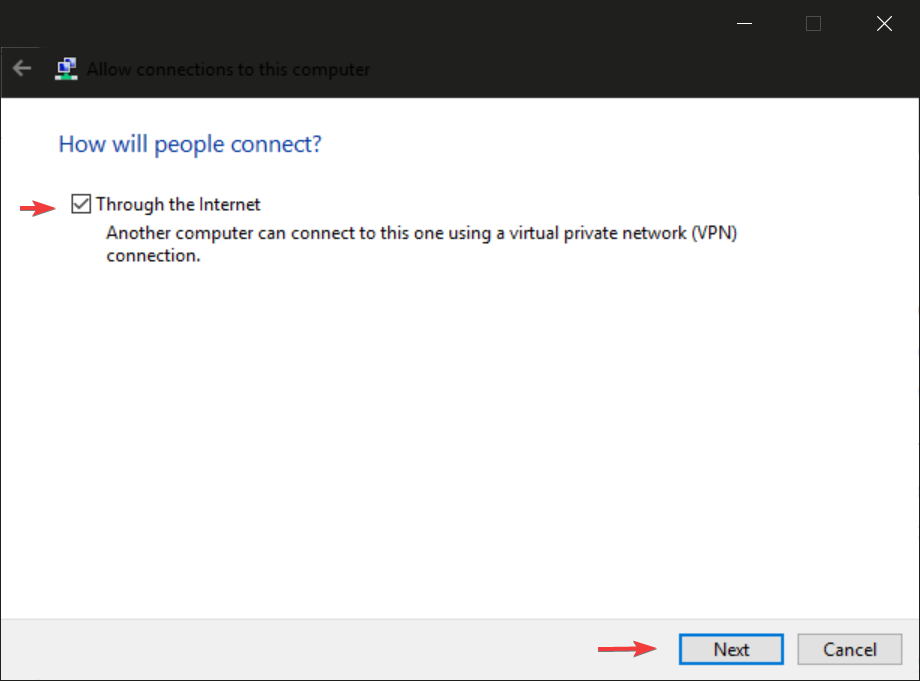
- Select Thorugh the Internet and click Next again.
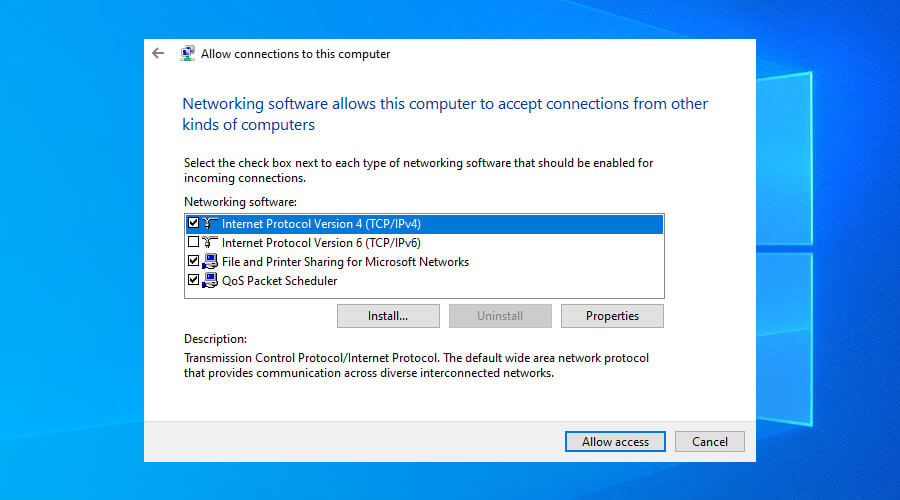
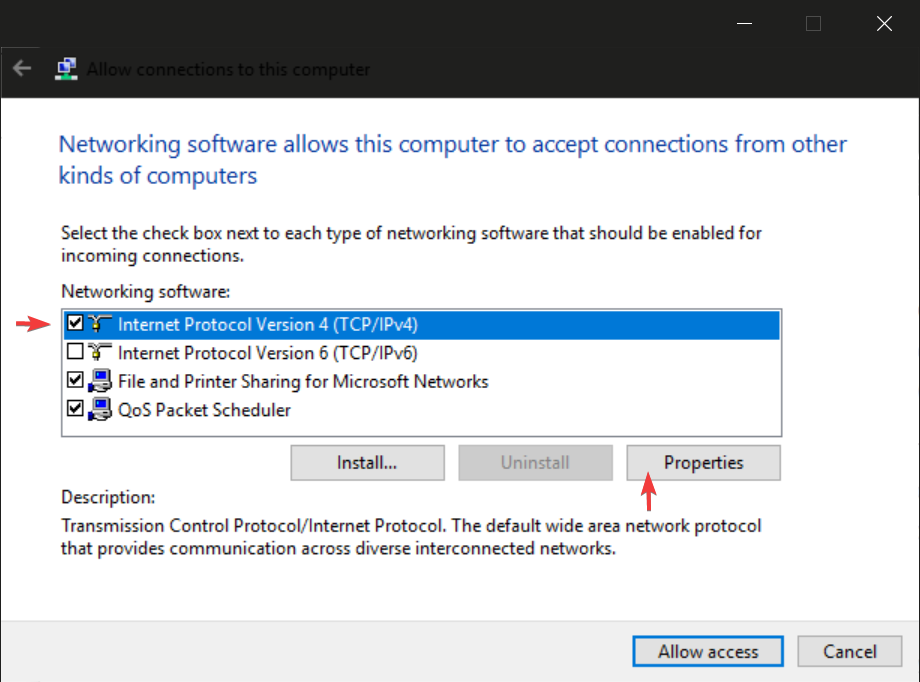
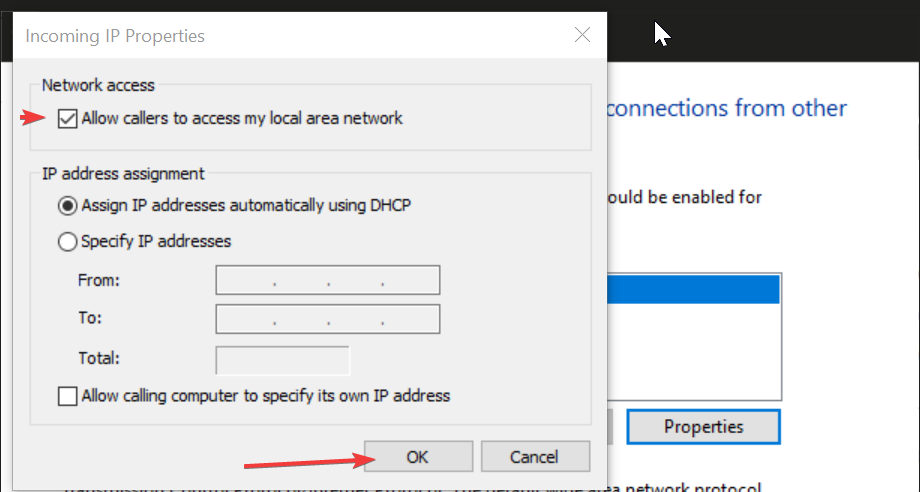
- Click on Internet Protocl Version 4 (TCP/IPv4) and then on Properties.
- Check the Allow callers to access my local area network box and click ok.
- Click Allow Access and close the panel.
Although Windows 10 provides you with the hostname and recommends making a copy of it, this won’t be necessary for remote connections over the Internet (only for LAN connections).
If you made any mistakes during the setup, you can edit the connection properties by right-clicking Incoming Connections and selecting Properties. For example, you can go back anytime to allow more user accounts or remove the permissions of existing users.
*To ensure your computer’s security, it’s recommended to create a new user account that only you will know. Make sure to generate a random and secure password that can’t be hacked. To easily keep track of your user credentials, use a password manager.
2. Configure router settings
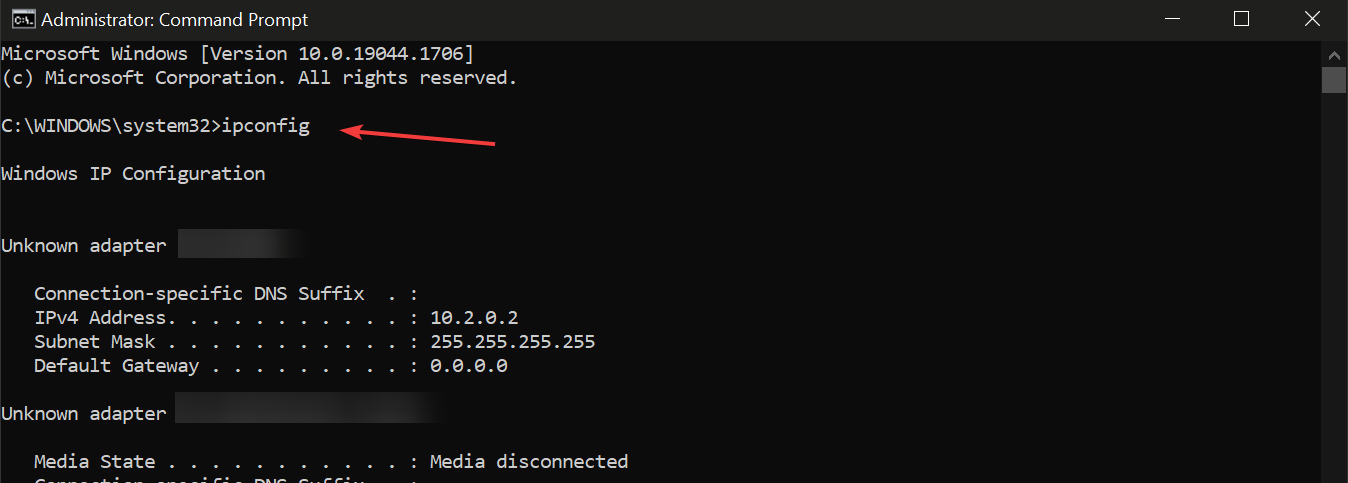
- Press Ctrl + R, type cmd, and press Enter to open the Command Prompt.
- Type ipconfig and hit Enter.
- Select your IPv4 address and press Enter to copy it.
- Log in to your router administration panel.
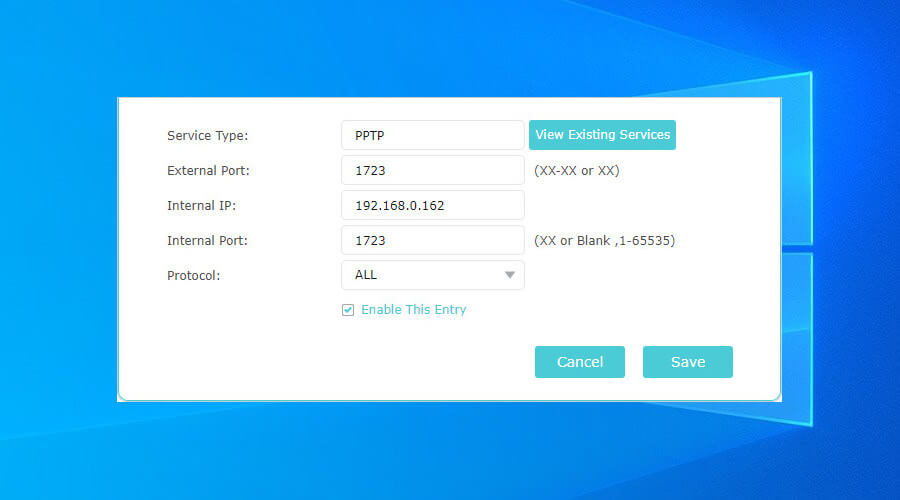
- Set up a new rule to enable port forwarding.
- Pick the PPTP protocol.
- Paste the IPv4 address you copied earlier.
- Set 1723 over TCP as the internal and external port.
- Make sure that PPTP passthrough is enabled.
If your networking device supports custom firmware, check out the best router software for Windows 10.
3. Check firewall settings
- Press Start, type firewall, press Enter.
- Click Advanced settings and go to Inbound Rules.
- Press New Rule in the Actions panel on the left side.
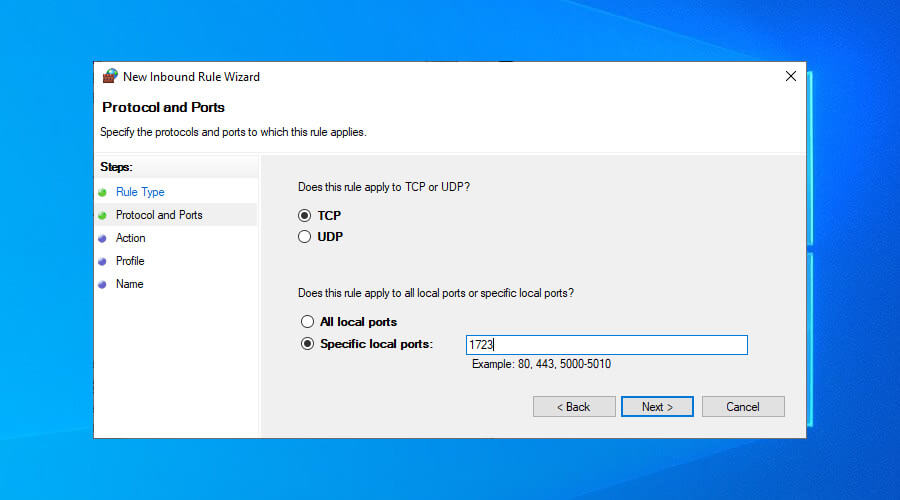
- Set Rule Type to Port and select TCP.
- Select Specific local ports and write 1723.
- Make sure to Allow the connection.
- Set any rule name and press Finish.
4. Use the Windows built-in VPN to create a new network
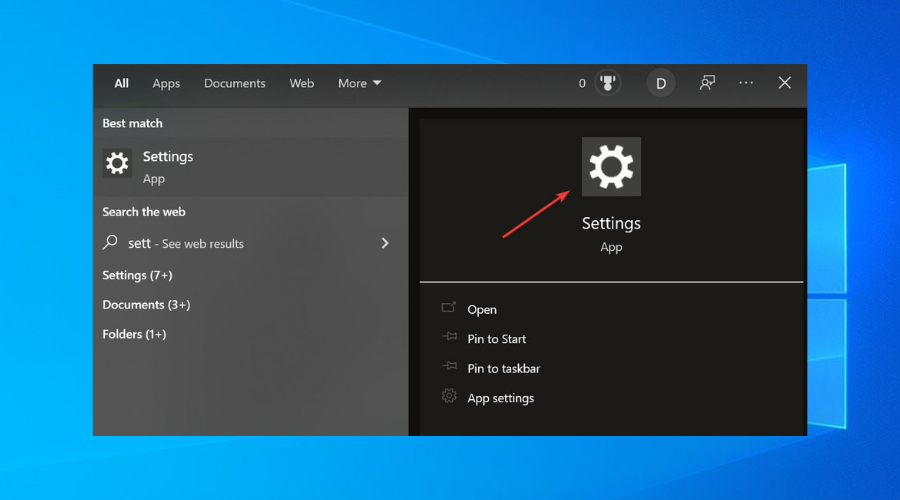
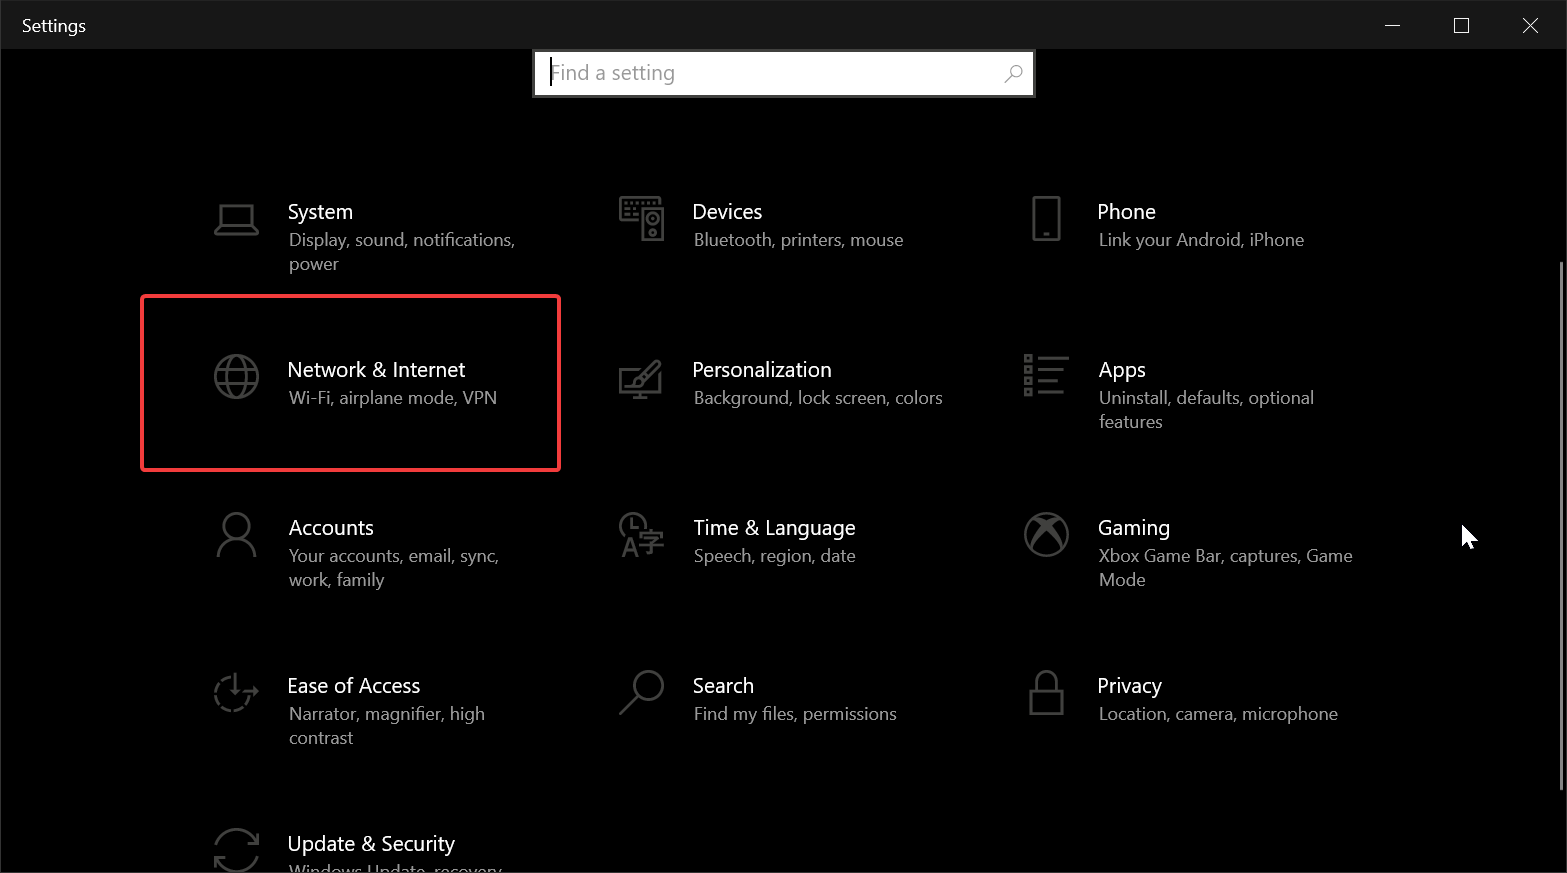
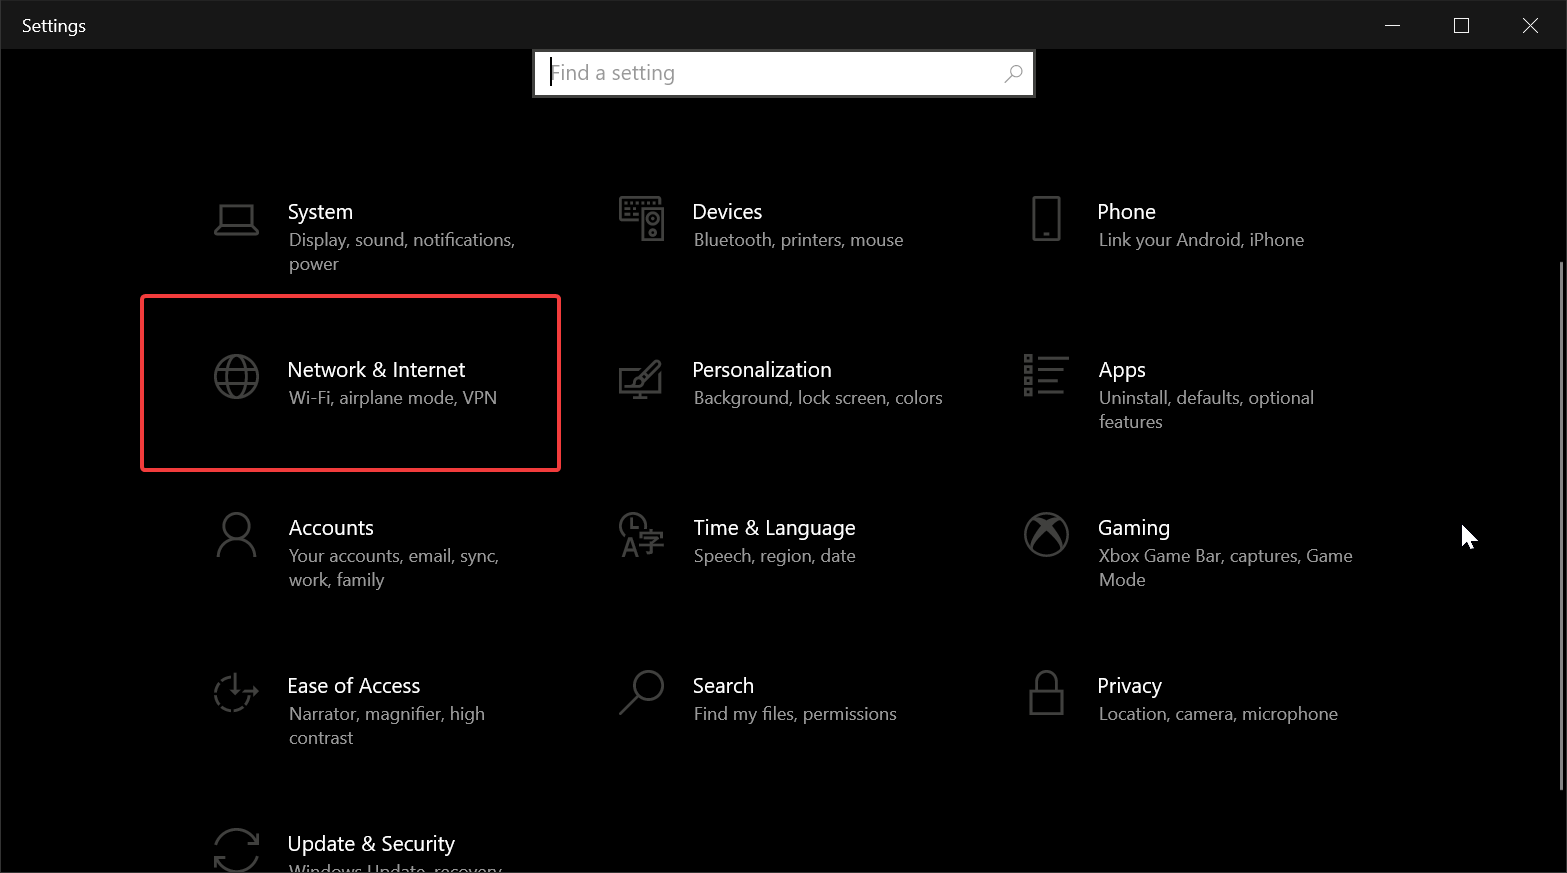
- Type settings in the taskbar and open the Settings app.
- Select the Network & Internet category.
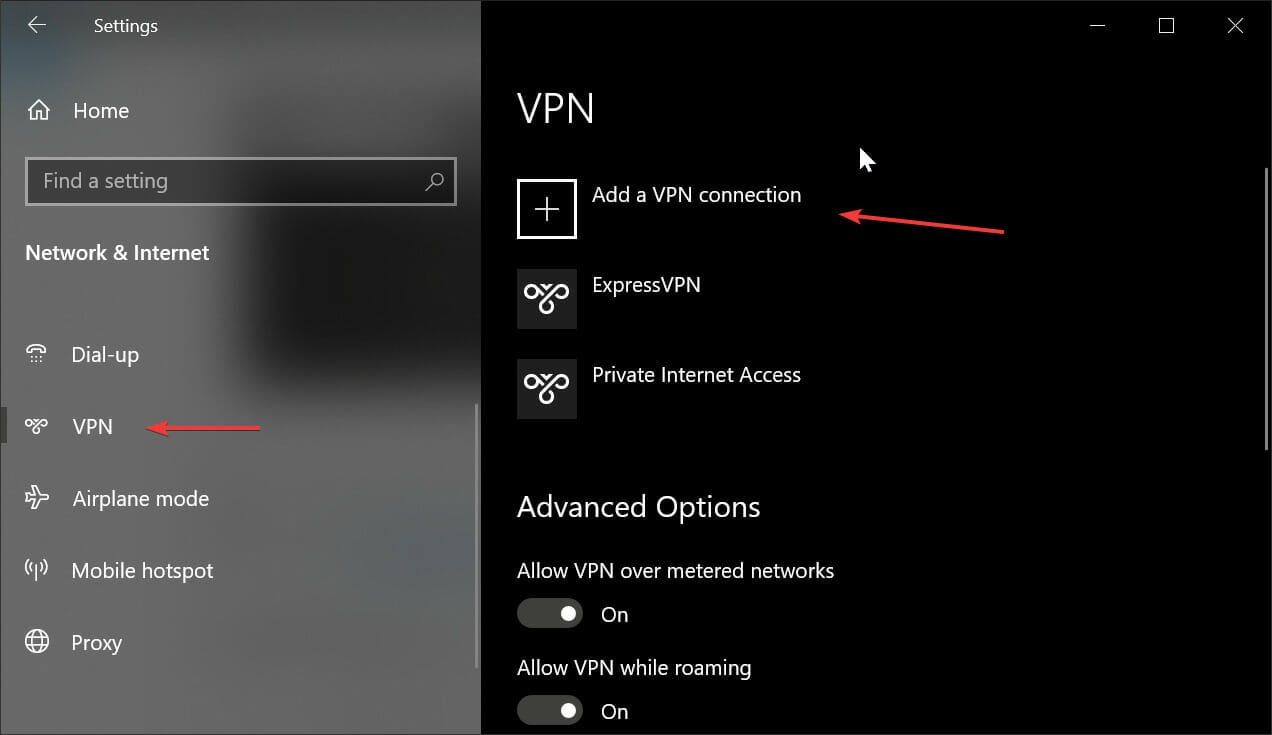
- Select VPN, then Add a VPN Connection.
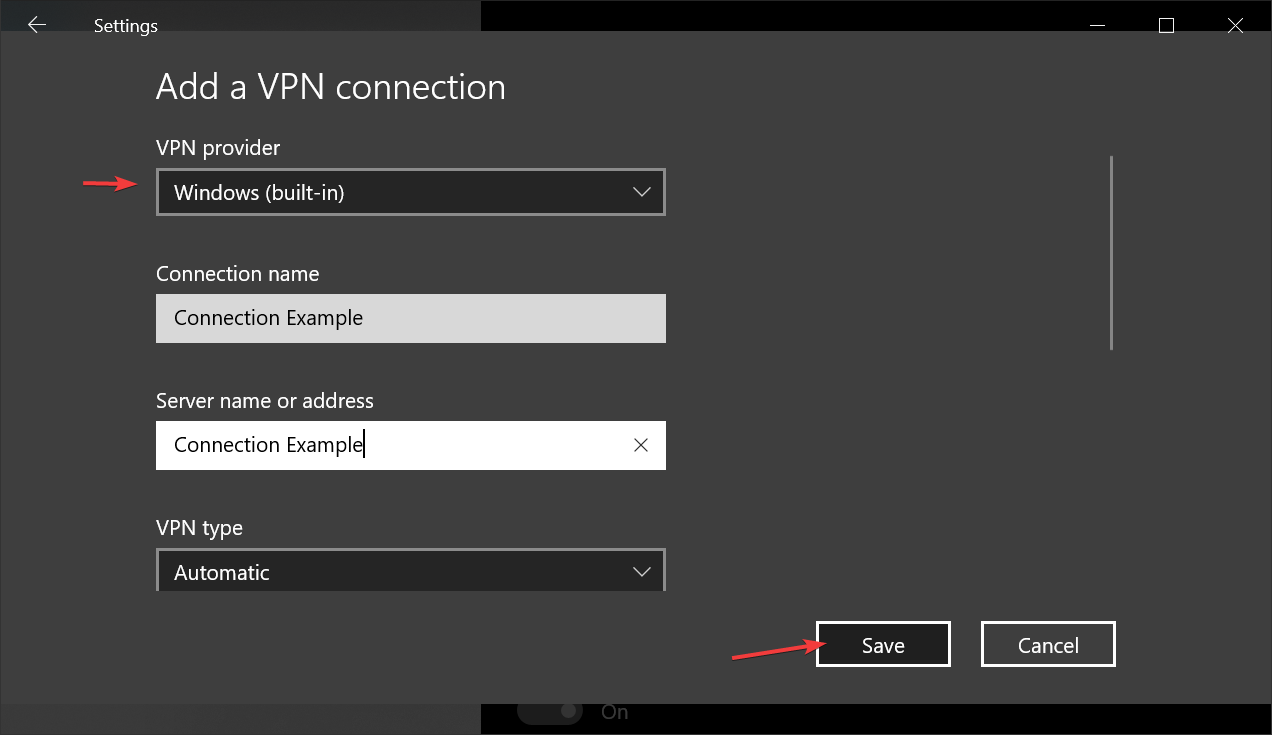
- Select Windows (bult-in). Fill in the form with your preffered connection and server name, and VPN type. Select how you want to connect and hit Save.
This method lets other devices to connect to your VPN network. Using the same credentials you provided, try to connect to this network from a different device.
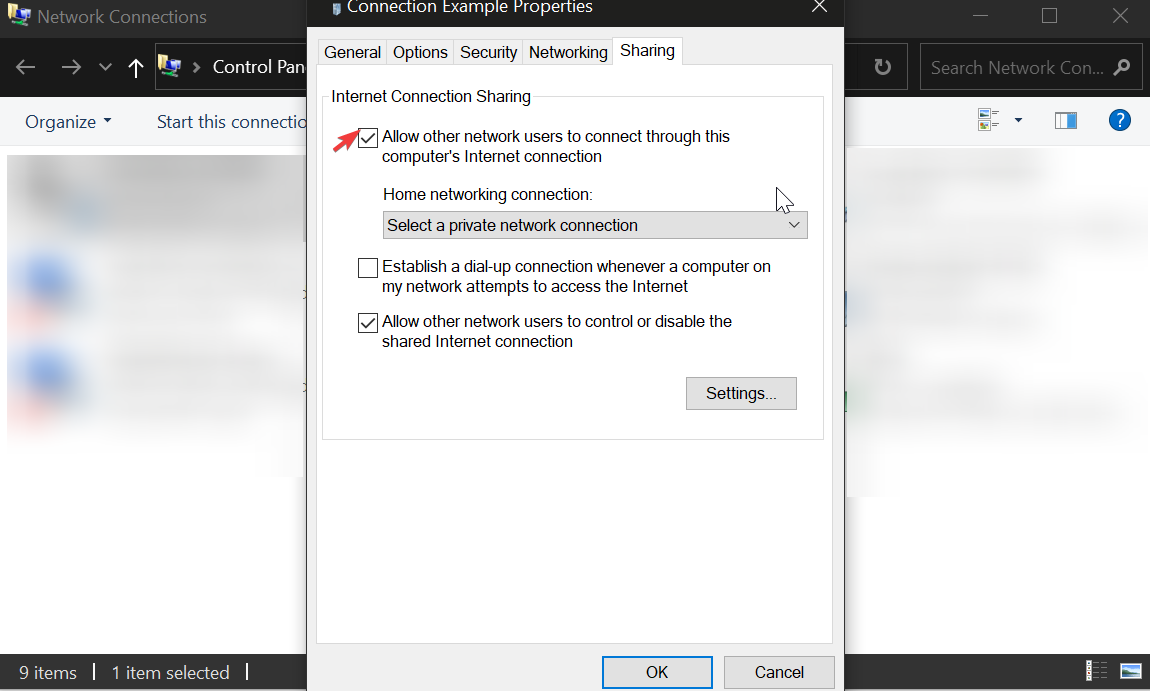
To make sure other devices have access to your network, right click on it in the Network Connections panel and hit Properties.
Tick the box next to Allow other network users to connect through this computer’s Internet connection. Hit ok.
Once you’re in, you can access files through the VPN, copy, edit or rename data, and more.
5. Enable Network Discovery to allow access to your VPN server
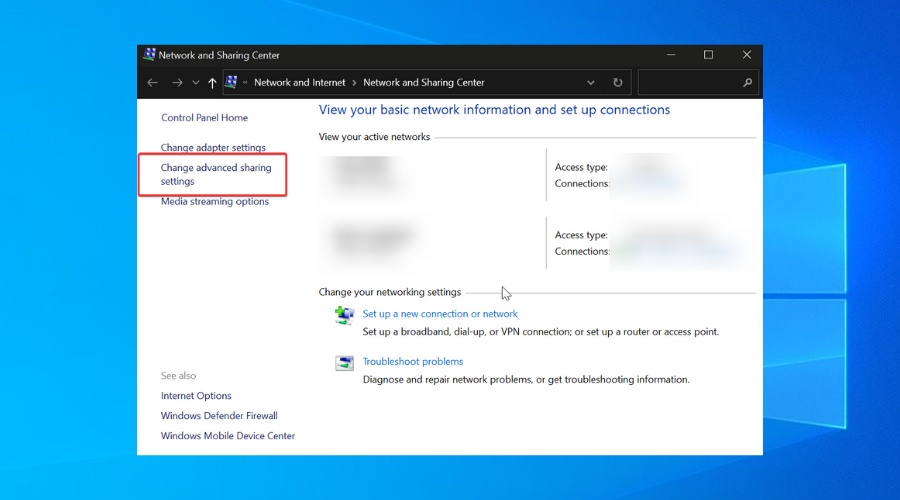
- Open Settings> Network & Internet.
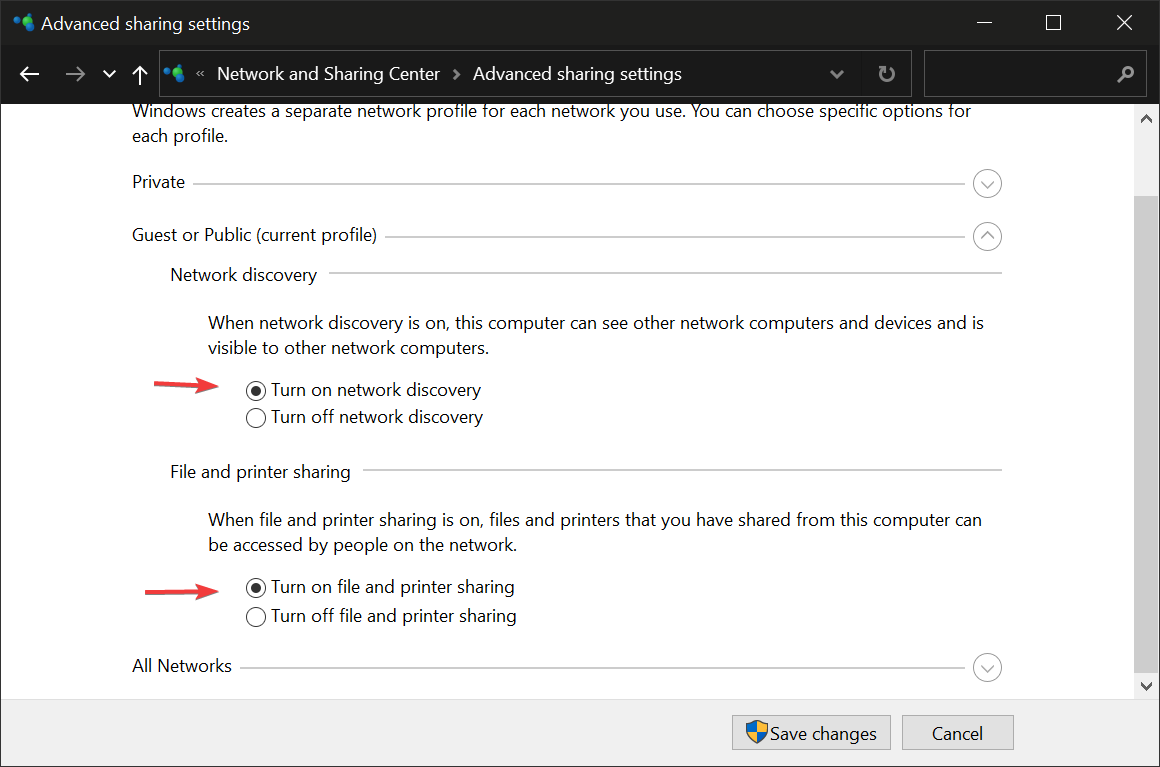
- Open the Network Sharing Center and click on Advanced Sharing Settings.
- Under Network Discovery, enable Turn on Network Discovery and Turn on file and Printer Sharing. Click Save changes.
At this stage, you should be able to connect to the VPN and share data on your network. If you encounter any problems, consider our troubleshooting tips for Windows 10 PPTP VPN not working.
In conclusion, figuring out how to set up a VPN at home on Windows 10 is the first step toward turning your home PC into a VPN server. It enables you to remotely connect from any computer and gain access to your personal data.
It’s not necessary to install additional software. However, PPTP is a weak protocol with low security. We suggest upgrading to router firmware that supports OpenVPN configurations. Then you can install a free OpenVPN client on any device to remotely access your home VPN server.
To learn all the tips and tricks of Microsoft’s OS, visit our Windows 10 area. We give insightful tips and tricks that will improve your Windows experience.
Check out our VPN Troubleshooting Hub to fix any VPN problems. Here you can find suggestions and solutions for most VPN issues, both for in-built and third-party VPNs.





User forum
0 messages