How to Fix Smite if it's Not Launching/Not Responding on Steam
A simple app repair can fix this problem

Users have reported that Smite is not launching on Steam, so let’s see how to solve those problems for good. While playing the game, there may be several factors that can trigger a crash. Of these, the most common culprits include compatibility issues, Smite server downtime or crashes, missing or corrupted files, or problems with the graphics card driver. To rule out at least one issue, check your Smite ping on the server first.
How do I fix Smite when it is not responding?
1. Allow an app through the firewall
- Click the Start menu, type Windows Security, then select the Windows Security app.

- Click on Firewall & network protection.

- Select the option for Allow an app through the firewall.

- Search for and tick Smite under the Name column, then click the OK button.

According to users, your antivirus software is the most common cause of Smite issues. Sometimes your antivirus might interfere with the game and prevent you from running it.
To fix the issue, ensure that the game is added to the exclusions list in your antivirus and firewall.
If that doesn’t work, you might have to disable certain antivirus features and check if that solves the problem. If that doesn’t work, your next step is to disable your antivirus altogether.
In some cases, you might even have to uninstall your antivirus. For example, users reported issues with Avast.
If you managed to fix the problem by removing your antivirus, you might switch to different antivirus software.
There are many great antivirus tools on the market. Still, if you want an antivirus solution that won’t interfere with your gaming passion, you should consider one suitable for this experience.
No matter what antivirus you choose from our list, it won’t interfere with your games and will protect against malware and other threats that may be present when playing Smite.
2. Update your graphic card driver
- Press the Windows and R at the same time to open the Run window.
- There, into the search space type the following: devmgmt.msc, and then click the OK button.
- Now, select Display adapters from the list, then right-click on the driver from the drop-down.
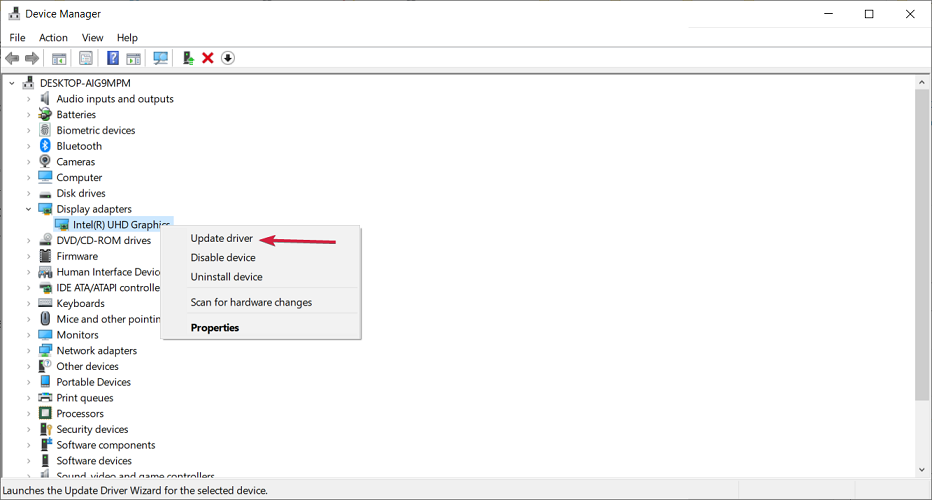
- Select the Update Driver option, then click Search automatically for drivers.
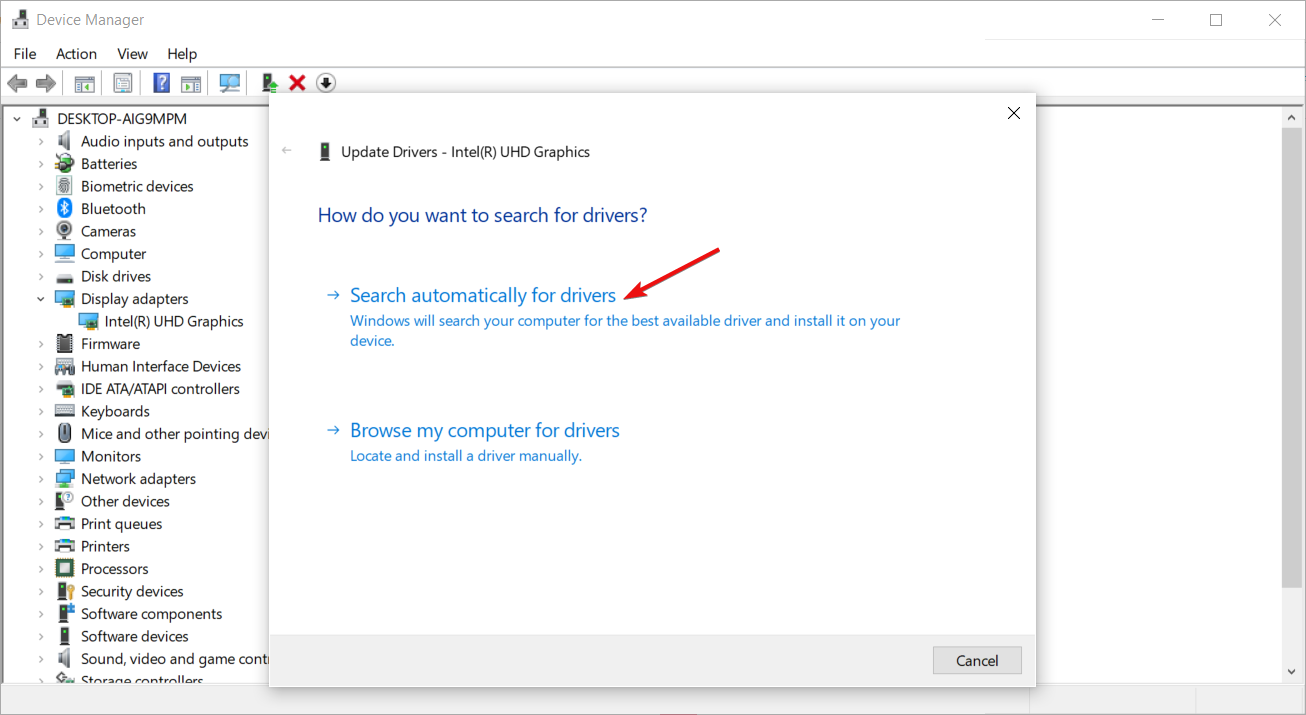
This can take up some time and might not work every time. For this, we have an alternative, a third-party software that specializes in driver updates which you can use.
- Download and install the Outbyte Driver Updater app.
- Launch the software and wait for the app to detect all incompatible drivers.
- Now, it will show you a list of all faulty drivers to select the ones to Update or Ignore.

- Click on Update & Apply Selected to download and install the newest versions.
- Restart your PC to ensure the applied changes.

OutByte
Keep your GPU in a flawless state without worrying about possible driver issues.3. Reinstall Smite and Microsoft Visual C++ 2010 Redistributable Package
- Visit the Microsoft Visual C++ 2010 Redistributable Package download website.
- Click on the download button.

- Click the downloaded file to run it.

- Install Smite again.
According to users, sometimes this issue can occur if there’s a problem with Smite and Visual C++ installation. To fix it, try to reinstall Smite and Visual C++ components.
Some users suggest installing all versions, both x86 and x64, of Visual C++ Redistributable from 2010 to 2013.
Sometimes, you might not even have to download the Visual C++ Redistributables. Most games come with necessary redistributables, so you can easily install them.
To do that, go to Smite’s installation directory and navigate to BinariesRedist. Now run the setup files from that directory to install the necessary redistributables.
Before you start, be sure to remove Smite from your PC. You can do that right from the Settings app, but usually, the better option is to use an uninstaller software tool.
In case you’re unfamiliar, uninstaller software is a unique application that can remove all files and registry entries associated with the problematic application.
After thoroughly removing Smite from your PC, follow the steps above.
4. Make sure that Hi-Rez Studios Authenticate and Update Service is running
- Press Windows Key + R shortcut, type Services.msc, and press Enter, or click the OK button.

- A list of services will appear. For example, locate Hi-Rez Studios Authenticate and Update Service.
- Right-click this service and choose Start.

- Try installing Smite again.
Users complain that they cannot install Smite on Windows 10, and if you’re having this issue, you might want to try enabling Hi-Rez Studios Authenticate and Update Service.
After starting this service, try to install the game again and check if the problem is resolved.
5. Install Smite through Steam
- Visit the Steam website, and log into your account.
- Search for Smite and click the Smite option.

- Click on Play game or Add to Library. If you have Steam installed on your computer, you will get a prompt to open it on Steam.

If Smite crashes on launch, you can try downloading the game from Steam.
Users have confirmed that downloading the game from Steam has fixed this issue, so this solution might be worth trying.
6. Verify integrity of game files
- Launch Steam and navigate to the game Library.

- Right-click on the game and select Properties.

- Click on LOCAL FILES, then select Verify integrity of games cache.

7. Remove the updates for Microsoft Visual C++ x64 and x86
- Open the Settings app by using Windows Key + I shortcut.
- Now go to the Update & Security section.

- Select View update history.

- Select the Uninstall updates option.

- Locate the problematic update and double-click it to remove it.

This solution also applies to your case, so don’t hesitate to remove the updates for Microsoft Visual C++ x64 and x86.
This is quite simple, and you can do it by following the above steps. Once you remove the problematic updates, check if the problem is resolved.
If the issue doesn’t appear anymore, be sure to block Windows from installing automatic updates with the help of this dedicated guide to prevent this issue from reappearing.
8. Create a new user account
- Open the Settings app by using Windows Key + I shortcut.
- In the Settings app, navigate to the Accounts section.

- Select Family & other people from the left pane, then click Add someone else to this PC button in the right pane.

- Select I don’t have this person’s sign-in information.

- Now, choose to Add a user without a Microsoft account.

- Enter the desired username and click Next.

Sometimes Smite issues can be caused by your user account, and several users reported that they fixed the problem simply by creating a new user account.
This is quite simple on Windows 10, and you can do it by following the above procedure.
Once you create a new account, switch to it, and check if the problem still appears. If not, you’ll have to move your files to the latest version and start using it instead of your old one.
9. Run the game on a single monitor
According to users, Smite issues such as crashes can occur if you’re using a dual-monitor setup.
Sometimes multiple monitors can cause this issue, and to fix it, it’s advised to disconnect the second monitor before starting Smite.
This is a workaround, but it should work according to users, so try it out.
10. Install the game on an SSD drive
The problem might be your hard drive if you’re having Smite issues, such as freezing. Also, HDDs are slower than SSDs.
If you’ve noticed increased challenging drive activity while trying to run Smite, the problem might be your hard drive.
According to users, they managed to fix this issue simply by installing their game on the SSD drive, so if you have an SSD drive, be sure to try this solution.
How do I repair Smite?
- Launch the Control Panel.
- Click on Uninstall a program.

- Click on the Smite app, select Repair, then follow the instructions.

There you have it—a comprehensive guide on fixing launching issues on Smite. If you have read this far, we believe you now have the game running perfectly.
Please note that you can skip around solutions, and you should apply only what seems most appropriate to your case. These fixes should also work if Smite is not responding on Startup or not launching through Steam.
if you’re wondering if you can download Smite without Steam, the answer is yes. The game is available for download on Steam but also for Xbox, PS, Nintendo, and the Epic Games store.
We hope that these solutions were helpful to you and that you’ve managed to fix any issues with Smite on Windows.
Read our disclosure page to find out how can you help Windows Report sustain the editorial team. Read more


Improve this guide


User forum
0 messages