The Webcam Is Not Working when Plugged into the Monitor
Some monitors don't have USB data interfaces for webcams
4 min. read
Updated on
Read our disclosure page to find out how can you help Windows Report sustain the editorial team Read more
Key notes
- If your Webcam is not working when plugged into the monitor, then you are not alone as many users encounter this issue.
- In most cases, the webcam is either not placed properly, the app does not have access to the camera in privacy settings, or the camera drivers are outdated.
- Also, for the video output, the monitor has to be connected to the host laptop/PC via USB, otherwise, you may not get the desired results.
It can be frustrating if the webcam is not working when plugged into the monitor. This is usually when you use an external webcam and want to attach it to the monitor.
It’s important to note that if the monitor has a powered USB port, you can plug in your USB camera (webcam). However, you should not expect a video output unless you connect the webcam to the monitor via USB. Plus, ensure you are routing that connection back to the host PC.
You can follow our detailed post for more info if you are looking for the best monitors with speakers and webcams.
Can a webcam be plugged into a monitor?
Yes, a webcam can be connected to a monitor; for this, the monitor should have either a USB type B plug or a USB type C plug.
Next, connect the monitor to a USB hub and the laptop simultaneously. You can then plug an external device like a webcam into the monitor.
Why is my computer not detecting my webcam?
If your computer is not detecting your webcam, it might be due to any of the following reasons:
- Driver issues – may mean outdated, corrupted, or missing camera drivers, especially after a recent update.
- Antivirus conflicts – While using some form of antivirus is essential, they may block the camera in some cases.
- Privilege and access rights – Sometimes, camera access is disabled in privacy settings for some apps.
- Random glitches – A glitch with the app you want to use may trigger this problem, but these are hardly permanent and easily correctable.
- Connection issues – Chances are that the webcam is not connected or placed correctly. Connection is often the first thing you need to rule out before troubleshooting.
So, if the webcam on the monitor is not working, you can follow the below troubleshooting methods to fix the issue.
How do I fix my webcam if it’s not working when plugged into my monitor?
Before trying the solutions recommended in this guide, you may try the following quick checks and tests:
- Confirm the webcam is correctly connected – You must turn off the computer and refit the cable. Also, ensure it faces you and is not enclosed in a dark space.
- Restart your computer and retest – A reboot can end stubborn processes. So, if it is a minor glitch this may fix it.
1. Enable apps access to webcam
- Press the Win + I keys simultaneously to launch Windows Settings.
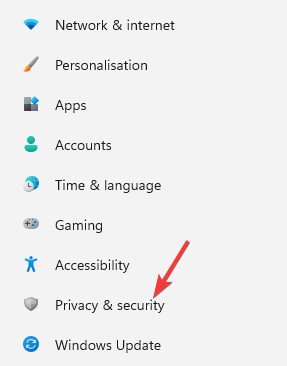
- Click on Privacy & security on the left.
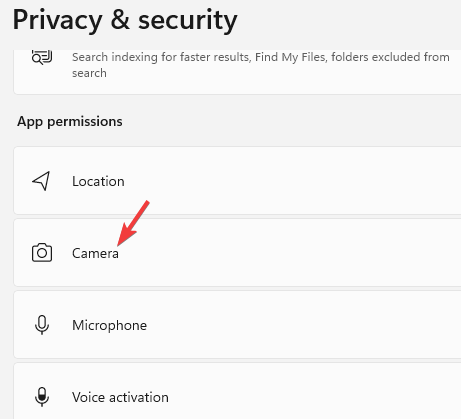
- Next, on the right, scroll down and under App permissions, select Camera.
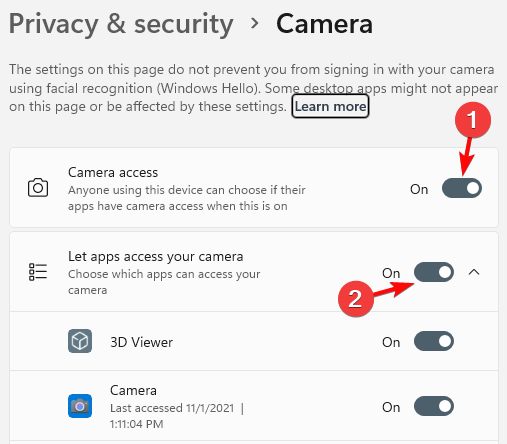
- Now, on the right, turn on Camera access.
- Also, turn on the Let apps access your camera option, and enable the camera access for the specific app in the list.
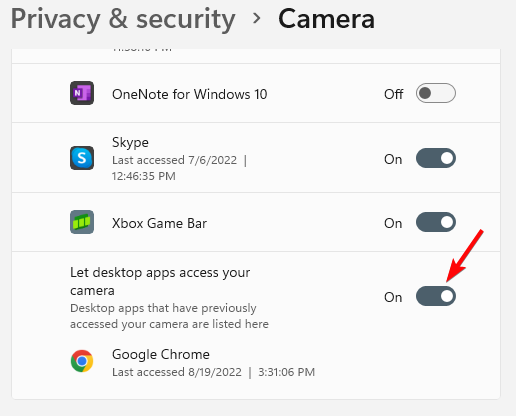
- You can also turn on the Let desktop apps access your camera option.
Now, go back to your webcam and check if it works with the monitor.
2. Update the webcam drivers
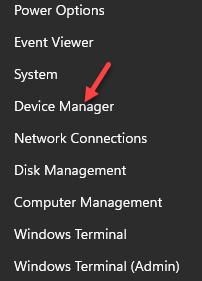
- Right-click on Start and select Device Manager.
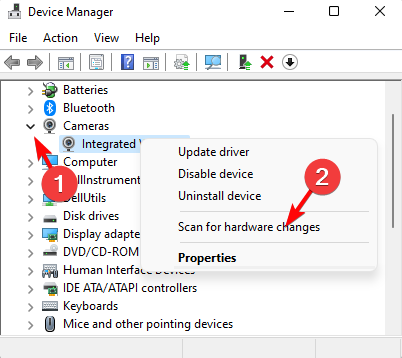
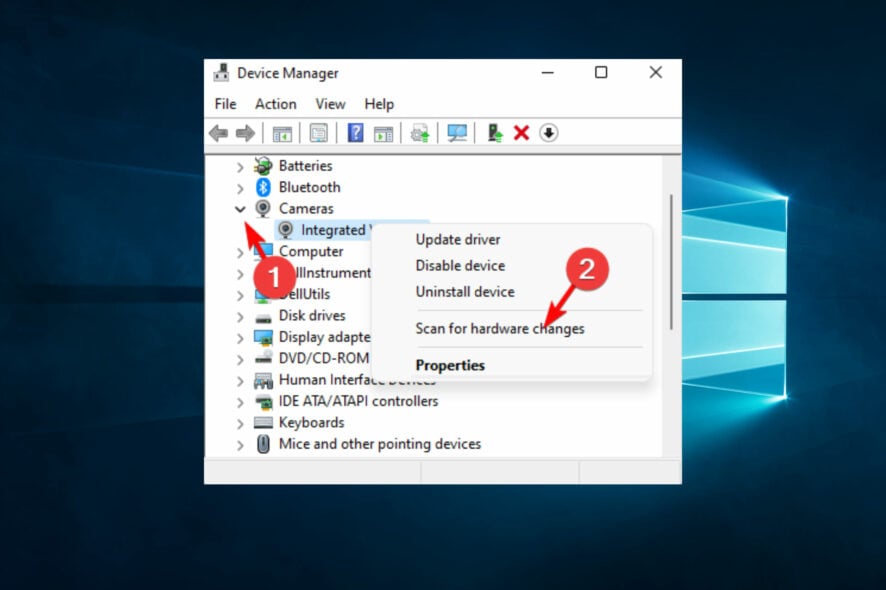
- Expand the Cameras section, right-click on the Integrated Webcam, and select Scan for hardware changes.
- Now, wait for Windows to scan and reinstall the updated drivers.
Once done, restart your PC, and now check if the webcam not working when plugged into the monitor issue is fixed.
- Download and install the Outbyte Driver Updater app.
- Launch the software and wait for the app to detect all incompatible drivers.
- Now, it will show you a list of all outdated drivers to select the ones to Update or Ignore.
- Click on Update & Apply Selected to download and install the latest versions.
- Restart your PC to ensure the applied changes.

Outbyte Driver Updater
Maintain your device healthy by letting OutByte Driver Updater find the latest driver options.You can also disable the webcam and enable it back to check if this helps fix the webcam not working when plugged into the monitor issue.
Alternatively, you can also roll back your current drivers to the previous version, which helps fix the webcam issue if the current drivers are corrupted.
But if you see a black screen while using the webcam on your PC, we have some quick tips for you in this detailed post.
For any other queries on the webcam or related errors, let us know in the comments box below.

