5 Ways to Fix Logilda.dll Error/not Found on Windows 10
You may start by disabling the assistant from startup
Key notes
- The logilda.dll error is an error message that can pop up on desktops and laptops with Logitech mice when Windows starts up.
- Using the Task Manager, the first solution is to disable LogiLDA from Windows startup.
- You can use a third-party repair tool to eliminate all the problems in your PC.
- Also, reinstall the driver and for other solutions on how to fix the logilda.dll error in Windows 10, read the complete guide below.

The logilda.dll error is an error message that can pop up on desktops and laptops with Logitech mice when Windows starts up.
The error message states explicitly: There was a problem starting C:\Windows\System32\LogiLDA.dll. The specified module could not be found.
Some users have stated that the error message started to pop up after upgrading their Windows platforms.
This article will show you the easiest ways to resolve this problem.
What is LogiLDA dll used for?
This is a Windows Dynamic Link Library (DLL) file. It’s a valid process file and a part of the Logitech Download Assistant program.
You will be able to find it in the following path: C:/Windows/System32
In case you didn’t know, the Logilda.dll is intended to check for recent updates to any Logitech drivers for Logitech gear each time Windows boots, and hardware like a keyboard, mouse, video cameras, etc. depend on it.
Why does the logilda.dll not found message appear?
If this dll cannot be found, it may have been improperly installed or may not be present in the application.
In a lot of instances, a recent Windows update could have made the software start looking for this file in the incorrect place.
You may need to download the File again if it’s corrupted, which is another possibility.
Logilda.dll error after Windows Update
- Open the Settings app and navigate to the Windows Update section.
- Select Update history and click on Uninstall updates.
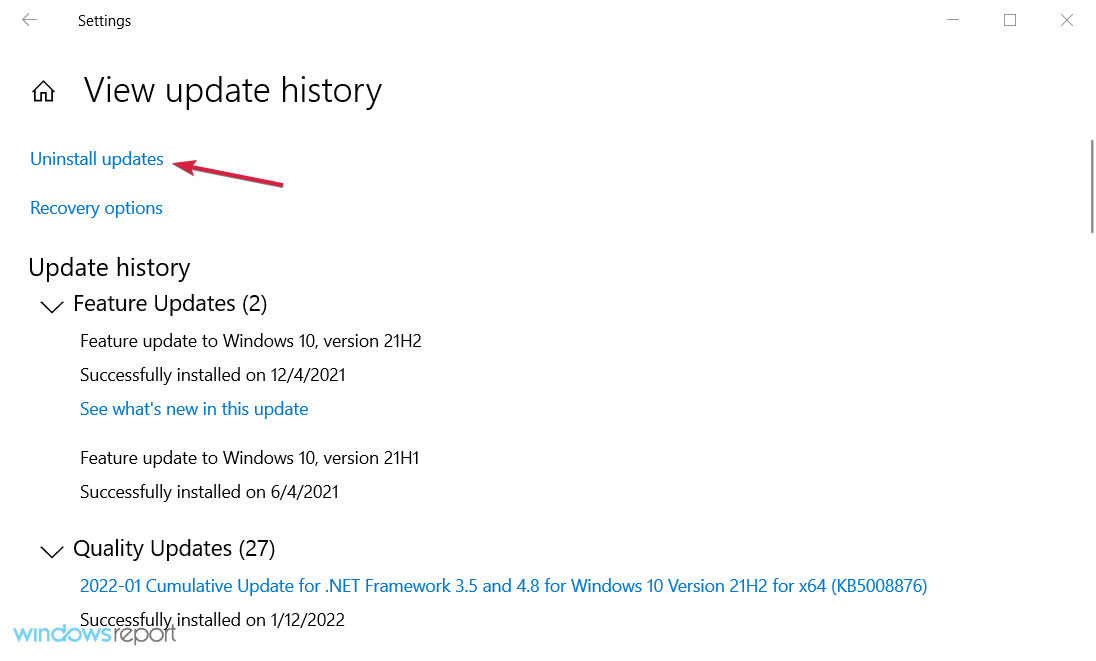
- Finally, locate the update you want to remove and click on Uninstall.
Windows updates are essential and help keep your OS in pristine condition. However, it is not a perfect system so glitches can occur occasionally.
We recommend you use a professional Windows Update repair tool to address these potential issues and enjoy the Windows experience to its full potential.
The logilda.dll error primarily pertains to the Logitech Download Assistant, and these are some potential fixes for it.
How do I fix Windows system32 LogiLDA DLL?
- Disable LogiLDA from the Windows Startup with Task Manager
- Use a third-party app
- Erase the Logitech Download Assistant Key from the Registry
- Uninstall the Logitech SetPoint software
- Reinstall the Logitech Driver
1. Disable LogiLDA from the Windows Startup with Task Manager
- Press the Windows key + R hotkey.
- Enter taskmgr in Run’s text box, and press the OK button.

- Click the Startup tab on the Task Manager window, select LogiLDA on the list of startup items, and press the Disable button.

- Disable other Logitech startup items if there are any. The logilda.dll missing issue will be fixed afterward.
To fix the logilda.dll error, you’ll usually need to at least disable LogiLDA (Logitech Download Assistant) from Windows startup.
2. Use a third-party app
If all kinds of errors plague your system, the cause might be problematic files on your PC which need to be addressed.
Thankfully, you can install a third-party system restoration app that automatically scans your device for corrupted files, data, and malware; then, it will remove or repair them.
3. Erase the Logitech Download Assistant Key from the Registry
3.1 Using the registry
- Open Run with the Windows Key + R keyboard shortcut.
- Enter regedit in Run’s text box, and press the OK button.

- Then enter the following path in the Registry Editor’s path text box and hit Enter:
Computer\HKEY_LOCAL_MACHINE\SOFTWARE\Microsoft\Windows\CurrentVersion\Run
- Right-click the Logitech Download Assistant key and select Delete.
To ensure the Logitech Download Assistant is entirely removed from the Windows startup, erase the Logitech registry key.
Note: changing and deleting files through the Registry Edit is risky and requires some background knowledge, so you must be careful.
Alternatively, you can erase the Logitech Download Assistant registry key with a batch file.
3.2 Using a batch file
- Open Notepad.
- Copy the batch file below.
echo Startecho #
echo ######################## Default dirctory for x86 x64 ########################
echo #
echo this command is default system32 directory for x86 OS or x64 OS
cd %windir% & cd system32
reg delete "HKCUSoftwareMicrosoftWindowsCurrentVersionRun" /v "Logitech Download Assistant" /f
reg delete "HKLMSOFTWAREMicrosoftWindowsCurrentVersionRun" /v "Logitech Download Assistant" /f
echo #
echo ######################## Change the dirctory for x64 ########################
echo #
echo this command is x86 application's registry for x64 OS
cd %windir% & cd syswow64
reg delete "HKCUSoftwareMicrosoftWindowsCurrentVersionRun" /v "Logitech Download Assistant" /f
reg delete "HKLMSOFTWAREMicrosoftWindowsCurrentVersionRun" /v "Logitech Download Assistant" /f
echo End
Paste that code into Notepad by pressing the Ctrl + V hotkey.
- Click File, and select Save as.

- Select All Files from the Save as type drop-down menu.

- Enter Logitech.bat as the batch file title.
- Select to save the batch file to the desktop, and press the Save button.
- Then right-click the Logitech.bat File on the desktop and select Run as administrator.

4. Uninstall the Logitech SetPoint software
- Enter appwiz.cpl in Run, and click OK.

- Enter the keyword Logitech SetPoint in the search box.

- Select the listed SetPoint software, and press the Uninstall button.
- Press the Yes button to confirm further.
- Restart the Windows OS.
- Navigate to the SetPoint software website and click on the Download Now button.

- Open SetPoint‘s installer to add the software to Windows.
Removing Logitech Download Assistant from Windows startup will usually fix the logilda.dll error.
However, if not, then reinstalling the Logitech SetPoint software with the latest version might also fix the logilda.dll error.
5. Reinstall the Logitech driver
5.1 Using the Device Manager
- Enter devmgmt.msc in Run’s text box and hit Enter.

- Double-click Mice and other pointing devices to expand the listed devices.

- Then right-click the Logitech HID mouse and select Uninstall device.
- Windows will then reinstall the default logilda.dll driver for the mouse when you restart your laptop or desktop.
Another alternative resolution for the Logilda.dll error is reinstalling the default Logitech mouse driver.
If your Windows cannot find and download new drivers, you may resolve it in a few clicks.
5.2 Update drivers automatically
If you won’t want to spend a lot of time searching for the appropriate drivers, if you think it is tedious or don’t have the necessary knowledge, know that you can install a third-party driver installer.
Not only will the software help you quickly get the latest compatible version of your drivers, but it will also do it automatically and periodically, so you won’t have to worry about it anymore.
How do I fix the logilda.dll error on Windows 11?
Since Windows 10 and 11 are very similar, you will find that all the solutions we discussed will work on both operating systems.
There are rare occasions where you will have a slightly different UI. But typically, it is the same processes and steps.
Does Logitech need a download assistant?
The Logitech Download Assistant is a decent tool for maintaining the functionality and updates of Logitech products.
You need it if your Logitech products remain fresh and correctly operational. However, while we do not recommend disabling or uninstalling it, you may disable LogiLDA from startup, so your computer startup faster.
Those are a few fixes that will obliterate the logilda.dll error message window and allow you to use your PC the way you need.
Please note that you can keep your system performing correctly by updating your drivers regularly. If you have any more questions, don’t hesitate to leave them in the comments section below.
Read our disclosure page to find out how can you help Windows Report sustain the editorial team. Read more


Improve this guide


User forum
1 messages