Error 720 on Windows 11: What is it & How to Fix it
6 min. read
Updated on
Read our disclosure page to find out how can you help Windows Report sustain the editorial team. Read more
Key notes
- The Windows 11 VPN error 720 prevents you from establishing a VPN connection, without divulging much about the underlying cause.
- To fix it, you can reinstall the WAN Miniport drivers, update the network drivers, disable Firewall, or reset the network settings.
- Also, find out the best VPNs to establish a quick and secure connection, coupled with enhanced privacy and security over the web.

A VPN (Virtual Private Network) is a tool that can be used to gain access to another network. It could be used to access resources or even mask your identity over the web. But, several users have reported getting the VPN error 720 in Windows 11.
This will prevent you from establishing a VPN connection. The error message that accompanies it reads: A connection to the remote computer could not be established. You might need to change the network settings for this connection.
There isn’t much in the error message to help you troubleshoot the issue. So, if you are encountering the Windows 11 VPN error 720, just try the fixes listed in the following sections to eliminate it.
Why am I encountering the VPN error 720 in Windows 11?
There are a bunch of reasons that could lead to this error. Issues with Internet connectivity or slow speed could be the cause. Also, the Windows Firewall or other similar third-party applications could be blocking the connection.
Other than that, corrupt or outdated network drivers too are known to cause the Windows 11 VPN error 720. A corrupt one can be easily be identified by the warning sign near the driver icon in the Device Manager.
Issues with the WAN Miniport driver are just as likely to cause the error. Also, make sure that you are entering the correct credentials and that the network you are trying to connect to is working fine since problems with either of these are a probable reason.
With a basic understanding of the underlying causes, you are now in a far better position to troubleshoot. So, let’s walk through the most effective fixes for Windows 11 VPN error 720.
How do I fix the Windows 11 VPN error 720?
1. Check if the VPN IP address is correct
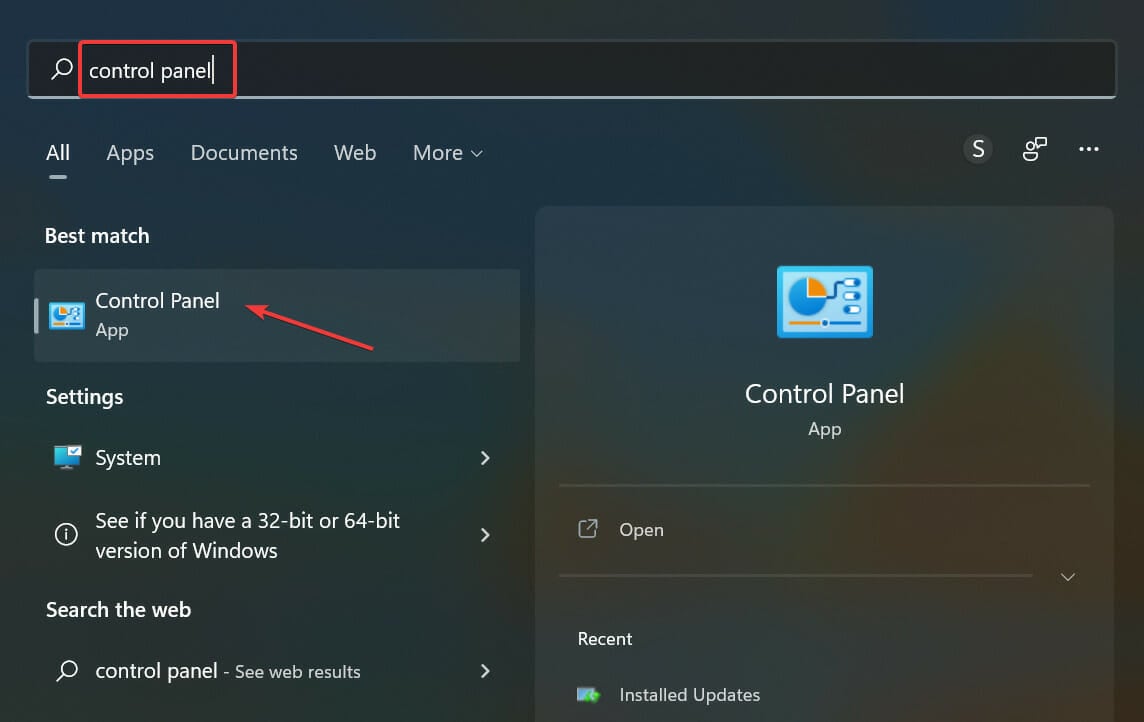
- Press Windows + S to launch the Search menu, enter Control Panel in the text field, and click on the relevant search result that appears.
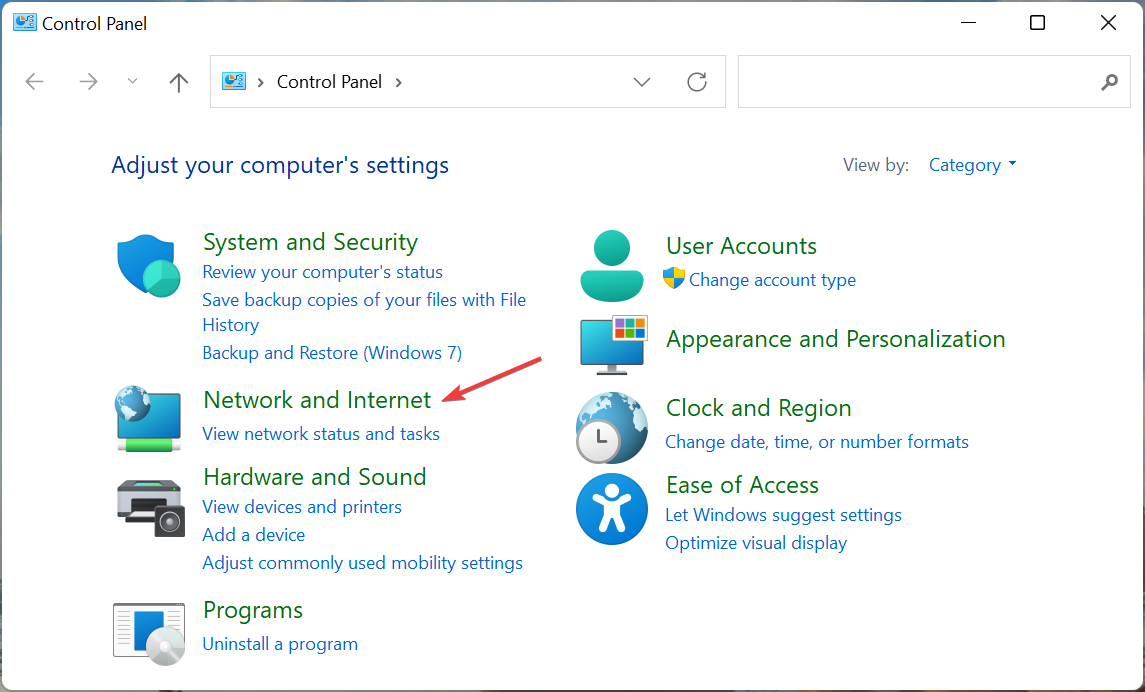
- Click on the Network and Internet option here.
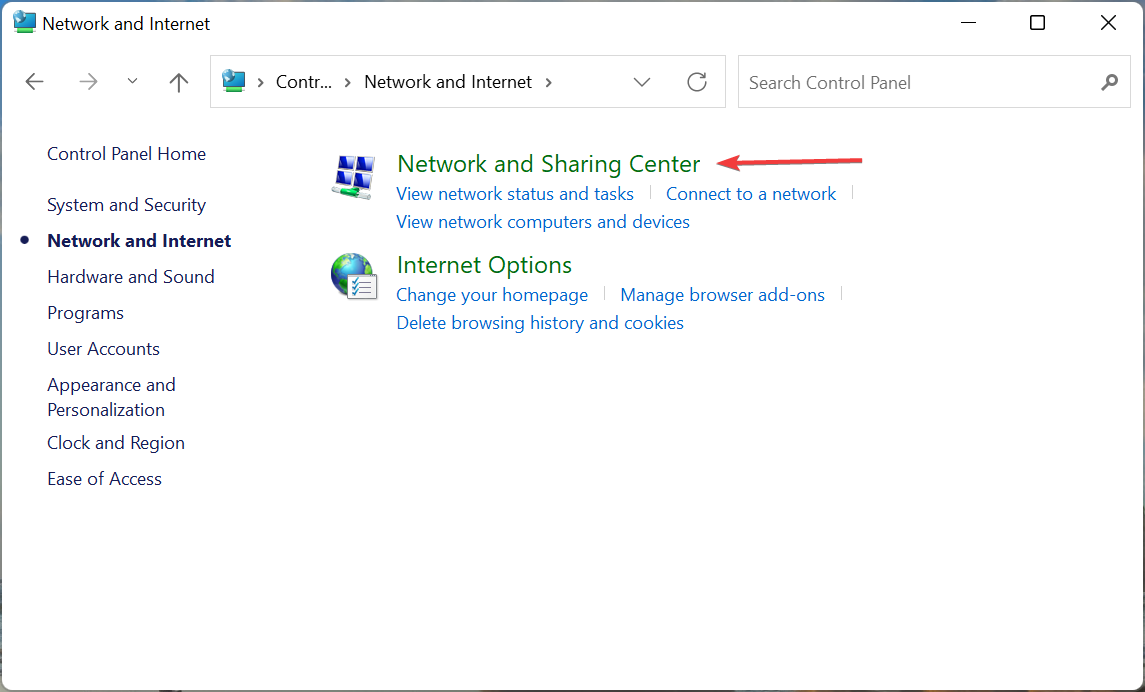
- Next, click on Network and Sharing Center.
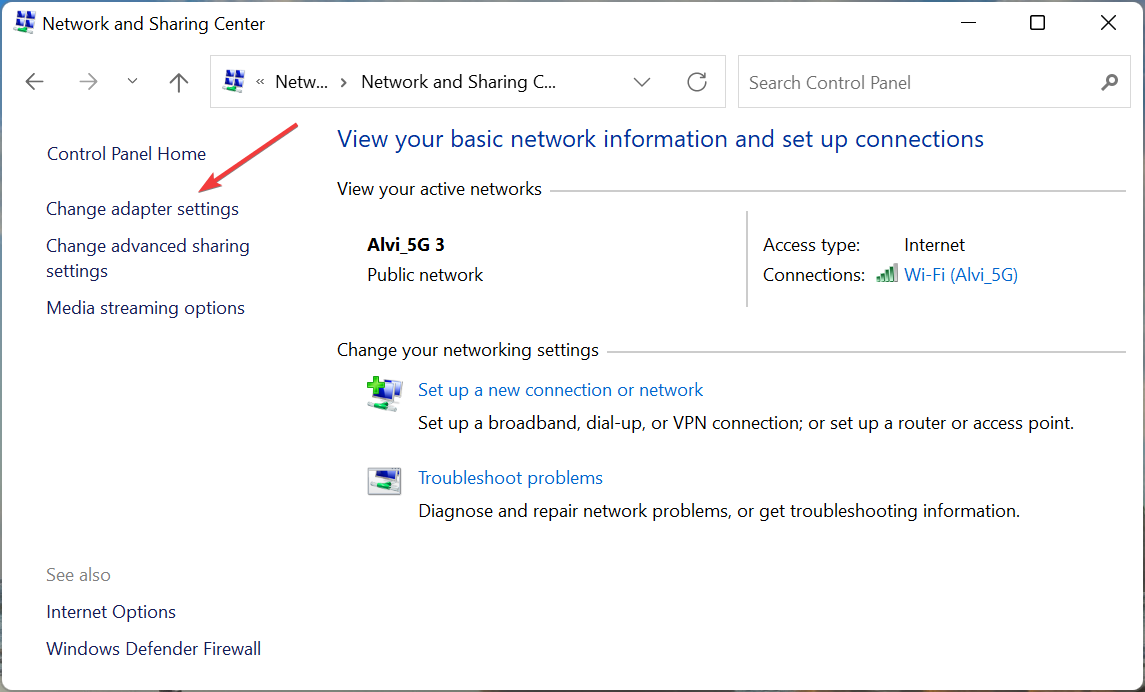
- Click on Change adapter settings from the list of options on the left.
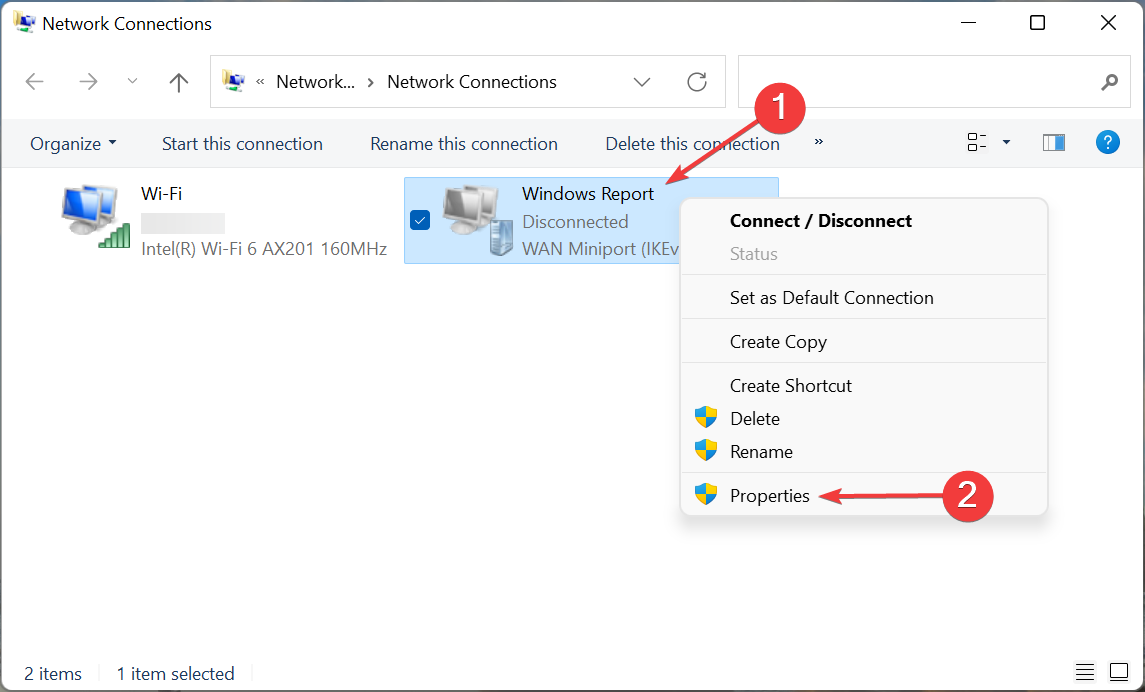
- Now, right-click on the VPN you are trying to connect to, and select Properties from the context menu.
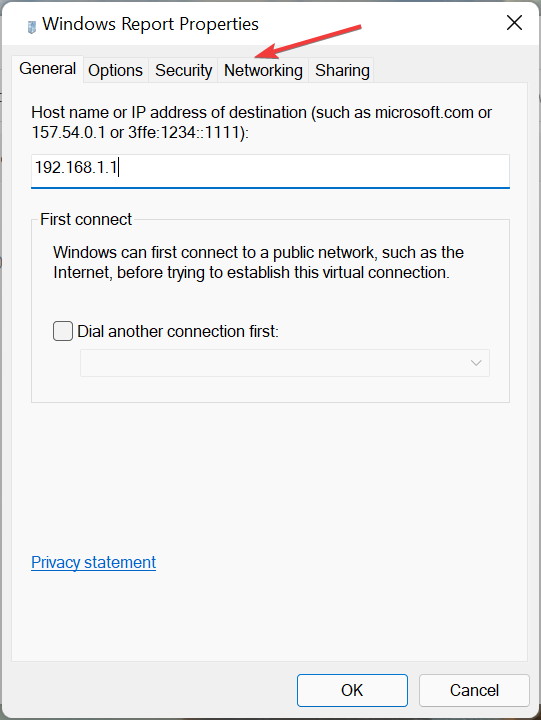
- Next, navigate to the Networking tab from the top.
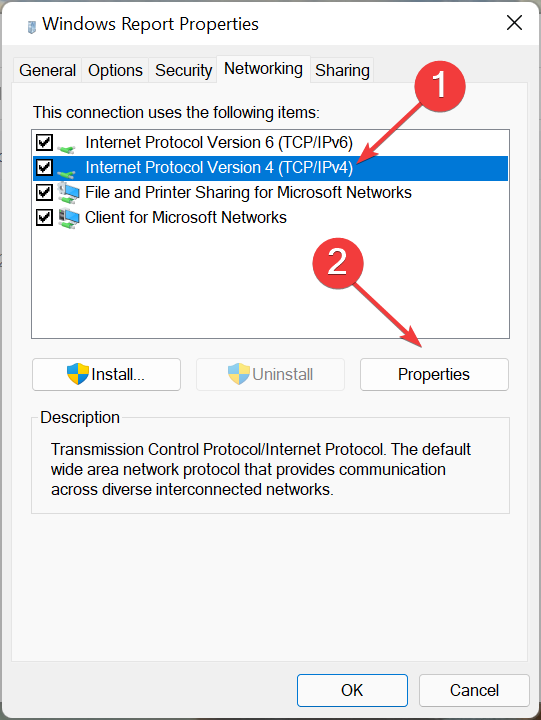
- Select the Internet Protocol Version 4 (TCP/IPv4) and click on the Properties button.
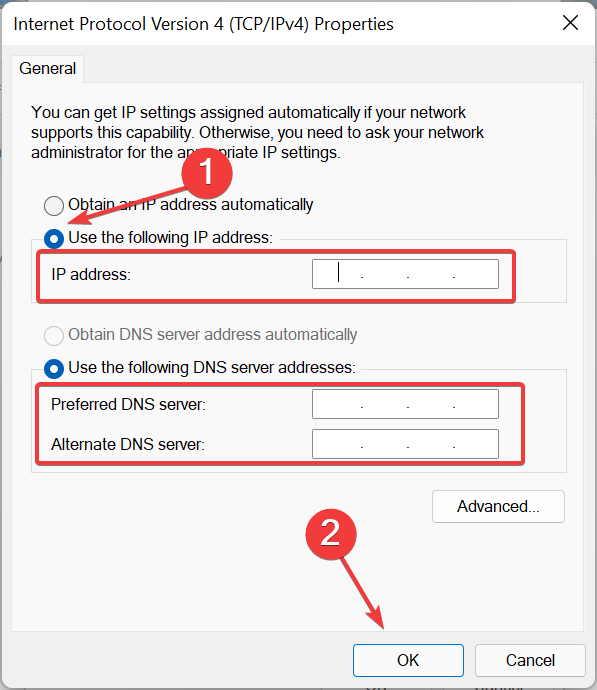
- Tick the Use the following IP address option and enter the correct IP address and DNS server in the designated fields, and click on OK at the bottom to save the changes.
After you have made the changes, restart the computer and check if the Windows 11 VPN error 720 is fixed.
2. Disable the firewall
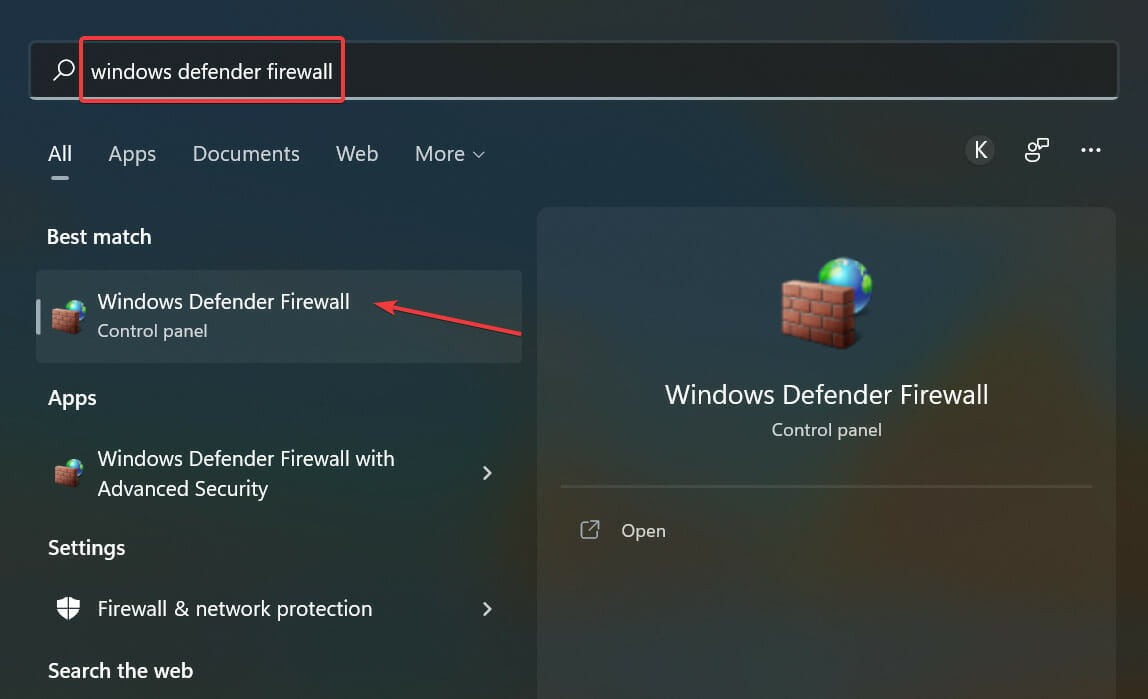
- Press Windows +S to launch the Search menu, enter Windows Defender Firewall in the text field at the top, and click on the relavnt search result.
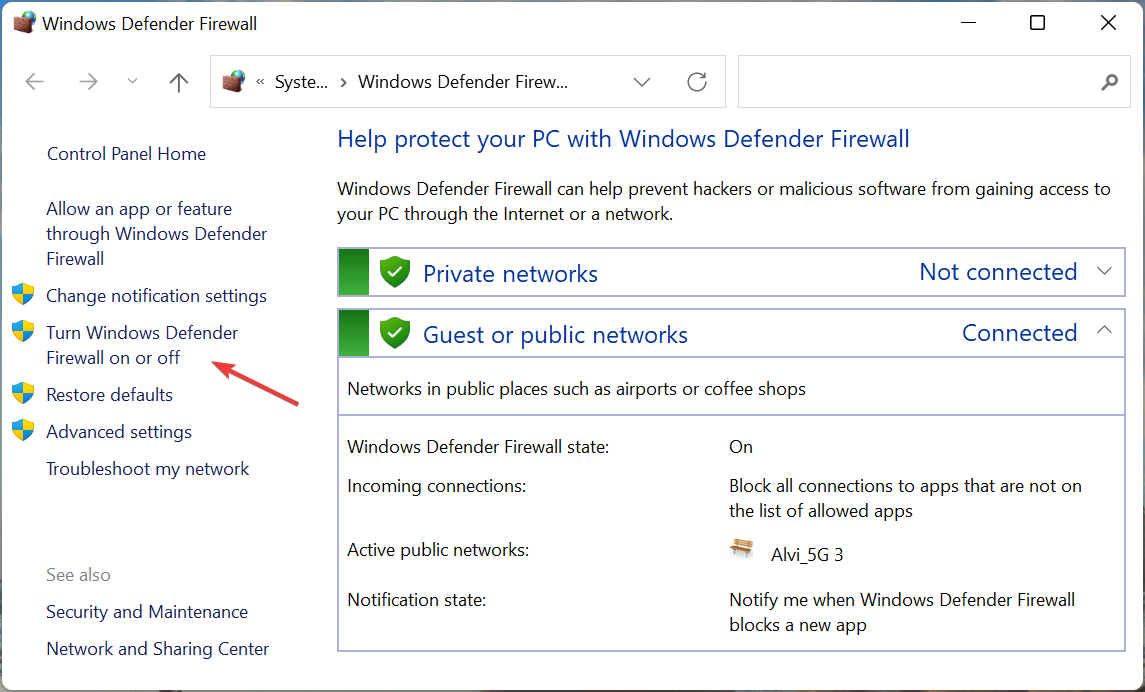
- Next, select Turn Windows Defender Firewall on or off from the options listed on the left.
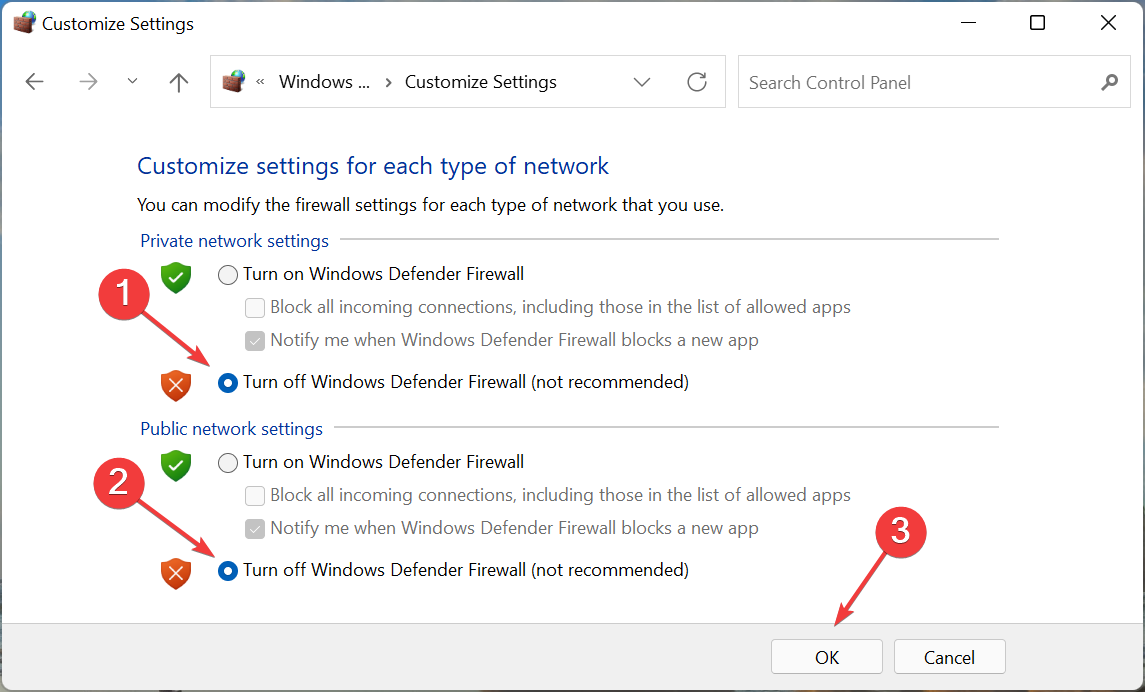
- Now, tick the option for Turn Windows Defender Firewall off under both Private network settings and Public network settings, and click on OK at the bottom.
Oftentimes, the Windows Defender Firewall may block you from establishing a VPN connection. So, it’s best that you disable it and check if the Windows 11 VPN error 720 is fixed.
Also, if you use a third-party antivirus or firewall, make sure to disable it from there as well, or you can simply uninstall the app.
3. Reinstall the WAN Miniport driver
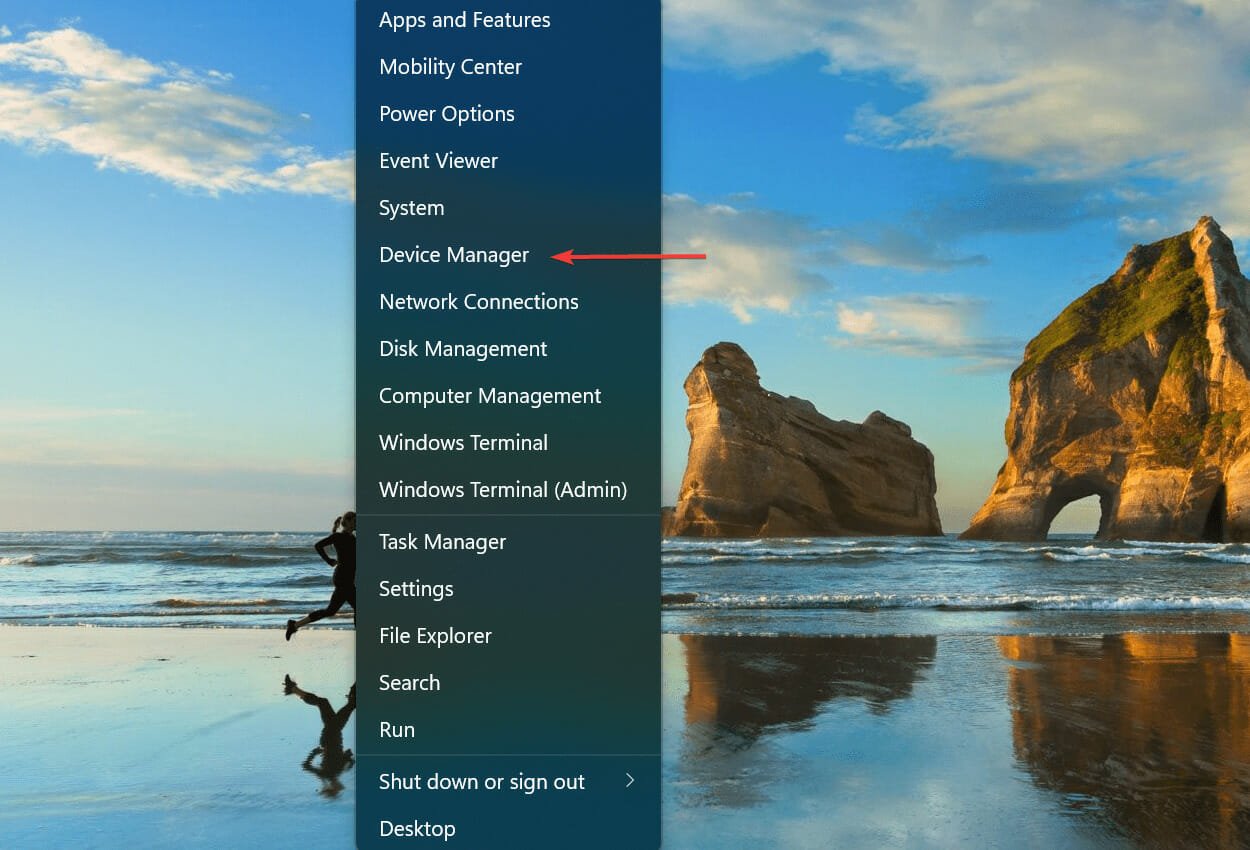
- Press Windows + X or right-click on the Start icon to launch the Quick Access/Power User menu, and select Device Manager from the options listed here.
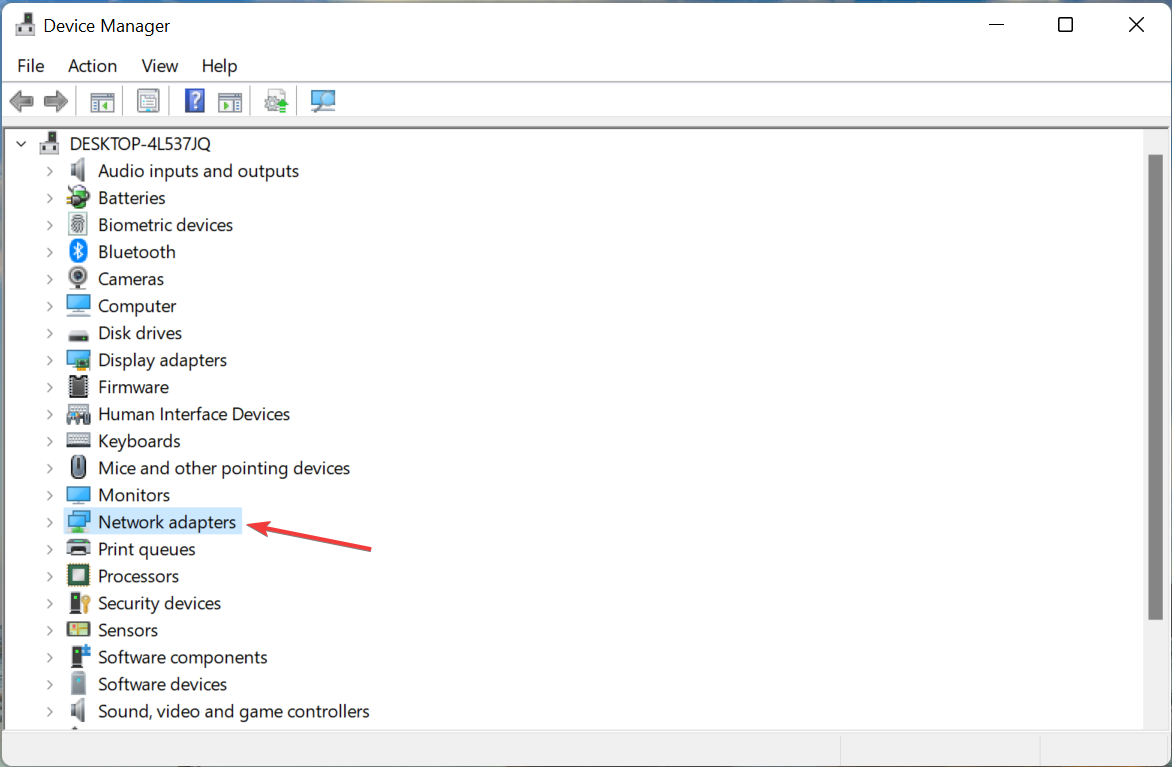
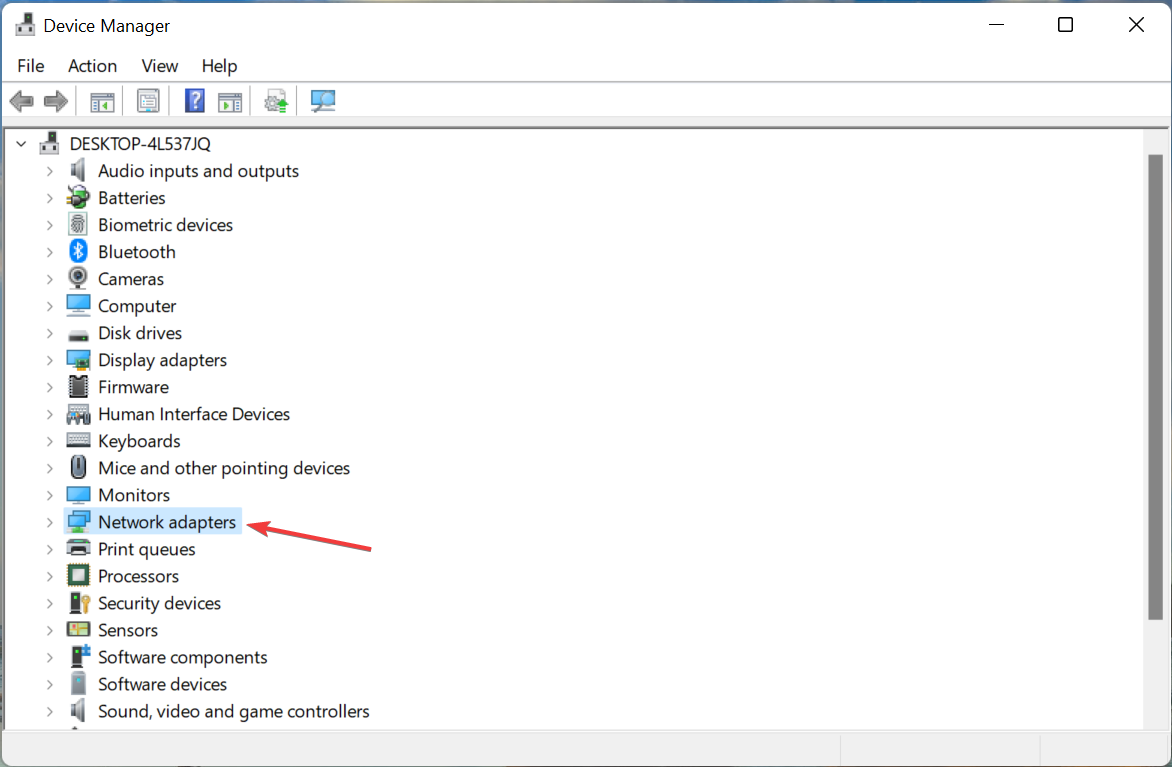
- Double-click on the Network adapters entry to expand and view the devices under it.
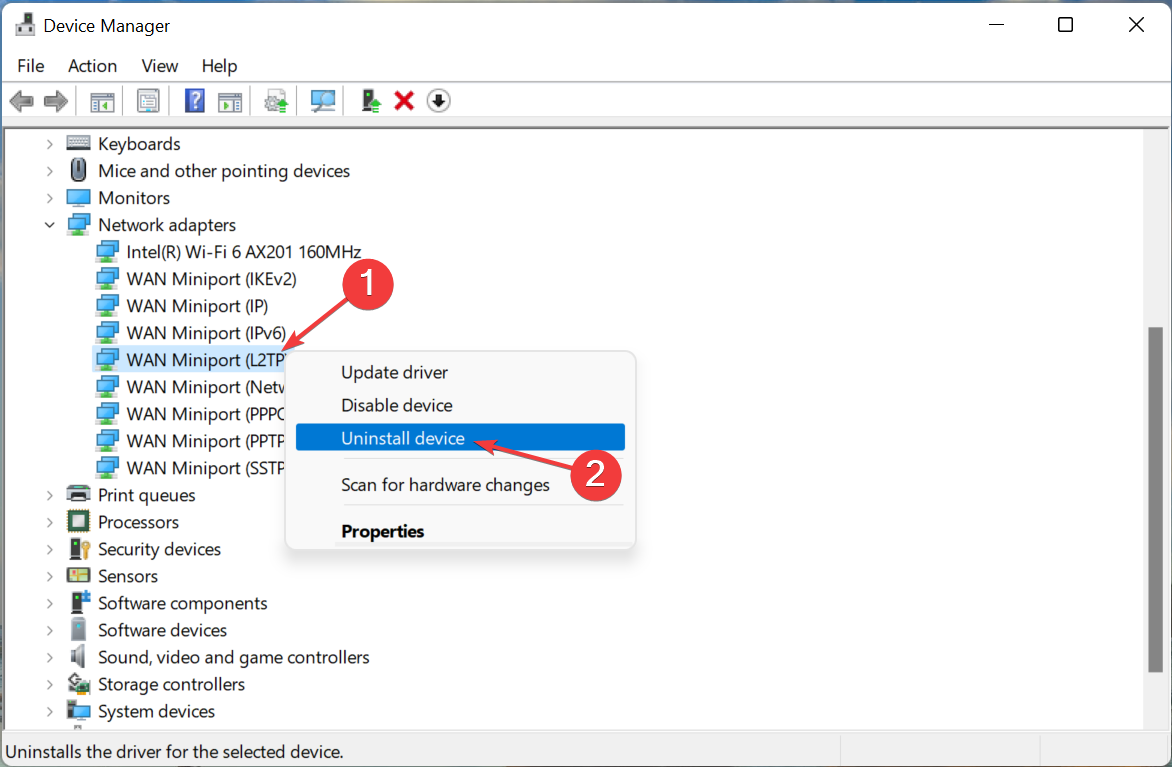
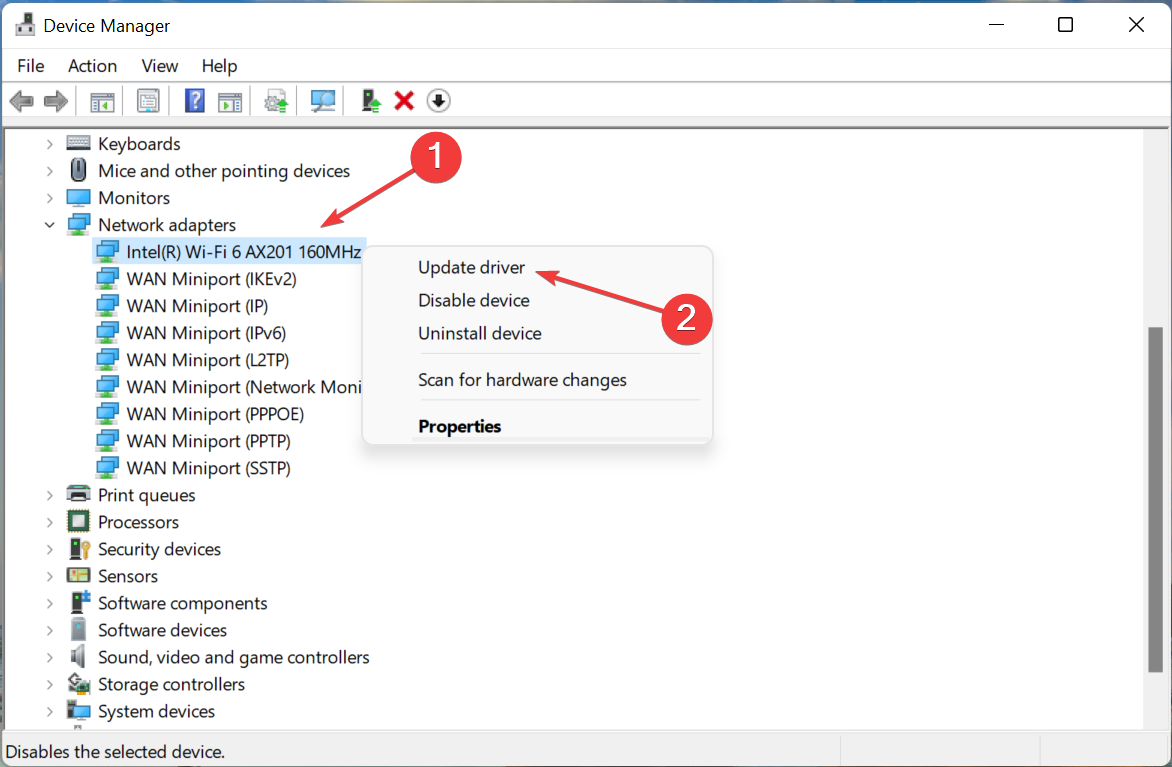
- Right-click on the WAN Miniport entry here, and select Uninstall device from the context menu.
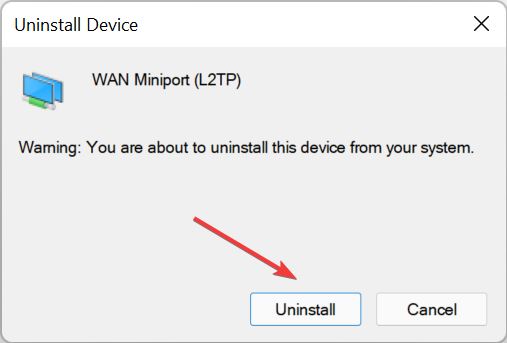
- Click Uninstall in the prompt that pops up.
- Now restart the computer, and Windows will automatically install a fresh driver for the device.
- Repeat the same steps for all entries here that read WAN Miniport.
4. Update the network driver
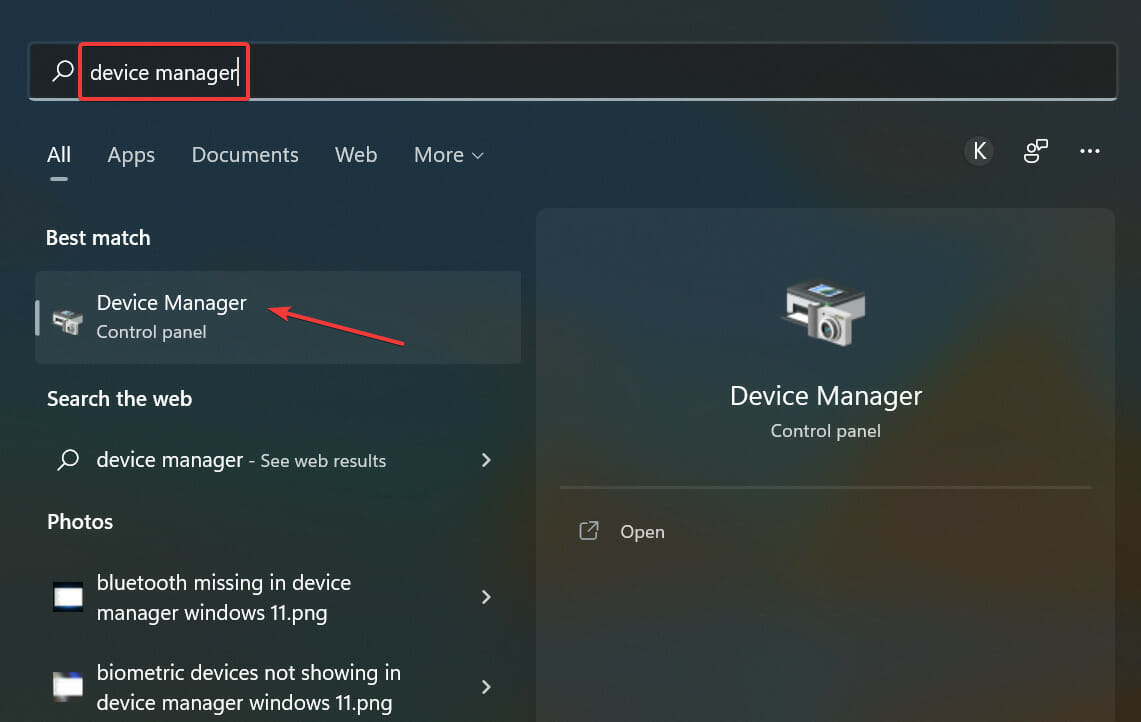
- Press Windows + S to launch the Search menu, enter Device Manager in the text field at the top, and click on the relevant search result.
- Now, double-click on the Network adapters entry.
- Locate the network adapter driver, right-click on it and select Update driver from the context menu.
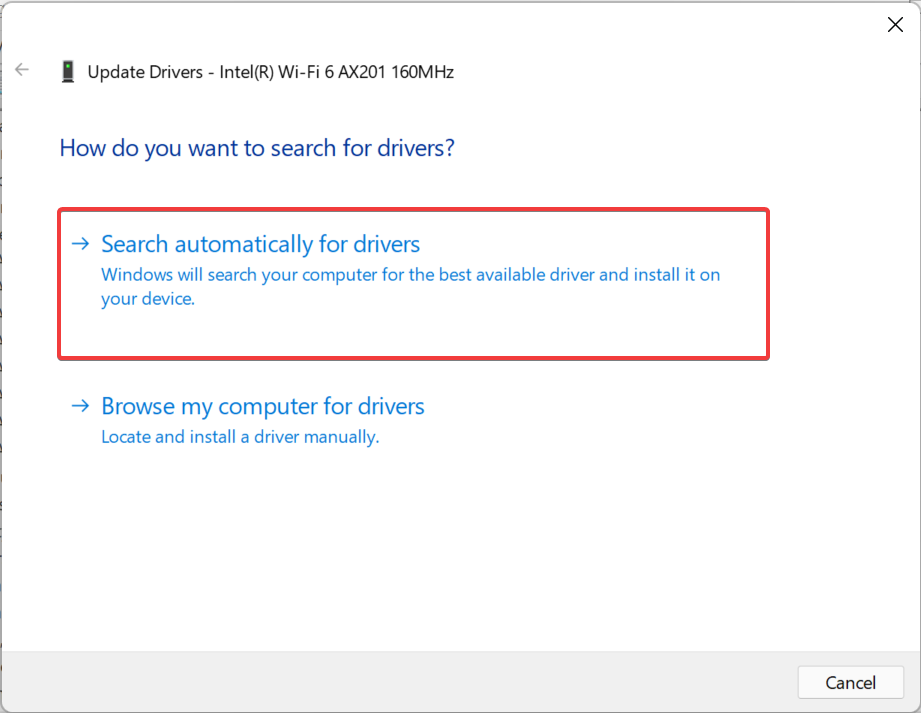
- Select Search automatically for drivers from the two options that appear in the Update Drivers window.
If it was a bug in the current version of the driver or it was simply malfunctioning, there’s a chance of you encountering a bunch of errors. After the network driver is updated, the Windows 11 VPN error 720 should be fixed.
However, there’s a chance that you may not be able to install the latest version using the Device Manager. In which case, you can try the other methods to update the network driver.
But there’s an easy way to keep all the drivers on your system up-to-date, use a reliable third-party app. We recommend using Outbyte Driver Updater, a dedicated tool that automatically scans for the latest driver version and installs it on your computer.
5. Reset network settings
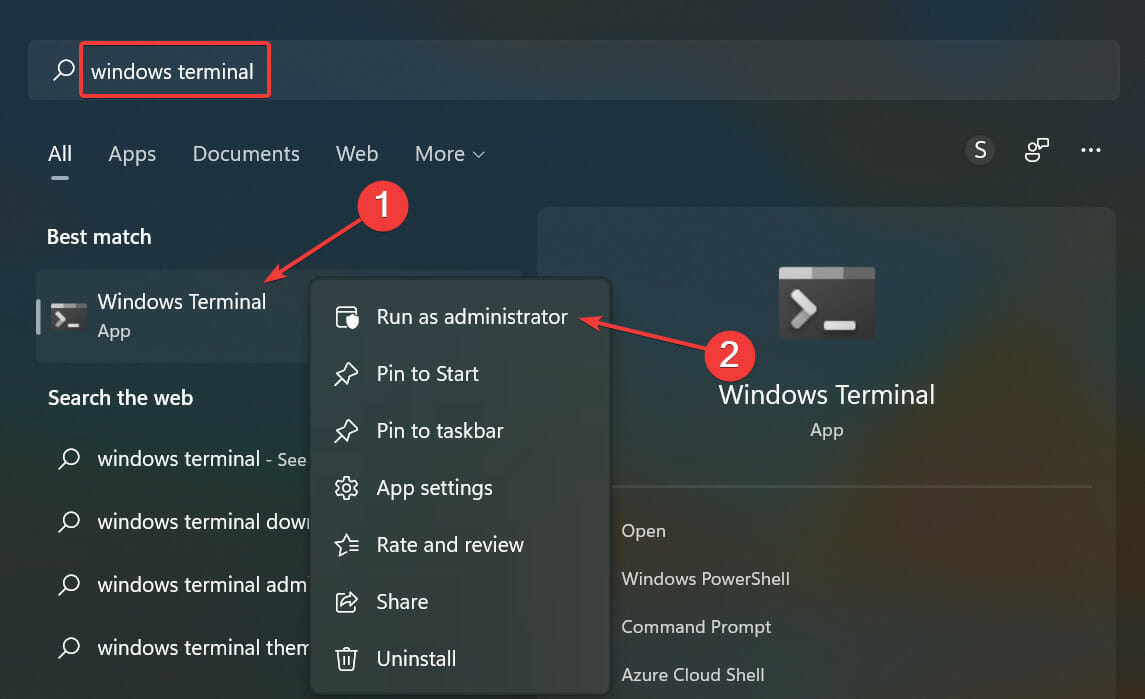
- Press Windows + S to launch the Search menu, enter Windows Terminal in the text field, right-click on the relevant search result, and select Run as administrator from the context menu.
- Click Yes on the UAC (User Account Control) prompt that pops up.
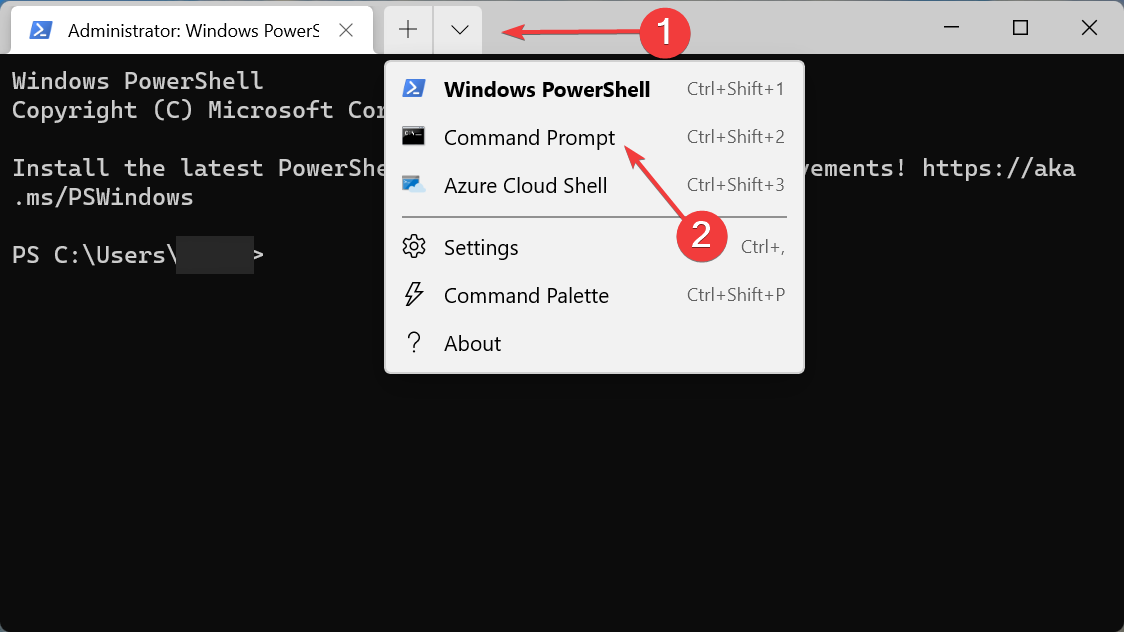
- Click on the downward-facing arrow at the top, and select Command Prompt from the options. Alternatively, you can hit Ctrl + Shift + 2 to launch Command Prompt in a new tab.
- Now, paste each of the following commands one a time, and hit Enter after each to flush the DNS and reset Winsock:
ipconfig /flushdnsipconfig /registerdnsipconfig /releaseipconfig /renewNETSH winsock reset catalogNETSH int ipv4 reset reset.logNETSH int ipv6 reset reset.log - Once done, restart the computer for the changes to come into effect.
After making these changes, the Windows 11 VPN error 720 should be fixed, and you can now establish a connection.
6. Use a premium VPN
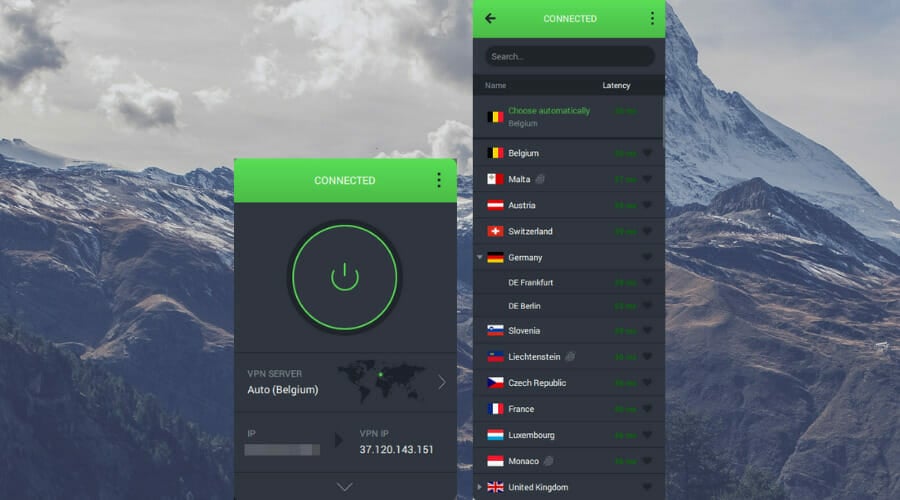
If nothing else works, you always have the option to use a reliable VPN. And, we recommend using the PIA (Private Internet Access) VPN. This one actually walks the talk, they don’t store your data in any form, it’s open-source, and offers 24×7 support.
Apart from that, you can use it on up to 10 devices at no extra cost with a dedicated app for each. Once you have it up and running, the Windows 11 VPN error 720 should be fixed, and you would no more face trouble establishing a VPN connection.
⇒ Get PIA
That’s it! With the error finally solved, you can try some of the best VPNs for Windows 11 for better connectivity and enhanced privacy. Also, find out how to fix other issues with the VPN, in case there’s no specific error code.
Tell us which solution worked and if you are using a third-party VPN, in the comments section below.






User forum
0 messages