How to Change IP Address in Windows 7 (Quick Guide)
Need to change your IP address in Windows 7? Whether you want to fix a network issue or protect your privacy, the process is simple and can be done in several ways. Follow the steps below.
Table of contents
How to Change IP Address in Windows 7?
1. Change IP Address Manually via Control Panel
You can assign a static IP address manually through your network adapter settings.
- Click the Start button and open the Control Panel.

- Select Network and Sharing Center.

- Click Change adapter settings on the left side.

- Right-click your active network connection and select Properties.
- Choose Internet Protocol Version 4 (TCP/IPv4) and click Properties.
- Select Use the following IP address.
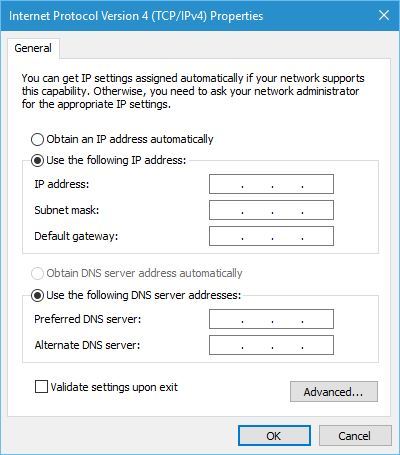
- Enter your preferred IP address, subnet mask, and default gateway.
- Add the preferred and alternate DNS servers.
- Click OK to apply the new settings.
Restart your connection to activate the new IP address.
For a complete setup walkthrough, see how to set up Internet in Windows 7. After restarting, if your network still fails to connect, read this troubleshooting guide on how to fix Windows 7 not connecting to the internet to identify and resolve any remaining connectivity problems.
2. Change IP Address Automatically Using Command Prompt
You can make Windows 7 automatically obtain a new IP address from your router.
- Click Start and type cmd in the search bar.
- Right-click Command Prompt and choose Run as administrator.
- Type the following command to release your current IP and press Enter:
ipconfig /release
- Type the command to renew your IP and press Enter:
ipconfig /renew
- Wait for the process to complete.
This method works best if your network uses DHCP to assign IPs automatically.
If you are troubleshooting Wi-Fi, check how to connect to Wi-Fi in Windows 7.
3. Change IP Address Through Router Settings
You can also refresh your IP address directly from your router interface.
- Open a web browser and type your router’s address, usually similar to 192.168.1.1.
- Log in using your router’s credentials.
- Navigate to LAN Setup or DHCP Settings.
- Change the DHCP range or modify your PC’s assigned IP address.
- Save the changes and restart the router.
Once the router restarts, your PC will receive a new IP address.
4. Use a VPN for a New Public IP
If your goal is to change your public IP instead of the local one, a VPN is the easiest solution.
- Install a reliable VPN application.
- Open the app and sign in to your account.
- Choose a server location and connect.
You will get a new public IP address that helps protect your online identity and bypass restrictions.
For privacy tips, see how to hide your IP address in Windows 7.
FAQs
Open the Start menu, search for Command Prompt, and run the command to display your network details. Look for the IPv4 address next to your active adapter.
Yes. Changing your IP can resolve conflicts, restore connectivity, and improve privacy.
No. You need administrative privileges to modify network configuration settings.
Your router likely uses DHCP, which assigns IPs dynamically whenever your device reconnects.
Conclusion
Changing your IP address in Windows 7 can solve connectivity problems and enhance privacy. You can do it manually through Control Panel, automatically with Command Prompt, by adjusting your router, or by using a VPN for a new public IP.
Read our disclosure page to find out how can you help Windows Report sustain the editorial team. Read more


Improve this guide


User forum
0 messages