How to Set Up Internet on Windows 7 (Step-by-Step Guide)

Setting up an Internet connection on Windows 7 is simple and can be done in a few minutes. Whether you’re connecting via Wi-Fi or Ethernet, this guide will show you the exact steps to get online quickly.
Table of contents
How to Set Up Internet on Windows 7?
1. Check Your Hardware Connection
Before configuring Windows 7, make sure your Internet hardware is working properly.
- Ensure your router or modem is powered on.
- Check that the Ethernet cable is firmly plugged into your PC if you are using a wired connection.
- For Wi-Fi, verify that your wireless adapter is enabled using the keyboard toggle or laptop switch.
If you need permission to change system settings, review how to log in as an administrator in Windows 7.
2. Open Network and Sharing Center
Windows 7 uses the Network and Sharing Center to manage Internet connections.
- Click the Start button and select Control Panel.

- Choose Network and Internet.
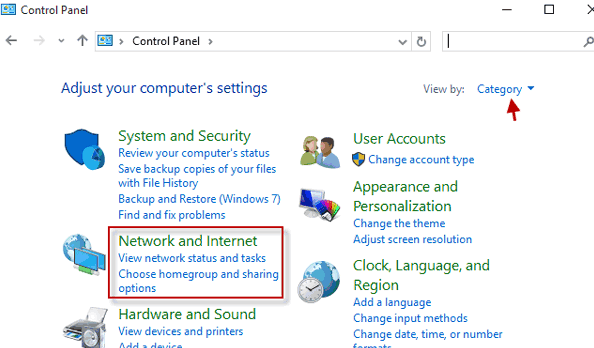
- Click Network and Sharing Center.

If the panel fails to open or crashes, you can troubleshoot by starting the system in a clean state using Safe Mode in Windows 7.
3. Set Up a New Connection
Create a new Internet connection from the Network and Sharing Center.
- Click Set up a new connection or network.
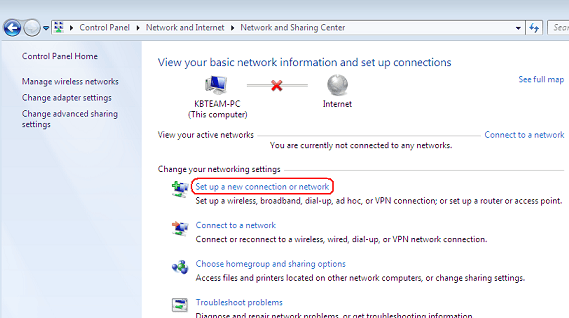
- Select Connect to the Internet and click Next.
- Choose Wireless or Broadband (PPPoE) based on your setup.
4. Connect to a Wireless Network
Windows will display nearby Wi-Fi networks for you to join.
- Click the network icon in the taskbar notification area.
- Select your Wi-Fi network from the list.

- Enter the password when prompted and click Connect.
For a detailed walkthrough of wireless settings, see how to connect to Wi-Fi in Windows 7.
No WiFi networks appear in the list? Follow the guide on Windows 7 not showing WiFi networks to restore missing wireless connections before continuing with the setup.
5. Configure a Broadband (PPPoE) Connection
Some ISPs require a username and password for wired broadband.
- Select Broadband (PPPoE) when creating the connection.
- Enter the Username and Password provided by your ISP.
- Click Connect to establish the session.
6. Test Your Internet Connection
Verify that your PC can reach the Internet.
- Open a web browser and visit any website to confirm access.
- If it loads, the setup is complete.
- If not, return to the Network and Sharing Center and select Troubleshoot problems.
Still having connectivity issues such as unidentified network or IP conflicts? Try updating your network settings by changing the IP address in Windows 7 to force a fresh configuration and restore access.
Still not online after running the built-in troubleshooter? Read this step-by-step guide on how to fix Windows 7 not connecting to the internet for deeper diagnostics and proven fixes.
FAQs
Ensure the wireless adapter is enabled and the router is broadcasting the SSID. Restart both devices if necessary.
Right-click the network icon, choose Troubleshoot problems, and apply the recommended fixes.
Yes. Enable hotspot on your phone, select it from the Wi-Fi list on the PC, and enter the hotspot password.
Common causes include outdated network drivers and wireless interference. Update the adapter driver, restart the router, or change the Wi-Fi channel in the router settings.
Conclusion
Setting up Internet on Windows 7 is straightforward when you follow these steps. Whether you use Wi-Fi or a wired broadband connection, the Network and Sharing Center provides all the options you need. Keep drivers current and maintain your router properly to ensure a stable and secure connection.
Read our disclosure page to find out how can you help Windows Report sustain the editorial team. Read more


Improve this guide


User forum
0 messages