Twitch Audio Desync: Fix the Delay With These 6 Methods
Your browser extensions might cause problems with Twitch
8 min. read
Updated on
Read our disclosure page to find out how can you help Windows Report sustain the editorial team. Read more
Key notes
- If you are facing the Twitch audio desync issue, it might be because of outdated drivers.
- A quick and effective way to solve the problem is to disable the hardware acceleration feature.
- You can also fix the error by disabling the device time stamp feature on OBS.
Even if it is one of the most efficient streaming services, some users claim they experience audio desync on Twitch.
This problem can negatively impact your viewing experience, so today, we’ll show you how to fix this issue on your PC. Note that you may also experience Twitch audio delay on mobile devices. And while the interface may differ, some solutions in this guide will also work.
What causes Twitch audio desync?
There are many reasons why this may happen. Many users have described this problem as often starting with your Twitch audio cutting out or a minor Twitch audio lag. Here are the primary culprits:
- Slow or bad internet connection: If your Twitch audio and video are out of sync when live streaming, your internet connection is the first thing you need to check. You must switch to a robust and active network to get the best experience.
- Incompatible extensions: While extensions improve your browser experience, they can cause problems at some point. If you installed an extension before noticing this issue, you need to disable or remove the extensions and clean your browser with PC cleaner software.
- Problems with drivers: Another potential cause of Twitch VOD audio desync is faulty or outdated drivers. The quick way out of this is to update your drivers to the latest version.
- Issues with your browser: many users have complained about the Twitch audio desync on Firefox and Chrome. You might need to switch to one of the best browsers for streaming to fix this.
What are the most common Twitch audio delay issues?
Twitch audio issues can be pretty problematic, and speaking of audio issues, here are some common problems that users reported:
- Twitch streaming audio out of sync, game audio out of sync: This issue can occur while streaming using OBS. To fix it, set the delay to your microphone to match the audio delay.
- OBS audio out of sync: This issue usually occurs due to OBS settings, and many users reported that they fixed the problem by disabling the Use device timestamps option.
- Twitch audio lagging behind video, audio lag: Many causes lead to these errors, and if you encounter them, try all of our solutions.
Quick Tip:
If your problems persist, and you think your web browser might be to blame, it may be time to try a different one. Avid gamers may like to try Opera GX, the world’s first web browser created specifically for gamers.
Thanks to the visuals powered by Razer Chroma and the features of Twitch integrations, it looks fantastic, allowing for a better Twitch experience when viewing streams from it.
Opera GX
This gamer’s browser is the perfect choice for uninterrupted streaming on Twitch, so have a try with no doubts.How can I fix Twitch audio desync?
Before exploring the fixes in this section, below are some troubleshooting steps you should try:
- Refresh the page.
- Ensure that your internet connection is strong and active.
- Try streaming in incognito.
If these preliminary fixes do not work, you can now explore the fixes below.
1. Update your GPU drivers
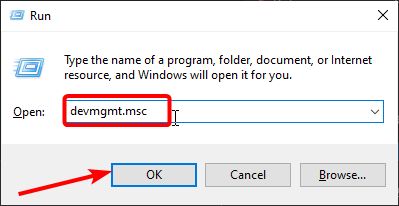
- Press the Windows key + R, type devmgmt.msc, and click OK.
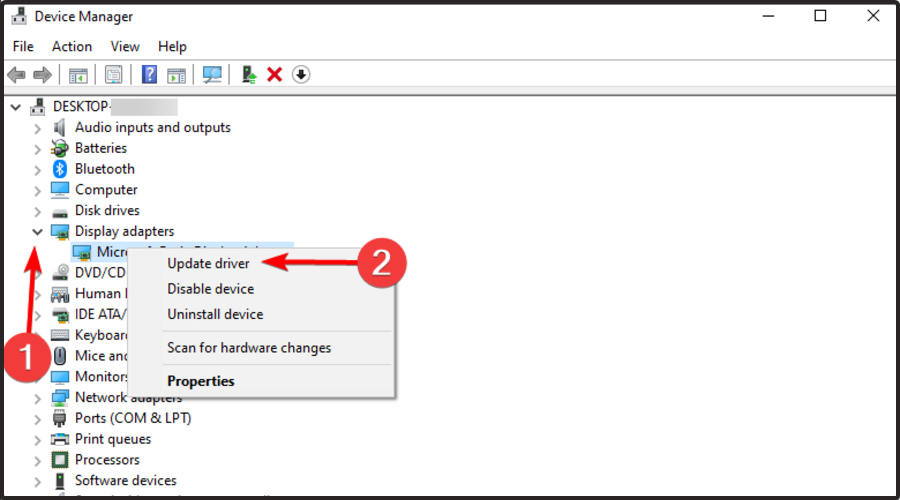
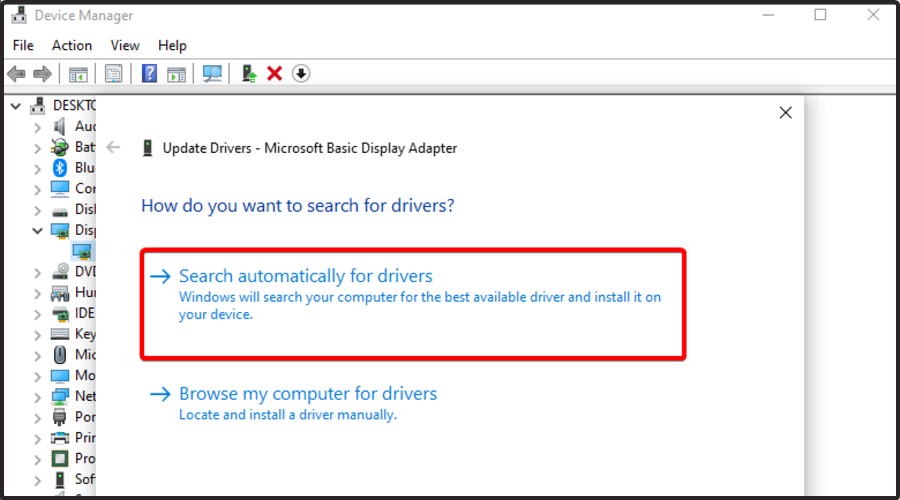
- Expand the Display adapters section, then right-click your graphics card and select Update driver.
- Click on Search automatically for drivers.
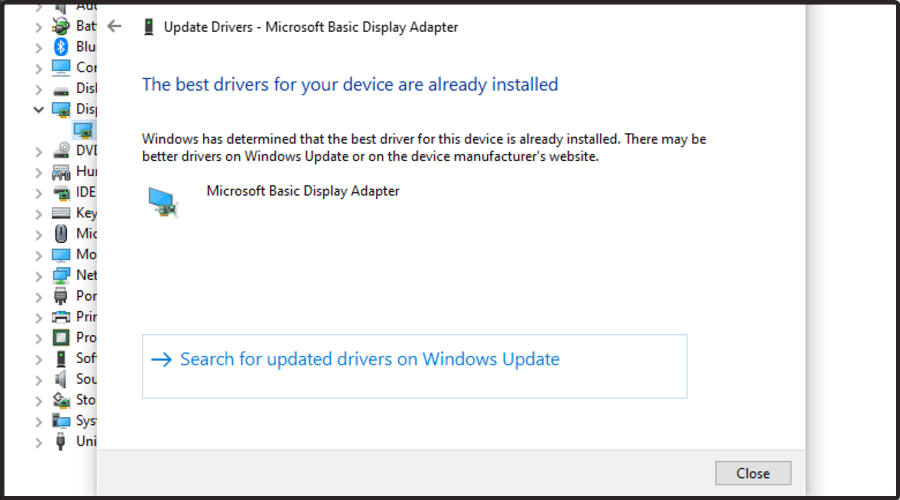
- You’ll get the following message if the best-found driver is already installed.
- If there are any available drivers to update, you’ll be notified.
Your GPU drivers are pretty important, and if your drivers are corrupted or out of date, perhaps you’ll need to update them to fix audio delay issues in Twitch.
This is relatively simple, and the best way to do that is to visit your graphics card manufacturer’s website and download the latest drivers for your model. Once you download the latest versions, install them and check if that solves your issue.
If you don’t want to update your drivers manually, you can always use third-party tools such as Outbyte Driver Updater to automatically update all your drivers with just a couple of clicks. Once your drivers are updated, check if the problem is still there.
The program is fast and reliable; with it, you’ll be just two clicks away from having your PC’s drivers updated to the latest versions.
2. Disable the HTML5 player
- Visit the Twitch website.
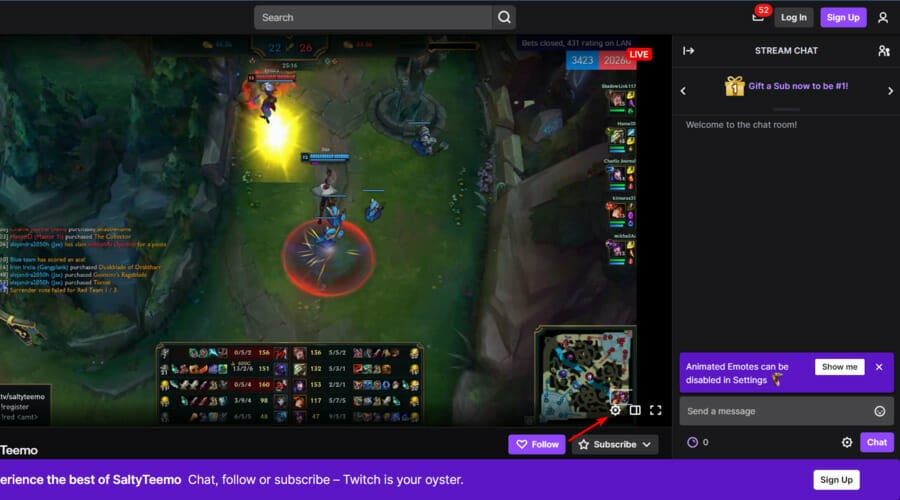
- Open the desired stream and click the Gear icon below the video.
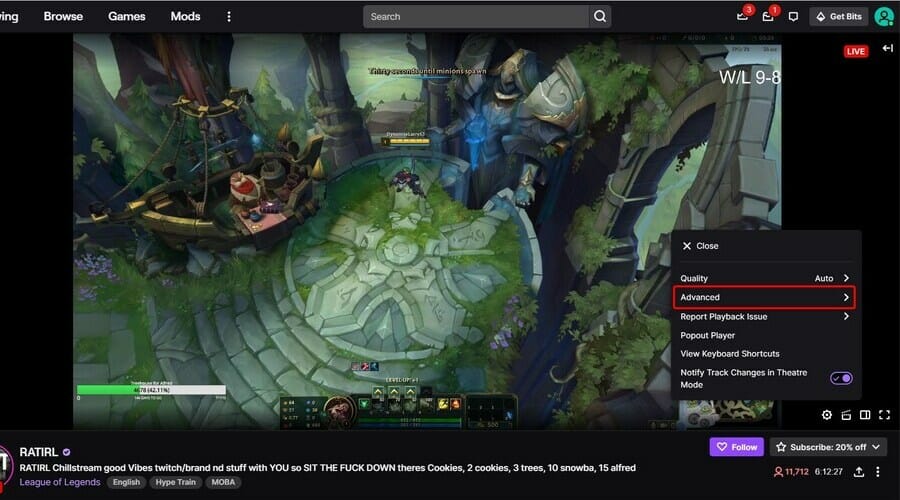
- Choose Advanced from the menu.
- Locate the HTML5 Player option and disable it.
According to users, the Twitch audio desync can sometimes appear due to the HTML5 player. HTML5 almost completely replaced Adobe Flash on the web. But apparently, some people are having issues with HTML5 players on Twitch.
To fix this problem, users are suggesting disabling HTML5 players on Twitch.
After that, the problem should be resolved, and your audio issues will be fixed. Remember that you might have to repeat this workaround for each stream you want to play.
3. Disable hardware acceleration
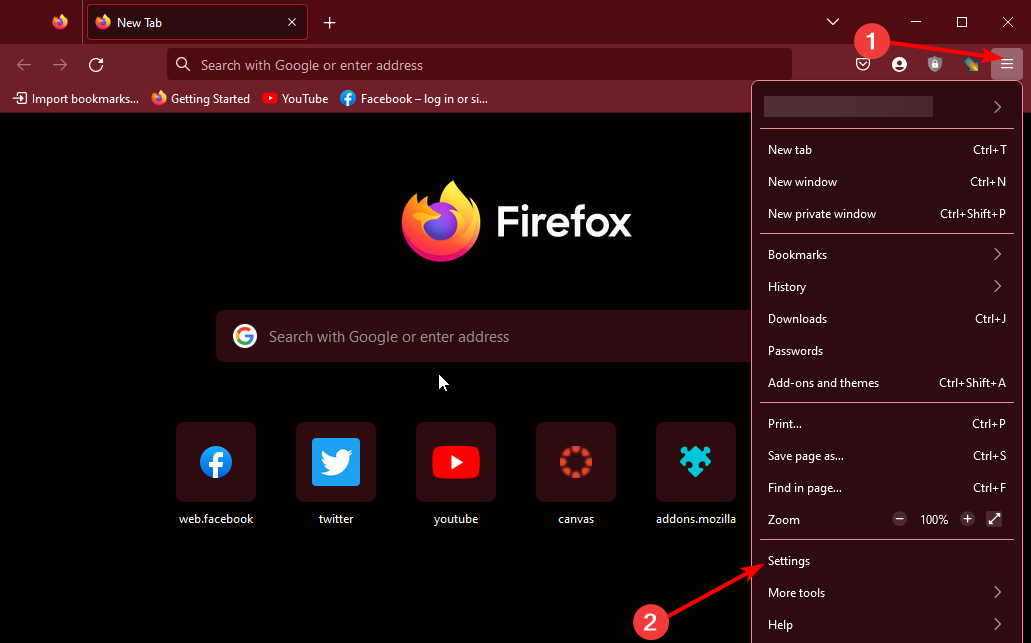
- Launch Firefox and click the menu button (three horizontal lines) in the top right corner.
- Click on Settings.
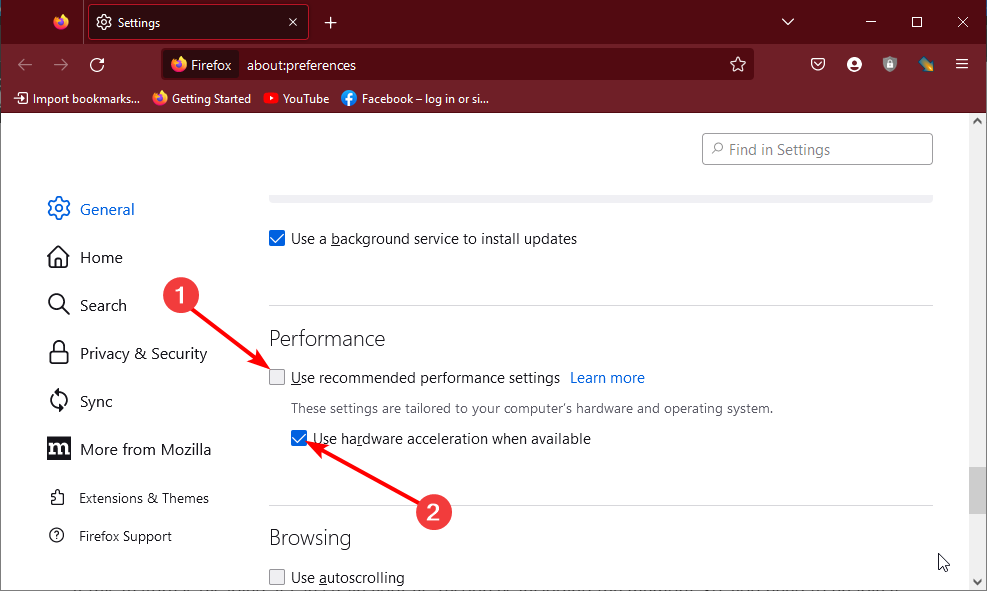
- Now, scroll down and uncheck the Use recommended preferences settings box under the Performance section.
- Finally, uncheck the Use hardware acceleration when available box.
According to users, sometimes the Twitch audio desync issue can occur due to problems with hardware acceleration in your browser. Hardware acceleration is helpful because it utilizes your GPU to render content and improve performance.
However, this feature can sometimes lead to audio delays and other issues on Twitch. Many users suggest disabling hardware acceleration in your browser to fix the problem.
4. Disable extensions and clear browser data
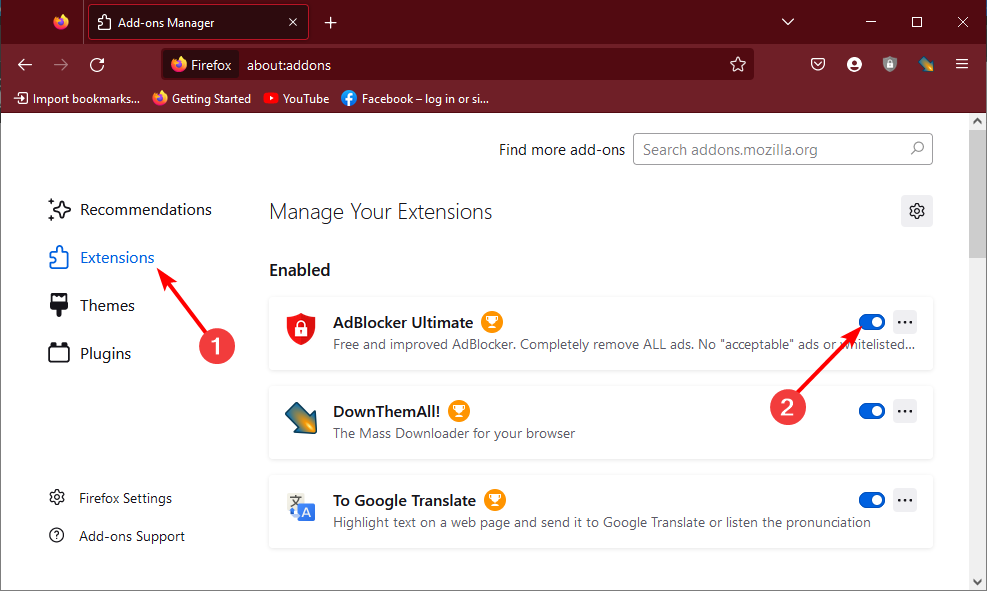
- Launch your browser and press the Ctrl + Shift + A keys.
- Select the Extensions option in the left pane.
- Now, toggle the switch before each extension backwards to disable it.
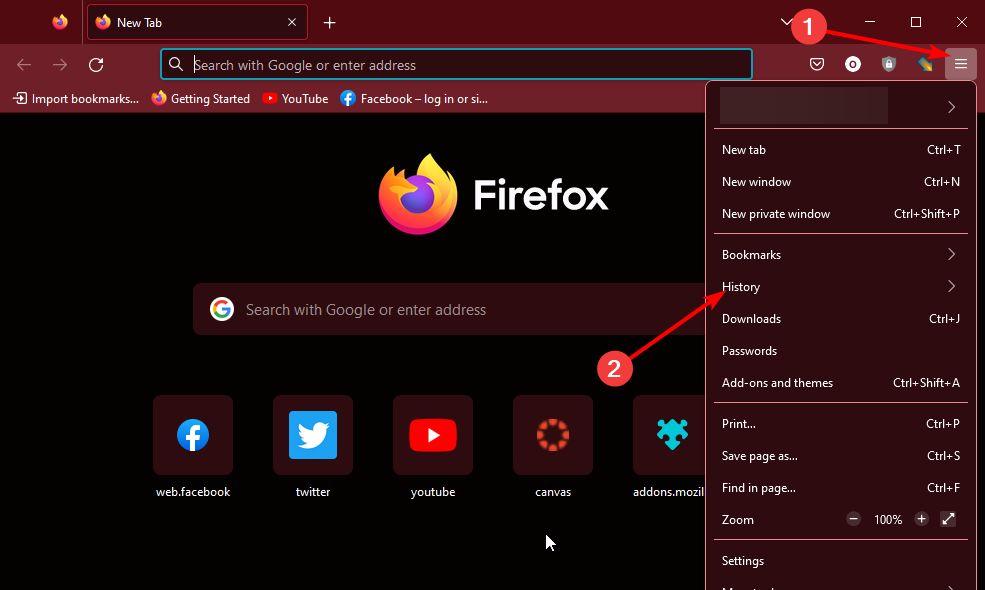
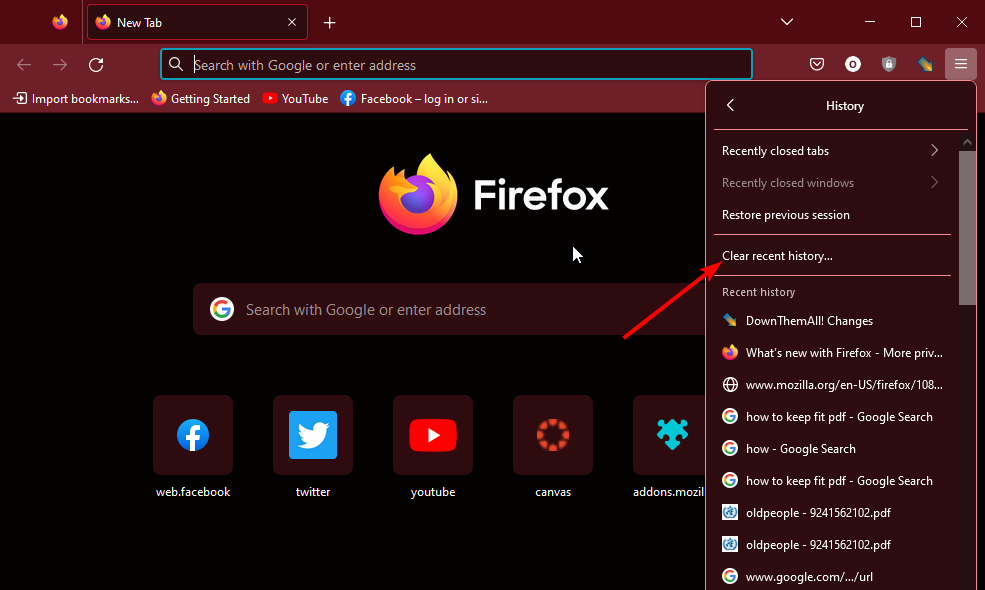
- From here, click the menu button in the top right corner and select the History option.
- Choose Clear recent history…
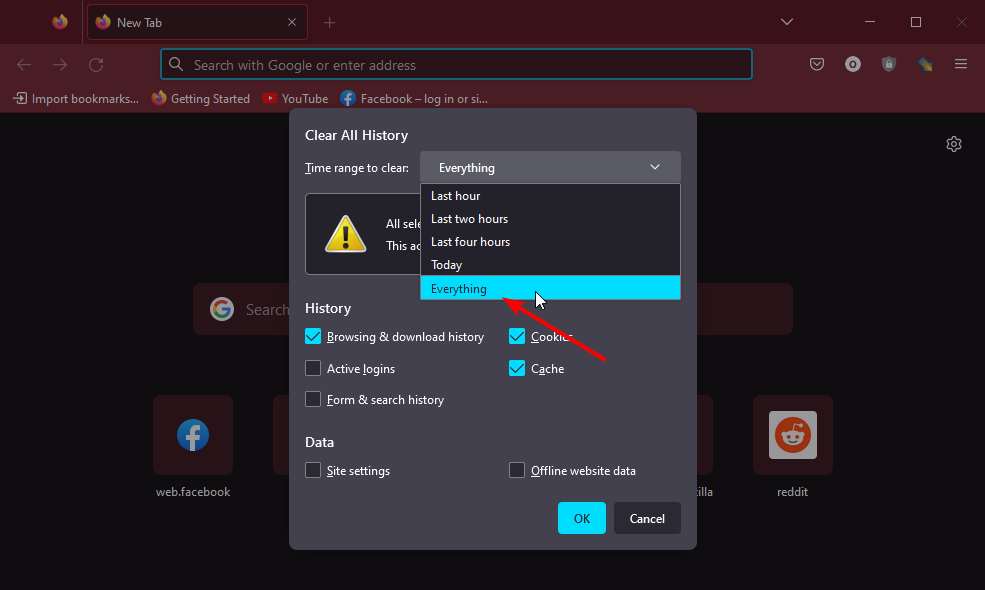
- Now, click the Time range to clear dropdown and select Everything.
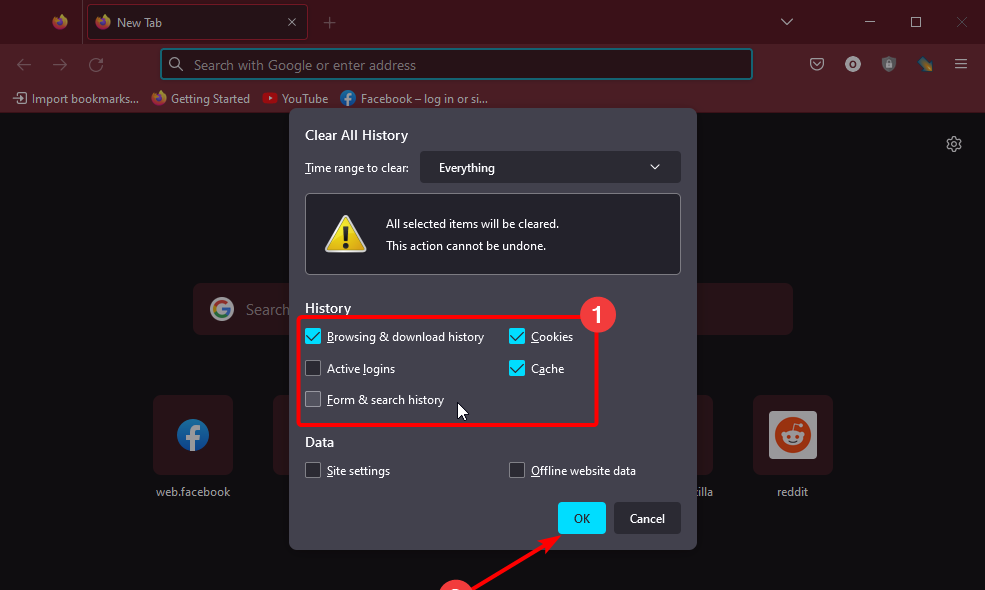
- Tick the boxes for Browsing & download history, Cache, and Cookies.
- Finally, click the OK button.
Extensions and browser data can cause any browser to misbehave. Hence, they can be the cause of the Twitch audio desync issue. The solution is to clear data and disable your extension.
If this fixes the issue, you start enabling your extensions one after the other to know the one causing the issue. Note that we have used Firefox here because most users are facing the issue on the browser. However, the solution can also be applied to any other browser with a few tweaks.
5. Disable Fast Boot
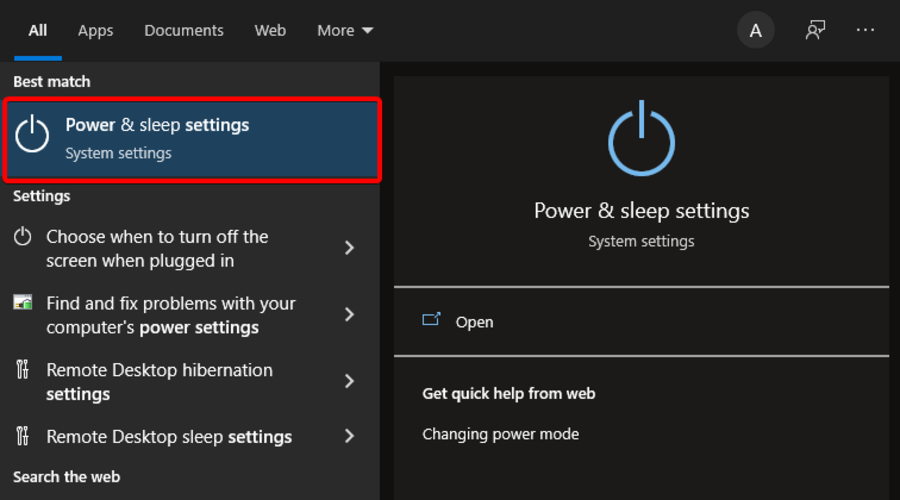
- Use the following keyboard shortcut to open the Windows search box: Windows + S.
- Type power settings in the search field, then choose Power & sleep settings from the results list.
- In the right pane, go to the Related settings section and click Additional power settings.
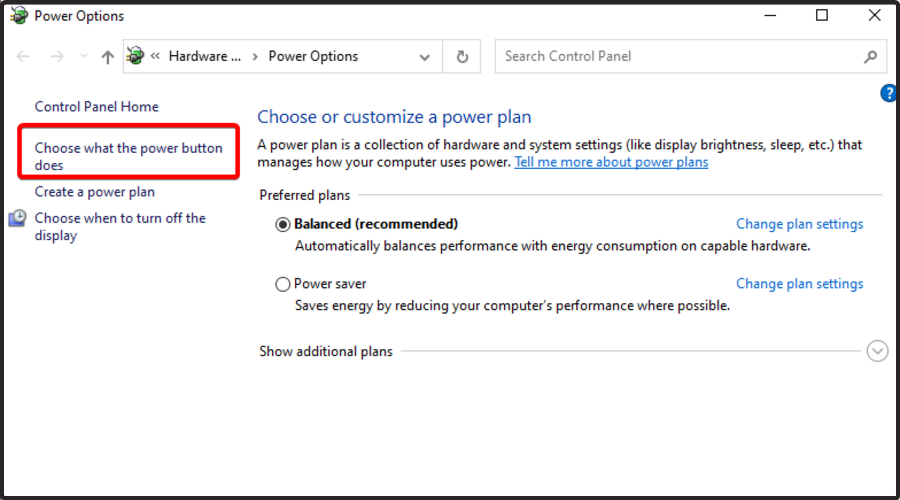
- Look at the left pane, and select Choose what the power button does.
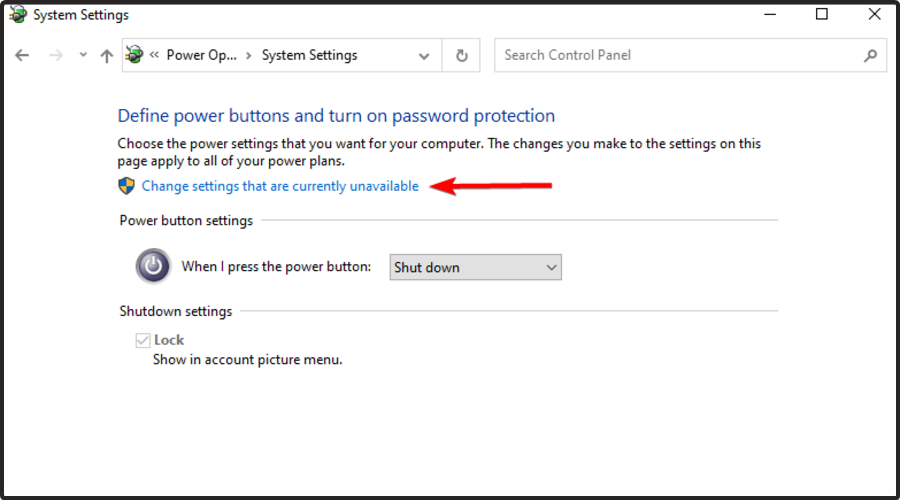
- Click on Change settings that are currently unavailable.
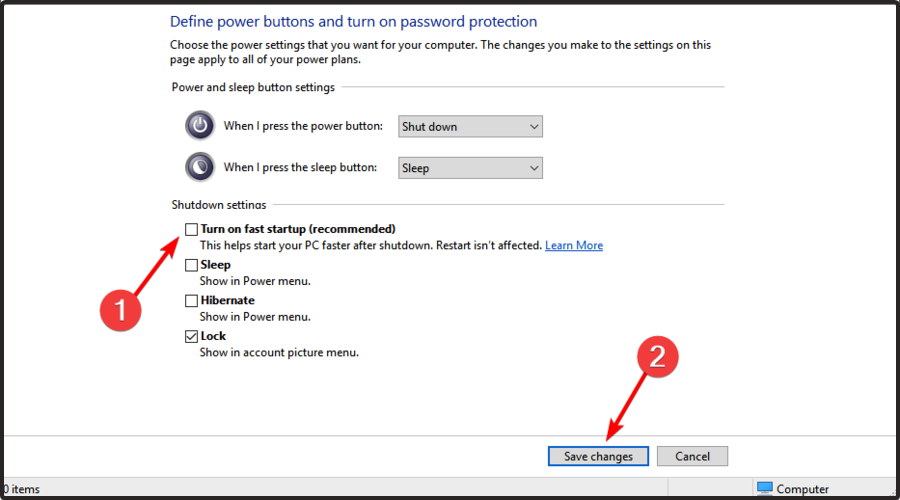
- Uncheck Turn on fast startup (recommended) option, then click on Save changes.
According to users, this Twitch audio desync issue can be caused by the Fast Boot feature on Windows. This is useful since it will allow your system to boot faster by putting it in a state similar to hibernation.
Although this feature is useful, some users claim that it’s causing audio issues on Twitch. To fix the problem, it’s advised to disable it altogether.
6. Uninstall third-party audio drivers
6.1 Use the Control Panel
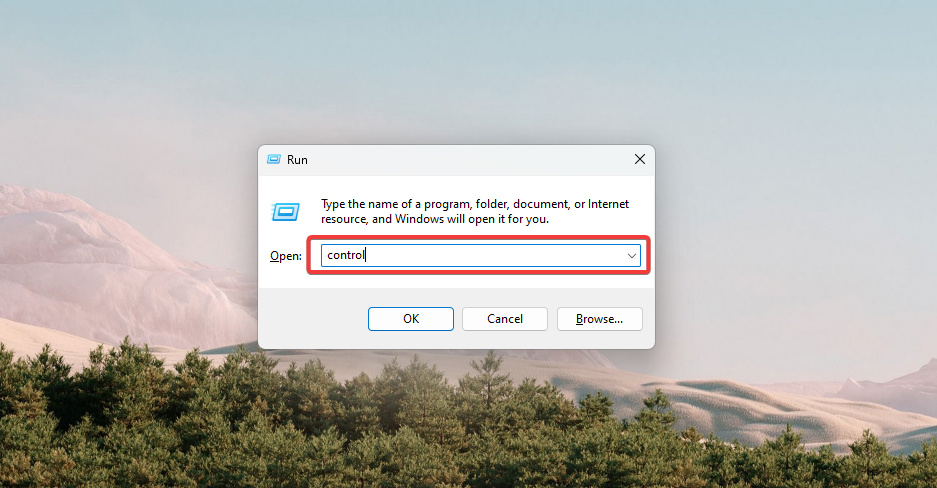
- Press Windows + R, type control, and press Enter to open the Control Panel.
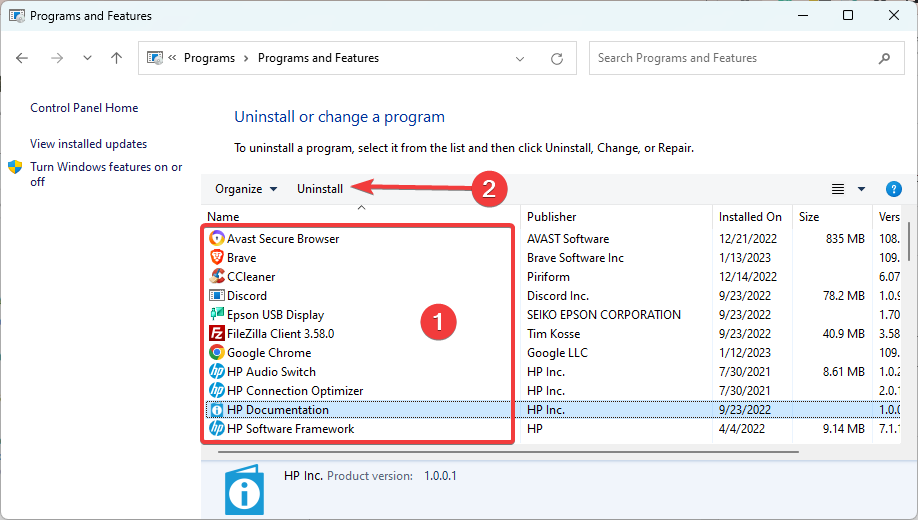
- Click on Programs and Features or Uninstall a program to see a list of all the installed programs on your computer.
- Locate the Realtek HD audio driver in the list and click on it, then click on the Uninstall button to begin the uninstall process.
- Follow the prompts to complete the uninstallation process, then restart your computer to complete the uninstallation process.
Note: If you cannot find the Realtek audio driver in the Programs and features, you can try uninstalling it from the device manager.
6.2 Use the Device Manager
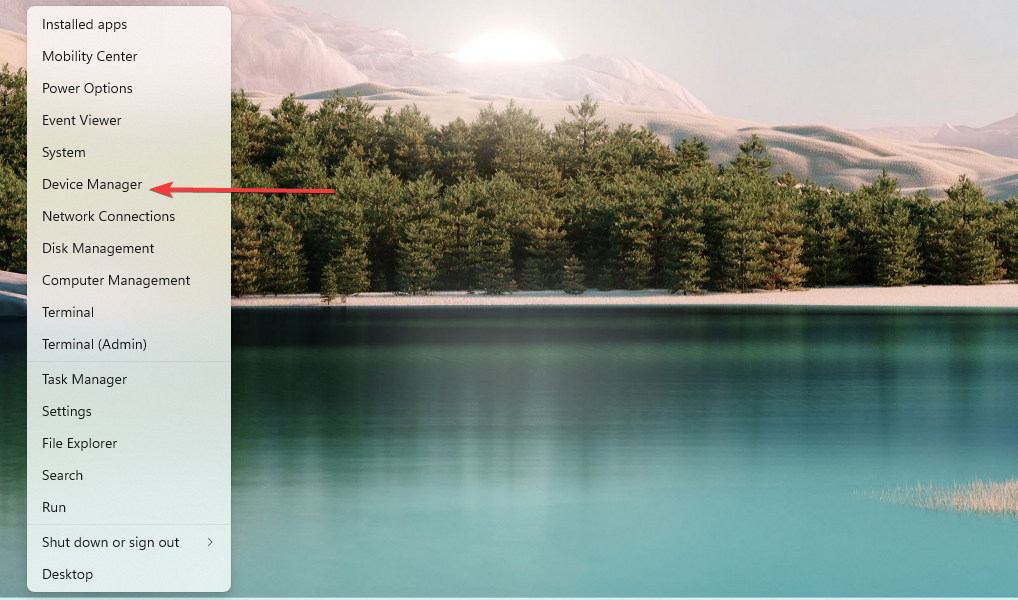
- Press the Windows + X keys, and click on Device Manager.
- Expand Sound, video, and game controllers.
- Locate the audio driver, right-click on it, and select Uninstall device.
- Confirm your choice when prompted, and restart your computer.
This solution may work if you are using Realtek audio drivers. We believe the Realtek drivers provided by ASUS for the Prime z370-a motherboard just have this bug unresolved. And uninstalling it will force your computer to use the native audio driver.
7. Disable the Use Device Timestamps option
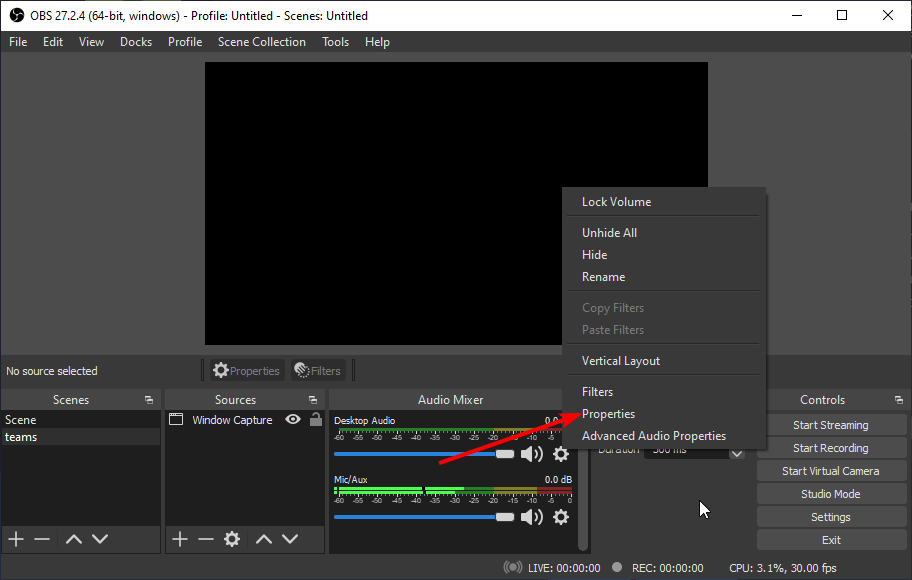
- Launch OBS and click the Gear icon under the audio you want to disable this feature for.
- Select the Properties option.
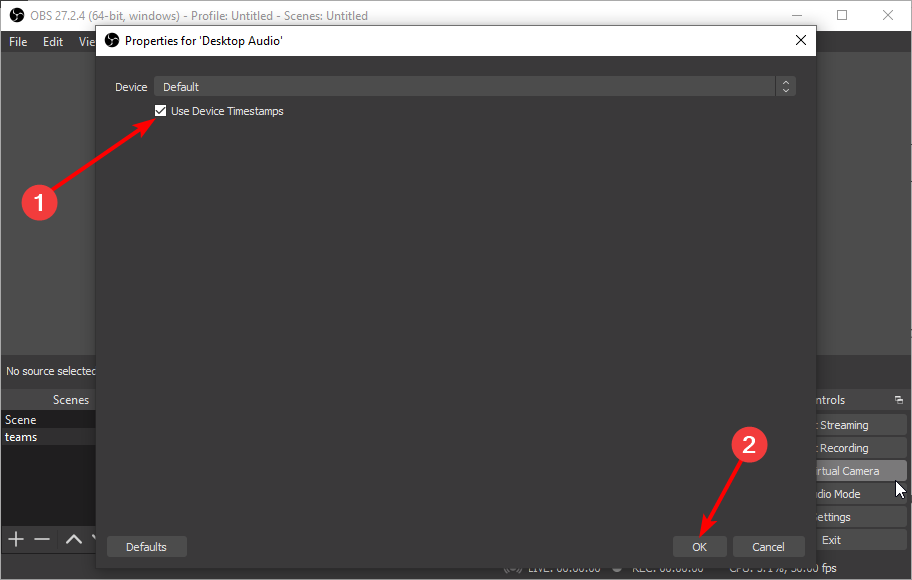
- Now, uncheck the box for the Use Device Timestamps option to disable it and click OK.
Some users reported Twitch audio desync while streaming and using OBS. To fix this problem, it’s advised to change a single setting in OBS.
After doing that, check if the problem is resolved. If this feature is already disabled, try enabling it and check if that solves your problem.
Audio delay issues in Twitch can negatively impact your viewing experience, but try all our solutions if you have this problem. They should help you fix it for good.
Also, if you have no audio on some Twitch streams, check our detailed guide to fix it quickly.
Use the comment section below for additional questions or suggestions about the subject matter.




User forum
1 messages