Bluestacks is Crashing my PC: 7 Ways to Fix Blue Screen issues
You may need to boot into safe mode to isolate the error's trigger
Key notes
- Many users can enjoy playing Android games on PC using the BlueStacks emulator.
- However, you may encounter the Blue Screen of Death error and may be required to check the Hyper-V feature.
- We recommend performing a fresh install, but you should do this as a last option.
Android emulation is possible on Windows, but many users reported Blue Screen of Death errors while using the BlueStacks software.
This can be a big problem and cause stability issues with your PC, but in this article, we’ll show you how to fix this problem.
Why does Bluestacks keep crashing?
Users have noticed this error, and it is triggered by a few different elements, the most common being:
- Outdated or corrupted drivers – Curropt drivers are a huge factor and sometimes will even mean that the BlueStacks engine won’t start. We discuss how to fix this below.
- Errors in the Hyper-V feature – If the BlueStacks isn’t opening or constantly crashing, it’s possible that there’s an issue with the virtualization and everything is not configured correctly.
- Third-party applications – Third-party applications can cause this error to appear, which will require a detailed fix in some cases.
- Compatibility issues with antivirus – While antivirus software keeps you safe, it may not interact with some legitimate applications in some cases. You should use only the best antivirus software.
Blue Screen of Death errors can be pretty problematic, and sometimes these errors can appear in different variations while using BlueStacks, including:
- BlueStacks keeps crashing Windows 10 – Sometimes BlueStacks can keep crashing on your PC. This can occur due to the Hyper-V feature, so be sure to disable it.
- BlueStacks BSOD memory_management – Third-party applications can cause this error to appear. You will have to identify and eliminate the trigger applications.
- Blue screen after installing BlueStacks – Your antivirus can also cause problems with BlueStacks to appear.
- BlueStacks quit unexpectedly – This is very similar to the restarting error, and just like it is with other variations, you should try some of the solutions recommended below.
How can I fix Bluestacks crashes on PC?
Before you go into any of these solutions, you may decide to change emulators altogether. However, many users who have switched to get LD Player have had a positive experience.
- Use a professional solution
- Disable the Hyper-V feature
- Reinstall the BlueStacks software
- Reinstall your graphics card drivers
- Check your antivirus
- Use an alternative android emulator software
- Try running BlueStacks in Safe Mode
- Perform a Clean boot
1. Use a professional solution
The BlueStacks Blue Screen of Death error will prevent you from having an excellent gaming experience. However, after fixing this problem, you can enjoy playing the best Android games on your computer.
We recommend you use a professional solution that offers you many benefits. First, it safely repairs and secures your computer, bringing it into an optimized state.
2. Disable the Hyper-V feature
1. In the Search field, enter Windows Features. Select Turn Windows features on or off.
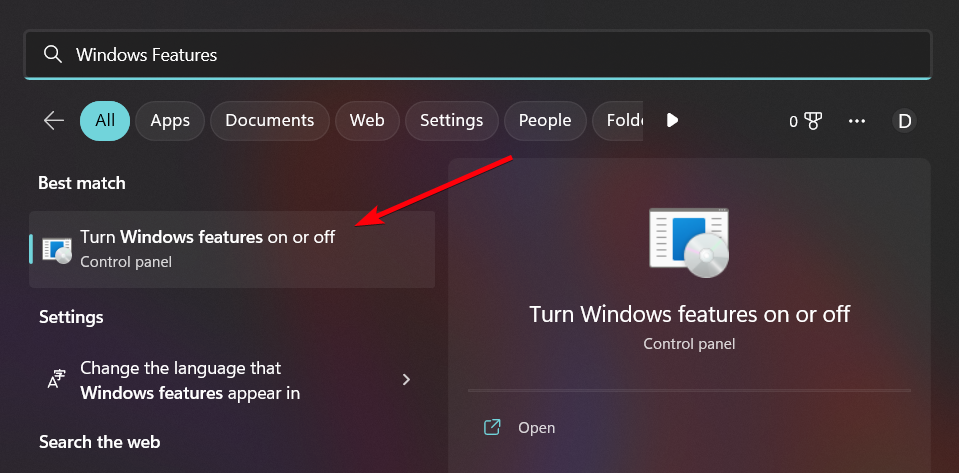
2. When the Windows Features window appears, locate Hyper-V and disable it. After doing that, click OK to save the changes.

3. Restart your PC to apply the changes.
A tested and reliable solution is to disable Hyper-V Windows feature on your device in order to repair Bluestacks crashing errors really fast.
3. Reinstall the BlueStacks software
A Blue Screen of Death can sometimes appear while using BlueStacks if the installation is damaged. To fix this problem, users are suggesting reinstalling the software entirely.
There are several ways to do that, but if you want to remove BlueStacks, you need to use third-party software.
This is an excellent uninstaller software, and it can remove any application from your PC and all its files and registry entries.
By using the uninstaller software, you’ll ensure that there will be no traces of Bluestacks on your computer, and you will be ready for a fresh install.
4. Reinstall your graphics card drivers
- Press Windows Key + X and choose Device Manager from the list.

- When Device Manager opens, expand Display adapters, right-click your graphics card and choose Uninstall device.

- If available, check to Remove driver software for this device option and click on Uninstall.

- Restart your PC to apply the changes, then run Bluestacks and verify if it is still crashing your PC.
If you find this process tedious, you can always use third-party tools to update all your drivers automatically.
Try out a highly-efficient software such as Outbyte Driver Updater that updates all your drivers, including the ones for your graphics card. It’s simple, fast and secure technology allows it to improve the performance of your graphic card.
5. Disable or uninstall your antivirus
- Click on the hidden access arrow in the Taskbar.

- Click on your antivirus icon, hover over Avast shields Control and select Disable for 10 minutes (This step varies for different antivirus software).

- Run Bluestacks and verify if it is still crashing your PC.
If you’re getting Blue Screen of Death on your PC while using BlueStacks, the problem might be related to your antivirus software.
If the problem is still there, you must uninstall your antivirus and try rerunning BlueStacks.
6. Try running BlueStacks in Safe Mode
- Open the Settings app using the Windows Key + I shortcut.
- Navigate to the Update & Security section.

- Select Recovery from the left pane. Click the Restart now button in the right pane.

- Choose Troubleshoot > Advanced options > Startup Settings. Click the Restart button.
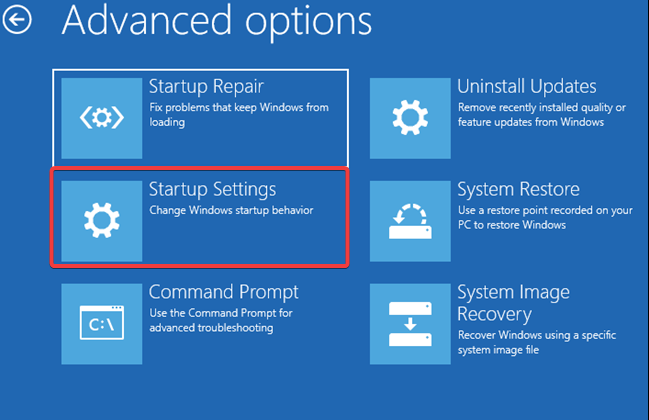
- You should now see a list of options. Select the Safe Mode with Networking by pressing the corresponding keyboard key.

- Run Bluestacks and verify if it is still crashing your PC.
7. Perform a Clean boot
- Press Windows Key + R to open the Run dialog.
- Type msconfig, and click OK.

- Navigate to the Services tab and check to Hide all Microsoft services checkbox, then click the Disable all button to disable the services.

- Head over to the Startup tab and click Open Task Manager.
- Right-click the first entry on the list and select Disable from the menu. Do this for all entries on the list.

- Go back to the System Configuration window.
- Click Apply and OK to save changes and restart your PC.
Once your PC restarts, check if the problem is still there. If the Blue Screen of Death doesn’t appear anymore, one of your startup applications or services was certainly causing the issue.
To pinpoint the cause, you must enable the disabled applications and services.
Once you find the problematic application, remove it, or keep it disabled to prevent this issue from reappearing.
You should note that there are a few variants to this error, including, BlueStacks crashing on Windows 11 and BlueStacks 5 crashing on Windows 11. But these solutions should work for any of these.
We hope that our solutions helped you solve this problem and if you have any suggestions, please let us know in the Comments section below.
Read our disclosure page to find out how can you help Windows Report sustain the editorial team. Read more


Improve this guide


User forum
1 messages