FIX: DNS server issues after Windows 10/11 update
3 min. read
Updated on
Read our disclosure page to find out how can you help Windows Report sustain the editorial team Read more

There have been reported quite a lot of DNS server issues with the Windows 10, 8.1 updates, as the DNS server is not responding. The problem has been also reported by some Windows 8 users. Below are some more details.
These days, a lot of issues are plaguing Windows 10, 8 and Windows 8.1 users. One of them is represented by DNS server problems reported by a good number of affected Microsoft customers. Here’s what one of them is saying:
I updated this morning and cannot connect wirelessly to the Internet any more. My VPN connects fine, no issues. Error message says the problem is my DNS. I have some tech from India trying to solve this but no luck. He is trying network drivers now. Has anyone else run into this. I am extremely frustrated and will hesitate to ever do an update until all the kinks are worked out. Anyone else have this and how did you solve it?
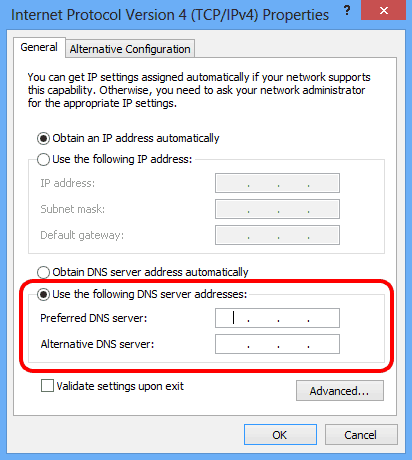
If you need to change the DNS settings in Windows 10, 8, then you need to know how to properly do it. Also, if you want to use the Google DNS settings, find the full instructions here.
How to fix DNS server after Windows update
1. Update your drivers and router firmware
Of course, it goes without saying that you need to update all of your drivers, especially the motherboard drivers, to be sure they aren’t the culprits. Also, since it involves your connectivity, do check your router firmware, as well.
2. Run the Network Troubleshooter
Try going to Control Panel > Network and Sharing Center > Troubleshoot Problems and see whether this workaround helps you fix the problem.
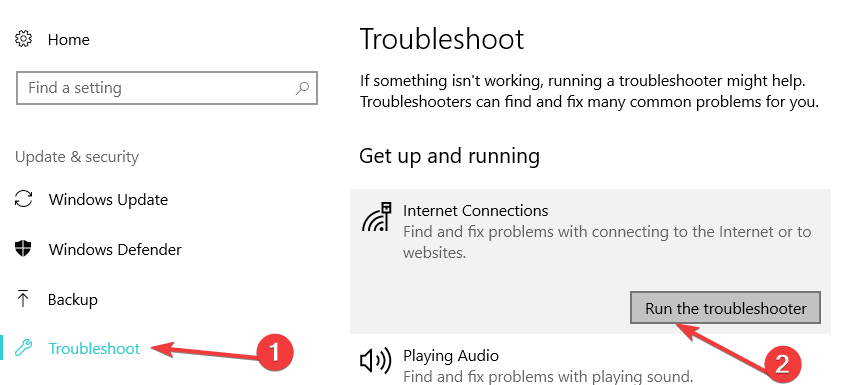
If you’re running Windows 10, then go to Start > type ‘troubleshoot’ in the search box and double click on the first result to launch the Troubleshooting page. Now, select Internet Connections and run the troubleshooter.
3. Scan your system for malware infections
There is a chance that you could have a DNS changing malware, so try running a full scan. If you haven’t installed a full fledged antivirus software on your machine, check out this list of the best antivirus solutions that you can use on Windows 10. You can also install a dedicated anti-malware program that’s compatible with your antivirus of choice.
4. Disable IPv6
Thanks to a reader of ours, we managed to find another fix, so here are the steps that you need to take:
- Go to Network and Sharing Center
- Click on Change Adapter settings
- Right click on your WIFI adapter and click Properties
- Uncheck the IPv6 option and click OK
5. Clear your DNS cache
- Launch Command Prompt as administrator > enter the following commands and hit Enter after each one:
- ipconfig /flushdns
- ipconfig /registerdns
- ipconfig /release
- ipconfig /renew
- Test your internet connection. If the error persists, try restarting your modem/ router.
If your Internet connection is still unavailable, check out these troubleshooting guides for additional solutions:

