FIX: Set as Desktop Background not working in Windows 10/11
5 min. read
Updated on
Read our disclosure page to find out how can you help Windows Report sustain the editorial team. Read more

Setting your desktop background is an essential part of the Windows platform from its incidence back in the 90’s. However, apparently, there are issues concerning this simplest operation on Windows 10. Windows 10 offers a lot of improvements even in this area, but all that goes in vain if users are unable to set an image of their choosing as the desktop background.
In order to address this annoying error, we enlisted the most common solutions for the issue. In case you’re, after several attempts, unable to resolve set the background of your choice, make sure to check the list below.
How to resolve desktop background error in Windows 10
- Make sure the background file is supported and not corrupted
- Check Ease of Access
- Check the Group Policy
- Delete the corrupted files
- Make sure that the Power options comply
1: Make sure the background file is supported and not corrupted
First things first. There are various reasons why Windows won’t accept one of the most common operations there is. And we need to start with the elementary steps. We need to you to make sure that the image file at hand isn’t corrupted and that is, in fact, supported by the system itself.
We recommend sticking to standard image formats, JPG or PNG. In addition, make sure that the file is accessible and not corrupted. Corrupted or incomplete files, as same as the unsupported formats, can’t be applied as desktop background wallpapers. The image at hand should be easily accessible so we recommend creating a separate folder for all rad background wallpapers you want to use in Windows 10.
2: Check Ease of Access
Ease of Access is there to make the user experience as best as possible. And, with a few tweaks here and there, it really does. However, there’s also an option which, if enabled, prevents changing the desktop background. This feature’s main use is to relieve you of unneeded background switching while reading or focusing on the task.
This might work for some of us, but if you’re a background aficionado and want that wallpaper changed right away, we recommend disabling it right away.
Here’s how to do it in a few simple steps:
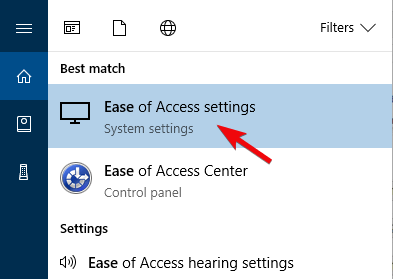
- In the Windows Search bar, type Ease and open Ease of Access settings.
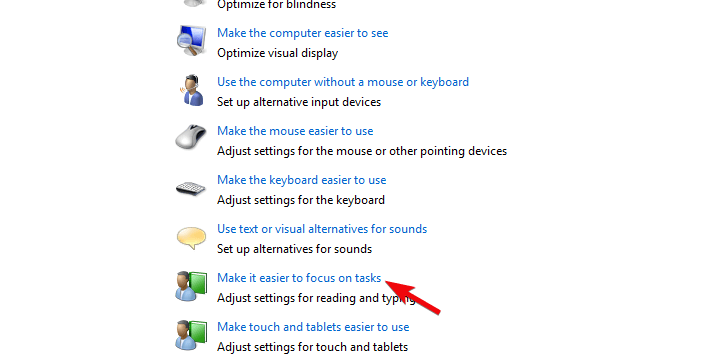
- Scroll down and click on the “Make it easier to focus on tasks” section.
- Confirm that the “Remove background images (where available)” box is unchecked.
- Confirm changes if needed and close the Ease of Access settings.
- Try setting the desktop background again.
3: Check the Group Policy
Finally, similar to the Ease of Access options, Group Policies can prevent the change of the current active wallpaper. This requires an administrative permission and it can be easily done. The option at hand is to be found under the User Configuration submenu, and once you know the path — the rest is rather simple.
Here’s how to make sure the Group Policy isn’t blocking desktop background:
- In the Windows Search bar, type Group and open “Edit group policy” from the list of results.
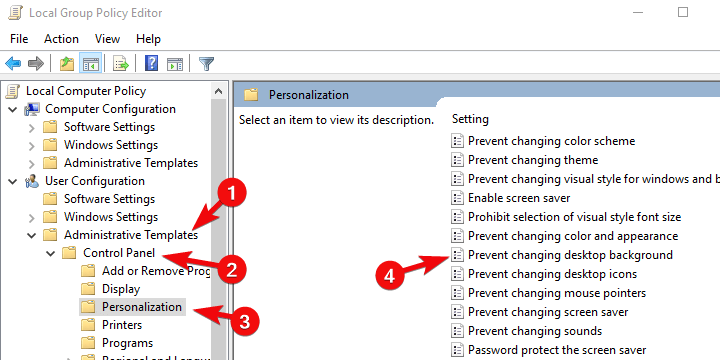
- Under User Configuration, expand Administrative Templates.
- Further, expand Control Panel and then click on Personalization.
- Finally, open Prevent changing desktop background in the right pane.
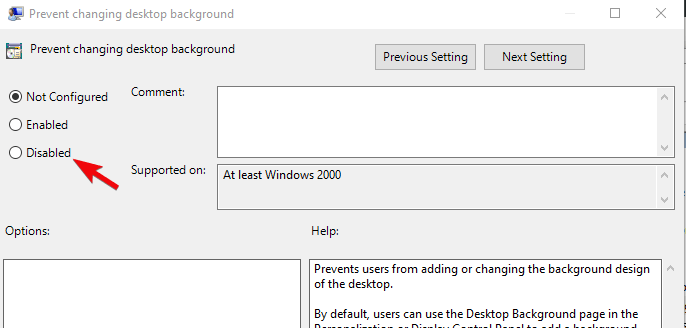
- Make sure this option is either Disabled or Not Configured.
4: Delete the corrupted files
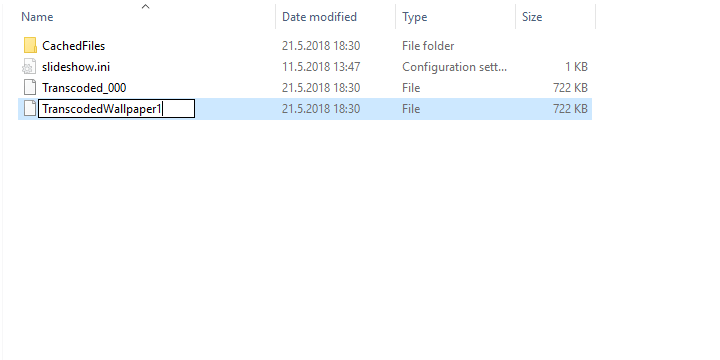
Another thing worth checking is the “TranscodedWallpaper” file which often gets corrupted. Also, it’s worth resetting the Slideshow configuration which resides in the same folder. Once you’ve done that, just restart your PC and try setting the desktop background again.
This is the fastest way to locate it and address the possible corruption:
-
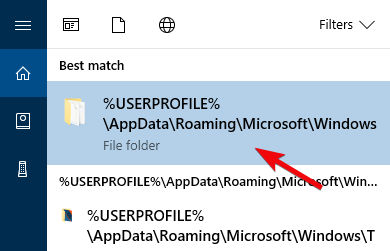
- Copy-paste the following input in Windows Search bar and press Enter:
- Right-click on the TranscodedWallpaper and rename it. Add .old at the end, so it should read like TranscodedWallpaper.old.
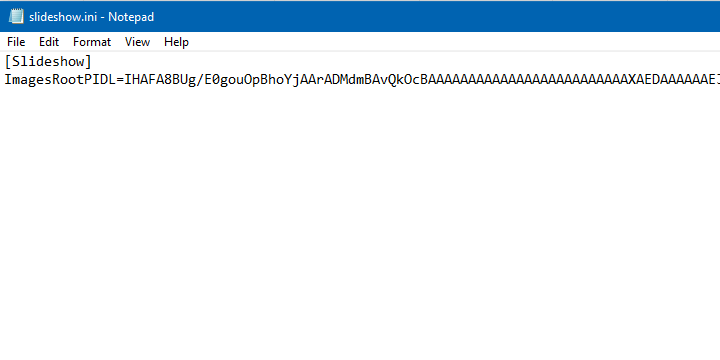
- Now, open the slideshow.ini with Notepad, delete everything inside the file and save changes.
- Restart your PC and look for resolution.
After that, you should be in the clear and every new single-image or slideshow configuration should work without any issues.
5: Make sure that the Power options comply
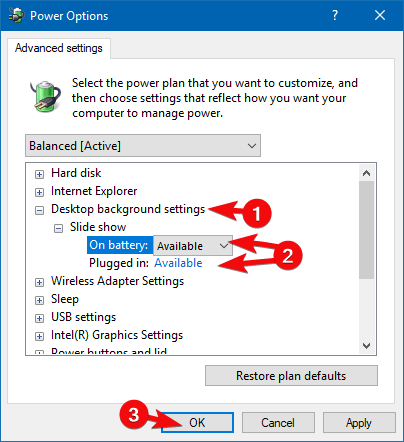
Finally, the one remaining thing you need to check concerns the Power Options configuration and the slideshow mode. One of the options will, by default, disable the background slideshow mode in order to preserve power while on a battery charge. We’re aware that sometimes every extended minute counts, but have in mind that this (of all others) background operation won’t consume too much of the battery power.
Here’s how to disable power saving in Advanced Power settings:
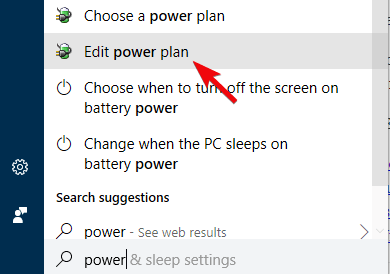
- Type Power in the Windows Search bar and open Edit power plan from the list of results.
- Click on the “Change advanced power settings” link.
- Expand Desktop background settings > Slideshow.
- Set “Available” for both power options and confirm changes.
That should do it. In case you have any questions or suggestions concerning the issue we tried to address today, feel free to share them with us. You can do so in the comments section below.
RELATED STORIES YOU SHOULD CHECK OUT:


User forum
0 messages