Nvapi64.dll: What Is It & How to Fix Its Errors
This DLL file is important to operations of your NVIDIA drivers

You might have been encountering issues related to nvapi64.dll, and you are wondering what the file does on your PC. Rest assured that this file is pretty safe and poses no threat to your PC.
In this guide, we have provided detailed information on this DLL file and what to do when you encounter issues with it.
What is nvapi64.dll?
The nvapi64.dll is a 64-bit file that is an essential module of the NVIDIA Windows drivers. This DLL file plays an important role in the smooth running of your graphics driver, which many apps depend on to work properly.
The good thing about this DLL file is that it is completely safe. However, it must be noted that viruses can make these files malfunction, leading to DLL files missing error messages. Usually, a full virus scan should fix this.
How can I fix nvapi64.dll errors?
1. Use a dedicated DLL fixer
Nvapi64.dll is one of the third-party DLL files that come with the needed software. The importance of this file cannot be downplayed, as many apps depend on it to run successfully.
Fortunately, you can fix this DLL file with one of the best DLL repair tools. Such software is known to fix compatibility issues which are the major problem that plagues third-party DLL files and Windows PCs.
2. Download from a third-party website
- Go to a top third-party website like DLL files.com and click the Download link.

- Now, extract the content of the downloaded file and move the nvapi64.dll file to the path below on a 32-bit PC:
C:\Windows\System32 - Move it to the path below instead on a 64-bit PC:
C:\Windows\SysWOW64 - Finally, restart your PC.
If you are facing issues related to the nvapi64.dll file on a PC you built, you need to download it from a third-party website. Moving it to your system files should help you fix this issue.
Note that you need to scan the downloaded file to ensure its safety.
3. Update your PC
- Press the Windows key + I and select the Windows Update option in the left pane.
- Click Check for updates in the right pane.

- Finally, download and install all available updates, including the optional ones.
Windows update is important for fixing many issues on your PC. So, if you are dealing with errors related to nvapi64.dll, you need to update your system and restart it after.
4. Update your graphics driver
- Press the Windows key + R, type devmgmt.msc, and click OK.
dev
- Click the arrow next to Display adapters to expand it and right-click the device under it.
- Now, choose the Update driver option.

- Click the Search automatically for drivers option and install any available updates.

- If updating the driver does not fix the issue, repeat Steps 1 to 3 and select Uninstall device instead.

- Finally, click the Uninstall button and restart your PC.

The activity of the nvapi64.dll file is related to your graphics driver. So, when your display driver is outdated or broken, you will likely get different errors. This is also the reason behind amfrt64.dll errors.
An alternate method of restoring your driver to top condition is to use an automatic driver updater in Outbyte Driver Updater. With this tool, you can take out the guessing, as it will scan and repair any faulty driver with just a few clicks.
5. Repair system files
- Press the Windows key, type cmd, and select Run as administrator under Command Prompt.

- Type the command below and hit Enter to run it:
DISM /online /cleanup-image /restorehealth
- Wait for the command to finish running. Now, run the command below:
sfc /scannow
- Finally, wait for the command to finish running and restart your PC.
Sometimes, you might face problems with nvapi64.dll because of faulty system files. The fastest way around this is to run the DISM and SFC scans.
6. Perform a system restore
- Press the Windows key, type restore, and select Create a restore point.

- Click the System restore button on the next page.
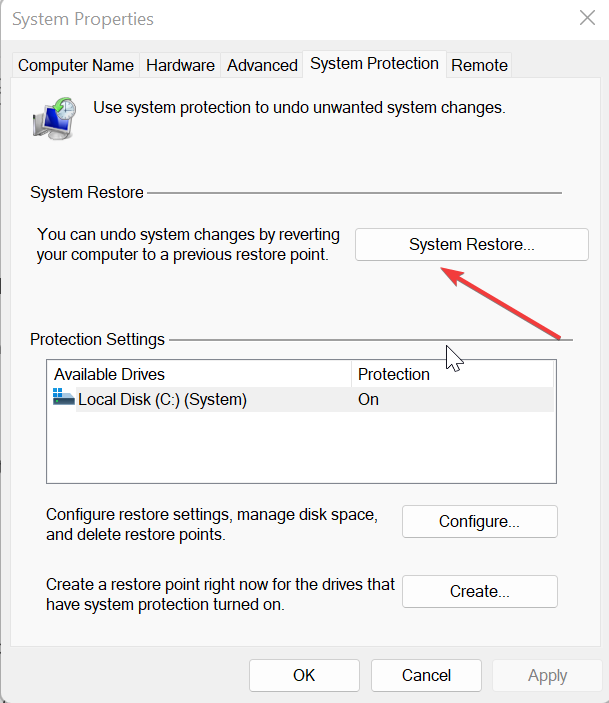
- Now, click the Next button on the page that pops up.

- Select your preferred restore point and click the Next button.

- Finally, click the Finish button and follow the onscreen instructions to complete the process.

Sometimes, it might be hard to trace the cause of the nvapi64.dll issue. What you need to do here is to perform a system restore to a point before the problem.
There you have it: everything you need to know about the nvapi64.dll file. You should now know the importance of the file and how to fix its occasional errors.
If you are missing some DLL files on Windows 10, check our detailed guide to get them back.
We also have a guide on what to do if cudart64_90.dll is missing, so don’t miss it. This isn’t the only issue, and we covered libgcc_s_dw2-1.dll was not found earlier, so check it out.
We also wrote about Gwrks64.dll in our latest article, so don’t hesitate to visit it for more information.
Do you have any experience to share about this file? Feel free to use the comments below.
Read our disclosure page to find out how can you help Windows Report sustain the editorial team. Read more


Improve this guide


User forum
0 messages