How to fix screen flickering after upgrading to Fall Creators Update

The long-awaited Windows 10 Fall Creators Update is finally here and we’ll see is it going to meet the expectations. Just like it’s predecessor, the Redstone 3 update brings out arguably mediocre improvements and a lot of issues.
One of the most sensitive problems we bump into is an unusual screen flicker. It emerged immediately after the upgrade so it’s safe to say that Fall Creators Update is the one to blame.
In order to address this, we compiled a list of possible solutions and curated them for you. If your screen flickers or behaves unusually in any other manner, consider following the steps below.
How to fix screen flickering in Windows 10 Fall Creators Update
- Check GPU drivers
- Uninstall the third-party antivirus
- Change display refresh rate
- Update BIOS
- Reset this PC
1. Check GPU drivers
When it comes to screen-related issues, you should first point your finger at GPU drivers. Most of the time, the main culprit for flickering, stutters, resolution drops, sudden black screens, and other not-so-welcomed distresses are faulty or unsuitable drivers. And, it seems that it’s a trend for every new Windows version to cause some kind of incompatibility-provoked issue in regards to drivers.
So, your further actions are simple: check drivers > uninstall the generic driver > install the official driver > tap yourself on the shoulder and enjoy in Fall Creators Update without the screen flickering. If this looks like something too much to handle on your own, make sure to follow the instructions below:
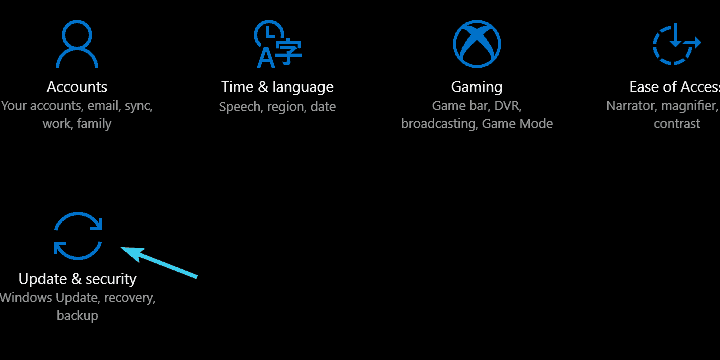
- Press Windows key + I to bring out the Settings app.
- Click on the Update & security section.
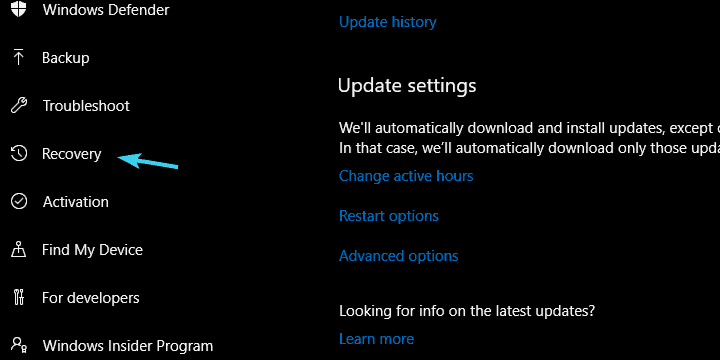
- Choose Recovery from the left pane.
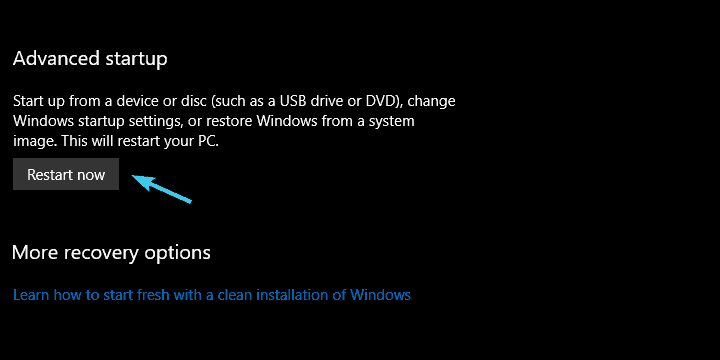
- Click on the ”Restart Now” button.
- Choose Troubleshoot from the Windows Recovery Environment.
- Click Advanced options.
- Select Startup settings and then Restart.
- Press 5 to let your PC boot in Safe Mode with Networking.
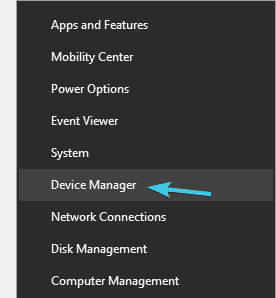
- Now, right-click on the Start button and open Device Manager.
- Navigate to Display adapters.
- Right-click on your GPU device and uninstall it.

- Restart your PC.
If that wasn’t enough and you’re still experiencing issues, make sure to navigate to one of these websites, depending on your GPU model, and download official driver provided by the manufacturer.
Keep in mind that all drivers must be updated for your PC to work properly. In order to prevent PC damage by installing the wrong driver versions, we suggest updating drivers automatically by using a specialized driver updater tool.
This type of tool will automate the entire process on your behalf and will search, update and download the appropriate driver version for your device avoiding permanent damage on PC.
- Download and install the Outbyte Driver Updater app.
- Launch the software and wait for the app to detect all incompatible drivers.
- Now, it will show you a list of all faulty drivers to select the ones to Update or Ignore.

- Click on Update & Apply Selected to download and install the newest versions.
- Restart your PC to ensure the applied changes.

OutByte
Keep your GPU in a flawless state without worrying about possible driver issues.2. Uninstall the third-party antivirus
This is a long shot solution but even the stranger things have happened in Windows 10 so it’s worth giving it a try. The feud between Windows 10 and third-party antivirus solutions is well-known.
It can cause a lot of issues, especially with the introduction of usable, non-marginalized Windows Defender. The possible conflict might affect the overall performance and cause various issues.
Because of that, we advise you to uninstall antivirus and look for changes. If you’re still stuck with the irritating screen flickering, you can always install antivirus of choice again. Follow the instructions below to get rid of the antivirus temporarily:
- In the Windows Search bar, type Control and open Control Panel.

- Choose Category view.
- Select Uninstall a program.
- Locate your antivirus on the list, right-click on it and select Uninstall.
- After the antivirus is gone, restart your PC and look for changes.
Additionally, some antivirus solutions are more resistant to uninstalling, so you might need to boot into Safe Mode and remove them that way.
3. Double-check display’s refresh rate
Now, we’re still roaming in ”not likely” grounds, but the refresh rate, as same as other system settings, can get disrupted by the latest Windows update.
With issues like this everything is possible, so it’s welcomed to confirm that the refresh rate is set at 60Hz. It won’t take too much of your time and it even might help.
Here’s a step-by-step explanation:
- Right-click on the desktop and open Display Settings from the contextual menu.

- Navigate to the bottom and open Display adapter properties.
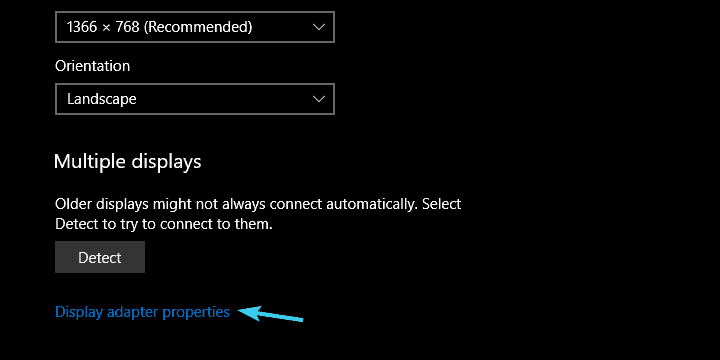
- Under the Monitor tab, confirm that the Screen refresh rate is set at 60Hz.
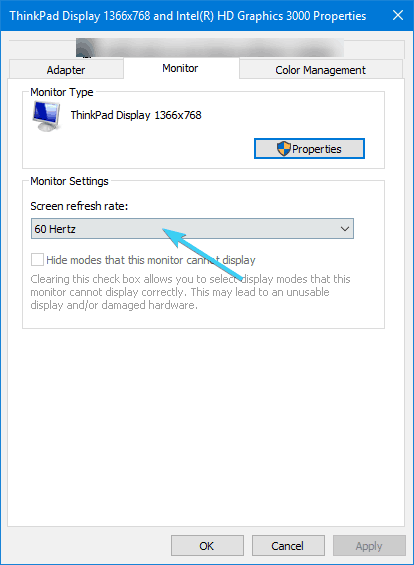
- Confirm changes.
4. Update BIOS
Switching back and forth from Windows 10 to its predecessors is usually a simple and clean operation. However, occasionally BIOS can pose as the stumbling block and create a lot of issues.
In this case, if you upgraded from Windows 7 or 8 to Windows 10 and you’re running an older motherboard, the old UEFI/BIOS firmware might not suffice.
Consequently, the not fully functional firmware that’s incompatible with Windows 10 can further affect GPU and that creates a line of problems that are hard to cope with.
So, what you’ll need to do is to update your BIOS and, hopefully, resolve all screen issues that way. However, updating BIOS isn’t exactly simple or rather, it can have fatal consequences.
Therefore, we advise you to look up for your motherboard and inform in detail about available BIOS versions and the update procedure. We have a great article about BIOS updating (flashing), so make sure to check it out here.
5. Reset this PC
Finally, if none of the previously enlisted solutions worked for you, don’t worry, we won’t yield yet. There’s turning to restore options as the last resort. Or the ”Reset this PC” option that’s the most thorough when it comes to problem resolving. It’s somewhat analog to the clean reinstall procedure, but the main difference lies in the fact that it lets you keep your apps and files.
If you’re not certain about the recovery options, make sure to follow these instructions closely:
- Use Windows key + I to open Settings.
- Choose Update & security.
- Select Recovery from the left-side pane.
- Under the ‘Reset this PC‘ option, click Get started.
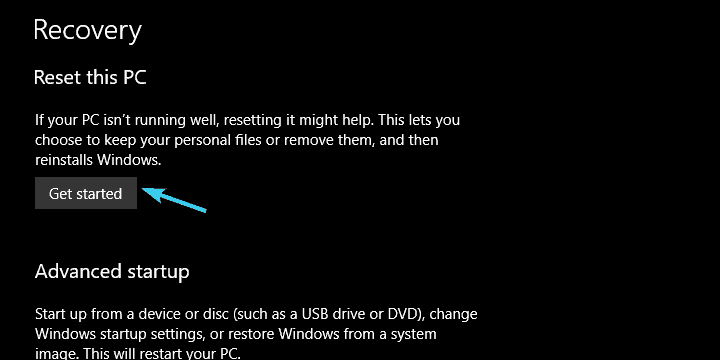
- Choose whether you want to keep your files or delete everything.
- Click Next and then Reset.
- The procedure is a bit long but it will eventually restore your PC to factory values.
This is probably the best-suited solution for users that upgraded to Windows 10 rather than performing a clean reinstall. Just in case you can’t launch the reset process, check out this troubleshooting guide to fix the issue.
That should do it. If you have questions, suggestions or possibly an alternative solution or two, please do share them with us in the comments section below.
RELATED ARTICLES YOU SHOULD CHECK OUT:
Read our disclosure page to find out how can you help Windows Report sustain the editorial team. Read more


Improve this guide


User forum
1 messages