How to Use RSAT: Complete Step-by-Step Guide
Use RSAT for remote management of other Windows computers
IT administrators know the importance of RSAT, or Remote Server Administration Tools, as it’s a valuable service employed to remotely manage roles and features in Windows Server from a client machine. And they must know how to use RSAT.
Still, for everyone else, we’ll start with an introduction to what RSAT can do. Then, we’ll walk you through the entire process of enabling the service and using it effectively. Ready? Let’s get right into it!
What is RSAT?
Remote Server Administration Tools (RSAT) is a powerful collection of Windows Server management tools that allow administrators to remotely manage and control Windows servers from a client computer.
In other words, you can use it for remote management of other Windows PCs.
Keep in mind that the RSAT feature is only available for the Pro and Enterprise versions of the Windows operating system. So, if you’re using the Home edition and want to make use of the collection of tools, you’ll first need to upgrade to either Windows Pro or Windows Enterprise.
Here’s what you can do with RSAT:
- Add and remove roles, role services, and features on remote devices
- Customize different security settings
- Manage event logs
- Install security updates
How does RSAT work?
As we established, RSAT is a collection of tools developed by Microsoft. It includes two types of packages: one for roles and one for features. The former entails access management to your server. This includes services such as the Active Directory services, Certification Authority snap-in, Dynamic Host Configuration Protocol (DHCP) servers, NIS Server tools, etc.
The latter allows you to control other features on the server, e.g., Group Policy Management Tools, Network Load Balancing Tools, Storage Manager Windows System Resource Manager Tools, etc.
Here are its primary features at a glance:
- Active Directory: RSAT includes tools for managing and administering the AD services.
- Group Policy Management: Administrators can create, edit, and manage group policies across the network thanks to tools such as Group Policy Management Console and Group Policy Management Editor.
- Hyper-V management: This includes the Virtual Machine Connection tool, which allows remote access, as well as the Hyper-V manager snap-in. The Hyper-V feature is also available as a Windows 11 standalone.
- Best Practices: RSAT provides PowerShell cmdlets and modules for automating administrative tasks
This was just an overview of the RSAT tools. You can view the complete list on Microsoft’s dedicated page.
How do I run RSAT on Windows 11?
1. Enable RSAT
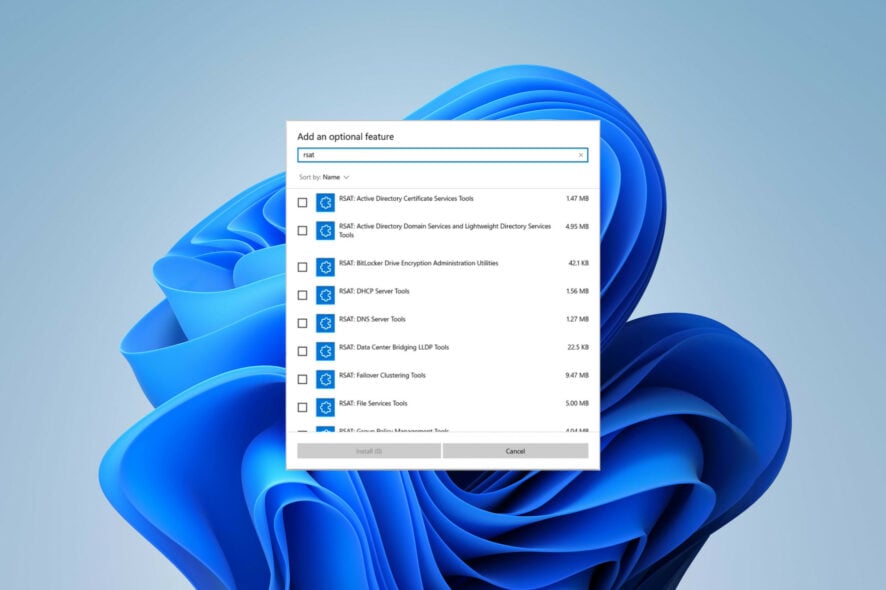
- Press Windows + I key to open Settings. Click on Apps from the left-hand side.

- Choose Optional features on the right.

- Click on the blue View features button next to the Add an optional feature option.

- Type rsat in the search box. Select all the tools you want to enable (preferably, that’d be all the tools from the list) and click Install to proceed.

- Wait for the installation process to finish and restart your PC.
As you can see, installing RSAT on Windows 11 is simple – all you need to do is enable it as an additional feature. That’s the easiest way to enable the tool on your PC.
Though, sometimes, RSAT isn’t available as an optional feature. That generally happens if your OS is outdated, your Windows edition isn’t compatible with the administrative tool, or the service isn’t available in your geographic region.
If that’s the case, or if you encounter any difficulties installing RSAT, you might want to look for other options, e.g., using Windows PowerShell or modifying the Registry to get it on your PC.
Keep in mind that you can’t download the RSAT installer on your Windows 11. The RSAT download version is only available for Windows 10 devices.
2. Connect to a remote server
- Open the RSAT tool you want to use by typing it in the Start menu or using the Run dialog.
- Say you want to launch Active Directory Users and Computers. Press Windows + R key and type the following command and hit Enter:
dsa.msc
- Go to File and select Connect. Enter the server’s name.
- Choose the appropriate auth method and provide your credential to connect. Click OK.
Now that you’ve installed RSAT and its necessary tools are enabled, you need to perform one last thing before you can run it on your PC. The second step is to establish a connection to a remote server.
 Tip
Tip
3. Employ RSAT tools
3.1. Active Directory Tools
Create and manage user accounts, groups, organizational units, or objects. You can also reset passwords, manage group policies, monitor directories, etc. Active Directory tools make life easier by combining all those tools into one interface while increasing security simultaneously.

Admin privileges and rights, user configuration, PC control, and domain resources are centralized into one repository. If you’ve already enabled RSAT, as per the tutorial above, you should also have the AD tool active on your computer.
You can check that by opening your Start menu and looking for the Administrative Tools folder (this will contain the Active Directory Users and Computers information).
This is one of the most important and used features, so if your Active Directory Users and Computers tool is missing, you must learn how to fix it quickly.
3.2. Dynamic Host Configuration Protocol
Dynamic Host Configuration Protocol (DHCP) is a tool with the primary purpose of automatically assigning dynamic IP addresses to your device. You can also use it to configure other aspects of network information, e.g., DNS server data, subnet masks, and default getaways.

Dynamic IP addresses are more flexible, comprehensive, and easier to manage. With RSAT, you can manage DHCP servers, configure IP settings, and troubleshoot DHCP issues.
The RSAT DHCP service can be enabled through the Optional features method listed above. However, you can also learn how to connect your PC to a DHCP server and what to do if you encounter any difficulties along the way.
3.3. Domain Name System
The Domain Name System (DNS) server is crucial to internet access, as it’s used to communicate with origin servers and access website information. RSAT helps you manage DNS servers and resources. You can delete records, configure conditions, and resolve related issues.

The RSAT feature can be enabled through the Optional features method. However, there are several issues you may face when trying to use to service itself. For example, you may find that your DNS server isn’t available on Windows 11, or the DNS server might not be responding at all.
This will prevent you from accessing the web and hinder any admin attempts to manage servers and resources. Keep in mind that the ability to diagnose & fix the most common DNS issues is of utmost importance to your IT admin efforts.
3.4. Hyper-V
Hyper-V is a Windows-native virtualization product. With it, you can run a software version of a computer (virtual machine). Virtual machines act like ordinary PCs, running an OS and using specific programs.

However, they do this in an isolated space, meaning your physical computer is protected from any software issues you might encounter while on your VM.
Thanks to RSAT, you can easily manage virtual machines, monitor their performance, and control their storage, network, and capabilities.
3.5. Remote Desktop
The Remote Desktop service allows you to manage user sessions, monitor performances, troubleshoot network issues, configure sessions, etc. In other words, you can control another computer or device from a distant location.

Learn all the different ways to enable & use the remote desktop service on your Windows 11 PC. Once you’ve allowed it on your computer, you can use the RSAT feature by enabling it through the Optional features method.
Once you enabled RSAT and connected to a server, you can start using the collection of tools now available. These were just some examples of its most popular features and what you can do with them.
So, that’s how to use RSAT on your Windows PC. We hope this information proved itself valuable to your IT admin efforts.
Before you go, you might want to check out what to do if RSAT frequently crashes or all the additional ways to enable RSAT on Windows.
Keep in mind that RSAT isn’t available on all platforms, and if you can’t use RSAT on Windows 11 ARM at the moment.
Do you have any questions or suggestions, need further assistance, or want to share what proved most useful to you? Reach out to us in the comment section below, and we’ll get back to you.
Read our disclosure page to find out how can you help Windows Report sustain the editorial team. Read more


Improve this guide


User forum
0 messages