2 ways to specify deadlines for automatic updates and restarts
Ever since Microsoft has lined up a series of new features for the Windows 10 April 2019 Update also known as Windows 10 version 1903 or simply 19H1, one of the most awaited features was a 35-day window that will allow Windows 10 Home SKU users to automatically pause Windows 10 updates.
Apart from the Home SKU users, those who have the Pro and Enterprise SKUs will now get a new policy named Specify deadlines for automatic updates and restarts for better update management.
This upcoming policy will be very useful to IT administrators. They can use this option to set a deadline for the installation of updates and PC reboots.
Specify deadline before auto-restart for update installation
If you are interested in the feature, there are two ways that you can use to enable it.
1. Open the run dialogue box by pressing Win+R key and type gpedit.msc.
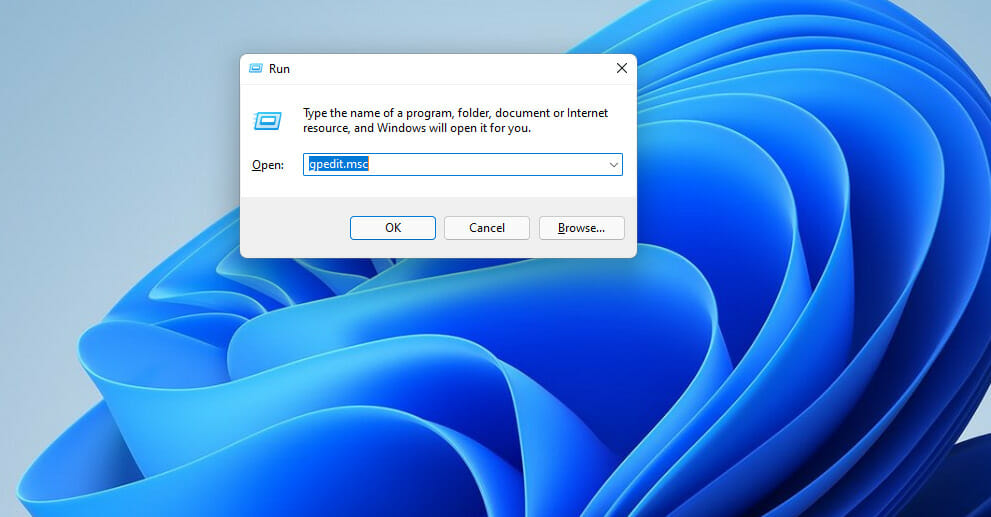
2. Hit the Enter key to open Group Policy Editor.
3. Navigate to Computer Configuration >> Administrative Templates >> Windows Components >> Windows Update.
4. You will see a policy option Specify deadlines for automatic updates and restarts on the right-hand side double click on it.
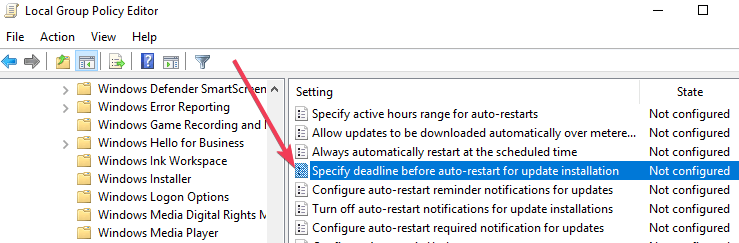
5. Turn on the policy by selecting Enabled.
6. Now set the number of days a user has before quality updates run automatically, from the Quality updates drop-down list by choosing the option 2 to 30 days.
7. Set the number of days a user has before feature updates run automatically, from the Feature updates drop-down list by choosing the option 2 to 30 days.
8. Change the Grace period drop-down list to 0 to 7 days.
9. Finally, if you want you can also enable Don’t auto-restart until end of the grace period.
Specify deadlines for automatic updates and restarts with GPEdit
The first method to specify a deadline for an automatic restart is to use the PC’s built-in Group Policy Editor. Through it, you can configure in how many days the PC will auto-restart.
Solution 2: Using a Registry Tweak
Moreover, there is also an option to use a Registry tweak to set a 7-day deadline for both Feature and Quality updates. Furthermore, a 2 day Grace period can also be set through another Registry tweak.
- Open Registry Editor by typing regedit in the run dialogue box.
- Look for the following Registry key:Computer\HKEY_LOCAL_MACHINE\
SOFTWARE\Policies\Microsoft\Windows\WindowsUpdate - Next set the 32-bit DWORD value SetComplianceDeadline to 1 to enable the feature. You have to use a 32-bit DWORD as the value type even you have a 64-bit Windows.
- Set the 32-bit DWORD value ConfigureDeadlineForQualityUpdates from 2 to 30.
- Set the 32-bit DWORD value ConfigureDeadlineForFeatureUpdates from 2 to 30.
- Set the 32-bit DWORD value ConfigureDeadlineForFeatureUpdates from 0 to 7.
- Set the 32-bit DWORD value ConfigureDeadlineNoAutoReboot to 1. Changing the value will enable the option Don’t auto-restart until end of the grace period.
- Finally, you need to reboot your Windows 10 system so that the changes can be applied.
If you observe any performance issues in your system, the changes can be undone by deleting all the mentioned five values.
We hope that our guide has helped you specify deadlines for automatic updates. Let us know in the comments section below if you have any questions.
RELATED ARTICLES YOU NEED TO CHECK OUT:
- Windows 10 v1903 RTM candidate affected by installation issues
- Windows 10 v1809 is now ready for business users (finally!)
- Download Windows 10 v1903 ISO to fix some annoying reboot issues
Read our disclosure page to find out how can you help Windows Report sustain the editorial team. Read more


Improve this guide


User forum
0 messages