0xc1900101 – 0x20017 Installation Error in Safe_OS [Solved]
Learn to solve this issue and resume the installation process
Key notes
- Windows 10 installation reaches 100% but the computer restarts and you receive the 0XC190010 – 0x20017 error that the installation failed.
- This is frustrating, but there are a few solutions available in the article below.
- Sometimes 0XC190010 – 0x20017 error is caused by extra RAM, so you might need to remove one module and try to install Windows 10 again.
- Also, you can try removing the wireless adapter from your PC.
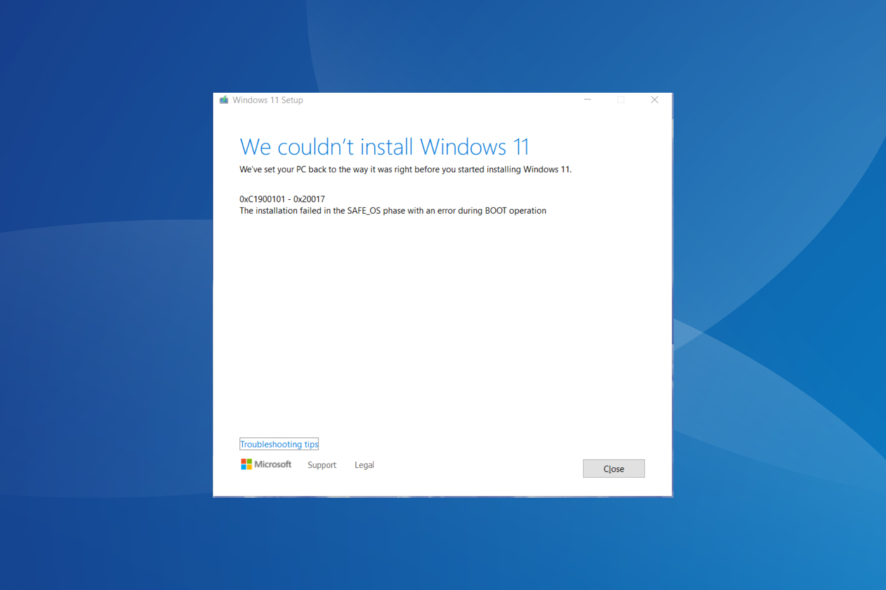
Some users have reported that they are getting installation error 0xC1900101 – 0x20017, and today we’re going to see how to resolve this issue.
Users have reported that their Windows installation manages to reach 100% but the computer starts restarting giving you the 0XC190010 – 0x20017 error while saying that installation failed.
This is a quite frustrating issue, but luckily there are few solutions available.
How can I solve the error 0xc1900101 – 0x20017?
1. Uninstall Broadcom Bluetooth and Wireless drivers
According to reports, Broadcom drivers aren’t compatible with Windows 10, so if you’re using these drivers you might need to uninstall them before upgrading to Windows 10. To do so, do the following:
- Open Device Manager.
- Find your Bluetooth driver on the list.
- Right click the driver and choose Uninstall device.
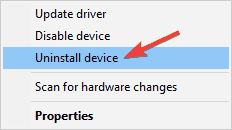
- Repeat the process for wireless network driver.
2. Disable wireless from BIOS
If uninstalling the Bluetooth driver didn’t get the job done, you can try with disabling wireless from BIOS. Here’s exactly what you need to do:
- If your computer is running, restart it.
- During the boot sequence keep pressing F2 or Del to enter BIOS.
- While in BIOS to go the Advanced Tab.
- In Advanced Tab navigate to Wireless option and press Enter to open it.
- You should see two options Internal Bluetooth and Internal WLAN.
- Disable them both by pressing Enter and choosing Disabled from the list.
- Press Esc to go back to the main screen, and choose to save the changes before exiting.
Depending on the version of BIOS you’re using this process might differ on your computer.
3. Remove additional RAM or your Network card
Sometimes 0XC190010 – 0x20017 error is caused by extra RAM, so you might need to remove one RAM module and try to install Windows 10 again.
Several users reported that they fixed this problem by removing their wireless adapter from your PC.
According to users, some Broadcom wireless adapters aren’t compatible with Windows 10, and in order to install it, you need to remove the adapter from your PC.
This is rather simple and you just need to power down your PC and disconnect all cables, open the computer case and carefully remove the wireless adapter.
Keep in mind that this will void your warranty, so if your PC is still under warranty, you might want to take it to the official repair center.
After removing the wireless adapter, you should be able to install Windows 10 without any issues. Several users reported that they had to replace their Broadcom wireless adapter with a new one once the Windows 10 was installed, so you might have to do that as well.
4. Update your BIOS
Sometimes you might encounter Windows 10 installation errors because of your BIOS. To fix this problem, it’s important to update your BIOS to the latest version.
To do that, be sure to visit your motherboard manufacturer’s website and download the latest BIOS for your motherboard.
Keep in mind that BIOS update can be a potentially dangerous procedure, so be extra cautious while performing it.
To see how to properly update your BIOS, be sure to check your motherboard manual for detailed instructions.
We also wrote a short guide on how to flash your BIOS so be sure to check it out for more information.
5. Change your BIOS settings
Sometimes you might encounter Windows 10 installation errors because of your BIOS settings.
BIOS allows you to configure your hardware, and if your configuration isn’t correct, you might encounter this or any other similar error.
If you can’t install Windows 10 due this error, we advise you to check your BIOS configuration. According to users, they managed to fix the problem after changing the AHCI mode to IDE mode.
After doing that, the issue should be completely resolved and you’ll be able to install Windows 10 without issues.
6. Connect your hard drive to SATA port
If you’re having Windows 10 installation errors, you might be able to solve the problem simply by connecting your hard drive or SSD to a SATA port.
Some PCs have both SATA II and SATA ports, and according to users, sometimes using the SATA II port can cause this issue to appear.
SATA II ports are faster, but your hard drive or SSD might not work properly with a SATA II port.
To fix this issue, you need to disconnect your hard drive or solid state drive and connect it to a SATA port. A
After doing that, you should be able to install Windows 10 without any problems and no longer receive the error 0xc1900101 – 0x20017.
7. Use Media Creation Tool
Several users reported the 0xc1900101 0x20017 error on their PC, and it seems that the problem was caused by two Windows partitions on their hard drive.
If you have two Windows installations on your hard drive, go to Media Creation Tool and try to install Windows 10.
After doing that, your PC will restart and you’ll be asked to choose between two Windows installations.
Select the second installation and follow the instructions on the screen to complete the installation.
This is an unusual solution, and it works only if you have two Windows partitions on your hard drive.
However, you can try using Media Creation Tool if you just have a single Windows partition and check if that solves your problem.
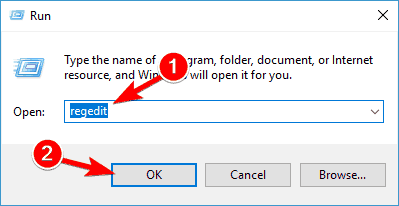
8. Change your registry
If you’re having Windows 10 installation errors 0xC1900101 or 0x20017, the problem might be related to your registry.
To fix the problem, you need to modify your registry by doing the following:
- Press Windows Key + R and enter regedit. Press Enter or click OK to proceed.
- Optional: Modifying the registry can be potentially dangerous, therefore it’s recommended to export your registry before making any changes. To do that, go to File > Export.
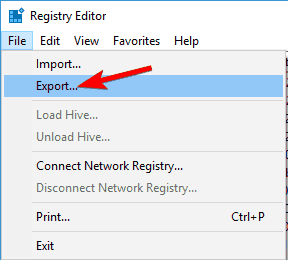 Select All as Export range and enter the desired file name. Choose a safe location and click on Save.
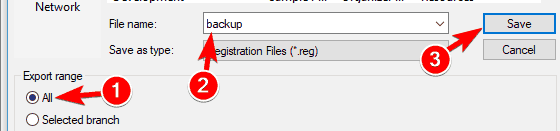 After exporting your registry, you’ll have a backup of the registry on your PC. Thanks to this backup, you can easily restore your registry to an earlier state in case anything goes wrong after modifying the registry. Simply double click the exported file and you’ll restore your registry to the original state.
 - In the left pane, navigate to HKEY_LOCAL_MACHINE\SOFTWARE\Microsoft\WindowsSelfHost\Applicability.
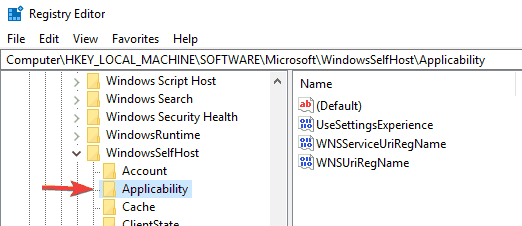
- Now change the following values:
- Ring = WIF
- RingBackup = WIS or Enabled
- EnablePreviewBuilds = 2
- BranchName = TH1
- UserPreferredBranchName = TH1
After making these changes, close Registry Editor and restart your PC.
Keep in mind that this solution might work only for Insider builds, so if you don’t have these keys in your registry, you might want to skip this solution.
9. Change the number of active cores to 1
According to users, sometimes you might be able to fix this problem simply by changing the number of active cores. This is an unusual solution, but many users reported that it worked for them.
To do that, simply enter BIOS and change the number of active cores to 1.
To see how to do that properly, we advise you to check your motherboard manual for detailed instructions.
Keep in mind that now all processors and motherboards support this feature, so be sure to check if your BIOS supports this feature.
After setting the number of active cores to 1, try to install Windows 10 again.
Keep in mind that this is just a workaround, and even if you manage to install Windows 10, you’ll have to keep the number of active cores to 1.
This is a peculiar workaround for the 0xc1900101 – 0x20017 installation error, but several users confirmed that it works, so feel free to try it.
What are some common Windows installation errors?
Windows 10 installation errors are relatively common, and speaking of which, users reported these errors while trying to install Windows 10:
- 0xc1900101 – 0x20017 Creators Update – Many users reported this error while trying to install Creators Update. We already covered this error in great detail in our 0xC1900101 driver errors in Windows 10 Creators Update article, so be sure to check it out.
- 0xc1900101 – 0x20017 Windows 10 Anniversary – This error can also appear while trying to install Windows 10 Anniversary Update. We already covered this error in our 0xC1900101 – 0x20017 Anniversary Update error article, so we advise you to check it out for more solutions.
- Windows 10 install error 0xc1900101 – 0x30018 – This is a variation of this error, but you should be able to fix it by using one of our solutions.
- The installation failed in the safe_os phase Windows 10 – This is another error related to Windows installation. We covered this error in detail in our Installation Failed in Safe_OS Phase With an Error article, so you might want to check it out.
- 0xc1900101 – 0x20017 1709 – This error message can appear while installing build 1709 of Windows 10. If this error occurs, you should be able to fix it by using one of our solutions.
If you have any other Windows 10-related issues you can check for the solution in our Windows 10 Fix section.
We hope you managed to fix the error 0xc1900101 – 0x20017 during Windows installation. Let us know whether our solutions worked for you in the comments section below.
Read our disclosure page to find out how can you help Windows Report sustain the editorial team. Read more


Improve this guide


User forum
1 messages