Windows Update Error 0x80242ff: 9 Easy Fixes
Learn to solve this issue on a Windows 10 device
6 min. read
Updated on
Read our disclosure page to find out how can you help Windows Report sustain the editorial team. Read more
Key notes
- Error 0x80242ff can sometimes occur when Windows is trying to install some updates.
- In most cases, this is a matter of software settings, and we’re showing you what can be done.
- Resetting your Windows Update services is a confirmed easy fix.
Windows Update is an essential feature of Windows 10 ensuring that you always have the latest security and stability updates and the optimal Windows performance.
Nevertheless, there is an abundance of errors that may occur before or during the update process. In the long list of errors, you’ll also find error code 0x80242ff.
This one mostly occurs after upgrading from Windows 7/8.1 to Windows 10. After the Windows 10 installation process is finished, the system updates just won’t finish downloading.
In case you encounter this problem as well, we offer you a few workarounds that should resolve the issue.
How do I fix the Windows Update Error 0x80242ff?
1. Scan your system for malware
The most common cause for update error 0x80242ff can be your antivirus. Sometimes a third-party antivirus can interfere with your system and cause problems with Windows Update.
However, you can fix this problem simply by disabling certain antivirus features or by disabling the software altogether.
If disabling it doesn’t fix the problem, it’s advised that you remove your antivirus and check if that solves the issue.
Additionally, it might be a good idea to switch to a different antivirus solution.
There are many great antivirus tools on the market, but if you want an antivirus that will provide maximum protection without interfering with your system, you should definitely consider ESET HOME Security Essential.
It guarantees the ultimate protection, without hijacking processes running simultaneously with the real-time online security feature.

ESET HOME Security Essential
Avoid unexpected system errors by using this reliable and powerful antivirus tool.If you encounter the error 0x80242ff on Windows 11, check out our dedicated article.
2. Check the Proxy status
While malware is the best-known culprit for this and similar errors, the proxy and VPN can slow down or stop an update, as well. Make sure to disable them while updating.
Additionally, you can check your Proxy status via Command Prompt:
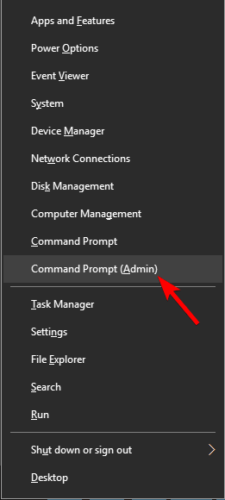
- Right-click Start and run Command Prompt (Admin).
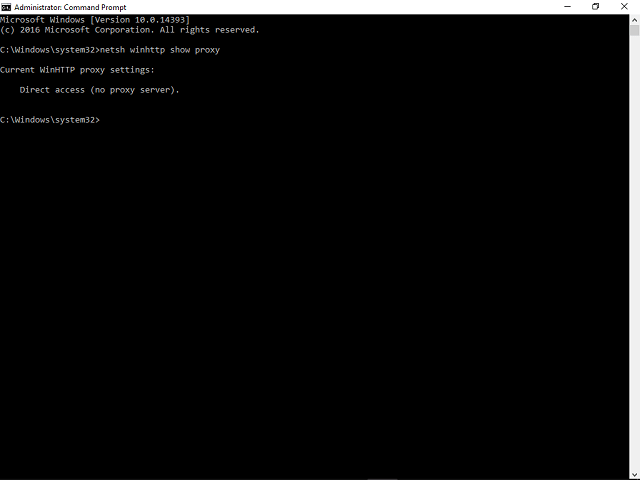
- In the command line type
netsh winhttp show proxy - In case you are prompted with Direct Access (no proxy server) message, everything is safe and sound.
To disable your proxy, do the following:
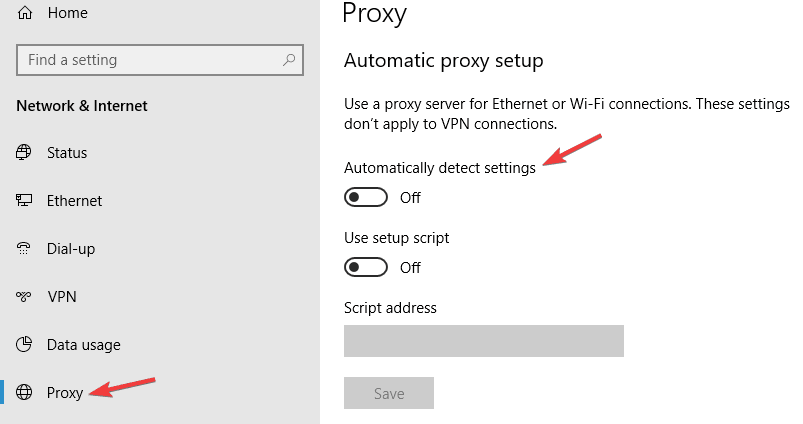
- Press Windows Key + I to open the Settings app.
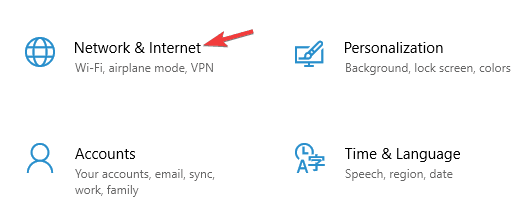
- Now navigate to the Network & Internet section.
- From the menu on the left, select Proxy. In the right pane disable all options.
After doing that, your proxy should be disabled and the update error 0x80242ff should be resolved.
3. Check the integrity of your system files
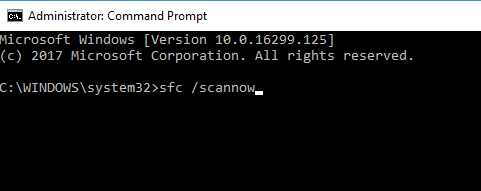
- Press Windows Key + X and select Command Prompt (Admin) from the list (or PowerShell for older systems).
- Enter sfc /scannow and press Enter.
- The SFC scan will now start. The scanning process can take about 15 minutes, so don’t interrupt it.
This process finds and fixes corrupt files, if any. Once the SFC scan is finished, check if the problem is still there.
If it is, you need to run a DISM scan. You can do that by following these steps:
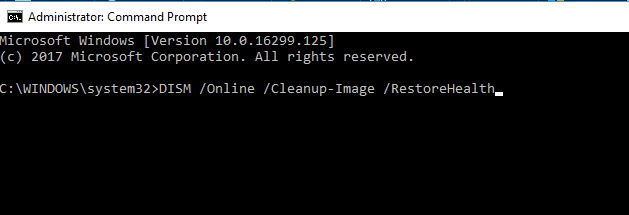
- Open Command Prompt as administrator.
- Now run the following command and press Enter:
DISM /Online /Cleanup-Image /RestoreHealth - Once again, the scanning should take about 20 minutes, so don’t interfere with it.
After the DISM scan finishes, check if the problem is resolved. If you want, you can also repeat the SFC scan once again and check if that solves the problem.
4. Start system in Clean Boot
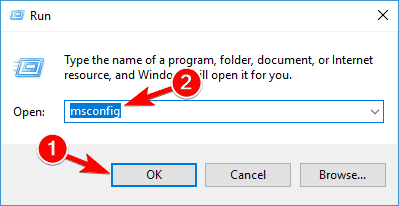
- Press Windows Key +R, enter msconfig and press Enter.
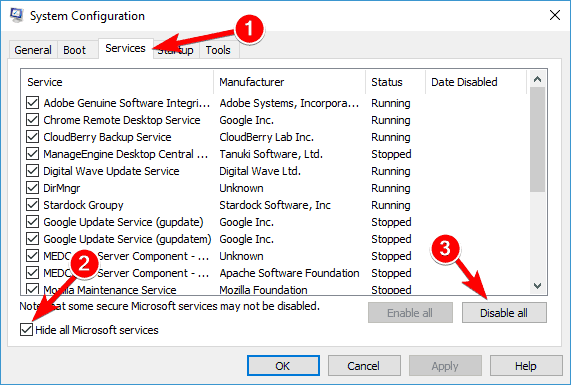
- Go to the Services tab and check Hide all Microsoft services box.
- Then click Disable All and confirm with Apply.
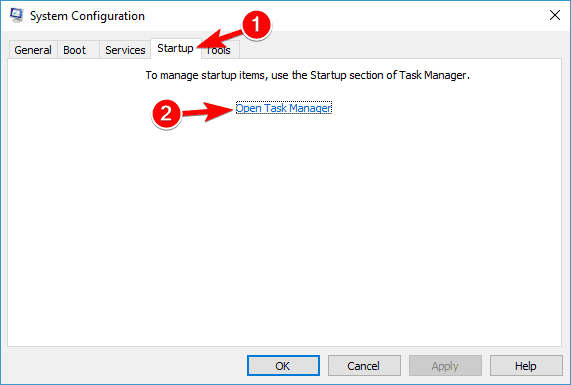
- Go to the Startup tab and choose Open Task Manager.
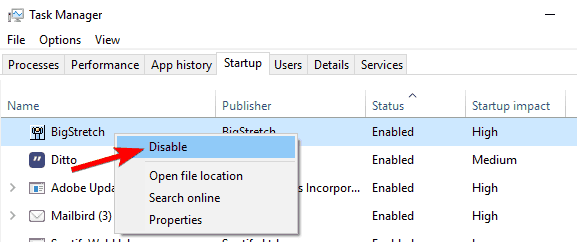
- Disable all startup programs individually and press OK.
- Restart your PC and try updating.
5. Reset Windows Update services
- Start Command Prompt as administrator.
- Disable your network connection.
- Now run the following commands one by one:
net stop wuauservnet stop cryptSvcnet stop bitsnet stop msiserverren C:WindowsSoftwareDistribution SoftwareDistribution.oldren C:WindowsSystem32catroot2 catroot2.oldnet start wuauservnet start cryptSvcnet start bitsnet start msiserverexit
After running these commands enable your Internet connection once again and restart your PC. Once your PC restarts, check if the problem is resolved.
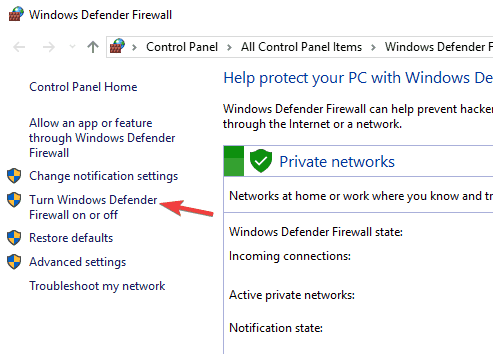
6. Turn off the Windows Firewall
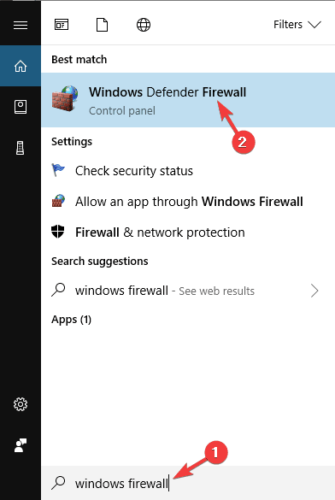
- Press Windows Key + S and type firewall.
- Choose Windows Defender Firewall from the list.
- Select Turn Windows Defender Firewall on or off.
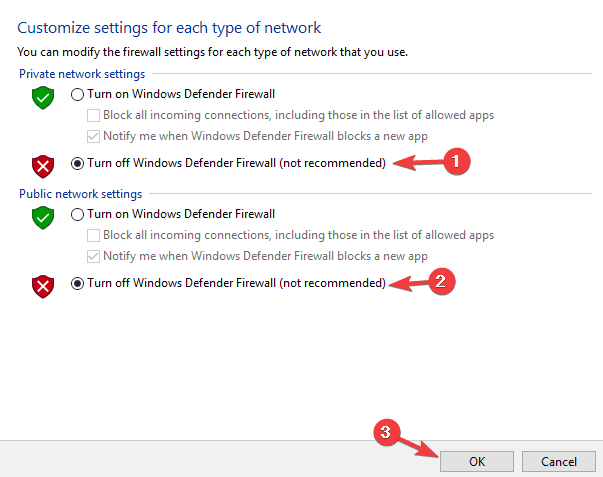
- Select Turn off Windows Defender Firewall (not recommended) for both Private and Public networks.
- After doing that, click the OK to save changes.
Once you disable Windows Firewall, check if the problem is still there. If the issue is resolved, update Windows and then turn the firewall back on again.
7. Download the update from the Microsoft Update Catalog
If you can’t download a specific update due to update error 0x80242ff, you might be able to fix that problem by downloading the update directly from Microsoft’s online Update Catalog.
Before you can do that, go to the Windows Update section on your device and look for the update code of the update you’re trying to install.
The update will contain KB plus an array of numbers. Once you find the update code, do the following:
- Go to the Microsoft Update Catalog website and enter the update code in the search box.
- Pick the update that uses the same architecture as your PC and click the Download button.
- Once the download is finished, double-click the setup file to run the installation.
After the update is installed, your Windows will be updated to the latest version.
Keep in mind that this method might not fix the core problem, but it will allow you to circumvent the error message and install the update.
8. Perform an in-place upgrade
- Download and run the Media Creation Tool.
- Choose Upgrade this PC now.
- Wait while the setup prepares the necessary files.
- Choose Download and install updates (recommended)option.
- Now click the Next button.
- The setup will now download the updates. This might take a bit, so be patient.
- After the updates are downloaded, follow the instructions on the screen.
- Once you reach the Ready to install screen, click Change what to keep.
- Select Keep personal files and apps and click Next.
- Follow the instructions to complete the setup.
Once you complete the in-place upgrade, you’ll have a fresh up-to-date version of Windows. Of course, all your files and applications will be preserved, so you can continue where you left off.
9. Run the Windows Update troubleshooter
Our last fix on the list is more of a basic one, but it should fix most Windows Update related issues within minutes. You can access this built-in troubleshooter via Settings > Update & Security > Troubleshoot.
These were possible workarounds for this update problem. We certainly hope you’ll find it useful and manage to resolve the 0x80242ff error in no time.
For more Windows Update workarounds, see these easy-to-use troubleshooting tools.
In addition, if you have any suggestions or questions related to the 0x80242fff error code, please tell us in the comments.





User forum
0 messages