How to Enable or Disable Super Administrator in Windows 11
These are the easiest methods to enable the super administrator account
![]() 2 min. read
2 min. read
![]() Updated on
Updated on
Share this article
Improve this guide
Read our disclosure page to find out how can you help Windows Report sustain the editorial team. Read more
The super administrator account in Windows 11, also known as the built-in Administrator account, has elevated privileges and is hidden by default. Here’s a step-by-step guide to enable and disable this account.
How do I enable Super Administrator in Windows 11?
1. Enable/disable the Super Administrator account using CMD
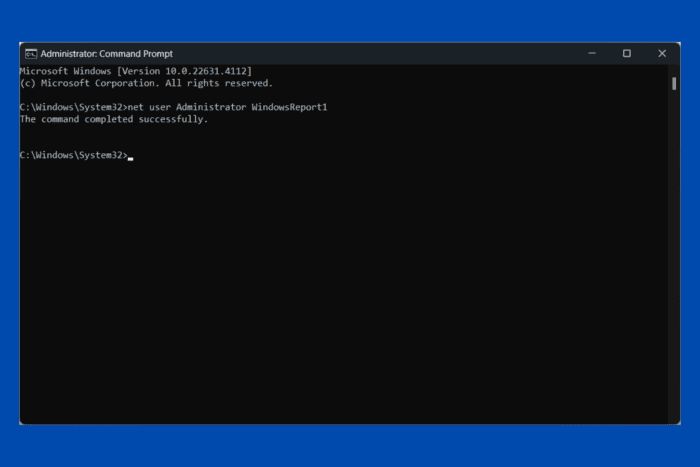
- Click the Start button, type cmd and select Run as administrator from the results.
- If prompted by User Account Control (UAC), click Yes to allow changes.
- In the Command Prompt window, type the following command and press Enter:
net user Administrator /active:yes - You should see a message saying The command completed successfully.
- To set a password, type the following command and press Enter:
net user Administrator [YourPassword] - Sign out of your current account.
- On the login screen, you should now see the “Administrator” account.
- Click on it and enter the password if you set one.
- To disable the super administrator account, type the following command in Command Prompt: type the following command and press Enter:
net user Administrator /active:no - Now, if you log out, you shouldn’t see the Administrator account in the login screen.
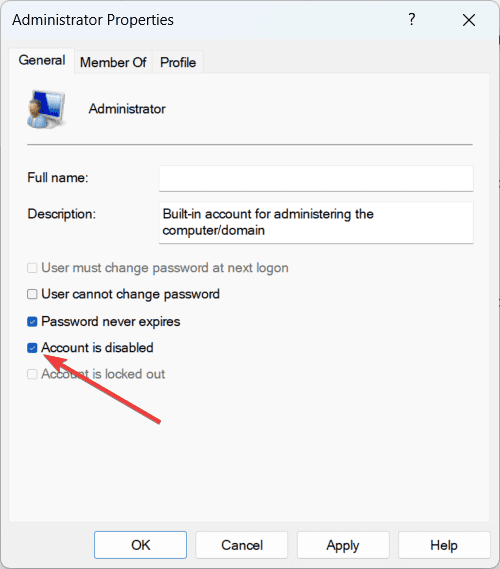
2. Using the Local Users and Groups
- Press Win + R, type lusrmgr.msc, and press Enter.
- Navigate to Users under Local Users and Groups.
- Right-click on Administrator and select Properties.
- To enable, uncheck Account is disabled and click OK.

- To disable, check Account is disabled and click OK.
3. Using PowerShell
- Press Win + X and select Windows PowerShell (Admin).
- If prompted by UAC, click Yes to allow changes.
- Type the following command and press Enter:
Enable-LocalUser -Name "Administrator" - Type the following command and press Enter:
Disable-LocalUser -Name "Administrator"
By following these steps, you can easily enable or disable the super administrator account in Windows 11. Please note that you still need administrative rights to enable or disable the built-in Administrator account.
For more information, check our article on the differences between the standard and administrator accounts. We also have a helpful guide on how to change the administrator account in Windows 11.
If you have any questions, access the comments section below and let us know.


User forum
0 messages