0x8024a203 Windows Update (We Couldn't Install This Update): Fix
Encompassing solutions that will help you install the latest updates
Key notes
- The Windows 11 update error 0x8024a203 is usually down to broken or corrupt system files.
- Resetting the Windows update component and other services can quickly fix this issue.
- Repairing faulty system files with a dedicated tool or the built-in file repairer is also an effective solution.

Are you trying to install a new update for your Windows 10 or Windows 11 PC and getting the Windows Update error 0x8024a203? Unfortunately, you aren’t alone, as several users running Windows on their PC are encountering this issue.
Thankfully, in this guide, we have curated a list of solutions that will fix this update error. So, with that said, let us jump right in.
What is the error 0x8024a203?
The Windows Update error 0x8024a203 occurs when users try to install the latest version of the OS. The full error message reads: We couldn’t install this update but you can try again (0x8024a203).
Because of this error, after a full 100% download of Windows 11, the installation goes back to 41% and ultimately shows you a blue screen of error.
Below are some of the causes of this issue:
- Faulty system files: The major cause of the we couldn’t install this update 0x8024a203 error is broken system files. These files are important for the installation of your updates. You need to repair the corrupt system files with a dedicated tool or the built-in file repairers to get past this error.
- Disable Windows components: Some services and components are important for installing updates. You need to restart these components to fix this issue.
- Minor system glitches: Sometimes, the Windows Update error code 0x80204a203 on Windows 11 21H1 can be down to some minor issues on your PC. Running the Windows update troubleshooter should fix this.
How can I fix the Windows Update error 0x8024a203?
1. Use a specialized tool
When handling system files, it is always a good idea to employ the help of specialized repair tools. This type of software will streamline the repair process by automatically scanning and replacing any broken files they encounter.
2. Run the troubleshooter
1. Open the Start menu.
2. Search for Troubleshoot other problems and open it.

3. Hit the Run button next to Windows update.
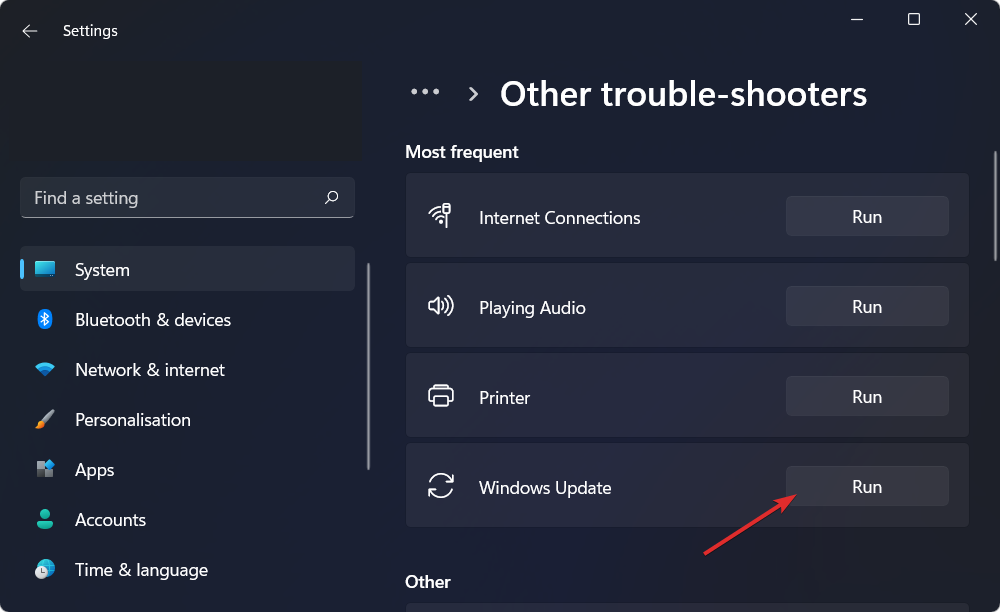
4. The troubleshooter will begin the diagnosis.

5. Apply the recommended fixes.
6. Restart your PC.
The first thing you should do when you come across a Windows update error such as the error code 0x8024a203 is to make use of the in-built Windows troubleshooter program.
It is pretty easy to use, and by following the mentioned steps, you will be able to not only detect the issue with the Windows 11 update but fix it as well.
3. Use the Reset Windows Update Tool
- Download the Reset Windows Update Tool.
- Install it on your PC.
- Right-click on the app icon and select Run as administrator.
- Select your preferred language by entering the number and pressing Enter.

- Press Y to accept the terms and conditions of the tool.

- Press 2 to select the Reset the Windows Update Components option and hit Enter.

Using the Reset Windows Update tool, you can fix the underlying problems that prevent your Windows 11 PC from installing the latest updates.
In our case, you can use the above steps to reset Windows update components and resolve issues such as Windows 11 update error 0x8024a203 that isn’t letting you update your system.
4. Run the System File Checker tool
- Open the Start menu.
- Search for Command Prompt and run it as an administrator.
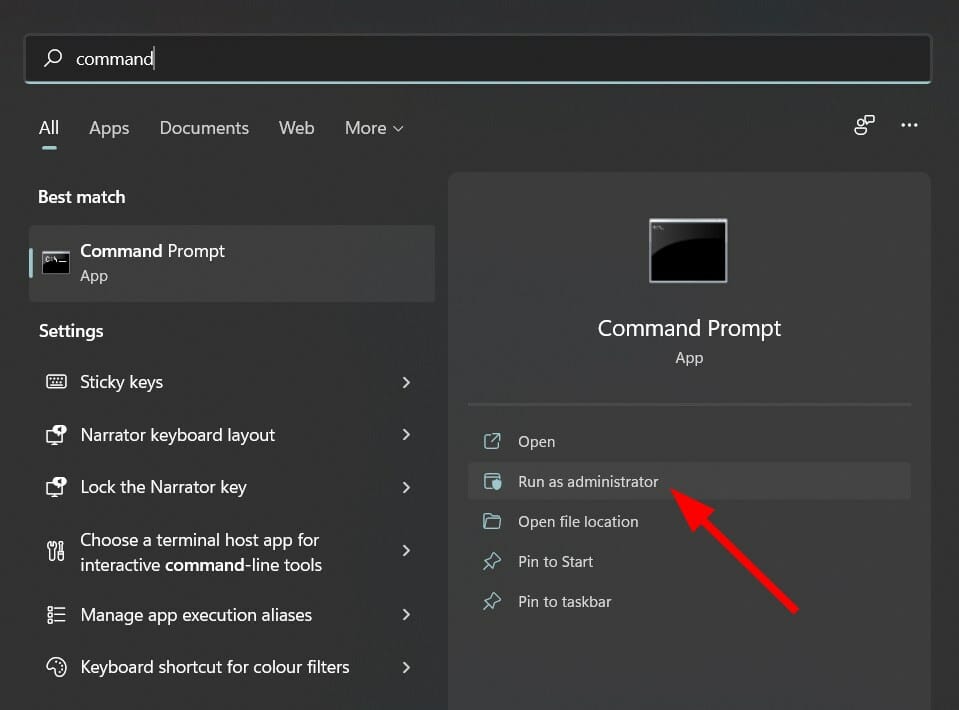
- Type the below command and hit Enter:
sfc /scannow
- Your PC will start scanning and, in the process, will try to fix the issue.
If a corrupt system file is present in your system, it can prevent Windows 11 from installing the latest updates.
So, run the System File Checker tool and let it fix the issue triggering the Windows 11 update error 0x8024a203.
5. Restart essential services
- Press the Start menu.
- Search for Services and open it.
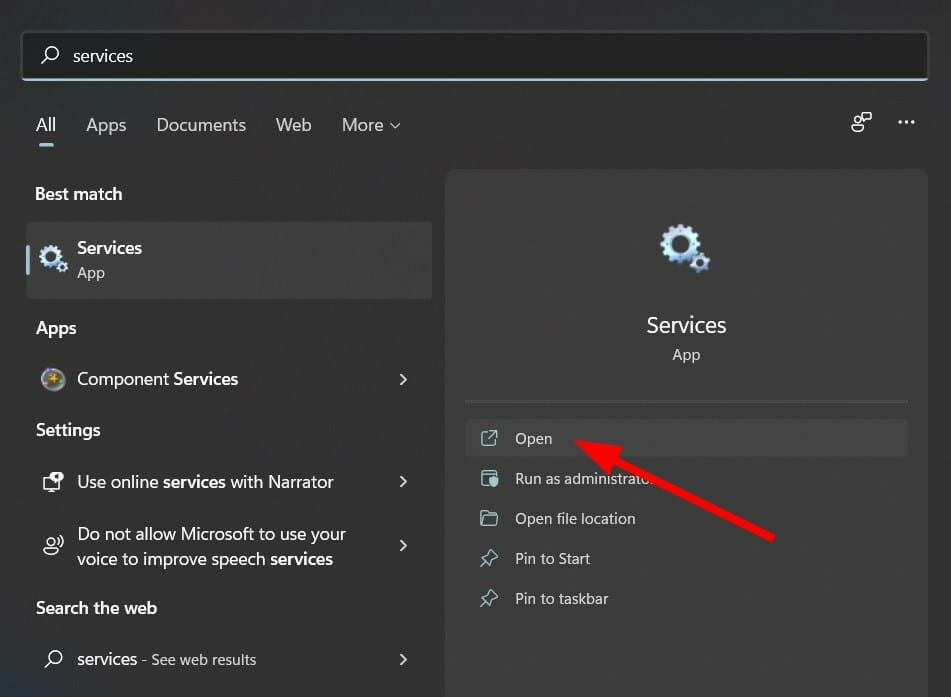
- Locate Background Intelligent Transfer Service (BITS) and double-click on it.

- Under the Startup type, from the drop-down menu, select Automatic.

- Click Start, Apply, and OK.
- Perform the same steps for Windows Update services.
For Windows Updates to perform their operations, they rely on several Windows services. These services must run in the background for the updates to get installed.
Following the above steps, you can tweak the critical Windows update services options and possibly fix the issue.
6. Clear the temporary folder
- Press the Windows key + R buttons to open the Run command.
- Type %temp% and hit Enter.

- Press Ctrl + A to select all files.
- Press the Delete button on your keyboard or right-click and select Delete.

We hope this guide helped you fix the Windows 11 or Windows 10 update error 0x8024a203 and that you can install the latest Windows updates on your PC.
Are you facing the update error 0x80073701 on Windows 11? Then, check our detailed guide to fix it quickly and effectively.
Feel free to let us know which solutions worked for you in the comments below.
Read our disclosure page to find out how can you help Windows Report sustain the editorial team. Read more


Improve this guide


User forum
0 messages