6 Methods to Use if Windows was Unable to Repair the Drive
Run a CHKDSK or use the System File Checker tool
Key notes
- The Windows was unable to repair the drive error can suddenly occur with either external or internal drives.
- It would be best if you tried to boot your system in Safe Mode to be able to start tweaking the problems.
- A built-in tool will help you determine if your drives are malfunctioning.

You must have just encountered the error message Windows was unable to repair the drive.
Windows 10 OS has a built-in System File Checker and Disk Checker utility. If the OS detects a corruption or malfunction of the drive, it will ask you to run the CHKSDK utility to fix the drive.
The tool has a good record of repairing minor corruption and resolving problems with the hard drive.
However, the built-in diagnostic tools sometimes fail to repair the drive and show Windows could not repair the drive error.
What does Windows was unable to repair the drive message mean?
This error means you have a bad drive that can not be repaired by the built-in Windows tool. A few things may trigger this situation; the following are at the top of the list.
- Damaged or bad files – There is the possibility that some of your files are destroyed beyond repair. In this case, the repair tool may be unable to fix the drive.
- Quick drive ejection – Sometimes, you may have removed a drive without following the correct Safely remove hardware process. This can damage the drive, and in some cases, you may not be able to repair it.
- Virus infection – Generally, this is a cause of many computer problems. It may affect drives and damage them beyond repair. The recommendation is always to use good antivirus software.
A few variations to this problem may include:
- Windows was unable to repair the drive flash drive – This is the very same error but is limited to when you use a flash drive on the device. You should use quality USB flash drives to reduce the occurrence of this error.
- Disk repair not working Windows 10 – Just like this error manifests in the new OS, it also exists in the old one, and similar solutions would apply.
- Windows was unable to repair the external drive – In some cases, it is because the external drive is not showing. Other than that, very similar fixes will apply.
- Windows unable to repair SD card – This is a similar case with USB flash drives, and you may need specialized software to fix the SD cards.
While there may be other triggers, these are the top ones, and we will show you the most recommended solutions.
How do I fix Windows was unable to repair the drive errors?
1. Boot into Safe Mode
1.1 If you can log in to Windows
- Press Windows Key + R, type msconfig, and hit Enter.

- Open Boot tab, select Boot Options, check the Safe boot option and click OK.

- Restart the PC.
1.2 If you can see the lock screen
- Click on Power button, press hold the Shift key, and click Restart.

- From the Choose an option screen, select Troubleshoot, and then Advanced Options.

- Next, click on Startup Settings and select Restart.

After your PC restarts, you should see a list of options. Press 4 or F4 on your keyboard to start the PC in Safe Mode.
1.3 If you can’t log in to Windows
- Click on Advanced Options, this will open Choose an Option screen.
- Click on Troubleshoot, and select Advanced Options.
- Go to Startup Settings and select Restart.
- Windows will restart and show a lot of options. Press 4 or F4 on your keyboard to start the PC in Safe Mode.
Windows will show a Recovery menu if it fails to boot normally three times over. You can manually interrupt the boot process by pressing the Power button when the Window starts to boot.
During the next restart, Windows will show the Preparing Automatic Repair screen and then asks you to select a user account. Windows will try to diagnose the issue and present you with an Automatic Repair screen.
Note that some of these fixes require you to be able to log in to Windows. If you cannot log in or if the boot process fails, you can try to boot Windows into Safe Mode.
Safe Mode is a diagnostic mode in Windows OS that helps you to clean boot the PC with absolutely minimal services running to boot the computer successfully.
This way, if the software or driver conflicts with the booting process, you can log in without the error for diagnostic purposes.
Now that you know how to boot into Safe Mode let’s dive in and look at the solutions to fix Windows that could not repair the drive error.
2. Run Check Disk tool from Command Prompt
- Type cmd in Windows search and click on Run as administrator to start Command Prompt with complete privileges.

- Now type the following command and hit Enter. Make sure that you enter the right drive letter first and then enter the command:
Chkdsk /f /r
The first solution is to run the check disk tool again but manually from the Command Prompt.
In the above command /r locates bad sectors and recovers data where possible, and /f forces the drive to dismount before beginning the scanning process.
Wait for the check disk process to complete. Windows will automatically scan and fix the drive for any error and corruption issues.
3. Run a diagnostic tool
Assuming that the disk error is occurring due to your external hard drive, you can use any diagnostic tools to pinpoint the problem and fix the bad sectors.
Some hard drive makers like WD offer their diagnostic tools. If not, you can always use third-party software like the one recommended below to run and test the drive for errors.
While this software may not fix the error, you can always prevent the hard drive from serious damage due to continued use under bad conditions.
Stellar Data Recovery
This amazing software will help you identify and then further prevent any disk errors.4. Run the SFC scan
- Type cmd in Windows search and click on Run as administrator to start Command Prompt with complete privileges.
- In the Command Prompt, type the following command and hit Enter:
Sfc /scannow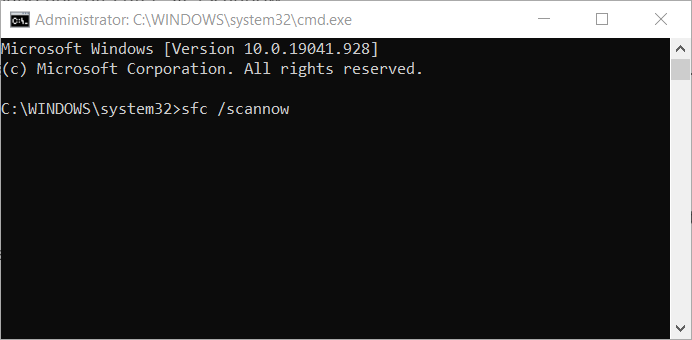
- Exit Command Prompt, restart your PC, and check for any improvements.
5. Check the hard drive for hardware failure
It also might be that you can’t boot into Windows even with a bootable USB flash drive, which means you probably have a bad hard drive.
Whether it is an internal SDD/HDD or external HDD, the only way to make sure of the hardware failure is to remove the drive from the computer and connect it to another working computer.
If the other computer does not recognize the drive, you mostly have a faulty one and need to repair or replace it.
Connect a spare drive, if you have one, to your non-working computer and try to boot from it. If the PC recognizes the hard drive, it could be a hard drive failure.
In this case, you do not have many options. You can try to return the hard drive, claim the warranty, and recover the data from the hard drive, taking professional help.
6. Clean Install Windows
Assuming you don’t have a hardware failure, you can try to perform a clean install of Windows as a last resort.
This is a solution that many don’t like, but at times, this is the last option to get your computer working again.
If you can log in to Windows, you must create a data backup of your important files and folders.
If you cannot boot into Windows, but your hard drive is not dead, you can still recover the data from the hard drive using Linux Mint OS via a USB drive.
This isn’t the only error, and many reported Unable to determine volume version and state in chkdsk, but we have addressed this issue in a separate guide.
Windows cannot repair the drive while it’s in use errors can be fixed with CHKDSK or the System File Checker tool most of the time. You can format the disk on an external hard drive or USB drive if feasible.
However, if the problem is with the primary local drive, the error can create serious issues. Follow all the solutions suggested in this article that may help you fix the error on your Windows PC.
Please let us know if any solutions did the trick for you or if you have a new solution that deserves to be on the list in the comments.
Read our disclosure page to find out how can you help Windows Report sustain the editorial team. Read more


Improve this guide


User forum
0 messages