How to Boot into Safe Mode in Windows 7 (Step by Step)

Booting into Safe Mode in Windows 7 is a useful way to troubleshoot issues. This guide explains the exact steps to access Safe Mode quickly and safely.
Table of contents
How to Boot into Safe Mode in Windows 7?
1. Restart and Access Advanced Boot Options
To reach the boot menu, you need to restart your computer and press the correct key.
- Click Start and choose Restart from the power menu.

- As soon as your PC begins to boot, press the F8 key repeatedly.
- Wait for the Advanced Boot Options screen to appear.
If your system still does not work after troubleshooting, consider a full reset: how to factory reset Windows 7.
Troubleshooting Safe Mode failures or a PC that will not reach the boot menu? Open the Windows 7 not booting guide for step-by-step startup fixes.
2. Choose Safe Mode from the List
Once in the boot options, select the right Safe Mode option from the list.
- On the Advanced Boot Options screen, use the arrow keys to navigate.
- Select Safe Mode from the list of startup options.
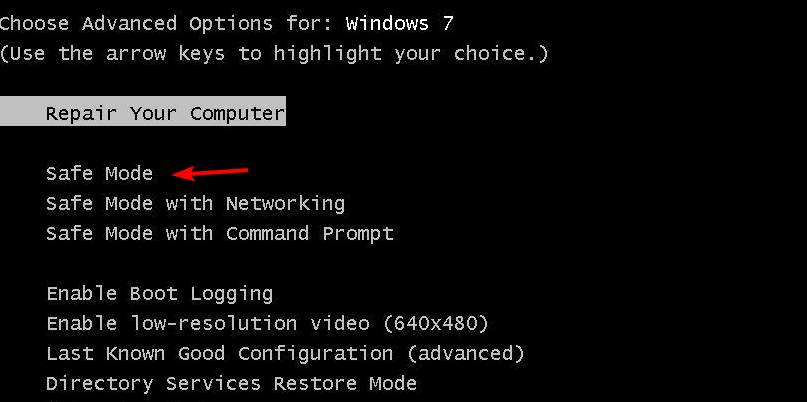
- Press Enter to confirm your selection.
If Windows files are missing or damaged, a clean setup may be needed: how to install Windows 7. For extended troubleshooting steps covering startup failures, visit Windows 7 not starting for detailed recovery instructions.
3. Log in to Windows 7
After choosing Safe Mode, Windows loads basic drivers before you log in.
- Wait while Windows loads essential drivers and processes.
- At the login screen, enter your account credentials.

- Once logged in, your desktop appears with minimal drivers loaded.
To document error messages and settings during troubleshooting, follow this Windows 7 screenshot guide for quick captures in Safe Mode.
When Safe Mode loads, you may need elevated rights to run repairs, so learn how to log in as Administrator in Windows 7.
Seeing “Not a Valid Win32 Application” when launching a program in Safe Mode? Fix it with this step-by-step guide.
4. Use Safe Mode with Networking or Command Prompt (Optional)
Pick the Safe Mode variant that fits your troubleshooting needs.
- If you need internet access, choose Safe Mode with Networking.
- If you want command-line tools only, select Safe Mode with Command Prompt.

- Press Enter to continue with your chosen option.
If you plan to reinstall or repair Windows, you may need your key: find your Windows 7 product key.
When using Safe Mode with Networking, you can also set up or troubleshoot your Internet connection. For detailed instructions, see how to set up Internet on Windows 7 to make sure your network functions correctly while repairing your system.
After troubleshooting in Safe Mode, you may decide to start fresh. Learn how to wipe a hard drive in Windows 7 safely to completely remove old data before reinstalling or restoring the system.
Stuck on checking for updates in Safe Mode with Networking? Follow the dedicated guide Windows 7 not updating to repair update services, clear the cache, and install patches successfully.
FAQs
You will see the words “Safe Mode” in the corners of your screen, and only essential programs run.
Yes. Restart your computer and it will boot back into normal Windows 7 mode.
Use Safe Mode to troubleshoot driver issues, malware problems, or system errors.
The F8 key might not register, or system files may be corrupted. Try pressing F8 earlier, or use a Windows 7 installation disc for repair.
Conclusion
Safe Mode in Windows 7 helps diagnose and fix common problems. Follow these steps to enter Safe Mode quickly and restore your PC to normal operation.
Read our disclosure page to find out how can you help Windows Report sustain the editorial team. Read more


Improve this guide


User forum
0 messages