6 Best Windows 11 Optional Features to Enable on Your PC
Key notes
- Windows 11’s optional features give users the power to customize their PC and enjoy experiences that you can manage.
- Most of the features are hidden, and that is why few people know about them.
- They improve productivity due to the ability to multitask and activating them is simple.

Every time Microsoft releases a new version of the Windows operating system, it comes with new features to improve the user’s experience. Windows 11 options are excellent with a lot of new things.
Windows 11 has optional features that users or businesses can choose to turn on and install if they need them.
These features give users more functionalities and control of their PC. Most of the features are for businesses, IT firms, and server administrators who may need extra features to achieve what they want.
You can control most of the features through the Control Panel or Settings because most of them are off. Some of these features include the appearance of the taskbar, auto HDR, snap layouts, etc.
One can opt in and out of these optional features and functionalities to the extent allowed by the service description.
Additional benefits and functions come with these features on Windows 11, making the user experience even better. The benefits are for online and offline uses, depending on users’ wants.
A person’s niche determines what to install and what not to. Business features are different from educational ones; some need general ones.
Those categorized as optional include some from Windows legacy tools like Internet Explorer, Windows Media Player, and WordPad.
In this guide, we will look at some of the best Windows 11 optional features and how to turn them on.
What features should be turned on in Windows 11?
This version of Windows comes with many of these optional features that you can turn on and off. The components work well for servers and businesses, although some are general.
For optimal performance, you should take caution not to enable every feature so as not to slow down the system’s performance. It also helps for security reasons.
Since there are many optional features available, they take a lot of space, and so the hard drive fills whether they are enabled or not.
The process of enabling and disabling can be done offline because the features are stored on the computer already. There are other notable features like Windows 11 themes.
Optional features give you more power and control of your machine so if you like to tweak the system, they will come in handy.
The majority of the features like RAS Connection Manager Administration Kit (CMAK), Microsoft Message Queue (MSMO) Server, Internet Information Services (IIS), Data Center Bridging enable you to manage servers and networks using your PC.
They help in improving productivity. You can multitask by enabling features that support your work, e.g., turning on multiple Windows.
It also gives you the chance to improve the user experience of your PC. You can turn on several features like the change taskbar and desktop interfaces to improve the user experience.
How do I enable optional features in Windows 11?
- Click the Search icon on your taskbar, type windows features, and click on Turn Windows features on or off.

- Now, select the features you want to enable and click the OK button.

Some of our readers experienced a problem where the list of Windows 11 optional features is empty or not loading.
In this case, you will need to set the Windows Modules Installer service to start automatically.
What are the best Windows 11 optional features?
1. The classic File Explorer: How to restore it
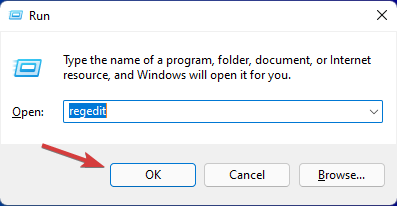
- Press Windows + R to open the Run window, type regedit, and hit Enter or click OK to open the Registry Editor.

- Navigate to the following path:
HKEY_LOCAL_MACHINE\SOFTWARE\Microsoft\Windows\CurrentVersion\Shell Extensions
- Now if you see a subkey called Blocked, click on it to open. In our case, and if it’s the same for you, right-click anywhere on the right pane, select New, then Key to create a new subkey and name it Blocked.

- Now click on the Blocked subkey, right-click on a free space on the right pane, then select New and choose String Value.

- Name the value {e2bf9676-5f8f-435c-97eb-11607a5bedf7} and leave it just like that, without modifying its value.

- Now go to the following path in Registry Editor:
HKEY_LOCAL_MACHINE\SOFTWARE\WOW6432Node\Microsoft\Windows\CurrentVersion\Shell Extensions - Again, if you don’t have a Blocked subkey, create it just like in the previous steps, then add the same string value {e2bf9676-5f8f-435c-97eb-11607a5bedf7} exactly the same.

- Close the Registry Editor and restart your PC.
- If all works fine, when you open File Explorer again, you should see it with the Classic ribbon.

In Windows 11, most of the options are behind dropdown menus. To get rid of that and display all the commands as a ribbon, we use the steps stated above to achieve that.
However, we need to mention that this method removes the Share command from File Explorer so if you want to use it, think twice about using the solution.
It’s not really a problem because you can always perform the steps again and remove the string value and back to how it was before.
You have to be careful when editing your Registry Editor, and it can cause you to lose data and force you to install Windows afresh.
2. Auto HDR to improve the gaming experience
- Press Windows + G on the keyboard and select the Settings icon to access the gaming features.

- Click on the Edit more preferences in the Windows Settings. It will direct you to the settings.

- Choose the System settings.

- Navigate to the Display settings and choose the HDR option.

- Toggle the Bar to turn it on.

- Click on the HDR page to bring up more settings. Select the AutoHDR option and turn it on.

Auto HDR improves the gaming experience when you configure it well. It will help users benefit from over the 800 games enhancement, each looking vibrant and detailed.
However, you should know that not all devices support the HDR feature so if your device doesn’t show this option, you will not be able to turn it on.
3. Use Snap Layouts to split the screen into multiple areas
- Click on the Start Search box, type settings, and hit Enter to open the Settings app.

- Select System and choose the Multitasking option.

- Turn the Snap windows button ON.

- Check the Show snap layouts when I hover over a window’s maximize button option.

- For the maximize option to show, hover over the window’s Maximize button.
You can choose from several options when arranging the pages with other apps. The layout also depends on the PC’s display, i.e., some are 16:9, 3:2, etc.
If your display has 1920 pixels or below, you won’t be able to enjoy these features due to the Windows 11 requirements.
4. Different backgrounds for virtual desktops
- Hover your cursor on the Taskbar button.

- Click on the Plus sign to add a new desktop.

- Right-click on the new desktop and select Choose background.

- It will direct you to the Personalization settings. Select a new background, and the new desktop will look different.

5. New keyboard shortcuts
Although Windows 11 inherited all the Windows 10 shortcuts, the new OS has some additional keyboard shortcuts that give you access to some of its features:
- Press Windows key+ Alt + Up arrow – To snap active Windows to the top half of the screen.
- Hit the Windows key+ Alt + Down arrow – To snap active Windows to the bottom half of the screen.
- Press Windows key + W – to open the widgets.
- Hit Windows key + Z – to open snap layouts.
- Press Windows key + H – to initiate voice typing.
6. Taskbar size – How to change it
- Head over to the Start Search box, type regedit, and hit Enter.
- Navigate to the following path:
HKEY_CURRENT_USER\Software\Microsoft\Windows\CurrentVersion\Explorer\Advanced
- Right-click on the Advanced folder. Select New, and then DWORD (32-bit) Value to create a new key.

- Name the DWORDS value as TaskbarSi.
- Double click on the value created to open the key properties.

- Enter numbers 2 or 0 in the Value data box – 2 increases the size while 0 reduces the size. Select the base to Hexadecimal and click OK to save the changes.

- Close the Registry Editor and restart your PC to apply all the changes.

When the PC restarts, it applies all the changes according to your choice. You can play around with the values and maintain the size you like.
Is it safe to work with Windows 11’s optional features?
There is no problem with turning Windows 11’s optional features on. As they help you improve and maximize your results to meet the set goals.
But you have to ensure that the features you turn on, you can control and limit them. We have a detailed article on how to better manage your optional features.
You might also be interested in our article on the best Windows 11 tips & tricks to customize your OS.
For some users, turning a lot of the features on can affect your PC’s storage and memory, leading to slow performance that can affect your daily duties. It can also make your PC vulnerable. If you turned an optional feature on and aren’t using it, it’s good to turn it off.
If you plan to install Windows 11 on your PC, make sure that it meets the system requirements and if you face any issues, try to troubleshoot the problem and how you can overcome them.
Which optional features of Windows 11 do you use? Let us know in the comments section.
Read our disclosure page to find out how can you help Windows Report sustain the editorial team. Read more


Improve this guide


User forum
0 messages