7 Ways to Fix Can’t Remove the Printer in Windows 10
Unable to remove printer in you Windows 10 PC? Try these fixes
11 min. read
Updated on
Read our disclosure page to find out how can you help Windows Report sustain the editorial team. Read more
Key notes
- It could be frustrating if you cannot remove the printer in Windows 10 because you will not be able to refresh it and solve other issues.
- One of the viable solutions is to remove the printer from the Registry using the dedicated tool.
- Uninstalling the printer software can also help remove the printer from your system.
- It would help if you also considered deleting the drivers and installing new ones with the help of third-party, dedicated software.
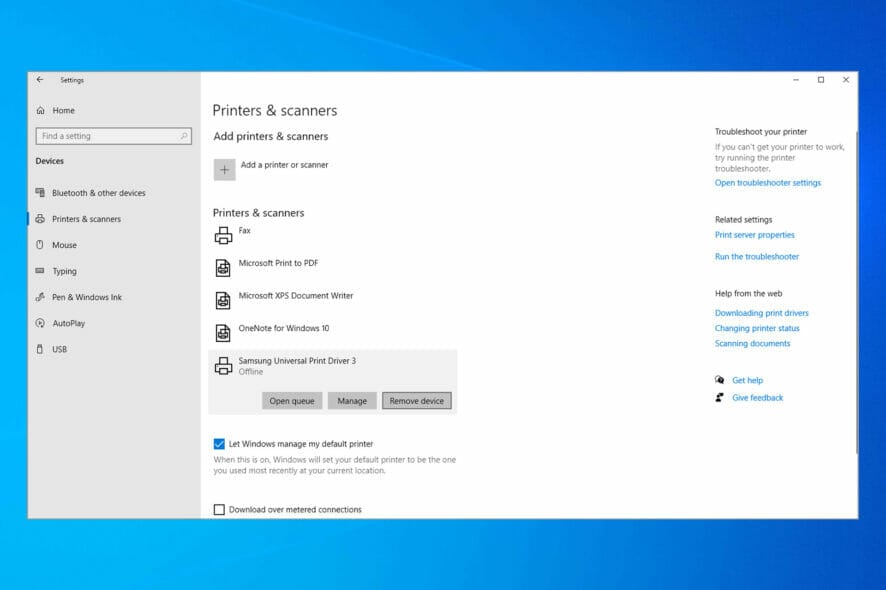
We frequently use printers to print important documents, but problems with printers can sometimes appear.
You will find multiple user reports from different times, that indicate that users often aren’t able to remove the printer on their Windows 10 PCs.
To fix printer problems we sometimes need to remove the printer, but users reported that they cannot remove the printer in Windows 10.
Why can’t I remove printer in Windows 10?
Here are a few of the most common reasons you aren’t able to remove the printer on a Windows 10 PC.
- There is a bug in the Windows version that you are running.
- Your printer drivers aren’t up to date.
- Old printer drivers are interfering with the removal process.
- There might be a presence of corrupt printer registry entries.
- A stuck print job queue is also responsible for this problem.
What can I do if I get Can’t remove printer access denied message?
If you can’t remove printer in Windows 11 or older, it’s probably because you don’t have administrative privileges. We wrote in-depth about the Access is denied guide, so we encourage you to check it out for more solutions.
If the printer is displayed as an unspecified device that can cause additional problems with it, and prevent you from removing it. This is most likely a configuration or a driver issue.
A few users reported that a deleted printer keeps coming back, and that’s a variation of this error, but luckily, this guide will show you how to fix this problem.
How do I fix unable to remove printer message on Windows 10?
1. Remove the printer
1.1 Change the Print server properties
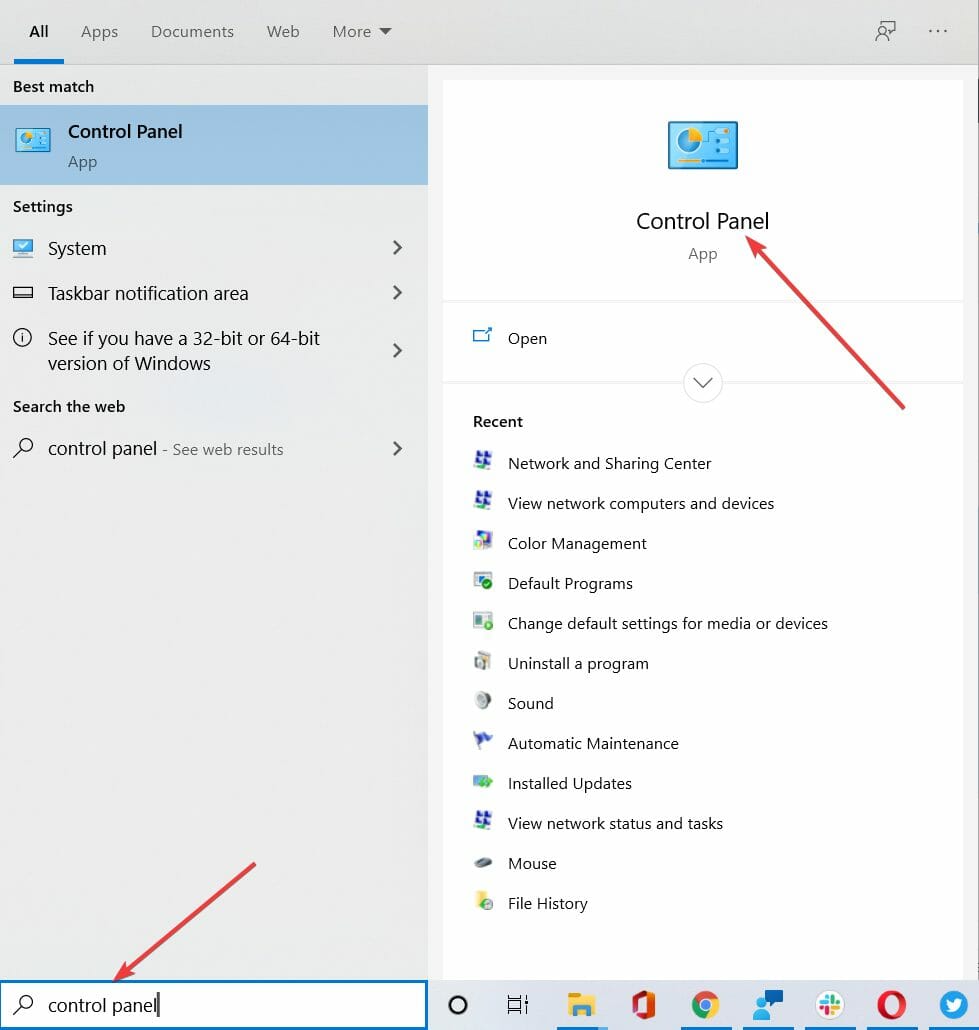
- Open the Start menu, type Control panel, and open it.
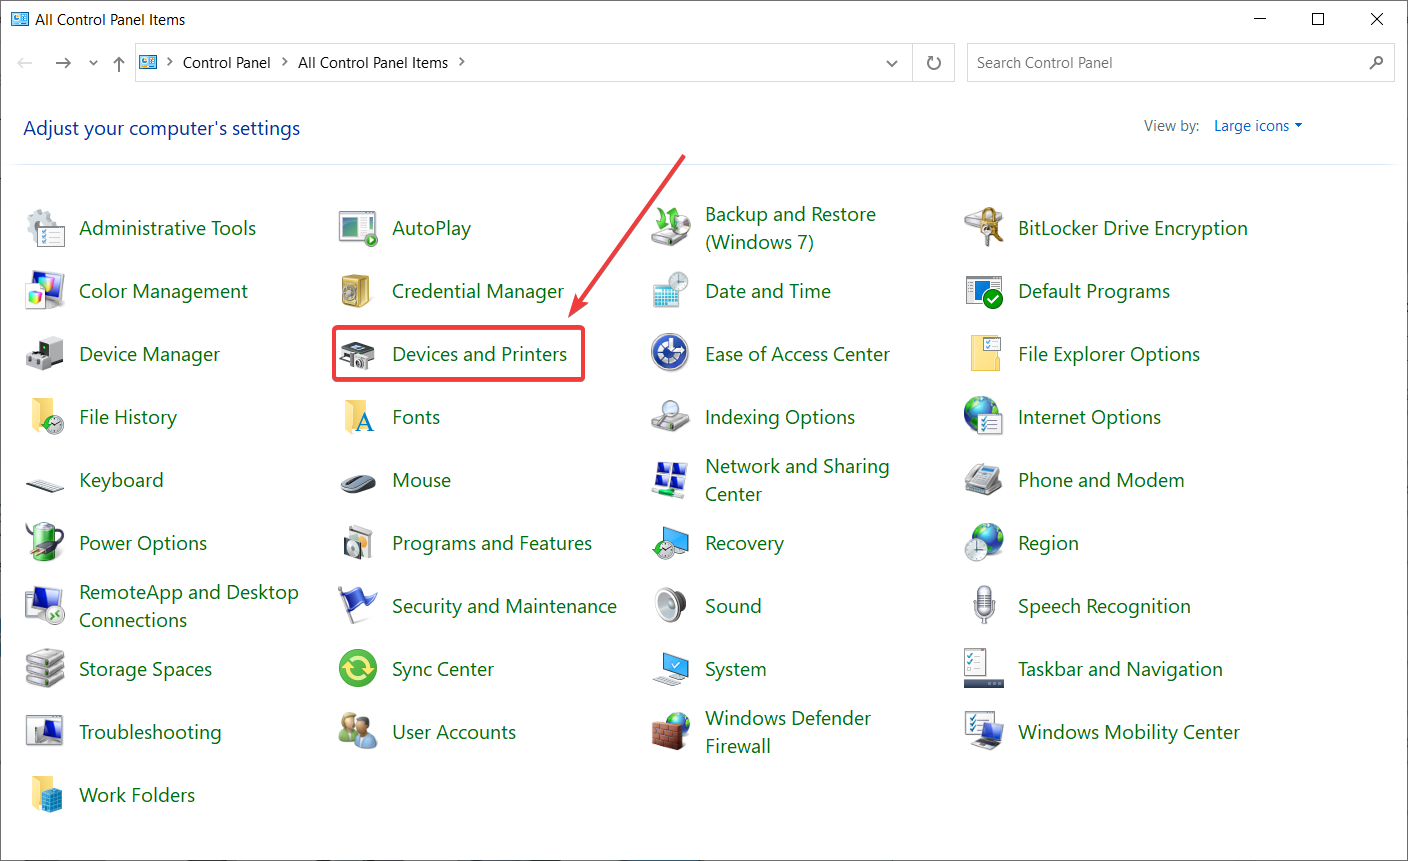
- Select Devices and Printers.
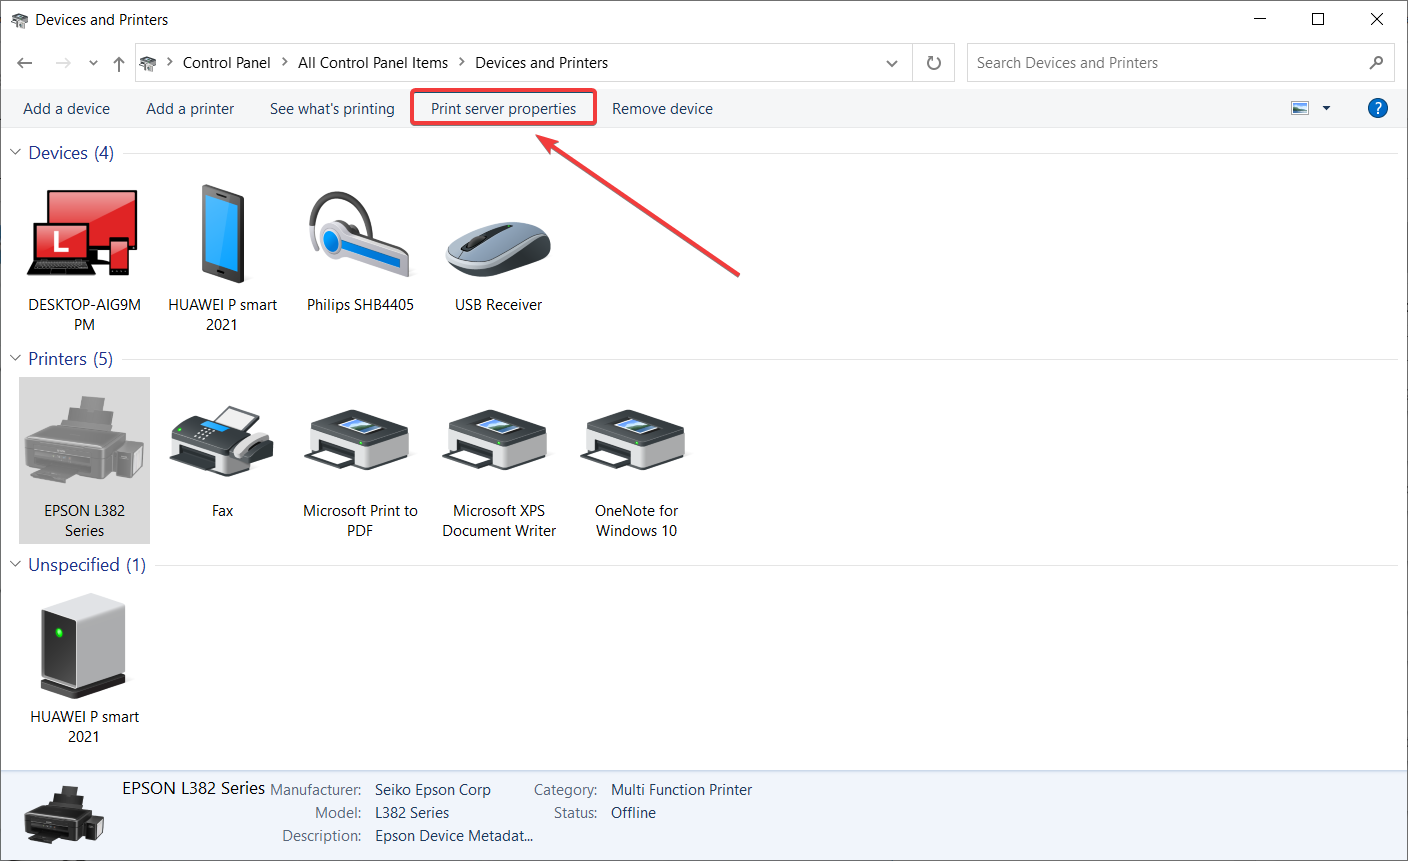
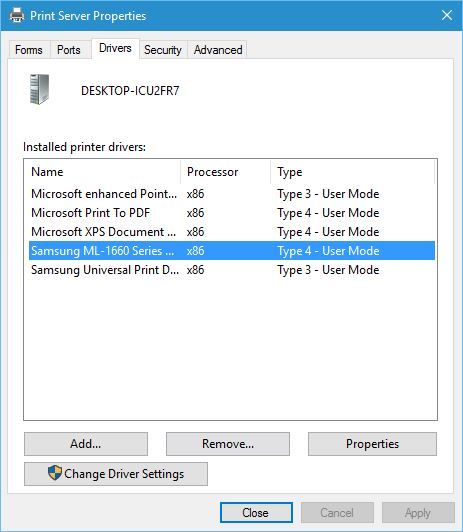
- Choose the questionable printer and click the Print server properties.
- Go to the Drivers tab, select the printer you want to remove, and click the Remove button.
- Select Remove driver and driver package option.
- After removing the printer, click Apply and OK to save the changes.
Users reported that they can’t remove their printer on Windows 10, and if you’re having the same problem, you might be able to fix it by deleting the printer driver from the Print server properties window.
1.2 Remove the printer software
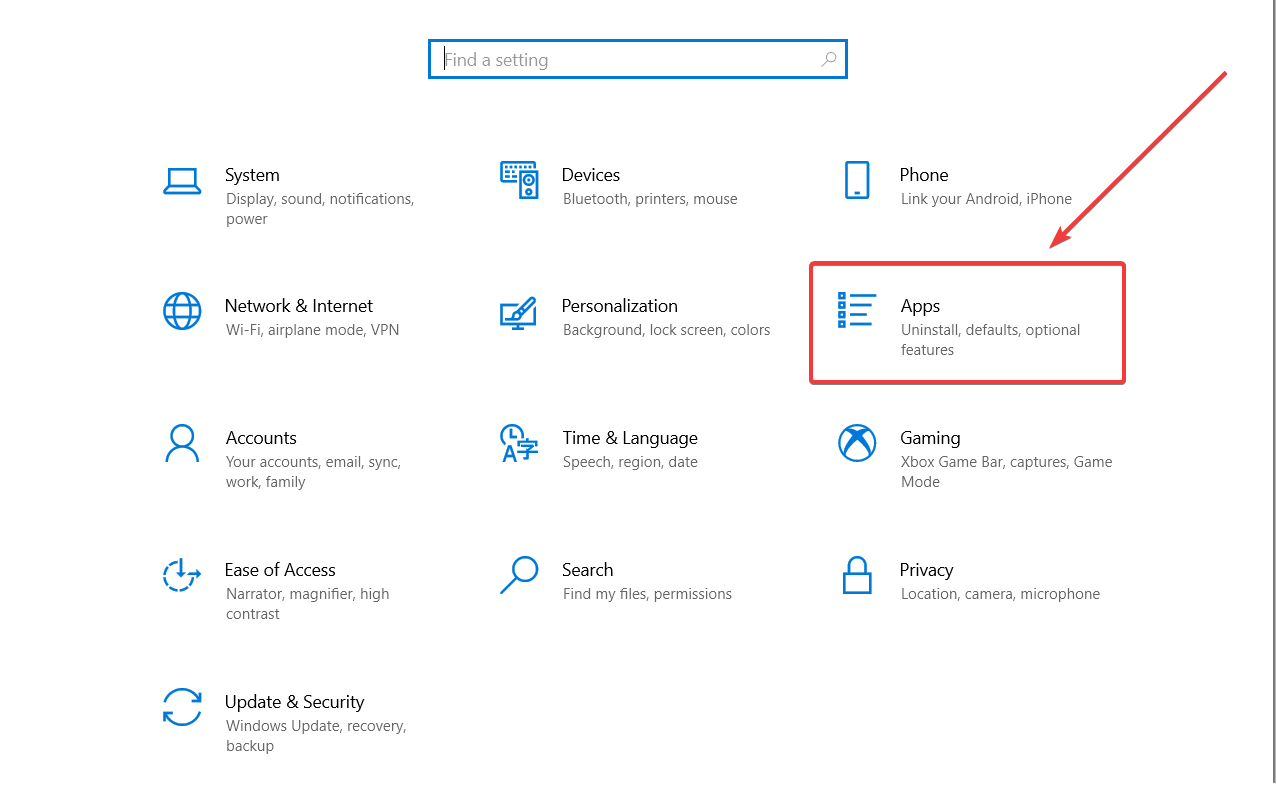
- Press the Win + I buttons to open the Settings app.
- Select Apps.
- Locate the printer software and remove it from your PC.
1.3 Stop the Print Spooler service
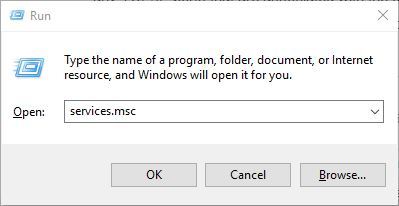
- Press Windows + R to open the Run dialogue.
- Type services.msc and click OK.
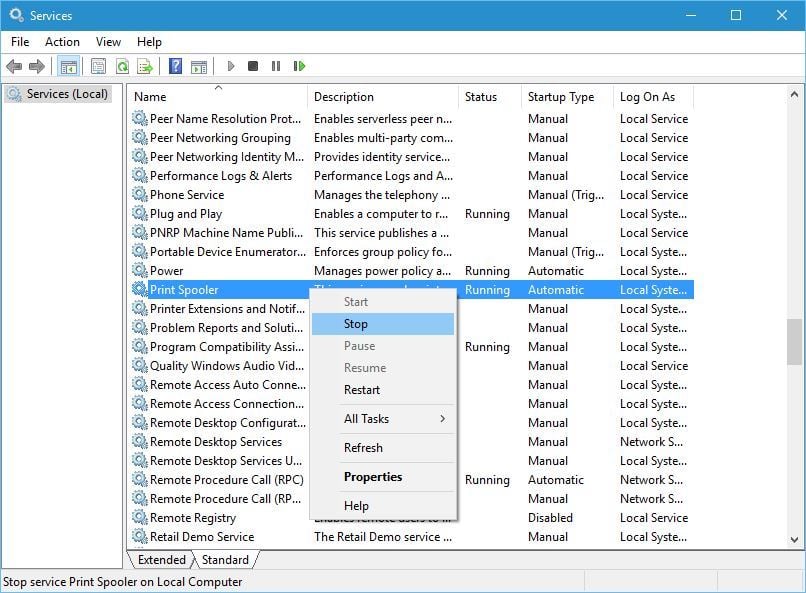
- Locate the Printer Spooler service, right-click it and choose to Stop from the menu.
- Go to the following folder (you’ll need administrator privileges to access it):
C:\Windows\System32\spool\Printers - Delete everything from the Printers folder.
- Go back to Services window, locate Print Spooler service, right-click it and choose Start.
If you can’t remove your printer by using the method from steps 1.1 and 1.2, you’ll have to stop the Print Spooler service first. To do that, follow the steps above.
After restarting the Spooler service, try using the Print server properties window to remove your printer.
Keep in mind that issues can occur if your printer is shared with other computers on your network, so be sure to stop printer sharing and remove printer mappings.
If you have trouble removing the printer, check out our list with the best driver removal software that you can get right now.
2. Edit the registry
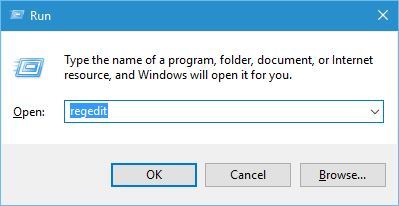
- Press Windows + R to open the Run dialogue.
- Type regedit and click OK.
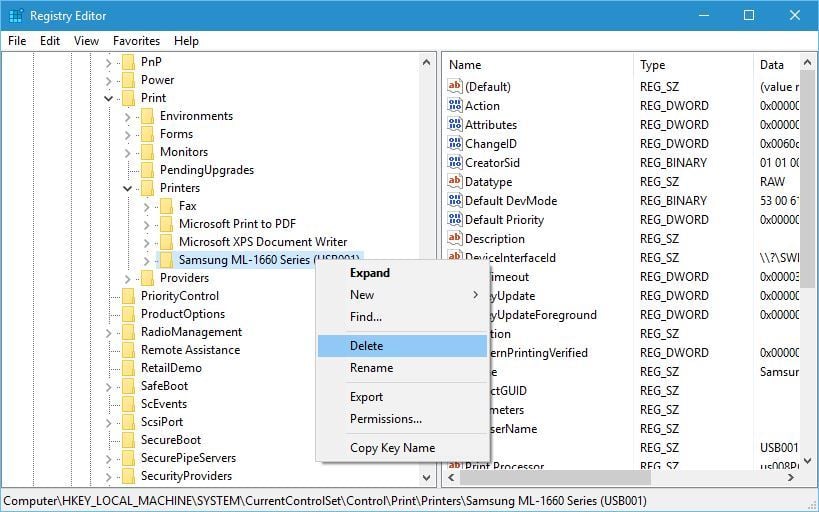
- When Registry Editor opens navigate to the following key:
HKEY_LOCAL_MACHINE\SYSTEM\CurrentControl\SetControl\Print\Printers - Expand the Printers key and locate your printer.
- Right-click it and choose Delete from the menu. Be careful not to delete any other key from the registry.
- After deleting the printer key restart your PC.
If you can’t remove a printer in Windows 10, you might have to change a few values in your registry.
Changing the registry can cause problems with your PC, therefore it might a good idea to create a backup of your registry, just in case.
When your PC restarts, go to the Devices and Printers window, find your printer and delete it.
If you find it difficult to work with the embedded Registry Editor from Windows, you can try a lot of other registry editors.
3. Cancel all print jobs
- Open the Control Panel.
- Click on Devices and Printers.
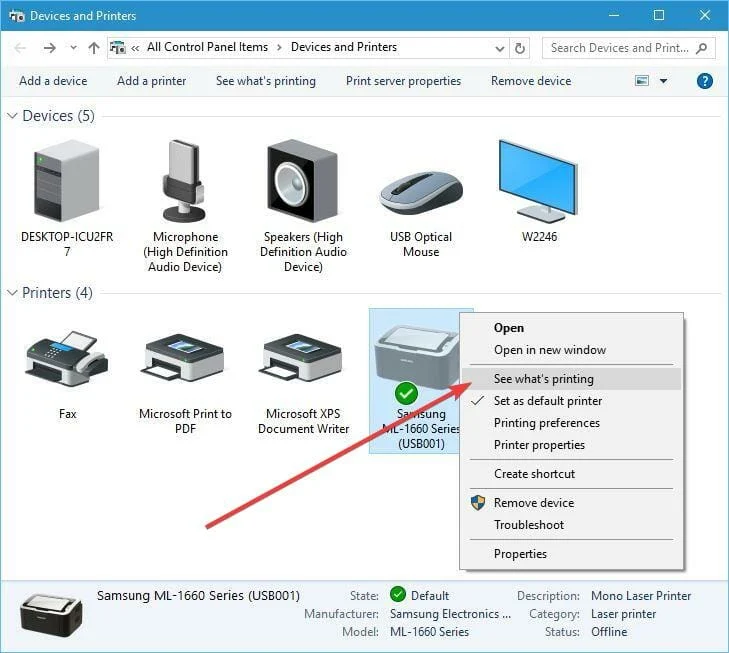
- Select your printer and right-click on it.
- Choose See what’s printing from the context menu.
- Remove all entries from the printing queue.
Sometimes you won’t be able to remove a printer because there are still active print jobs.
If the devices and printers menu isn’t opening on your Windows 10 PC, then you can check out our guide that will help you resolve the problem.
4. Update the printer driver
4.1 Update the drivers manually
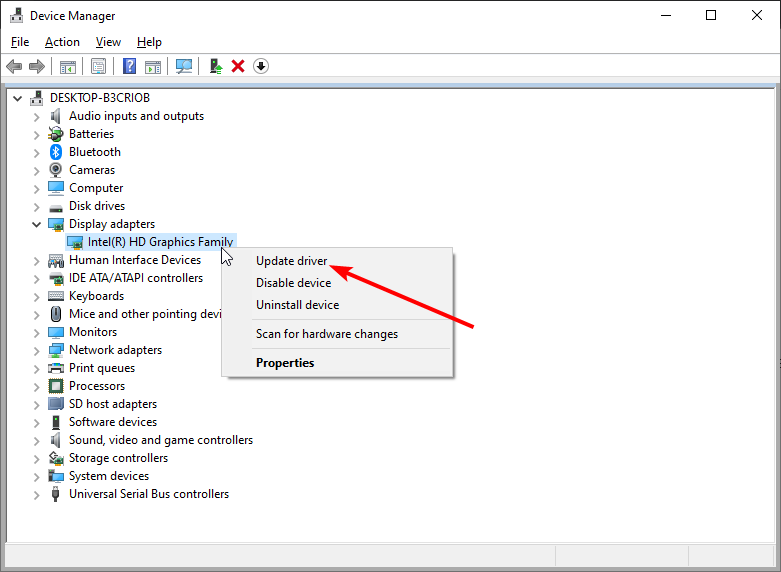
- Right-click the Start button and select Device Manager from the list.
- Expand Print queues and select your printer.
- Right-click your printer and go to Update driver.
- Follow the instructions to update the printer driver.
- Restart your computer.
If none of the previous workarounds resolved the problem, let’s try updating the printer driver to the latest version. Follow the steps above to do that.
4.2 Update the drivers automatically
If you don’t want the hassle of searching for drivers on your own, you can use a tool that will do this for you automatically.
Professional software, like PC HelpSoft Driver Updater, will greatly simplify the updating process and will inform you if your drivers are going out of date again in the future.
⇒ Get PC HelpSoft Driver Updater
5. Remove your printer using the Print Management
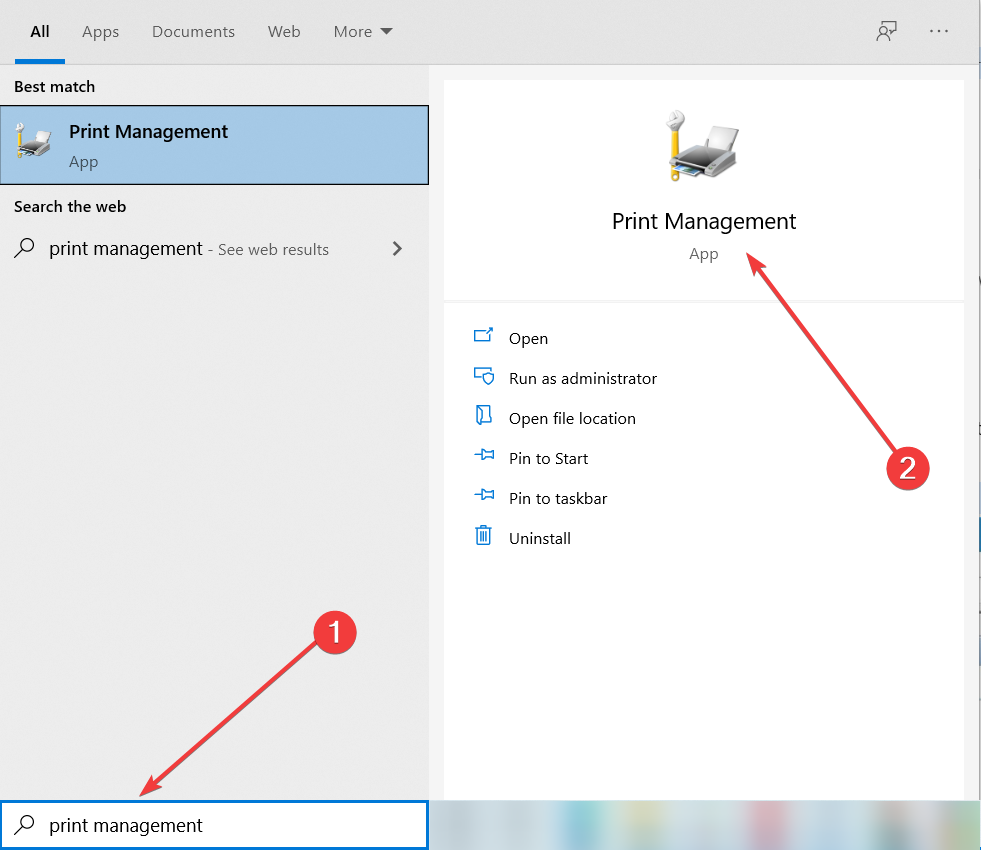
- Open the Start menu.
- Type print management and open it.
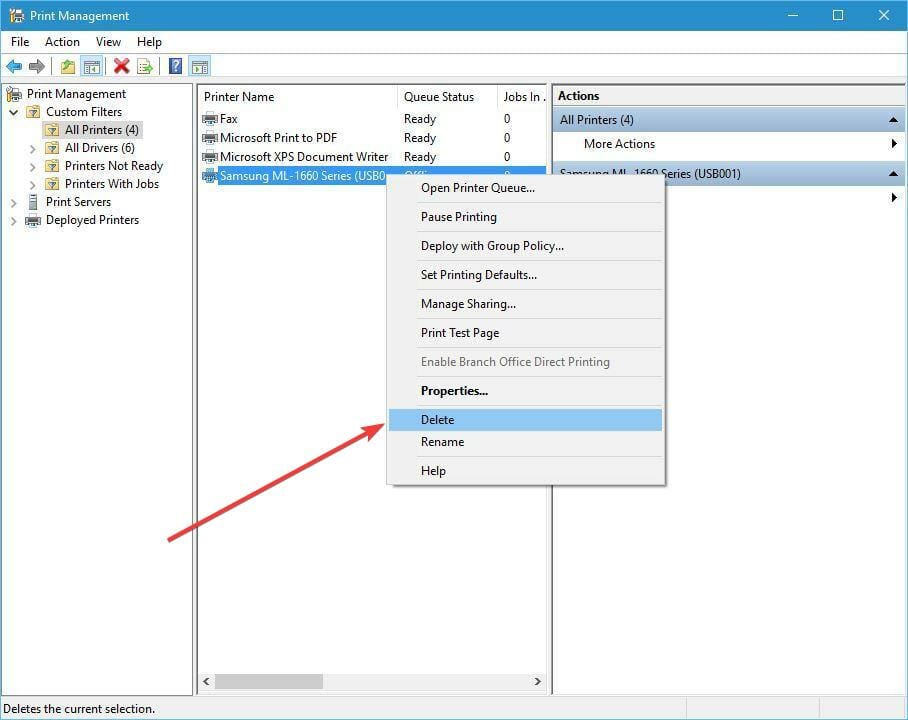
- Go to Custom Filters and select All Printers.
- Locate the printer you want to remove, right-click it and choose Delete from the menu.
According to users, if you can’t remove a certain printer in Windows 10, you might want to try removing it by using the Print Management tool.
6. Delete hidden printers from Device Manager
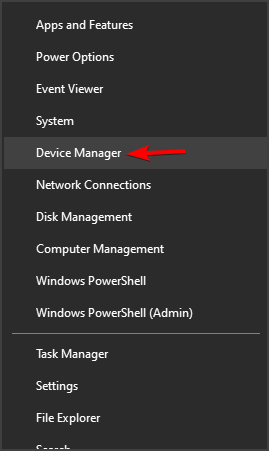
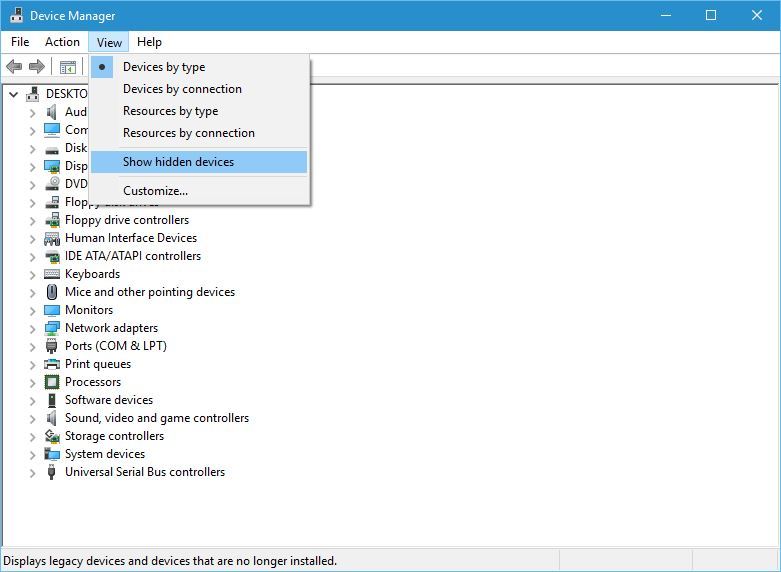
- Press Windows + X to open the Power User Menu.
- Select Device Manager from the list.
- Click on View and select Show hidden devices.
- Delete your printer from Print queues and Printers sections.
- Restart your PC.
Sometimes hidden devices can cause problems with printers, therefore you’ll need to remove them. To do that, follow the steps above.
7. Delete the driver entries from the registry
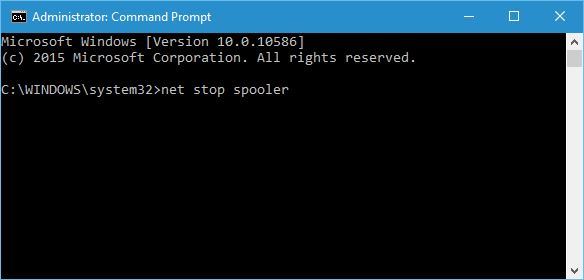
- Open the Start menu, type cmd, and click on Run as administrator.
- Type the below command and press Enter.
net stop spooler - Launch Registry Editor.
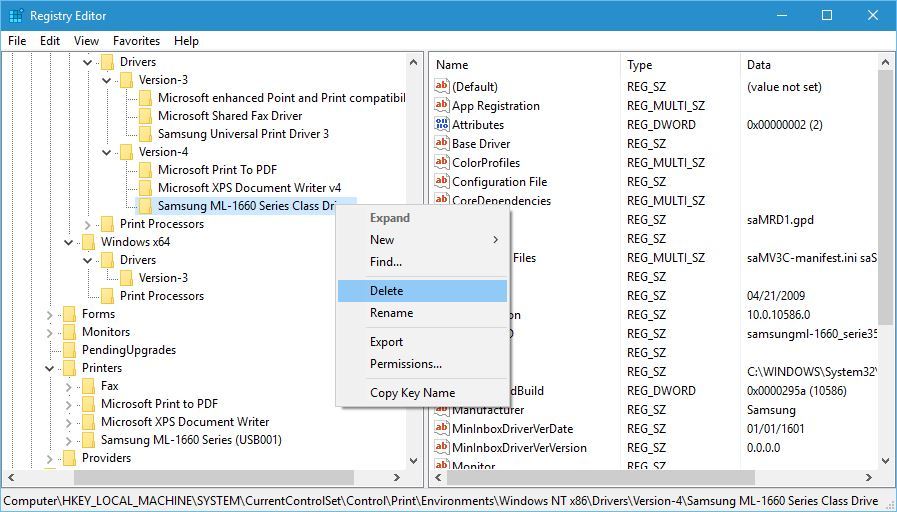
- Go to the following key in the left pane:
HKEY_LOCAL_MACHINE\SYSTEM\CurrentControlSet\Control\Print\Environments\Windows NT x86\Drivers\Version-4- If you use the 64-bit version of Windows 10, you’ll have to navigate to the following key instead:
HKEY_LOCAL_MACHINE\SYSTEM\CurrentControlSet\Control\Print\Environments\Windows x64\Drivers\Version-4
- If you use the 64-bit version of Windows 10, you’ll have to navigate to the following key instead:
- Expand the Version 4 key and locate your printer.
- Right-click it and choose Delete.
- After doing that, go to the following path in File Explorer:
C:\Windows\System32\spool\drivers\w32x863 - Delete all files from that folder. If you have the w32x861 or w32x862 folders instead on your PC, be sure to delete all files from those folders as well.
- Bear in mind that some printers can have extra folders, so you’ll have to find those folders and delete them. For example, HP’s printers have hphp and Hewlett_Packard additional folders.
- Delete the .inf files that are linked to the removed drivers %windir%inf.
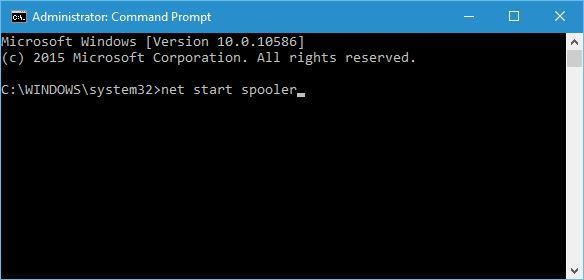
- Start Command Prompt as administrator and execute the below command.
net start spooler
We have to mention that this is an advanced procedure, so be extra cautious while performing it. First, you need to uninstall all printers from your PC. After all, printers are uninstalled, do the steps above.
Bear in mind that this is an advanced solution, therefore we advise you to create a System Restore point so you can restore your PC in case anything goes wrong.
If you can’t access the Registry editor, check out our comprehensive article to solve the issue quickly.
What can I do if I can’t remove the printer driver in use?
1. Delete the driver as every user
If you have multiple users on your PC, you might not be able to remove the printer since the driver is in use.
In order to fix this problem, you need to log in to each user account that has the printer connected and delete the device. After that, log in to the administrator account and delete the driver package.
2. End all tasks
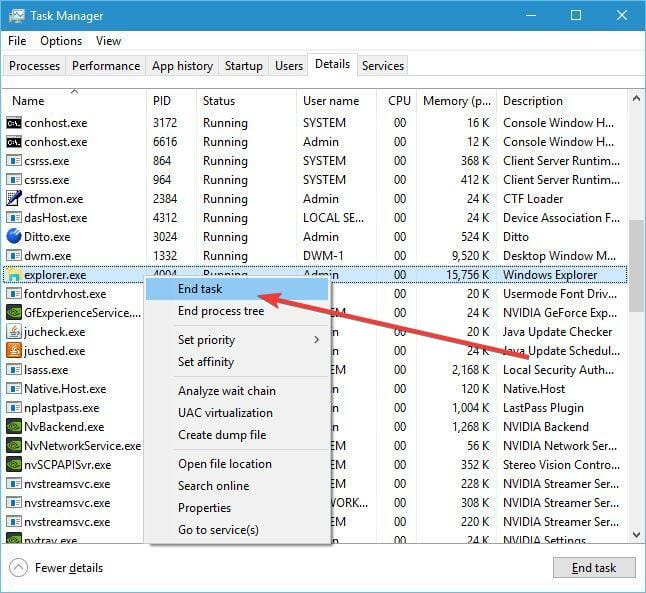
- Press Ctrl + Shift + Esc to open Task Manager.
- Go to the Details tab.
- Locate explorer.exe, right-click it and choose End task.
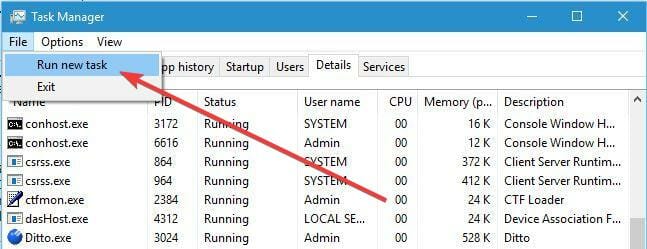
- In Task Manager click on File and select Run new task.
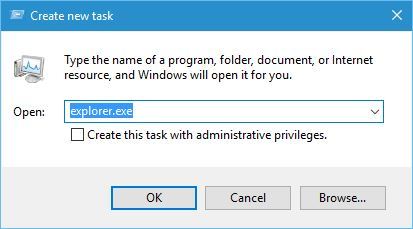
- Create new task window will appear. Enter explorer.exe and click OK.
- When Explorer starts again, try to delete the printer driver.
If you can’t delete the driver, stop the Print Spooler service and try again. Be sure to turn on the Spooler service back on after you delete the driver.
3. Use the Kyocera Deleter tool
If you can’t remove the printer because the driver is in use, you might want to try using the Kyocera Deleter tool from Kyocera’s download center.
Users reported that this tool will delete your printer without any problem but be sure to run this tool as the administrator since it requires administrator privileges to remove your printer.
If you are the owner of a Kyocera printer, you might also be interested in consulting our comprehensive guide on how to download and use Kyocera printer drivers for Windows 10.
4. Try to delete the printer quickly after restarting the Print Spooler service
A few users reported that you can fix this problem by trying to remove the printer after restarting the Print Spooler service.
We already explained how to restart this service in one of our previous solutions, so we advise you to check it out.
This process requires speed, therefore be sure to remove the printer as soon as you restart the Print Spooler service.
According to users, you only have a few seconds to remove the printer, so be sure to do it as fast as you can. If Print Spooler doesn’t work, we have a helpful guide on how to solve its issues.
5. Disable the Bidirectional support
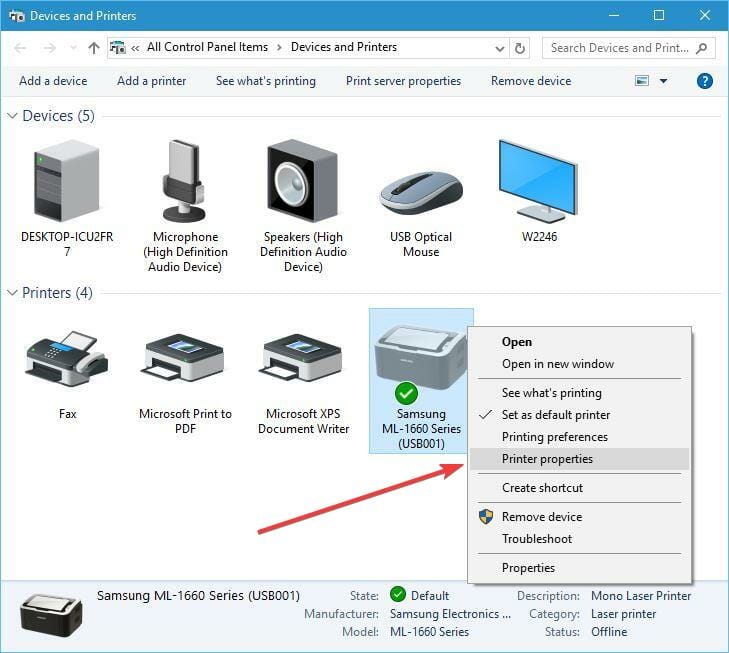
- Open Devices and Printers.
- Locate your printer, right-click it and select Printer properties.
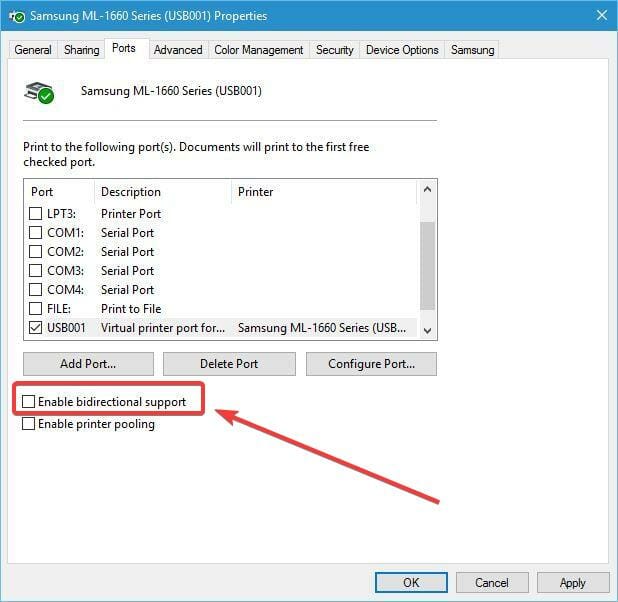
- When the Properties window opens, go to the Ports tab and uncheck the Enable bidirectional support option.
- Click Apply and OK to save the changes.
Users reported that you can fix this problem by disabling the Bidirectional support. To do that, follow the steps above.
6. Set the Print Spooler service to Manual
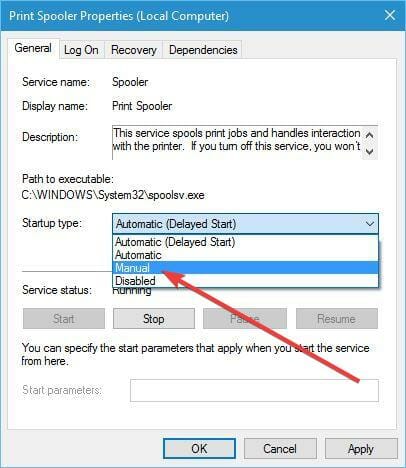
Users reported that you can fix this problem by setting the Spooler service to Manual. To do that, open the Services window, locate the Print Spooler service, and double-click it to open its properties.
Set the Startup type to Manual and click Apply and OK to save the changes.
After that, try to remove your printer. If the uninstall tool mentions Print Spooler service, simply go to Services, locate Print Spooler service and start it.
After that, you should be able to remove your printer without any problems.
Not being able to remove a printer in Windows 10 can be a big problem, but you can usually fix this problem by restarting the Print Spooler service and trying to delete the printer again.
How do I fix Cannot remove printer on Windows 11?
- Clear the print queue.
- Reconnect your printer.
- Run the printer troubleshooter.
- Remove the printer from the printer server properties.
- Uninstall the printer driver.
How do I force a printer to uninstall in Windows 10?
- Open the Start menu.
- Search for the command prompt and open it as an administrator.
- Execute the below command.
wmic printer get name - Run the below command to delete the printer.
printui.exe /dl /n "Your_Printer_Name"- You need to replace the “Your_Printer_Name” text from the above command with the name of your printer.
- Restart your PC.
If you’re still unable to remove the printer in Windows 10, you can also consider changing your printer to a better one. You can choose one of the best wireless printers from our extensive list.
Do I need to uninstall an old printer before installing a new one?
It is not compulsory to remove your old printer and its components from your PC before installing a new one. However, it is good practice to do so if you are sure you won’t be using the old device anytime soon.
This is to avoid confusion and free up valuable space.
 NOTE
NOTE
We hope that our solutions helped you fix the printer problems. Make sure you provide us with your feedback in the comments section below.


User forum
5 messages