Allow Files on This Drive to Have Contents Indexed [Explained]
Key notes
- By turning on certain components of the index service you can speed up file searches or you can choose to disable it.
- In most cases, this service is turned on automatically, but you can also enable the indexing service in Windows 10 manually.
- For more helpful tips, just visit our Windows 10 section next.
- Check out our How to page for tech tutorials, as well as various tips and tricks.

There are many things Windows as an OS platform does good. One of those is the manipulation of files and directories. The user interface is similar for ages, and it’s hard to argue about its intuitive nature.
Another thing which is rather useful is system search. Thanks to file indexing, the searches for obscure files in your local drives are not dull and lengthy.
If you ever wondered how it works and how to, if the need arises, disable it, make sure to check to continue reading and find out.
What does Allow files on this drive to have contents indexed.. mean?
Even though Windows 10 is the new star for a couple of years, this trick is part of Windows for ages.
File’s contents indexing is an old feature that is resourcefully implemented in order to speed up the search process of local files.
However, nowadays, we can question whether it’s useful or it’s really just slowing down your system due to not-perfect indexing times.
Here, we’re referring to everyday users and not the enterprises. Windows 10 focuses on files you frequently use and access.
So, it shouldn’t be an issue to let it be since it’s enabled by default and strictly focuses on certain directories and not every given file within the given partition.
How does it work?
It basically scans all accessed folders and subfolders contained within the partition. Then, it indexes them and, the next time you search for a file or a folder, the searching process is vastly faster.
The more files you commonly use and look for, the greater value of this nifty feature. The idea is to index files while the PC is idle, however, this isn’t the case for some users.
Namely, some of them reported frequent HDD usage spikes during the startup or while using some demanding applications.
This will, of course, affect the overall system performance. On the other hand, looking up for that one file in the directory with tens of thousands can be a slow-death experience, so have that in mind.
How can I enable or disable file indexing on the given partition?
1. Turn off indexing for a specific partition
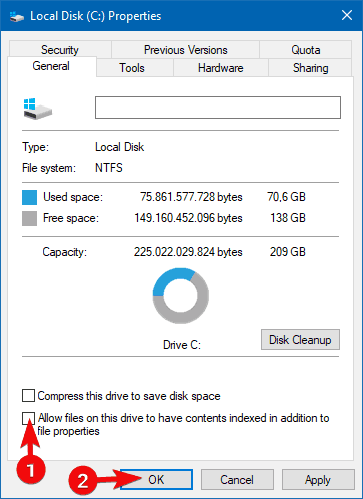
- Open This PC or File Explorer.
- Right-click on the partition you want to relieve of indexing and open Properties.
- Uncheck the Allow files on this drive to have contents indexed in addition to file properties box.
- Restart your PC.
This feature is, by default, enabled on all your various partitions or drives. Including the external partitions connected to Windows 10 PC. Disabling it is as simple as possible.
Just navigate to This PC or File Explorer, right-click on the partition at hand and open Properties. What you want to do next is uncheck the Allow files on this drive to have contents indexed in addition to file properties box, as above mentioned.
2. Change indexing options
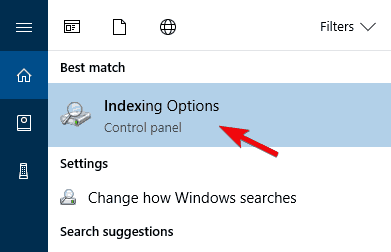
- In the Windows Search bar, type index and open Indexing Options.
- Click Modify to choose the directories you commonly access.
- Click Advanced and choose the File Types tab.
- Select file types you want to be indexed (or uncheck the ones you don’t see necessary) by checking the boxes.
- Confirm changes and restart your PC.
Another good thing you can do is make selective indexing. Meaning, the indexing will focus on directories you choose and it won’t take a toll on your HDD or processing power.
You can choose a certain file type to be indexed (this can come in handy if you have lots of photos), too. Also, you can exclude subdirectories or file extensions if you deem them redundant.
3. Use a dedicated tool
Copernic Desktop Search is a free search tool for file search on your own PC. The program searches MS Office, HTML, PDF, text and OpenOffice files.
Using categories it can distinguish between file categories such as music, photos, videos, or e-mails from Outlook or Mozilla programs.
Copernic Desktop Search currently supports over 119 different file types for indexing and previewing. This search file tool indexes better and finds more files than a regular Windows 10 search.
In case you have something interesting to add, we encourage you to do so in the comments section below.
Read our disclosure page to find out how can you help Windows Report sustain the editorial team. Read more


Improve this guide


User forum
1 messages