Ethernet Spiking in Task Manager: Fix Ping Spikes in 8 Steps
Rest assured that every solution in this article was verified by our team
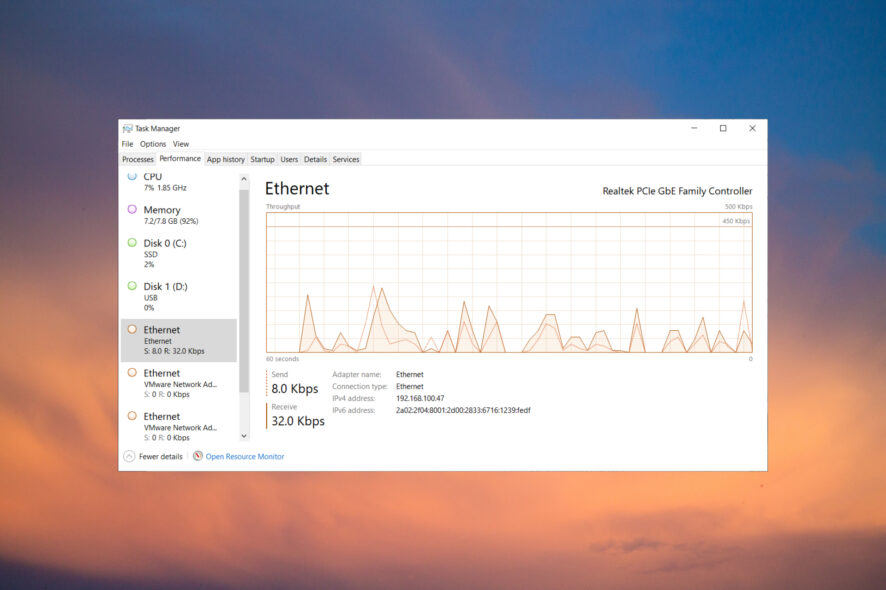
Ping (or latency) spikes are one of the main causes of lag in multiplayer games. Many users switch to Ethernet connections because they’re less susceptible to ping spiking.
So, if you require answers about Task Manager Ethernet spikes, the insights and solutions described below will help.
Why is my Ethernet spiking in Task Manager?
There are a lot of reasons why you experience Ethernet spikes in Task Manager, and we will highlight the most important ones:
- Network congestion – When you see lots of Ethernet spiking in Task Manager, you might be connected to a very congested cell tower. And network congestion causes data packet loss.
- Limited bandwidth – If you have many devices connected to the same router/modem, your available bandwidth will suffer.
- Incorrect configuration – Sometimes, even the simple fact that your connection settings are not configured properly may lead to Ethernet spikes.
Here is how to stop Ethernet spikes on Windows 10, or at least reduce random Ethernet ping spikes for games and software.
How do I fix ping spikes on Ethernet?
Before getting to the main solutions to fix Task Manager Ethernet send and receive problems, there are a few things you can do to improve the situation:
- Make sure you don’t have any other programs running that may consume your bandwidth.
- Restart your router. Sometimes ping spikes on Ethernet are easily solved this way.
- Disconnect other devices that are using the same connection/router.
- Check if there are any ongoing app or system updates. If so, try to prioritize and let the processes finish.
- Update your Windows OS. Microsoft is patching the system all the time and a pending update might fix this exact problem.
- If you’re utilizing a crossover cable for your connection, consider replacing it with proper Ethernet cables. CAT-5 or CAT-6 cables are best for Ethernet connections.
If you’ve crosschecked the prerequisite measure above, this comprehensive guide will help you learn how to stop ping spikes on Ethernet with simple steps.
1. Update your network drivers
- Right-click the Start button and select Device Manager.
- Click on the Network adapters section to expand it, right-click on your device, and select Update driver.

- Now, select Search automatically for drivers.
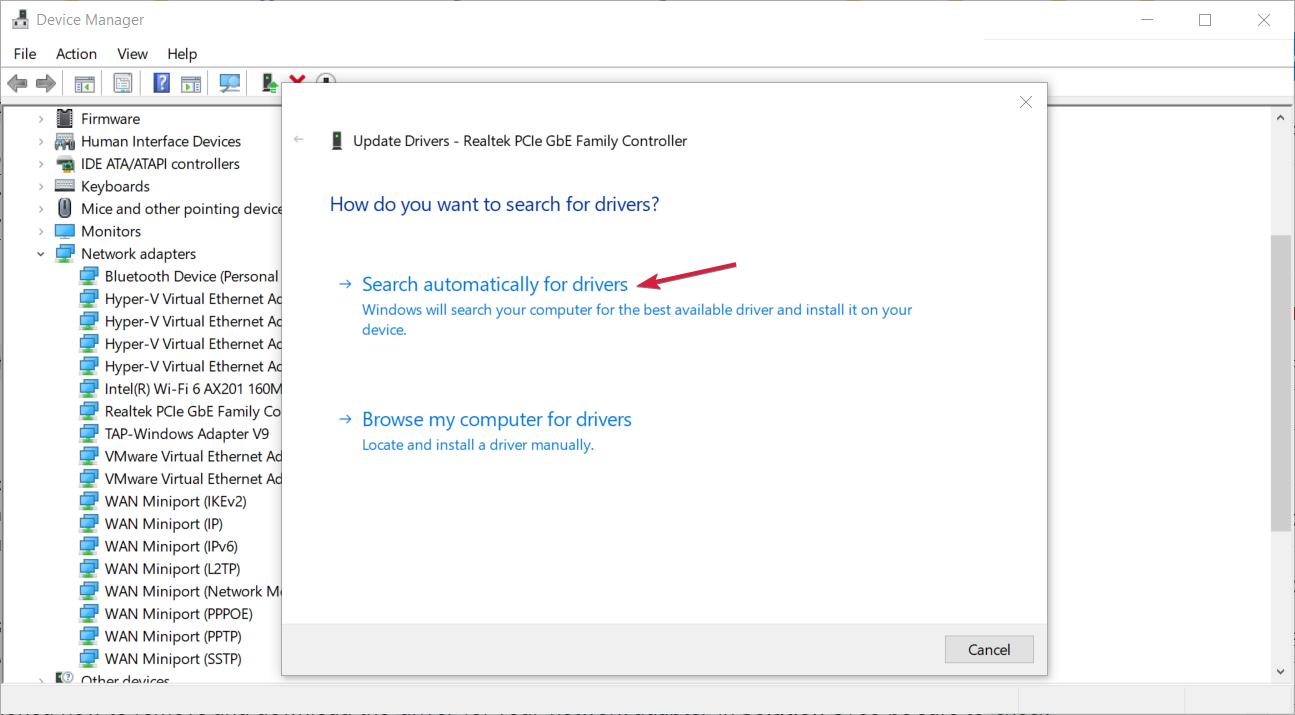
- If there are any new ones, the system will install them.
Outdated network drivers can cause Ethernet lag spikes. The fastest fix? Use a driver updater like PC HelpSoft, it scans your system, detects outdated drivers, and updates them automatically to keep your network stable.
2. Change to Google DNS
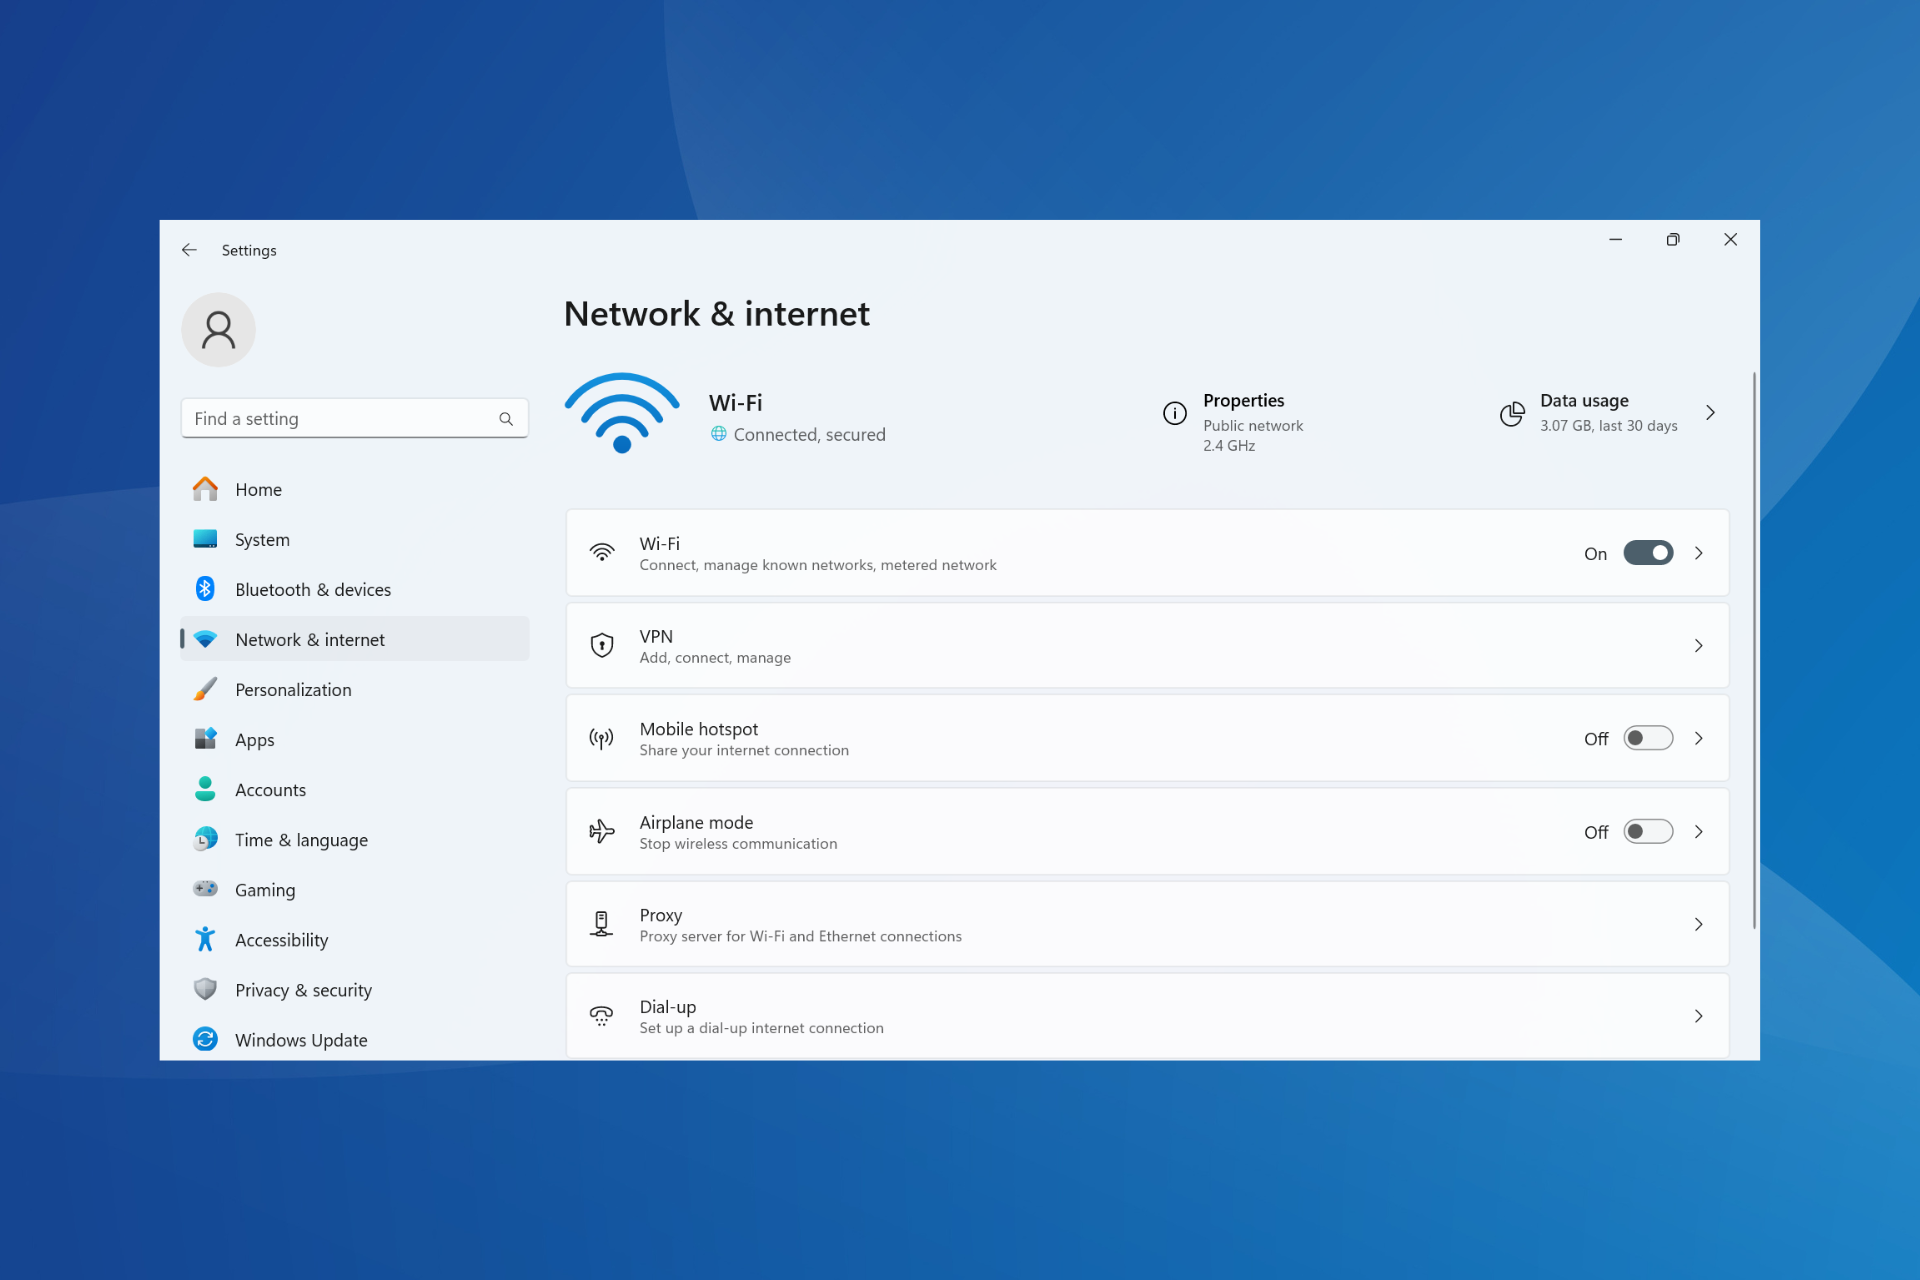
1. First, click the Start button and choose Settings from the menu.
2. Next, select Network & Internet to open the tab in the screenshot below.
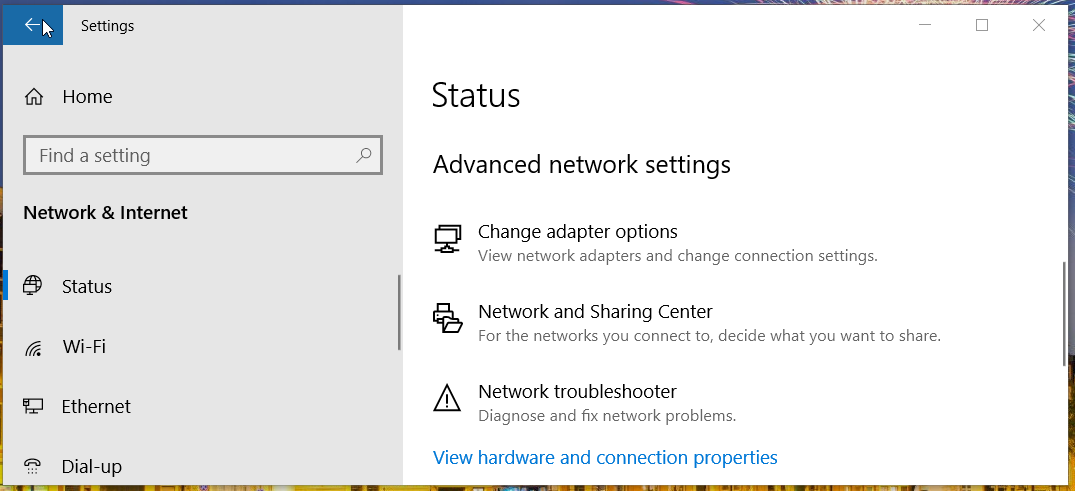
3. Click on Change adapter options to open the Network Connections Control Panel applet.
4. Double-click your Ethernet connection.

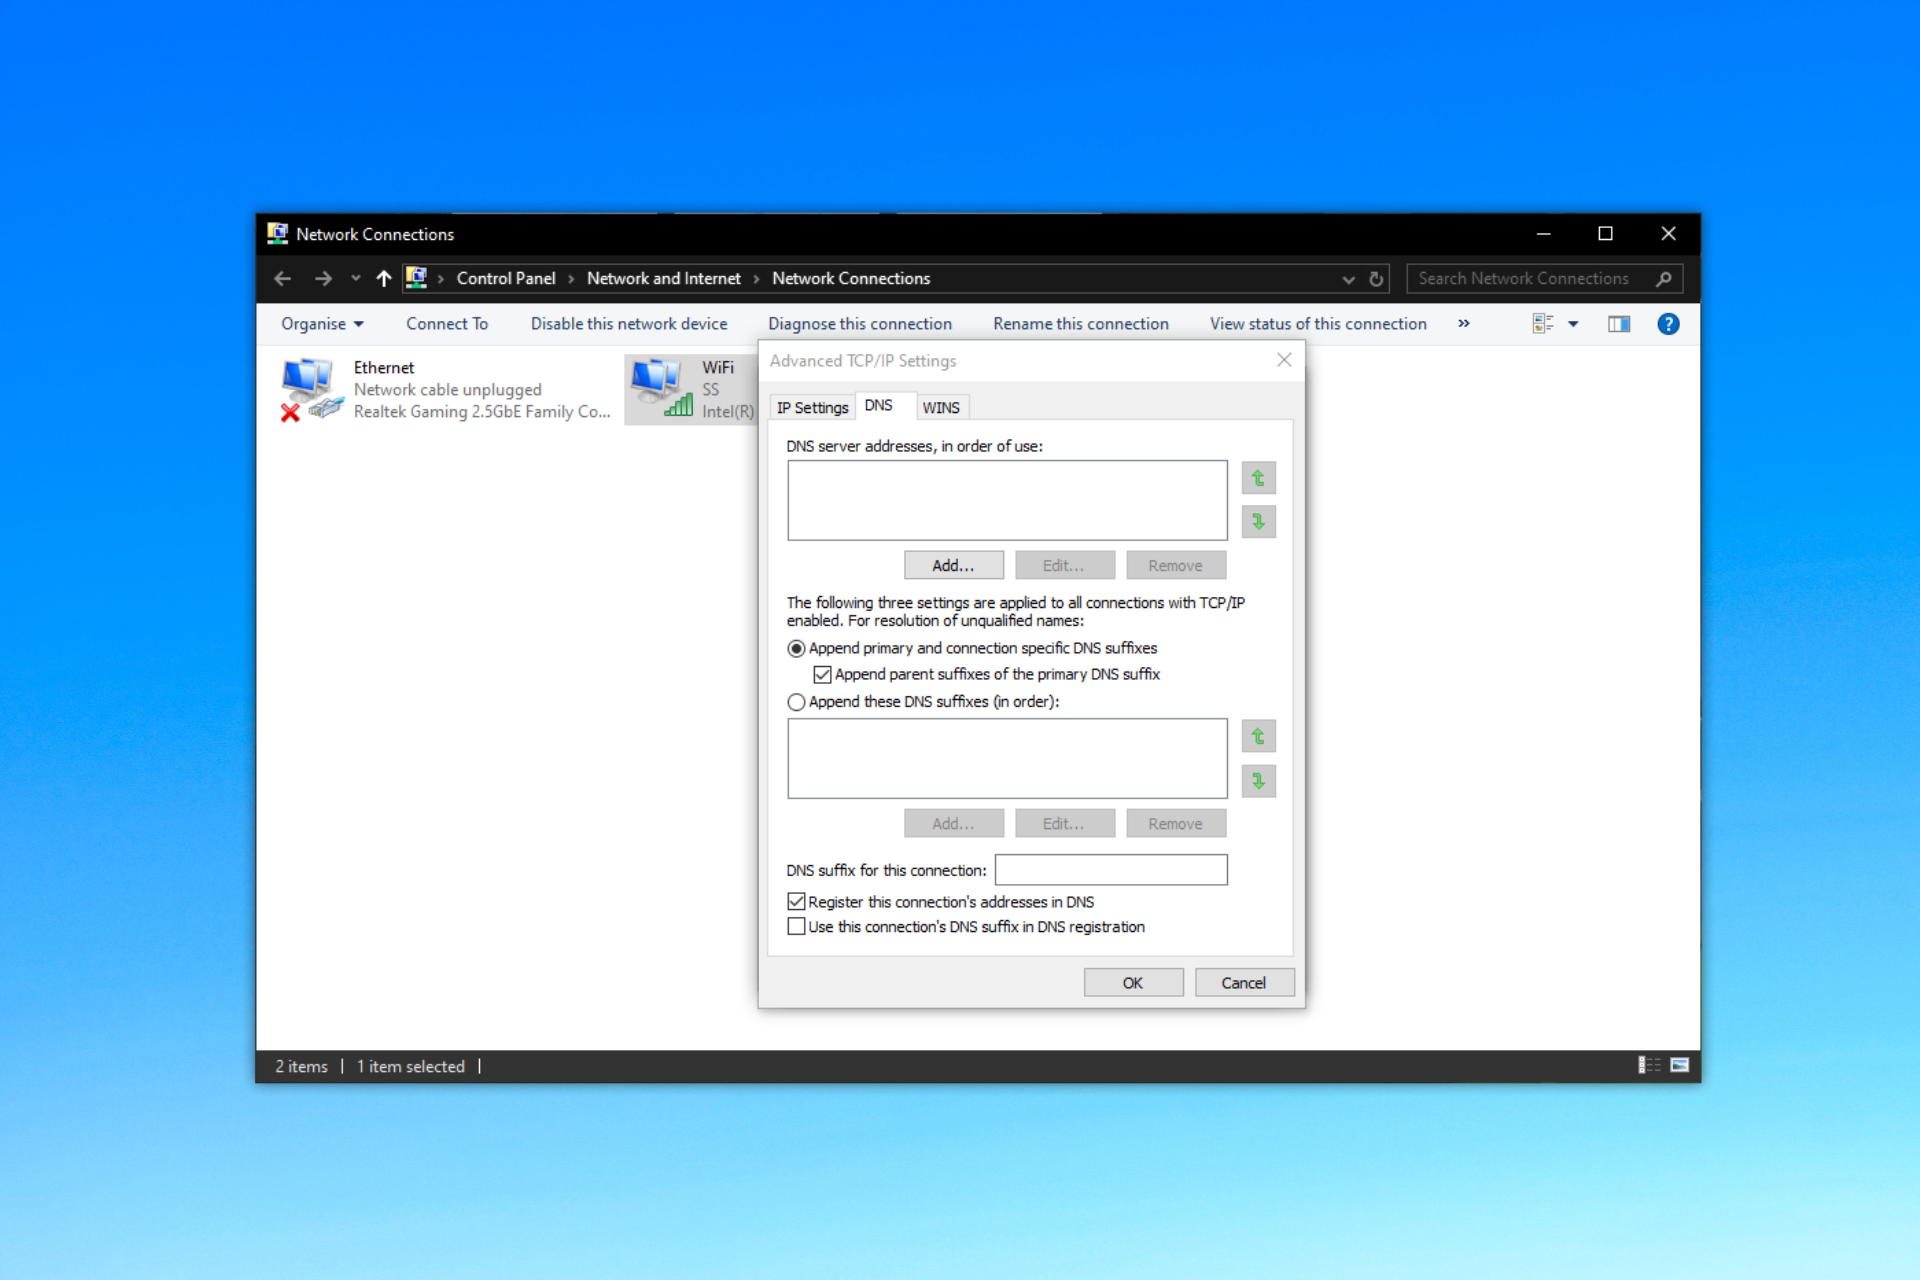
5. Select Internet Protocol Version 4 (TCP/IPv4) and press the Properties button.
6. Next, select the Use the following DNS server addresses radio button.
7. Enter 8.8.8.8 within the Preferred DNS server box and 8.8.4.4 for the Alternative DNS server box.
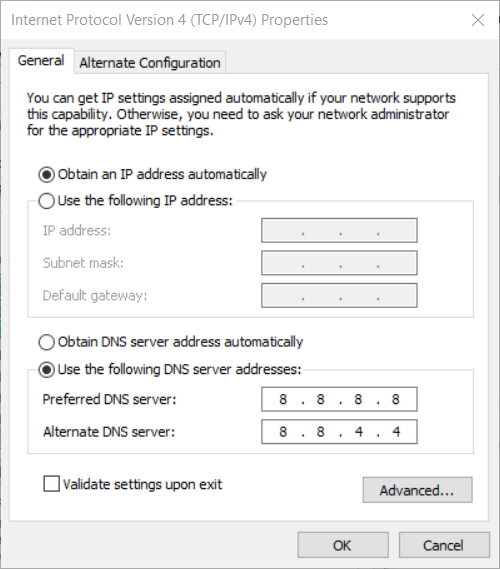
8. Click the OK button and close the window.
If you’re experiencing ethernet spiking issues and you’re using an automatically selected DNS server address, you should change to Google’s DNS.
Google has a safe public DNS Server that offers reliable latency and should fix your internet issues.
3. Select the WPA2-PSK [AES] protocol
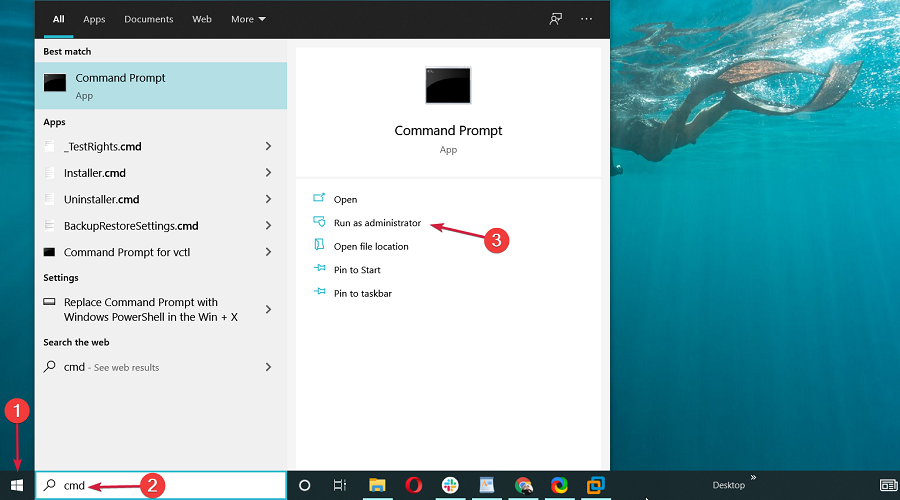
- Click the Start button, type cmd, and select Run as administrator from the results.
- Type this command in the prompt’s window and press Enter:
ipconfig
- Next, note down your IP address listed for the Default Gateway, which will be something like 192.168.1.1.1.
- Open a web browser and input your IP address in the browser’s URL bar and press Enter to open your router’s configuration (firmware) page.

- Log in to your router firmware page (check your router’s manual for login details).
- Select a WPA2-PSK [AES] option within your router’s security settings.
This procedure is different for any manufacturer and router, but if you have difficulties, we gave a dedicated article on how to access your router’s page.
4. Close bandwidth-hogging background programs
- Right-click the Windows 10 taskbar and select Task Manager on the menu that opens.
- Next, click the Network column within the Processes tab of Task Manager.

- Select apps and background services with high network percentage figures (for bandwidth utilization) and click End task to close them.

This setting might be the reason why Windows can’t get the network settings from the router.
5. Use a VPN

VPN servers often provide more stable network performance even during peak periods. For that reason, we recommend NordVPN, which is among the most high-rated VPN services. Our fix gaming lag post provides further details about how you can reduce ping spiking with NordVPN.
NordVPN packs in all the features you would expect from a quality VPN service, plus a bit more besides. It supports a variety of protocols, such as OpenVPN, L2TP, IPSec, and PPTP. Furthermore, this software also utilizes the next-generation AES-256-GCM VPN encryption algorithm.
Other useful NordVPN features
- It includes a Dark Web Monitor for dark web email alerts
- Presets enable users to launch NordVPN with custom connection configurations
- NordVPN incorporates double data encryption
- Supports proxy server connectivity

NordVPN
NordVPN enables you to resolve any Ethernet ping spikes by managing your network through their servers.6. Reset the network settings using Command Prompt
- Click the Start button, type cmd into the Search field, and select Run as administrator from the results.
- Then input all these separate network commands, pressing Enter after each one:
netsh winsock reset
netsh int ip reset
ipconfig /release
ipconfig /renew
ipconfig /flushdns
- Thereafter, open the Task Manager’s Performance tab to see if the latency spiking has dropped off.

7. Reset Windows 10’s network settings
- Click the Start button and select Settings.
- Click Network & Internet and then Status in Settings.
- Click Network reset to open the button directly below.

- Press the Reset now button.

We have a complete guide on how to reset network settings in Windows 10 that will provide more information.
8. Turn off Windows Defender Firewall
- Click the magnifying glass taskbar button and enter firewall in the Search box.
- Select Windows Defender Firewall to open that applet.

- Click Turn Windows Defender Firewall on or off to open further options.

- Select both Turn off Windows Defender Firewall options and click OK to exit.


It’s recommended that you only temporarily turn off the firewall to reduce Ethernet spiking for gaming. Turn the firewall back on when not playing games.
If you have a third-party antivirus utility installed, that might also incorporate its own firewall. So, temporarily disable its shield whilst gaming. To do so, right-click the system tray icon for your antivirus software and select a disable or turn off the context menu option.
You might also be interested in our guide on how to fix network congestion because that might also influence the Task Manager Ethernet performance.
We also have a dedicated guide on the best LAN VPN to use while gaming.
Those are some of the best ways to fix Ethernet lag spikes. If your Ethernet spiking is especially severe, however, consider contacting your ISP.
Your ISP can check for network issues causing the spiking and give you guidance for enhancing your connection quality.
Even more, this guide on what to do if Ethernet is not working is worthy of your attention. Take a closer look and let u know which solution worked for you in the comments area below.
Read our disclosure page to find out how can you help Windows Report sustain the editorial team. Read more


Improve this guide

User forum
0 messages