How to change the pagefile.sys file in Windows 10
Pagefile.sys is a special type of file in Windows 10 that stores crash dumps. In addition, this file can also help you achieve better performance by writing the contents of your RAM to it. Pagefile.sys is a rather useful component of Windows, and today we’re going to show you how to use it properly.
What is pagefile.sys and how do we use it?
As we already mentioned, pagefile.sys is a component of Windows that can store contents of your RAM once your RAM is completely used. By doing so, Windows will perform better overall. However, you can also modify pagefile.sys and change its configuration, something we’ll go into in this article.
- Changing the size of pagefile.sys
- Move pagefile.sys to a different drive
- Delete pagefile.sys after every shutdown
1.Changing the size of pagefile.sys
In order to improve your machine’s performance, you can easily change the size of the pagefile.sys file:
- Press Windows Key + S and enter advanced. Select View advanced system settings from the menu.

- When the System Properties window opens, click the Settings button in the Performance section.

- Navigate to the Advanced tab. From there, you’ll see the size of the paging file for all drives. To change it, click the Change button in the Virtual memory section.

- Uncheck Automatically manage paging file size for all drives. Select your system drive from the list. By default, it should be labeled as C. Select the Custom size option and set the Initial and Maximum size. Once you’re done, click Set and OK to save changes.

As for the maximum size of the paging file, if you have 16GB of RAM you should set it to about 2.5GB. If you have 32GB of RAM, set the paging file to about 5GB.
- READ ALSO: How to solve memory leaks in Windows 10
2. Move pagefile.sys to a different drive
If your pagefile.sys is taking too much space on your system drive, you can move it to another drive easily. To do that, follow these steps:
- Open Advanced system settings. Go to the Performance section and click the Settings button. Now, go to Advanced tab and click the Change button. For more information on how to do that, be sure to check our previous section.
- Uncheck the Automatically manage paging file size for all drives option.
- Select your C drive and then set No paging file option. Now click the Set button.

- Choose the drive that you want to use to store pagefile.sys. Select System managed size option and click the Set button. Click OK to save changes.

- Restart your PC to apply changes.
After doing that, your pagefile.sys will be moved to a different drive. Moving your pagefile can be extremely useful especially if you don’t have enough space on your system drive to store it. We have to mention that some applications require your pagefile.sys to be on the C drive in order to work properly. Therefore, if any issues occur after moving the file, be sure to move it back to your system drive. If you want, you can completely disable pagefile.sys by selecting the No paging file option for all your partitions. Keep in mind that disabling pagefile.sys can lead to certain issues with your PC.
3. Delete pagefile.sys after every shutdown
If you’re working on confidential documents, you might want to delete the pagefile after every shutdown. By doing so, you’ll overwrite the contents of pagefile.sys with zeroes. This will clean the pagefile, but it will also make the shutdown process a bit slower. To enable this option, you need to modify your registry. To do that, follow these steps:
- Press Windows Key + R and enter regedit. Press Enter or click OK to start Registry Editor.

- In the left pane, navigate to HKEY_LOCAL_MACHINESYSTEMCurrentControlSetControlSession ManagerMemory Management.

- In the right pane, locate ClearPageFileAtShutdown DWORD and double-click it to open its properties.
- If this DWORD isn’t available, right-click the empty space in the right pane and choose New > DWORD (32-bit) Value. Enter ClearPageFileAtShutdown as the name of the new DWORD and double-click it.

- When the Properties window opens, set the Value data to 1 and click OK to save changes.

- Close Registry Editor.
You can also clean the pagefile.sys on every shutdown by using Group Policy Editor. To do that, follow these steps:
- Press Windows Key + R and enter gpedit.msc. Press Enter or click OK.

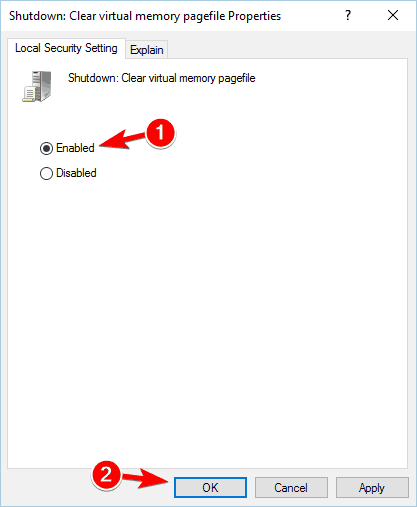
- When the Group Policy Editor opens, in the left pane navigate to Computer Configuration > Windows Settings > Security Settings > Local Policies > Security Options. In the right pane, double-click Shutdown: Clear virtual memory pagefile.
- When the Properties window opens, select Enabled and click Apply and OK to save changes.
After making these changes, pagefile.sys will be cleared every time you turn off your PC. Once again, we have to mention that by enabling this option your shutdown time might increase.
Pagefile.sys is an important component of Windows 10, and you can configure it in order to achieve the best performance. Stability issues can occur if your pagefile.sys is missing or improperly configured, so be cautious if you decide to change your pagefile.
Also, don’t forget to share your thoughts about this in-depth explanation of various methods to tweak the Pagefile.sys file. We look forward to your valuable feedback, as always. The comments section is just below.
READ ALSO:
Read our disclosure page to find out how can you help Windows Report sustain the editorial team. Read more


Improve this guide


User forum
3 messages