Fix Common Steam Errors on Windows 10/11 in a Few Easy Steps
Give a try to these quick methods now

Steam is one of the biggest distribution platforms that allows gamers to buy games and play them with their friends. This platform allows millions of users to play together.
But sometimes, certain errors with Steam can appear, and today we will show you how to fix Steam errors on Windows 10.
How can I fix Steam errors on Windows 10?
What can I do when getting Could not connect to Steam network error?
1. Delete all files from the Steam folder
- Go to the Steam installation directory. By default, it should be C:Program FilesSteam, but it could be different on your computer.
- After you enter Steam’s directory, delete all files and folders except the steamapps folder and Steam.exe.
- After that, click Steam.exe and wait for Steam to download and install again.
If you encounter Could not connect to Steam network error, you should be able to fix it by removing all files from Steam’s installation directory. To do that, follow the above steps.
By not deleting the steamapps folder all your games will remain on your PC, so you won’t have to download them again.
2. Enter Steam in Offline mode
When you get this error message, you’ll usually have the option to start Steam in Offline mode. To fix this problem start Steam in Offline mode, go to Steam tab, choose Go Online option, and this problem should be fixed.
How long can Steam stay in Offline mode? We’re talking about an extended time frame if there are no Steam client updates involved. So, expect it to stay in Offline mode for up to five days.
3. Change the Internet security settings
- Press Windows Key + S, enter Internet options, and select Internet Options from the results.
- Go to the Security tab and select the Local intranet option. Lower the security level for this zone to Low.
- Click on Trusted sites and lower the security level to Low.
- Click Apply and OK to save changes.
Users reported that this problem can be fixed by changing their Internet options. According to them, after changing security settings Could not connect to Steam network error was resolved.
After lowering your security settings to low, the issue with Steam should be resolved. Although this method can fix this error, keep in mind that lowering your security settings poses a slight security risk.
4. End all running Steam processes
- Close Steam.
- Open Task Manager by pressing Ctrl + Shift + Esc.
- Locate all running Steam processes and end them.
- Close Task Manager and try to start Steam again.
Sometimes, this problem can be fixed simply by ending all Steam processes. According to users, after closing all running Steam processes and restarting Steam the issue was resolved. To do that, complete the above procedure.
5. Disable/restart your antivirus
According to users, your antivirus software can sometimes interfere with Steam and cause the Could not connect to Steam network error to appear. To fix this problem, you need to disable your antivirus temporarily.
If that doesn’t work, you might have to uninstall your antivirus and check if that helps temporarily. Users reported issues with Norton and AVG antivirus.
Even so, keep in mind that almost any third-party antivirus can cause this problem, so be sure to try disabling all installed antivirus programs. You may check out this list with the best uninstaller software you can use right now.
6. Delete the ClientRegistry.blob file
- Go to the Steam installation directory.
- Locate ClientRegistry.blob file and delete it. You might have several ClientRegistry.blob files with different names, so delete them all.
After deleting the problematic file, the issue should be completely resolved.
Sometimes ClientRegistry.blob file can interfere with Steam and cause this error to appear, but you should be able to fix it simply by deleting the ClientRegistry.blob file.
7. Check your firewall settings
- Start PeerBlock and click on List Manager then select Add.
- Enter Steam in the description field.
- Click Add URL and enter https://list.iblocklist.com/?list=steam.
- Select Allow and click OK.
This error can appear due to a third-party firewall, but you can easily fix this problem by adding Steam to the list of allowed programs.
Users reported issues with a software called PeerBlock, but after allowing Steam to run in PeerBlock, the issue was completely resolved. To do that, complete the above procedure.
Alternatively, you can start PeerBlock and Steam. Go to PeerBlock and look for Valve entry, right-click on all Valve entries and select Allow Permanently.
Close Steam completely. You’re probably wondering: How do I close Steam client? You can do that from Task Manager if you want. Just press Ctrl + Alt + Delete to open the Windows Security, then select Task Manager.
After adding Steam to the list of exclusions, try to start it again. Although PeerBlock is the common cause of this problem, keep in mind that other third-party firewall tools can also cause this issue.
Be sure to add Steam to the allowed list, but if that doesn’t work, try disabling your firewall.
8. Use the -tcp parameter
- Locate Steam shortcut, right-click it, and choose Properties.
- Go to the Shortcut tab and in Target field add -tcp after the quotes.
- Click Apply and OK to save the changes.
Users reported that they managed to fix Could not connect to Steam network error simply using -tcp parameter. You may try doing the same. After adding -tcp parameter, try to start Steam again.
9. Change your registry
- Press Windows key + R keyboard shortcut and enter regedit.
- When Registry Editor opens, in the left pane navigate to the following path:
HKEY_CURRENT_USERSoftwareValveSteam - In the right pane double click the AlreadyRetriedOfflineMode DWORD to open its properties.
- Change the Value data from 0 to 1 and click OK to save changes.
- Try to start Steam again.
According to users, you can fix this error by changing a few values in your registry. Editing your registry can lead to system stability issues, therefore it’s always a good idea to create a backup of your registry just in case.
10. Run Steam as administrator
Few users claim that they fixed this issue simply by running Steam as an administrator. To do that, simply locate Steam’s shortcut or .exe file, right-click it and choose Run as administrator from the menu.
11. Disable and enable your network connection
- Press Windows Key + X to open Win + X menu and choose Network Connections.
- After Network Connections window opens, locate your network connection, right click it and choose Disable from the menu.
- After a couple of seconds, right-click your network connection again and choose Enable from the menu.
Alternatively, you can simply unplug your Ethernet cable, wait for a few seconds, and reconnect the cable.
Few users reported that they managed to fix this problem simply by enabling and disabling their network connection.
12. Run flushconfig command
- Press Windows Key + R to open the Run dialog.
- When Run dialog opens, enter steam://flushconfig and press Enter or click OK.
- Follow instructions on the screen to complete the process.
According to users, you can fix Could not connect to Steam network and the Steam 102 error simply by running flushconfig command. This command will reset Steam’s configuration, and in order to run it you need to follow these instructions.
If that doesn’t work, you might have to try reinstalling Steam.
How can I fix Steam error An error occurred while updating (corrupt download)?
1. Try using a different network
According to users, they managed to fix this problem by connecting to a different network and trying to download the same game again. If you’re on a Wi-Fi network, you can switch to a different wireless network to fix this problem.
But if you’re connected via an Ethernet cable, you might have to switch to a different router.
2. Clear Steam download cache
- Open Steam and click on Steam > Settings.
- When Settings menu opens, go to Downloads tab and click the Clear Download Cache button.
After clearing the download cache, click OK and restart Steam. - When Steam starts try to download the game again.
Clearing the download cache can sometimes fix problems with corrupt downloads, and to clear your download cache, you need to follow these steps.
3. Change the download region
- Open Steam and go to Steam and select Settings.
- Go to Downloads tab, and in the Download Region section choose a different download server. For best performances use the server that is closest to your location.
- After you’re done, click OK to save changes.
Sometimes An error occurred while updating can appear if your download server is busy or if it has any issues.
The simplest way to fix this problem is to change your download server. This is pretty easy to do, and you just need to follow the above steps.
4. Make sure that steamapps folder isn’t set to Read-only
- Open Steam installation directory.
- Locate steamapps folder, right-click it, and choose Properties.
- In Attributes section make sure that Read-only (Only applies to files in folder) option isn’t checked.
- Click Apply and OK to save changes.
Steamapps folder is the default download location for your games, and if this folder is set to Read-only, you might encounter corrupt download error message. To fix this problem, you need to follow these steps:
5. Close unnecessary applications
Few users reported that this issue was caused by background applications, and after closing these applications the issue was resolved.
According to users, there wasn’t enough memory for Steam to run, and after closing applications such as Fruit Ninja and Xbox Smartglass the error was resolved.
6. Rollback / update the WLAN driver
- Press Windows Key + X and select Device Manager.
- Locate your wireless adapter and double-click it.
- Go to the Driver tab and click the Roll Back Driver button.
- Optional: If Roll Back Driver option isn’t available, click the Uninstall button.
You might get An error occurred while updating in Steam if you have any problems with your wireless adapter drivers.
Although it’s usually better to keep your drivers up to date, several users reported that this issue was fixed after rolling back their wireless adapter driver to the older version. To roll back a driver, perform the above procedure.
After rolling back the driver, restart your PC and check if the problem is resolved. If you choose the Uninstall option, the default driver will be installed after you restart your PC.
Several users reported that updating your WLAN driver can also fix this problem, therefore, we strongly suggest that you visit your wireless adapter manufacturer’s website and download the latest drivers for your device.
After installing the latest drivers check if the issue is resolved.
7. Verify the game cache
- Start Steam.
- Go to your Library and right-click the game that is giving you this error. Choose Properties.
- Go to Local Files tab and click on Verify integrity of game cache.
- The verification process will now start. Wait for it to complete.
- After the verification is completed, check if the problem is resolved.
If you’re getting a rrupted download error, you might want to verify the cache of the game that you’re trying to download. To do that, follow these steps.
8. Uninstall Skype
Few users reported that Skype can cause these types of errors to appear, therefore in order to fix the problem you’ll have to uninstall Skype.
According to users, this error appears even if Skype isn’t running in the background, but after uninstalling Skype the issue was resolved.
Before uninstalling Skype, you can try to update both Skype and Steam and check if that fixes the problem.
9. Disable your antivirus
- Press Windows Key + I to open the Settings app.
- Navigate to the Update & Security section and go to Windows Defender tab.
- Disable Real-time protection and Cloud-based Protection.
- After disabling Windows Defender, check if the problem is resolved.
Your antivirus can often interfere with Steam and cause An error occurred while updating message to appear. The simplest way to fix this problem is to disable your antivirus software until the download is completed.
Although third-party antivirus tools usually have issues with Steam, users reported that Windows Defender can also cause this error to appear.
To fix this problem, you need to manually turn off Windows Defender by following these steps. Remember that you can disable Windows Defender only if you don’t have any third-party antivirus software installed.
Some users are also suggesting to uninstall your third-party antivirus tool, so you might want to try that as well.
10. Close Razer Synapse
To fix this problem, you have to completely close Razer Synapse. To do that, close the application and then press Ctrl + Shift + Esc to open Task Manager. Select Razer Synapse process and click End Task.
After ending this process, you should be able to download and update games without any problems.
How can I fix Steam error code 53?
1. Disable your antivirus
Antivirus programs can interfere with Steam and cause Steam error Code 53 to appear, but you should be able to fix this problem after disabling your antivirus.
Users reported problems with McAfee, and according to them, after disabling Real-time scanning in McAfee the problem was completely resolved. Bear in mind that you can use this method with other antivirus tools as well.
2. Make sure that you have Visual C++ Redistributables installed
Many games rely on Visual C++ Redistributables to run properly, and if you don’t have these tools installed, you might get Steam error Code 53. To fix this problem, install the necessary tools.
You can find these tools in game’s installation directory under _CommonRedistvcredist folder. If you can’t find them on your PC, you can download them from Microsoft’s website.
3. Install the games on your SSD
Few users reported fixing this problem simply by installing their games to SSD. For some unknown reason, the games wouldn’t run from a hard drive, but after installing them to the SSD, the issue was resolved.
4. Reformat your hard drive
- Go to My Computer and right click the drive that you want to reformat.
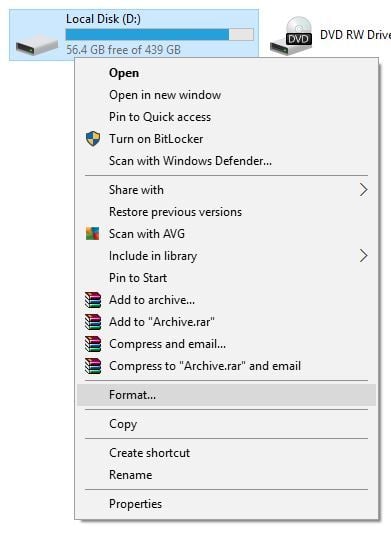
- Set File System to NTFS and click the Start button.
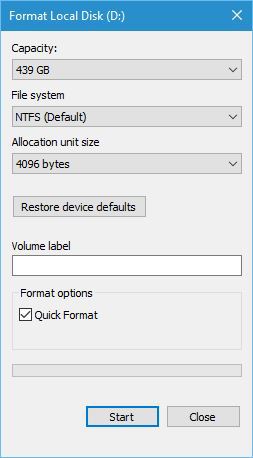
- Wait for the process to complete.
Users reported that they had this error while trying to run games from an exFAT hard drive. It seems that Steam has issues with exFAT partitions, and to fix this problem, you might have to reformat your partition to NTFS.
Reformatting your partition will delete all your files from that partition; therefore, be sure to back them up. To reformat a drive, follow the above procedure.
Once again, we must mention that this process will remove all your files from the selected partition; therefore, be sure to back them up before you format.
How can I fix Steam error code 41?
Reinstall the problematic game
Users reported this issue while trying to start a specific game on Steam. To fix error Code 41, you need to reinstall the problematic game, and the issue should be resolved.
In addition to reinstalling the game, users are also suggesting to disable your antivirus software. You can also fix this problem simply by verifying the game cache.
We explained how to verify the game cache in one of our previous solutions, so be sure to check it out.
What can I do when getting Steam error Could not connect Steam service?
1. Uncheck the Remember me option
When starting Steam you’ll be asked to enter your username and password, and it seems that this error occurs if you check the Remember me option while starting Steam.
Few users reported that this error was fixed after unchecking this option, so be sure to try it. If that doesn’t work, delete all files except steamapps folder and Steam.exe from Steam installation directory and try to run Steam again.
2. Remove/move user data folder or localconfig.vdf file
To fix this problem, users are suggesting to remove or move userdata folder. You can find this folder in Steam installation directory. Simply move or remove this folder and check if the problem is resolved.
If the problem still persists, open Steam installation directory, go to config folder, and move or remove localconfig.vdf file. After that, try to start Steam again.
3. Delete the appcache folder
According to users, you can fix this problem by removing the appcache folder. We don’t know why this folder causes this problem, but you can fix it simply by removing it.
To do that, go to Steam installation directory and delete appcache folder from it.
4. Remove or update Advanced System Care
Could not connect Steam service error can appear due to tools such as Advanced System Care. Users reported that this application interferes with Steam.
In order to fix this problem, you’ll need to remove this application from your PC. In addition, you might want to update this application and check if that resolves the problem.
5. Run netsh command
- Press Windows Key + X and select Command Prompt (Admin).
- When Command Prompt starts enter netsh int ip reset and press Enter to run it.
One way to fix this problem is to run netsh command. To do that, follow the above steps. After netsh command is executed, try to run Steam again.
How can I fix Steam Disk write error?
1. Check your hard drive
- Open My Computer and right click the hard drive partition that has Steam installed on it. Choose Properties from the menu.

- Go to Tools tab and click the Check button in Error checking section. Keep in mind that you might have to restart your PC in order to check your hard drive.
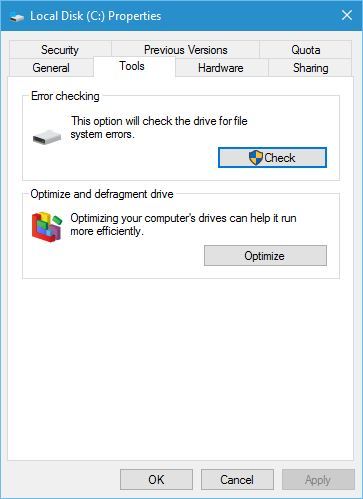
This error can appear if your hard drive has issues, and one of the easiest ways to fix this problem is to scan your hard drive for errors. To do that, follow the above steps.
2. Check the game cache
Sometimes Disk write error can appear if certain game files are corrupt, but you can fix this error simply by checking the game cache.
We already explained how to check game cache in one of our previous solutions, so be sure to check it out.
3. Move your Steam installation
- Go to Steam installation directory and remove all files except Steam.exe, Userdata and SteamApps folders.
- Move those files to a different location.
- After the files are moved, double click the Steam.exe and install Steam again.
To fix Disk write error, you might have to move your Steam installation to a different folder or to a different hard drive partition. To do that, follow these steps.
4. Delete files from steamapps/common folder
Users reported that this error can occur due to certain files in your steamapps/common folder. Open Steam installation directory and go to steamapps/common folder.
You should see a white page file that has the same name as the game you’re trying to download. Delete this file and try to run your game from Steam library again.
5. Make sure that your Steam installation folder isn’t set as Read-only
This problem can occur if your Steam installation folder is set to Read-only, therefore in order to fix this problem go to Program Files, locate your Steam folder, and open its properties.
Make sure that Read-only option isn’t checked. In addition, you can also try running Steam.exe as administrator.
6. Delete the steammanifest files
One way to fix this problem is to remove steammanifest files from your PC. To do that open Steam installation directory and go to steamapps folder.
You should see several steammanifest files available. Delete them and check if the issue is resolved.
7. Be sure that your user account has the necessary privileges
- Locate Steam directory. By default it should be in C:Program Files.
- Right-click Steam folder and choose Properties.
- Go to the Security tab and click the Edit button.
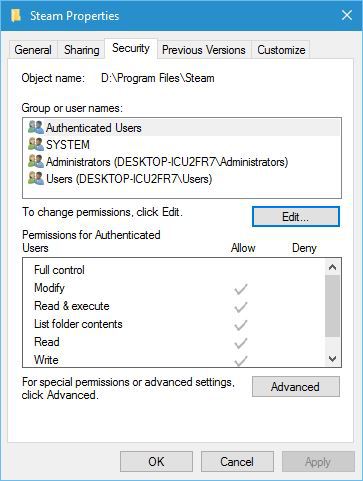
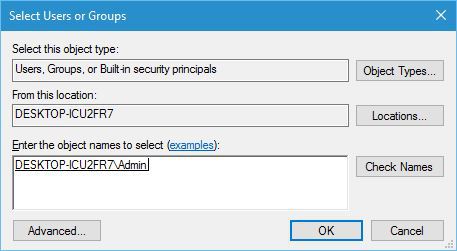
- If your user name is not on the list, click the Add button to add it.
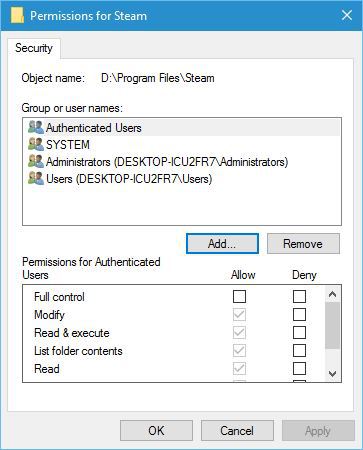
- In the Enter the object names to select enter your user name and click Check Names. If your user name is correct, click the OK button.
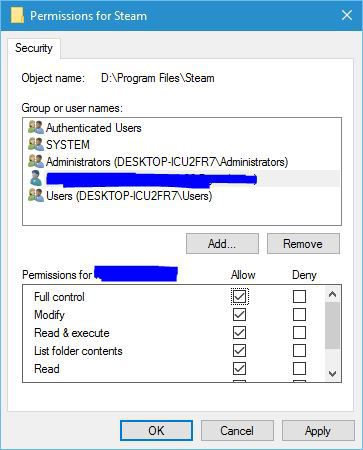
- Select your user name in Group or user names section and check Full control in the Allow column. Click Apply and OK to save changes.
Disk write errors can occur if your user account doesn’t have the necessary privileges over the Steam folder. To change that, follow these steps:
8. Delete the downloading folder
Several users reported that they managed to fix this problem by removing the downloading folder. To do that, go to your Steam directory and go to the SteamApps folder.
Locate the downloading folder and remove it. After removing this folder, check if the error is resolved.
How can I fix Steam error Failed to load overlay localization file?
1. Delete files from Steam folder
According to users, you can fix this problem simply by removing specific files from your Steam folder. The files that you need to remove are ClientRegistry.blob, steamclient.dll and SteamUI.dll.
After removing these files, restart Steam and it will download the missing files and fix the problem.
2. Add -clientbeta client_candidate
- Right-click Steam shortcut and choose Properties.
- Go to Shortcut tab and in the Target field add -clientbeta client_candidate after the quotes.
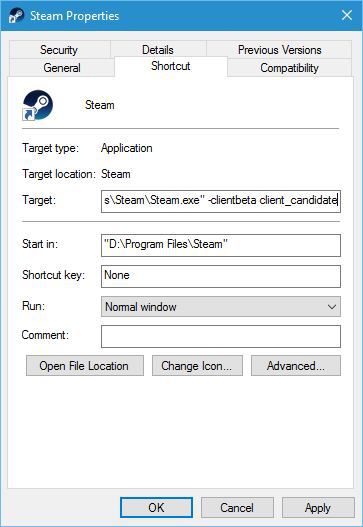
- Click Apply and OK to save changes.
According to users, you can fix Failed to load overlay localization file error simply by adding -clientbeta client_candidate parameter. To do that, follow these steps.
3. Reinstall Steam
Few users are suggesting that you can fix this problem by reinstalling Steam. This might not be the fastest solution, but few users reported that reinstalling Steam fixed the problem for them, so be sure to try it out.
4. Delete the cached folder
One way to fix Failed to load overlay localization file error is to remove the cached folder. To delete this folder, you need to open Steam installation directory and go to the Steam folder.
Inside the steam folder, you should see the cached folder. Delete it and try to start Steam again.
These are some of the common errors that you can encounter. Speaking of which, many users reported Steam disk write error, but we tackled this issue in its own guide.
We also have an entire article dedicated to Steam error code E20, so don’t miss it for more information.
Steam errors can prevent you from playing your favorite games, but we hope that you managed to fix Steam errors on your Windows 10 PC by using some of our solutions.
Read our disclosure page to find out how can you help Windows Report sustain the editorial team. Read more


Improve this guide


User forum
0 messages