VAN9003 in Valorant on Windows 11 [Solved]
Run the game with administrative privileges
5 min. read
Updated on
Read our disclosure page to find out how can you help Windows Report sustain the editorial team Read more
Key notes
- To fix the VAN9003 Valorant error in Windows 11, enable Secure Boot and TPM, or run the game in compatibility mode for Windows 8.
- The error appears when Secure Boot and TPM are not enabled, or the changes don’t reflect.
- Keep reading to find out how Windows Report experts fixed the error!
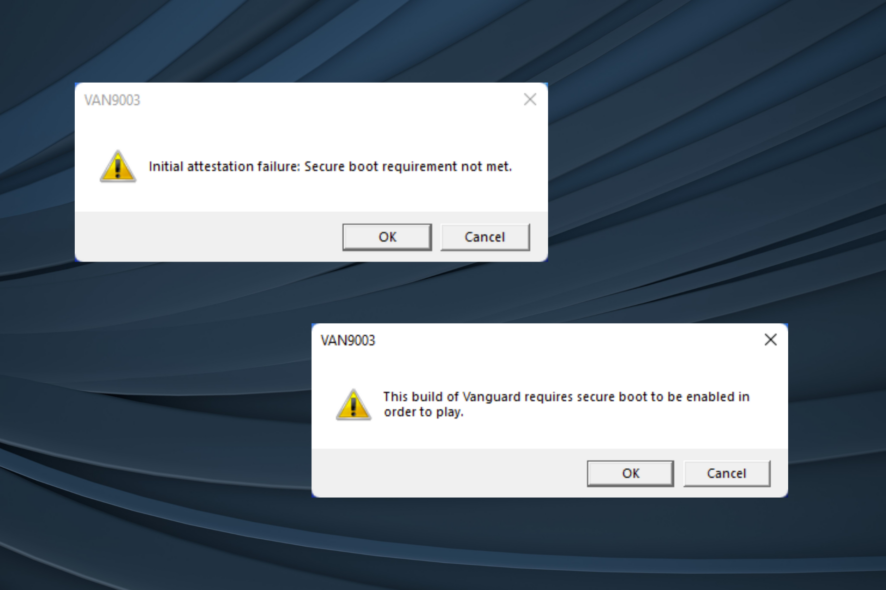
Valorant is seen throwing the VAN9003 error on several Windows 11 devices and won’t launch. The error message either read This build of Vanguard requires secure boot to be enabled in order to play or Initial attestation failure: Secure boot requirement not met.
The problem, Valorant on Windows 11 requires that both Secure Boot and TPM 2.0 are enabled. Without the two, Valorant would fail to launch or crash when you reach the main menu. On Gigabyte motherboards, the problem remained even after changing the BIOS settings, but it’s easy to fix!
How do I fix VAN9003 error in Valorant on Windows 11?
Before we start with the slightly complex solutions, try these quick ones:
- Restart the computer and try again.
- Run Valorant as an administrator for maximum privileges. Also, if you have Valorant running on a standard user account, make it the administrator account and check for improvements.
- Update the BIOS.
 Tip
Tip
1. Change the Secure Boot mode
1.1 Changing the mode
- Turn off the computer, then power it on, and as soon as the logo appears, press Esc, F1, F2, F10, or F12, depending on the system manufacturer, to access the BIOS.
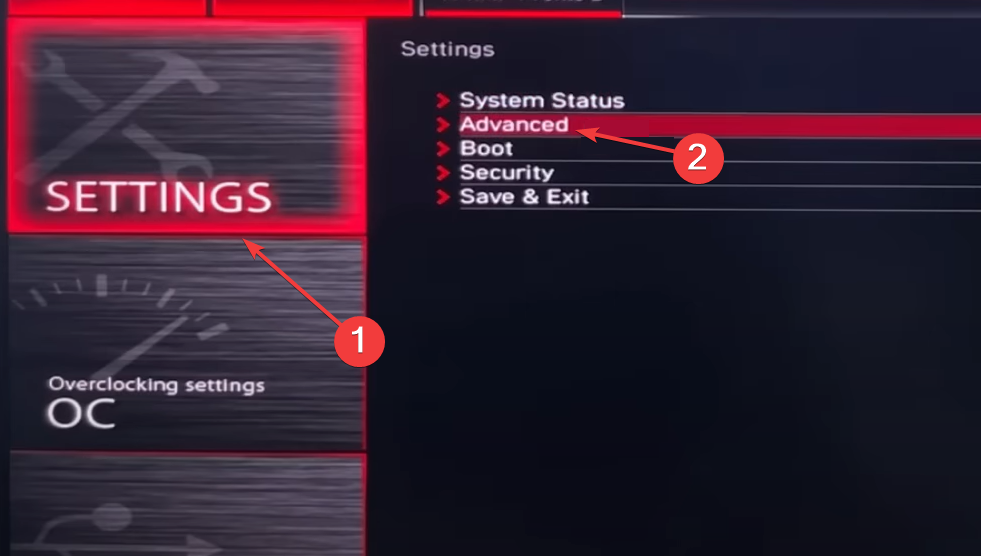
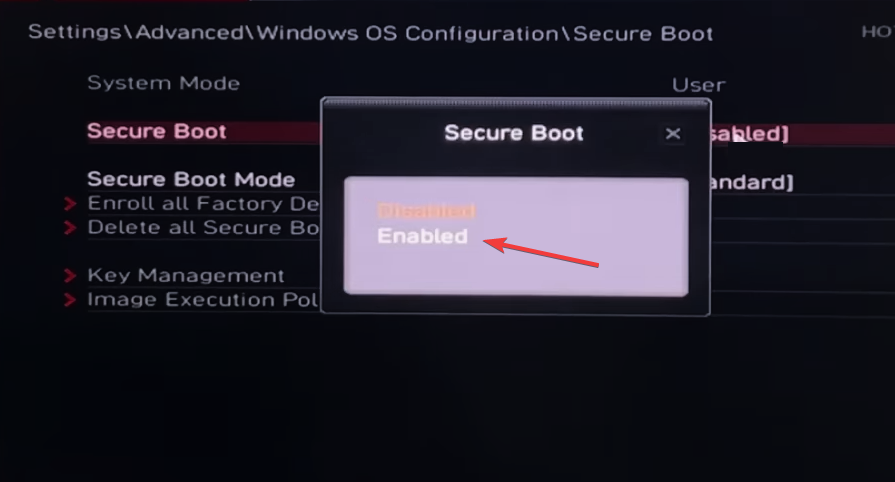
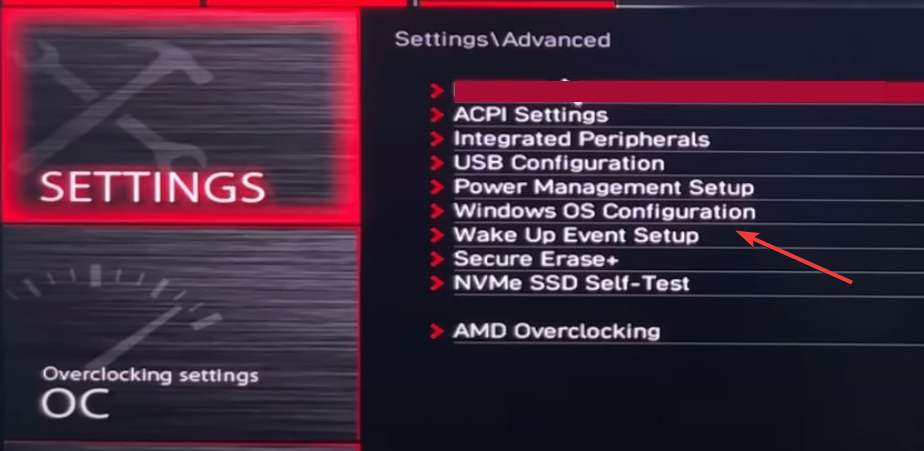
- Go to Advanced mode in the BIOS, select Settings from the left pane, and then click on Advanced.
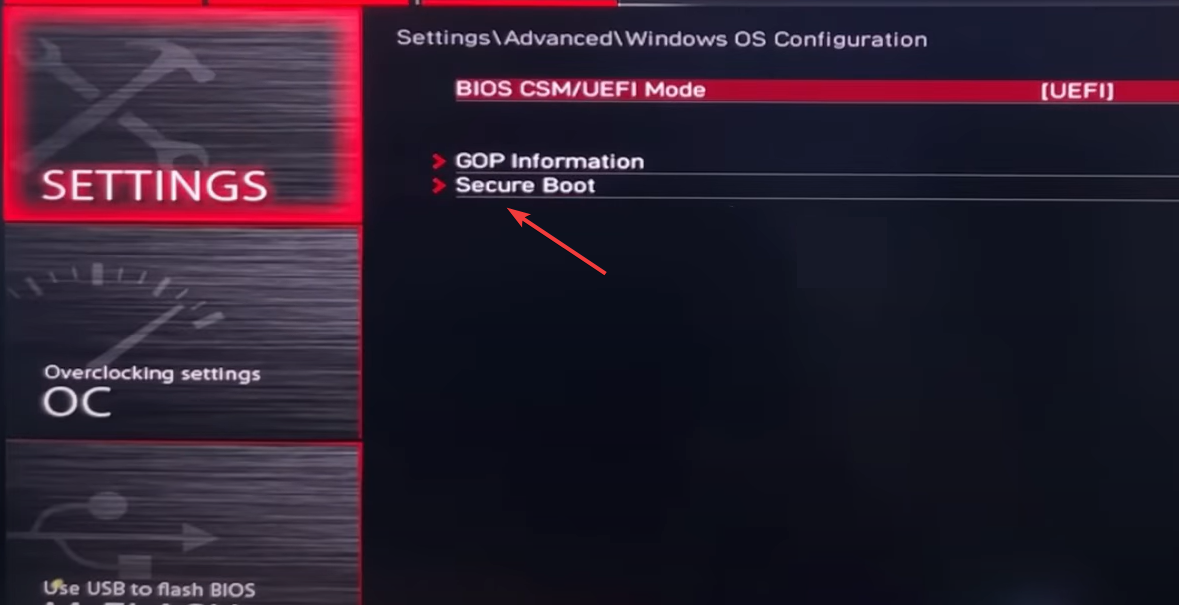
- Select Windows OS Configuration from the list.
- Click on Secure Boot.
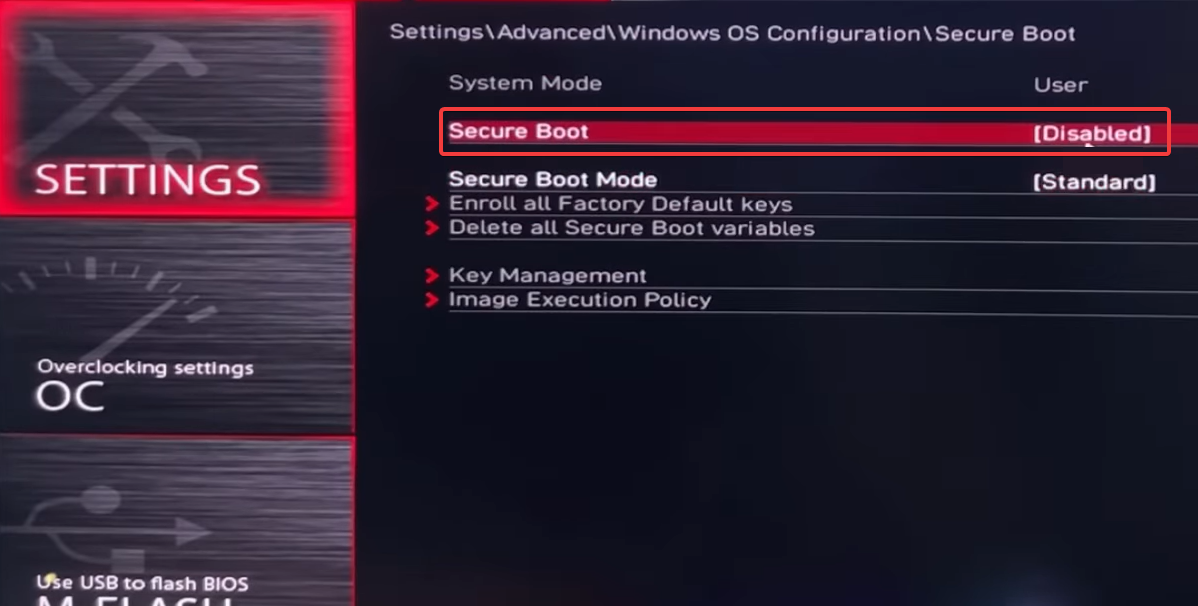
- Set Secure Boot to Disabled.
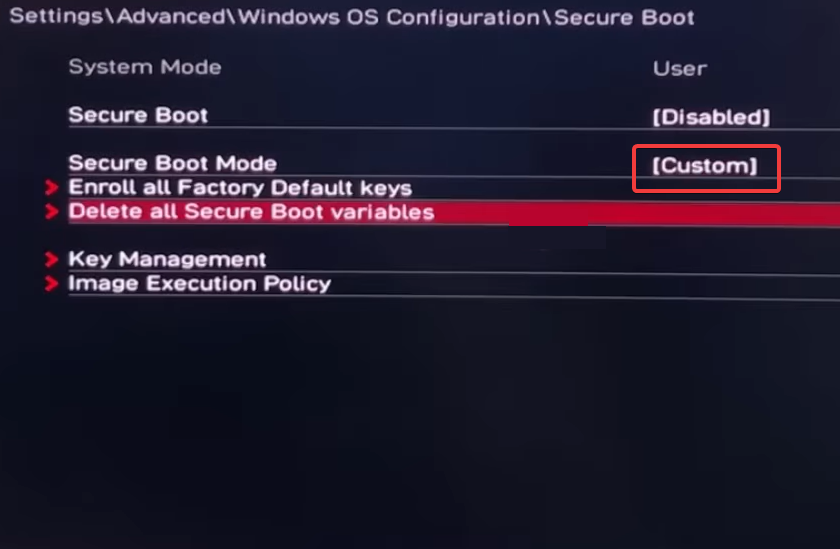
- Now, change the Secure Boot Mode to Custom.
- After the System Mode changes to User, again set Secure Boot Mode to Standard.
- Finally, select Secure Boot and choose Enabled from the options.
- Save the changes, exit the BIOS, and boot Windows.
1.2 Verify that Secure Boot is enabled
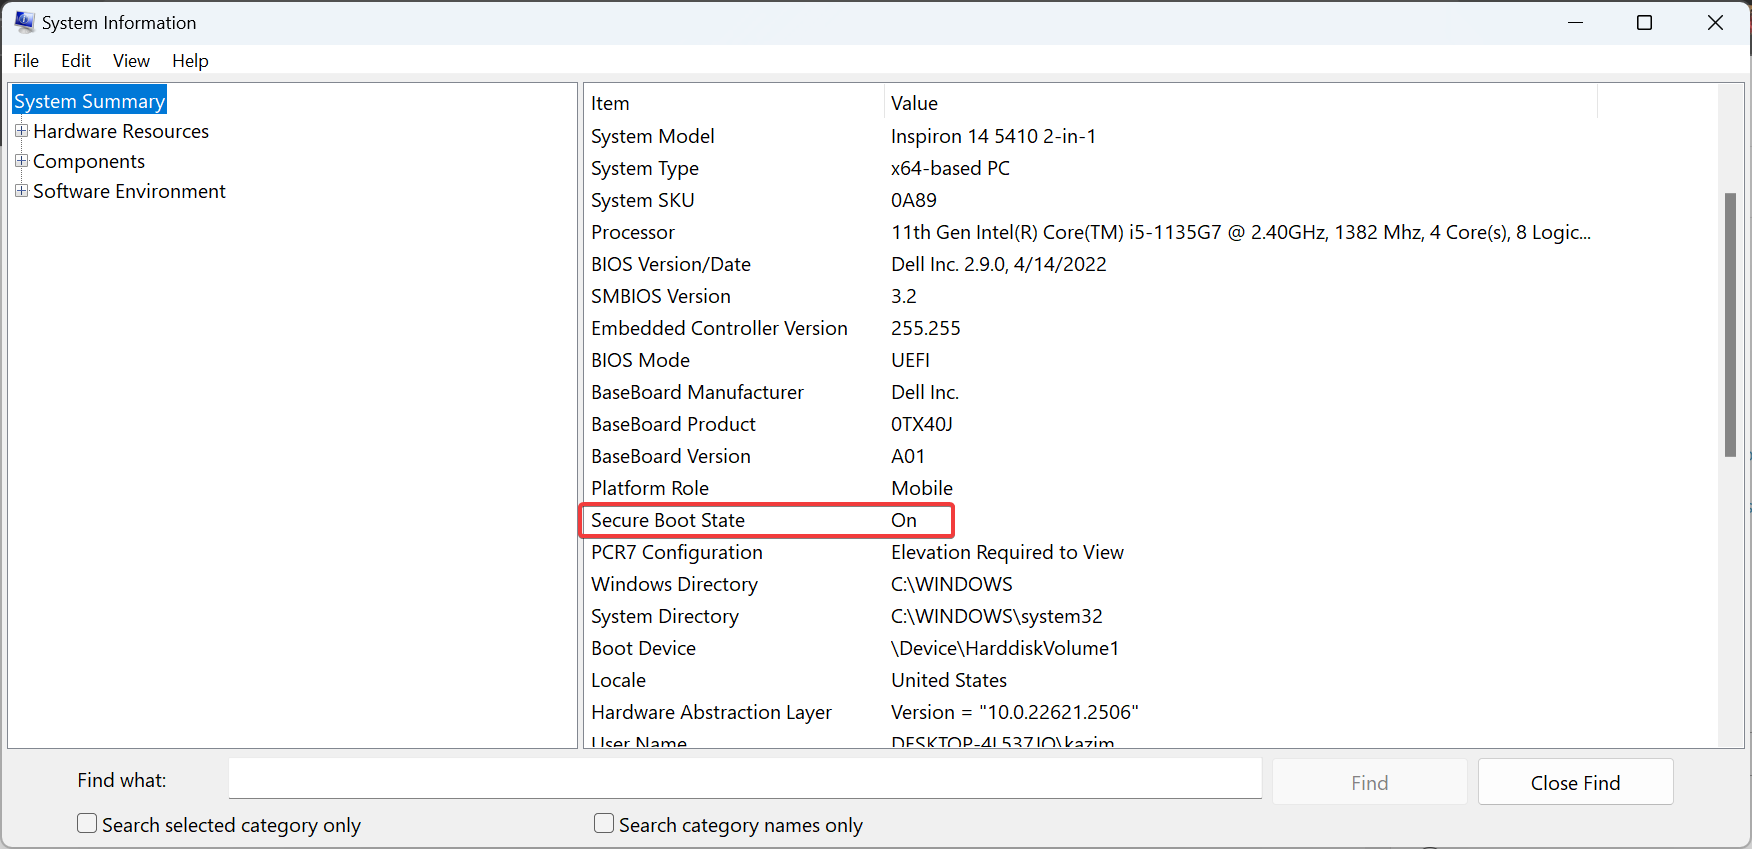
- Press Windows + S to open Search, type System Information in the text field, and click on the relevant result.
- Now, in the Summary tab, make sure the Secure Boot State reads On.
A few users reported that even after enabling Secure Boot on a Gigabyte motherboard, the changes wouldn’t reflect in System Information. In that case, you will have to change the Secure Boot Mode to Custom and then back to Standard.
2. Enable TPM
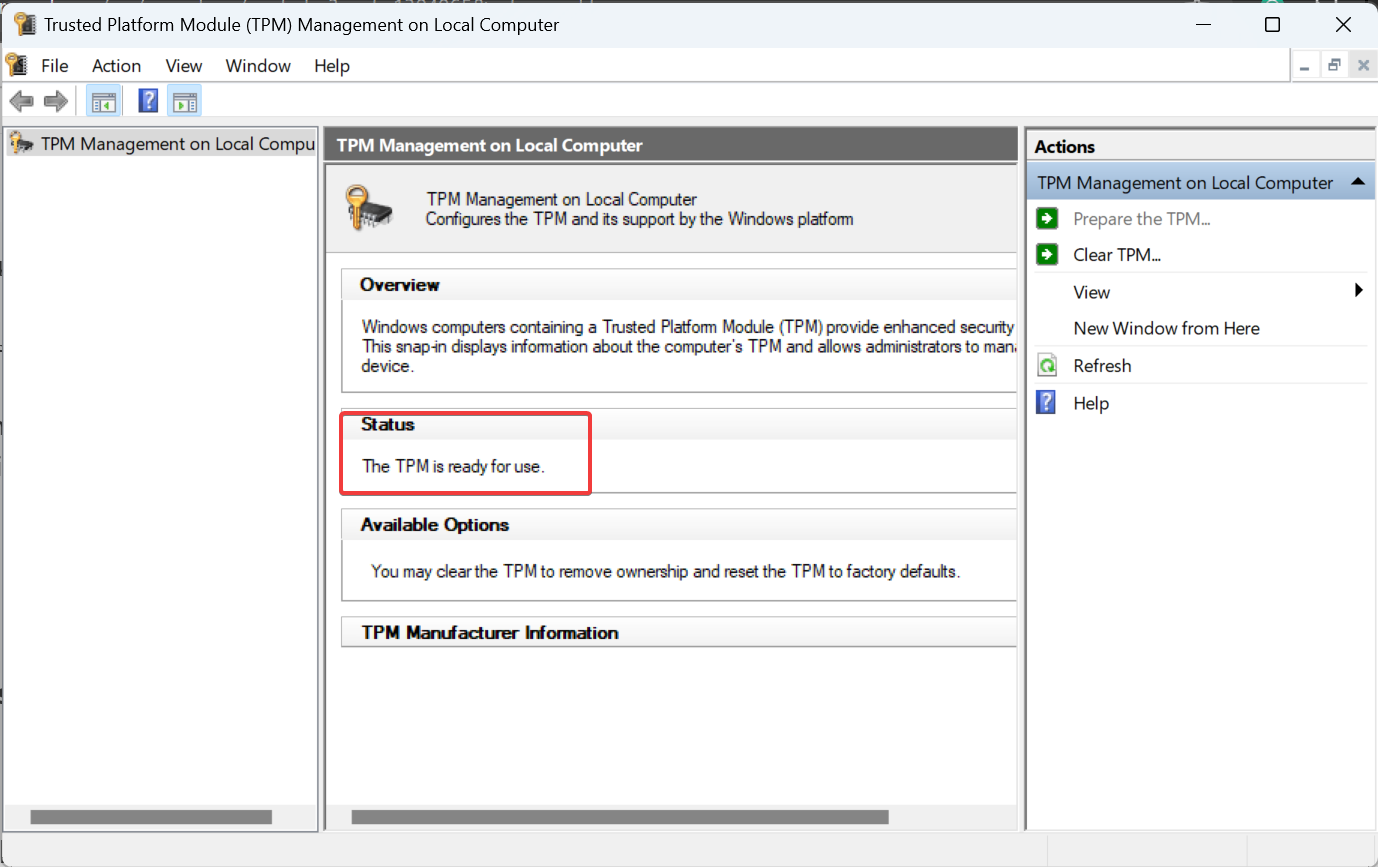
2.1 Checking whether TPM is enabled
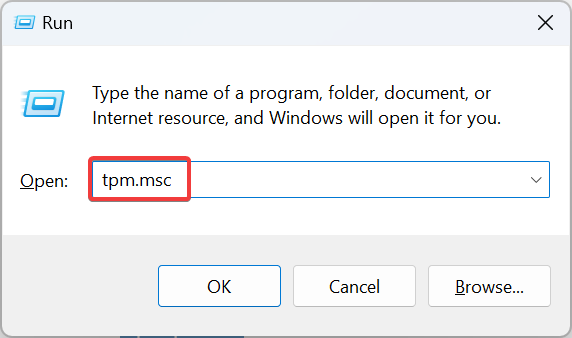
- Press Windows + R to open Run, type tpm.msc in the text field, and hit Enter.
- Check what is listed under the status:
2.2 Enabling TPM
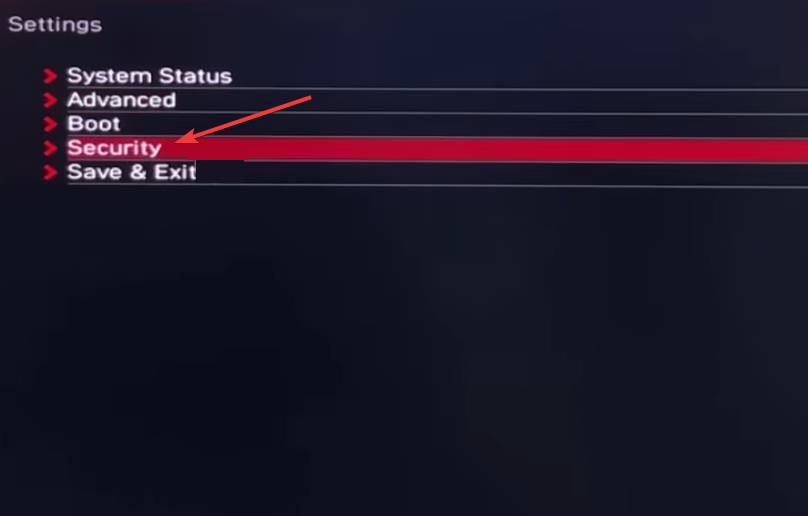
- Access the PC’s BIOS, go to Advanced Settings, and select Security.
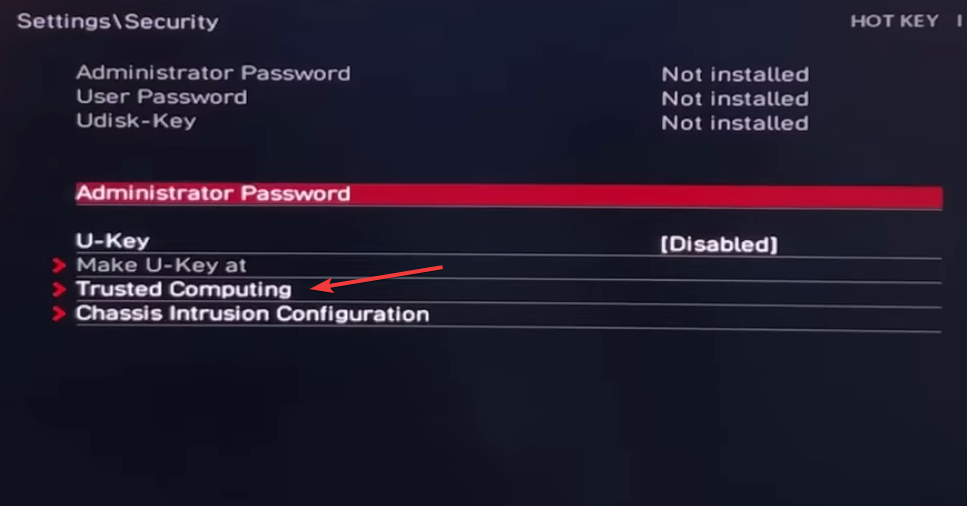
- Now, click on Trusted Computing.
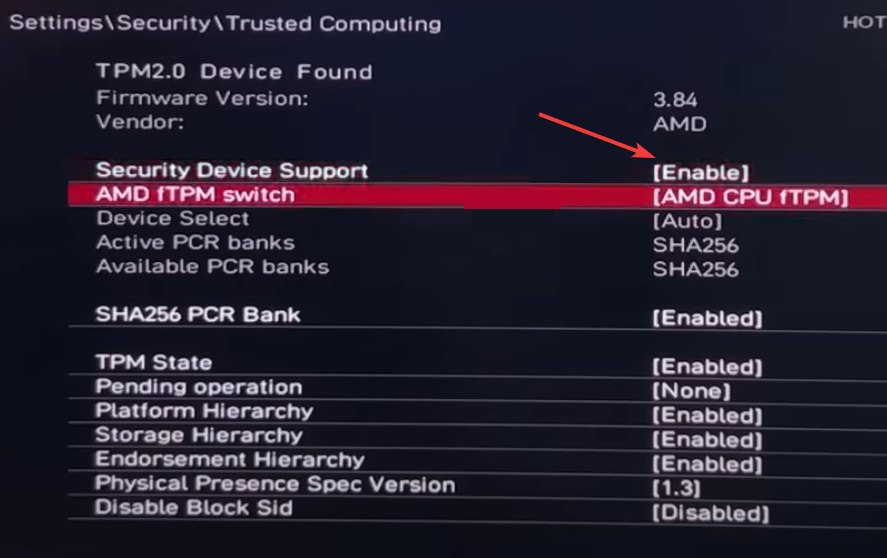
- Choose Security Device Support, and select Enable from the options.
- Save the changes and exit the BIOS.
To fix the VAN9003 Valorant error in Windows 11, you will need to enable TPM (Trusted Platform Module). For more information about the feature, read all about TPM.
3. Set the VGC service to automatic
- Press Windows + R to open Run, type services.msc in the text field, and hit Enter.
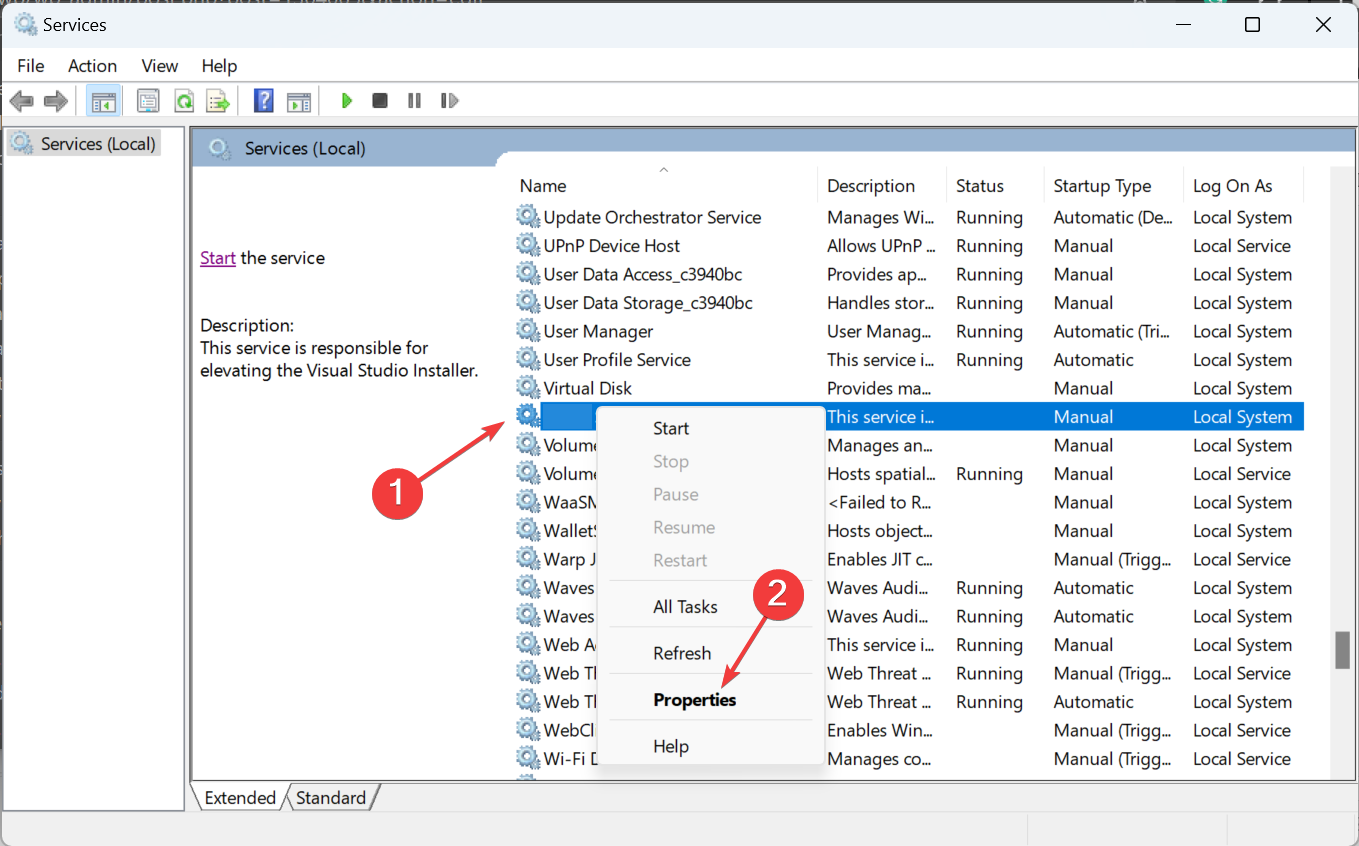
- Scroll down, right-click on the VGC service, and select Properties.
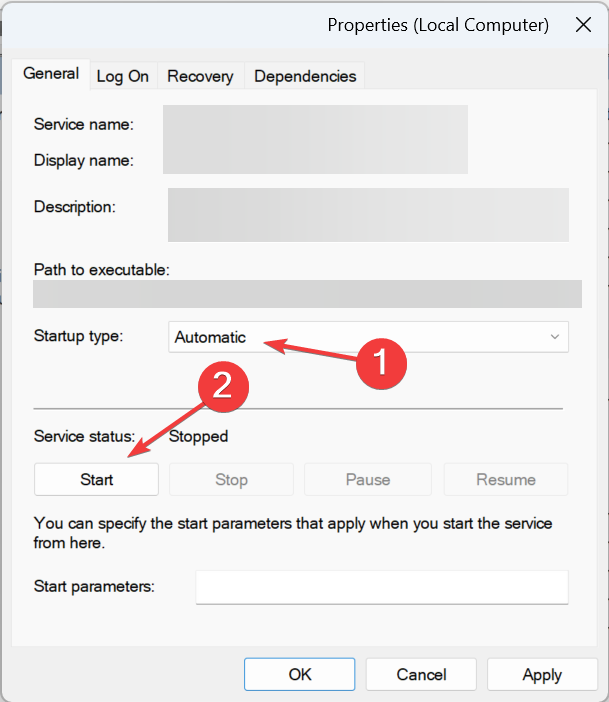
- Select Automatic from the Startup type dropdown, and then click the Start button under Service status.
- Finally, click Apply and OK to save the changes.
Configuring the VGC service to run automatically at boot also helps with the VAN1067 error on Windows 11.
4. Switch to UEFI mode
- Access the BIOS, go to Settings, and click on Advanced
- Now, select Windows OS Configuration.
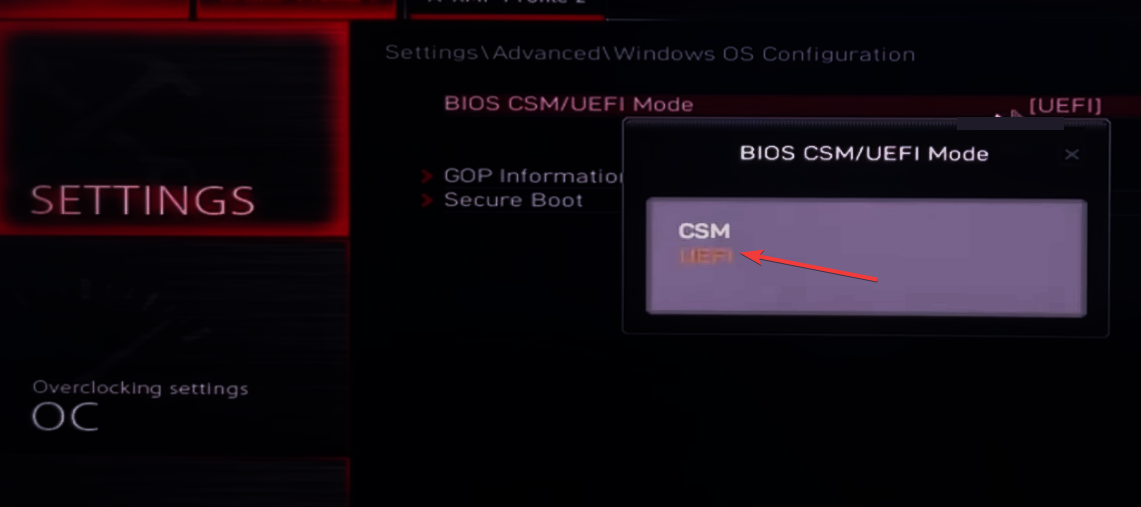
- Select the BIOS CSM/UEFI Mode entry.
- Choose UEFI from the list of options.
- Save the changes, and then exit the BIOS.
- Verify whether the VAN9003 Valorant error in Windows 11 is fixed.
5. Run Valorant in compatibility mode for Windows 8
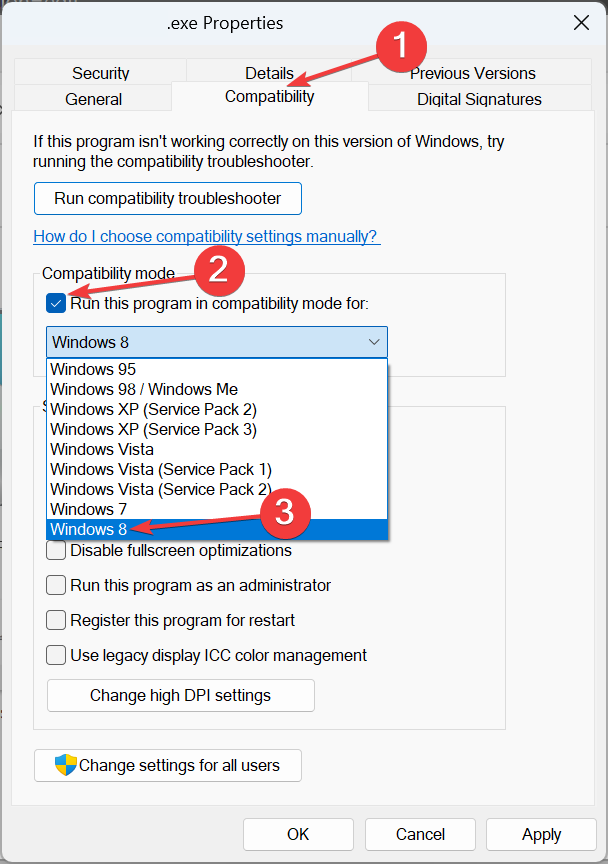
- Right-click on the Valorant launcher, and select Properties from the context menu.
- Go to the Compatibility tab, tick the checkbox for Run this program in compatibility mode for, and select Windows 8 from the dropdown menu.
- Once done, click on Apply and OK to save the changes.
Running the game in compatibility mode also helps when Valorant is not working on Windows 11.
6. Run the Riot Repair Tool
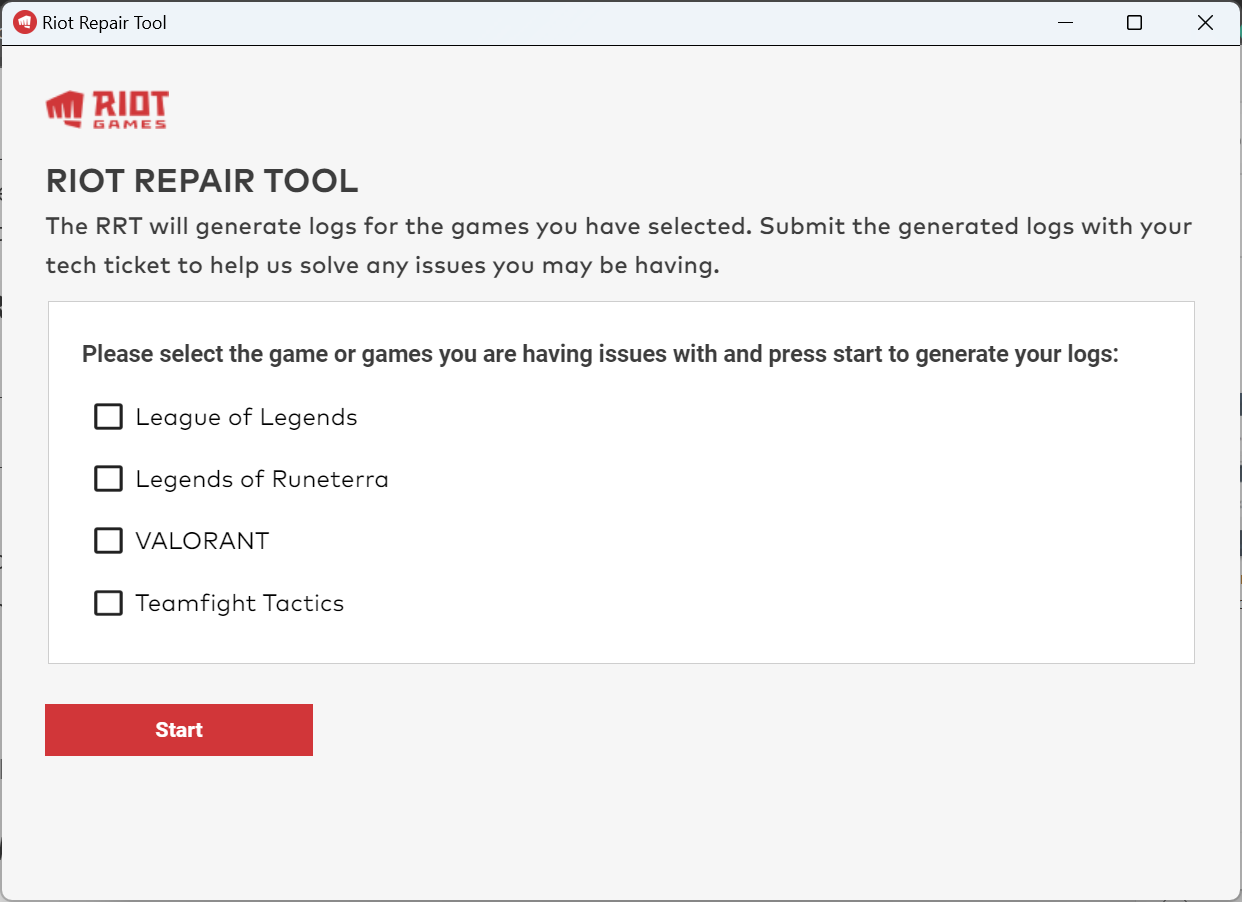
The Riot Repair Tool, though primarily a log collection and sharing app, can be used to fix a range of Valorant errors, including VAN9003 in Windows 11.
You could download it from the official support website or contact the support team and ask them for the tool since the available download is an MSI file, and the one shared by the team is an executable (.exe), which is easier to run. Also, make sure to run the tool with administrative privileges.
7. Roll back to Windows 10
If nothing else works, and you recently upgraded to the latest iteration of the OS, roll back to Windows 10. Remember, you can only do this within 10 days, unless the period is manually extended beforehand.
In case you are past the 10-day period, create a bootable Windows 10 USB, and then install the OS from scratch.
Reinstalling Windows 10 should be used as the last resort when the previous solutions for the VAN9003 Valorant error on Windows 11 didn’t work. In our experience, enabling both Secure Boot and TPM and running the VGC service should do the trick!
Before you leave, find out the best Windows 11 settings for gaming and enjoy superior Valorant gameplay! We also have a guide on VAN 1067 error on Windows 10, so don’t miss it.
For any queries or to share what worked for you, drop a comment below.

