How to Disable the Windows Problem Reporting Service
Advanced users can manage the service by tweaking their Registry
Key notes
- The Windows error reporting service is enabled by default on Windows PCs.
- Users have been looking for ways to manually turn it off.
- We create a guide on how to disable the Windows problem reporting in Windows 10.

The Windows 10 error reporting service is designed to help ensure your PC works optimally. The central idea behind Windows Error Report (WER) is to keep Microsoft informed about user issues working with Windows.
However, every Windows OS version has the service enabled on default settings. But an individual user can choose to disable it if the need arises.
This article explores how to enable or disable the error reporting service on Windows 10.
How the Windows 10 error reporting service works
Windows 10 Error Report focuses on discovering hardware and software issues from the user’s PC and reports to Microsoft.
With a database of likely complaints experienced with using the Windows 10, Microsoft can then send solutions for troubleshooting.
While working with the PC, some users experience pop-ups or alerts requesting the submission of the problem report.
Windows error report usually occurs after a system failure, program crashes, refused to load properly or operating system errors. W
Windows usually prompts the user to submit an error report online to help proffer solutions in the future. The problem report may include the program name, date, time of error, and version.
Should I disable the Windows problem reporting service?
Windows users often disable error reporting due to disk space or privacy issues but might need to exercise restraint. Error reporting service for Windows 10 offers dual benefits to Microsoft and PC users.
Each error report helps Microsoft develop more advanced service packs for dealing with glitches. That means a better user experience with Windows 10 based on the information gathered.
How can I disable the Window error reporting Service?
Just like other versions, Windows 10 does have a slightly different graphical user interface for disabling error reports.
Lower versions of Windows OS have error reporting under Action Center Setting. On Windows 10 it is the Security & Maintenance function that requires working with registries.
1. Use the Run dialog
1. Press down the Windows +R keys on your keyboard.
2. The Run dialog box will open.
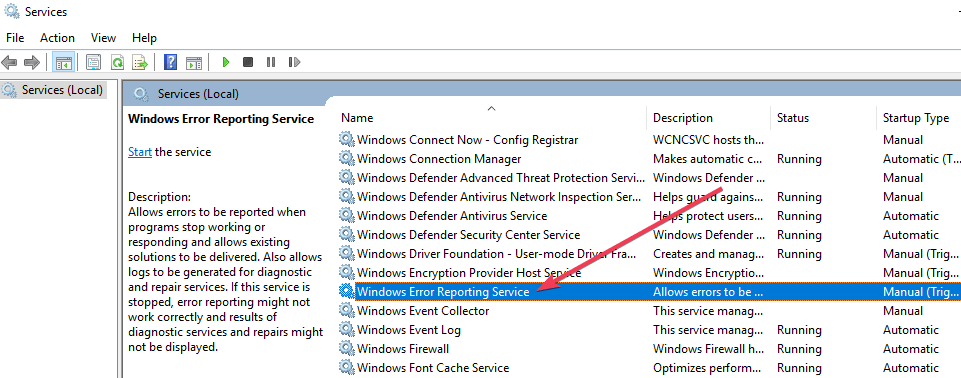
3. Type service.msc in the box and click on OK or press Enter to run the command.
4. Locate the Windows Error Reporting Service in the list that opens.
5. Right click on it.
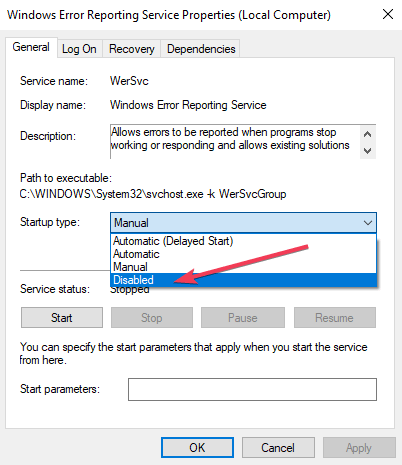
6. Go to the Startup type section and press the button next to it to open a drop-down menu.
7. Click on the Disabled button, which is at the bottom of the list.
8. Click on Apply and OK to save the changes.
9. Close the service window to exit. Now the process has been completed.
The easiest way to manage the Windows error reporting service is via the built-in Settings app. From there, you can enable or disable the problem reporting service in a few clicks.
In some cases, the Startup type which is close to disabled might appear gray. That means the user needs admin rights to continue the process. Therefore, log out and log in as an administrator. Or locate the administrative command prompt by pressing Windows key+ X to select command prompt admin.
2. Use the Registry Editor
Using the Registry Editor is another way to safely disable the Windows 10 Error Reporting Service. This second method for disabling the Windows error reporting service includes tweaking the registry. But first, you need to check for error report issues:
- Locate Control Panel from Windows startup.
- Click Control Panel> System and Security> Security and Maintenance.
- Look out for Report problems. Report problems should by default display ‘On’.
2.1 Steps to disable Windows Error Reporting Service using the Registry Editor
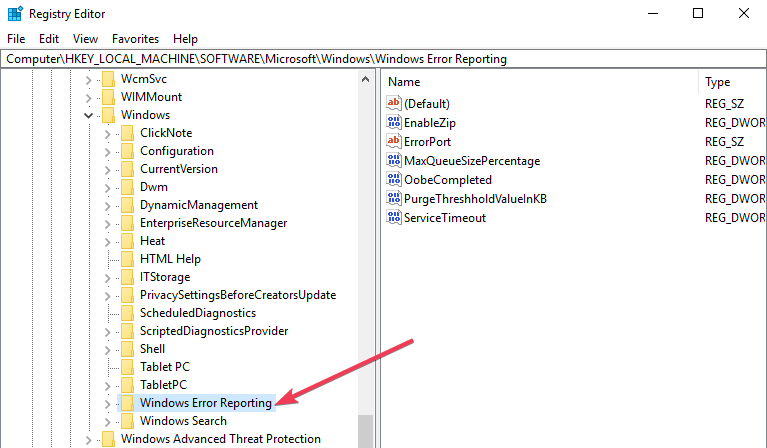
- Locate the registry editor app below:
- To the right of your window, locate the registry key in the dialog box.
- Click on the option ‘disabled’ so the dialog box can appear. Replace the value ‘0’ with ‘1’.
- If there is no value then create a new one with the same name, ‘Disabled’.
- To create a new DWORD from the registry editor, one needs to locate Edit > New on the menu.
- Then set the new 32-Bit DWORD value to ‘1’.
- Tap ‘OK’ to effect changes.
To confirm that the Windows error reporting service has been disabled, go to Security and Maintenance. Check the comment on the report problem to see if it reads on or off.
Can I enable the problem reporting service after I disable it?
To re-enable the error reporting service on Windows 10, simply set the disabled value back to zero.
Another option would be to delete the disabled value in the Registry Editor.
It’s quite simple to disable and enable Windows 10 error reporting service anytime. And understanding how to use the Registry Editor or finder makes everything much simpler.
Before you go, don’t miss our guide on Werfault.exe application error for more useful information.
We hope that our guide helped you disable this service. Let us know your thoughts in the comments section below.
Read our disclosure page to find out how can you help Windows Report sustain the editorial team. Read more


User forum
0 messages