Windows 11 Keeps Changing Audio Output: 8 Ways to Fix It
Disable other audio devices to prioritize your default device
Key notes
- One of the most annoying things about Windows 11 is its tendency to change the default audio output device on you.
- No matter how many times you set it to your preferred device, you’ll find yourself with a different audio output.
- Sometimes, it happens because you’re switching between audio sources a lot, have a faulty Windows update or just have a faulty device.

When working on your PC, you may need to use other audio outputs. If you have set up your PC to use multiple audio outputs, you should have no problem.
However, if you have a default device set and Windows 11 keeps changing the audio output even after you’ve set your preferred device, it can be annoying so let’s jump straight into how we can put a stop to Windows 11 from changing your audio device.
Why does Windows keep changing my audio settings?
At first, this might seem like a minor issue, but it can be very annoying and disruptive to your work. If you’re someone who works with audio a lot, you can appreciate the importance of having consistency when it comes to your computer’s functionality.
Now, onto why you’re having difficulty maintaining a default audio device. Below are some possible reasons for this:
- Driver conflict – If you have updated your drivers recently, this could be the reason. Many software programs need specific drivers to work properly with certain types of hardware.
- Hardware failure – This can happen if there is something wrong with one of your internal components, such as RAM or motherboard failure, or even due to overheating issues.
- Multiple programs – If you have multiple programs using your audio, they can change the sound volume in your computer.
- Interference from other apps – Some apps use their audio technology instead of Windows’ built-in one. This often results in unexpected changes to your output devices’ settings.
How do I stop the audio device from changing in Windows 11?
Try the following workarounds first before attempting the more complex solutions:
- Make sure that your audio device and your PC are compatible with each other.
- Close any unnecessary programs that may be using audio.
- Verify that you have set the said device as the default audio device in Settings.
- If you’re using Bluetooth headphones, ensure they are fully charged and not in power-saving mode.
- Test your microphone to ensure it is working.
- Try connecting to another audio device if available to roll out the possibility of a faulty audio device.
- Uninstall recent Windows updates and check if the issue persists.
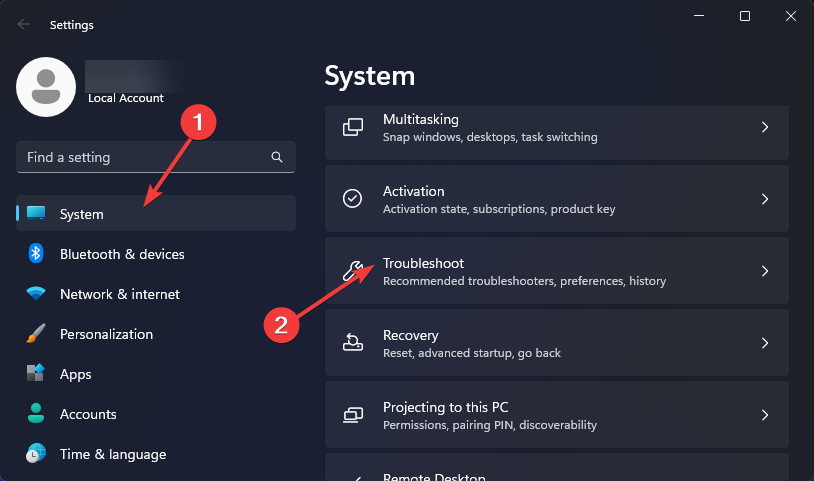
1. Run the audio troubleshooter
- Press the Start Menu key and select Settings.

- Click on System on the left pane, then Troubleshoot on the right pane.
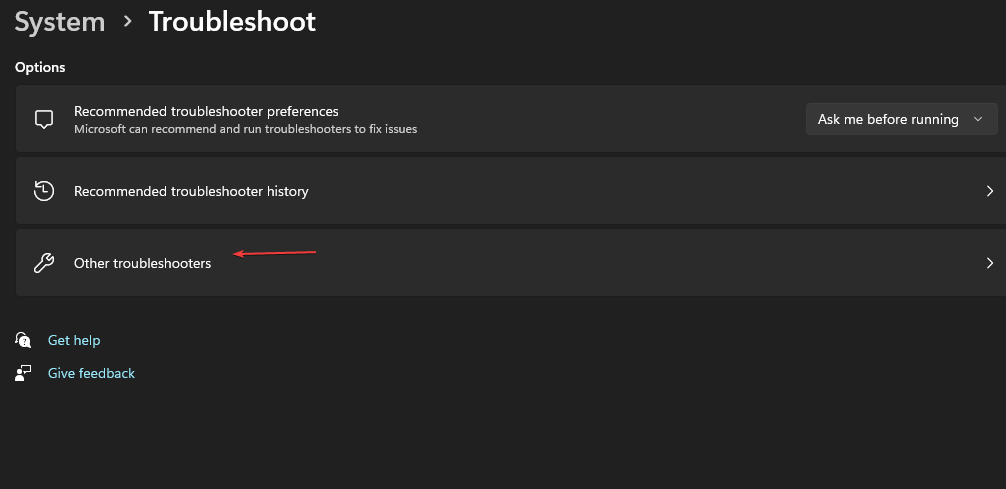
- Select Other troubleshooters.
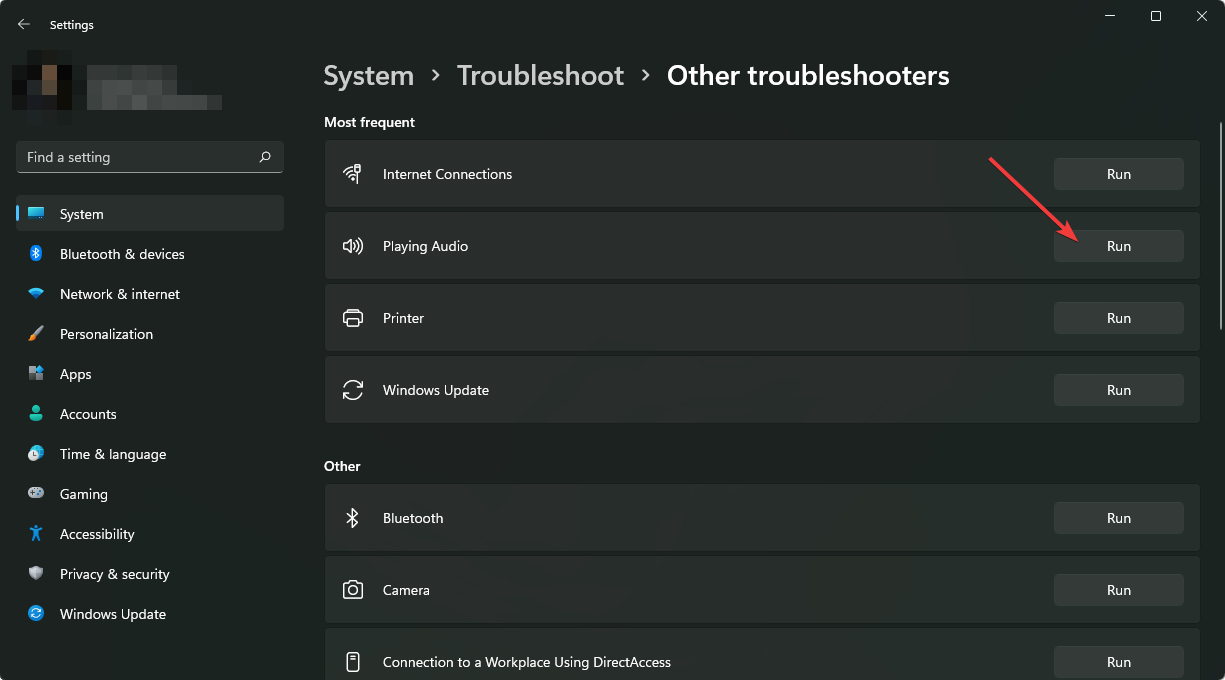
- Locate the Playing Audio troubleshooter, and click on the Run button next to it.
2. Reinstall audio drivers
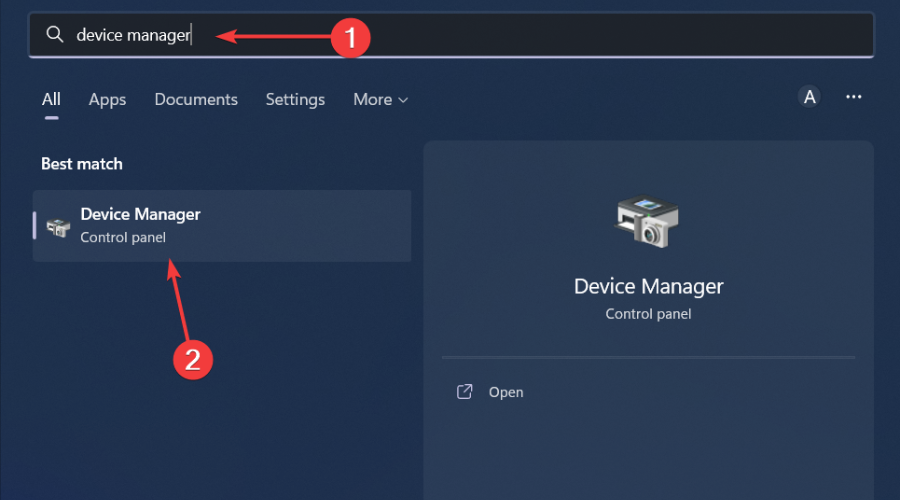
- Hit the Windows key, type Device Manager in the search bar, and click Open.
- Navigate to Sound, video, and game controllers to expand, right-click on your audio device, and select Uninstall device.
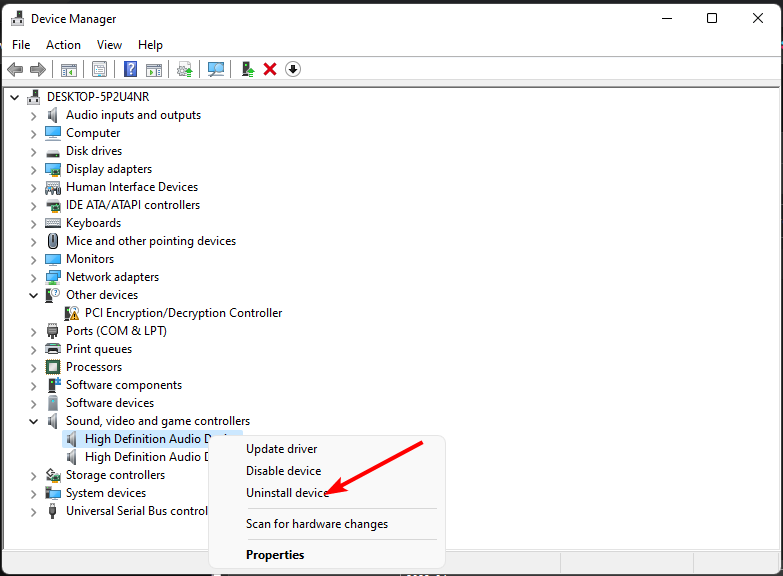
- Confirm on Uninstall.
- Restart your device, and the drivers will automatically reinstall themselves.
3. Update audio drivers
- Hit the Windows key, type Device Manager in the search bar, and click Open.
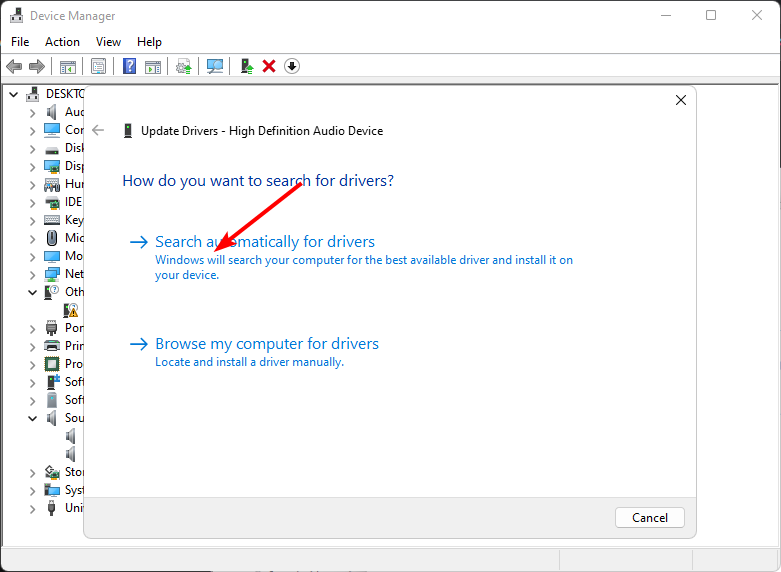
- Navigate to Sound, video, and game controllers to expand, right-click on your audio device, and select Update driver.
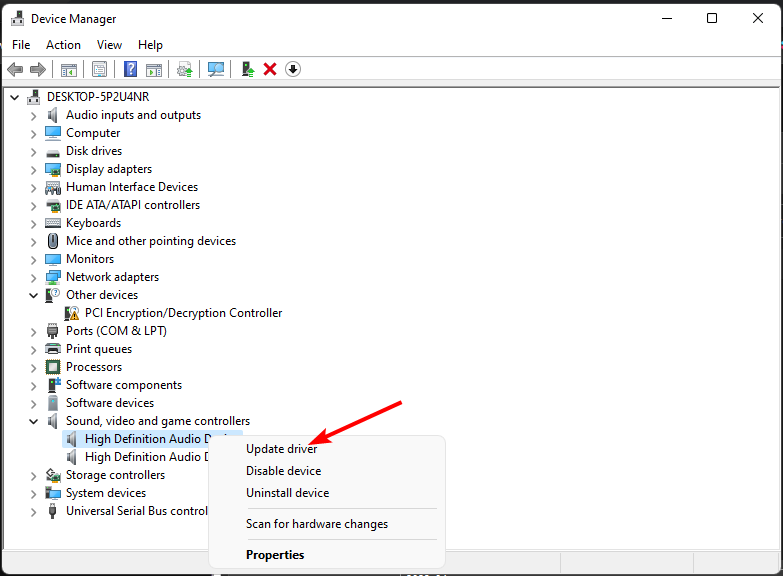
- Select Search automatically for drivers.
- Restart your PC and try reconnecting.
Alternatively, you can opt for a sure way of getting the right drivers, as sometimes even Windows recommends the wrong drivers.
Outbyte Driver Updater is a simple driver updater tool that can help you update your audio drivers. When it runs for the first time, it searches for outdated drivers on your PC and cleans out all the outdated or broken ones.
After that, it will automatically install the latest version of those downloaded files on your computer.
4. Disable audio devices
- Click on the Start Menu icon, type Device Manager in the search bar, and click Open.
- Navigate to Sound, video, and game controllers to expand, right-click on your audio device, and select Disable device.

- Repeat these steps for all audio devices you’re not using.
If your audio keeps switching from say your headphones to speakers in Windows 11, it may be because you have too many devices installed. Disabling audio devices on your computer can be helpful if you’re trying to mute your computer or prevent other sounds from playing.
When you disable your output or playback device in Windows, your computer will no longer be able to hear sound from these sources and won’t send any sound out of its speakers or headphones, regardless of whether they are enabled by default.
5. Scan for viruses
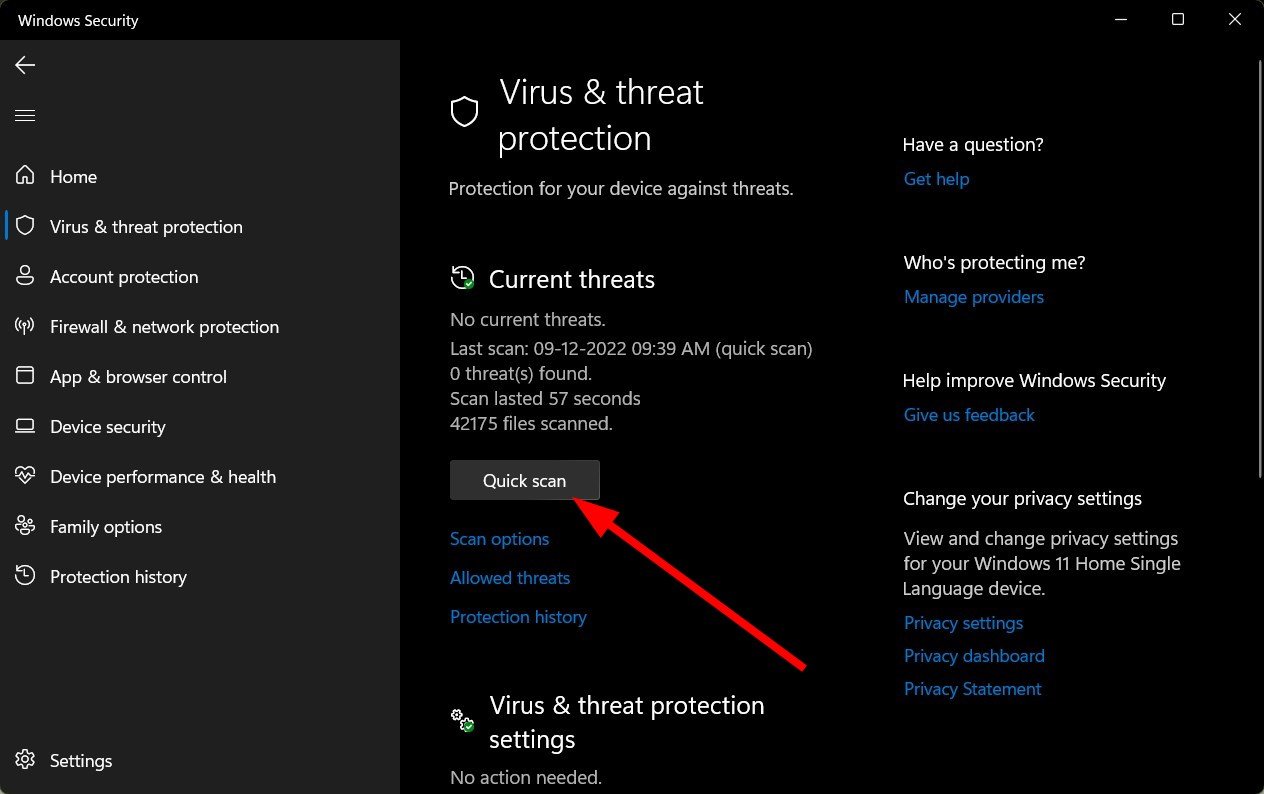
- Press the Windows key, search Windows Security, and click Open.

- Select Virus & threat protection.
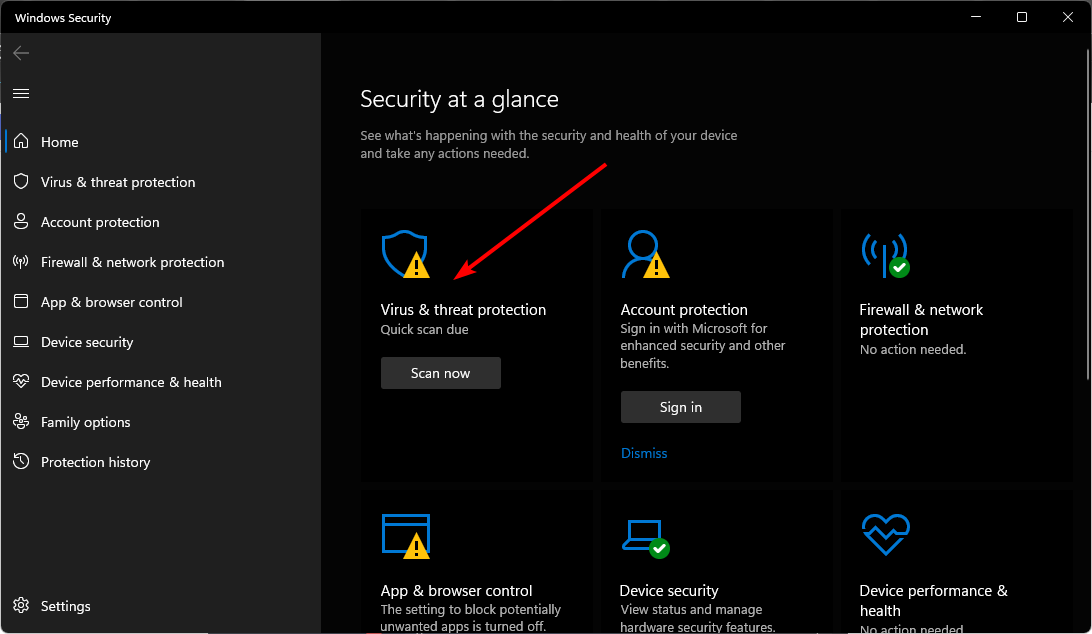
- Next, press Quick scan under Current threats.
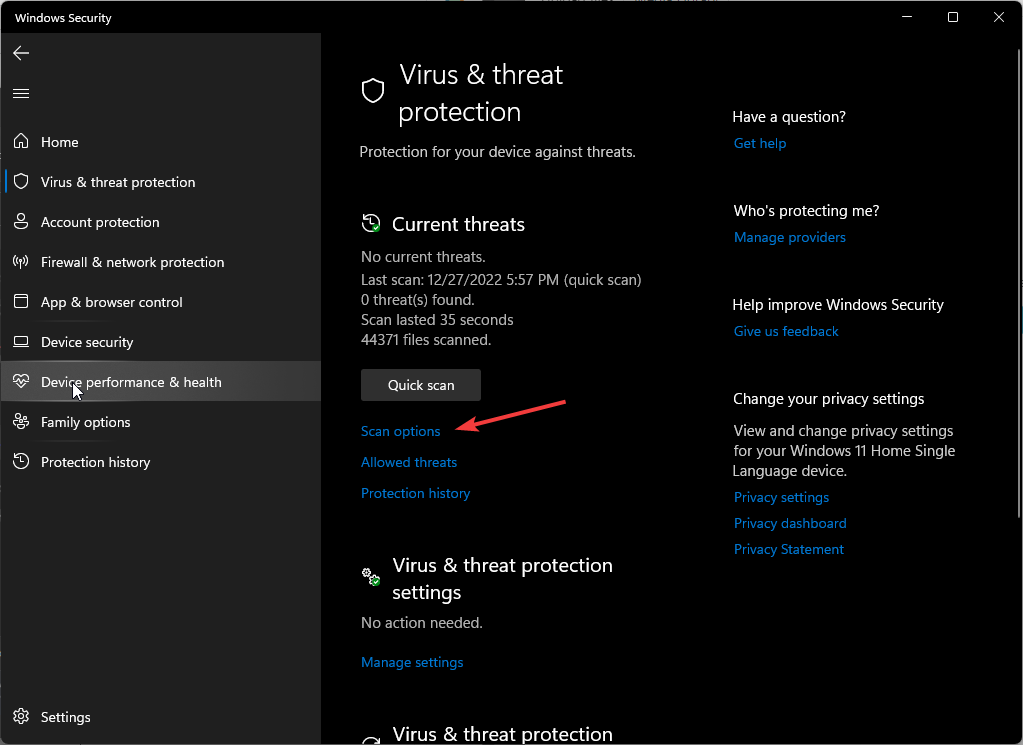
- If you don’t find any threats, proceed to perform a full scan by clicking on Scan options just below Quick scan.
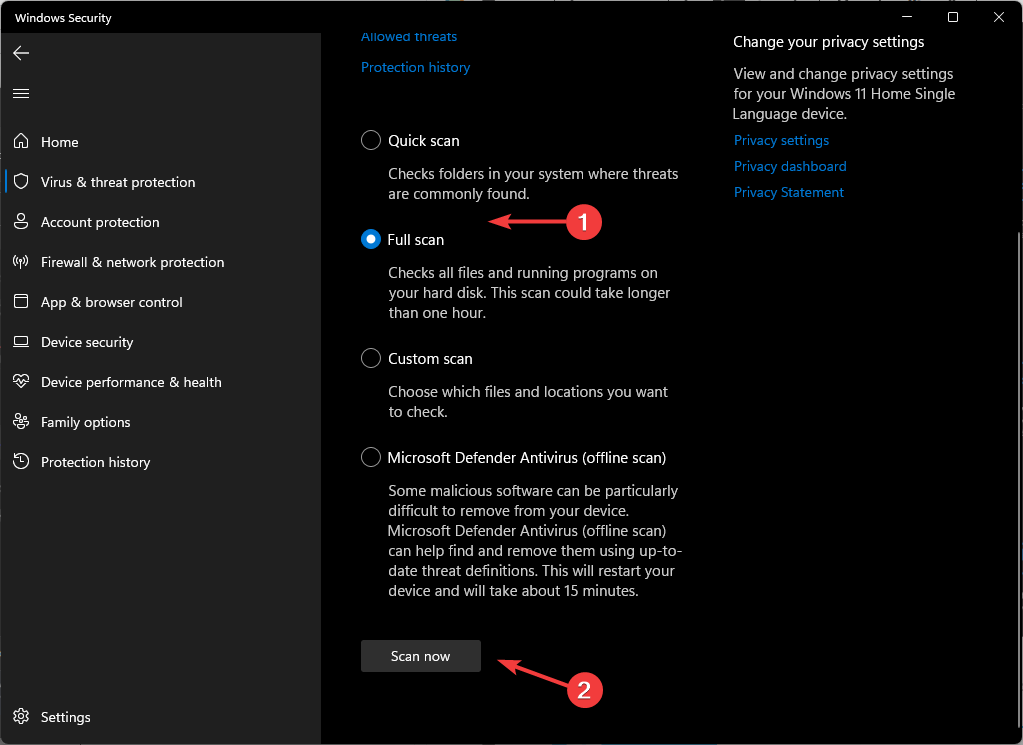
- Click on Full scan then Scan now to perform a deep scan of your PC.
- Wait for the process to finish and restart your system.
6. Check for Windows updates
- Press the Windows key and click on Settings.
- Click on Windows Update, then select Check for updates.
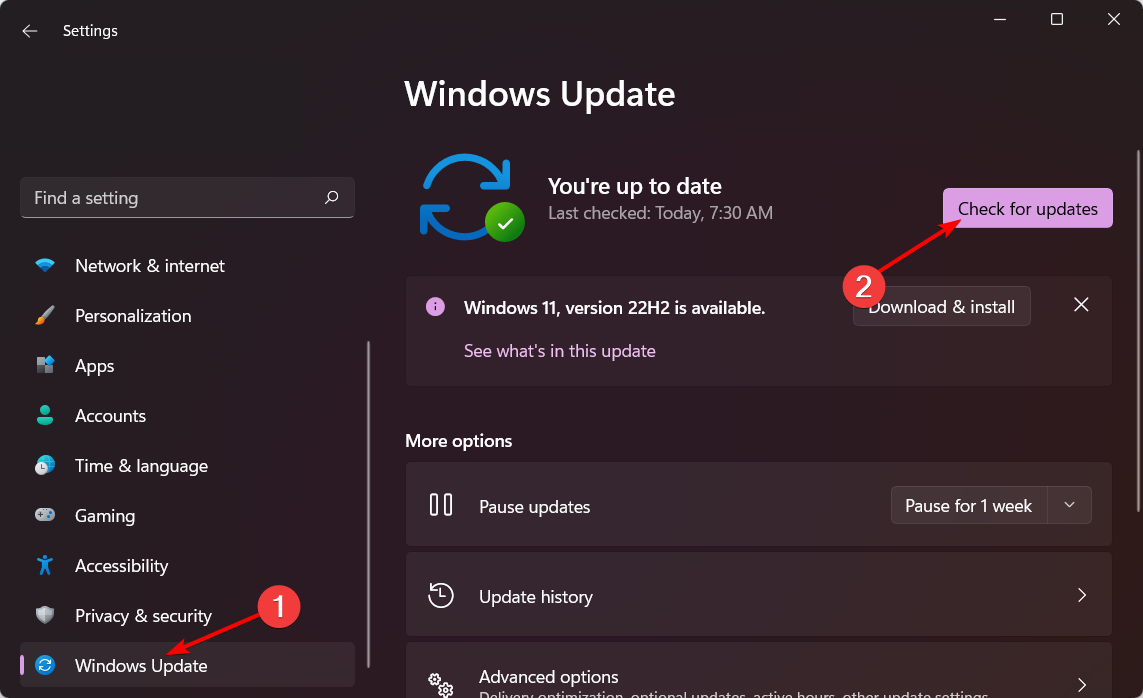
- If you have any pending updates, proceed to Download & install and then restart your system.

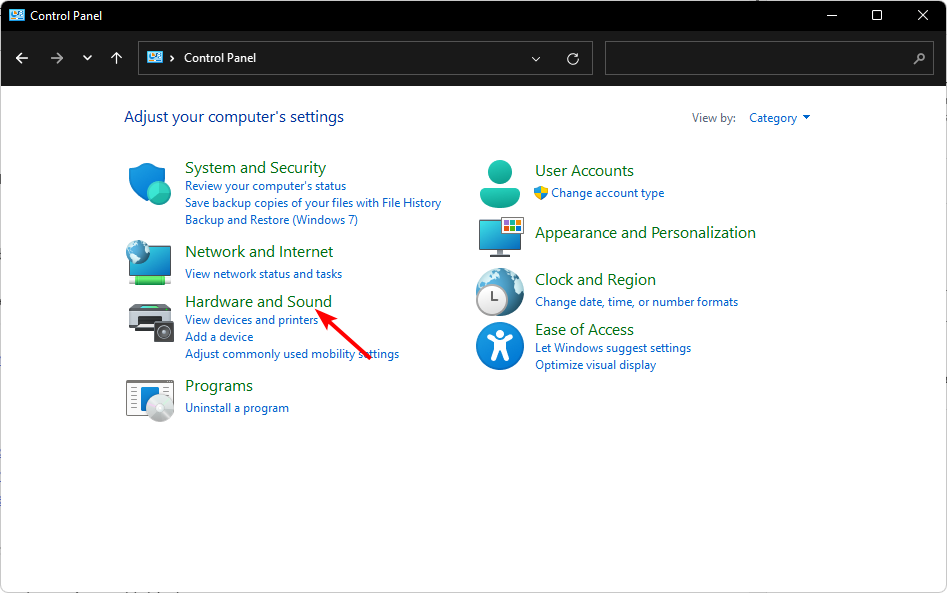
7. Disallow app controls
- Hit the Windows key, type Control Panel in the search bar, and click Open.

- Click on Hardware and Sound.
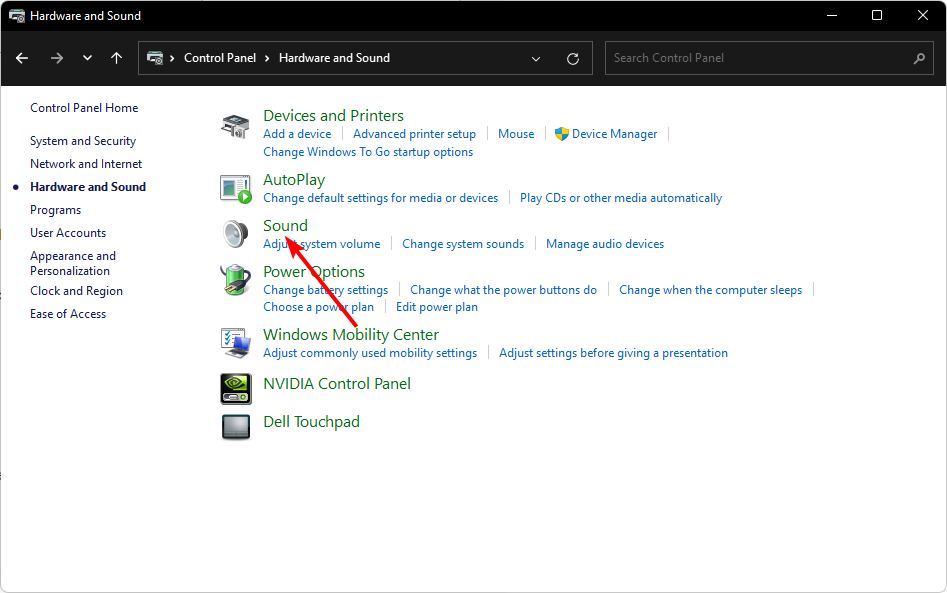
- Select Sound.
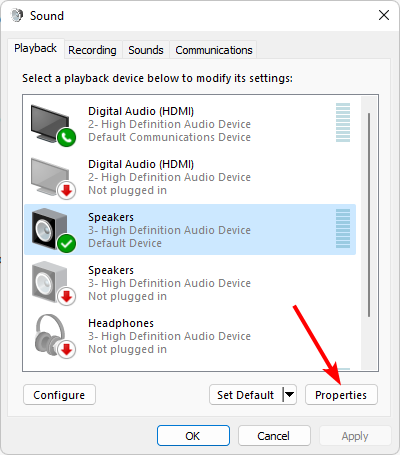
- Navigate to the Playback tab, right-click on your audio output device, and select Set as Default Communication Device.

- Click on Properties at the bottom.
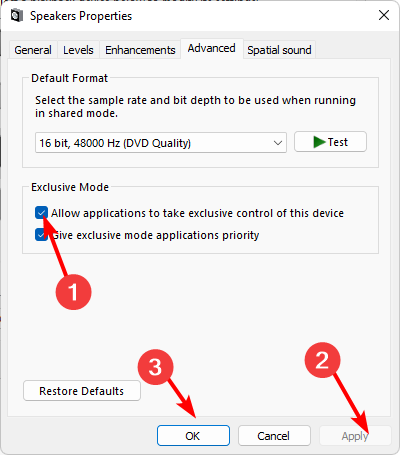
- Navigate to the Advanced tab and uncheck the Allow Application to take exclusive controls on this device box.
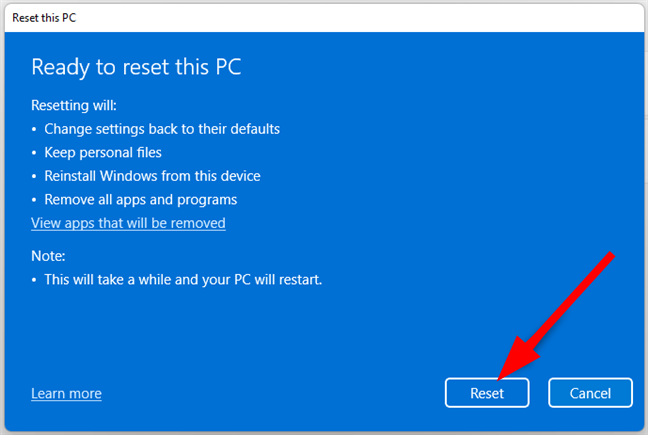
8. Reset your PC
- Hit the Start Menu key and click on Settings.
- Select System and click on Recovery.
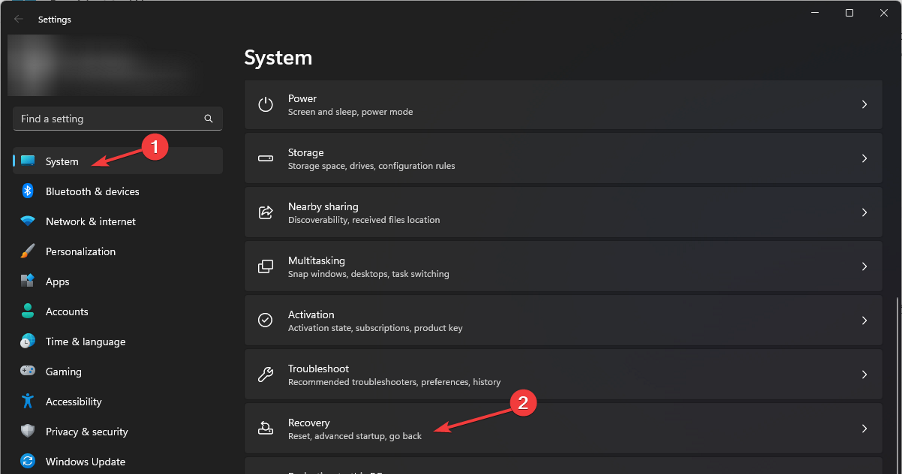
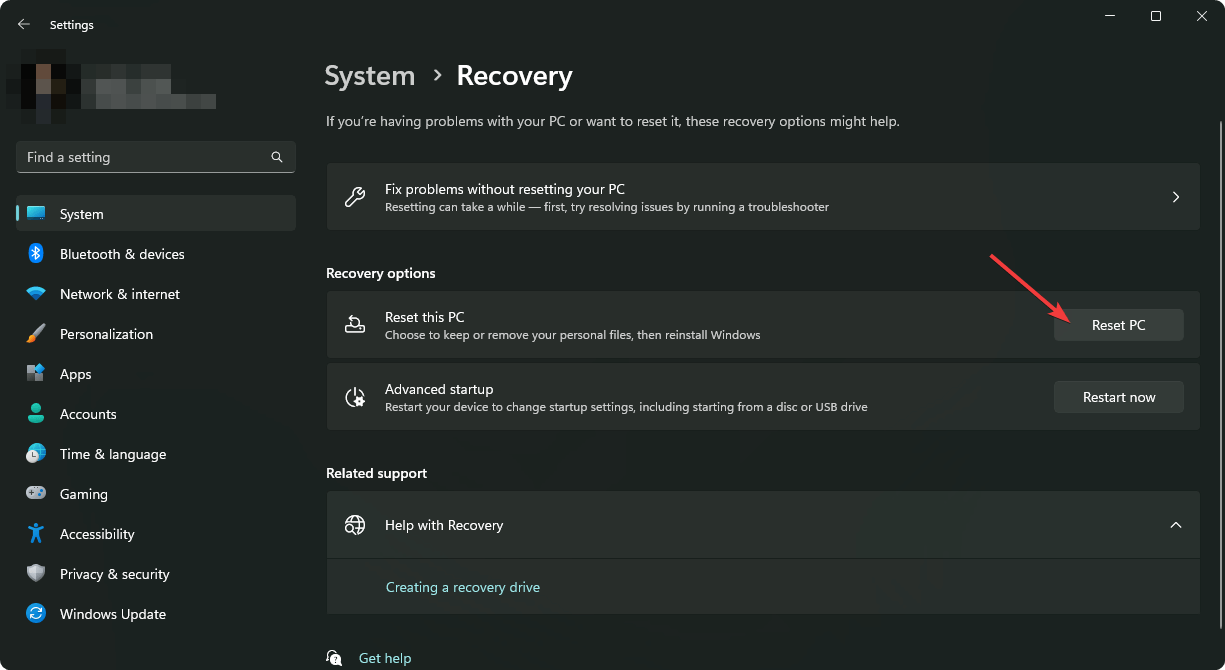
- Click on Reset PC.
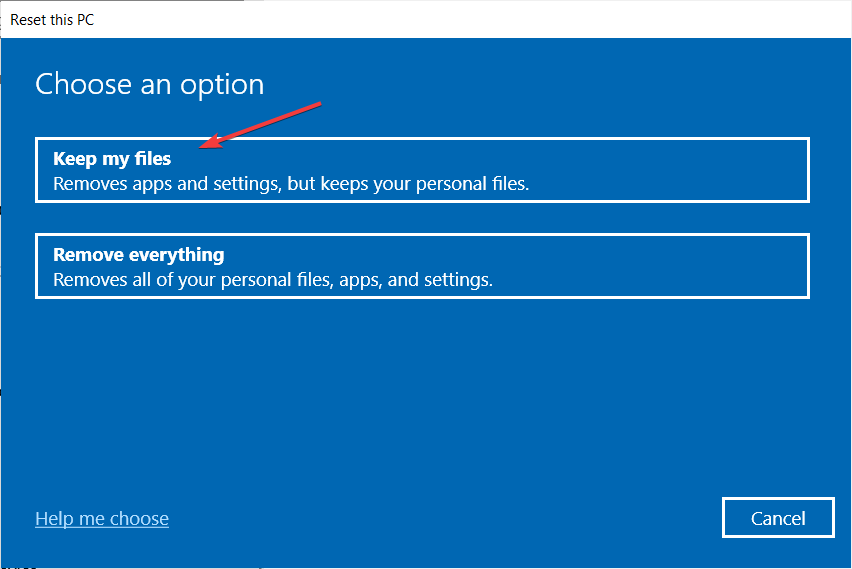
- Choose the type of factory reset you need. You can Keep my files, or Remove everything on the PC.
- Select the option you want to reinstall Windows: Cloud download or Local reinstall.
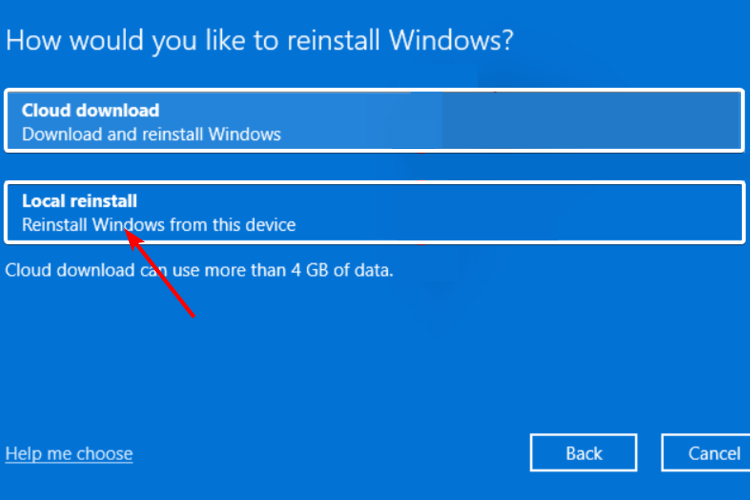
- Click on Next.
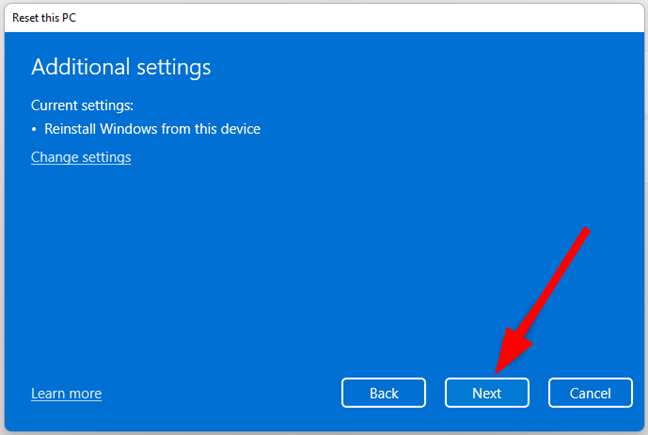
- Finally, press the Reset button.
If your Windows 11 default sound device keeps changing, one of these steps should help you. Unfortunately, this is not the only sound issue you may face, as sometimes, you may not get sound after your PC comes from sleep.
You may also be interested in volume boosters if you’re not happy with the sound output in your device. To learn more about this subject, check our guide on how to change output device on Windows 11 properly.
Many also reported that no output devices are found in Windows 11, but we tackled that issue in a different guide.
That’s it from us but share with us what solution worked instantly for you in the comment section below.
Read our disclosure page to find out how can you help Windows Report sustain the editorial team. Read more


Improve this guide


User forum
0 messages