How to Allow Hamachi Through Firewall [3 Quick Steps]
Make this popular VPN service work again in no time
Key notes
- Trying to access LogMeIn Hamachi on your Windows 11 PC, but the Windows Defender Firewall is blocking the service? Chances are there's no inbound rule set for the app.
- So, if you want to allow Hamachi through the Firewall and clear it from the list of Protected network connections, we have some quick steps to guide you through.


World-class 24/7 support with 82% for a 2 years plan and 2 months free
70% of our readers choose Private Internet Access
70% of our readers choose ExpressVPN
Amazing connection speed with 61% off and 4 months free for the 2-years plan.
Best security protocols with 83% off and 2 months free for a 2-year plan.
If you are unable to set up Hamachi and want to know how to allow the app through Firewall, you are at the right place.
When trying to set up Hamachi, you may often come across errors such as Inbound Traffic blocked, check firewall settings, which arise due to the Firewall blocking the application.
Why does Firewall block Hamachi?
There could be different reasons why the Firewall may block Logmein Hamachi as below:
- Hamachi is included in the list of Protected Network Connections – If the application is among the protected networks, you may have difficulty accessing it.
- Firewall is blocking Hamachi – Sometimes, the Firewall may block the VPN considering it harmful.
- No inbound rule in Firewall for Hamachi – The application fails to maintain inbound connections due to strict firewall settings.
How do I allow Hamachi through Firewall?
Make sure to run a few preliminary checks to rule out any other issues:
- Disable any 3rd party antivirus.
- Allow the app in the antivirus.
- Restart your PC. If your computer is stuck on restarting, rest assured we have a remedy for this issue.
1. Add Hamachi to the list of excluded Firewall items
- Press the Win + R to open the Run console, type firewall.cpl, and press Enter to launch Windows Defender Firewall.

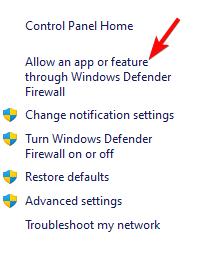
- In the Windows Defender Firewall screen, click on Allow an app or feature through Windows Defender Firewall on the left.
- Next, in the Allowed applications window, click on Change settings.

- Now, under Allowed apps and features, click on Allow another app at the bottom.

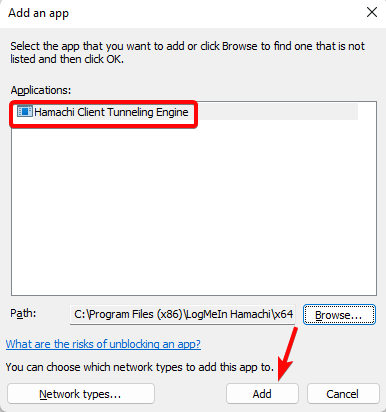
- In the Add an app dialog, click on Browse.

- Next, in the File Explorer window, navigate to the following location:
C:\Program Files (x86)\LogMeIn Hamachi\x64 - If using a 32-bit Windows version, navigate to the below path instead:
C:\Program Files (x86)\LogMeIn Hamachi - Here, double-click on hamachi-2.exe to add it to the applications list.

- It should show Hamachi Client Tunneling Engine, click on Add. Press OK to save the changes and exit.
Restart your PC, and Hamachi is successfully added to the Firewall exception list.
But, if Windows Defender is not working, here we have a comprehensive guide on how to fix it in a few quick steps.
2. Clear Hamachi from the list of Protected network connections
- Open the Run dialog box by pressing the Win + R shortcut keys. Then, type firewall.cpl and press Enter to open Windows Defender Firewall.
- Next, click on Advanced settings on the left.

- In the Windows Defender Firewall with Advanced Security window, click on Action, and select Properties.

- It will open a new dialog box. Here, go to the Public Profile tab, navigate to Protected network connections, and click on Customize.

- Now, on the Protected Network Connections for the Public Profile screen, go to Network connections, and uncheck the box next to Hamachi. Press OK.

- Press Apply and OK again to save the changes and exit.
This is how you can allow Hamachi through Firewall and you can now use the VPN app easily.
3. Establish a new inbound rule for Hamachi
- Press the Win + R to open up a Run dialog box. Then, type firewall.cpl and press Enter to open up the Windows Defender Firewall window.
- Next, click on the Advanced settings option on the left to open Windows Defender Firewall with Advanced Security.
- Here, click on Inbound Rules on the left. Next, on the right, go to Actions and click on New Rule.

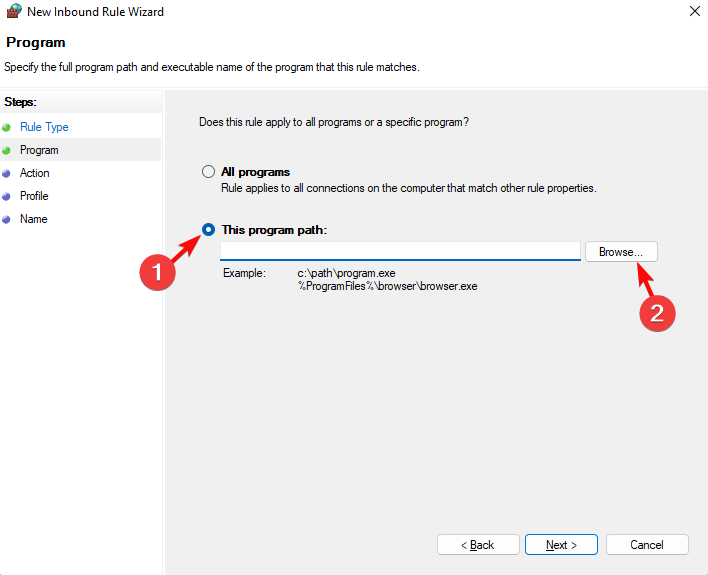
- Inside the New Inbound Rule Wizard, select Program in Rule Type, and click Next.

- On the next screen, select This program path and click on Browse.
- In the File Explorer window, navigate to the below path, and double-click on hamachi-2.exe:
C:\Program Files (x86)\LogMeIn Hamachi\x64
- For a 32-bit Windows version, navigate to the below path instead, double-click on hamachi-2-ui.exe:
C:\Program Files (x86)\LogMeIn Hamachi - Once the path is selected, click Next.

- Next, select Allow the connection in the Action screen, and press Next.

- On the Profile page, select Domain, Private and Public, and click Next.

- Now, name the new rule as, for example, Allow Hamachi, and click Finish.

Once the inbound rule is created successfully, reboot your PC, and now Firewall would not be blocking Hamachi anymore.
What can I do if Hamachi is not connecting?
- To open the Run console, press the Win + R keys together. Now, type devmgmt.msc and hit Enter to open up Device Manager.

- Next, expand the Network adapters section, and select LogMeIn Hamachi Virtual Ethernet Adapter.
- Click on the Actions tab at the top, and select Add legacy hardware.

- On the Add Hardware wizard, click Next.

- Next, select the Install the hardware that I manually select from a list (Advanced) option and press Next.

- Now, under Common hardware types, find and select Network adapters in the list, and select Next.

- On the next screen, click on Have Disk button at the bottom.

- In the Install from Disk window, click on the Browse button, navigate to the below path, and double-click on hamachi.inf:
C:\Program Files (x86)\LogMeIn Hamachi\x64
- Back in the Install From Disk dialogue, press OK.
- As you return to the Add Hardware window, press Next.
This will trigger the Hamachi driver installation. Now, follow the on-screen instructions to finish the installation.
Once done, reboot your computer and check if the issue is resolved and Hamachi is connecting now. But, if Hamachi does not work on your Windows 11 PC, we have some best solutions for you.
However, if you are unable to allow hamachi through Firewall because the Windows Exclusions are not working, we have some quick fixes to help you troubleshoot the issue.
Above are three quick methods to allow Hamachi through Windows Defender Firewall. However, if it’s the Avast Firewall that’s blocking a program, you can follow the solutions in our detailed post.
For any other issues with the Hamachi VPN service or the Windows Defender Firewall, let us know in the comments section below.
Read our disclosure page to find out how can you help Windows Report sustain the editorial team. Read more


Improve this guide


User forum
0 messages