DNS Server Not Responding in Windows 7: How to Fix it
Try changing the DNS server manually or updating the network drivers
Key notes
- DNS server issues can be pretty frustrating as they will prevent you from accessing the internet. They have been reported by several Windows 7 users.
- You can try clearing the DNS cache or switching to a different browser and see if this resolves the problem or not.

The DNS server ensures that you are able to connect to the internet and surf through it. Sadly, there have been multiple user reports regarding DNS server issues on Windows 10.
So much so that this issue has also troubled Windows 7 users in the past. Users have been complaining about the DNS server not responding in Windows 7 error. This guide will give you a bunch of solutions that will help you resolve the problem quickly.
What causes the DNS server not to respond in Windows 7?
Here are a few reasons that could trigger the DNS server not responding in Windows 7:
- Misconfigured DNS settings: If the DNS settings are misconfigured then your browser will have a hard time connecting to the internet.
- Outdated network driver: Outdated drivers often cause multiple issues and conflict with the smooth performance of the PC.
- DNS Cache: The presence of unwanted DNS cache can also trigger multiple issues, such as the one at hand.
- Problem with your internet connection: You should ensure that the internet that you are connected to is working and there are no issues with it.
- Your browser is at fault: Often due to a bug or glitch the browser may misbehave and throw up errors like the DNS server not responding in Windows 7.
How can I fix the DNS server not responding in Windows 7 error?
Before jumping to the advanced solutions, let us first go through a bunch of preliminary solutions that could help you fix the problem:
- Try restarting your PC. There might be a temporary glitch that is causing the problem.
- Restart your modem or router. This will ensure that the router starts from scratch and connects to the server without any issues.
- Install all the latest Windows updates as this could very well be because of a bug on the earlier version of Windows update.
1. Change the DNS server manually
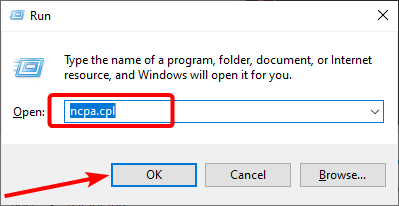
- Press Windows + R to open the Run dialogue.
- Type ncpa.cpl and click the OK button.

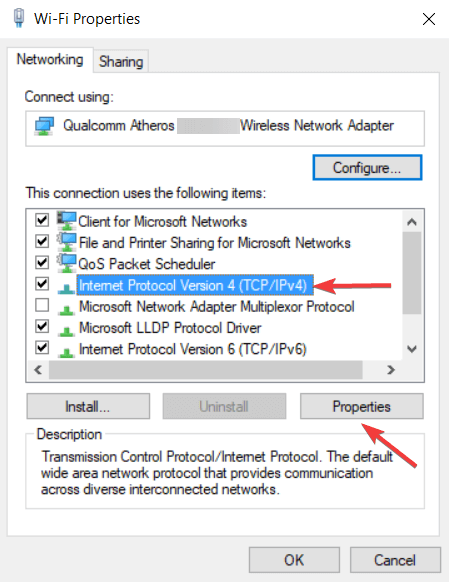
- Right-click your network and choose Properties.

- Select Internet Protocol Version 4 (TCP/IPv4) and click the Properties button.

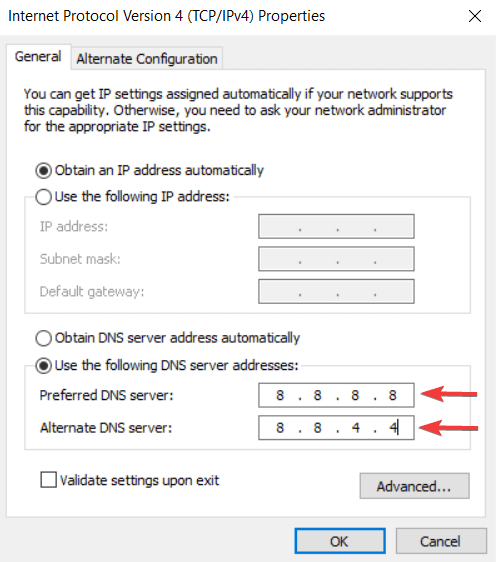
- Click on Use the following DNS server addresses option.
- Set the Preferred DNS server to 8.8.8.8. and the Alternate DNS server to 8.8.4.4.

- Alternatively, you can also use 208.67.222.222 as Preferred and 208.67.220.220 as the Alternate DNS server.
- Click OK.
2. Clear DNS cache
- Press the Windows button to open the Start menu.
- Search for the command prompt and right-click on it to select Run it as an administrator.

- Type the below command and press Enter.
ipconfig /flushdns
- Close the command prompt and check if this resolves the issue or not.
3. Update network drivers
- Press the Windows key and open the Start menu.
- Type Device Manager and open it.
- Expand the Network adapters section.

- Right-click on your network adapter and select Update driver.

- Click on Search automatically for drivers.

- Your system will check if there is a new update available and install it if it finds one.
Updated drivers not only bring new features on board but also get rid of the bugs and glitches present in the version that is currently installed on your PC.
While you can manually update the driver following the above steps, you can ease the process by using a dedicated driver updater tool. For this purpose, we recommend you use Outbyte Driver Updater.
Outbyte Driver Updater not only updates your drivers but can automatically scan for all of your drivers and update them for you. It can create driver backups, fix system-related issues, schedule scans, and much more.

Outbyte Driver Updater
This tool keeps all your drivers updated to maintain your system in top shape.4. Perform network reset
- Press the Windows button to open the Start menu.
- Search for the command prompt and right-click on it to select Run it as an administrator.
- Type the below command and press Enter after each command.
netsh int ip reset reset.txtnetsh winsock resetnetsh advfirewall reset
5. Run the Network Troubleshooter
- Open the Start menu by pressing the Windows key.
- Open Control Panel.
- Under Network & internet heading, select View network status and tasks.

- Click on Troubleshoot problems.

- Select Internet Connections.

- Click Advanced.

- Check Apply repairs automatically.
- Click Next.
- Select Troubleshoot my connection to the Internet.
- Your system will begin the diagnosis and will prompt you to perform steps to resolve the issue.
6. Use a different browser
Often the DNS server is not responding in Windows 7 error is associated with the browser itself. Because of some glitch or bug in the browser, it may throw up unnecessary errors.
In such a case, we would suggest you switch to a different browser and check if the problem exists there as well or not.
If you are confused about which browser to download, then we have a guide that gives a list of some of the best browsers that you can install on your Windows 7 PC.
Let us know in the comments below which one of the above solutions fixed the DNS server not responding issue.
Read our disclosure page to find out how can you help Windows Report sustain the editorial team. Read more


Improve this guide


User forum
0 messages