How to Listen to Your Microphone in Windows 11
Test your mic so you can have the best possible audio quality
5 min. read
Updated on
Read our disclosure page to find out how can you help Windows Report sustain the editorial team. Read more
Key notes
- It's highly recommended that you listen to your microphone to configure and set it up properly.
- The reason is to discover any audio problems that may otherwise be overlooked.
- You can do this by using the native Recorder app on Windows 11.
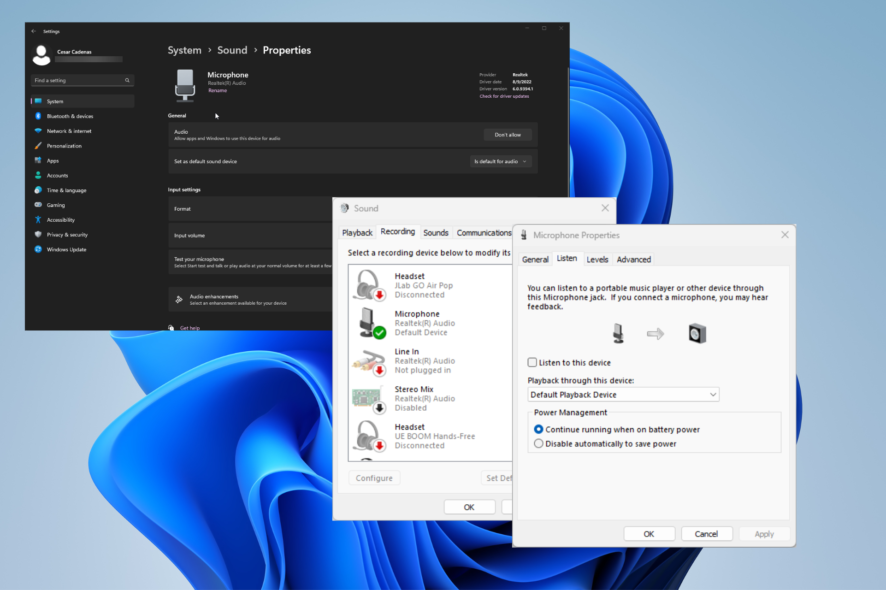
You must listen to a microphone when you buy one to test its quality. That way, you can discover and, subsequently, troubleshoot any audio problem you may come across.
For example, you may hear a high-pitched noise coming from your speakers. This can be the result of an improperly placed microphone. Maintaining your mic is a great way to ensure its longevity.
What may cause microphone problems?
Before learning to listen to your microphone, it’s essential to understand why you should do it. As stated, this can help you zero in on issues or malfunctions.
Below is a list of the most common mic problems, but it is by no means an exhaustive list:
- Your computer has low volume, or your mic is muted – It may seem obvious here, but having little to no volume from your source means you can’t properly test the devices.
- The mic has not been properly set up – Without a proper set up, your device will not work. Fortunately, it’s easy to do as you mainly have to tweak a few things in Settings.
- There’s too much background noise – Background noise can interfere with the recording process. You should download some noise canceling software to stop this problem.
- Devices are poorly connected – Bad connections can cause audio to become distorted. Double-check the cables and make sure everything’s plugged in all the way.
- Static noise – Your microphone may produce some static noise if it’s damaged or enabled audio enhancements.
How can I listen to my mic on Windows 11?
You can listen to your microphone on Windows 11 to test it properly in two main ways. But before you do, it’s recommended that you do the following to ensure the mic will work correctly.
- As alluded to earlier, make sure you increase the volume on your computer to the proper levels. This is a really common mistake that people often overlook when testing audio devices.
- Update your microphone’s drivers to ensure good device performance. And to that extent, install any missing Windows 11 updates you may have lingering in the back.
- Double-check if the mic is selected as the main audio input. You can do the latter by going into the Sound section of the Settings menu. See if it’s enabled.
- Run the audio troubleshooter if you experience any trouble with the mic. Microsoft’s website provides instructions on how to find and locate the troubleshooter.
- And if all else fails, you might need a new microphone. The only reason why a mic wouldn’t work after performing all these steps is due to malfunctioning parts.
1. Test via the Settings menu
- First, make sure your microphone is connected to your PC’s port.
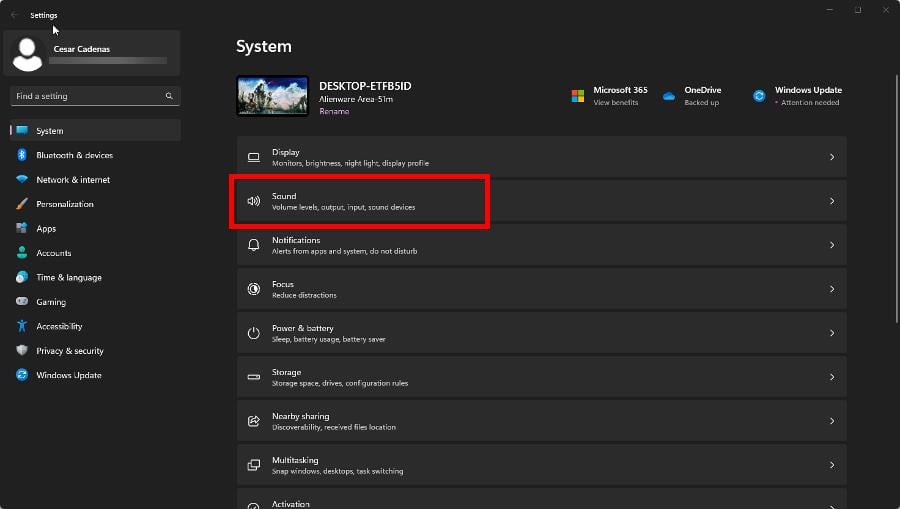
- Next, launch the Settings menu and click Sound in the System tab.
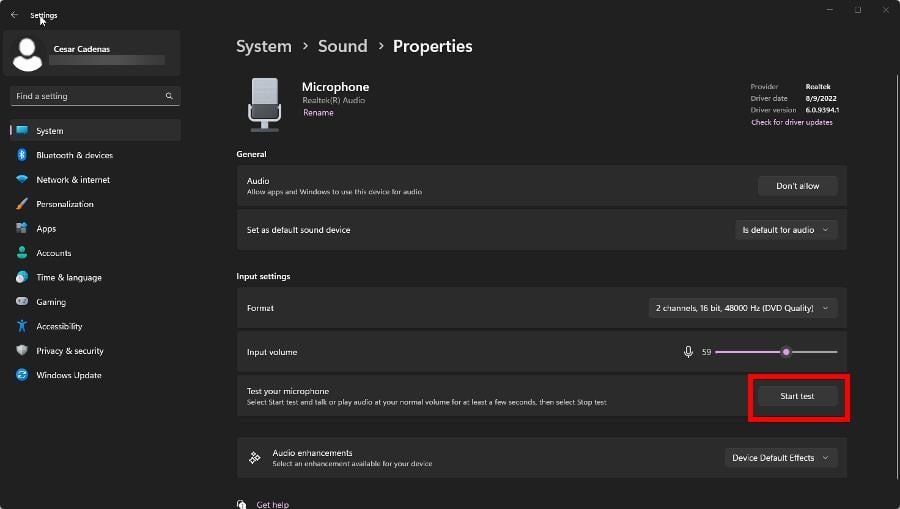
- In the Input section, select the microphone you want to test.
- Under Input Settings, click the Start Test button at the bottom and speak into your microphone. You should see a bar moving as you speak.
See if your computer is picking up the audio. You must plug in your headphones to hear the microphone much better. If that doesn’t work, you can try out the following solution.
2. Listen through a playback device
- Right-click the Windows logo in the bottom-left corner and select Run.
- Enter mmsys.cpl, then click OK to open the Sound menu.
- Click the Recording tab, and double-click the microphone that you’re using.
- In this new window, go to the Listen tab.
- Enable Listen to this device.
- Expand the menu under Playback through this device and select an output for your microphone’s audio.
- Click Apply, then OK.
- Additionally, it’s recommended that you turn off audio enhancements which you can do by going to the Advanced tab.
- Under Signal Enhancement, select the box next to Enable audio enhancement to disable the feature.
- Click Apply, then OK.
When you’re done testing, be sure to turn this feature off. If you don’t, you may cause a feedback loop with another device. This can also occur if the settings aren’t correctly configured.
3. Listen through native Recorder ap
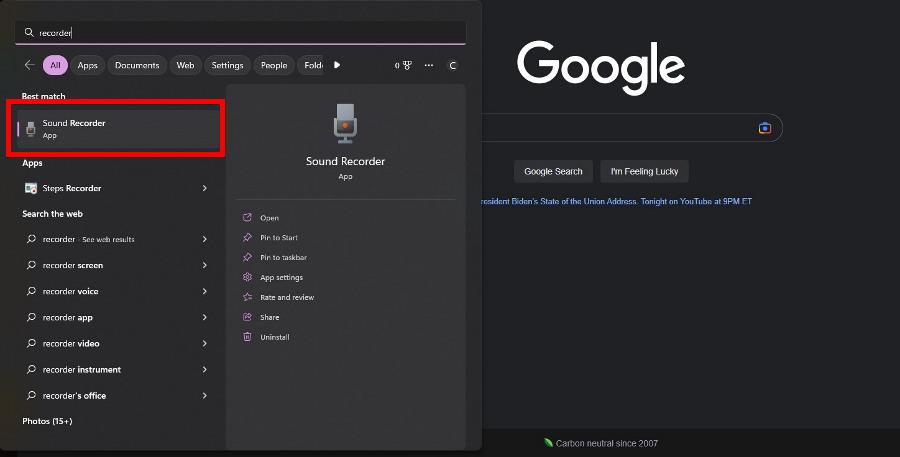
- In the Windows Search bar, type in Recorder and select the native Sound Recorder app.
- Plug in your microphone and hit the red Record button to begin recording your voice. If the app asks you for permission to access the mic, select Yes.
- Once you’re done recording, you can listen to the audio and hear how you sound.
Are there ways to improve my audio quality?
After you finish testing, you may begin wondering how you can improve the audio quality on your Windows 11 machine. Well, there are two main ways to do it.
You can download proper recording software, giving you better control over your audio and how it sounds. Some can professionally record, edit, and mix audio files like Adobe Audition.
We recommend restarting the Windows Audio Services on your computer or tweaking the audio settings. Some software adjustments may be all you need.
Feel free to comment below if you have questions about other microphone problems. And please tell us if there’s a specific guide for a Windows 11 error that you’d like to see.






User forum
0 messages