How to Manage Devices and Printers in Windows 11
Perfect match for a perfect print job
5 min. read
Published on
Read our disclosure page to find out how can you help Windows Report sustain the editorial team. Read more
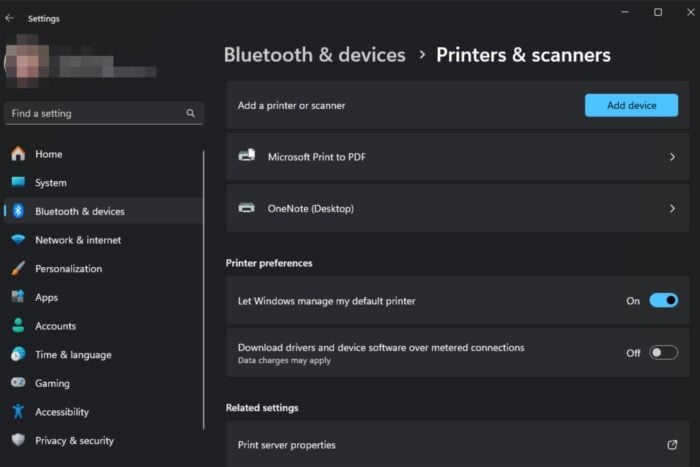
Connecting peripherals to your Windows 11 PC requires proper management for a seamless connection so here’s a quick guide to manage your devices and printers settings.
A malfunctioned printer can cause issues with your printing and cause your system to slow down. If your printer is not printing, you’ve probably neglected it by not updating its drivers promptly or its printer firmware.
Effective management ensures your print jobs are seamless and an unresponsive printer is not your portion, elevating your overall experience.
How do I manage my devices and printers in Windows 11?
1. Access device and printer settings
1.1 Access device and printer settings
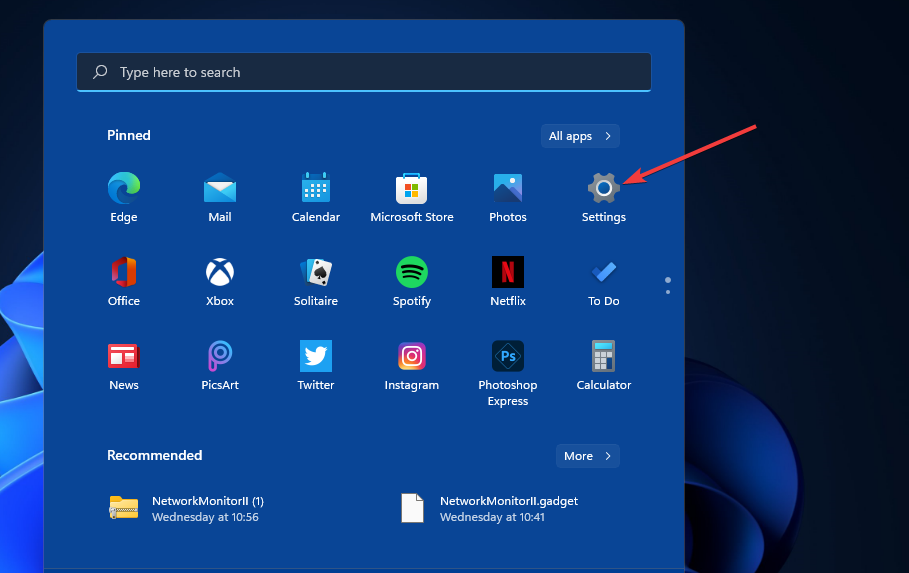
- First, click Start on your taskbar to bring up that menu.
- Select Settings on the Start menu.
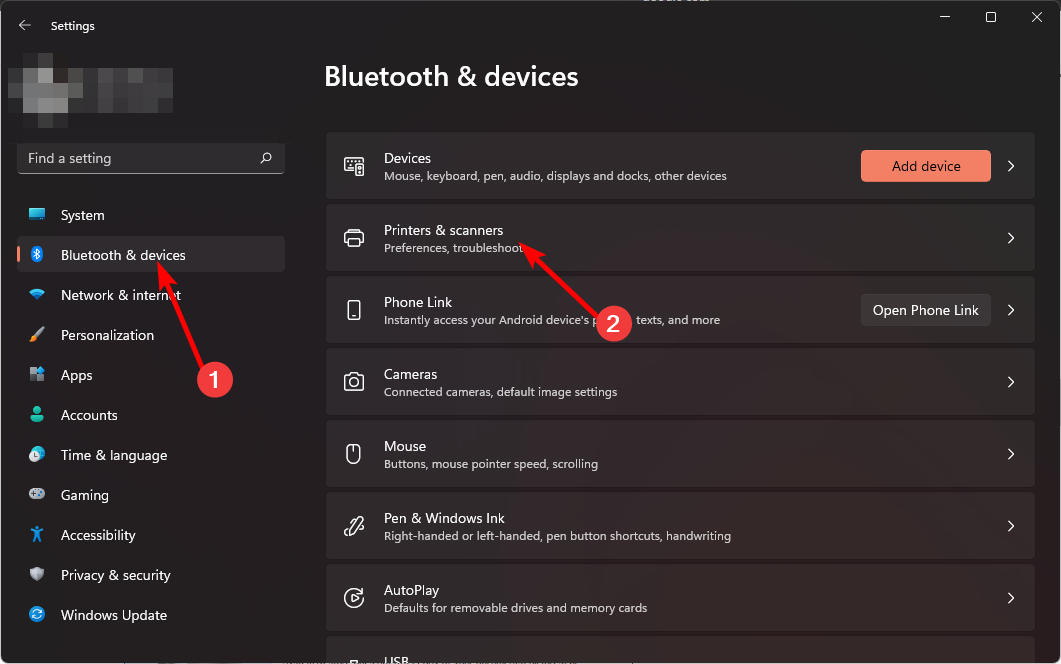
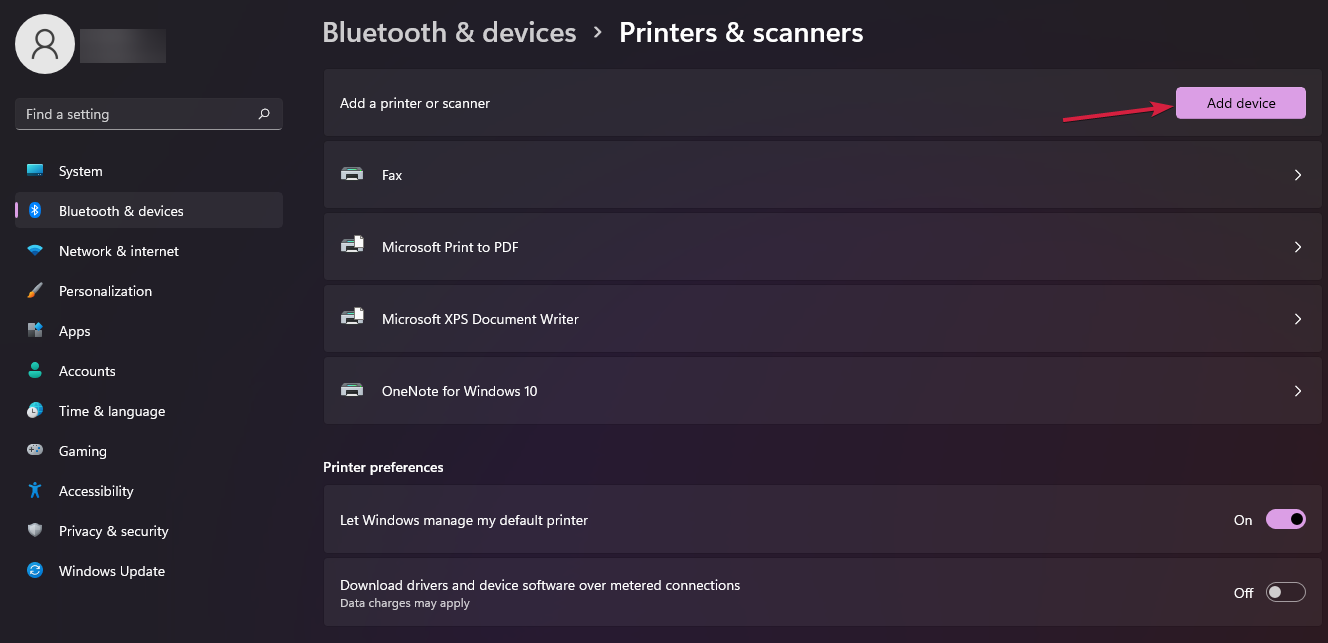
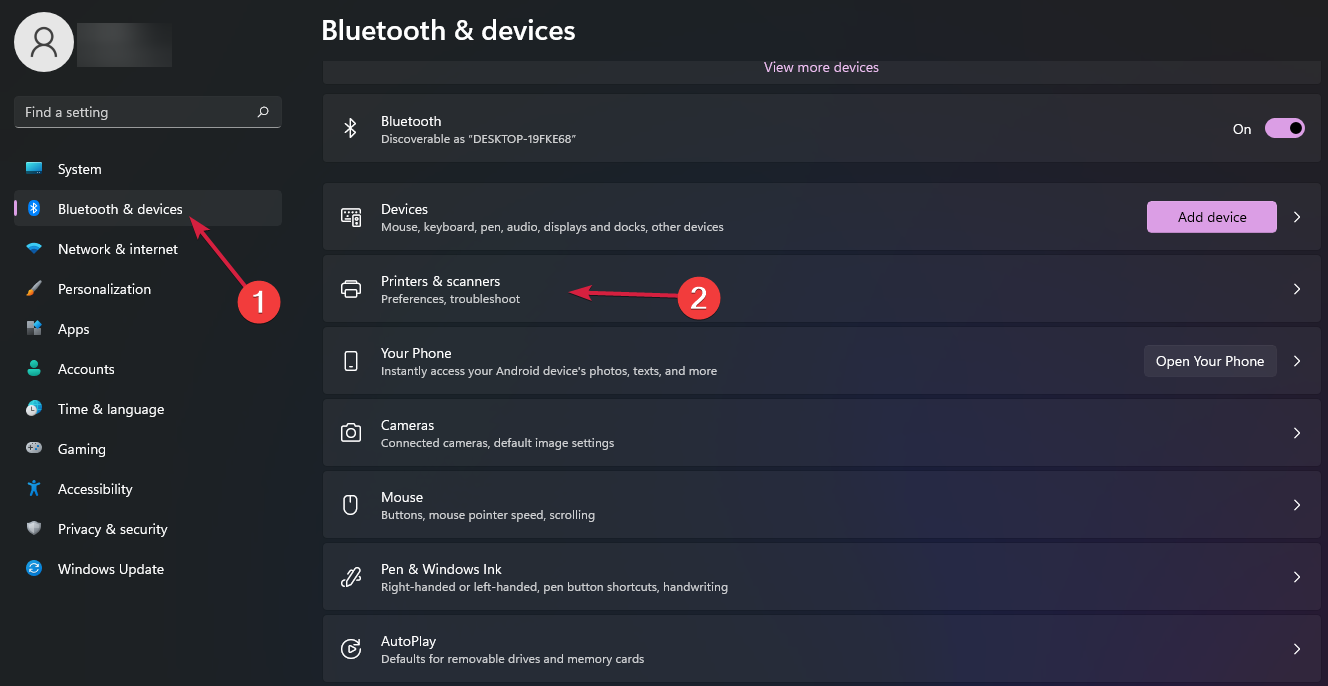
- Click the Bluetooth & devices tab in Settings then select Printers & scanners on that tab.
- Click on one of your printers and your Printer settings will open. Here, you can run the troubleshooter, check printer properties, adjust your printing preferences among others.
1.2 Update printer drivers
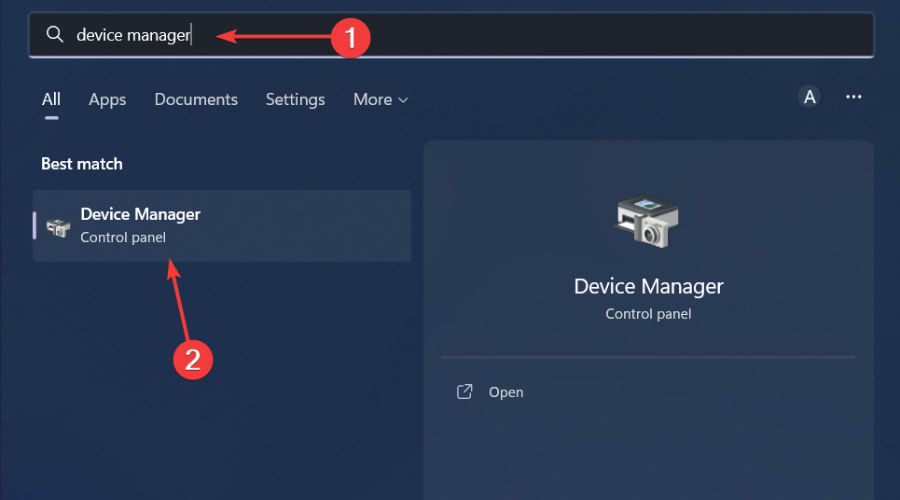
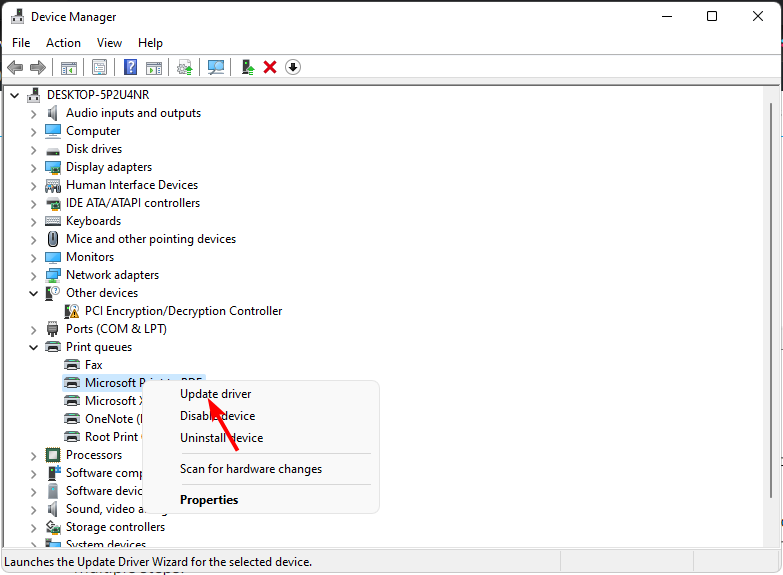
- Hit the Windows key, type Device Manager in the search bar, and click Open.
- Navigate to Printers and locate your printer.
- Right-click on it and select Update driver.
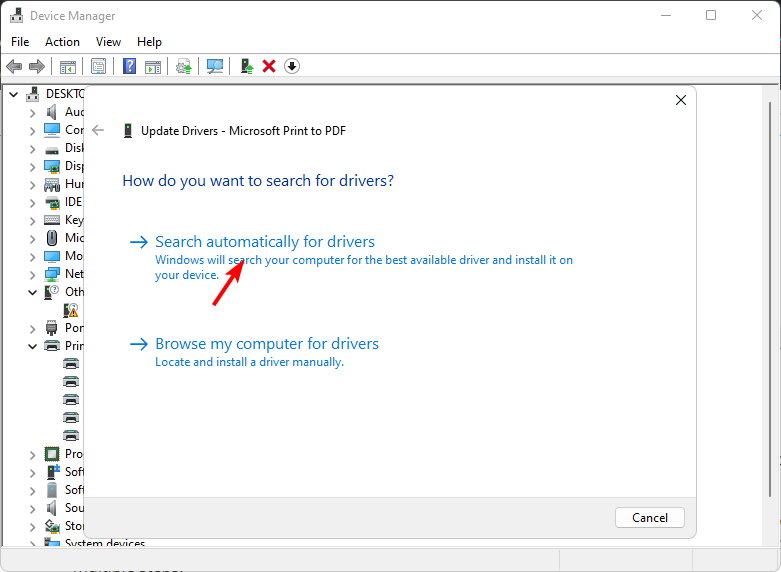
- Select Search automatically for updated drivers.
- Windows will find the most suitable driver and recommend you install it.
Remember, you can also update your printer drivers offline if you don’t have a network connection.
2. Add a printer
2.1 By using the Settings app
- First, click Start on your taskbar to bring up that menu.
- Select Settings on the Start menu.
- Click the Bluetooth & devices tab in Settings then select Printers & scanners on that tab.
- Press the Add device button.
- Click the Add device button for your detected wireless printer.
2.2 By using the Control Panel
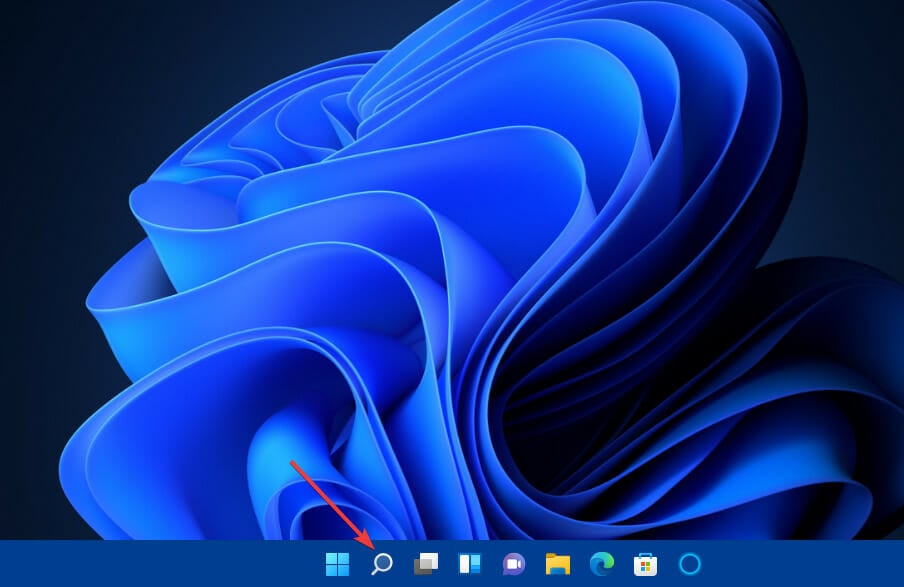
- Click the taskbar’s magnifying glass icon.
- Type Control Panel within the search tool that opens.
- Select Control Panel to open that window.
- Next, select Large Icons on the View by drop-down menu.
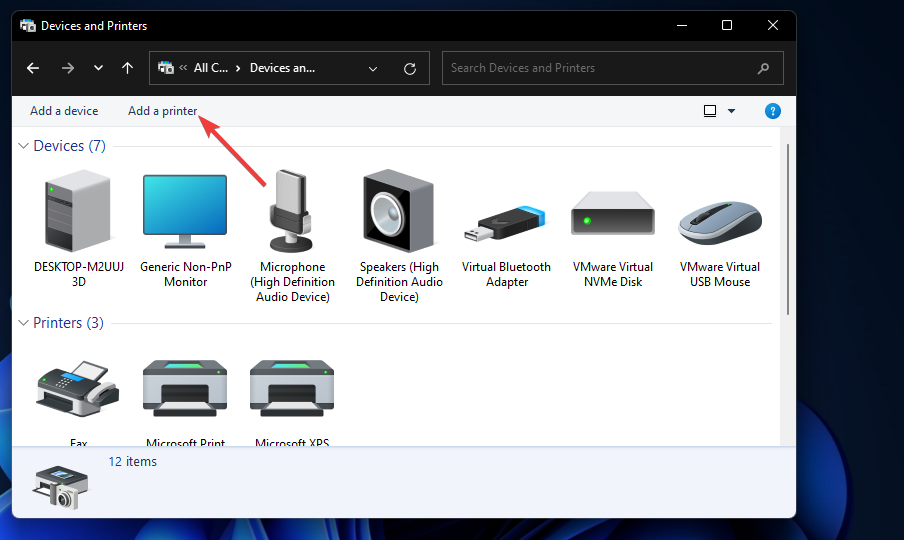
- Click Devices and Printers in the Control Panel.
- Then press the Add a printer button.
- Choose a printer on the Add a device window, and press the Next button to install it.
- Press the Finish button after the printer has been added.
3. Remove a printer
- Press the Windows key + I keyboard shortcut for opening Settings.
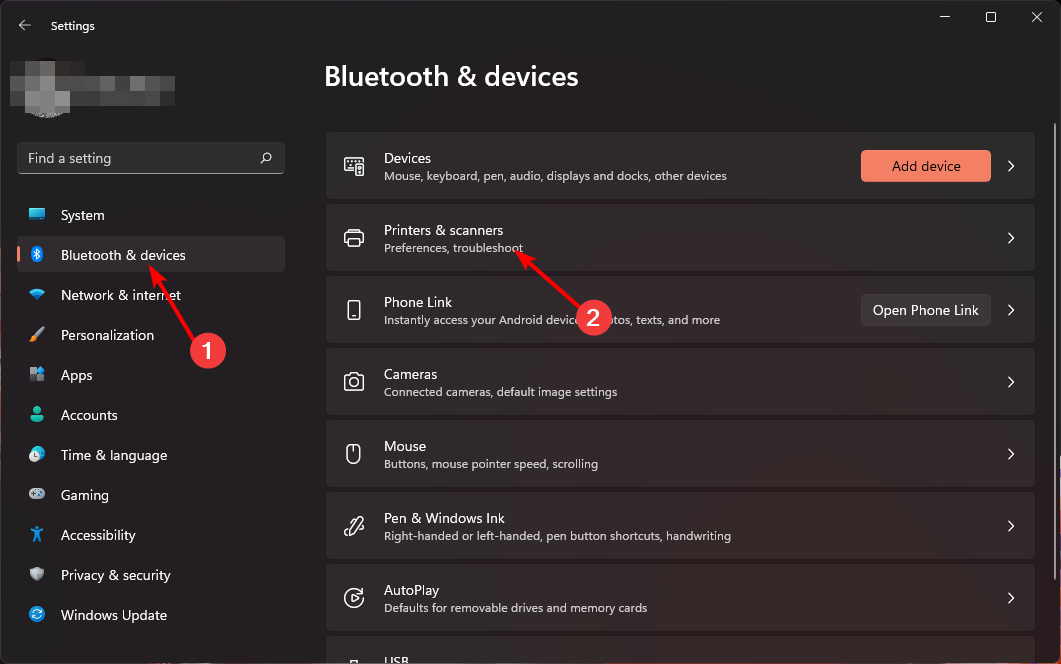
- Click Bluetooth & devices on the left of Settings then select Printers & Scanners to view your added printers.
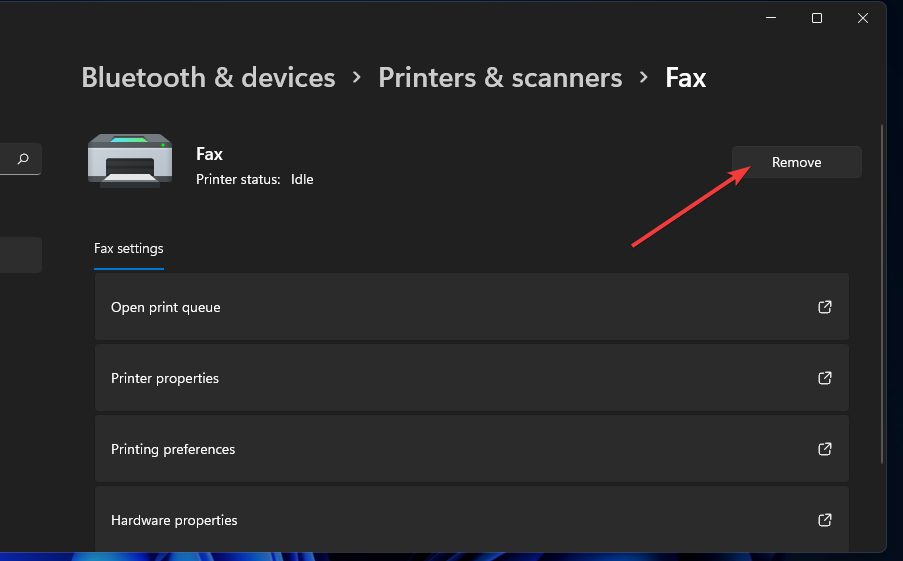
- Double-click the added printer you want to remove to open settings for it then press the Remove button.
- Click Yes to confirm you want to remove the printer.
4. Rename your printer
4.1 By using the Settings app
- Hit the Windows key and click on Settings.
- Click on Bluetooth & devices, then select Printers & scanners.
- Select the printer you wish to rename.
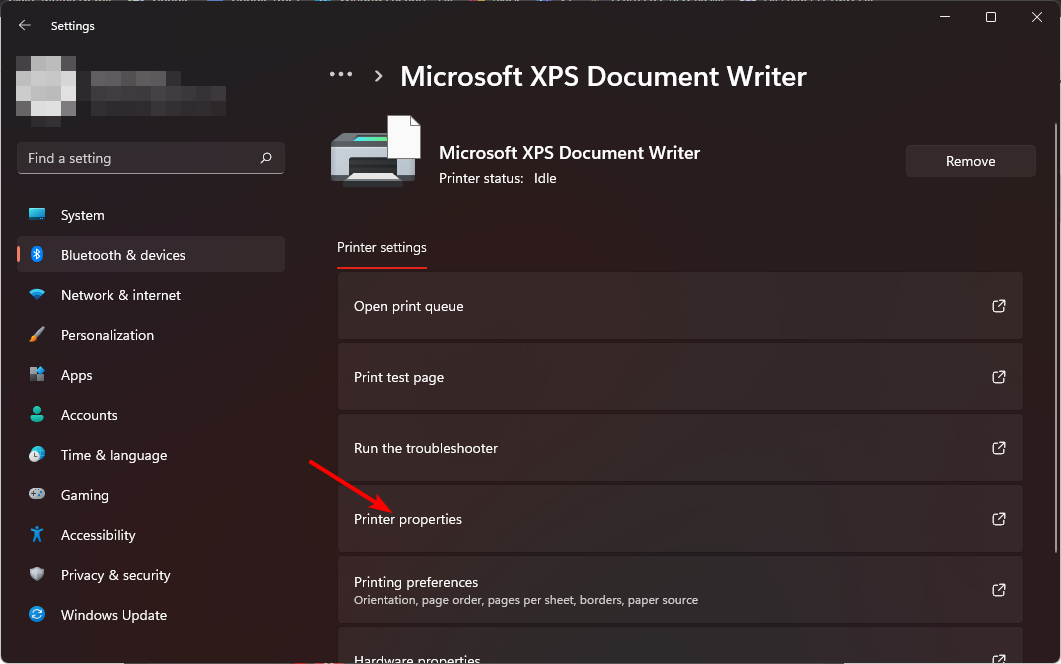
- Click on Printer properties.
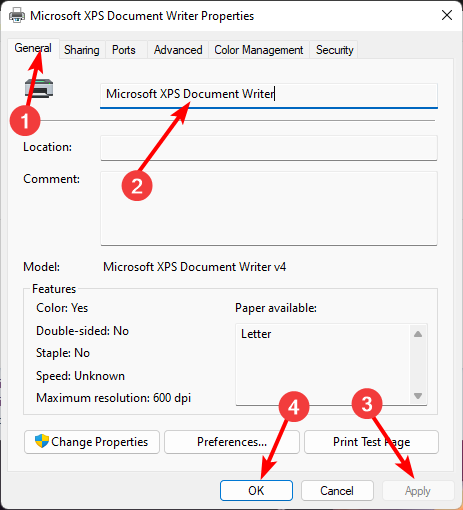
- Navigate to the General tab, type in the new name, then hit Apply and OK to save the changes.
4.2 By using the Control Panel
- Hit the Windows key, type Control Panel in the search bar, and click Open.
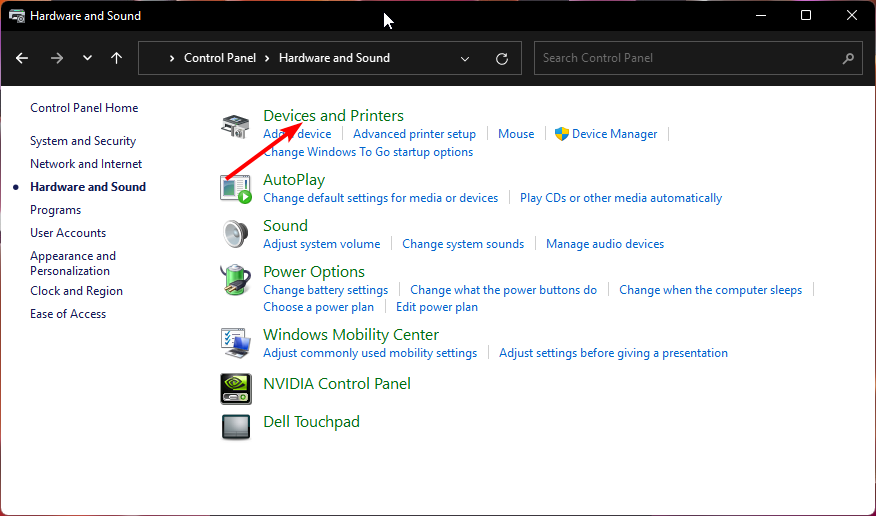
- Click on Hardware and Sound >select Devices and Printers.
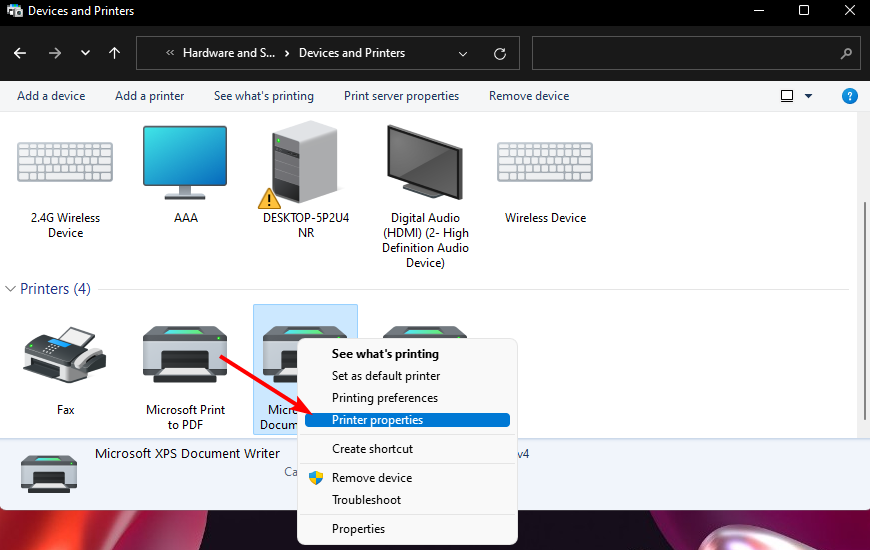
- Right-click on the printer you wish to rename and select Printer properties.
- Navigate to the General tab, type in the new name, then hit Apply and OK to save the changes.
5. Install the printer management feature
- Press Windows + I to open Settings.
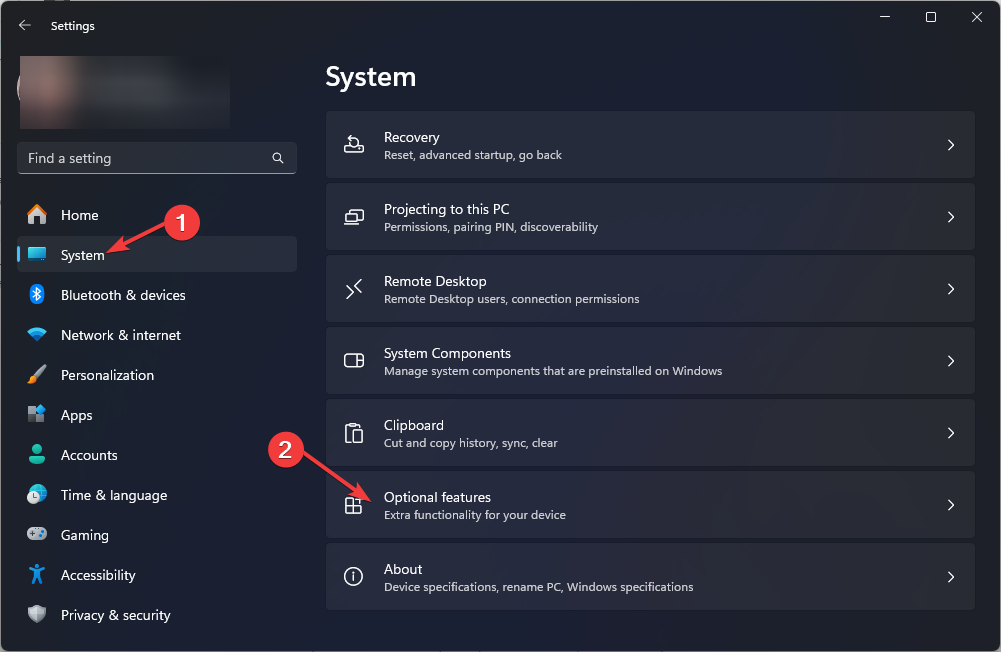
- Click on System from the navigation pane, and then click on Optional features on the right.
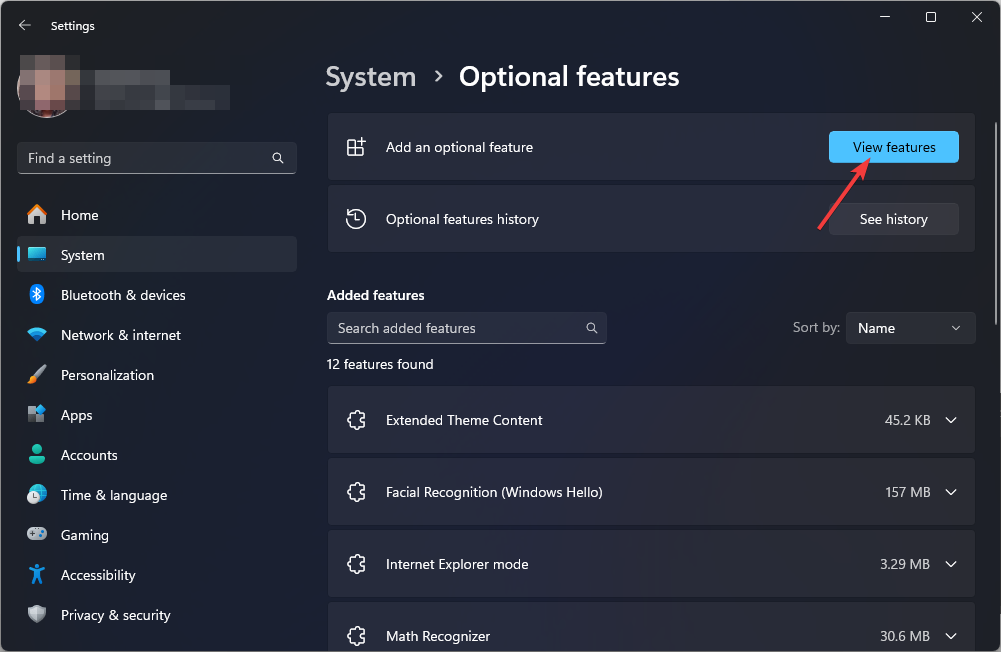
- Now, click the View features button next to Add an optional feature.
- Enter Print Management in the search box, tick the checkbox for the tool, and then click on Next.
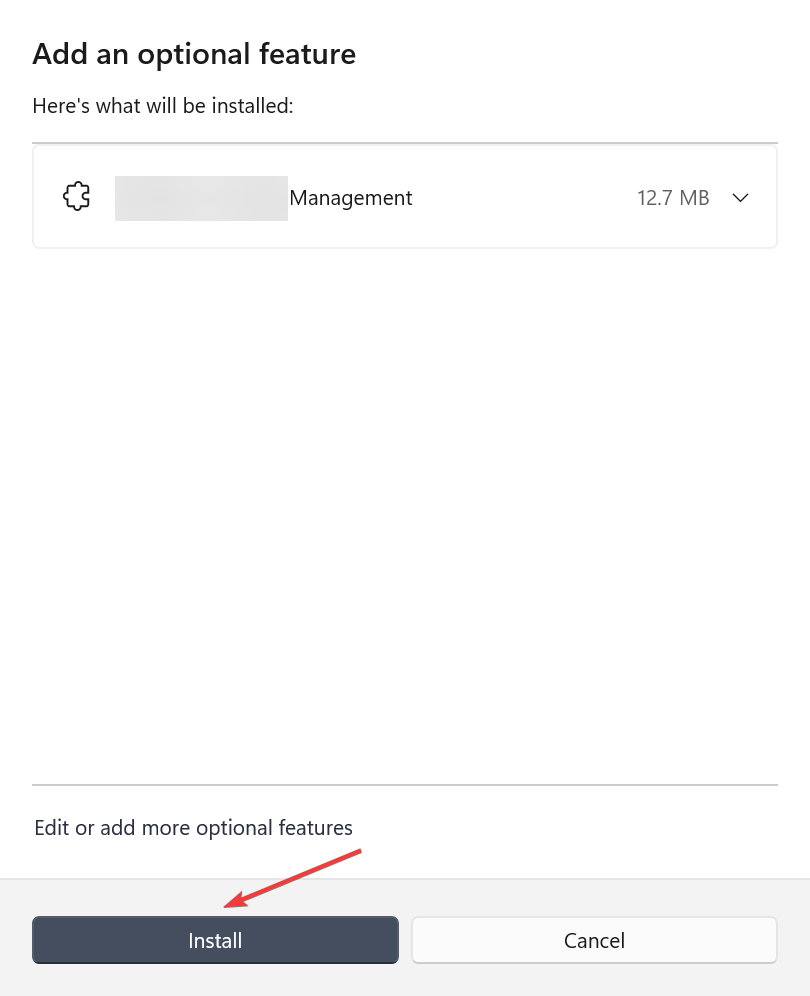
- Click on Install to begin the process.
- Wait for Print Management to install on the PC completely.
- Once done, restart the computer for the changes to come into effect.
Print management is an optional feature which means it is not added by default. It is also not available on all Windows editions so if it is missing, your edition is probably the issue. For more information on how to manage optional features, check out our detailed article.
Once installed, you can manage your printer, add a new printer and configure its settings. Printer configuration issues tend to occur when you do it manually so try this feature and see if the process is error-free.
How to troubleshoot common issues
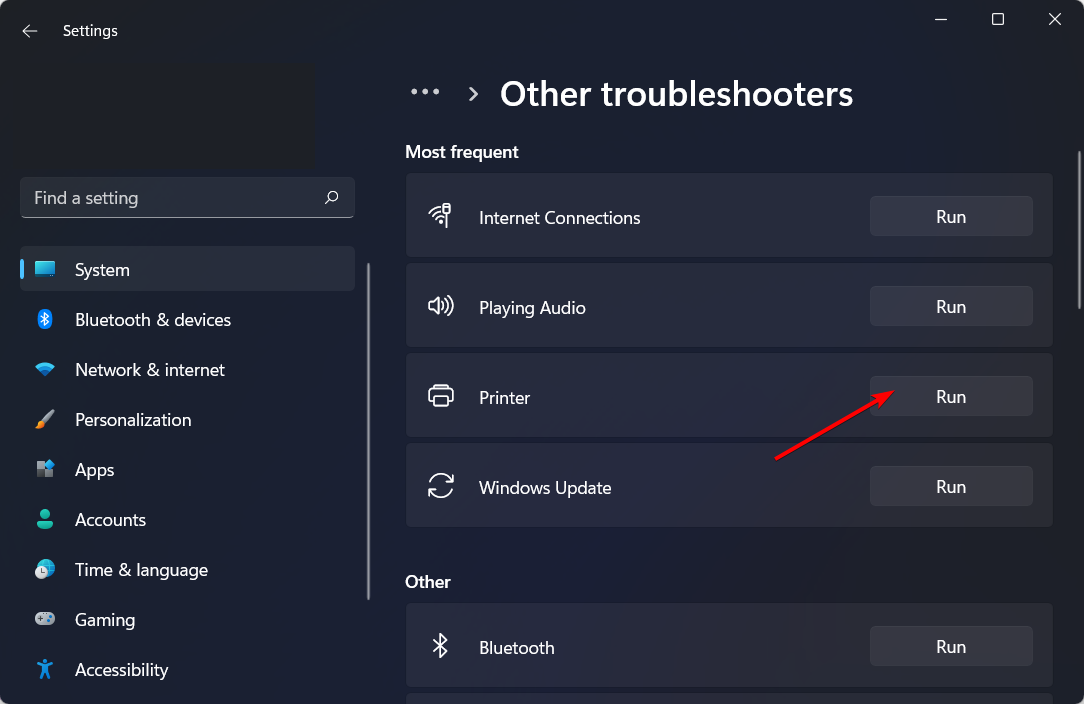
You can easily troubleshoot printer problems with Windows built-in printer troubleshooter.
- Hit the Windows key and click on Settings.
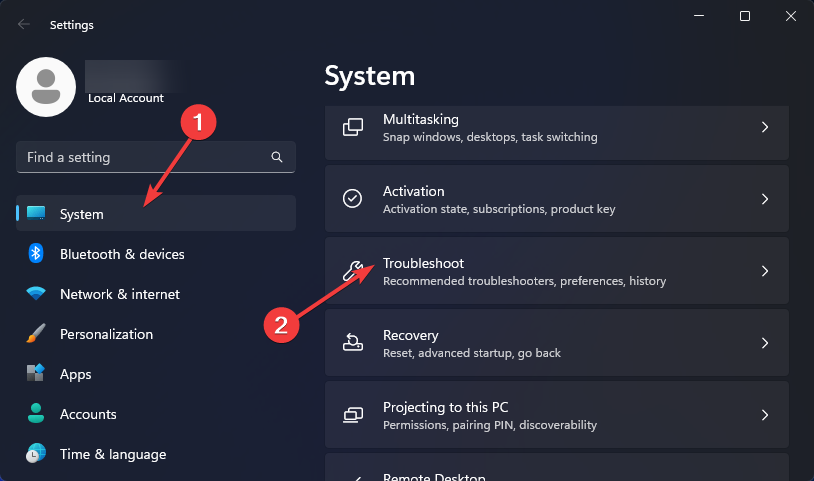
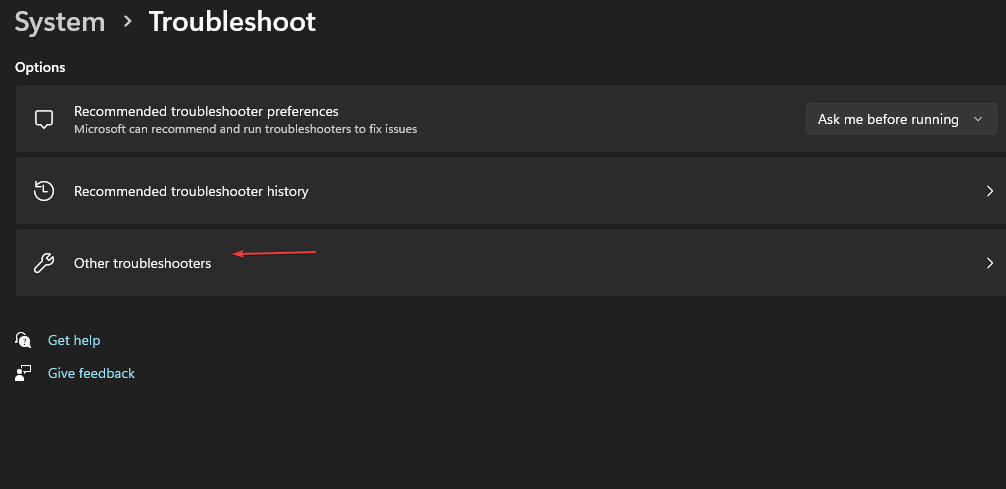
- Select System on the left pane, then click Troubleshoot on the right.
- Click on Other troubleshooters.
- Find the Print troubleshooter and click the Run button next to it.
To ensure your devices and printers are properly maintained, keep our drivers up-to-date, do routine check-ups and keep it clean.
Finally, while all these tweaks are built-in, you may want to ease your load by downloading printer management software. These tools can make your work easier by automating a majority of these tasks. Some even have advanced features that can help you troubleshoot common printer problems.
And in case you’re on the look out for a new printer, we have a collection of all-in-one printers that we think will be a perfect match for you.
Hopefully, with these tips, you can now make your printer work for you and get the most out of it. If you have any additional tips on how to better manage your device and printer settings on your Windows 11, we’re happy to hear them. Drop us a comment down below.





User forum
0 messages