FIX: Printer takes a long time to print on Windows
Make sure that the Word printer settings are in order
6 min. read
Updated on
Read our disclosure page to find out how can you help Windows Report sustain the editorial team Read more
Key notes
- Sometimes, your printer takes a long time to print in Windows 10 and that can also be triggered by network or cable problems.
- Printing time can be improved by updating or reinstalling the drivers, as shown below.
- If you're using a wireless printer, you can try to assign it a new IP address.
- Tweak the Print Spooler service and clear all the printing jobs from the device.
We print various documents all the time, but some users reported that their printer is slow to start printing or that the printing process takes forever.
While sometimes the problem could be caused by your network (especially if you’re using a network printer), the print spooler or printer drivers might also be responsible for the issue.
Whatever the cause, the situation is not only annoying but will also slow down your workflow. So, let’s see how to solve this problem.
How can I improve printing time on Windows 10?
1. Update your printer driver
1.1 Update the driver manually
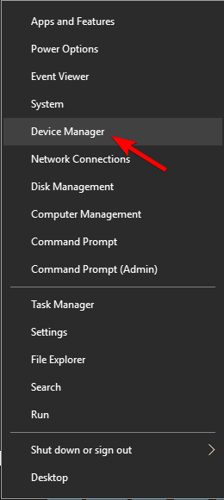
- Right-click the Start button and select Device Manager from the list.
- Expand the Printers section.
- Locate your printer, right-click on it, and select Update driver.
- If the system will find a more suitable driver it will download and install it.
- Restart your PC if the system installed a new driver.
If your printer is slow to start printing, the problem might be your driver. If it’s corrupted or out of date, not just this error but many other problems can arise.
However, you can easily fix the problem by updating your printer driver.
You can also visit your printer manufacturer’s website and download the latest drivers for your model. In order to do so, you’ll need to know the model of your printer and where exactly to look for the driver.
1.2 Update the driver automatically
If this process seems a bit complicated, you can always use third-party tools such as the one recommended below to automatically update all outdated drivers with just a couple of clicks.
Download the tool using the button below, allow it to scan your device, and check the recommended actions. You can update drivers either all at once or take them one by one.
- Download and install the Outbyte Driver Updater app.
- Launch the software and wait for the app to detect all incompatible drivers.
- Now, it will show you a list of all outdated drivers to select the ones to Update or Ignore.
- Click on Update & Apply Selected to download and install the latest versions.
- Restart your PC to ensure the applied changes.

Outbyte Driver Updater
Maintain your device healthy by letting OutByte Driver Updater find the latest driver options.2. Reinstall the printer driver
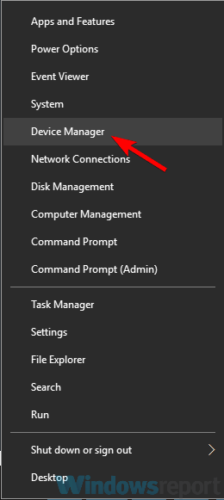
- Right-click the Start button and choose Device Manager from the menu.
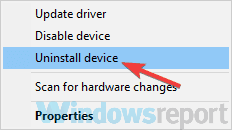
- Locate your printer, right-click it, and choose Uninstall device from the menu.
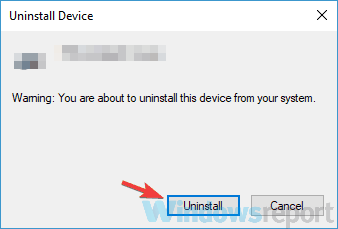
- When the confirmation dialog appears, check Remove driver software for this device, if available, and click the Uninstall button.
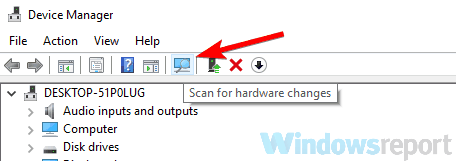
- After you successfully remove the driver, click Scan for hardware changes icon.
- Windows will now try to install the default driver for your printer.
If Windows manages to find a suitable driver for your printer, check if the problem is still there.
If the driver isn’t found, you’ll have to manually install it. To see how to do that, check the following solution.
3. Assign a new IP address to your printer
If you’re using a network printer, sometimes your printer is slow to start printing due to its IP address.
Apparently, there can be an issue with your IP address that can lead to this problem. What you need to do, is to assign a new IP address to your network printer and the problem should be resolved.
This can be a slightly advanced procedure, so if you don’t know how to do it properly, we suggest that you look for an online guide.
Once you change the IP address of your printer, the problem will be permanently resolved.
Keep in mind that this solution works only for network printers, so if you’re not using your printer as a network device, then this solution doesn’t apply to you.
4. Set the printer pointing to the port
This solution is intended for network printers, so if you’re not sharing your printer with a local network, this solution won’t apply to you.
Basically, if your printer is slow to start printing, the issue might be because your printer is mapped across the server.
To fix that, you just need to add a printer as a local printer and point it to the port and the issue should be resolved.
This might be a bit advanced solution, and if you don’t know how to perform it, contact your network administrator.
5. Stop the Print Spooler service and clear the printers directory
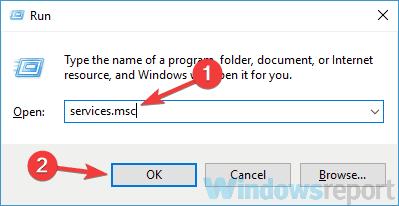
- Press Windows Key + R and enter services.msc. Now press Enter or click OK.
- Locate Print Spooler service, right-click it, and choose Stop from the menu.
- Minimize the Services window. Open File Explorer and go to the following location:
C:\Windows\System32\spool\PRINTERS - Delete all files from the Printers directory.
- Go back to the Services window, locate Print Spooler service, right-click it, and choose Start from the menu.
After doing that, check if the printing problem is still there. If not, proceed to the next solution.
6. Remove the WSD port and switch to the TCP/IP
Sometimes your printer is slow to start printing because it’s using a WSD port. Bear in mind that this issue only affects network printers, so if your printer isn’t shared with the network, then this solution won’t work for you.
If you’re using a network printer, remove the WSD port and switch to the TCP/IP and the problem should be resolved.
7. Change the printing settings in Word
- Open Microsoft Word.
- Go to Options, select Advanced, and click on Printing.
- Now locate the Background print checkbox and disable it.
After doing that, save changes and check if the problem is resolved. The solution applies only if printing time takes longer than it should when trying to print in Word.
8. Disconnect your printer
If the printer is slow to start printing, it’s likely that the issue is also related to certain printer glitches.
For a start, disconnect your printer entirely. Also, disconnect the USB cable and wait for a few minutes.
Then, press and hold the power button for about 30 seconds or more to remove any additional charge. Connect the printer to your PC once again, and power it on.
Once your printer powers up, check if the problem is still there. This is a generic solution, but if you have any glitches with your printer, it might help you out, so feel free to try it.
As mentioned, printer problems can seriously impact your work. So, if your printer is slow to start printing, be sure to try any of the solutions listed in this article.
 NOTE
NOTE
If you’ve already tried another solution, we’d be glad to hear about it so use the comments section below.


