Fix: Lock Screen Background Reverts to Blue Screen in Windows 11
Make sure the critical components can run in the background
7 min. read
Updated on
Read our disclosure page to find out how can you help Windows Report sustain the editorial team. Read more
Key notes
- To fix things when the lock screen background reverts to blue in Windows 11, re-register Windows Spotlight, take full control of the SystemData folder, or uninstall your antivirus.
- The problem arises due to missing permissions, corrupt system files, or network restrictions.
- Keep reading to find out how Windows Report experts fixed things in no time!
Quite a few users who set a lock screen background in Windows 11 found that it reverts to a blue screen with white wavy lines, the default selection. The same happens in the previous iterations of the OS as well.
The problem appears whether you use Windows Spotlight, select a picture, or go with the slide show. The changes don’t reflect after a reboot. And in most cases, it turned out to be an issue at the user’s end.
Why does my lock screen wallpaper keep changing in Windows 11?
- Windows Spotlight not registered properly (if using the feature)
- Corrupt system files
- Critical apps and components not running in the background
- The user doesn’t have access to the required folders/files
- A third-party application is triggering conflicts
What can I do when the lock screen background reverts to blue screen in Windows 11?
Before we start with the slightly complex changes, try these quick ones first:
- Check for any pending Windows updates and install them.
- Re-enable Windows Spotlight, or if you have configured a picture or slide show, re-set it.
- Make sure you are connected to a network and have a stable Internet speed.
1. Re-register Windows Spotlight
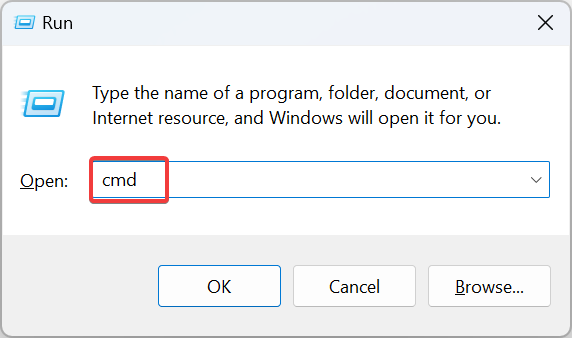
- Press Windows + R to open Run, type cmd, and hit Ctrl + Shift + Enter.
- Click Yes in the UAC prompt.
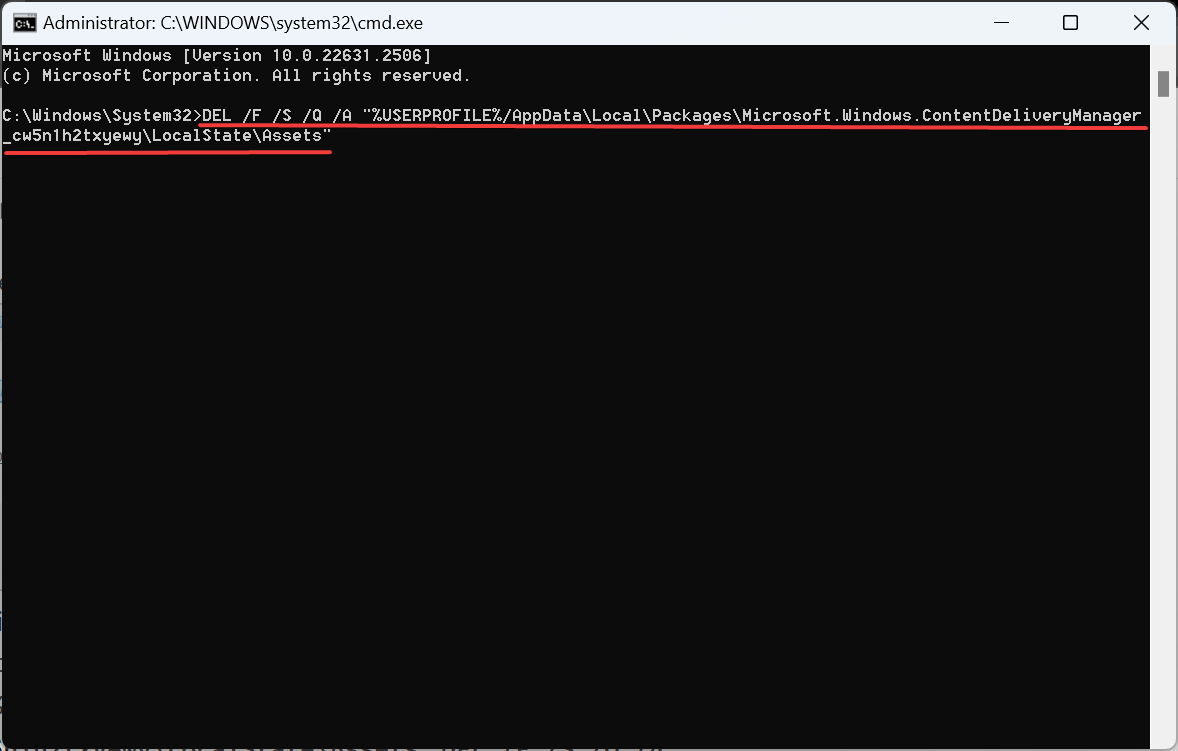
- Now, paste the following two commands and hit Enter after each:
DEL /F /S /Q /A "%USERPROFILE%/AppData\Local\Packages\Microsoft.Windows.ContentDeliveryManager_cw5n1h2txyewy\LocalState\Assets"DEL /F /S /Q /A "%USERPROFILE%/AppData\Local\Packages\Microsoft.Windows.ContentDeliveryManager_cw5n1h2txyewy\Settings" - Press Windows + S to open Search, type Windows Powershell, right-click on the relevant result, and select Run as administrator.
- Click Yes in the UAC prompt.
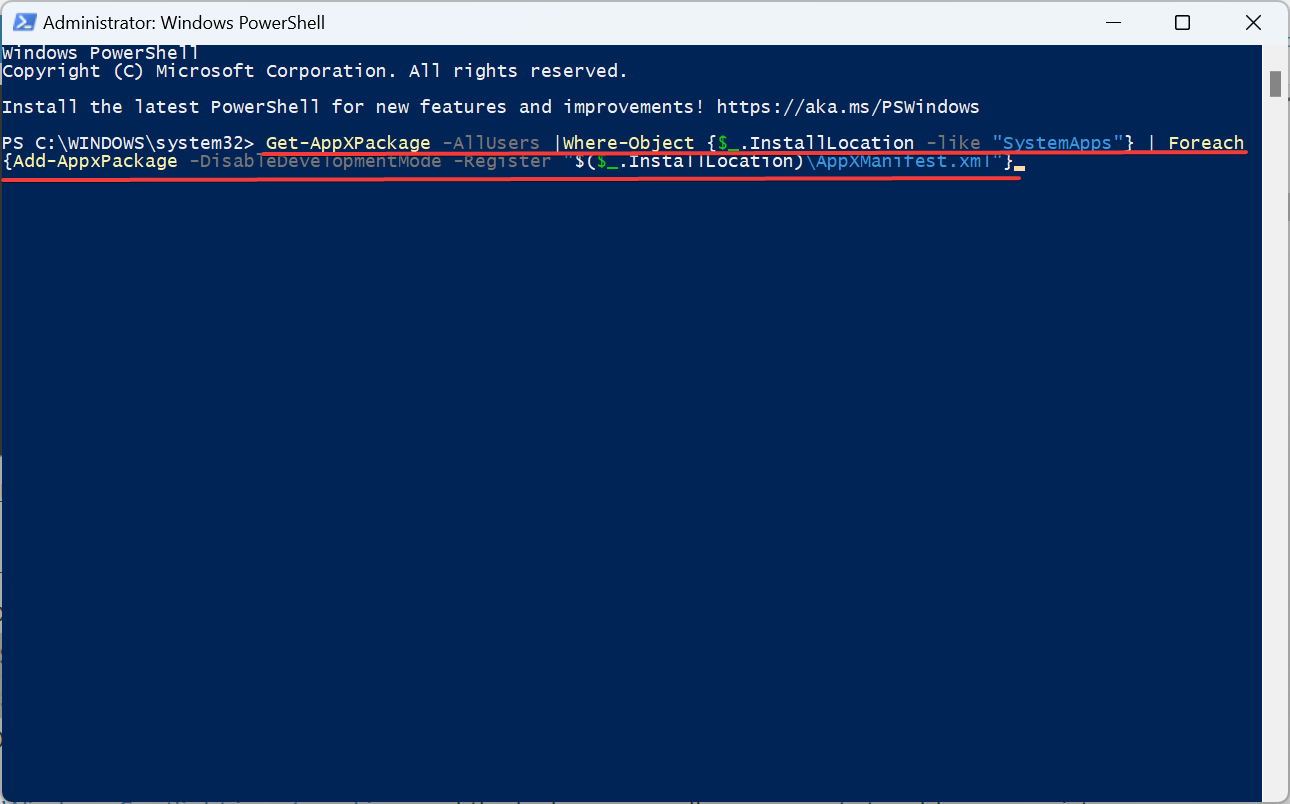
- Execute the following command:
Get-AppXPackage -AllUsers |Where-Object {$_.InstallLocation -like "SystemApps"} | Foreach {Add-AppxPackage -DisableDevelopmentMode -Register "$($_.InstallLocation)\AppXManifest.xml"} - Once done, reboot the PC and check for improvements.
When Windows Spotlight is not working, and the lock screen wallpaper reverts to a blue wavy picture, your primary approach should be to re-register Windows Spotlight.
2. Modify the permissions
2.1 Accessing the SystemData folder
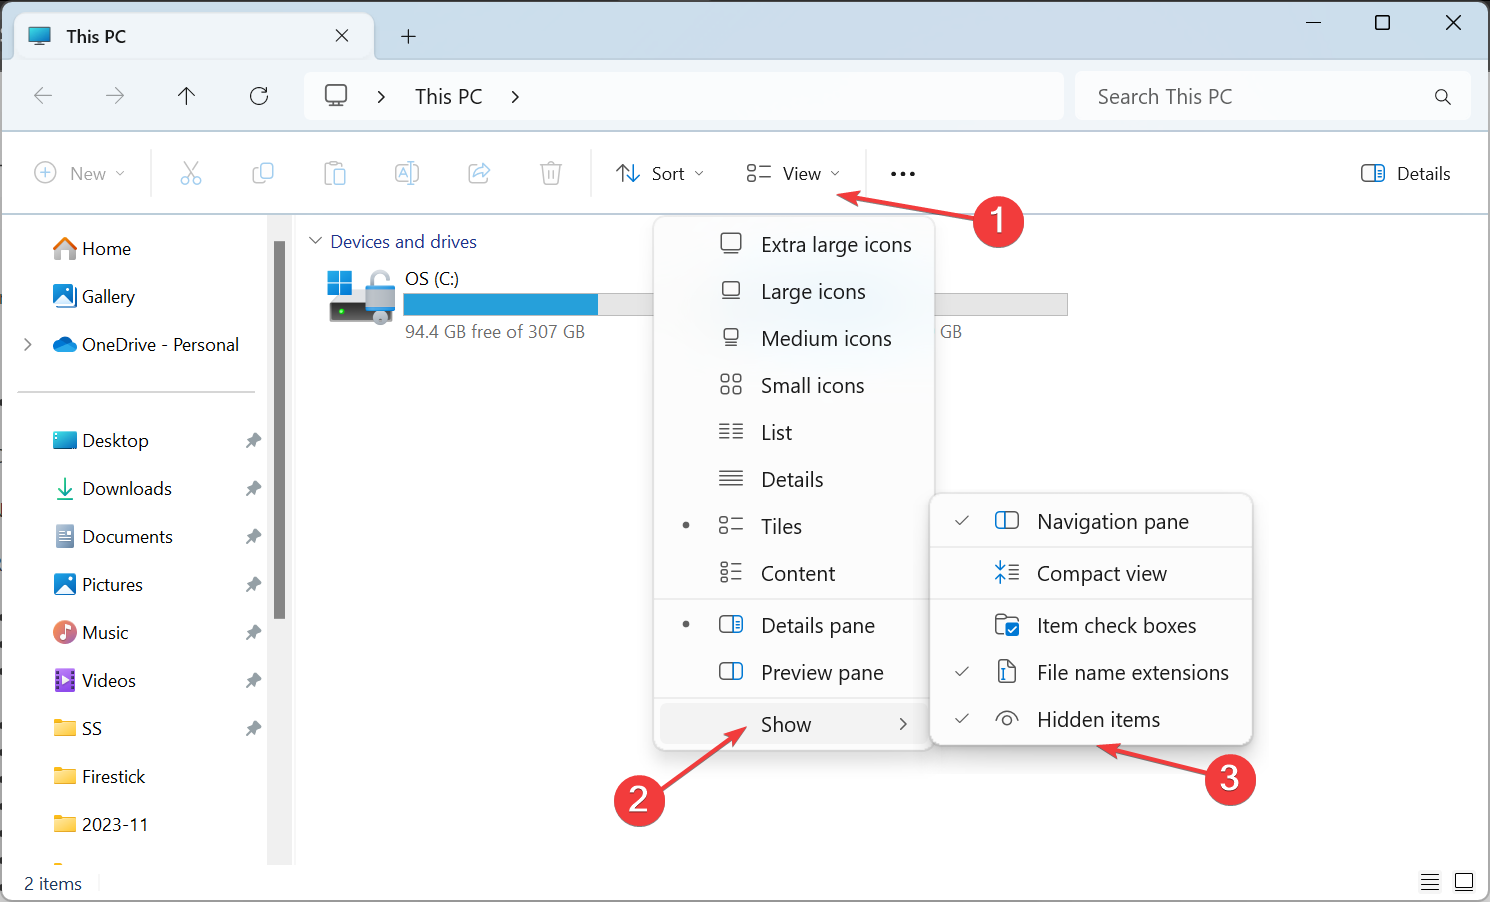
- Press Windows + E to open File Explorer, click the View menu, select Show, and choose Hidden items if it’s presently unchecked.
- Navigate the following path or paste it in the address bar and hit Enter:
C:\ProgramData\Microsoft\Windows
2.2 Taking full control of the folder
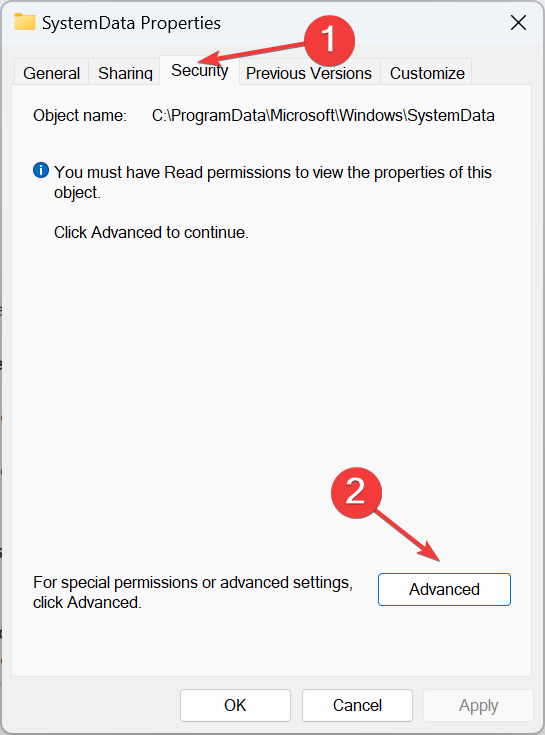
- Right-click on the SystemData folder and select Properties.
- Go to the Security tab, and click the Advanced button.
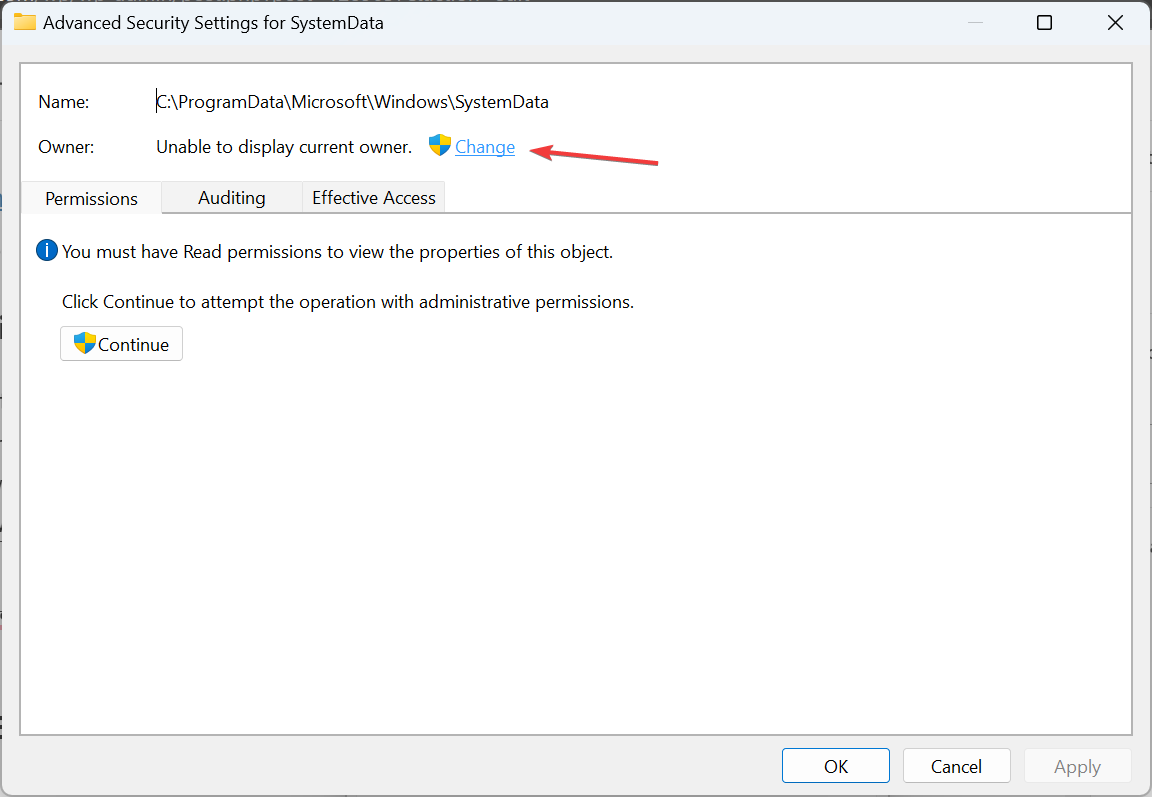
- Click on Change.
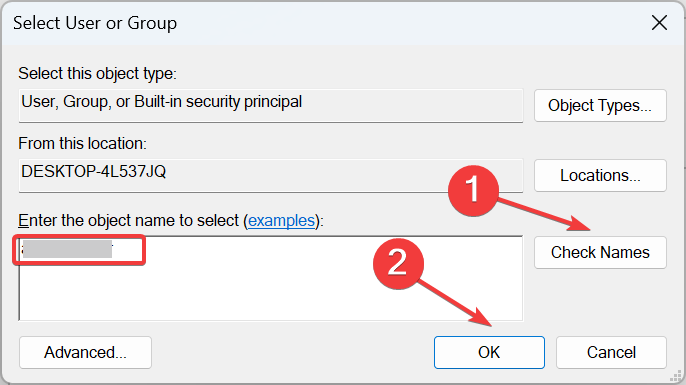
- Type your current profile name in the text field, click on Check Names, and then OK.
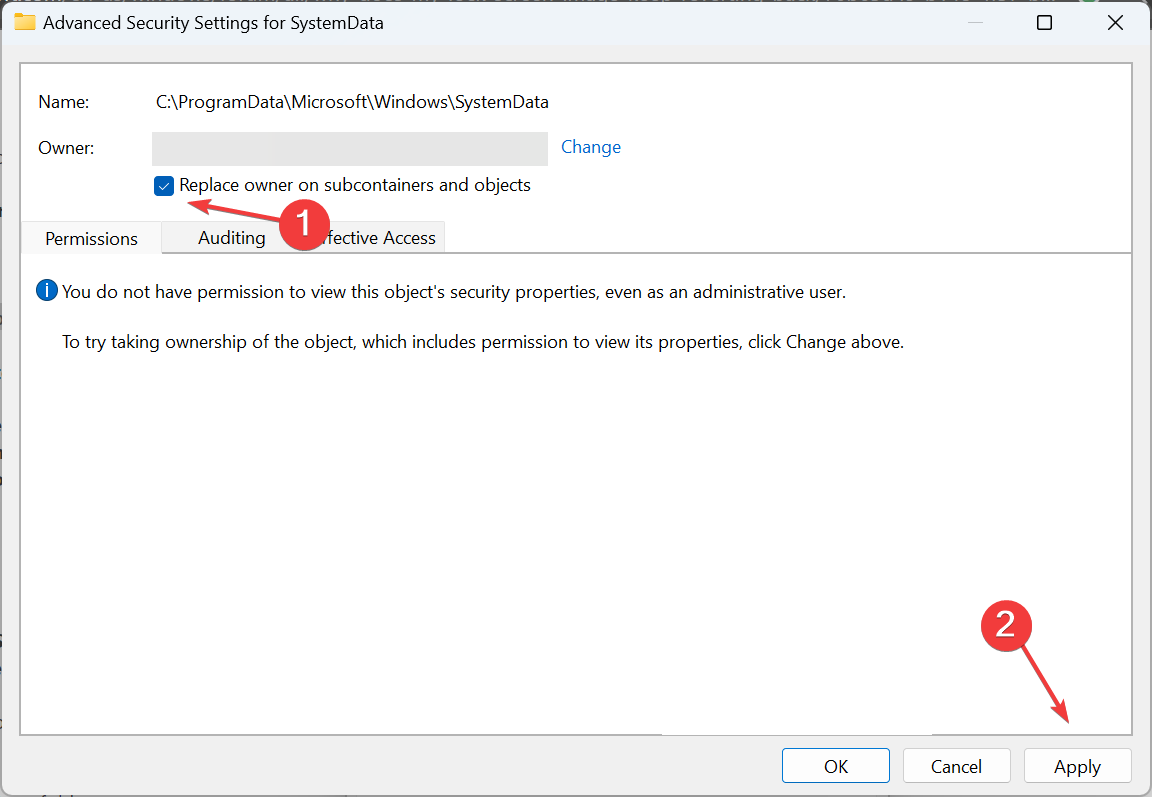
- Tick the checkbox for Replace owner on subcontainers and objects, and click Apply.
- Click Yes in the confirmation prompt.
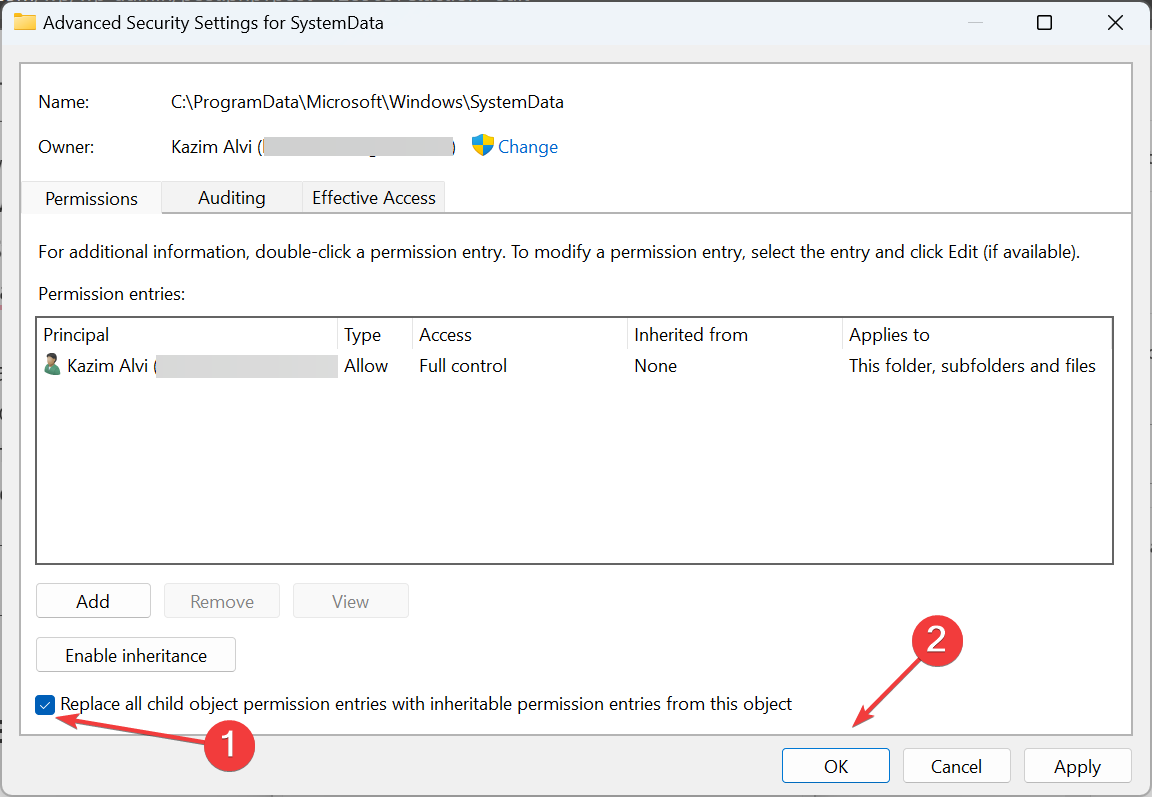
- Again, go to the Security tab in the Properties window of the SystemData folder, and click Advanced.
- This time, tick the checkbox for Replace all child object permission entries with inheritable permission entries from this object and click OK.
- Confirm the change.
2.3 Finding the SID
- Press Windows + R to open Run, type cmd in the text field, and hit Enter.
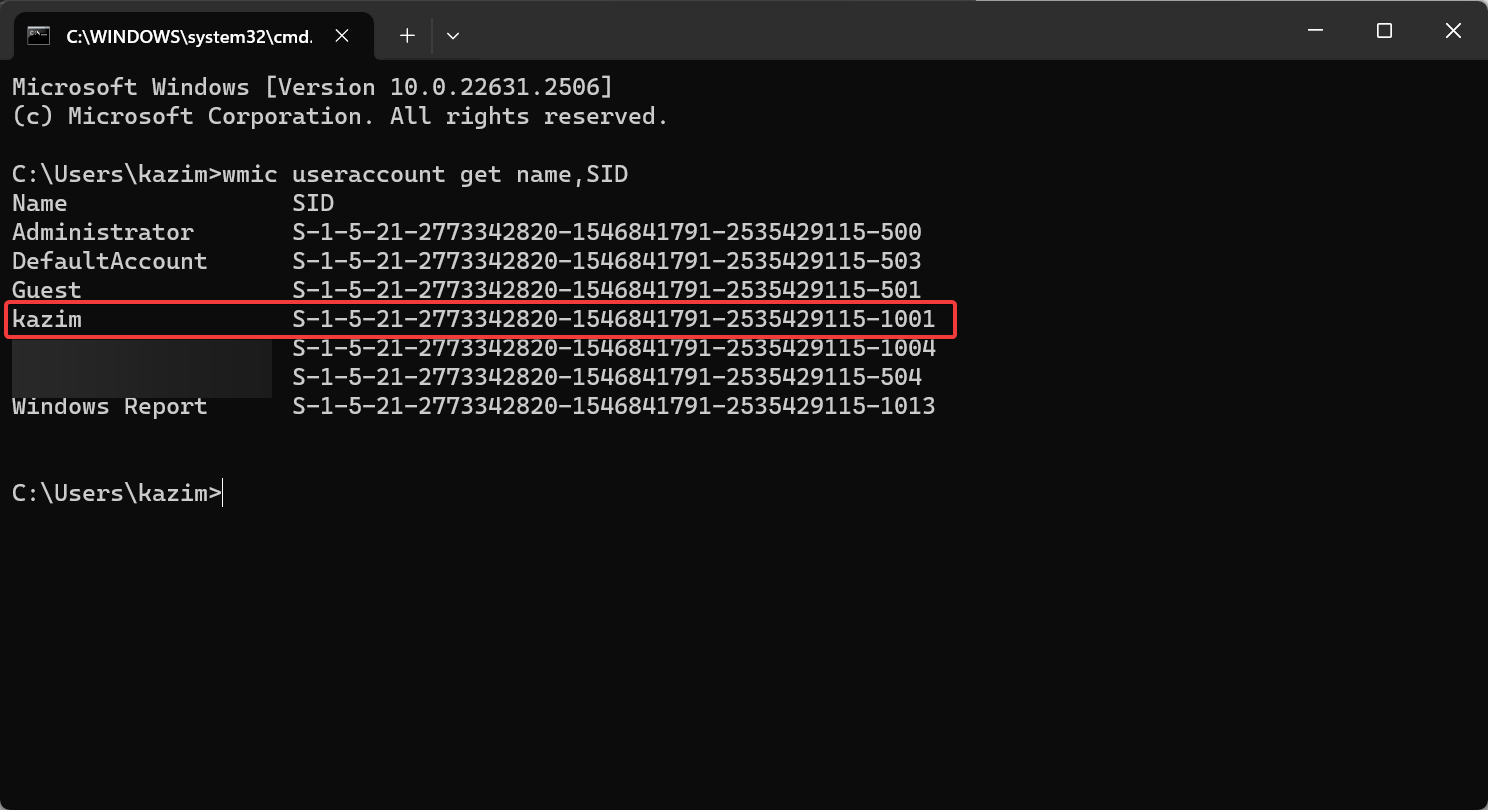
- Paste the following command and hit Enter:
wmic useraccount get name,SID - Identify the SID for the affected user account.
2.4 Moving the files
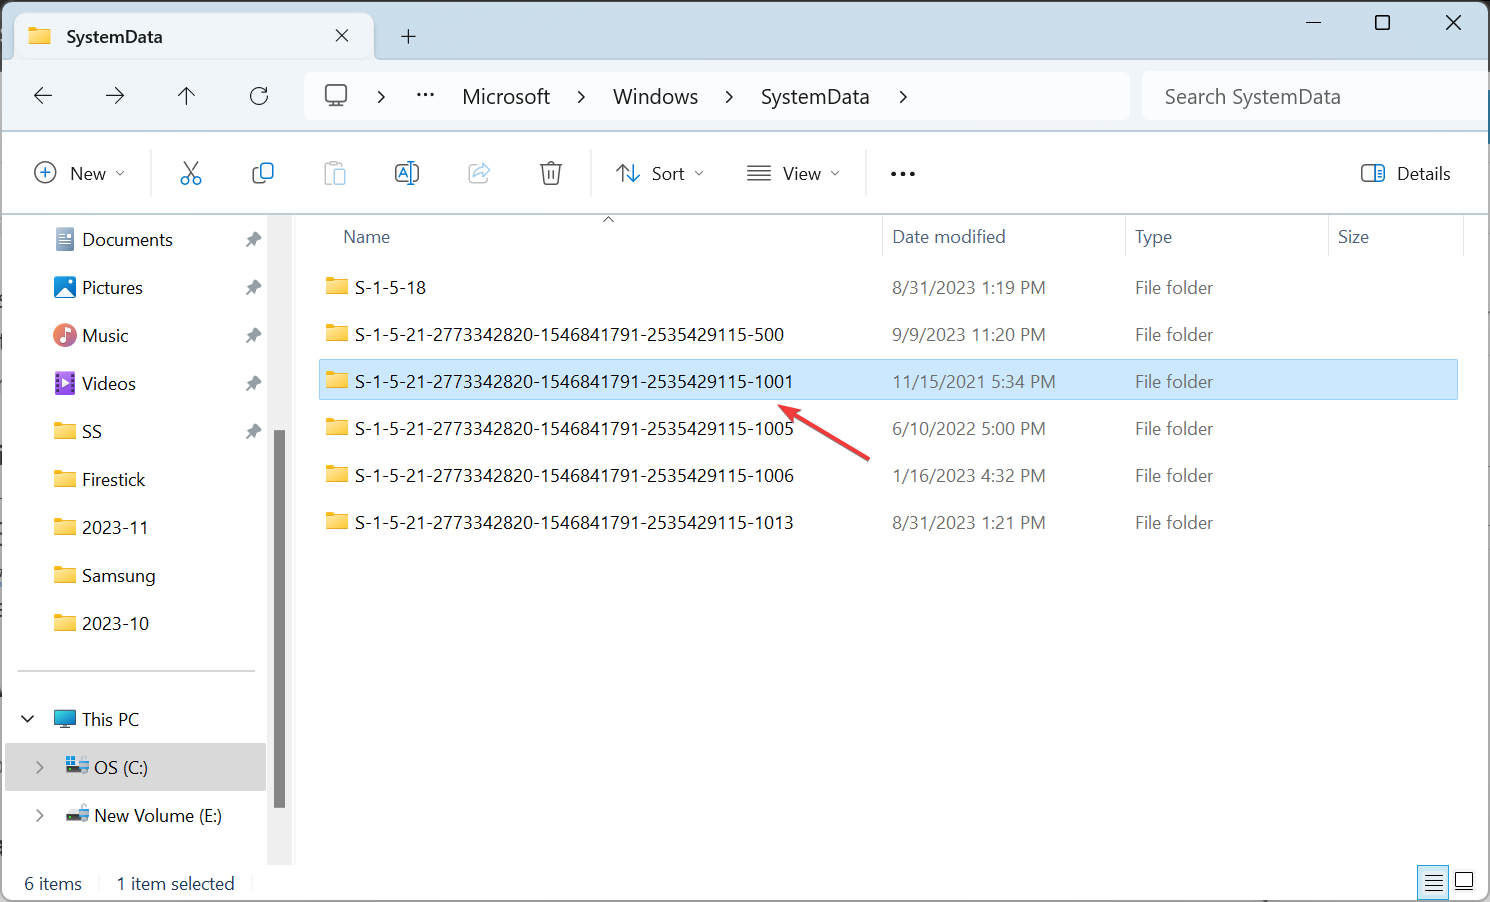
- Go back to File Explorer, and double-click the SystemData folder to view its contents.
- Now, double-click the folder with the same SID as the affected user profile.
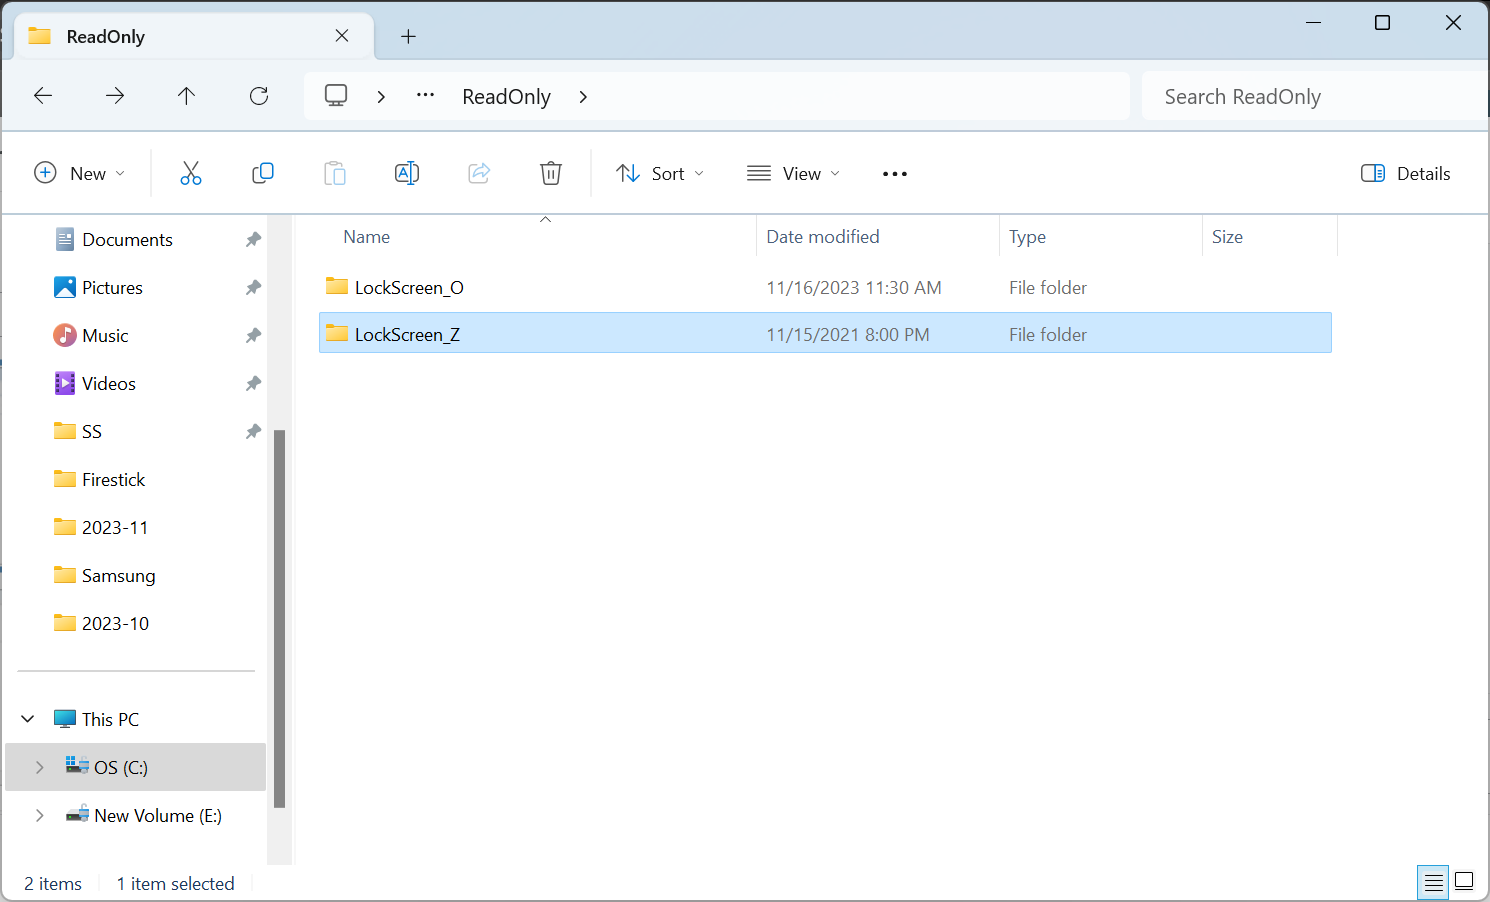
- Open the ReadOnly folder.
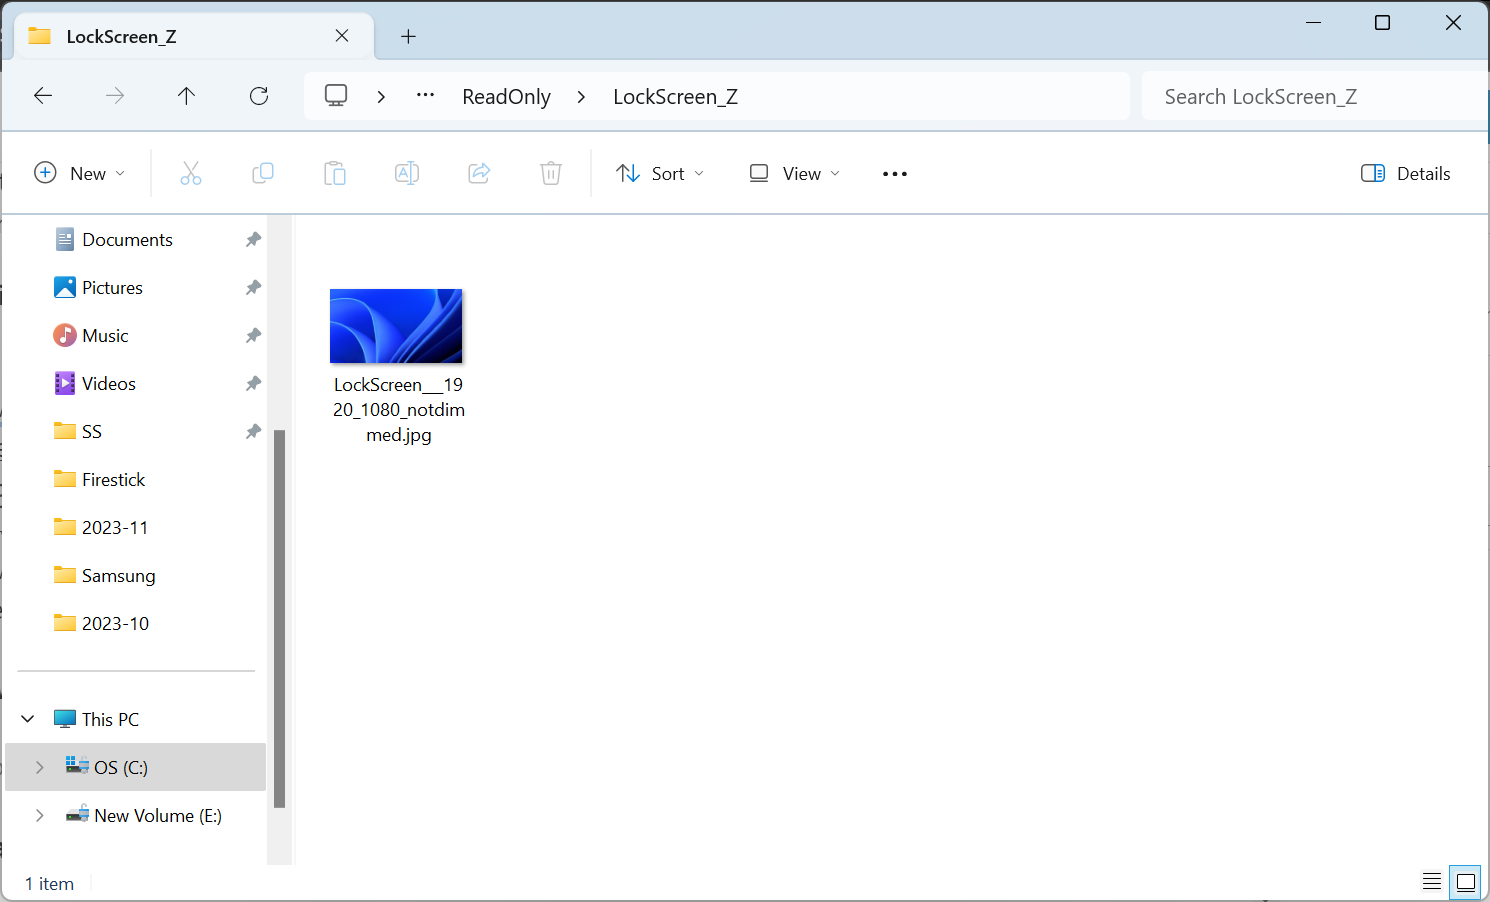
- Now, open the LockScreen folder. There might be several here with different letters. Choose one which stores the wallpaper you see on the lock screen.
- Now, move the image you want to set as the lock screen wallpaper here and remove the default blue one.
3. Allow Microsoft Edge and Store to run in the background
3.1 Microsoft Edge
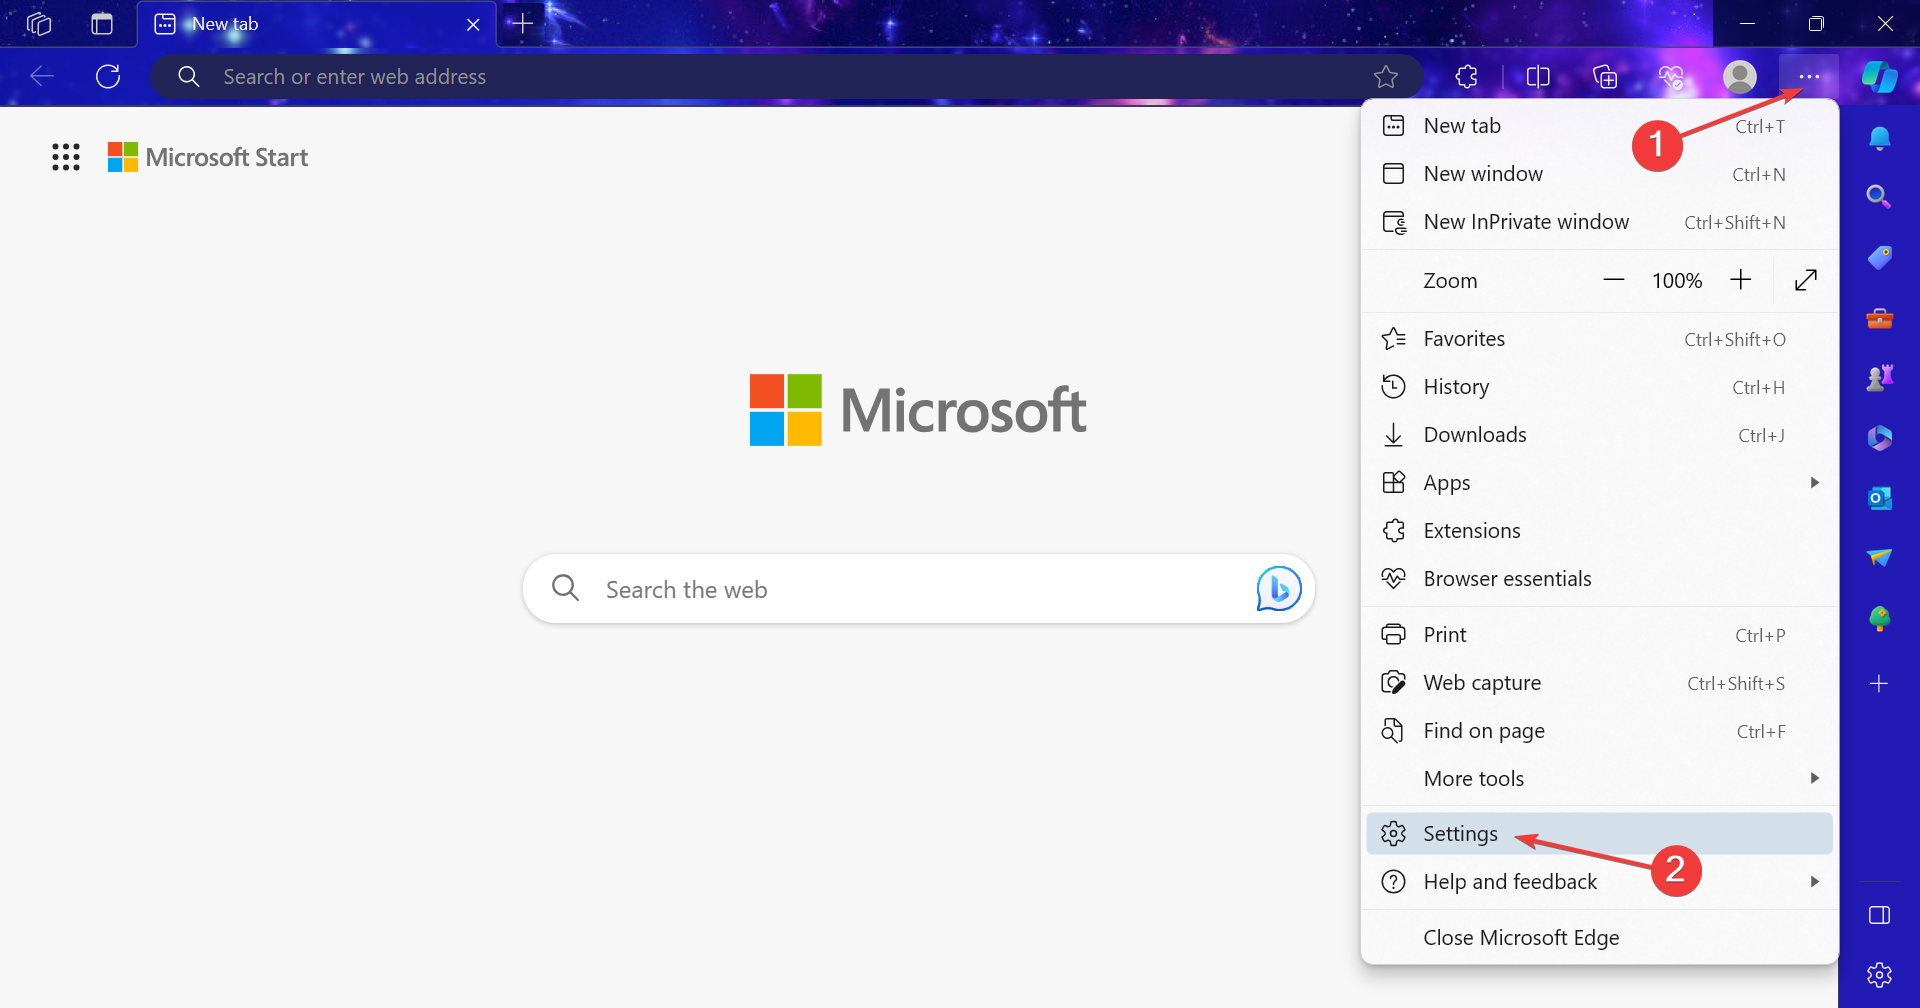
- Launch Microsoft Edge, click the ellipsis near the top right, and select Settings from the flyout menu.
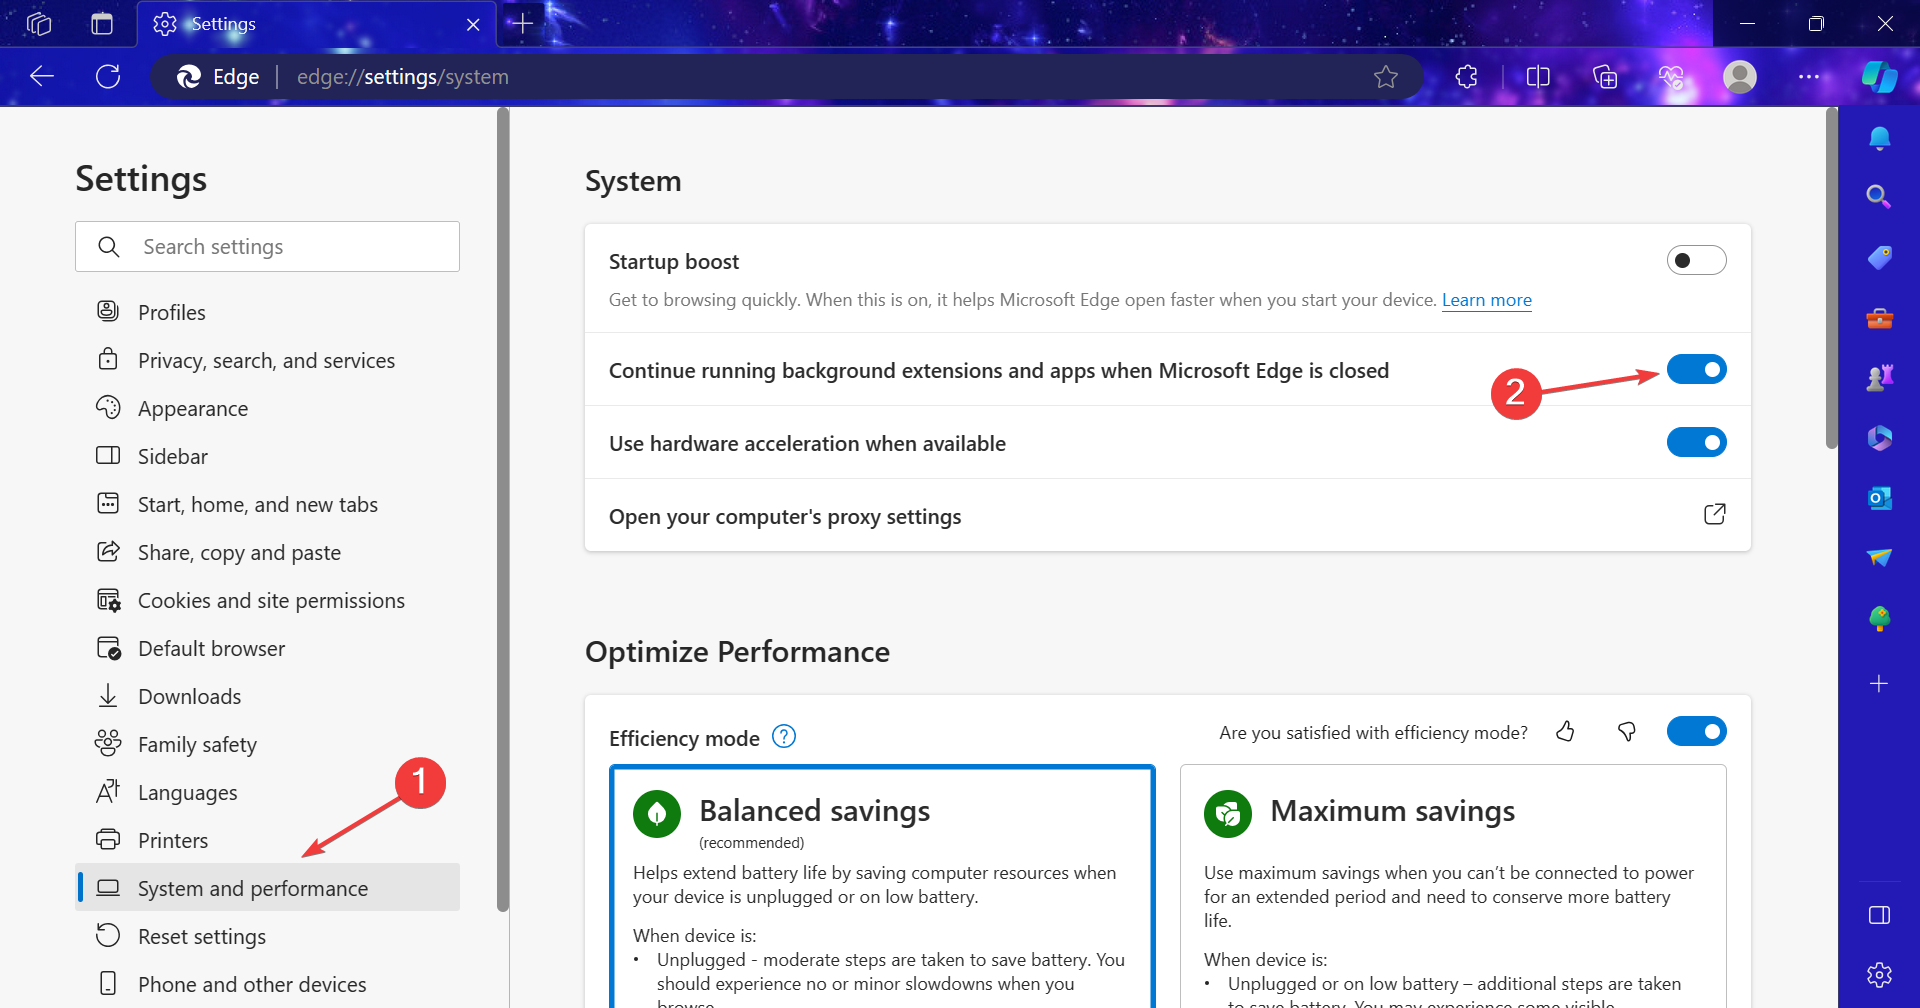
- Go to the System and performance tab, and enable the toggle for Continue running background extensions and apps when Microsoft Edge is closed.
3.2 Microsoft Store
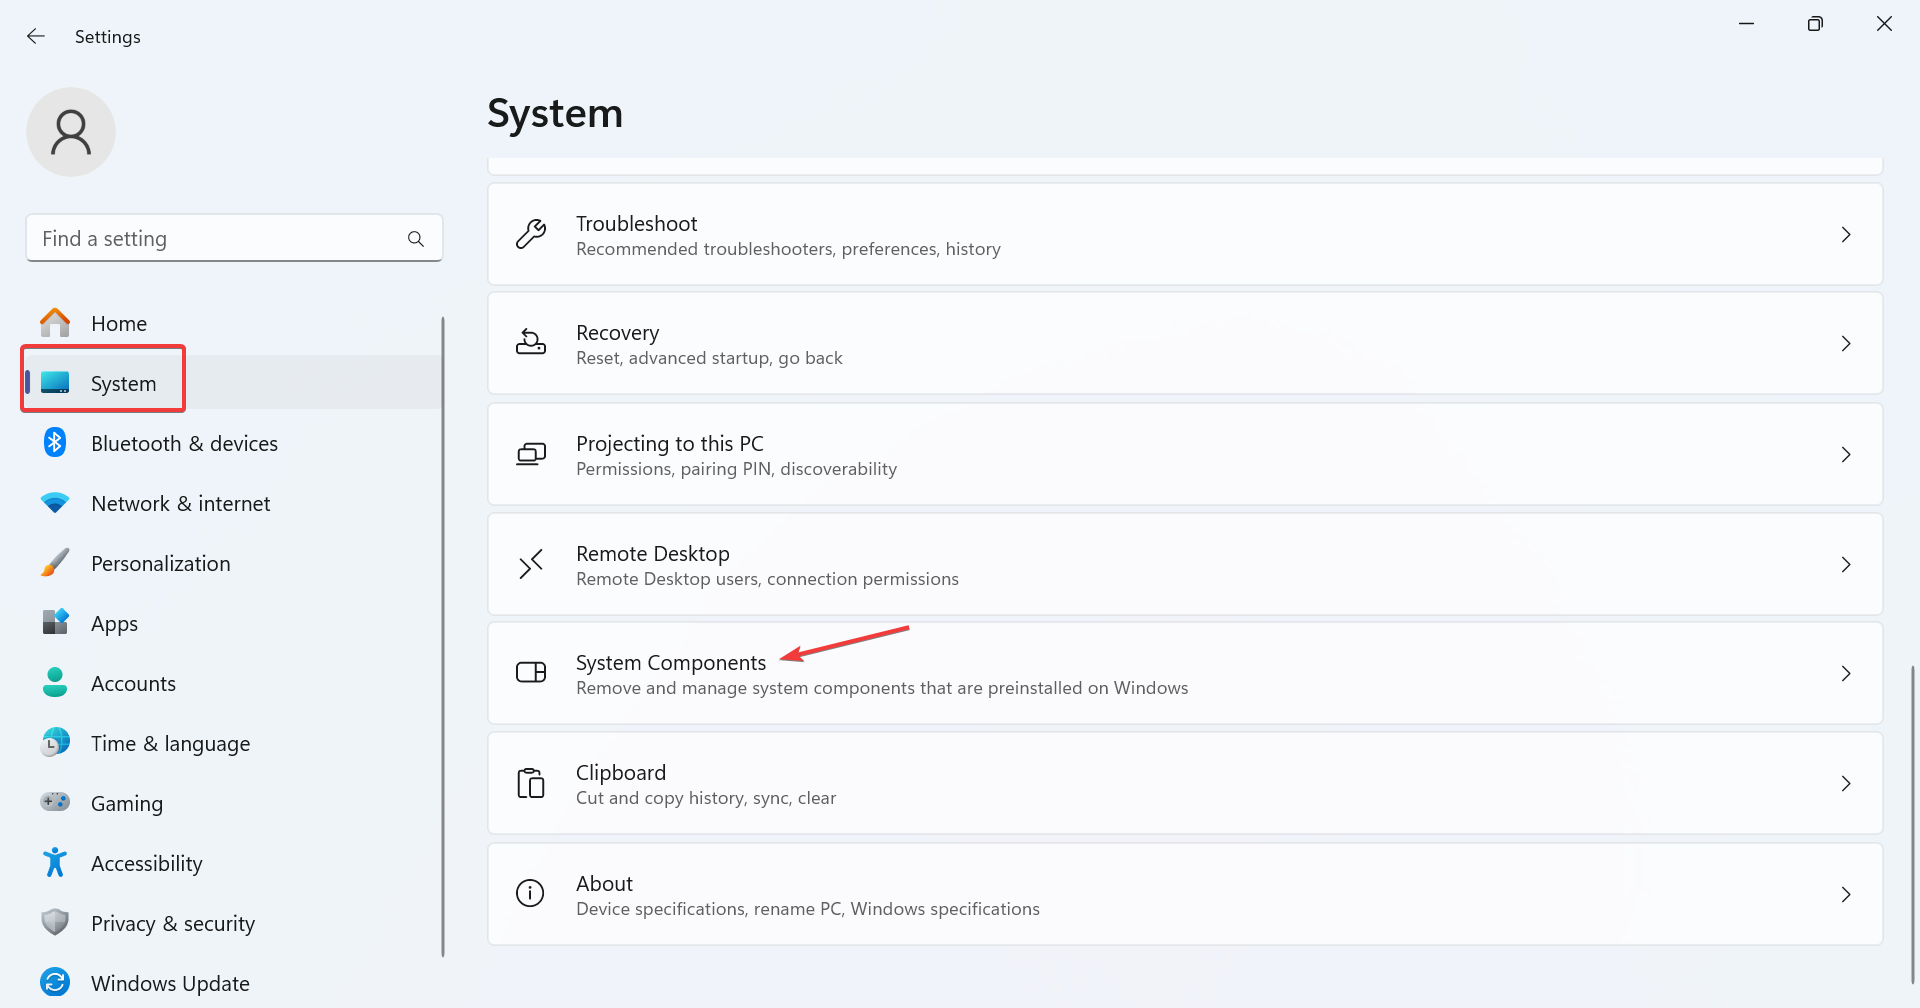
- Press Windows + I to open Settings, and click on System Components on the right in the System tab.
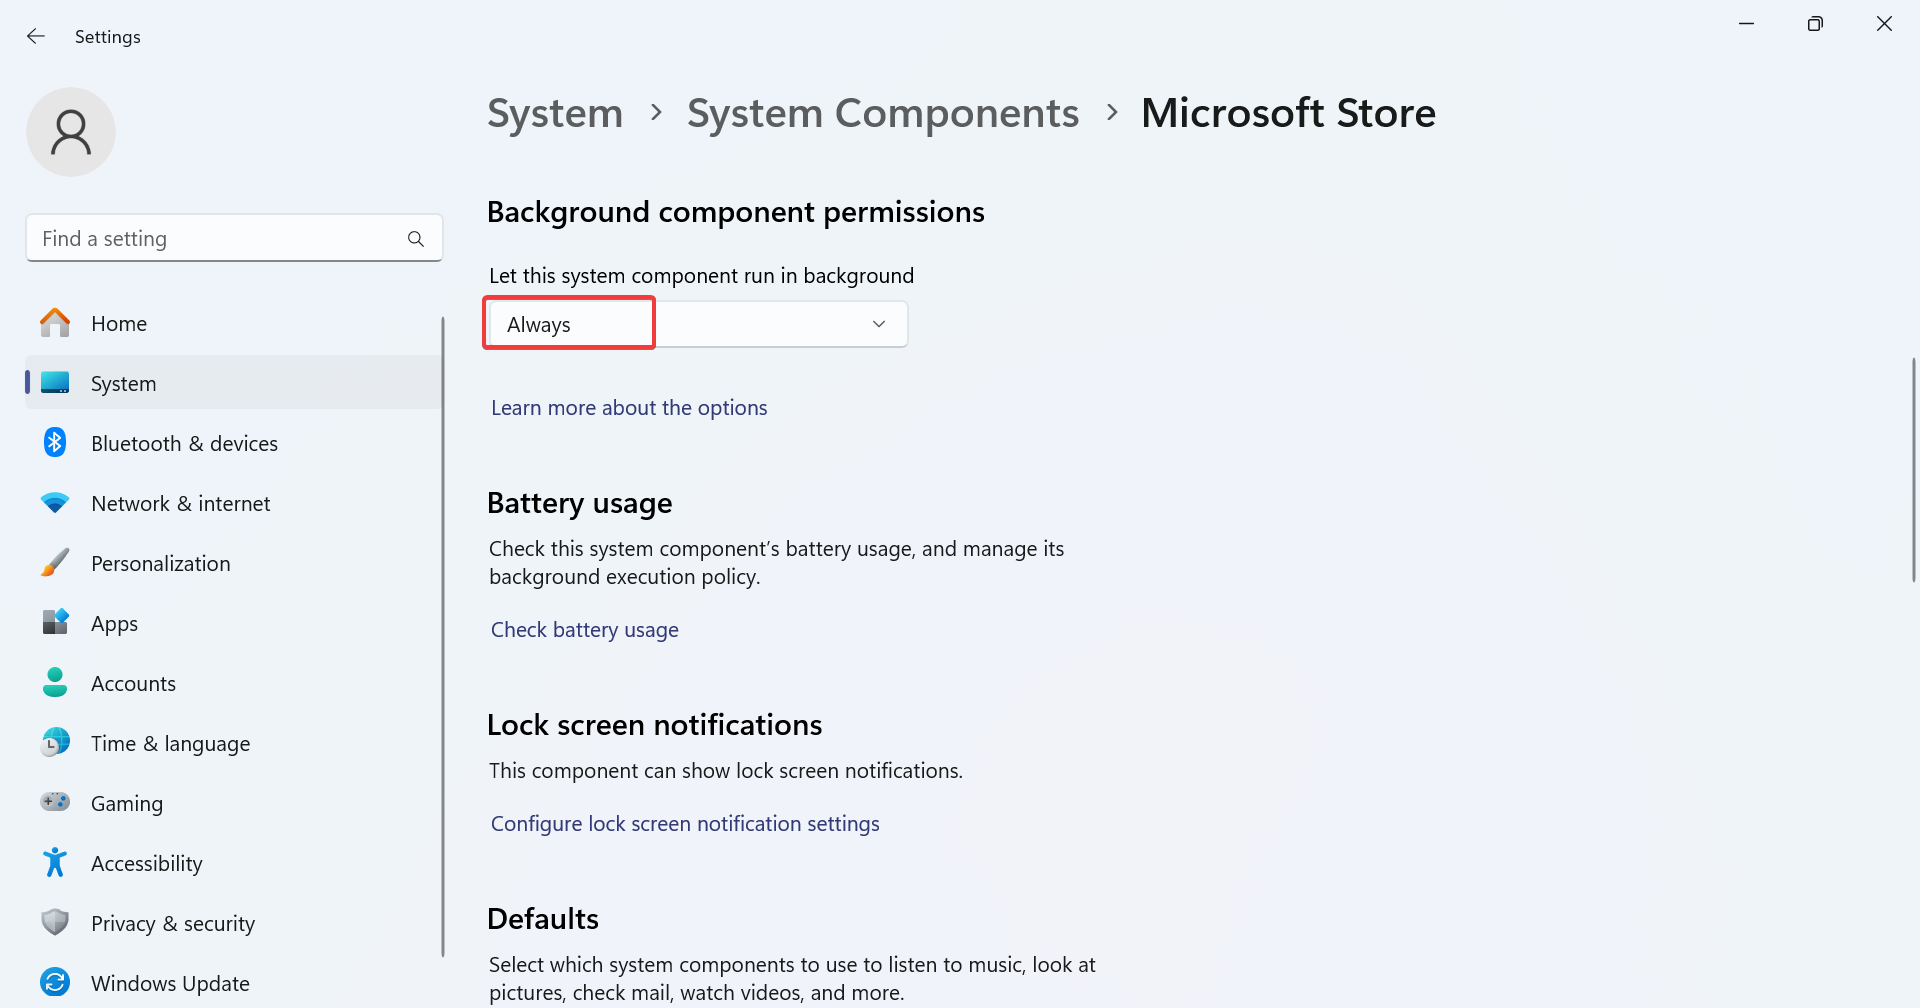
- Click on the ellipsis next to Microsoft Store, and select Advanced options.
- Now, select Always under the dropdown menu for Let this component run in background.
4. Repair the corrupt system files
- Press Windows + R to open Run, type cmd, hold Ctrl + Shift and click OK.
- Click Yes in the UAC prompt.
- Paste the following DISM commands individually and hit Enter after each:
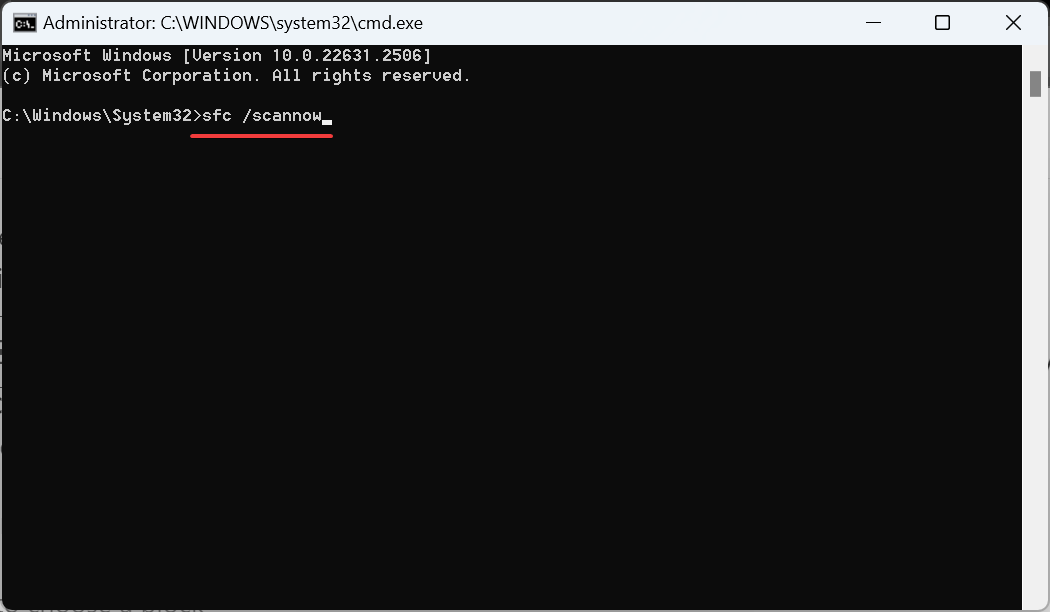
DISM /Online /Cleanup-Image /CheckHealthDISM /Online /Cleanup-Image /ScanHealthDISM /Online /Cleanup-Image /RestoreHealth - Execute the following command for the SFC scan:
sfc /scannow
If it’s the corrupt system files to blame for the Windows 11 lock screen wallpaper automatically changing, running the DISM tool and SFC scan should get things running. Alternatively, you can use dedicated repair software to automatically replace corrupt system files with healthy versions from an extensive database.
5. Uninstall conflicting applications
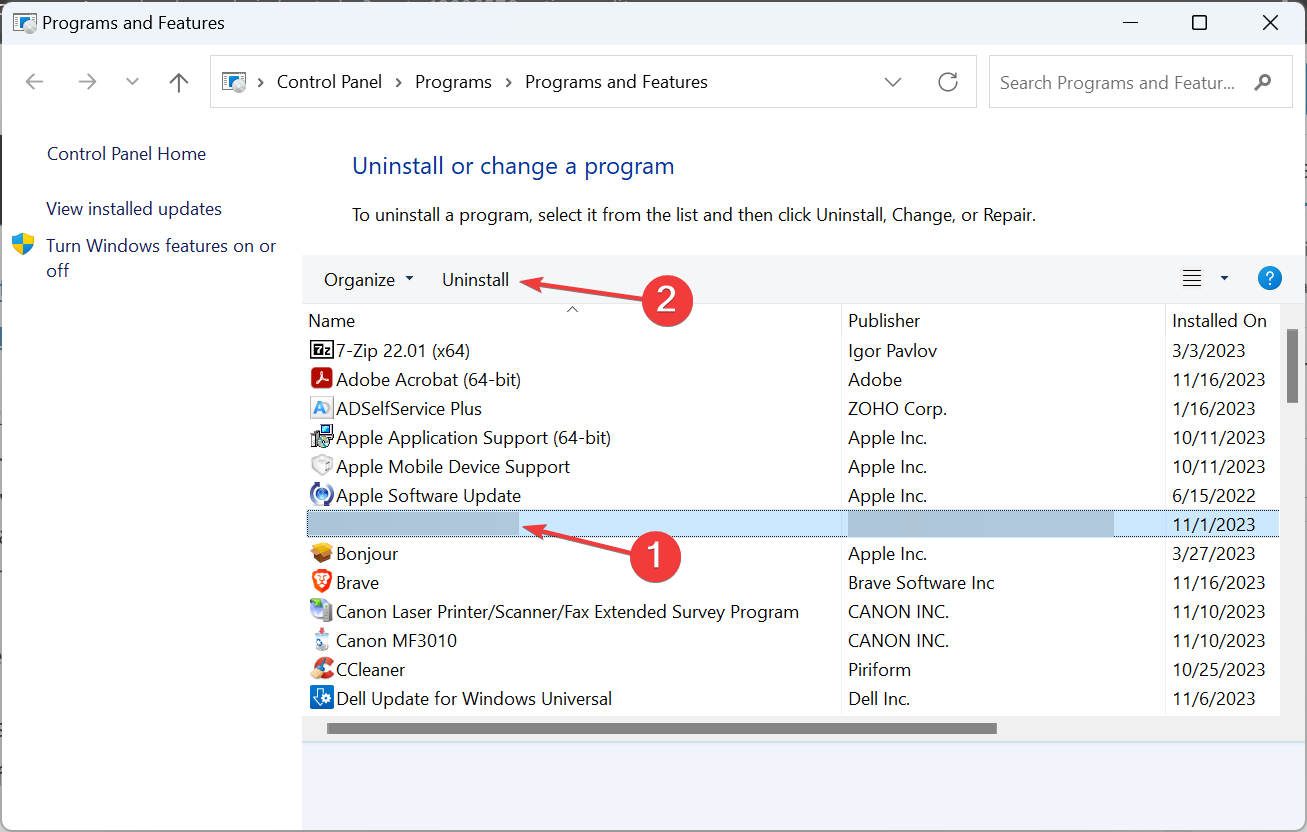
- Press Windows + R to open Run, type appwiz.cpl in the text field, and hit Enter.
- Select any antivirus or similar security software from the list that might prevent access to the network, and click Uninstall.
- Follow the on-screen instructions to complete the process.
- Reboot the device and check for improvements.
We saw a few users fix things when the lock screen background reverts to a blue screen in Windows 11 by removing BitDefender, AVG Internet Security, and Total AV or uninstalling apps in the same category.
if that doesn’t work right away, consider using an effective software uninstaller tool to remove any leftover files and Registry entries, and clear any changes made by the app.
6. Perform an in-place upgrade
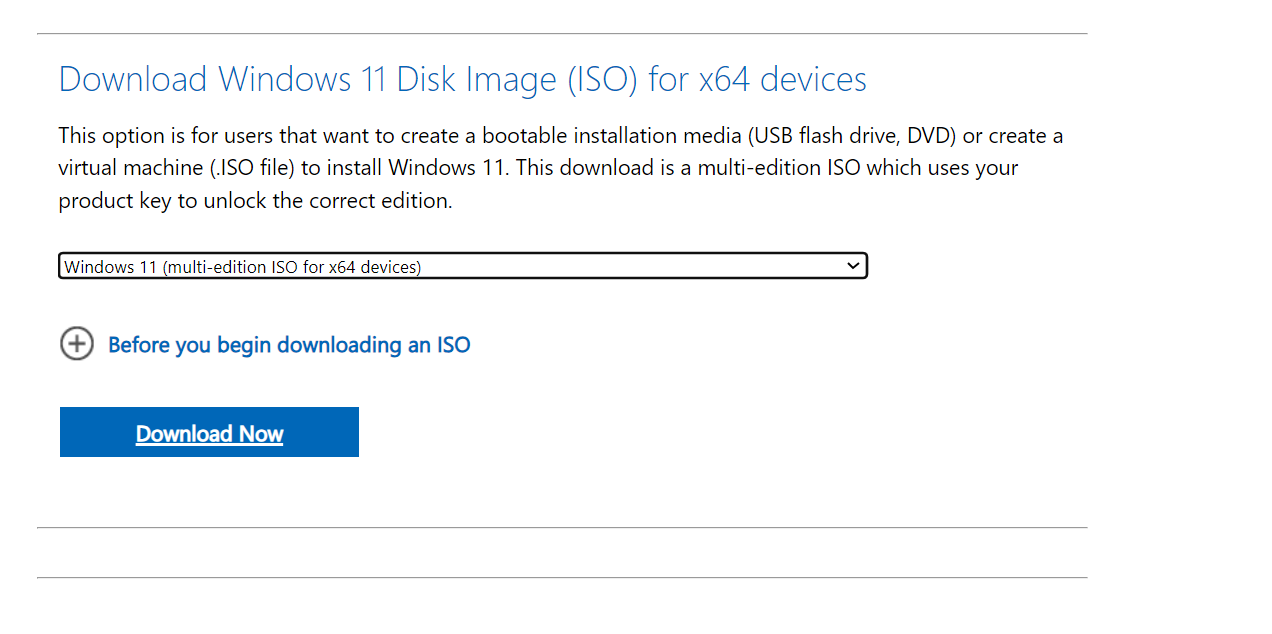
- Go to Microsoft’s official Windows 11 page, select the OS edition and product language, and then download the Windows 11 ISO.
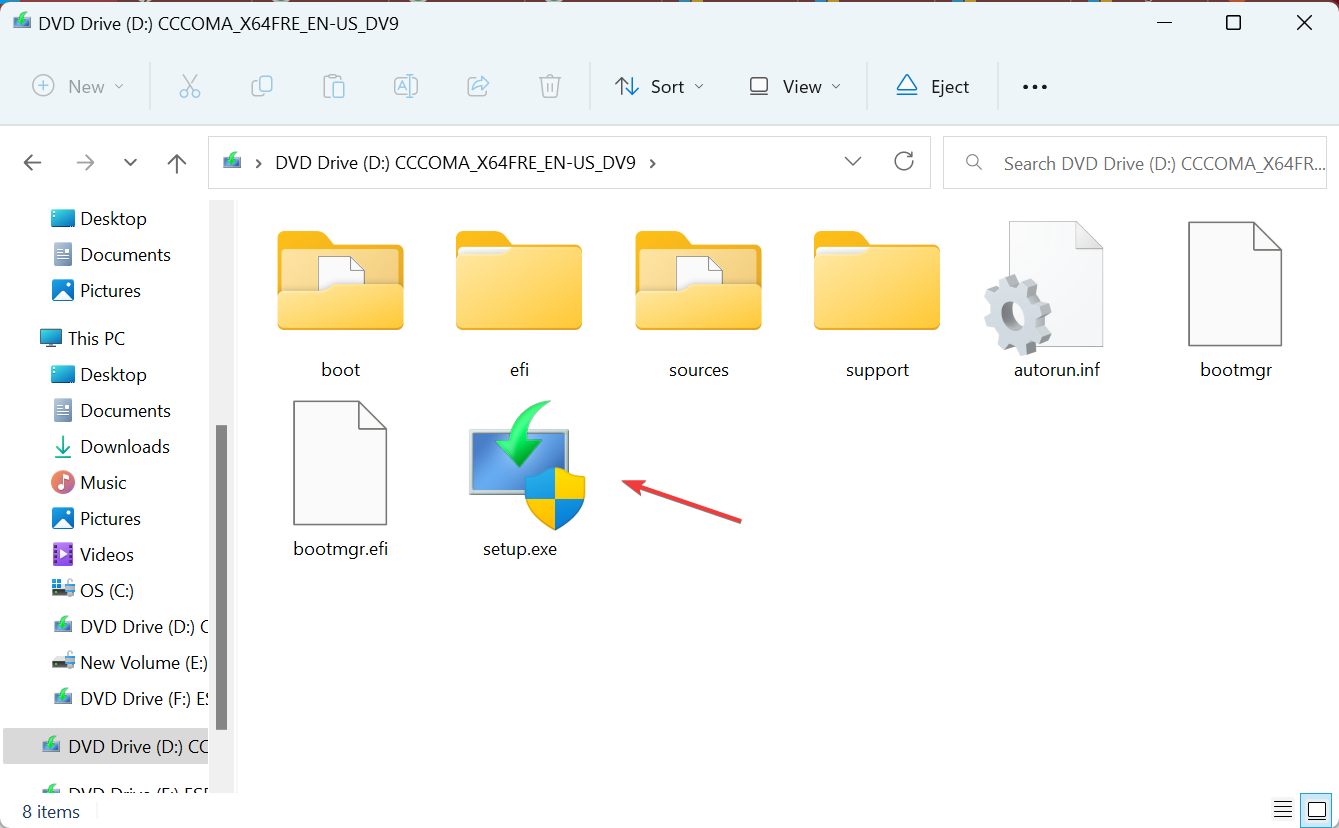
- Once downloaded, double-click the ISO file and click Open in the prompt.
- Run the setup.exe file.
- Click Yes in the UAC prompt.
- Click Next to proceed.
- Check the license terms and click Accept.
- Verify that the Windows 11 setup reads, Keep personal files and apps, and click Install.
- Wait for the in-place upgrade to complete. It may take a few hours.
A repair upgrade is an effective solution when the problem lies with the OS or the system files. It’s equivalent to reinstalling Windows, but you don’t lose the installed apps or stored files.
7. Create a new user account
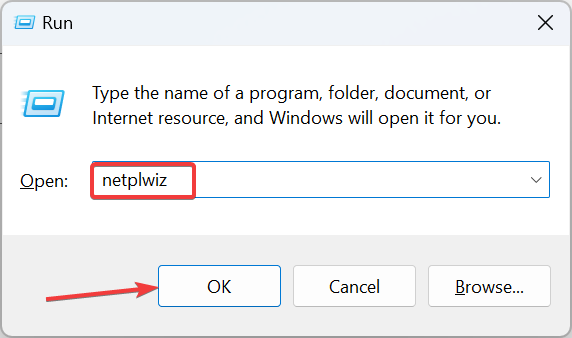
- Press Windows + R to open Run, type netplwiz in the text field, and click OK.
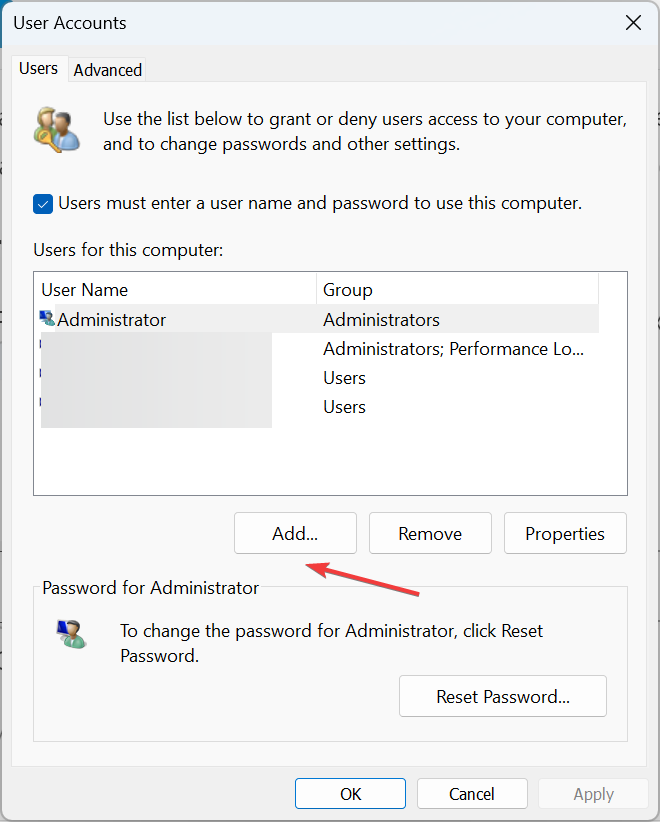
- Click the Add button.
- Click on Sign in without a Microsoft account (not recommended).
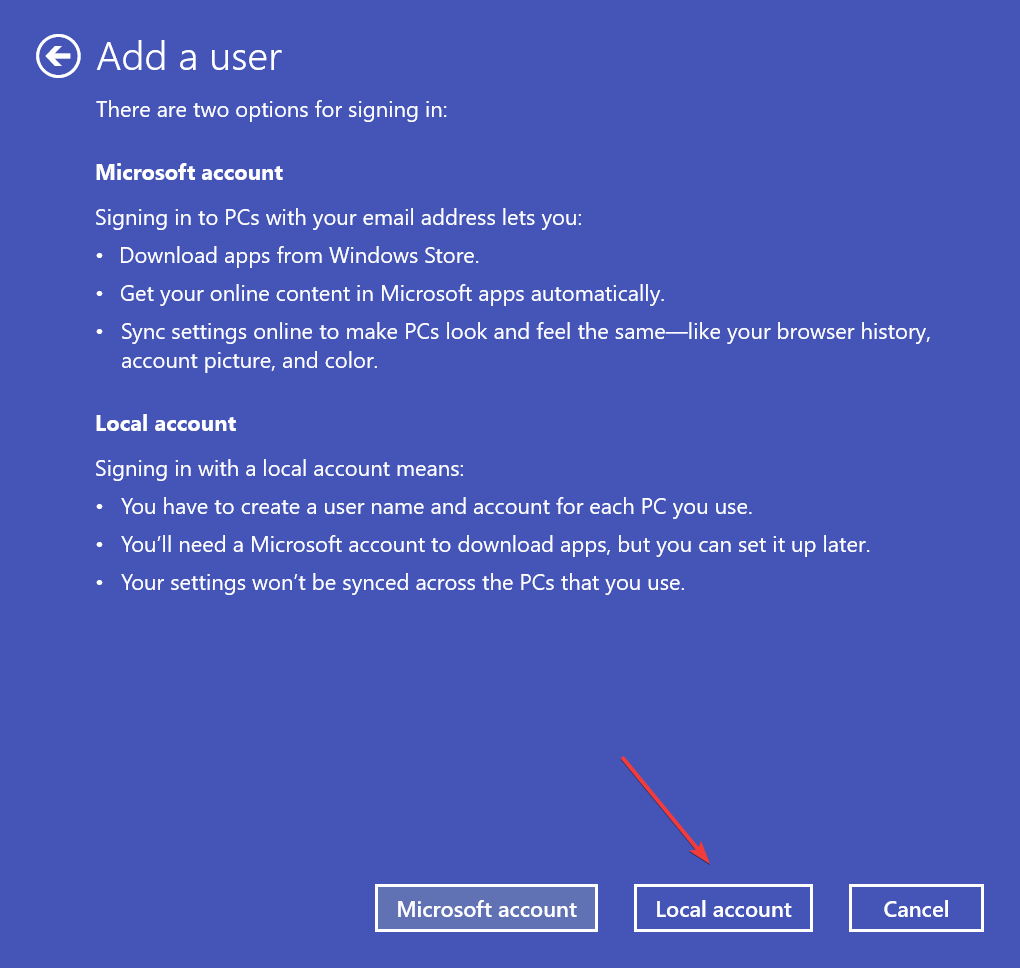
- Now, click on Local Account.
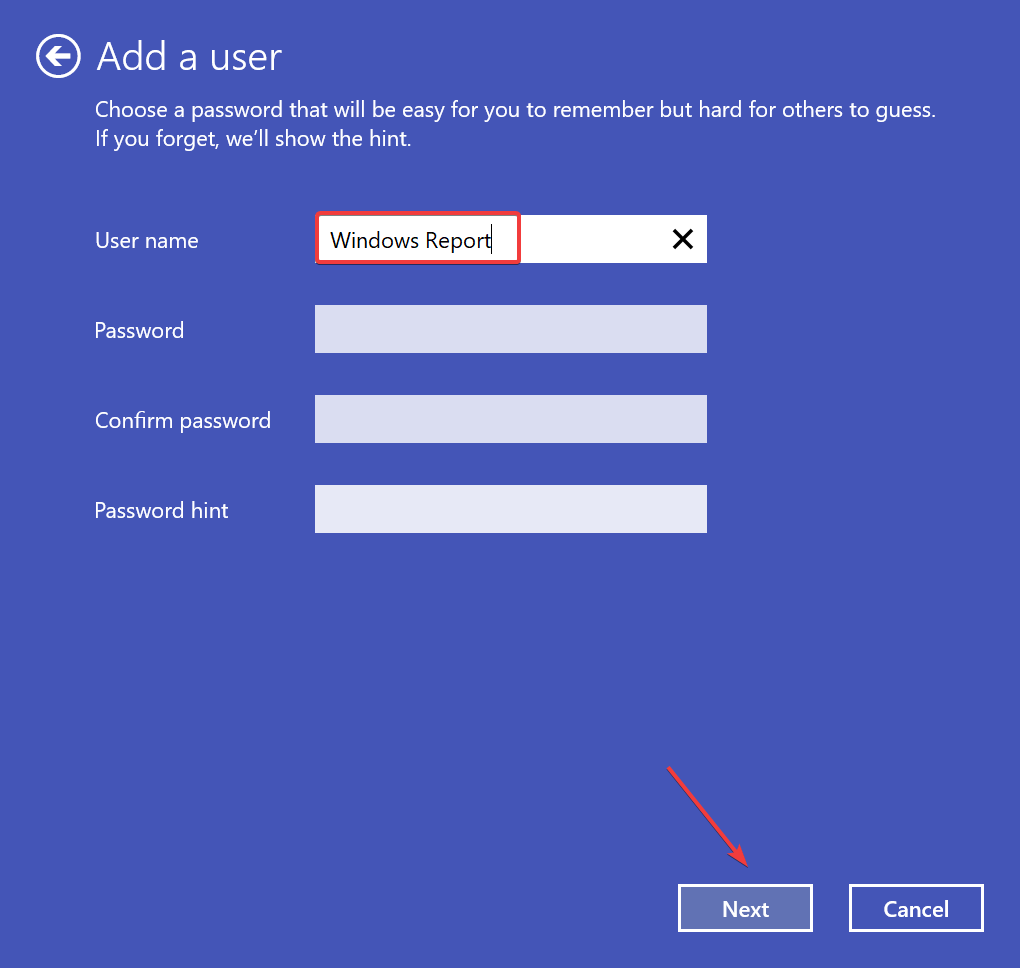
- Enter the user name and password (not mandatory) for the new profile, and click Next.
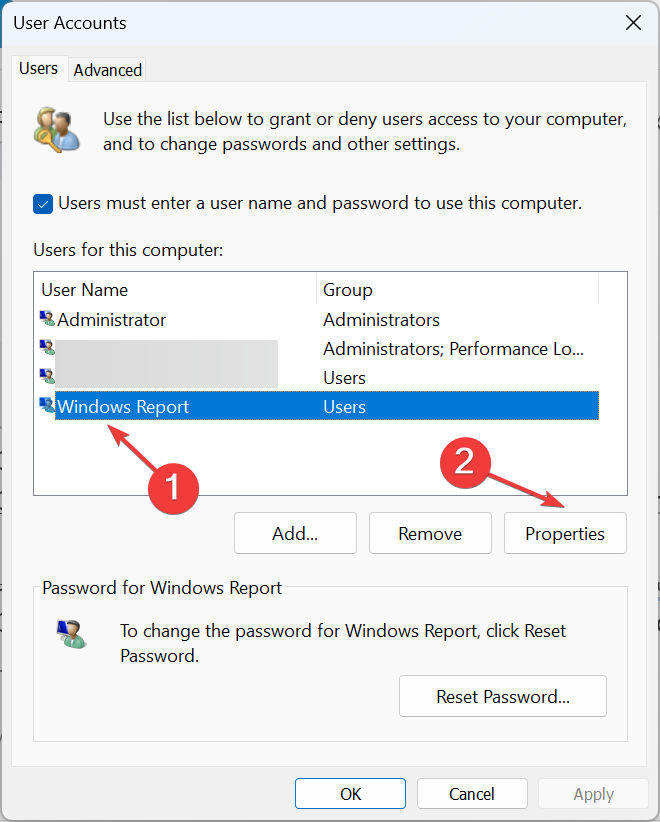
- Once done, select the new user account, and click on Properties.
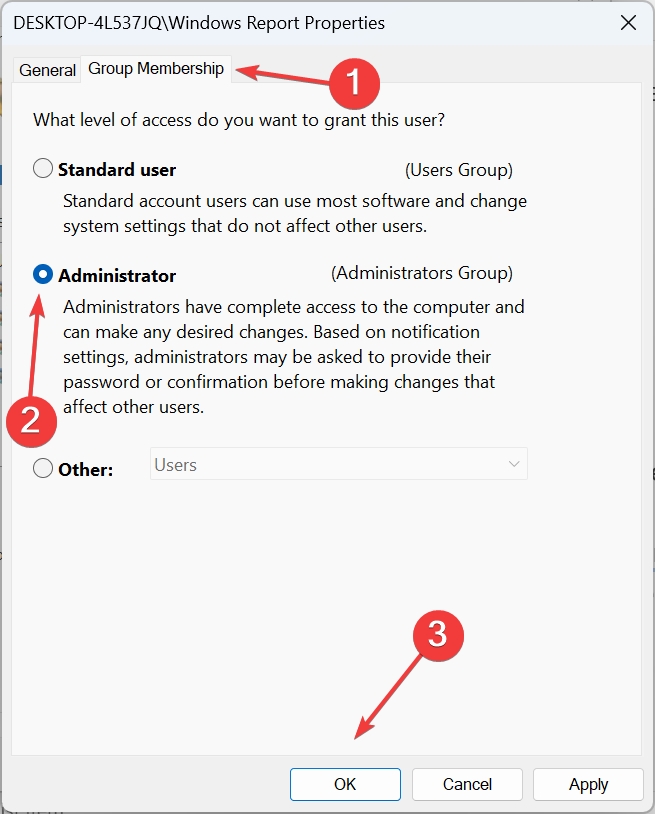
- Go to the Group Membership tab, select Administrator, and click OK to save the changes.
- Finally, sign in with the new user profile, customize the lock screen, and verify whether the changes reflect after subsequent reboots.
If nothing else works, the last option is to create a local account when the lock screen background wallpaper reverts to a blue screen in Windows 11. To transfer data between the two accounts, use an external USB drive. Besides, you can always make apps available to all users.
Remember, the problem is fixable, though it might take some time, depending on the underlying cause. As a last resort, you can reinstall Windows 11, but it shouldn’t come down to that for most!
And if it’s specifically the lock screen slideshow not working, you will have to check indexing and modify the local group policies.
For any queries or to share which fix worked for you, drop a comment below.



User forum
0 messages