Realtek HD Audio Manager Is Missing: How to Fix & Reinstall
Start by enabling Realtek HD Audio Manager in the Startup tab
![]() 4 min. read
4 min. read
![]() Updated on
Updated on
Share this article
This article is translated in


Improve this guide
Read our disclosure page to find out how can you help Windows Report sustain the editorial team Read more
Key notes
- Realtek Audio Manager can go missing for some users in Windows 10 due to build updates or sound driver changes.
- Audio driver issues might also cause the Realtek Control Panel issue.
- So, if you can't find the Realtek Audio Manager, a good start is to update the audio driver.
- You can also fix this issue using a third-party solution recommended below.
Some users have posted on support forums about the Realtek HD Audio Manager not showing in Windows.
Those users can’t find the Realtek HD Audio Manager on the taskbar, system tray, or even Control Panel, so they can’t make any advanced audio adjustments.
That issue is unusual but can typically arise after Windows 10 build updates or Sound driver changes.
Why is Realtek Audio Manager missing?
If Realtek Audio Manager is missing, you may have Realtek HD Audio Driver issues on Windows 11, but most of them can be easily fixed.
It’s possible that your installation is damaged, and to fix it, you need to uninstall it and download ASUS Realtek HD Audio Manager again.
Issues with drivers can also cause this problem, and to fix it, you need to reinstall the audio driver and check if that helps.
How do I get my Realtek HD Audio Manager back?
1. Enable Realtek HD Audio Manager on the Startup tab
You have an intuitive and practical method that will surely help you enable your Realtek HD Audio Manager by using Task Manager, as described in this solution.
- Right-click the Start menu and select Task Manager.
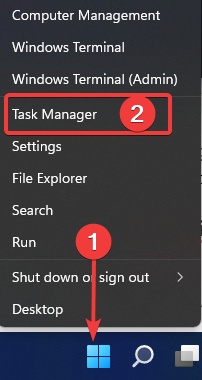
2. Next, select the Startup tab.
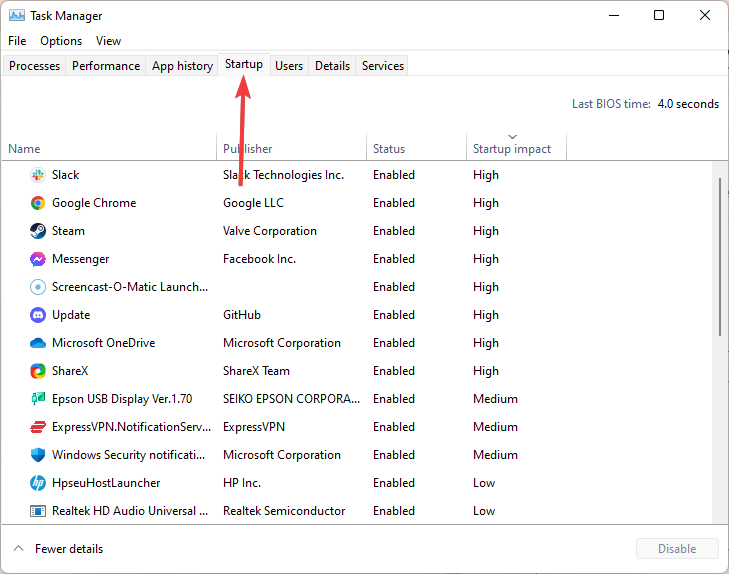
3. Then right-click Realtek HD Audio Manager and select Enable if it’s disabled.
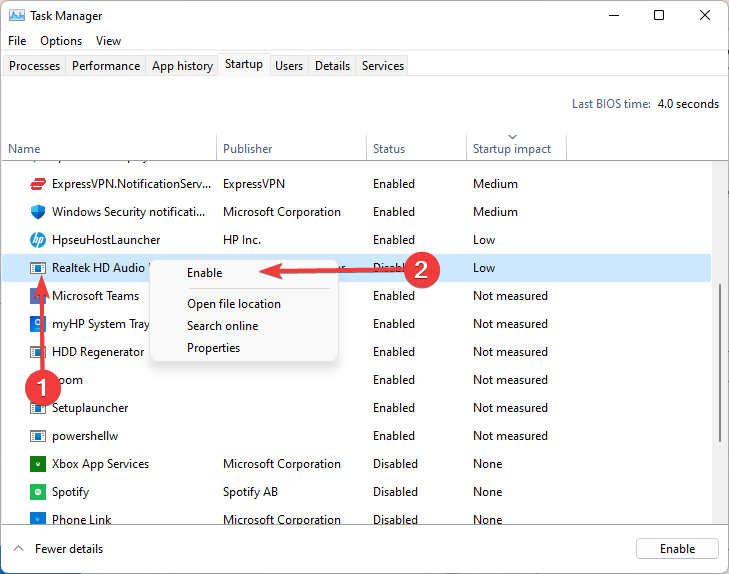
4. Close the Task Manager, and restart Windows.
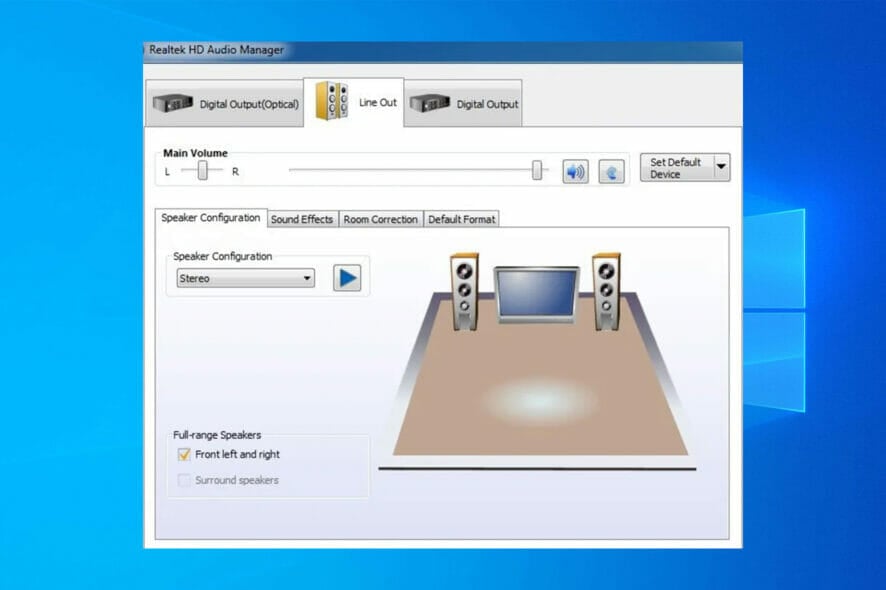
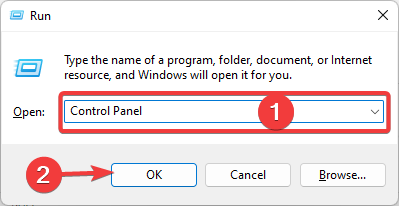
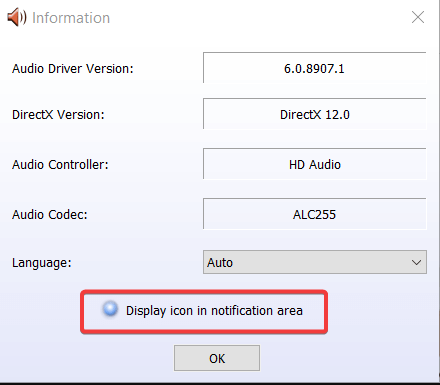
2. Select the Display icon in the notification area option
- Press the Windows key + R hotkey.
- Type Control Panel in Run’s Open box and click the OK button.

- Click the View by menu to select Large icons.

- Click Realtek HD Audio Manager, then click the Information button.
- Next, select the Display icon in notification area option on the Information window.

- Click the OK button.
- Check if the Realtek HD Audio Manager icon has appeared in the system tray.
3. Update the Realtek HD Audio Driver

A missing Realtek Audio Manager can also be a driver issue. Try updating the Realtek HD Audio driver by downloading the latest one from the Realtek website.
It sounds just right, but this solution takes time and attention. You must also pay attention to installing the correct driver, or you might be hit by the same problem again.
A much simpler and faster solution is to use a third-party solution that will update or fix all your drivers in just a few seconds with minimum effort.
- Download and install the Outbyte Driver Updater app.
- Launch the software and wait for the app to detect all incompatible drivers.
- Now, it will show you a list of all outdated drivers to select the ones to Update or Ignore.

- Click on Update & Apply Selected to download and install the latest versions.
- Restart your PC to ensure the applied changes.


Outbyte Driver Updater
Maintain your device healthy by letting OutByte Driver Updater find the latest driver options.4. Reinstall the Realtek HD Audio Driver
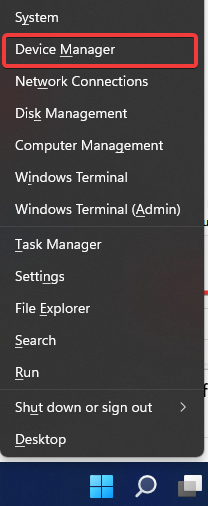
- Press the Windows key + X keyboard shortcut, and select Device Manager.

- Double-click Sound, video, and game controllers to expand that category.
- Right-click Realtek High Definition Audio to select Uninstall device.

- Select the Delete the driver software for this device option.
- Click the Uninstall button.
- Restart Windows after uninstalling the driver.

 NOTE
NOTE
How can I fix Realtek HD Audio Manager missing on Windows 11?
While the steps above are written with Windows 10 in mind, you should realize that both operating systems are very similar. This implies that most solutions on one will work on the other.
You may have minimal UI differences, but the exact solutions will generally work.
Do you need Realtek HD Audio Manager?
The most used sound driver for Windows systems, Realtek High Definition Audio Driver helps control surround sound, Dolby, and DTS sound systems on your computer. Removing this driver would result in major audio problems because you need it for your audio device to function on the computer.
Does Windows 11 have Realtek?
For years, Windows devices have been using Realtek drivers. This has not slowed down, and we do not anticipate it stopping any time soon. So if you have enjoyed Realtek, you may be confident that much will not change on subsequent devices.
Those are some of the resolutions that might restore a missing Realtek Audio Manager in Windows 10. They will be helpful if the Realtek HD Audio Manager is missing in advanced settings or the Control Panel.
When the issue arises after a Windows 10 build update, you might also be able to roll back the build update to fix the problem.
If you have any other suggestions or know about other possible solutions, drop us a line in the comments section below.