Full Fix: A component of the operating system has expired

Windows Insider program allows users to get the latest Windows 10 updates early and test the new features before they are released to the public. While testing new and unfinished builds of Windows 10 some issues can occur, and one of the issues that users reported is A component of the operating system has expired error message.
A component of the operating system has expired, how to fix it?
A component of the operating system has expired error message can sometimes appear on your PC and cause many problems. Speaking of problems, these are some common issues associated with this error message:
- A component of the operating system has expired Bootcamp, Virtualbox – According to users, this issue can appear while using Bootcamp or Virtualbox. If you have this problem, be sure to try one of our solutions in the virtual environment.
- Windows 10 preview a component of the operating system has expired – This error can occur if you’re using a preview version of Windows 10. If that’s the case, be sure to switch to the final version and your problem will be resolved.
- Component of operating system has expired winload.efi – This problem is usually caused by your BIOS clock, and in order to fix it, you just have to make sure that your clock in BIOS is correct. If not, set the correct date and time and the issue should be resolved.
Solution 1 – Change the date
This issue usually appears if your date is incorrect, and in order to fix this problem it’s recommended that you change the date. To do that, follow these steps:
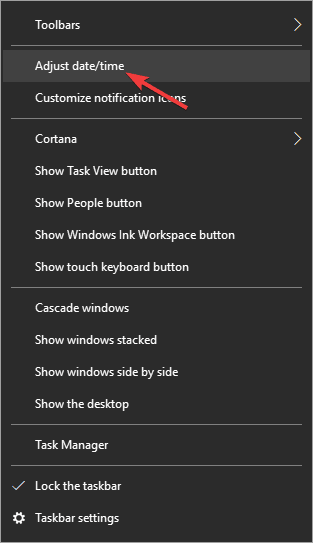
- Ricght-click the clock in the bottom right corner and choose Adjust date/time.
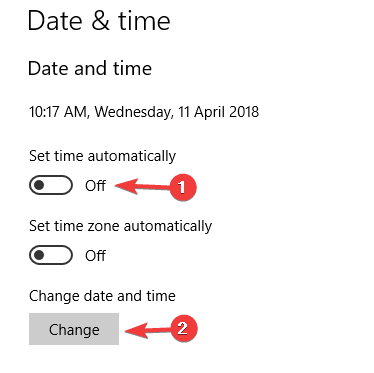
- Change Set time automatically to Off and click the Change button in Change date and time section.
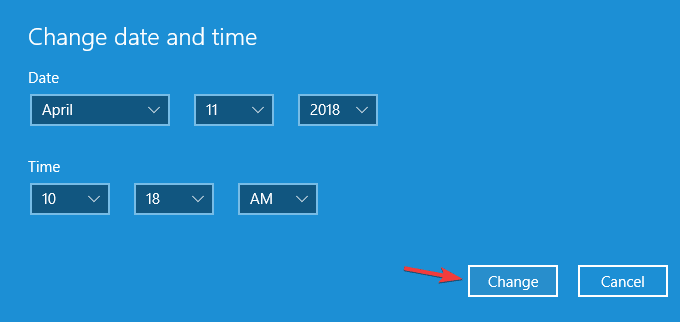
- Enter the correct date and click the Change button.
If you can’t access Windows 10, you can try changing the date from Safe Mode. To access Safe Mode follow these steps:
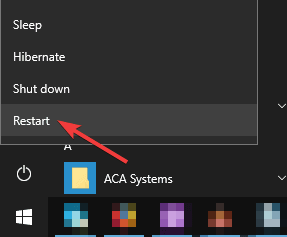
- Restart your computer few times during the boot sequence to start Automatic Repair.
- Choose Troubleshoot > Advanced options > Startup Settings. Click the Restart button.
- When your computer restarts the list of options will appear. Select any version of Safe Mode by pressing the appropriate key.
- Once you enter Safe Mode try to change the date again.
Some users are also suggesting to change the date from BIOS. To see how to access BIOS and how to change date from it be sure to check your motherboard manual for detailed instructions. In addition to setting the correct date, some users are also suggesting to set an earlier date in order to avoid issues like this, so you might want to try that as well. Just to be sure, you can also turn off automatic time syncing in order to prevent similar problems.
Solution 2 – Remove the motherboard battery and change the date in BIOS
It’s worth mentioning that your motherboard battery can also cause this problem to occur. If your battery isn’t working properly, the date will change whenever you turn off your PC causing the issue to reappear. This can be a problem, and in order to fix it, you need to check if your date keeps changing whenever you turn off your PC.
If that’s the case, it means that your motherboard battery is faulty, so you’ll need to replace it. The replacement process is quite simple, and you just need to turn off your PC, disconnect it from the power outlet and open your computer case. Now locate the battery on your motherboard and gently remove it. Once you do that, insert the new battery and the problem should be resolved.
Keep in mind that opening your computer case and removing the battery can void your warranty, so make sure that your warranty is expired. If your PC is still under warranty, it might be best that you take it to the official repair center.
Solution 3 – Use Linux Live CD to change the date
If you’re getting A component of the operating system has expired error message you might be able to fix it by using a Linux Live CD. Simply create a bootable Linux media and boot from it. After booting change the date and restart your PC.
Users also reported that you can fix this issue by removing your primary hard drive and replacing it with different one that has a different operating system installed. After starting the different version of Windows just change the date, and replace that hard drive with the first one.
Solution 4 – Use Command Prompt
To perform this step you’ll need a Windows 10 installation media, so be sure to create a bootable USB flash drive using a Media Creation Tool. To fix this issue do the following:
- Insert the bootable media to your PC.
- Enter BIOS and set an earlier date.
- Set your bootable media as the first boot device.
- Save changes and exit.
- When Windows 10 installation screen appears press Shift + F10.
- When Command Prompt opens enter the following:
- cd c:windows
- attrib -r -h -s bootstat.dat
- rename bootstat.dat bootstat.old
- exit
- Remove the Windows 10 installation media from your PC and restart it.
- After you boot to Windows 10 you should be able to download and install the latest build.
- After installing the latest build, you can go and set the correct date again.
Solution 5 – Revert to an older build
If this build is giving you A component of the operating system has expired error you might want to revert to the older build. Sometimes new builds can introduce certain bugs, therefore if you’re having problems with the current build you might want to revert to the previous one.
Solution 6 – Change the date and install the missing updates
As we previously mentioned, this issue can appear if the date on your PC isn’t correct. By changing the date you’ll fix this problem temporarily, but if you want to permanently fix it, it’s advised to install the missing updates.
Microsoft brings various improvements and bug fixes to Windows 10 with Windows updates, and in most cases the update download process is completely automatic. Most updates will be downloaded in the background without your knowledge, however, due to certain issues you might miss an update or two.
However, you can check for updates manually by doing the following:
- Open the Settings app. You can do that quickly by using Windows Key + I shortcut.
- Now navigate to Update & Security section.

- Click Check for updates button.

If any updates are available, they will be downloaded automatically in the background. Once the updates are downloaded, they will be installed on your PC as soon as you restart it. Once everything is up to date, the issue should be resolved completely.
Solution 7 – Perform an in-place upgrade
According to users, sometimes to fix this problem you need to perform an in-place upgrade. If you’re not familiar, this process will reinstall Windows 10 without removing any of your personal files or applications. To perform an in-place upgrade, you need to do the following:
- Download Media Creation Tool from Microsoft’s website.
- Start the application and choose Upgrade this PC now. Now click Next to proceed.
- Setup will now prepare your Windows for upgrade. This can take a while, so be patient.
- Now select Download and install updates (recommended) and click Next. This step isn’t mandatory, however, it’s recommended to download the updates.
- Now follow the instructions on the screen and wait while Windows checks for updates.
- If everything is in order, you should see Ready to install screen. Click Change what to keep.
- Select Keep personal files and apps and click Next to proceed.
- After doing that, the upgrade process will start. The upgrade itself can take about half an hour, sometimes more, so you’ll have to be patient.
Once your PC is upgraded, check if the problem is resolved.
Solution 8 – Reset Windows 10
If you’re still having a problem with A component of the operating system has expired, you might want to try resetting your PC. This process is similar to clean install, so we suggest that you back up all important files. In addition, be sure to create a Windows 10 installation media before you proceed. To reset your PC, you need to do the following:
- Open the Start Menu and click the Power button. Press and hold the Shift key and choose Restart from the menu.
- List of options will now appear. Select Troubleshoot > Reset this PC > Remove everything.
- If you’re asked to insert Windows 10 installation media, be sure to do so.
- Select the version of Windows that you want to repair and choose Only the drive where Windows is installed > Just remove my files.
- Now you’ll see a list of changes that the reset will perform. Once you’re ready, click the Reset button.
- Follow the instructions on the screen to complete the reset.
Once you reset your PC, you’ll have clean installation of Windows, and all previous problems should be resolved.
A component of the operating system has expired error can be a big problem, but you can usually fix it by changing the date in Windows 10 or in BIOS. If that doesn’t work, feel free to try any other solution from this article.
READ ALSO:
Read our disclosure page to find out how can you help Windows Report sustain the editorial team. Read more


Improve this guide


User forum
0 messages