Slow Internet on Windows 11: How to Speed It Up
Learn what you need to do to speed up your internet speed
12 min. read
Updated on
Read our disclosure page to find out how can you help Windows Report sustain the editorial team. Read more
Key notes
- Several users have reported facing the same slow Internet problem when dealing with the new Windows 11 operating system.
- A slow download speed in Windows 11 can happen due to misconfigured settings, metered connection, router issues, DNS server, amongst other reasons that can cause this.
- Besides learning how to solve this slow download issue in no time, find out which is a better choice, Wi-Fi or Ethernet.
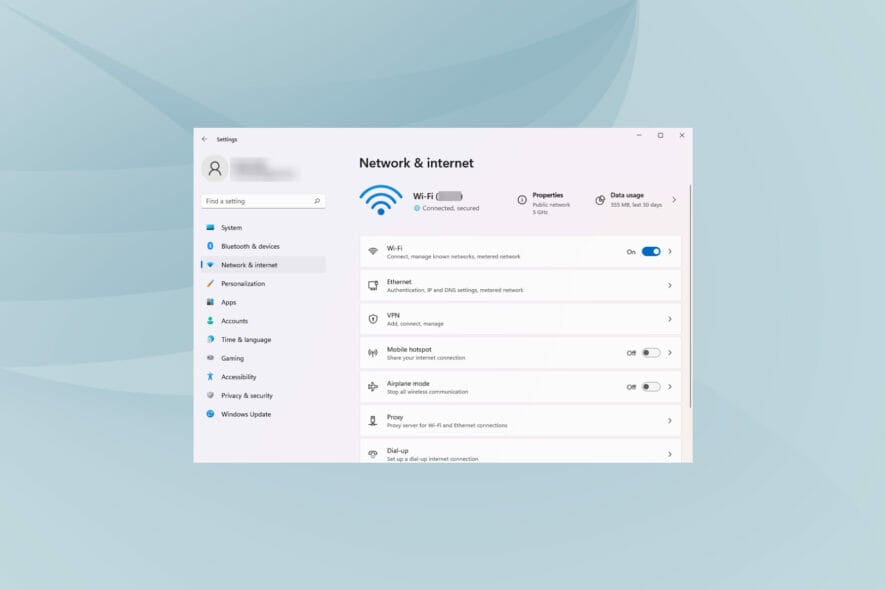
We are connected to the Internet for most of the day, for work, shopping, or recreational purposes. But, several users, after upgrading to Windows 11 have reported slow Internet.
A slow speed affects the whole user experience, whether browsing or downloading web files. With the increase in the size of web pages and dependence on downloads, you must look for ways to resolve the problem.
But before we head to the fixes, you must understand the underlying causes to troubleshoot the problem effectively.
Why is my Internet slow in Windows 11?
You should know that when several apps run in the background and consume data, it could lead to slow Internet problems in Windows 11.
Now, circling back to your question, know that download files can be large, especially when downloading a new operating system.
Thus, a large file is going to take longer to download than a smaller one, and seeing how the setup file is about 4GB in size, be prepared to wait for a while.
As you already know, your device’s memory (RAM) also plays a part in the download time, so having a lot at your disposal will ensure shorter, more efficient downloads.
Does Windows 11 cause Internet problems? Not really, but there have been cases where the new OS interfered with Internet quality if we go back in time just a little bit.
It is widely known that, on Windows 11, Wi-Fi connectivity is one of the most common Internet-related problems. The system uses too much data owing to all the new features, which can affect the Internet quality.
There are a lot of reports of users complaining about slow Wi-Fi speeds and error messages like Limited access, Unidentified Network, or No Internet access.
Be sure to check the Windows 11 network throttling index, especially if you have any Windows 11 Internet issues.
What causes slow Internet issues in Windows 11?
While most of us blame the ISP (Internet Service Provider), the other issues are often the real culprit. We have listed some of the prominent ones in the following section:
- Weak signal: When on wireless networks, the farther the device is from the router, the weaker the signal and, subsequently, the slower the Internet.
- A high number of devices connected to the router: If too many devices are connected to the router, it will lead to slow Internet in Windows 11.
- Problems with the DNS server: A DNS server locates the website on the web, and if it’s not set up properly or is facing an outage, it will take longer to load a website.
- Misconfigured settings: The network settings are closely linked to the Internet speed, and any misconfiguration with the former will affect the latter.
- Background processes consuming high data: If you have several background processes consuming data, especially a Windows update being downloaded, you will have a slow download speed in Windows 11.
- Bandwidth-intensive programs: If you have apps that consume too much data you may experience such issues. For instance, you’ll find that your video calls are still slow even with a fast internet connection.
- Issues with the ISP: For users who face the issue at specific times each day, the problem could be traced to your ISP. A simple method to identify this is to perform a Windows 11 Internet speed test. If the speed is slow at a fixed point every day, contact your ISP.
- Delivery Optimization is consuming bandwidth: The Delivery Optimization service is used for updating other devices in your network and it is using some of your bandwidth.
For Windows 11, or any other version of the OS, you can perform Internet speed tests to determine if your internet is slower after the Windows 11 update.
Thus, we made this guide to help you speed up your internet on Windows 11. That being said, if you need some internet optimizer advice for your Windows 11 device, you came to the right place.
Now that you thoroughly understand the causes, we head to the solutions for slow internet speed.
How can I fix my Windows 11’s slow download speed?
Here’s what you should first do
- One of the most effective solutions to most problems encountered in Windows 11 is to restart the computer. If a background process or bug leads to a problem, rebooting the OS will eliminate it, thereby fixing the error.
- Most devices display signal strength after you connect to a wireless network. Make sure it’s maximum.
- Also, we now have dual-band routers that support 5 GHz and the standard 2.4 GHz, which offers a higher Internet speed. In case your router supports both, make sure you are connected to the 5 GHz network.
1. Update your network drivers
1.1 Use Device Manager
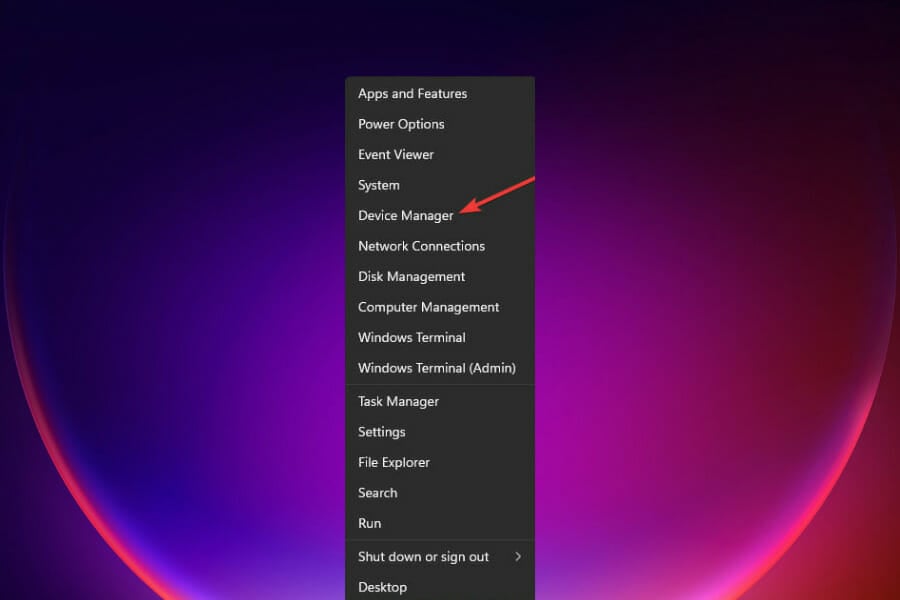
1. Press the Win + X keys simultaneously to open a Windows 11 shortcut menu.
2. Select Device Manager from the list.
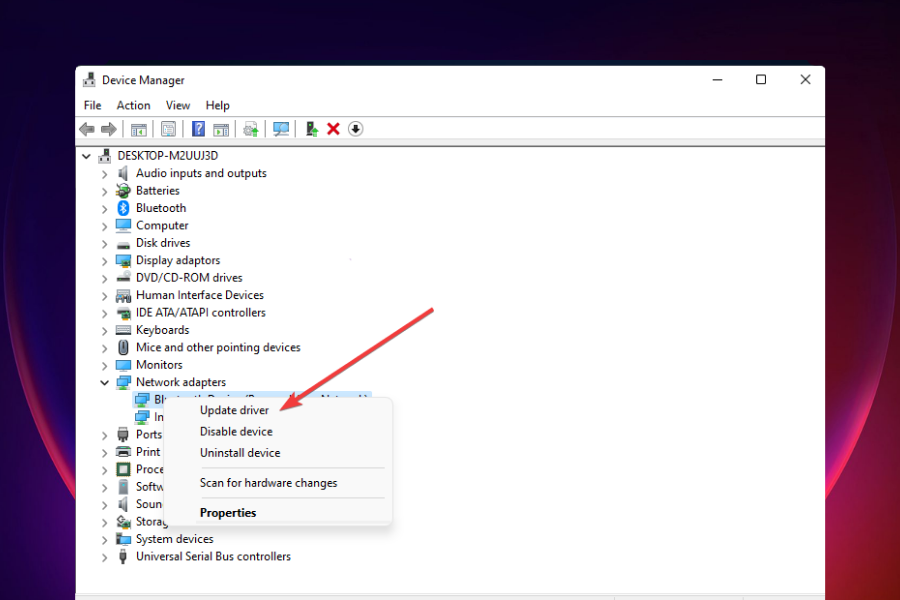
3. In the device list, locate and double click Network Adapters.
4. Then right-click on your Internet network adapter and select Update driver.
5. Select Search automatically for drivers and wait for the process to complete.
6. If the Windows 11 utility detects new drivers, it will automatically install them on your machine.
Corrupt or out-of-date drivers can have a negative impact on overall Internet performance. Many users report noticeable improvements after they update their network drivers in Windows 11 and it can also help you fix slow internet issues while using wired access points.
1.2 Use an automated solution
If you want a quicker solution to keep your drivers in check regularly, we recommend you try a lightweight utility such as Outbyte Driver Updater.
To update singular drivers, as in this case, the process is pretty similar. Select your network driver from a list and wait for the process to complete.
The benefit of this application, however, is that you can let it run in the background, and it will automatically find up-to-date replacements for any outdated or corrupt drivers on your PC and install them without any effort on your part.

Outbyte Driver Updater
A quick and safe tool to update all your outdated drivers.2. Lower the bandwidth for downloading updates
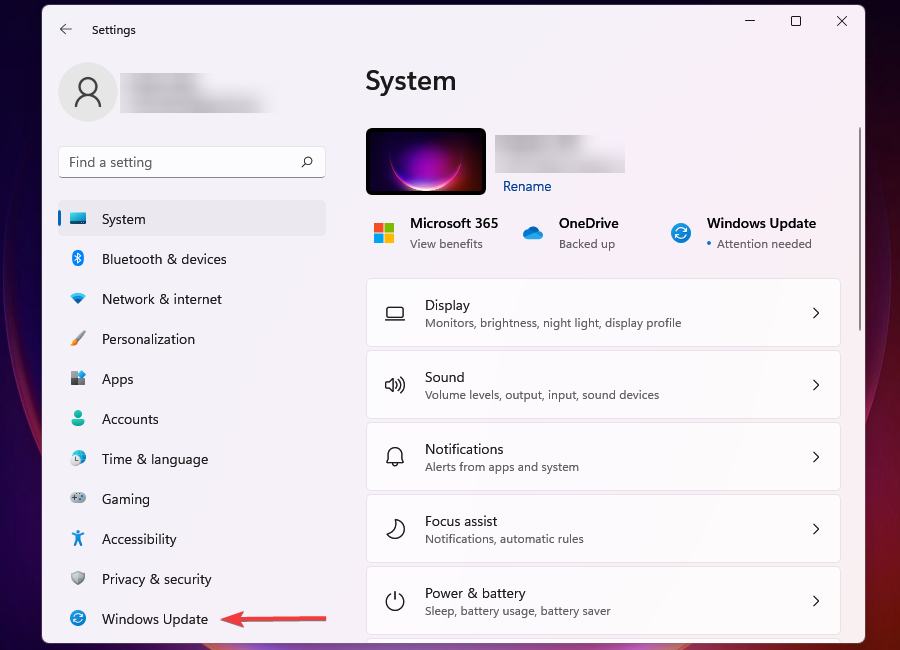
- Press Windows + I to launch the Settings app.
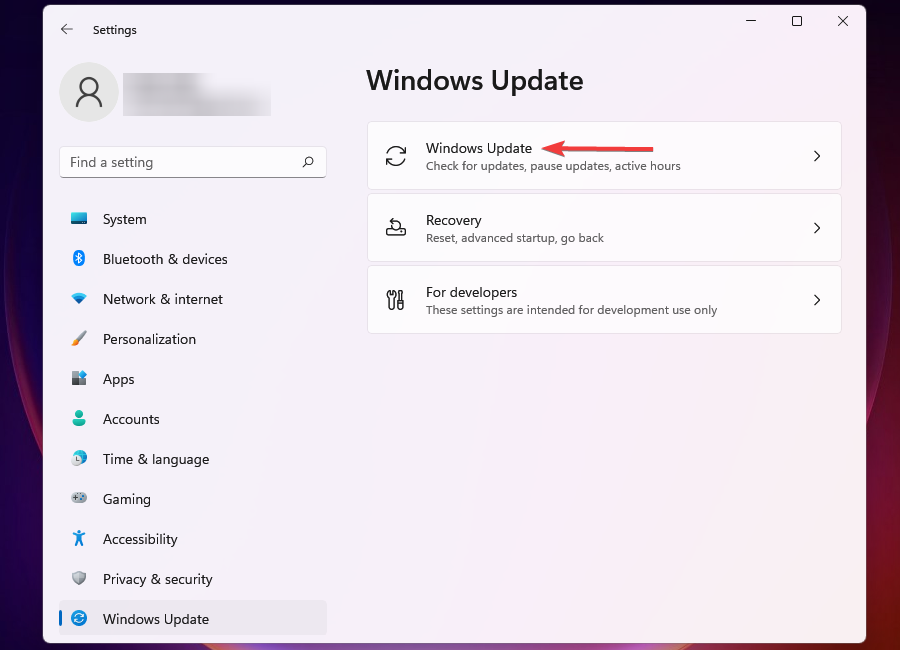
- Select Windows Update from the tabs listed in the navigation pane on the left.
- Click on Windows Update on the right.
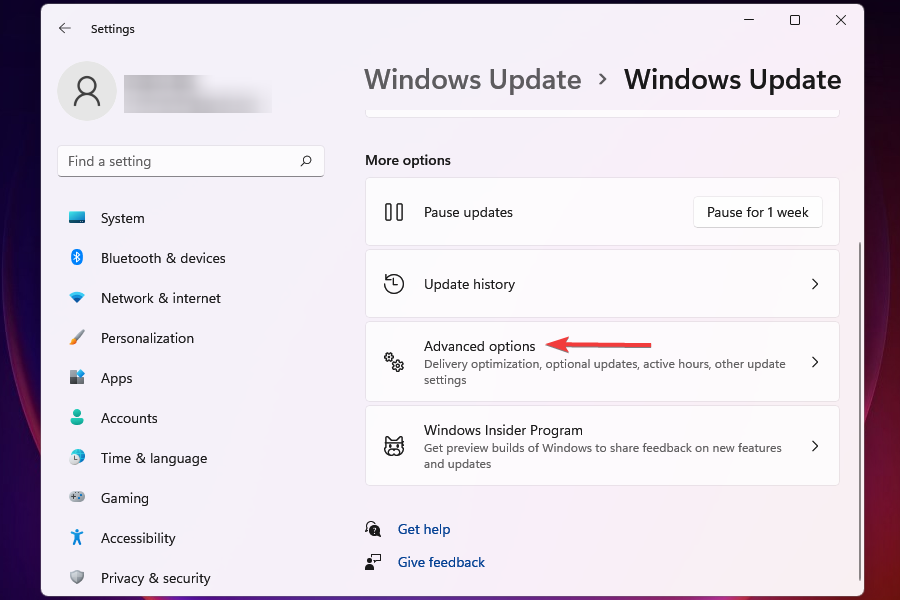
- Click on Advanced options.
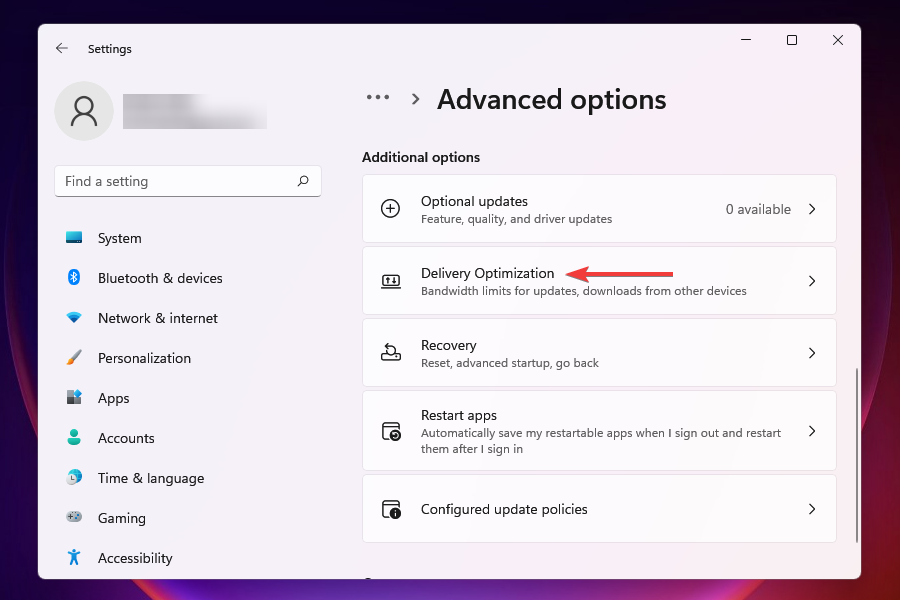
- Next, click on Delivery Optimization.
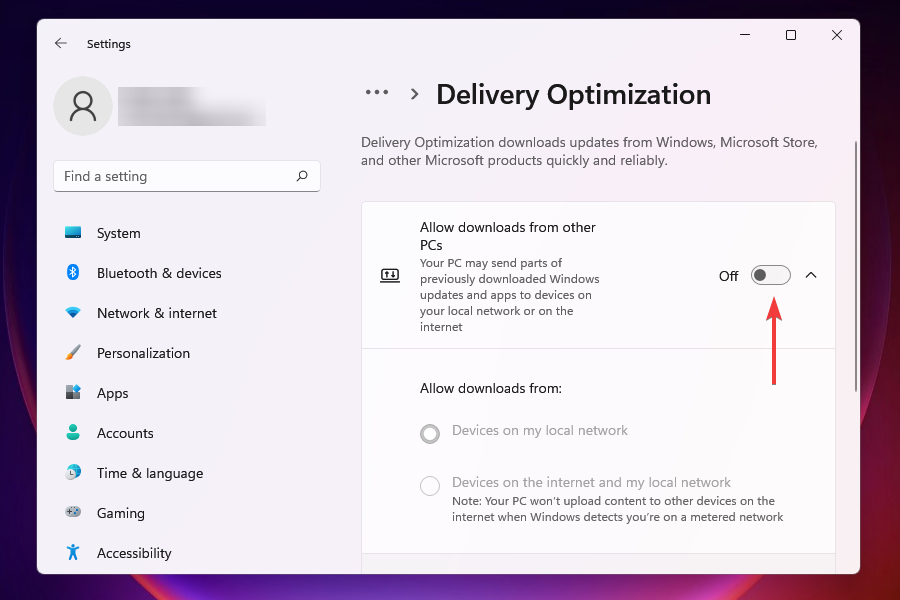
- Disable the toggle for Allow downloads from other PCs.
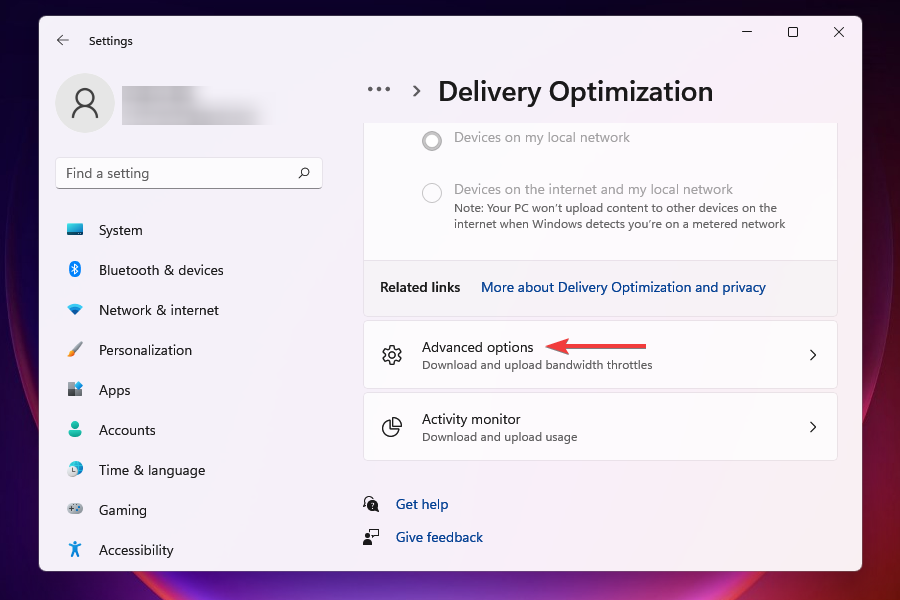
- Now, click on Advanced options.
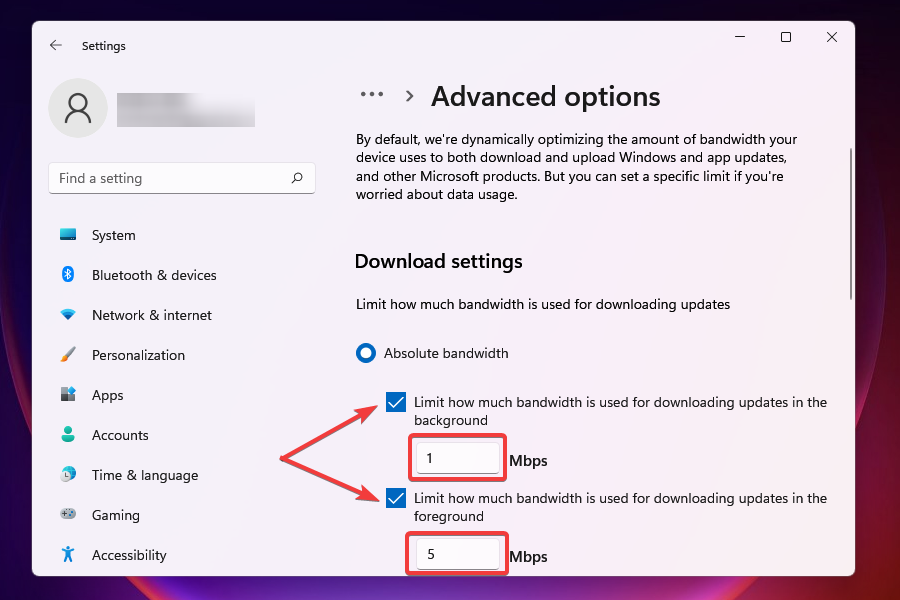
- Under Absolute Bandwidth, tick the checkboxes for allocation of bandwidth to downloading of updates in the background and foreground, and enter the desired value the respective fields.
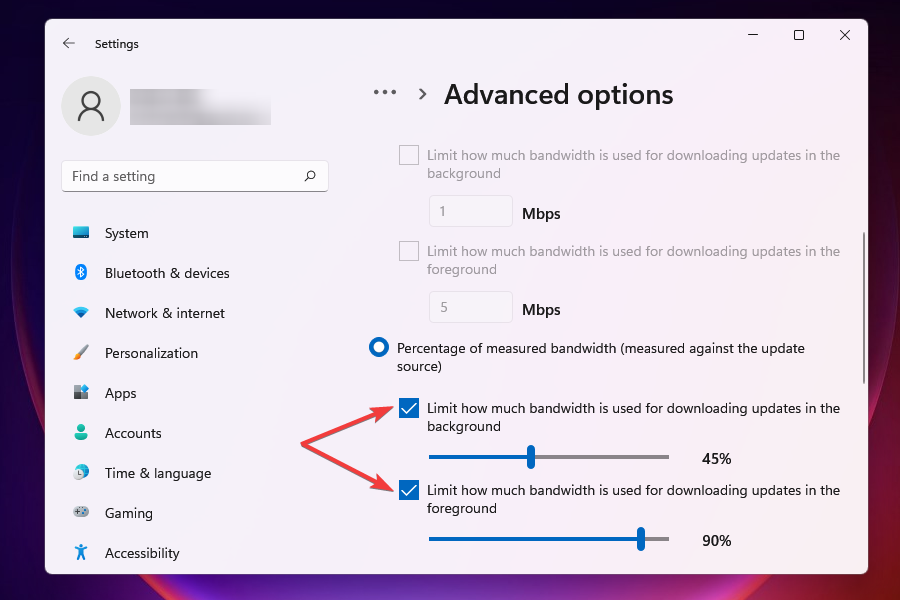
- You can also go with the Percetange of measured bandwidth method and use the slider to set the desired setting.
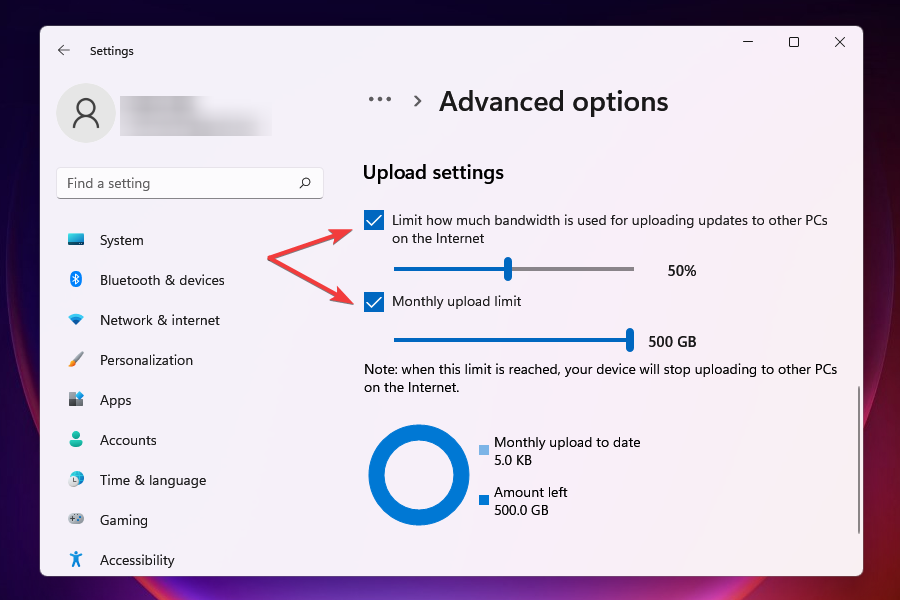
- Scroll down and tick the two checkboxes under Upload settings.
- Now use the slider to set the desired bandwidth for Uploading Updates and Monthly Upload Limit.
After changing the bandwidth settings, check if the slow download speed problem in Windows 11 is resolved.
A certain amount of bandwidth is allocated to Windows Update for both download and update. You can lower the bandwidth in order to maximize the bandwidth allocation to other tasks.
Also, Windows sends updates to other PCs on the network, which decreases the Internet speed. Disabling the setting might also help eliminate the problem.
3. Terminate processes consuming data
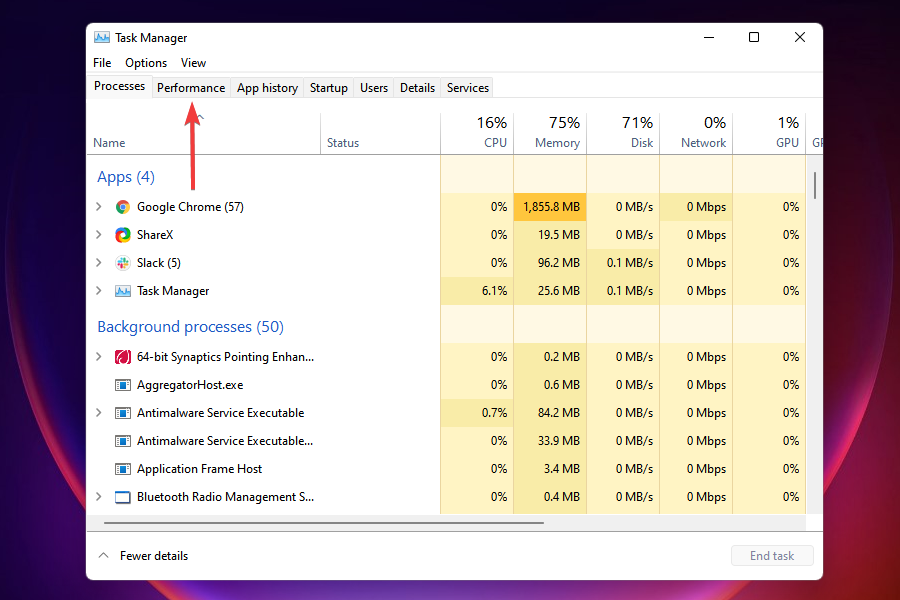
- Press Ctrl + Shift + Esc to launch the Task Manager.
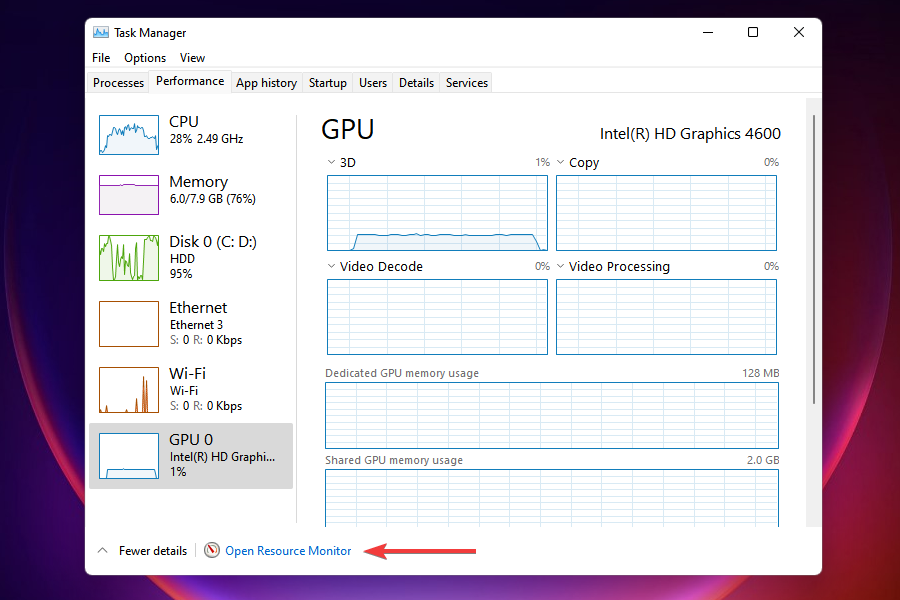
- Navigate to the Performance tab.
- Click on Open Resource Monitor at the bottom.
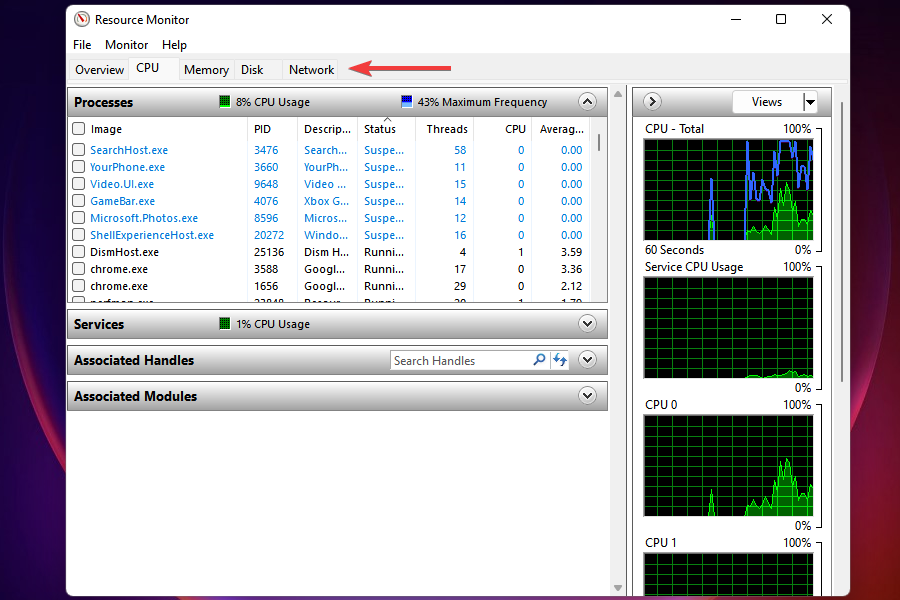
- Go to the Network tab in the Resource Monitor window.
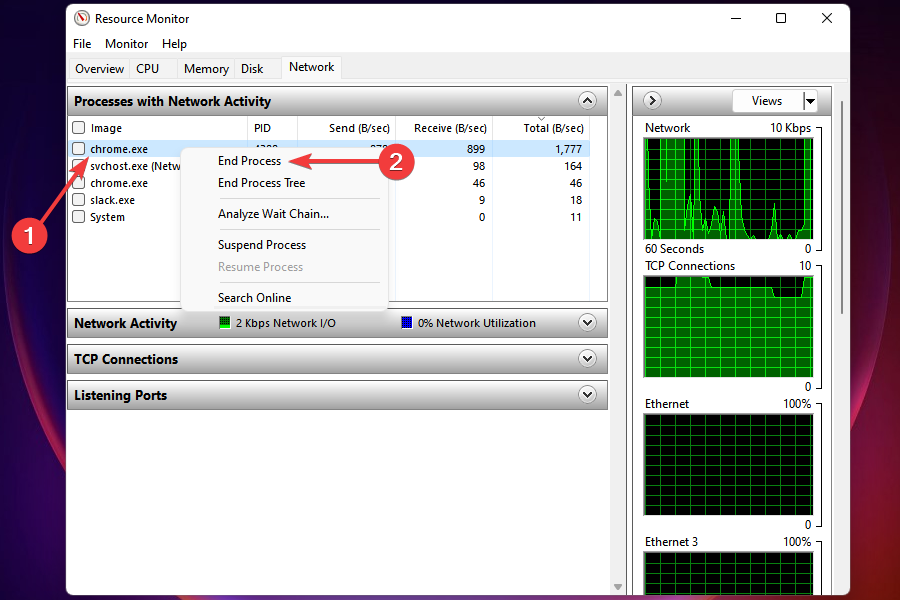
- Locate the programs that are consuming way too much data, right-click on them, and select End process.
Certain processes that consume a considerable amount of data can be terminated to fix the Windows 11 slow Internet. However, remember not to end any critical tasks, such as Windows Update.
If you couldn’t find any such tasks or terminating some didn’t help, head to the next fix.
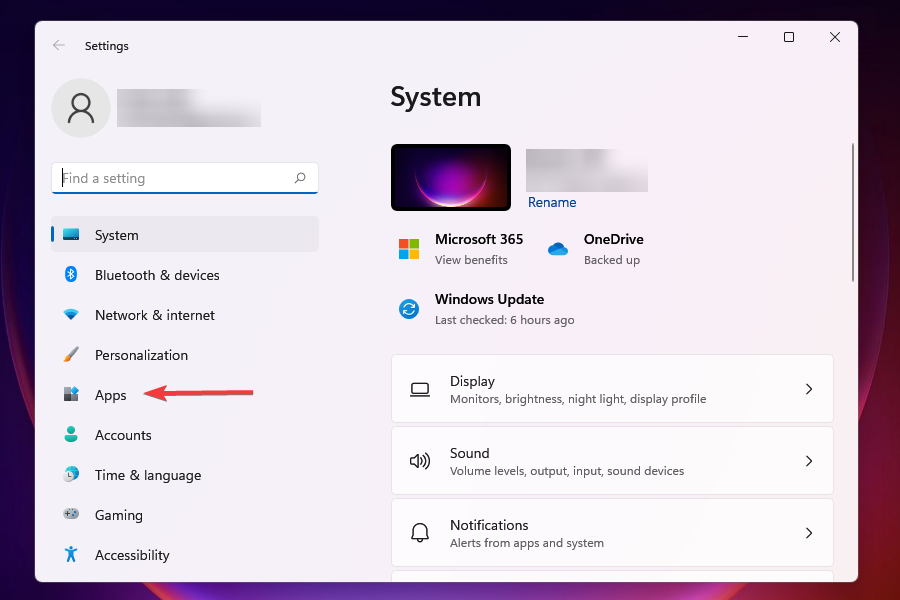
4. Disable apps from running in the background
- Press Windows + I to launch the Settings app.
- Select Apps from the list of tabs in the navigation pane on the left.
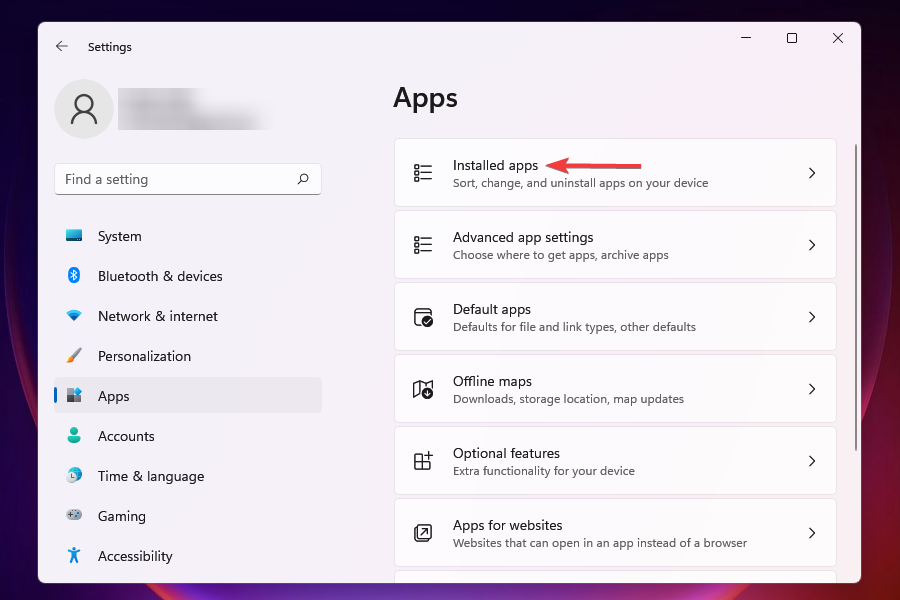
- Click on Installed apps on the right.
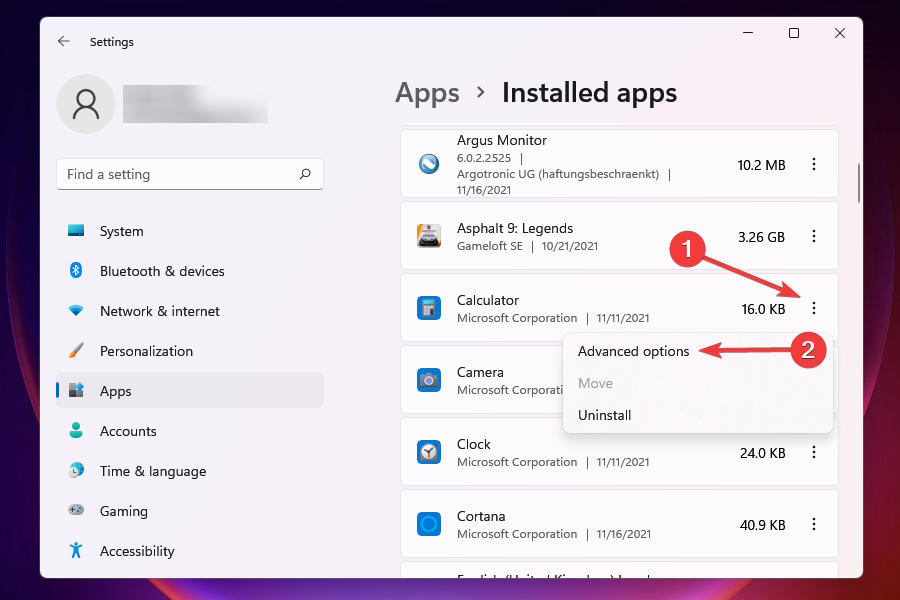
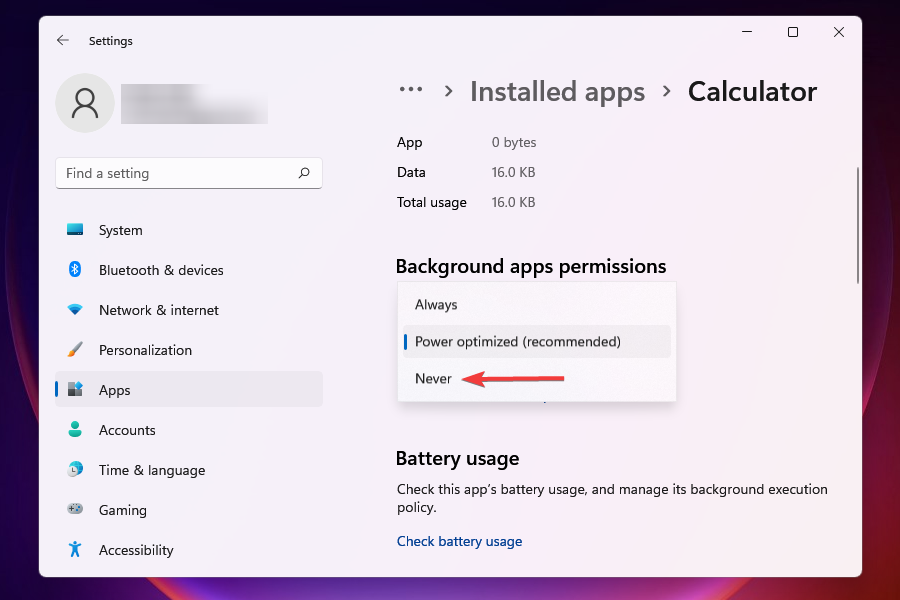
- Locate the app that you don’t want running in the background, click on the ellipsis next to it and then select Advanced options from the menu that appears.
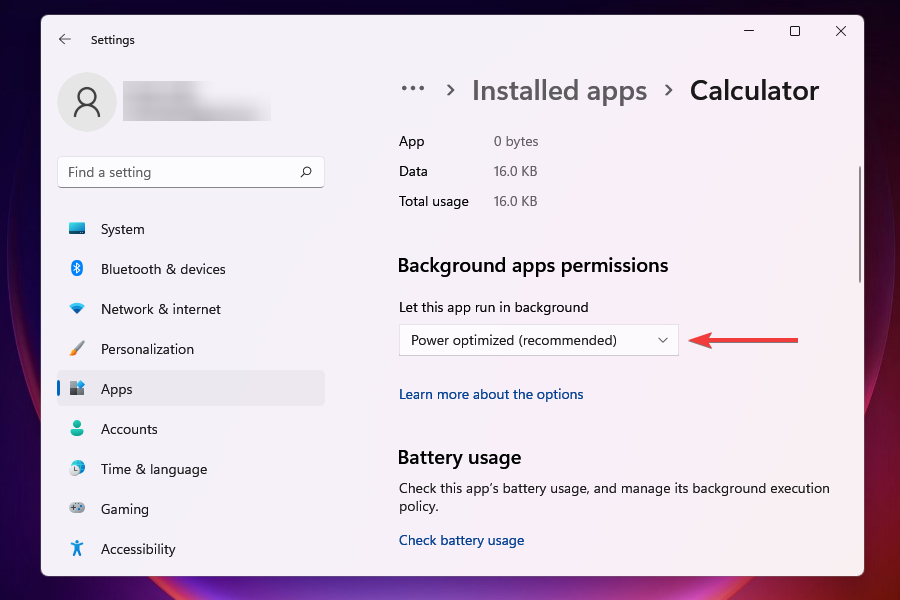
- Next, click on the Let this app run in the background dropdown menu.
- Select Never from the list of options.
Disabling background apps in Windows 10 is a lot different than the process in Windows 11. In the case of the former, you could easily disable them all in one go, while for the latter, the settings are specific to each app.
When several apps run in the background and consume data, it is bound to lead to a slow Internet problem in Windows 11. Also, some of these may download files or updates.
It would be best if you disabled the non-critical apps from running in the background to increase the download speed since these also lead to slow Windows 11 Ethernet. Whenever you need to work on any of these, launch them.
5. Run the Internet Connections troubleshooter
- Press Windows + I to launch the Settings app.
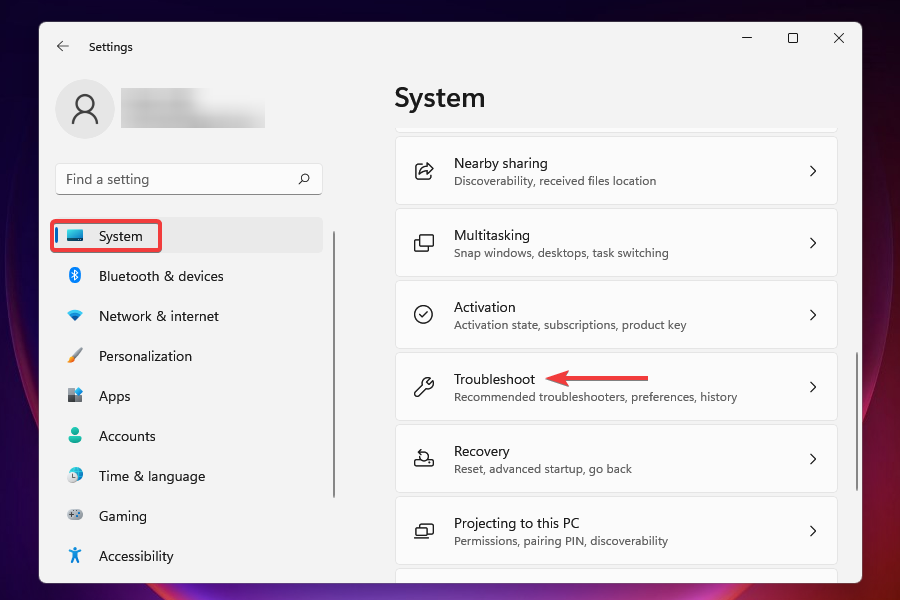
- Click on Troubleshoot on the right in the System tab.
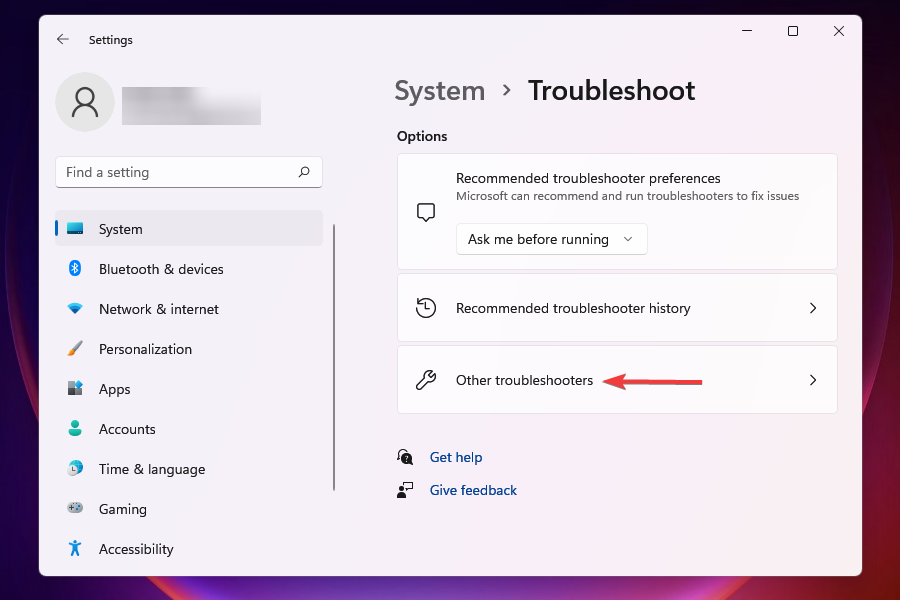
- Now, click on Other troubleshooters.
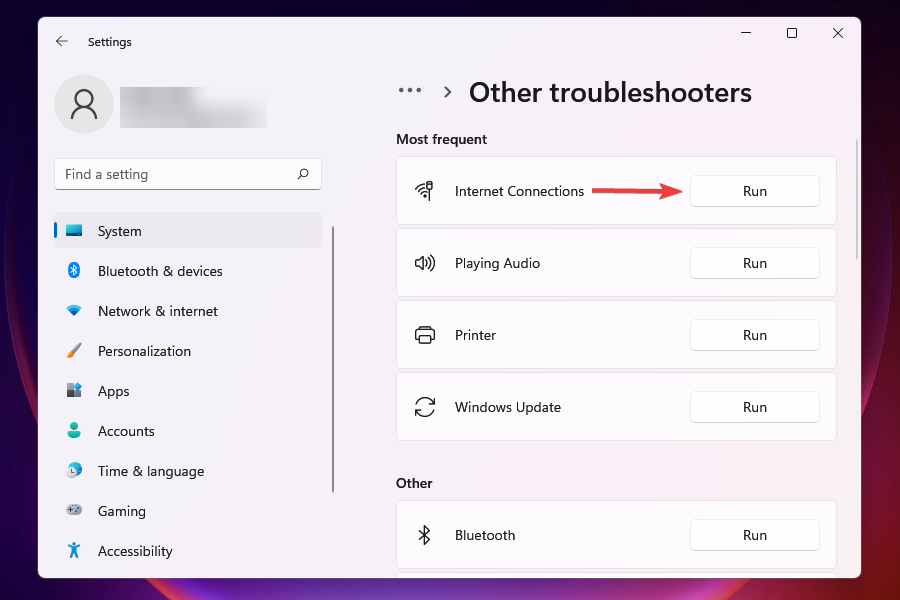
- Click on Run next to Internet connections to launch the troubleshooter.
- Choose the appropriate response, if and when prompted, to complete the troubleshooting process.
Microsoft offers a bunch of troubleshooters that can identify and eliminate some of the commonly known issues. Before going with the intricate methods, it’s recommended that you run these, in case one is available for the problem.
Internet connections troubleshooter can be used to resolve issues that prevent you from accessing the Internet.
6. Disable Windows Defender Firewall
 NOTE
NOTE
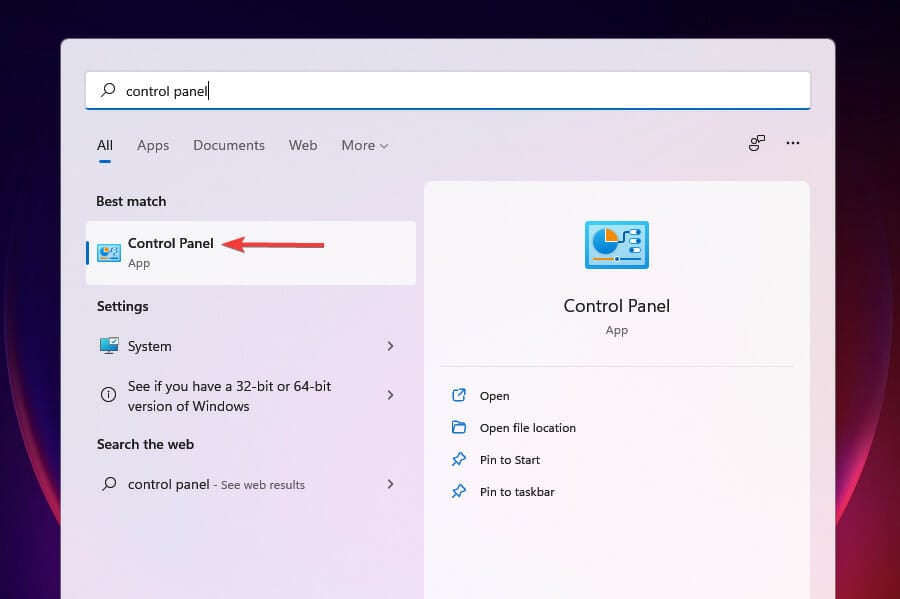
- Press Windows + S to launch the Search menu.
- Enter Control Panel in the text field at the top, and click on the relevant search result that appears.
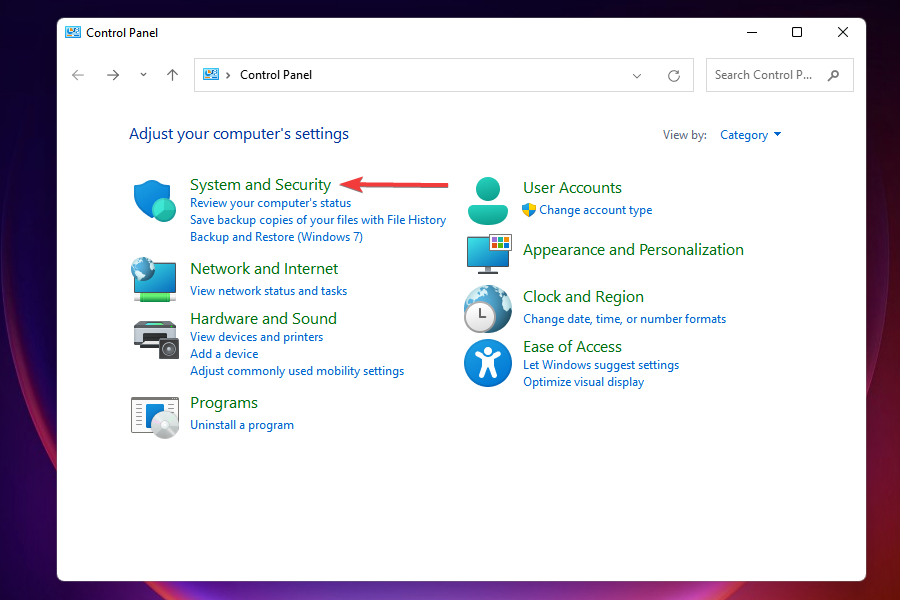
- Click on System and Security from the list of options that appear.
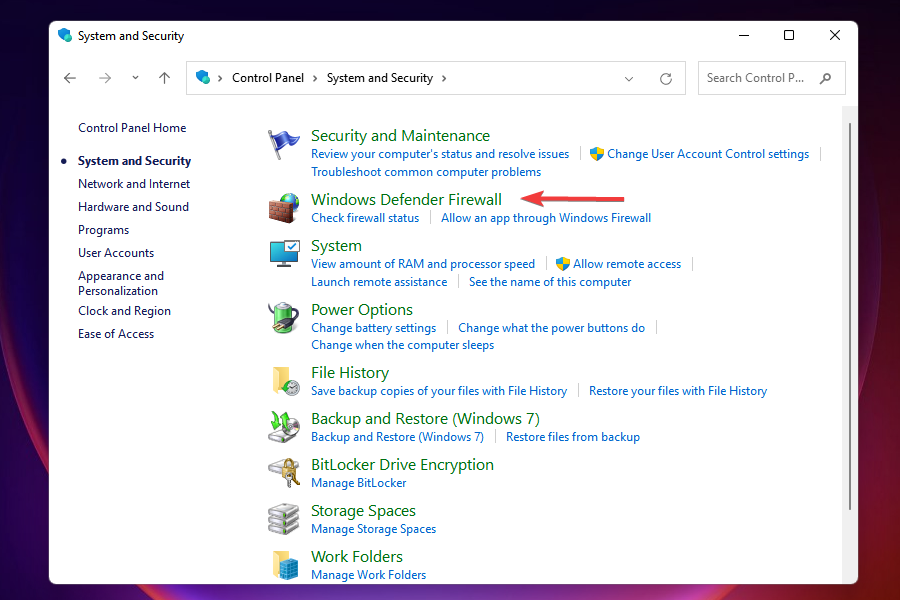
- Select Windows Defender Firewall.
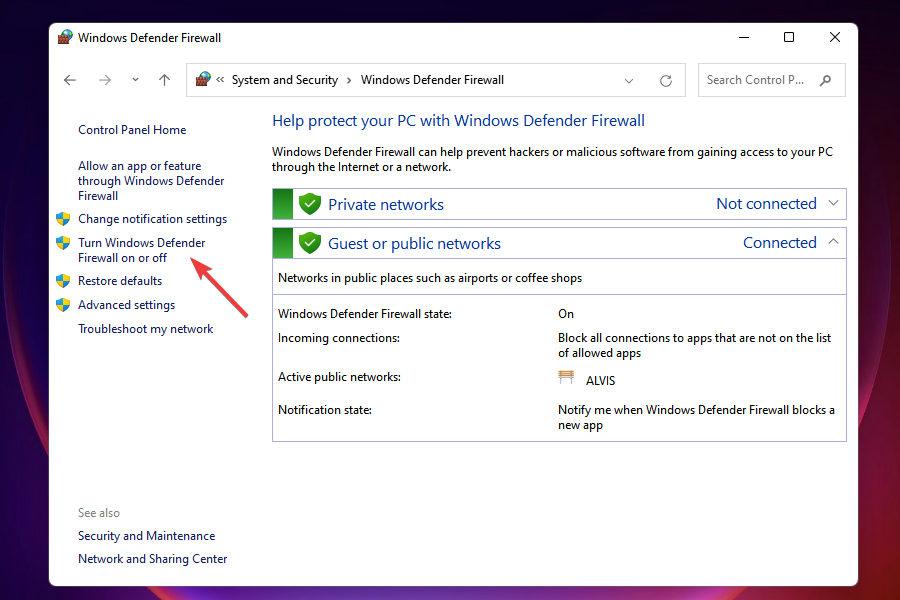
- Click on Turn Windows Defender Firewall on or off from the list of options on the left.
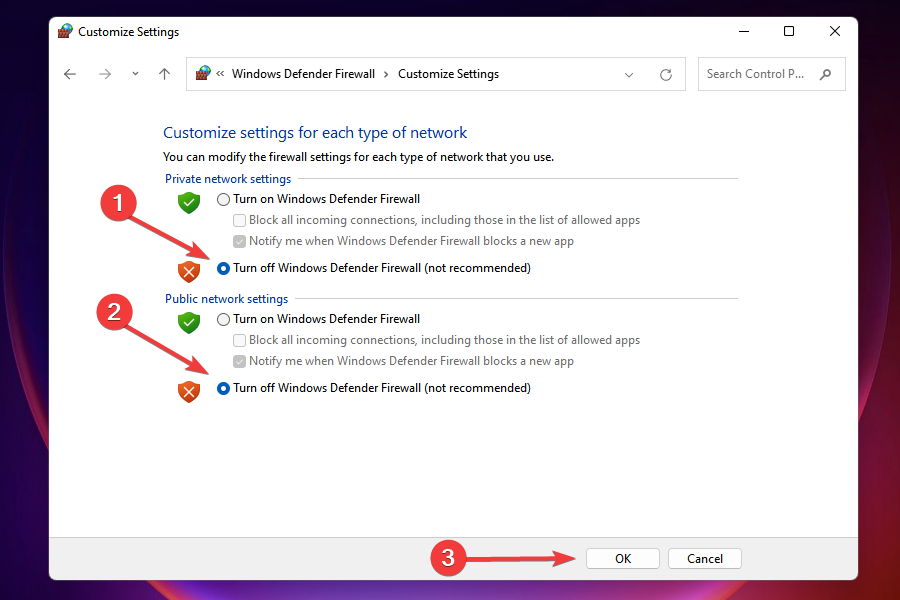
- Now, tick the checkboxes for Turn off Windows Defender Firewall (not recommended) under both Private network settings and Public network settings, and then click on OK at the bottom.
- Choose the appropriate response in case a prompt appears.
Windows Defender Firewall is a critical part of the OS that protects your device from unauthorized traffic, both to and from the computer. However, it’s known to cause slow Internet at times in Windows 11, thus disabling it could work as a fix in this case.
But, do remember that you would be losing out on critical security aspects, and the computer would be exposed to risks. Therefore, if disabling Windows Defender Firewall does not work, re-enable it immediately.
Even more, remember that you may choose one of the best antivirus solutions for Windows 11 to further protect your computer.
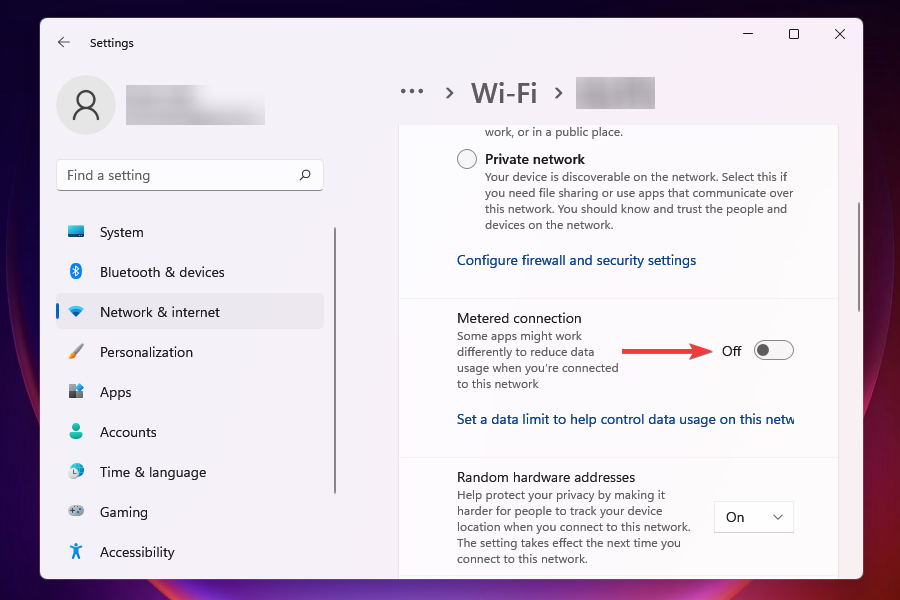
7. Turn off metered connections
- Press Windows + I to launch Settings.
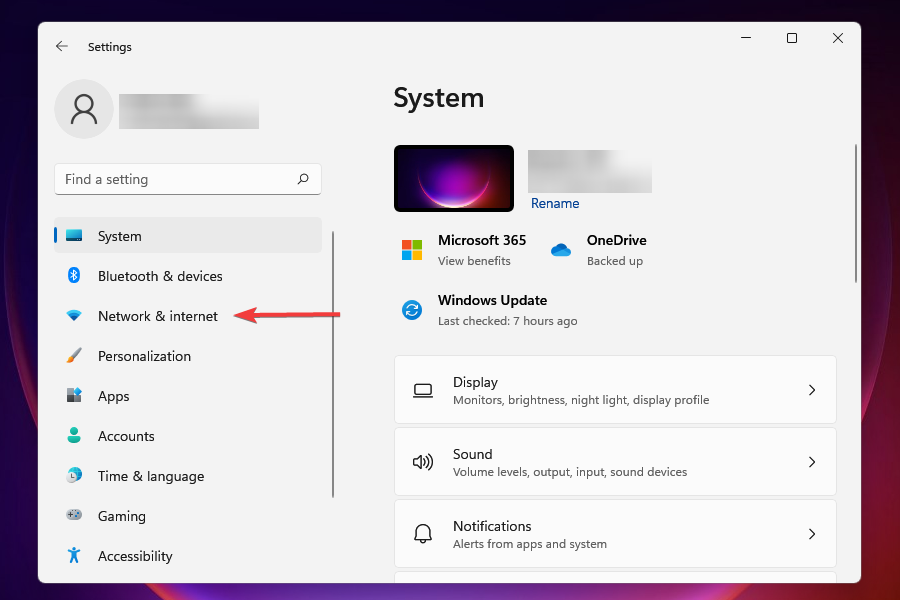
- Select Network & internet from the list of tabs in the navigation pane on the left.
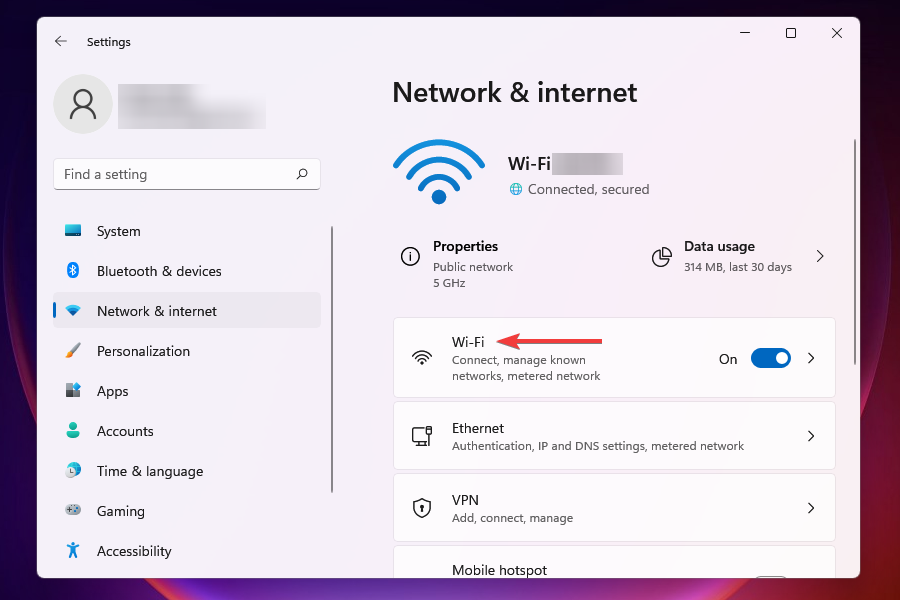
- Click on Wi-Fi or Ethernet depending on the network type.
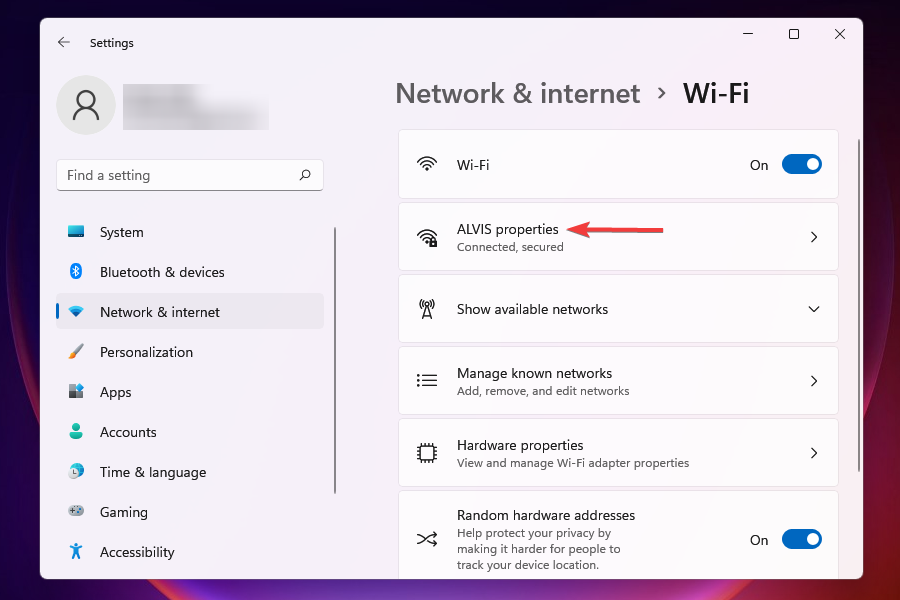
- Click on the network that you are connected to.
- Disable the toggle for Metered connection.
8. Change the DNS server
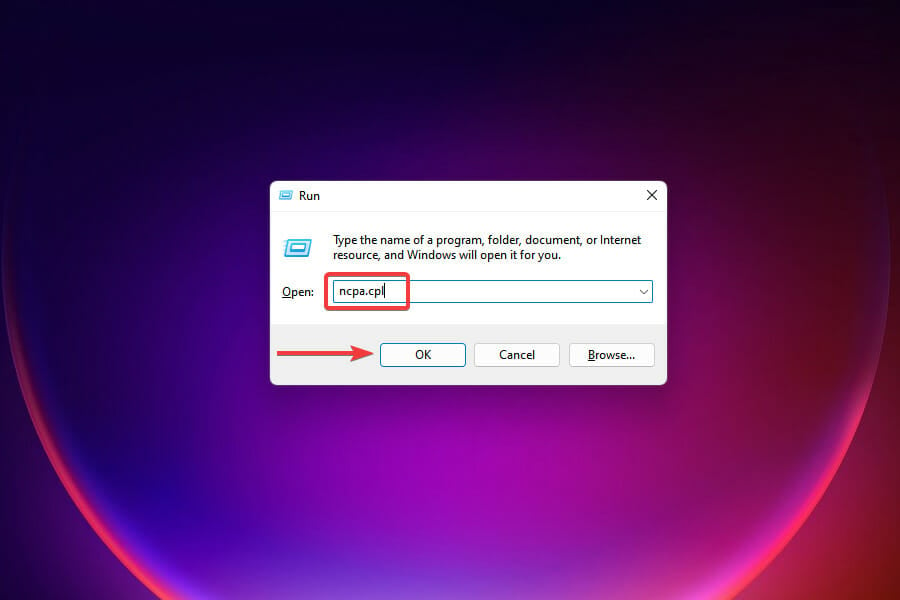
1. Press Windows + R to launch the Run command.
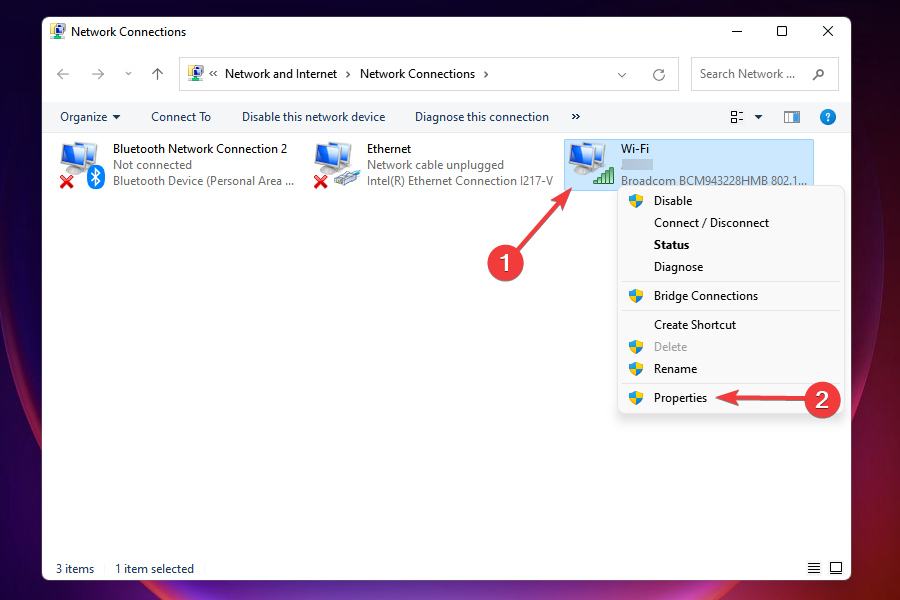
2. Enter appwiz.cpl in the text field and either click on OK or hit Enter to launch the Network Connections window.
3. Right-click on the connected network adapter, and select Properties from the context menu.
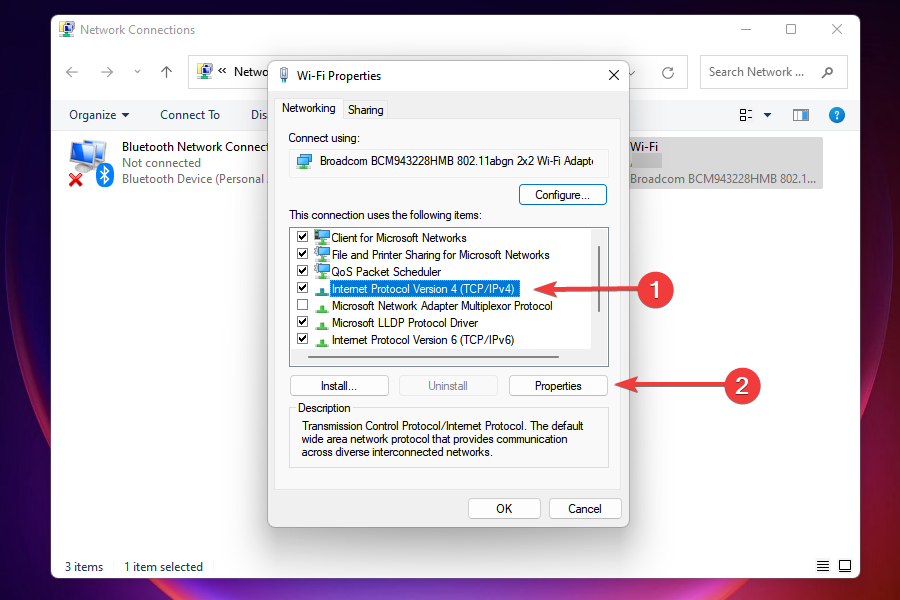
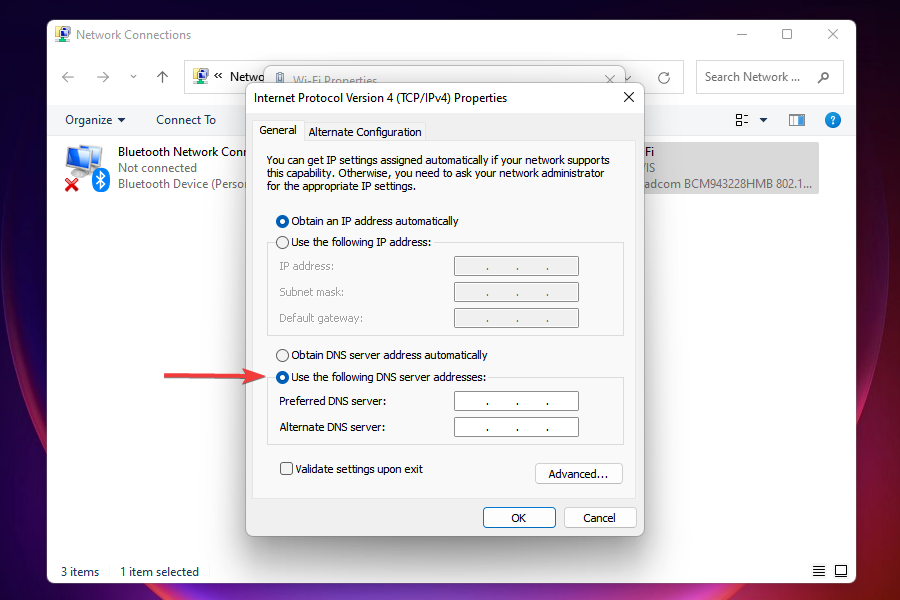
4. Select Internet Protocol Version 4 (TCP/IPv4) from the list of options and click on Properties.
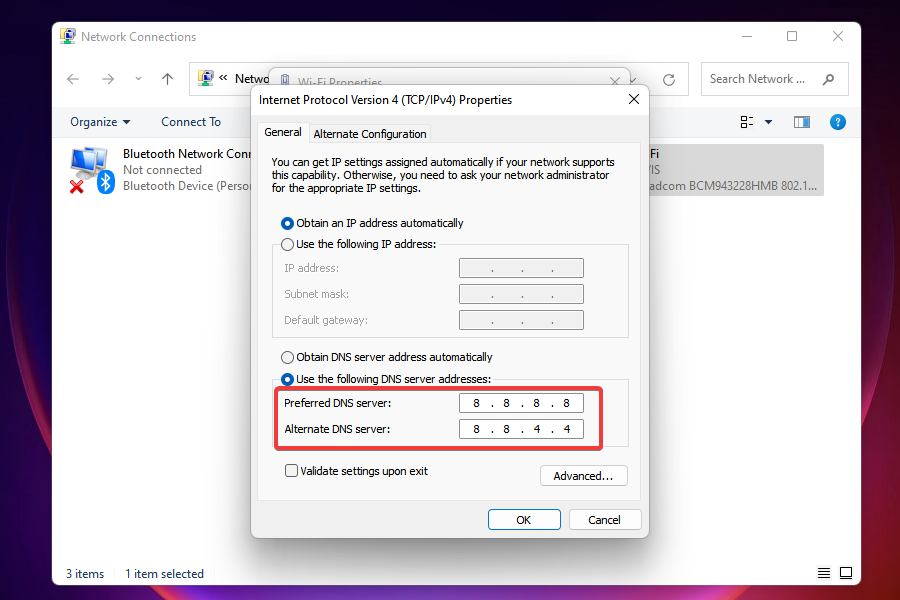
5. Tick the checkbox for Use the following DNS server addresses.
6. Enter the following the respective fields and click on OK to save the changes:
- Preferred DNS server: 8.8.8.8
- Alternative DNS server: 8.8.4.4
7. After making the changes, restart the computer.
The DNS server is used to locate the IP address corresponding to the domain name. Whenever you enter the domain name, it’s respective IP is located and the website launched.
Windows is set to choose the DNS server by default but due to issues with it, the Internet speed may be slow. Therefore, it’s recommended that you switch to an open-source DNS for better Internet speed.
Can I go back to Windows 10 from Windows 11?
It is really important to know that rolling back to Windows 10 after trying out Windows 11 can be done within the first ten days, which is considered a trial period.
That being said, if the rollback period has passed, the only method to go back to Windows 10 is to install a fresh copy of the OS.
This is a straightforward process, but it will take some hours of your time. but we can show you how to rollback from Windows 11 to Windows 10.
What do I do if none of the methods listed fix slow Internet issues?
This is a highly likely scenario primarily due to problems from the ISP’s end. In this case, you can either check the connections for faults or choose another plan with a higher Internet speed. Also, you can switch to a faster and safer web browser to resolve the slow Internet problem in Windows 11.
But before making the upgrade, remember to identify your requirements and choose the plan that best suits them.
Wi-Fi or Ethernet: Which is better?
Both have their own set of advantages and disadvantages. As the name suggests, Wi-Fi offers wireless connectivity, while Ethernet connections use cables. The former offers mobility, while the latter offers stability.
Regarding speed, Ethernet no doubt emerges as the winner, but the margin is getting narrower by the day due to advancements in wireless technology. So, if you are facing slow Internet problems in Windows 11, switching to Ethernet might work.
These are the most effective fixes for this inconvenience in Windows 11 and all the other relevant information that might be useful when facing it.
Also, see how you can solve issues that cause the Wi-Fi to disappear in Windows 11.
Now you better understand why your Windows 11 download speed is slow or why your Windows 11 Wi-Fi is so slow or unresponsive.
Besides, if you find slow Internet after the Windows 11 update, uninstalling the previously installed version of the OS may do the trick.
When you notice that the downloads are slow or your Windows 11 upload speed is just as slow, this guide will surely be useful.
Always remember that it is better to check your Windows 11 network speed before engaging in any troubleshooting process.
Tell us which fix worked in the comments section below or whether you had to upgrade the plan.




User forum
0 messages