The extended attribute file on the mounted file system is corrupt [Fix]
10 min. read
Updated on
Read our disclosure page to find out how can you help Windows Report sustain the editorial team. Read more

ERROR_EA_FILE_CORRUPT is a system error and it usually appears when there’s a file corruption on your PC. This error usually comes with The extended attribute file on the mounted file system is corrupt message, and today we’re going to show you how to fix this error on Windows 10.
How to fix ERROR_EA_FILE_CORRUPT error?
Fix – ERROR_EA_FILE_CORRUPT
Solution 1 – Install the latest updates
Before we start fixing this problem, we highly recommend you to install the latest Windows updates. Windows 10 is a great operating system, but it has a few bugs. Microsoft is working hard to fix these bugs, and the best way to keep your PC bug-free is to keep Windows 10 up to date. By default, Windows 10 automatically installs the necessary updates, but sometimes it can happen that you miss an important update. To fix this problem it’s advised to check for updates manually. This is rather simple and you can do it by following these steps:
- Press Windows Key + I to open the Settings app.
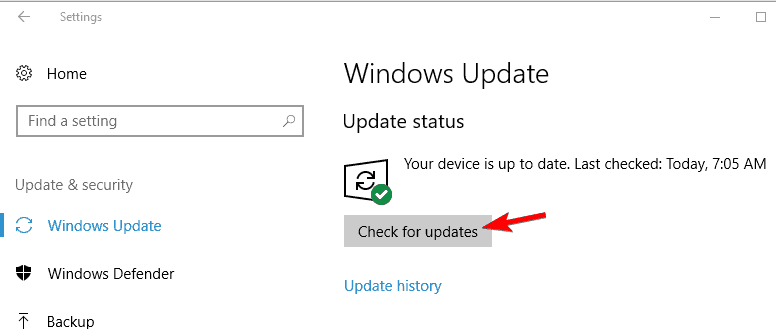
- Go to Update & security section and click on Check for updates button.
- Windows 10 will check for updates. If updates are available, it will download and install them in the background.
After you install the necessary updates, check if the problem still persists. If the error still appears, proceed to the next solution.
Solution 2 – Temporarily disable your antivirus
In some cases your antivirus software can interfere with your system and cause this and other errors to appear. To check if your antivirus is causing the problem, you can try disabling it and check if that helps. If you don’t want to disable your antivirus software completely, you might want to try changing its configuration. Sometimes certain features of your antivirus can interfere with your operating system and cause this and other errors to appear. To fix the issue, you need to check your antivirus settings and disable the problematic features. This isn’t the simplest task, and you might have some problems finding and disabling the problematic feature on your own.
Alternatively, you can uninstall your antivirus and check if that solves the problem. Keep in mind that antivirus applications can leave certain files behind after you remove them. To ensure that all files are removed, you need to use a dedicated removal tool. Antivirus companies offer these tools for free, so be sure to download the one for your antivirus.
If uninstalling the antivirus fixes the problem, you might want to consider switching to a different antivirus software or updating your antivirus to the latest version.
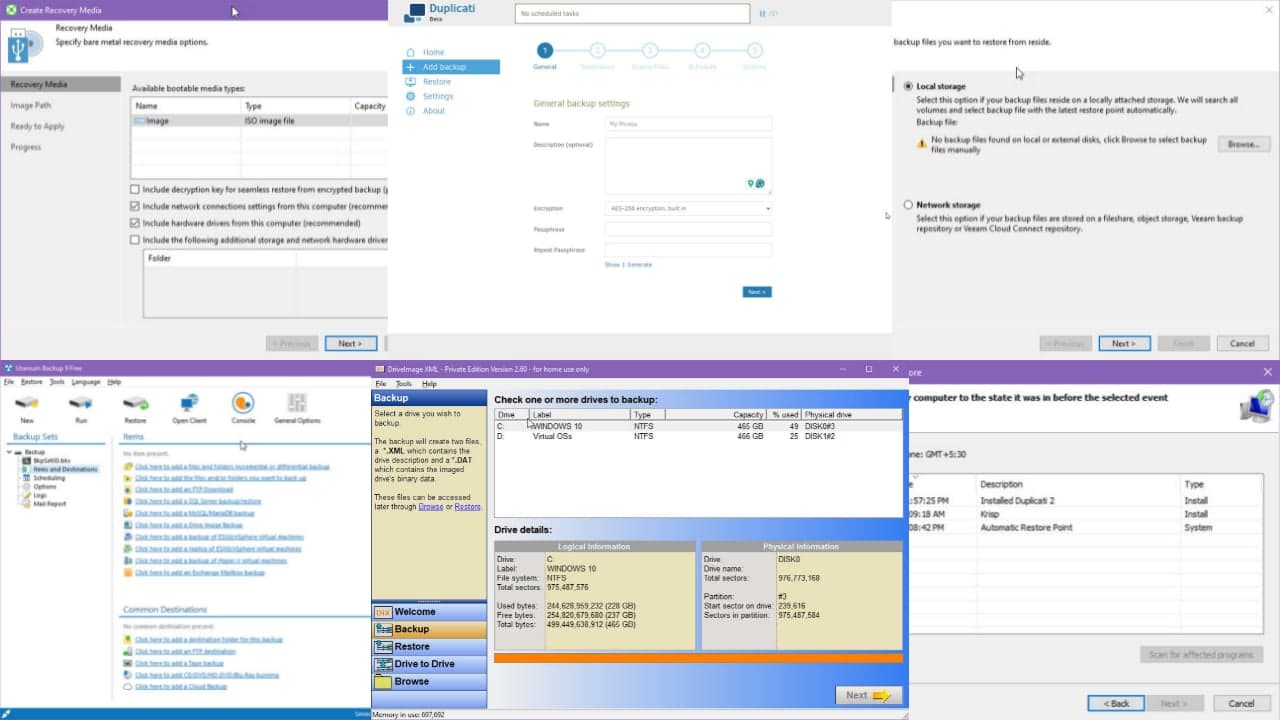
Solution 3 – Copy your files from a backup
According to users, this problem can appear due to corrupted files. However, you might be able to fix it by restoring your system from a backup. This is relatively simple in Widows 10, but in order to use this solution you need to have a system backup ready.
Windows 10 comes with Backup and Restore feature that allows you to create your system image and use it as a backup. Using this feature you might be able to restore the corrupted files and fix the problem. Keep in mind that this solution requires you to have a backup ready, but if you don’t you can skip this solution since it doesn’t apply to you.
Solution 4 – Enter Safe Mode
Safe Mode is a special segment of Windows, and it’s perfect for troubleshooting. Safe Mode uses only the default drivers and applications, so if this problem is caused by a third-party app you’ll be able to tell that from Safe Mode. To enter Safe Mode, do the following:
- Open Start Menu and click on Power button. Press and hold the Shift key on your keyboard and choose Restart from the menu.
- Choose Troubleshoot > Advanced options > Startup Settings from the menu. Now click on the Restart button.
- List of options will now appear. Select any version of Safe Mode by pressing the appropriate keyboard key.
Once you enter Safe Mode check if the problem still appears. If not, it’s possible that the cause of the error is a third-party application.
- READ ALSO: Read Apple and Linux file systems on Windows with this tool
Solution 5 – Perform a Clean Boot
As we already mentioned, sometimes third-party applications can cause this problem to appear. Third-party apps can sometimes start automatically with Windows, so you’ll encounter this problem as soon as you start your PC. To find which application is causing the problem, you need to perform a Clean boot. This is relatively simple and you can do it by following these steps:
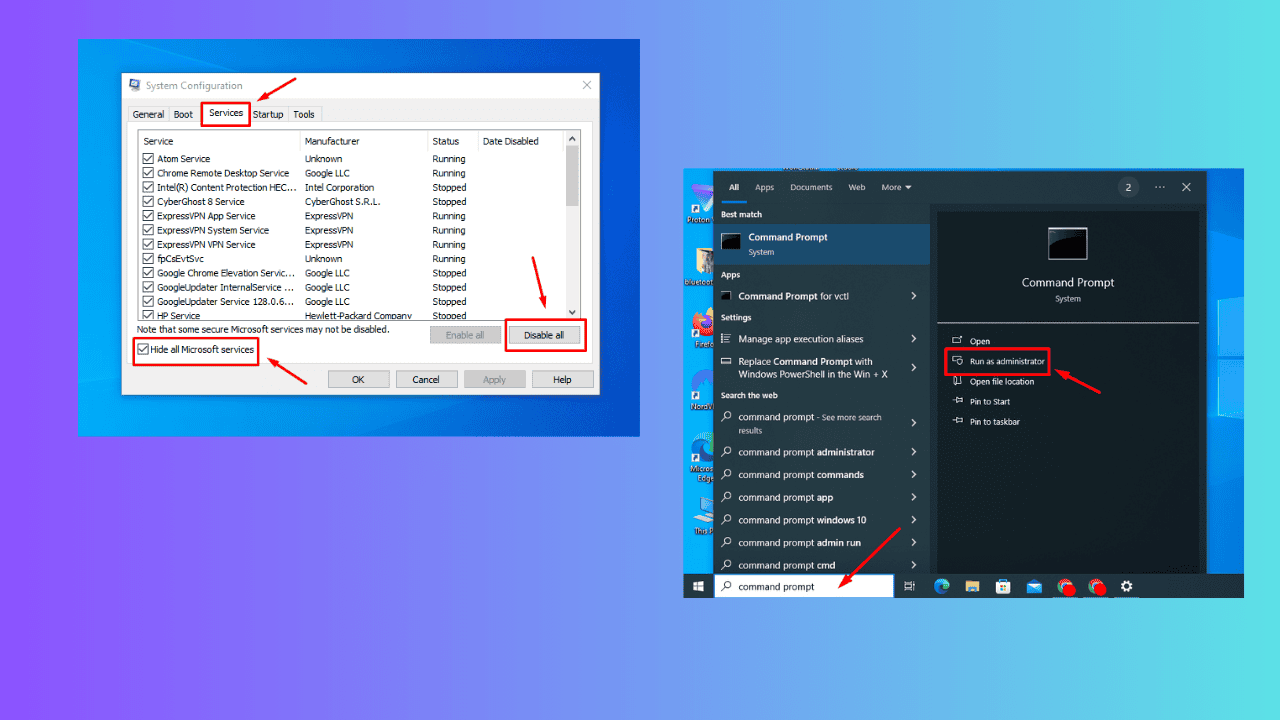
- Press Windows Key + R and enter msconfig. Press Enter or click OK.
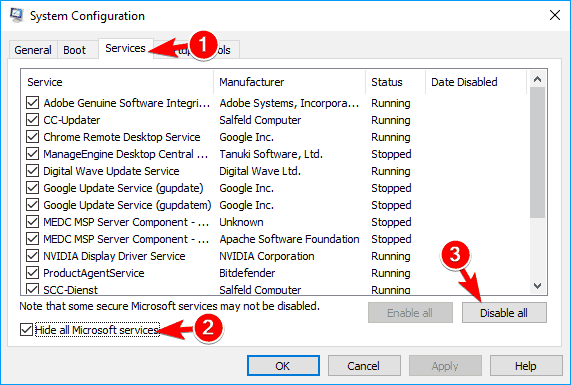
- Navigate to the Services tab. Check Hide all Microsoft services option and click on Disable all.
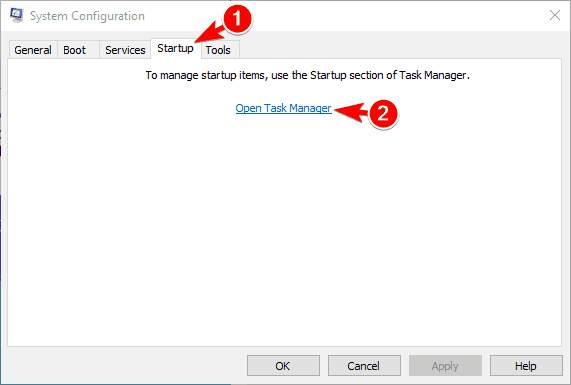
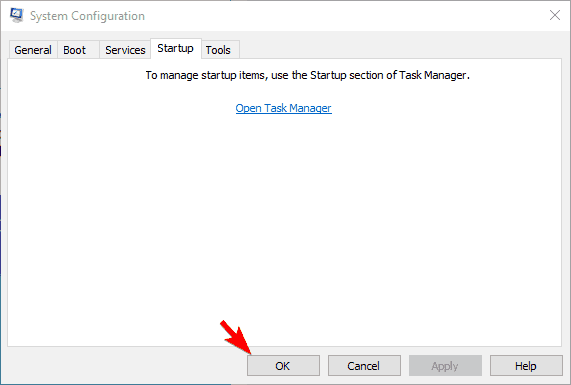
- Navigate to the Startup tab and click on Open Task Manager.
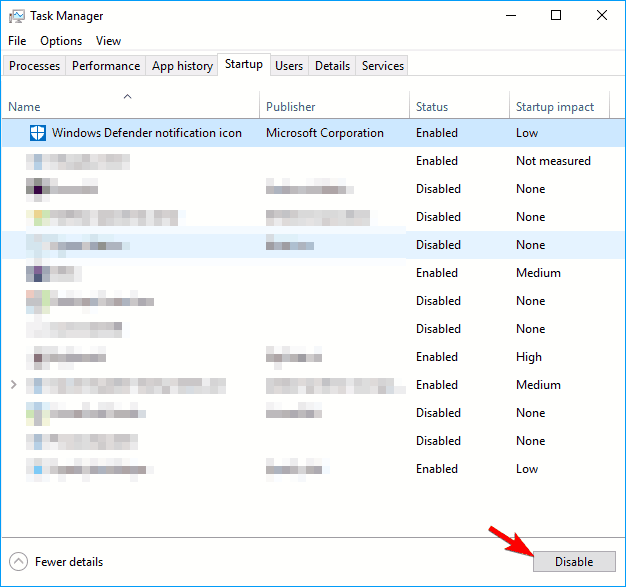
- When Task Manager opens, you’ll see a list of all startup applications. Select each application on the list and click on Disable button.
- After disabling all startup applications go back to System Configuration window and click on Apply and OK to save changes.
- After doing that, restart your PC to apply the changes.
Once your PC restarts check if everything is in order. If the error message doesn’t appear, it’s most likely that one of the disabled applications or services is causing the problem. To find out which application is the cause, repeat the same steps but enable applications one by one or in groups. After enabling a group of applications, restart your PC and check if the problem appears again.
Keep enabling applications and services until you find the problematic application. After you find it, you can keep it disabled, uninstall it or update it to the latest version and check if that solves the problem.
Solution 6 – Create a new user account
If this error keeps appearing on your PC, you might be able to fix it by creating a new user account. Sometimes your user account can be corrupted or not properly configured and that can lead to this error. To create a new user account, you need to do the following:
- READ ALSO: Fix: Corrupted system files on Windows 10
- Open the Settings app.
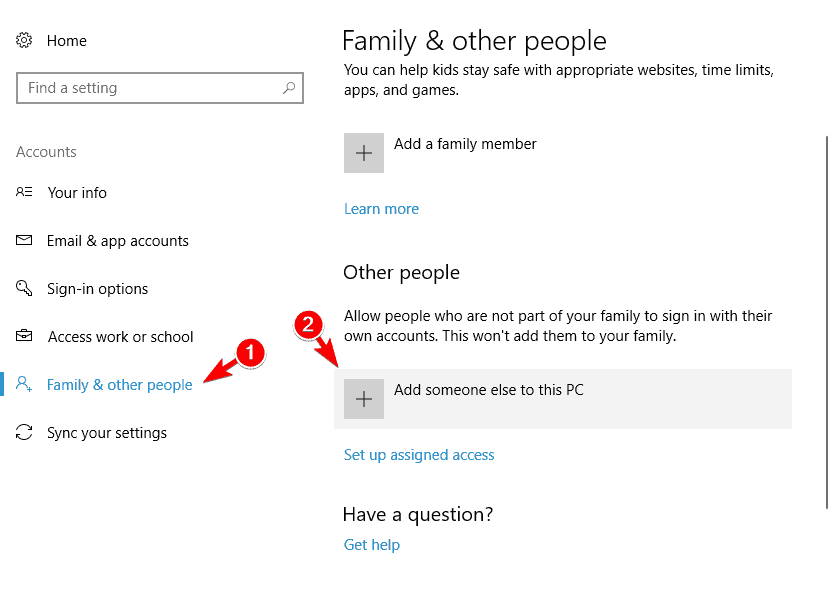
- Go to Accounts section. Select Family & other people from the left pane and click on Add someone else to this PC.
- Click on I don’t have this person’s sign-in information.
- Select Add a user without a Microsoft account.
- Enter the desired user name and click on Next.
After you create a new user account, switch to it and check if the problem appears. If the issue doesn’t appear on a newly created account, you need to move your personal files to it and start using it as your main account.
Solution 7 – Perform an SFC scan
If you’re getting The extended attribute file on the mounted file system is corrupt message, you might be able to fix it by performing an SFC scan. By doing that you’ll scan your system and repair the corrupted files. This is rather simple, and you can do it by following these steps:
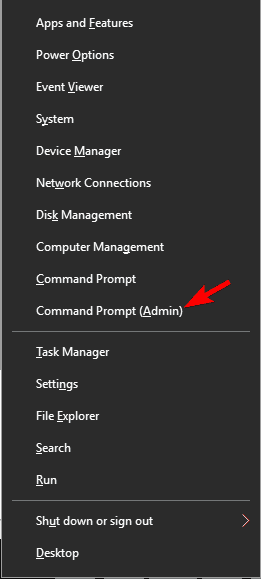
- Press Windows Key + X to open Win + X menu and select Command Prompt(Admin).
- When Command Prompt opens, enter sfc /scannow and press Enter to run the command.
- The scanning process will now start. This process can take a while, so don’t interrupt it.
After the scanning is completed, check if the problem still appears. If SFC scan can’t fix the problem, you might want to run DISM scan instead. To do that, follow these steps:
- Start Command Prompt as an administrator.
- Enter the following commands:
- DISM /Online /Cleanup-Image /CheckHealth
- DISM /Online /Cleanup-Image /ScanHealth
Keep in mind that these scans can take a while, so don’t interrupt them.
- If any of these scans finds corrupted files, you need to enter DISM /Online /Cleanup-Image /RestoreHealth command and wait for it to fix the problem. This process can take about 20 minutes or more, so don’t interrupt it.
After the scanning is finished check if the error is resolved.
Solution 8 – Perform System Restore
System Restore is a useful feature of Windows that allows you to restore your PC and fix many problems. If this problem started appearing recently, you might be able to fix it by using this method. To restore your PC, do the following:
- Press Windows Key + S and enter system restore. Choose Create a restore point from the menu.
- System Properties window will appear. Click on System Restore button.
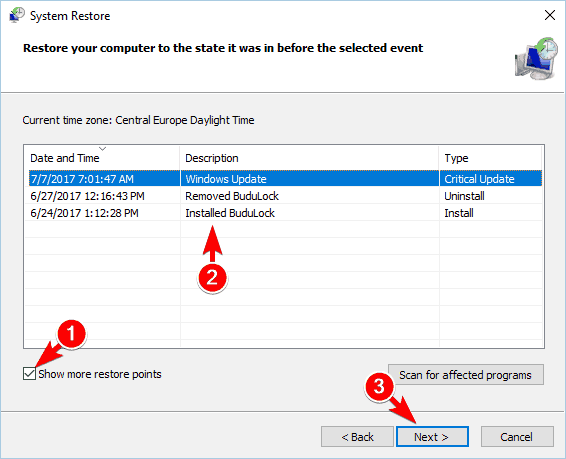
- Once System Restore starts, click on Next. If available, check Show more restore points option. Select the desired restore point and click on Next.
- Follow instructions on the screen to restore your PC.
Solution 9 – Reset Windows 10
If the error still appears, you might want to consider resetting Windows 10 as a final solution. Windows 10 reset is similar to clean install since it will remove all your files from your system drive. To avoid any file loss, we strongly advise you to create a backup before resetting Windows.
We also have to mention that this method might require a Windows 10 installation media so be sure to create one using Media Creation Tool. After creating your backup and installation media you can reset Windows 10 by doing the following:
- Open the Start Menu, press and hold the Shift key, click the Power button, and choose Restart from the menu.
- Choose Troubleshoot > Reset this PC > Remove everything. If you’re asked to insert Windows 10 installation media be sure to do so.
- Select your version of Windows and choose Only the drive where Windows is installed > Just remove my files.
- You’ll see a list of changes the reset will perform. Once you’re ready to start, click on Reset.
- Follow the instructions on the screen to complete the process.
After you finish the process you’ll have a clean installation of Windows 10. Now you just have to install all your apps and move the personal files from the backup. This is a drastic solution since it will delete all files from your system drive, so use it as a last resort.
The extended attribute file on the mounted file system is corrupt message and ERROR_EA_FILE_CORRUPT error can cause some problems on your PC. These aren’t serious errors, and you should be able to fix them by using one of our solutions.
READ ALSO:
- Fix: “You’ll need a new app to open this ms-windows-store” error
- Fix ‘Your OneDrive folder can’t be created in the location you selected’
- Blank page when printing from Internet Explorer [FIX]
- “PC stuck on Getting Windows ready, Don’t turn off your computer screen” error [Fix]
- “Windows Store configuration may be damaged” error [Fix]








User forum
0 messages