FIX: The system cannot find file specified on Windows 10/11
29 min. read
Updated on
Read our disclosure page to find out how can you help Windows Report sustain the editorial team Read more
Key notes
- The system cannot find the file specified error on Windows 10 is pretty common and it really contains the description. We've got the complete solution for you in the article below.
- First step to fix this error is to scan the registry. You can choose another one from our top 12 registry cleaners for Windows 10.
- If you encounter any other system errors, you will probably find a solution in our System Errors hub.
- Check out our Windows 10 errors hub for more solutions to such issues.
Computer errors can prevent you from running your favorite applications or from accessing your files.
Speaking of errors, users reported The system cannot find the file specified error on Windows 10.
According to users, they are getting this error while trying to access certain files, so today we’re going to show you how to fix it.
- Change your registry
- Open the Libraries folder
- Install the latest updates
- Format your USB flash drive
- Use chkdsk
- Use WinRAR
- Delete ProfileImagePath key
- Enable Automount
- Check if your system partition is active
- Change shadowcopy storage area
- Add a printer manually
- Copy the files manually
- Uninstall all HP applications
- Change the drive letter for System Reserved partition
- Delete the Config value from the registry
- Use download manager
- Check if necessary services are running
- Check if your USB port is powered
- Remove Windows.old folder
- Restart Windows Backup service
- The system cannot find the file specified cmd
- Fix – The system cannot find the file specified uTorrent
- The system cannot find the file specified virtual disk manager
How can I fix The system cannot find the file specified on Windows 10?
Solution 1 – Change your registry
According to users, you can fix this error simply by making few changes to your registry.
Modifying the registry comes with certain risks, therefore we strongly advise that you export your registry and create its backup, just in case. To modify the registry, do the following:
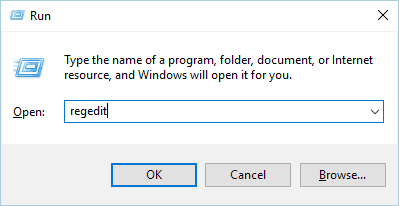
- Press Windows Key + R and enter regedit. Press Enter or click OK.
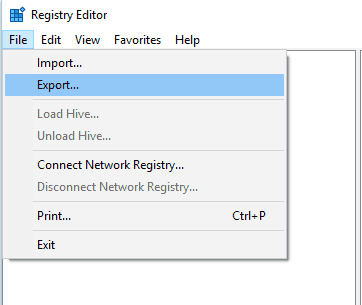
- Optional: To export your registry, click File > Export.
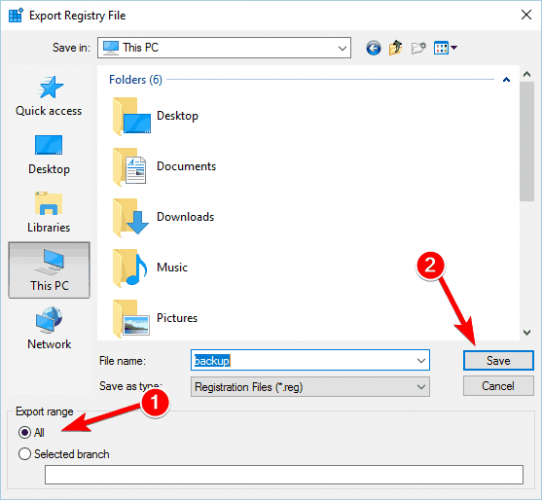
Now enter the file name for your backup, and select All in Export range section. Click the Save button to export your registry.
In case anything goes wrong, you can simply run this file in order to restore your registry to its original state. - Once Registry Editor opens, navigate to the HKEY_LOCAL_MACHINESOFTWAREMicrosoftWindowsCurrentVersion key in the left pane.
- Expand the key and look for RunOnce key. If this key isn’t available, you need to create it. To do that, just right click the CurrentVersion key and choose New > Key from the menu.
- Enter RunOnce as the name of the new key.
- Navigate to the HKEY_CURRENT_USERSoftwareMicrosoftWindowsCurrentVersion key in the left pane.
- Expand the key and check if RunOnce key is available. If not, repeat the procedure from Step 4 to create it.
- Close Registry Editor and restart your PC.
After your PC restarts, The system cannot find the file specified error should be resolved completely.
Once again, we have to mention that modifying the registry can lead to certain issues, so be extra cautious and be sure to create a backup.
Solution 2 – Open the Libraries folder
According to users, you might be able to fix this problem simply by navigating to the Libraries folder.
This folder is hidden by default in Windows 10, and in order to access it, you need to do the following:
- Open File Explorer.
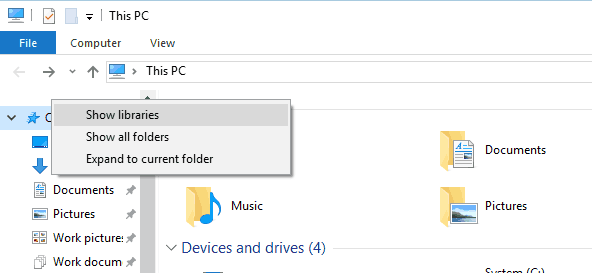
- In the left pane, right click the empty space and choose Show libraries option.
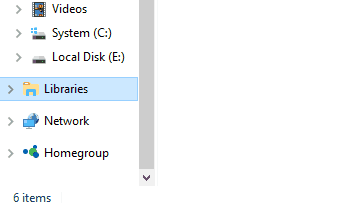
- After doing that, Libraries folder will appear in the left pane, and you’ll be able to access it easily.
Users reported that accessing the Libraries folder fixed the issue for them, so be sure to try this simple solution.
If you need more info on how to enable Libraries in Windows 10, check out this simple guide.
Solution 3 – Install the latest updates
According to users, this was an issue in the past, but you can easily fix it by installing the latest updates.
Windows updates often fix both hardware and software errors, therefore we strongly suggest that you install the latest updates.
Windows 10 usually installs the updates automatically, but you can also check for updates manually by following these steps:
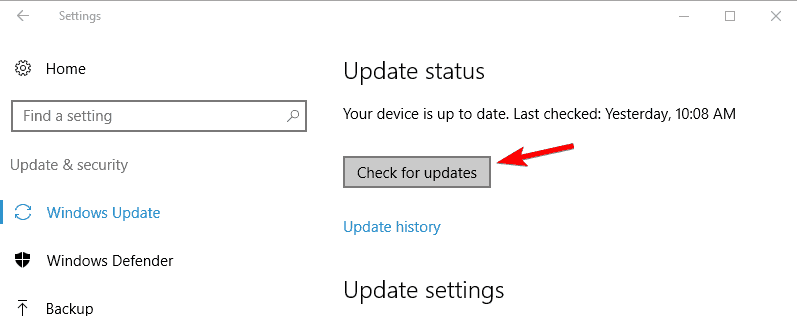
- Press Windows Key + I to open the Settings app.
- Navigate to the Update & security section and click Check for updates button.
Windows 10 will now check if updates are available. If so, it will download and install the updates automatically.
If you can’t open the Setting app, take a look at this article to solve the issue.
Having trouble updating your Windows? Check out this guide that will help you solve them in no time.
Solution 4 – Format your USB flash drive
Users reported The system cannot find the file specified error while inserting their USB flash drive. This issue can also appear with any removable storage, and in order to fix it, you need to format your drive.
To do that, follow these steps:
- Switch to a different computer that can recognize your USB flash drive. Connect the USB flash drive. If you can, be sure to back up all your files.
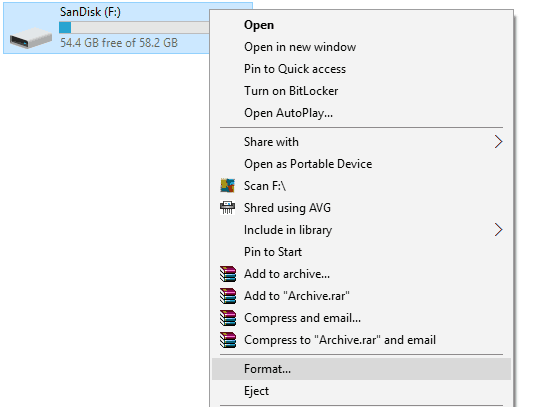
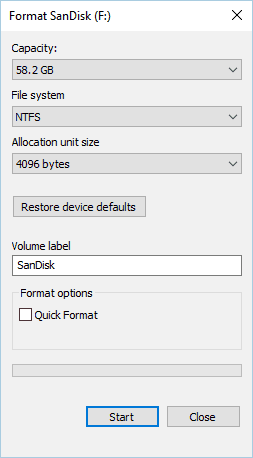
- Open This PC and locate your USB flash drive. Right-click the USB flash drive and choose Format from the list.
- When the Format window opens, make sure to uncheck Quick Format option.
- Now click the Start button to start the formatting process. Wait for the formatting process to finish.
By disabling the Quick Format option all your files will be completely removed and unrecoverable.
Some users are also suggesting to use ImageUSB software.
This software will format your drive and fill it with zeroes thus fixing this problem. Keep in mind that this process can take a while, so you’ll have to be patient.
If you encounter the Windows cannot format this drive error, follow the quick steps from this guide to solve the issue.
Solution 5 – Use chkdsk
If you’re getting The system cannot find the file specified error, that might be because the file is damaged or corrupted. To fix this problem, you need to run chkdsk command and scan your files.
This is relatively simple, and you can do it by following these steps:
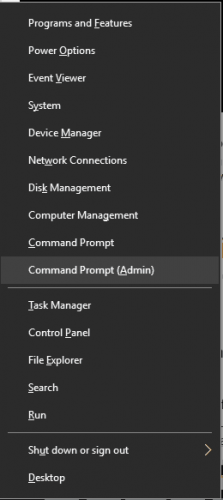
- Press Windows Key + X to open Win + X menu and choose Command Prompt (Admin) from the list.
- When Command Prompt opens, enter chkdsk /f X:. Be sure to replace X with the appropriate letter that matches your partition. Press Enter to run the command.
- Wait while chkdsk tries to repair your files.
chkdsk is giving you headaches? Check out this quick guide to fix any issues with it.
Solution 6 – Use WinRAR
According to users, The system cannot find the file specified error appears when trying to delete a specific file or folder.
If that’s the case, you might be able to fix the problem by using WinRAR. To fix the problem, do the following:
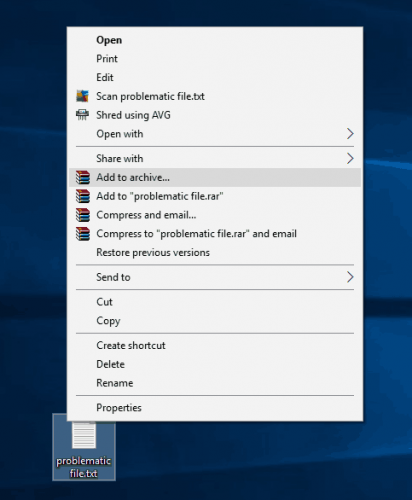
- Locate the problematic file and right click it. Choose Add to archive option from the menu.
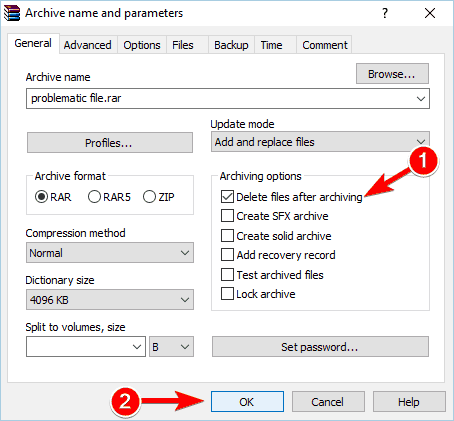
- Check Delete files after archiving option and then click the OK button.
Your file will be moved to the archive and the original will be deleted from the hard drive. Now you can just delete the archive to completely remove the file.
Solution 7 – Delete ProfileImagePath key
The system cannot find the file specified error can occur while using Windows Backup, and it will prevent you from creating your backup.
According to users, you might be able to fix this problem by deleting certain values from your registry.
Changing the registry can lead to stability issues, so before you make these changes, we strongly advise you to back up your registry and create a System Restore point.
To delete this key from the registry, do the following:
- Open Registry Editor. You can do that by following steps from Solution 1.
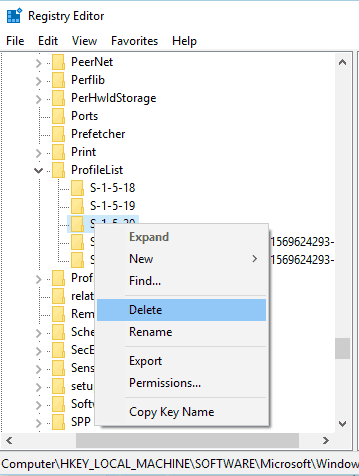
- Once Registry Editor opens, navigate to HKEY_LOCAL_MACHINESOFTWAREMicrosoftWindows NTCurrentVersionProfileList path in the left pane.
- Expand the ProfileList key. You’ll see several subkeys available. Navigate through each subkey and check if the key has ProfileImagePath value available on the right pane.
- If certain subkey doesn’t have ProfileImagePath value available or if its Data is empty, you need to delete that subkey. To do that, right click it and choose Delete from the menu.
After deleting the problematic profile, close Registry Editor and check if the issue is resolved.
As we already mentioned, modifying the registry can lead to certain issues, therefore we strongly recommend that you create a backup before making any changes.
Solution 8 – Enable Automount
If this problem appears while using Windows Backup, you can fix it by using diskpart and automount commands.
Diskpart is a powerful tool for hard drive management, so be extra cautious while using it.
By using this tool you can cause damage to your system, so keep in mind that you’re using this tool at your own risk. To run diskpart on Windows 10, follow these steps:
- Open Command Prompt as administrator. For detailed instructions on how to do that, check Solution 5.
- When Command Prompt opens, enter diskpart and press Enter.
- Enter the following lines into Command Prompt:
- automount
- automount enable
- Close Command Prompt and restart your PC.
If the issue still persists, you need to do the following:
- Open Command Prompt and start diskpart again.
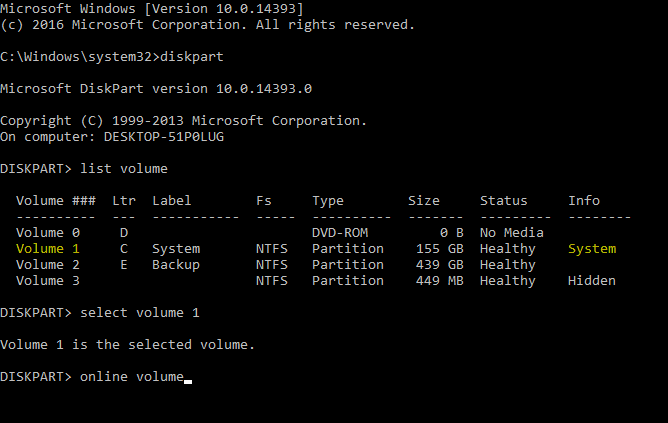
- When diskpart starts, enter list volume. List of all partitions will now appear.
- Select your system volume. In our case, that’s Volume 1, so we need to enter select volume 1. If your system volume is labeled by a different number, be sure to use that number to select it.
- Type online volume and press Enter.
- Close Command Prompt and restart your PC.
After your PC restarts, check if the issue is resolved. Once again, diskpart is powerful tool, and if you’re not careful you can delete files or make your system unbootable, so be extra cautious with it.
Solution 9 – Check if your system partition is active
The system cannot find the file specified error can occur while using Windows Backup. To fix the issue, you need to check if your system partition is set to active. To do that, follow these simple steps:
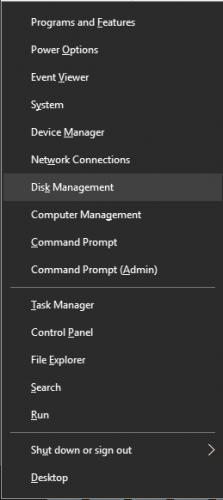
- Press Windows Key + X and choose Disk Management from the menu.
- Disk Management will now start. Locate your System drive, in most cases it should have a C label assigned to it, and right-click it. Choose Mark Partition as Active option. If you can’t select this option, it means that your system drive is already set to active.
- Close Disk Management and restart your PC.
Disk Management won’t load on Windows 10? Count on us to solve the problem.
Solution 10 – Change shadowcopy storage area
If The system cannot find the file specified error appears on your PC, you can fix it by changing the shadowcopy storage area size.
This can be a risky procedure, so we advise you to create a backup just in case.
To change shadowcopy storage area, you need to do the following:
- Open Command Prompt as administrator.
- When Command Prompt opens, enter the following line vssadmin list shadowstorage.
- Now you’ll be able to see shadowstorage area and the amount of space that it takes. To increase its size, enter vssadmin resize shadowstorage /For=C: /MaxSize=5%.
- After doing that, restart your PC.
If the issue still persists, open Command Prompt again and enter vssadmin delete shadows /all command.
Solution 11 – Add a printer manually
Few users reported that this issue occurs while trying to add a printer. If you have the same problem, you might want to try adding the printer manually.
This is a simple procedure, and you can do it by following these steps:
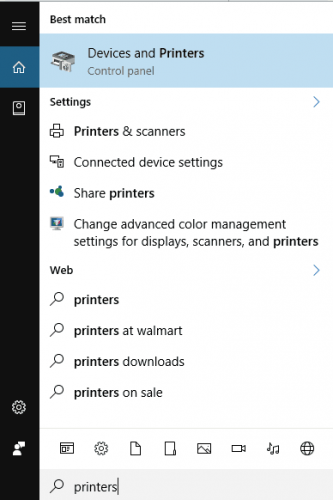
- Press Windows Key + S and enter printers. Select Devices and Printers from the menu.
- From the menu on the top select Add a printer option.
- Now you just need to follow the instructions on the screen to add your printer manually.
According to users, this error occurs while installing HP printers, but if you have this problem with any other printer, be sure to try this solution.
Solution 12 – Copy the files manually
Apparently this error can occur while trying to install certain devices, and users reported The system cannot find the file specified error while installing an Epson scanner.
Few users were able to solve this issue simply by finding the missing file in Windows folder and copying it to the appropriate location.
According to users, they fixed the problem with their device by finding the usbscan.sys file in Windows folder and copying it to Windowsinfsetupapi.dev folder.
This solution only works for particular devices, and you’ll mostly need to transfer a different file on your PC.
We have to warn you that making changes in Windows folder can be dangerous, so be sure to create a backup if you plan to make changes to Windows directory.
Can’t use copy paste in Windows 10? Follow this guide and fix the issue quickly.
Solution 13 – Uninstall all HP applications
According to users, this error appears while installing a printer driver on some HP laptops.
If you’re getting The system cannot find the file specified error, you might be able to fix it by uninstalling all HP applications. To do that, follow these steps:
- Download Microsoft’s Program Install and Uninstall tool.
- Run the application and remove all HP applications from your PC.
- After doing that, try to download and install the driver again.
Need more info on how to uninstall programs and apps in Windows 10? Take a look at this guide.
Few users reported the same problem, and according to them, the error is caused by McAfee antivirus. To fix the issue, you need to disable McAfee by following these steps:
- Open McAfee Internet Security.
- Click on Change settings.
- Now click on Real Time Scanning.
- Turn Real Time Scanning off and try to download and install the drivers again.
Solution 14 – Change the drive letter for System Reserved partition
The system cannot find the file specified error can appear while trying to use Windows Backup. If that’s the case, you might be able to fix the problem by revealing System Reserved partition.
We have to mention that changing System Reserved partition settings can lead to certain issues, so keep in mind that this procedure isn’t risk-free. To make the necessary changes, follow these steps:
- Press Windows Key + X and select Disk Management.
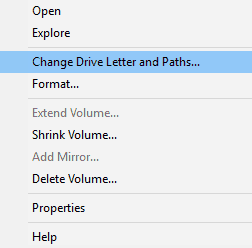
- Locate the System Reserved partition and right click it. Choose Change Drive Letter and Paths from the menu.
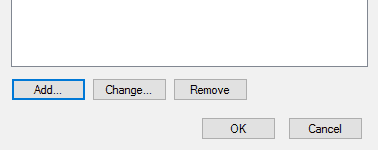
- Click the Add button.
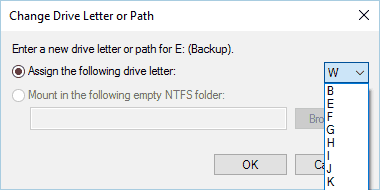
- Select Assign the following drive letter and choose a letter from the drop down menu. We suggest that you use letter such as Z or W.
- Once you’re done, click OK to save changes.
Close Disk Management and check if the issue is resolved. We have to mention that System Reserved partition will remain visible, so don’t make any changes to it.
This isn’t the best solution, but it’s a solid workaround that might work for some users.
Solution 15 – Delete the Config value from the registry
According to users, The system cannot find the file specified error can appear while trying to reinstall network driver. If that’s the case, you need to open Registry Editor and delete a single value from it.
Before making any changes, we advise you to check Solution 1 to see how to back up your registry. To remove the problematic key, do the following:
- Open Registry Editor.
- In the left pane, navigate to the HKEY_LOCAL_MACHINESYSTEMCurrentControlSetControlNetworkConfig key. If you can’t find this key in your registry, we advise you to skip this solution.
- Right click the Config key and choose Delete from the menu.
- After doing that, restart your PC and check if the issue is resolved.
Solution 16 – Use download manager
Few users reported that this problem appears while trying to install downloaded applications.
If you’re getting The system cannot find the file specified error while trying to install certain application, you might want to redownload the setup file.
Users reported that using a download manager such as Internet Download Manager fixed the issue for them so we advise you to try that.
Sometimes your download can become damaged or corrupted, so be sure to try using a download manager.
Looking for the best download managers for Windows 10? Check out this list with our top picks.
Solution 17 – Check if necessary services are running
This error can appear with almost any software, and users reported The system cannot find the file specified error while using VMware.
To fix the problem, you need to start appropriate VMware services, and you can do that by following these steps:
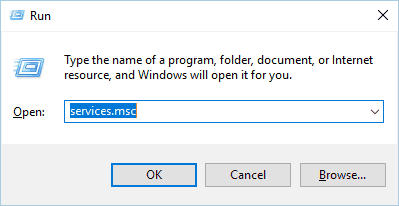
- Press Windows Key + R and enter services.msc. Press Enter or click OK.
- When Services window opens, locate VMware Authorization Service on the list. Right-click this service and choose Start from the menu.
- After starting the service, close the Services window and check if the issue is resolved.
Another way to start VMware services is to use Command Prompt. This method is faster, and you can perform it by following these steps:
- Start Command Prompt as administrator.
- When Command Prompt opens, enter net start vmx86 and press Enter to run it.
- After the command is executed, close the Command Prompt and check if the problem is resolved.
If the issue still persists, you might have to completely reinstall VMware and check if that solves the problem.
Solution 18 – Check if your USB port is powered
Apparently this issue appears while using Windows Backup feature. To fix The system cannot find the file specified error, it’s advised to connect any external hard drives to powered USB ports.
Few users reported that you can fix the issue simply by connecting an external hard drive to a different port.
It seems that Windows Backup feature requires external storage to be connected to a powered USB port.
After connecting the device to a different USB port, check if the issue is resolved.
Solution 19 – Remove Windows.old folder
According to users, The system cannot find the file specified error can appear due to Windows.old folder.
Windows.old folder appears if you upgrade your Windows or if you perform a clean install of Windows 10.
This folder holds your previous Windows installation, and it allows you to restore it.
Windows.old folder can cause this error to appear while using Windows Backup feature, and to fix the problem, you need to remove Windows.old folder.
This is relatively simple, and you can do it by following these steps:
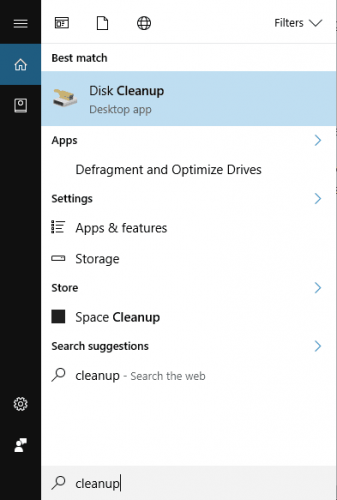
- Press Windows Key + S and enter cleanup. Select Disk Cleanup from the list of results.
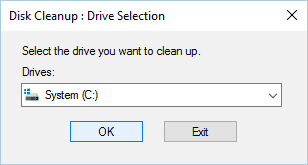
- Select your C drive and click OK. Windows 10 will now scan your PC.
- Select Previous Windows installation(s) option and click OK.
- Wait while Windows removes the selected files.
After removing Windows.old folder from your PC, check if the problem is resolved.
If you need more info on how to delete the Windows.old folder on Windows 10, check out this dedicated guide.
Solution 20 – Restart Windows Backup service
If you’re getting The system cannot find the file specified error message while trying to run Windows Backup, we recommend that you restart Windows Backup service. To do that, follow these steps:
- Open the Services window by following steps from Solution 18.
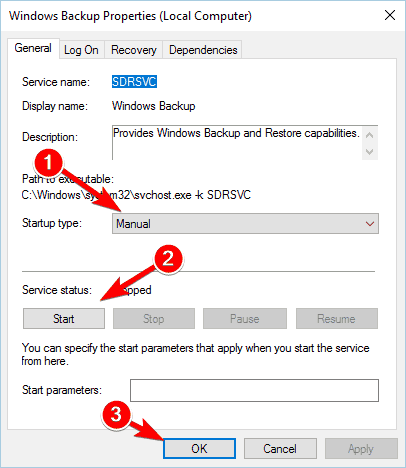
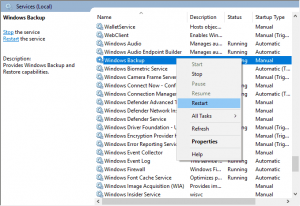
- When Services window opens, locate Windows Backup service and double click it.
- Set the Startup type of this service to Manual. If the service isn’t running, click the Start button to start it again. Now click Apply and OK to save changes.
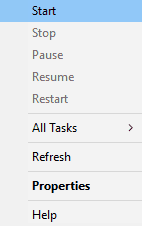
- In Services window, right click Windows Backup and choose Restart from the menu. After doing that, close Services window.
Some users are also recommending to remove Samsung Magician software from your PC. +If you have this software installed, remove it and check if that solves the issue.
How can I fix The system cannot find the file specified error?
Solution 1 – Move the problematic file
According to some users, you might be able to fix this problem simply by moving the problematic file to a different folder.
Users reported that moving the problematic file to the root folder, such as C: for example, fixed the issue for them. This is a simple workaround, but it might fix the issue for you, so feel free to try it out.
Can’t move a certain file in Windows 10? Follow this guide and solve the problem easily.
Solution 2 – Remove problematic software
Some users reported that The system cannot find the file specified error appears every time they start their PC. This can be quite annoying, and according to users, you can fix this problem simply by removing the problematic applications.
It seems that this problem is caused by Apple software, Real Player and Spybot Search & Destroy. If you have any of these programs installed, we advise you to remove them in order to fix this problem. To do that, you need to follow these steps:
- Press Windows Key + I to open the Settings app.
- Navigate to the System section and choose Apps & features tab.
- Locate any of the previously mentioned applications and remove it from your PC.
After uninstalling the problematic applications, you can run CCleaner and use it to remove any remaining files related to these apps. Lastly, restart your PC and check if the error message appears again.
Solution 3 – Use bcdedit command properly
Several users reported The system cannot find the file specified error message while trying to run bcdedit command in Command Prompt. This usually occurs if you’re not starting this command properly. To fix the issue, you need to do the following:
- Open Command Prompt as administrator.
- Now enter bcdedit /store c:BootBCD followed by a command that you want to perform. In order to use bcdedit command in Windows 10, you need to enter bcdedit /store c:BootBCD instead of bcdedit every time.
Solution 4 – Show file extensions
Sometimes you might get The system cannot find the file specified error message in Command Prompt if you don’t know the file’s exact extension.
By default, Windows 10 hides file extensions from the user, and this can sometimes lead to certain problems. For example, let’s assume that you have a file called file.txt.
This might look like a normal text file, but let’s see what happens if we enable file extensions for files. To do that, simply click the View tab and check File name extensions.
Now let’s see how our file.txt looks like. After revealing the file extensions, the full name of the file is file.txt.txt.
If you try to access file.txt.txt instead of file.txt in Command Prompt, you’ll see that it works without any issues. There’s also another way to check the file extension of your files in Command Prompt.
Simply navigate to the desired folder in Command Prompt and enter dir command.
List of all directories and files in that folder will now appear. As you can see, you can now easily find the full name and extension of any file in that directory.
This isn’t an error, and it’s more of a beginner’s mistake. In the future, before trying to access a certain file, be sure to check for its full name by using the dir command or by revealing file extensions.
Need more info on how to show file extensions in Windows 10? Take a look at this useful guide.
How can I fix The system cannot find the file specified error in uTorrent?
Solution 1 – Delete the problematic torrent
If you’re getting The system cannot find the file specified error while using uTorrent, you might be able to temporary fix it by using this solution. To fix the problem, follow these simple steps:
- Open uTorrent.
- Now locate the torrent that is giving you this message, right click it and choose Remove And Delete .torrent + Data option.
- After doing that, try to download the same torrent again.
Keep in mind that this is just a temporary workaround, so it’s quite possible that the same error message will appear again.
We also have to warn you that this method will completely delete the torrent and all associated files from your PC.
If you’re getting the System cannot find path uTorrent error in Windows 10, follow this article to solve the problem.
Solution 2 – Check the torrent’s download folder
Sometimes The system cannot find the file specified error occurs if your download folder path isn’t correct. To fix this issue, be sure to manually select the download folder for each torrent.
To do that, follow these steps:
- Right click the problematic torrent.
- From the menu select Advanced > Set Download Location.
- Now select the correct download folder.
- Repeat these steps for all affected torrents.
Alternatively, you can set a default download folder for all torrents by doing the following:
- Open uTorrent and choose Options > Preferences.
- Now navigate to the Directories tab.
- Select Put new downloads in option and choose the desired folder.
After doing that, the error message should be completely resolved.
Solution 3 – Perform a Disk Cleanup
According to users, you can fix The system cannot find the file specified in uTorrent simply by performing a Disk Cleanup.
Sometimes temporary files or old Windows installations can interfere with uTorrent and cause this error to appear.
Several users reported that Disk Cleanup fixed their problem, so we suggest that you try it out.
Regarding Disk Cleanup, we already explained how to perform it in one of our previous solutions, so be sure to check it out.
While performing Disk Cleanup be sure to select all available options in order to remove all unnecessary and old files.
Solution 4 – Delete uTorrent installation manually
Sometimes The system cannot find the file specified error can appear if your uTorrent installation is corrupted.
According to users, uTorrent isn’t available on the list of installed applications, and it starts on its own.
If you have the same problem, and you can’t remove uTorrent, you need to follow these steps:
- Open Task Manager by pressing Ctrl + Shift + Esc.
- When Task Manager opens, locate uTorrent in the Processes tab. Right click it and choose Open file location from the menu.
- uTorrent installation directory will appear, and you’ll be able to remove it manually.
Can’t open Task Manager? Don’t worry, we’ve got the right solution for you.
How can I fix The system cannot find the file specified?
Solution 1 – Use Chromebook Recovery utility
According to users, this error can appear while trying to format specific USB flash drives.
It seems that The system cannot find the file specified affects USB flash drives that are used as Chromebook recovery image holders.
In order to fix the problem, users are suggesting to use Chromebook Recovery utility to erase the USB drive.
After doing that, the flash drive will start working in Windows 10, and the error will be resolved. To fix the problem, follow these steps:
- First, download the Chromebook Recovery utility.
- Connect the problematic USB flash drive to your PC.
- Start the Chromebook Recovery utility.
- Click on Settings and choose Erase recovery media.
- From the dropdown menu select your USB flash drive.
- Click Continue > Erase now.
- Wait for the process to finish and click Done.
After doing that, you’ll be able to format the flash drive once again from your operating system. Keep in mind that this solution only works with USB drives that are used as recovery media for Chromebook.
Solution 2 – Use clean command in diskpart tool
If you’re having The system cannot find the file specified error while using your USB flash drive, you might need to use diskpart to fix it.
This process will remove all files from your flash drive, so create a backup if you need to.
To clean the USB flash drive, do the following:
- Start Command Prompt as administrator.
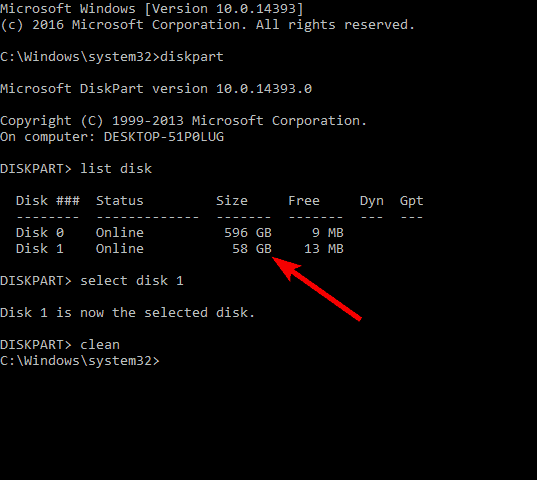
- When Command Prompt opens, enter diskpart and press Enter.
- Now enter list disk command. List of storage devices will appear. Check the size of each drive and be sure to locate your USB flash drive. It’s crucial to select the correct drive or else you’ll delete all files from your hard drive permanently.
- Enter select disk X to select your USB flash drive. In our example we used select disk 1 since disk 1 matches our USB flash drive. Once again, be sure to double check everything and select the correct USB flash drive.
- Now enter clean and diskpart will remove all files from your flash drive.
- Close Command Prompt.
Now your USB flash drive is clean from any files, and in order to use it, you need to format it. To do that, follow these steps:
- Press Windows Key + X and choose Disk Management from the list.
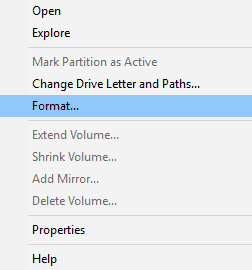
- When Disk Management opens, locate your USB flash drive, right click it and choose Format from the menu.
- Select the desired options and format your drive.
- After the formatting process is completed, close Disk Management.
As you can see, this process is relatively simple, but you need to be extra cautious while using diskpart tool.
Solution 3 – Make changes to your registry
The system cannot find the file specified error appears for some users while inserting a USB flash drive to their PC. To fix this problem, you need to make some changes to your registry.
Before making any changes, we advise you to create a backup of the registry, just in case.
- Start Registry Editor. To see how to do that, be sure to check some of our previous solutions.
- Now navigate to HKEY_LOCAL_MACHINESYSTEMCurrentControlSetServicesvds key in the left pane.
- In the right pane, look for ImagePath. By default, it should have a value of %SystemRoot%System32vds.exe. According to users, the problem can sometimes be %SystemRoot% variable, and you need to change it manually.
- Double click ImagePath to edit it. Replace %SystemRoot% with C:Windows in Value data field. After making the changes, Value data field will look like this: C:WindowsSystem32vds.exe. Click OK to save changes.
- Close Registry Editor.
In some rare cases %SystemRoot% variable might not work properly, and that will cause this error to appear.
After making the necessary changes and replacing the value with the absolute path, the issue should be resolved.
Solution 4 – Format the drive on Mac or Linux
If you can’t access your flash drive on Windows due to The system cannot find the file specified error, you might need to format it on Mac or Linux first.
According to users, they solved the issue simply by connecting their flash drive to any Mac or Linux computer and formatting the drive using FAT32 file system.
After formatting the drive, connect it to your Windows 10 PC and follow the Solution 2 to clean the drive using diskpart tool.
Solution 5 – Disable automount
In one of our previous solutions, we mentioned how enabling the automount feature can fix The system cannot find the file specified when inserting a USB flash drive.
However, it seems that in some cases you can fix this error by disabling automount in diskpart. To do that, you need to follow these steps:
- Open Command Prompt as administrator.
- Enter diskpart and press Enter.
- Now enter automount disable.
- Close Command Prompt and check if the error is resolved.
After disabling automount, you should be able to format your removable storage without any errors. After you’re done, you might want to enable the automount feature.
To see how to do that, check out one of our previous solutions.
Solution 6 – Delete and format all partitions
This solution will delete all files from your hard drive, so if you’re going to use it, be sure to back up all your important files.
Since this solution will delete all files, we suggest that you use it only with a new PC that doesn’t have any important files stored on it.
Users reported that after reinstalling their operating system they are unable to initialize their additional hard drive.
According to them, they are unable to initialize it due to The system cannot find the file specified error message.
If you have this or any other similar issue, you can fix it by using Partition Wizard software.
Simply create a bootable flash drive with this tool and start your PC from it. After the tool starts, you need to delete all your partitions on the drive that you can’t initialize and format them again.
After that, initialize partitions as GPT.
If you want to convert MBR to GPT disk without data loss, check out this awesome guide.
Once again, this solution will delete all files from the problematic drive, so be sure to use this solution as a last resort or only with a new PC or an empty hard drive.
The system cannot find the file specified error can affect your PC in many different ways. This can be an annoying error, but we hope that you solved it by using one of our solutions.
If you have any other questions, feel free to leave them in the comments section below and we’ll surely check them out.




User forum
0 messages