Copilot will act as a writing coach in Microsoft Word, per latest update

Microsoft brought Copilot to the 365 Suite, including Word, with the promise of summarization, editing, correction, and writing suggestions. Now, the Redmond-based tech giant seems to want to take things a bit further and will update the AI model to coach users in Word on how to write.

According to the latest entry in the Microsoft 365 Roadmap, Copilot in Word will act like a writing coach, suggesting and even telling you how to keep your tone, style, and other writing characteristics constant in a text.

The Copilot context menu will include an option for getting AI-generated coaching. Copilot will review the writing and offer suggestions for high-impact areas, such as logical structure, flow, and tone.

Copilot

The update will impact Copilot in Microsoft Word starting July 2024, but the coaching option will also be available to the entire 365 Suite.

This is not the first time Microsoft expressed a desire for such a task. In 2023, at the Microsoft Event in November, the Redmond-based tech giant said Copilot in Outlook would mimic the user’s style when composing emails.

However, the journey from mimicking to actually receiving writing lessons from AI is an entire road, and many people, including human writing coaches, might disagree with it.

Copywriters are specialized writers who focus on short content, such as social media posts, letters, emails, or creative content. With this update, Copilot in Word might replace their jobs, with users being able to quickly create creative posts for their businesses or emails.

But learning how to write a novel from Copilot? Well, that’s a sensitive subject. Sure, the AI might tell you something about structures, tones, styles, points of view, etc. It will also edit your writing and correct it.

I doubt it can tell you how to create your style and approach to topics, characters, actions, etc. So, while Copilot in Word coaching you on your writing is a good idea, take it with a pinch of salt. Appreciate its feedback, but remember, art needs emotions, which is something that Copilot doesn’t have, nor can it mimic.

Microsoft Defender brings new features that you’ll want to download right away

Microsoft has launched a fresh Defender update that safeguards Windows against malware within initial hours after deployment. This monthly update package contains security intellect and performance fixes.

But maybe, the most crucial part of this update is the antimalware package. It updates Defender binaries in OS installation images just after they’re deployed to avoid them being old-fashioned and therefore open to attacks.

More information about the new Defender updates

The update for Defender is present in Windows 11, Windows 10 (all editions), Windows Server 2022, Windows Server 2019 and also in Windows Server 2016.

Additionally, updates for Defender include important enhancements in performance that will enhance the user’s experience. Devices using Windows’ own antivirus or another safety solution can gain from these updates.

For updating Defender binaries, Microsoft suggests IT pros to service OS installation images every three months. The updates are simple to apply, you don’t need to order them except for the initial Defender update.

Microsoft stated that, This article talks about the antimalware update package for Microsoft Defender in OS installation images (WIM and VHD files). This feature works with OS installation images such as Windows 11, Windows 10, Windows Server 2022. It is also compatible with Windows Server 2019 and Windows Server 2016.

When a fresh Defender package edition comes out, assistance for the last two versions will be limited to technical aid. Versions that are before the previous two, they won’t get any help anymore.

The most recent Defender package version is 1.411.111.0, it includes updates for anti-malware client, anti-malware engine and signature versions in OS installation images to:

  • Platform version: 4.18.24050.7
  • Engine version: 1.1.24050.2
  • Security intelligence version: 1.411.111.0

The package size is approximately 78.2 MB for ARM64, 128 MB for x86 and 132 MB for x64 systems. Microsoft doesn’t acknowledge any issues with this update but we’ll just see about that in that following days.

What do you think about the new Defender updates? Let’s discuss about this topic in the comments below.

Microsoft finally fixes the BitLocker 65000 error in Windows 11

Did you ever find yourself swept up in the frenzy of tech updates, feeling a bit bewildered? If so, don’t worry – you are not alone. Microsoft has just released an important update for Windows 11 that focuses on fixing a bothersome BitLocker problem that has puzzled many users.

The bug famously called the “65000” error, was not just a small problem. Starting six months ago, it caused annoyance for many people, making them feel puzzled and irritated.

The newest Patch Tuesday update from Microsoft, KB5039213, has finally arrived, and it is here to save the day. It fixed the BitLocker 65000 error that had been present in Windows 11.

Just so you know, BitLocker is a feature in Windows that is already built-in for encryption purposes. Picture yourself sealing your treasures in a vault that, no matter how brilliant the thief, cannot crack—this is BitLocker.

This error was a topic of conversation when it initially emerged. People, including users and IT experts, were perplexed by the sudden appearance of a “65000” mistake code. This happened particularly when they attempted to apply device encryption settings via Microsoft Intune—it felt like sending an encrypted message that was not being read.

Microsoft, as they strive for openness, guaranteed that this was only a problem in reporting and that no harm occurred to BitLocker’s encryption power. However, the guarantee did not provide much relief to those impacted.

Now, they accepted that there was a problem and advised on what to do temporarily until the patch arrived for those who could not wait. This includes changing how encryption type settings are set up on operating system drives as a workaround method they suggested. It was a band-aid but a necessary one.

Finally, the saga is over. KB5039213 has been set free, and Microsoft has officially declared that the “65000” error has been restated. Now, all Windows 11 users can relax knowing their worries are resolved. This update shows how dedicated Microsoft is to dealing with issues from users and improving how everyone enjoys using it.

Resolution: This issue was resolved by Windows updates released June 11, 2024 (KB5039213), and later. We recommend you install the latest security update for your device. It contains important improvements and issue resolutions, including this one.

Microsoft

So, what does this say? If you use Windows 11, update it to fix the BitLocker 65000 error. It’s about enjoying new features and feeling calm knowing security problems have been fixed, similar to this issue.

To finish, the solution to the “65000” mistake in BitLocker is not just another update. It emphasizes the need to be alert and cautious in the digital era. So, you can proceed with installing that update now. Your data will thank you.

Microsoft fixes the Windows Server LSASS memory leaks with new updates

Right after the KB5035857 was released to patch Windows Server, Microsoft acknowledged an issue with Kerberos requests on domain controllers may cause LSASS memory leaks. Now, Microsoft announced that it has fixed this problem with KB5039227 and KB5039217 for Windows Server 2022 and 2019, as part of the June Patch Tuesday update.

More information about the new Windows Server patches

The KB5039217 update is important for those who are managing Windows Server 2019 because it fixes a problem where the LSASS process would crash and restart servers after installing April 2024 updates. Along with solving the LSASS predicament, this upgrade adjusts the version of curl.exe and repairs a memory leak in lsass.exe when LSARPC calls are made.

Now, let’s talk about Windows Server 2022. This KB5039227 update contains all the improvements from the 2019 one and brings thirteen more changes to the table. It handles stuff like boosting SMB over QUIC client certificate authentication and fixing issues with Outlook and OneNote search on Azure Virtual Desktops.

Fixes for things such as Windows Hello for Business, Microsoft Edge UI, Storage Spaces Direct are also included in this update along with a solution for Containers stuck in ContainerCreating status. But, there’s a little disturbance in the smooth water. When you attempt to swap your profile picture, a 0x80070520 error might appear.

This update also fixes a problem with Server Message Block (SMB) over Quick UDP Internet Connections (QUIC), another issue that could lead to network failure when using Storage Spaces Direct (S2D) and Remote Direct Memory Access (RDMA).

We’ll be your eyes on the field when it comes to these updates because oftentimes, although they bring some improvements, they also create new problems anyone never knew existed before. And yes, if something goes wrong after the updates, let us know about this in the comments below.

How to Download the Arc Browser on Windows, macOS, and iOS

Arc browser, touted as the perfect Chrome replacement by many, has become immensely popular in a short while. Initially released for macOS, the browser soon made its way to iOS and then to Windows.

The browser consumes minimal resources, so you don’t really need a high-end device, both iPhone and PC. And the steps to download the Arc browser are really straightforward and hassle-free!

How can I download the Arc browser?

1. On Windows

  1. Open any of the installed browsers, go to Arc’s official website, and click the Download Arc for Windows 11 option.arc browser download for Windows 11
  2. Once downloaded, run the ArcInstaller.exe file and follow the on-screen instructions to complete the installation process.arcinstaller.exe

You should now have the Arc browser for Windows 11 installed on your PC.

In case you want to download the Arc browser for Windows 10, it has not yet been released. Though, the team has confirmed that it is under development and should be out soon. If interested, sign up for Arc browser for Windows 10 updates.

Besides, the Arc browser is not yet available for Windows on ARM and PCs with Intel and AMD processors not supporting the BMI2 instruction set.

2. On macOS

  1. Go to Arc’s official website and click the Download Arc for Mac button.arc browser download for macOS
  2. Run the setup and follow the on-screen instructions to complete the installation.

3. On iPhone (iOS)

  1. Open the App Store on your iPhone and then search for the Arc browser. Alternatively, you can go directly to Arc’s listing on the App Store.
  2. Click on Get to install the browser and then follow the on-screen instructions. arc browser app store

The Arc browser is available for download on Apple’s dedicated App Store, making the installation all the more seamless. Last I checked, the mobile browser has got some fantastic reviews. Although, for the Arc browser to run, you will need iOS 16 or later.

Besides, the Arc browser is not available for iPad!

4. On Android

Arc’s official page for unsupported devices tells us that there’s no Android app for the Arc browser yet.

However, given the fact that the developers recently released a Windows version of the browser and the ongoing waitlisting for Arc on Android, it’s evident that the Android version of the Arc browser should soon be available in the Google Play Store, albeit after Windows 10.

As a reminder for the not-so-tech-savvy users, when you search for Arc Browser in the Play Store, an app by the same name does come up, but it’s not the browser. Instead, it’s a rom collection browser and emulator to maintain the game database and play them using the desired emulator.

If you haven’t yet downloaded the Arc browser, I would recommend you do it now and experience the improvements over the other browsers and alternatives everyone is talking about. Personally speaking, I liked the ad blocker in Arc!

Do keep in mind that the browser has a few minor issues, and many reported that the Arc browser keeps crashing for them, but that can be easily fixed.

What’s your review of Arc? Share with our readers in the comments section.

How to Manage Optional Features on Windows 11

Windows 11 comes with features that everyone else uses then there are optional features for those looking for a little more thrill and want to go the extra mile in customization.

When it comes to managing optional features on your Windows 11, this means you can turn them on, tailor them to your preferences and remove them when you no longer need them.

Windows 11 is already a resource hog so the ability to choose which features you can turn on or off makes sense to avoid clutter.

How do I manage optional features on Windows 11?

1. Access optional features

1.1 By using the Settings app

  1.  Press the Windows key and click on Settings.
  2. Type optional features in the search bar and click on the matching result.
  3. Alternatively, once you open Settings, click on System then select Optional features on the right.

1.2 By using the Run command

  1. Press the Windows + R keys to open the Run command.
  2. In the Run dialog box that opened, type optionalfeatures, then click OK.

1.3 By using the Control Panel

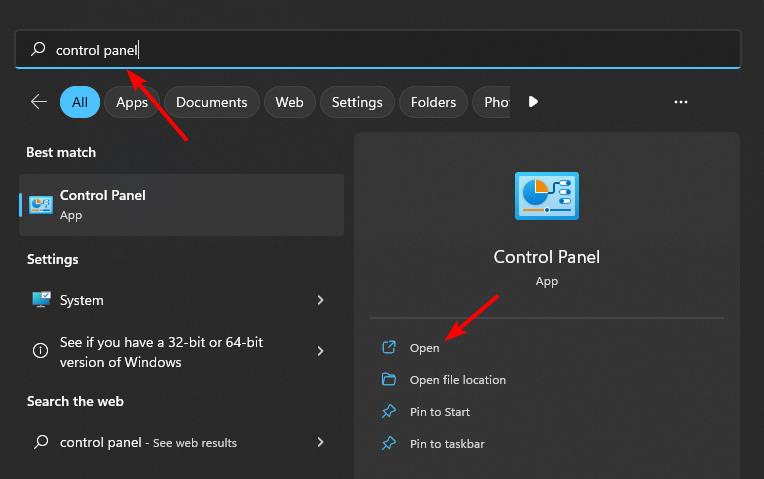
  1.  Press the Windows key, type Control Panel in the search bar and click Open.
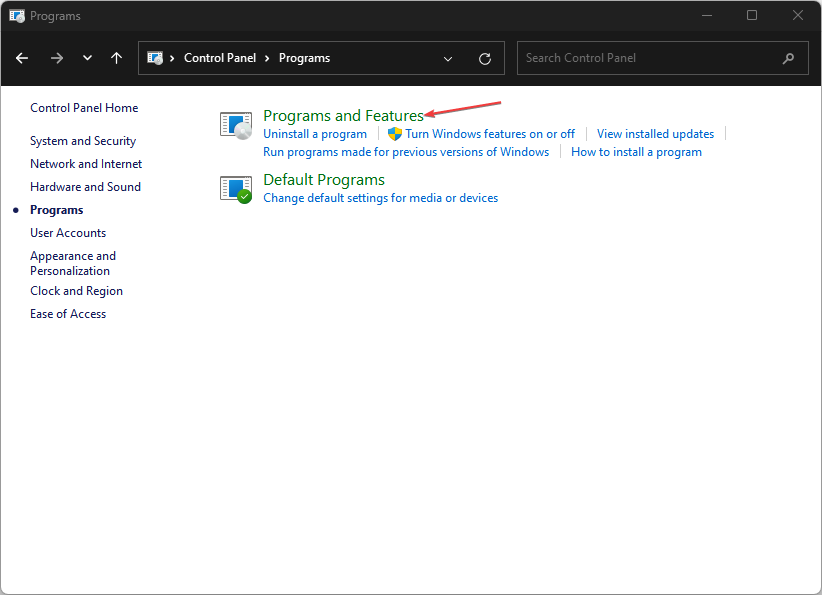
  2. Click on Programs > Programs and Features.
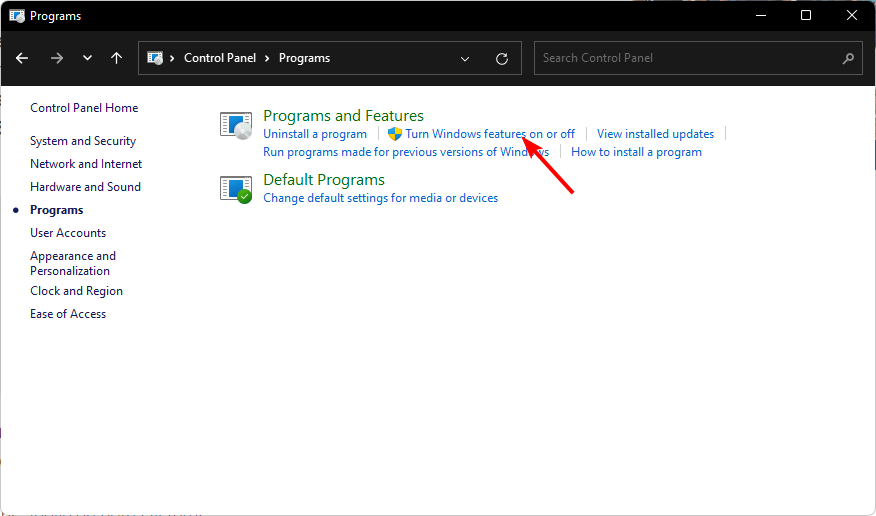
  3. Select Turn Windows features on or off.

2. Add optional features

2.1 By using the Settings app

  1.  Press the Windows key and click on Settings.
  2. Type optional features in the search bar and click on the matching result.
  3. Alternatively, once you open Settings, click on System then select Optional features on the right.
  4. Click on View features.
  5. Next, place a checkmark on the box to your right next to the feature you’d like to add and hit Next.
  6. Now click on Add.
  7. Wait for the feature to complete installation. This may take some time depending on the size of the feature. Once it’s done, check whether it’s working. If not, restart your PC.

2.2 By using the Control Panel

  1. Press the Windows key, type Control Panel in the search bar and click Open.
  2. Click on Programs > Programs and Features.
  3. Select Turn Windows features on or off.
  4. The Turn Windows features on or off window will open and you can place a checkmark on the box next to the feature you wish to add then hit OK.

2.3 By using Windows Powershell

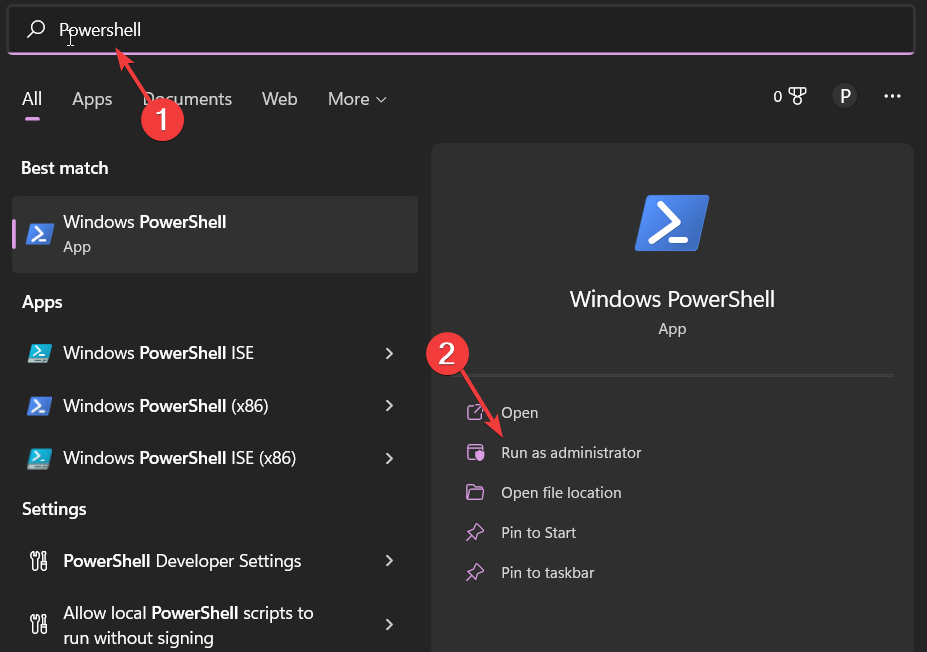
  1. Press the Windows key, type Windows Powershell in the search bar and click Run as administrator.
  2. Type and Enter the following command. Remember to replace FeatureName with the exact name of the optional feature you wish to add: Enable-WindowsOptionalFeature -FeatureName "FeatureName"

In all these adding optional features on your Windows 11, sometimes, the optional features may be empty. If so, we know how to get them back.

Keep in mind that some optional features may also be missing because of the Windows version you are on. Windows 1 Pro tends to have more than Windows 11 Home so if RSAT is missing in optional features, this might be the reason.

3. Remove optional features

3.1 By using Settings

  1.  Press the Windows key and click on Settings.
  2. Type optional features in the search bar and click on the matching result.
  3. Alternatively, once you open Settings, click on System then select Optional features on the right.
  4. Click on View features.
  5. Scroll down and locate the feature you wish to remove.
  6. Click on the downward arrow and hit Remove.
  7. If it’s not in the list, scroll down and select More Windows features.
  8. The Turn Windows features on or off window will open and you can remove the checkmark on the box next to the feature you wish to remove then hit OK.

3.2 By using the Control Panel

  1. Press the Windows key, type Control Panel in the search bar and click Open.
  2. Click on Programs > Programs and Features.
  3. Select Turn Windows features on or off.
  4. The Turn Windows features on or off window will open and you can remove the checkmark on the box next to the feature you wish to remove then hit OK.

Unfortunately, Windows PowerShell doesn’t have a command that disables specific optional features.

4. Hide and unhide optional features

4.1 Hide optional features

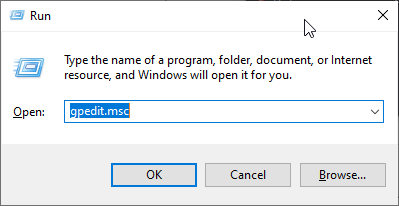
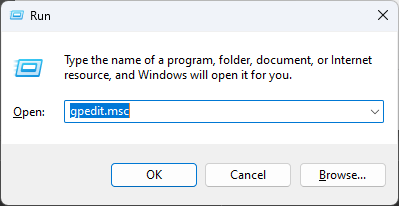
  1. Launch the Run utility, type gpedit.msc in the Run box, and press Enter.
    gpedit windows 11 optional features empty
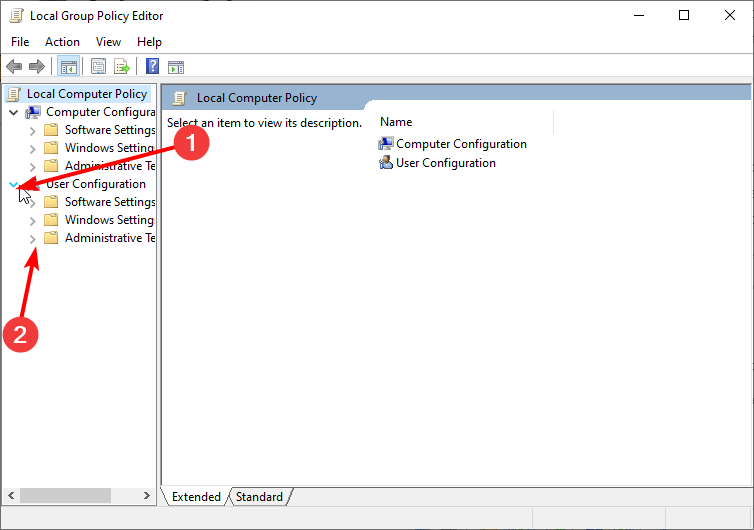
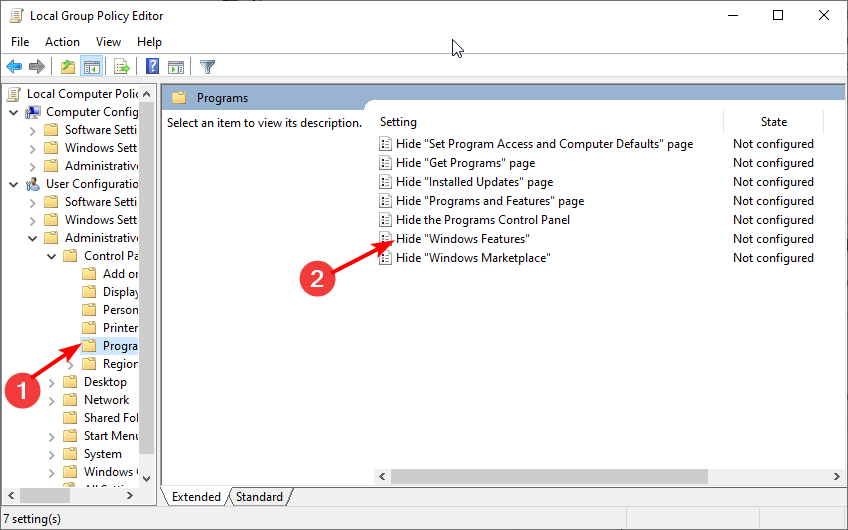
  2. Select User configuration on the left pane, followed by Administrative Template.
    user admin
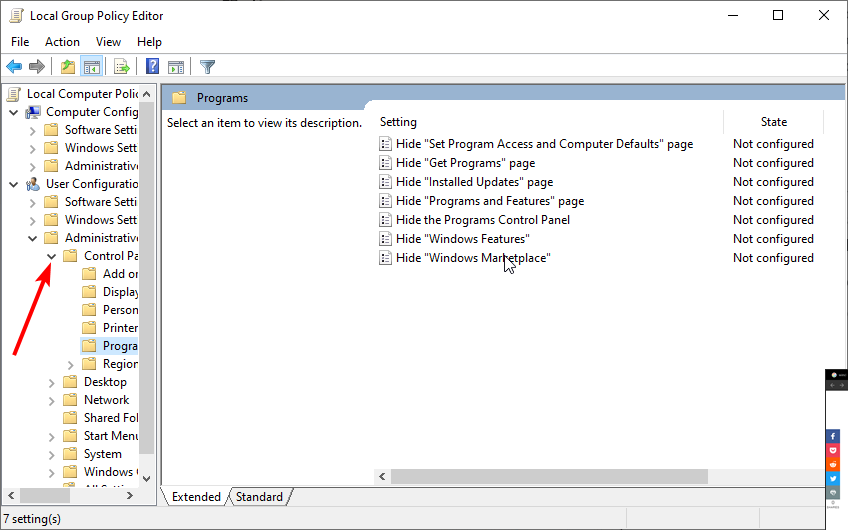
  3. Choose the Control Panel option.
    control panel
  4. Now, select Programs.
  5. Double-click on the Hide “Windows Features” option.
    hide program
  6. Tick the radio button for Enabled.
  7. Finally, click Apply followed by OK. Now when you go to Settings or the Control Panel, the optional features will be missing.

You can also hide the Apps feature in your Settings app and the Program and Features option in Control Panel by:

  1. Hit the Windows + R keys to open the Run command.
  2. Type gpedit.msc in the dialog box then hit Enter to open the Group Policy Editor.GPEDiT.msc -Windows Remediation Service Failed to Start?
  3. Navigate to the following location: User Configuration/Administrative Templates/Control Panel/Programs
  4. Find the Hide “Programs and Features” page option, right-click on it, and select Edit.
  5. A new window will open. Check the Enabled option and click Apply and OK to save the changes.
  6. To revert the changes, simply check the Not configured box, then click Apply and OK to save the changes.

4.2 Unhide optional features

  1. Launch the Run utility, type gpedit.msc in the Run box, and press Enter.
    gpedit windows 11 optional features empty
  2. Select User configuration on the left pane, followed by Administrative Template.
    user admin
  3. Choose the Control Panel option.
    control panel
  4. Now, select Programs.
  5. Double-click on the Hide “Windows Features” option.
    hide program
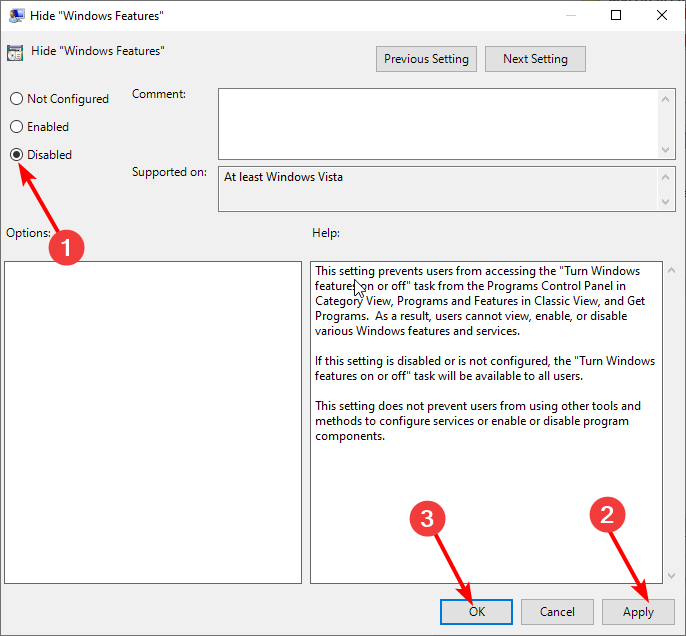
  6. Tick the radio button for Disabled.
  7. Finally, click Apply followed by OK.
    disabled windows 11 optional features empty

Additional tips and considerations

While optional features enhance your experience, it’s also important to limit the number you add because too many expose your system to security vulnerabilities. They can also add bloatware to your system and make it slow.

Now that you have control of your optional features, it’s time to get to know them a little bit more. To kickstart your journey and ensure you’re getting the most out of your Windows 11, we have compiled some of the best optional features that we think will elevate your Windows experience.

To explore all available Windows 11 optional features and learn how to manage them, visit Windows Optional Features for detailed guidance.

Finally, we’d love to know what optional features you’ve enabled and why. Are there any you’ve had to remove? Let us know in the comment section below.

If you encounter this bug in Windows 11 23H2, this is the best thing that you can do

When you think everything is going smoothly with setting up Windows 11, a fresh bug might confuse you and question the system’s stability. Imagine customizing the lock screen by selecting various apps to show their status when, suddenly, the Settings app starts crashing again. Some Windows 11 users are facing this reality today.

A keen Redditor revealed it; others have confirmed they also encountered such an irritating problem. The Windows 11 23H2 build bug creates considerable doubt regarding the internal workings of Microsoft’s newest OS.

Weeks after successfully addressing a famous VPN bug, Microsoft is once again in the bug spotlight. This problem causes the Settings app to crash when you try to change your lock screen, an unusual glitch because there isn’t any real need to regularly toggle between apps on this particular screen.

Yet, it’s worrisome because it suggests possible deeper problems related to the stability of the OS – Microsoft has not yet given any comments about this bug, so users are still unaware of where it comes from or if there’s a solution for it.

The bug found by the community highlights a bigger problem: Windows stable releases can still have bugs that impact user experience. Although insiders and beta testers anticipate encountering problems, regular users may find it surprising to encounter these glitches in what they thought was a refined product.

The recommendation for now? Avoid playing around with lock screen app settings until a fix is announced.

While waiting for some response or solution from Microsoft for this bug in Windows 11 23H2, this incident shows that software development can sometimes be unpredictable and underlines why thorough testing is so significant.

This bug may seem small in the big picture, but its implications are worrying. If a small change, like shifting lock screen apps, results in the Settings app crashing, what does it reveal about Windows 11’s strong stability?

At present, the most suitable response is to avoid triggers for this bug and be watchful for Microsoft’s updates. A solution is expected to be released quickly, restoring trust in Windows 11’s steadiness and dependability.

Microsoft is finally bringing the Copilot summarization notification to Edge

After releasing the Copilot summarization notification feature in the Edge in the beta channel for insiders, Microsoft has plans on rolling it out in the stable channel starting in July. If you remember, Edge replaced the Ask Copilot feature with Summarization, a feature which allows you to summarize various documents if you open them in Edge.

Well, soon, when you enter reading mode in Edge, you will get a notification to highlight the fact that you can summarize your text with Copilot. Here’s the description according to Microsoft’s 365 roadmap page:

The feature displays an Omnibox notification when users enter into a reading mode eligible page in Edge and offers them the option to open Copilot in the sidebar to generate a summary of the content.

What documents can I summarize in Edge?

Microsoft has a dedicated page on how the Copilot in Edge webpage summarization works. However, we brought the most useful information here to show you exactly what to expect from this summarization feature.

Document typeCopilot and Copilot with Commercial Data Protection
Intranet Sites such as SharePointSummarization is supported
* Embedded Office docs in SharePoint aren’t supported
Public Sites such as WikipediaSummarization is supported
Outlook Web AppSummarization is supported
PDFsSummarization is supported
Office DocumentsSummarization isn’t supported
Sites protected by Purview DLP Policies **Summarization isn’t supported
Sites protected by MAM Policies ++Summarization isn’t supported
Sites protected by MDA Policies ^^Summarization isn’t supported

So, pretty much you can summarize Wikipedia pages, intranet sites, PDFs and the text within the Outlook Web app. However, it’s still useless for Office documents and documents protected by certain policies.

Anyway, the summarization feature is pretty useful in Edge and the notification will certainly point a finger on this tool for users who were not aware of it.

What do you think about Edge’s summarization feature and notification? Let us know in the comments below.

Can Opera GX Use Custom Extensions? – Explained

Can Opera GX use custom extensions?

Browser extensions let you extend the functionalities with productivity, gaming, system resource usage, and other add-ons. However, Opera’s marketplace contains limited add-ons to choose from. So, you’ll probably want to install custom extensions for more options.

I’ve tested the Opera GX browser from a developer’s or power user’s point of view to see how well it works with custom add-ons. So, let’s get started!

Can Opera GX Use Custom Extensions?

Can Opera GX Use Custom Extensions?

Yes, Opera GX can use custom extensions. Besides the built-in Opera extension platform, you can add the following add-ons:

  • Unpacked extension files.
  • Pack extension files and then install the add-on.
  • Install Google Chrome add-ons.
  • Import them directly from Google Chrome.

Now, you might ask which extensions are considered custom. All add-ons that aren’t available in the native marketplace but you can add them from third-party sources count as custom. Also, as an Opera GX developer, you can create custom extensions you’ll need to test before publishing them on the official Opera marketplace.

Or, if you’ve recently switched to Opera GX from Firefox or Google Chrome, this feature comes in handy.

Now, let me show you below how to add custom add-ons to Opera GX from different sources effortlessly:

How To Install Google Chrome Extensions in Opera GX

  1. Visit the Google Chrome Webstore in your Opera GX browser.
  2. Click on the Sign in button located in the top-right corner of the extension marketplace.
  3. Enter your Google Account which you’ve been using in the Chrome browser.
sign in
  1. Enter the password and authenticate the sign-in process with OTP, Android device, etc.
  2. You should now see the Chrome Webstore home screen signed into your account.
  3. Click on the three-dots menu in the top right corner, near your Google Account profile picture.
  4. Choose My extensions & themes from the context menu.
my extensions
  1. You should now see all the Chrome extensions you’ve installed so far.
extension library
  1. Click on an extension to access its home page.
  2. Click the Add to Opera button to install it on Opera GX.
add to opera

How To Install Unpacked Extensions to Opera GX

Let’s say you’ve created an Opera GX extension. It hasn’t been published yet so you can’t download it from the official portal to see its performance. In that case, you’ll have to manually add it.

To do this, first, put all the extension files into a directory on your local PC. Typically, it contains the following files:

  • HTML — defines the structure and content of the add-on’s user interface, such as popup windows or options pages.
  • JSON — typically the manifest.json file, provides metadata about the extension, such as its name, version, permissions, and components.
  • PNG — used for icons and other graphical elements.
  • JS — contains the code that implements the extension’s functionality, such as background scripts, content scripts, or popup scripts.

So, put all the above project files in one folder as shown in the following screenshot. The directory must contain all of them or the custom extension won’t work.

all extension files

Now, open the Opera GX app and perform these steps:

  1. Click on the Extensions icon in the left-side navigation panel. It looks like a 3D box item.
  2. You should see the Extensions menu.
extensions menu
  1. Now, find and enable the Developer mode feature from the top-right corner.
enable developer
  1. Click on the Load unpacked button.
  2. The Select the extension directory dialog box will show up.
  3. Use this explorer dialog to select the directory that contains the four extension files.
  4. Click on the Select Folder button.
Select the extension directory
  1. Opera GX will import the custom extension.
  2. You might want to checkmark the following boxes depending on your requirements:
    • Allow in incognito
    • Allow access to search page results.
  3. As you import the add-on, Opera GX installs it automatically. You won’t see the Add to Opera button for custom extensions.
custom extension installation
  1. Now, test your custom add-on from the Extensions menu in the top-right corner of the address bar.

Summary

So, can Opera GX use custom extensions? Fortunately, it can. Simply follow these methods to import custom extensions from your Google Chrome account or directly upload your own add-ons using the Load unpacked feature.

If you know a better method, feel free to share it in the comments below.

OpenAI’s partnership with Oracle won’t impact Microsoft at all

OpenAI has become a new topic in the busy cloud computing and artificial intelligence. A notable player in the AI field, OpenAI recently made an arrangement with Oracle that attracted attention. 

This move has caused some people to question OpenAI’s ongoing association with Microsoft. However, OpenAI has given confidence that Microsoft will continue as its main cloud platform even with the fresh alliance it formed with Oracle.

In a post on X (formerly known as Twitter), OpenAI said:

We want to clarify some inadvertent confusion.  Our strategic cloud relationship with Microsoft is unchanged. The partnership with OCI enables OpenAI to use the Azure AI platform on OCI infrastructure for inference and other needs. All pre-training of our frontier models continues to happen on supercomputers built in partnership with Microsoft.

OpenAI

The nature of this partnership is interesting. OpenAI, a leading artificial intelligence and machine learning company, wants to enhance the Azure AI platform by utilizing Oracle Cloud Infrastructure (OCI), mainly for tasks such as inference. 

Inference can be understood as using trained AI models to make predictions or decisions. This tactic is clever because it lets OpenAI use OCI’s infrastructure for particular requirements yet still depend on Microsoft’s supercomputers to train its most cutting-edge models, called “frontier models.”

This is a considerable development as it highlights the collaborative aspect of the cloud computing industry. OpenAI’s strategy of using abilities from both Microsoft and Oracle shows a pattern of companies not concentrating their efforts in just one place.

Instead, they are making their operations more efficient by utilizing the strengths of each cloud provider.

Larry Ellison, Oracle’s Chairman and CTO, also spoke up about OCI’s abilities. He stressed how it attracts those leading in AI development because of its quickness and cost efficiency. Sam Altman, OpenAI’s CEO, shared the same excitement for this partnership that would help his company grow to a larger extent with the use of OCI.

This partnership is not only about OpenAI; it shows a bigger change in the tech field. Companies increasingly seek adaptable and strong answers to manage the rising need for AI services. 

When ChatGPT from OpenAI is used by over 100 million people monthly, infrastructure that can handle large-scale requests becomes necessary.

The deal between OpenAI and Oracle, as they continue their main relationship with Microsoft, shows a tactical step to improve AI power. It also represents how cloud computing is changing – cooperation and adaptability matter most for success in the competition to create and use advanced AI tech.

Lenovo’s ThinkPad X1 Carbon laptop is now 45% OFF

If you’re looking for the latest Copilot+ PC laptops, we’ve created a list with all upcoming models. However, if you care a bit less about the AI capabilities and just want a powerful laptop on your desk, Lenovo has a sweet deal on its ThinkPad X1 Carbon.

They’ve slashed the laptop’s $3,289 original price and now it’s only $1,809, a huge 45% off deal that is hard to pass out on. Just make sure to use the THINK3WEEKSALE code when you make the purchase.

Why should I buy the ThinkPad X1 Carbon laptop?

It’s not an Copilot+ PC, but it’s still an AI enabled laptop thanks to its Intel Core Ultra 7 155U CPU that stack up the 3.80 GHz E-cores with the 4.80 GHz P-cores for a more than decent processing power.

It’s also on par with the RAM today’s requirements, featuring 32 GB of LPDDR5X-6400MHz memory on the board. It’s also OK in the storage department for a business-oriented laptop with a 512 GB SSD.

And because we’ve mentioned its business purpose, Lenovo mentions that ThinkPad X1 Carbon has an all-day battery life, which is great for any trips you may take.

Certainly, with its 14-inch (1920 x 1200 pixels) display, this laptop fits almost any laptop bag together with USB and Bluetooth accessories. The only downside is that the laptop has an onboard Intel graphics GPU, but it’s still great for watching movies and enjoying some casual games.

You will find 2 USB-A (5-Gbps) ports, 2 USB-C Thunderbolt ports and HDMI if you want to connect an external monitor or TV. We should also mention the Intel Wi-Fi 6E AX211 connectivity and the Bluetooth 5.1 connection.

This is, by all means, not an obsolete configuration, so this is really a great deal in any book. Grab it now while this offer still stands! If you have a lower budget, you may also check this deal on an LG Gram 17 laptop.

Do you already own a Lenovo ThinkPad X1 Carbon? Tell us about your experience in the comments below.

Goodbye, DirectAccess! Microsoft deprecates it, but the company is coming up with something better

In a possibly surprising decision, Microsoft is planning to end DirectAccess, a feature present in the Windows line since Windows 7 and Windows Server 2008 R2. This attribute permitted users to join their corporate networks without any interruption and without requiring traditional VPN configuration. The world of technology changes constantly, and as it shifts, the tools we use also transform.

Now, Microsoft is advising people to go with a more current option—Always On VPN. They say it’s the better choice for future network connections. This move from DirectAccess to Always On VPN shows a general trend of Microsoft. It wants to update and improve its networking abilities so that users can use the most effective and protected ways of connecting with networks.

They have even created a dedicated webpage for IT administrators, which helps make the changeover process less turbulent.

But what caused this alteration? As technology progresses, users’ needs and demands also change. DirectAccess was very innovative when it first came out because it provided a smooth method for connecting to networks.

But Always On VPN offers an array of enhancements, from superior security protocols to more versatile setup methods. It shows Microsoft’s dedication to keeping pace with the industry and staying ahead.

This step is similar to Microsoft’s ongoing process of enhancing its offerings. At the same time as DirectAccess, other elements such as NTLM, Driver Verifier GUI, and specific APIs are also being phased out. This highlights that staying still is not a choice in the fast-evolving technology sector.

Characteristics of our digital journey that once were considered mainstays are now being reconsidered and replaced by newer options if they prove inadequate.

This conversion phase is very important for users and IT admins. Although deprecated features might still work temporarily, their end is near.

Microsoft’s communication is evident: the future belongs to Always On VPN, so it’s time to adjust. It’s not only keeping your network connections running but also making sure they are as safe, dependable, and effective as possible.

DirectAccess is deprecated and will be removed in a future release of Windows. We recommend migrating from DirectAccess to Always On VPN.

Microsoft

So, what can we understand from all of this? Change is certain, particularly in the quick-moving technology world. Microsoft’s choice to gradually remove DirectAccess and prefer Always On VPN shows their persisting interest in advancement and safety. For us in the IT world, it is a call to action.

It signifies that we must now welcome the new age and ensure that our networks are not only running but also ready for future developments.

How to Update the PC Health Check App on Windows 10 and 11

To update the PC Health Check app on Windows 10 or 11, uninstall the old version (if needed), then download the latest installer from Microsoft’s website.

Windows 11 users may get it through Windows Update automatically, while Windows 10 users often need to update it manually.

Here’s how you do it.

How do I update the PC Health Check app on Windows?

1. Via the PC Health Check app’s interface

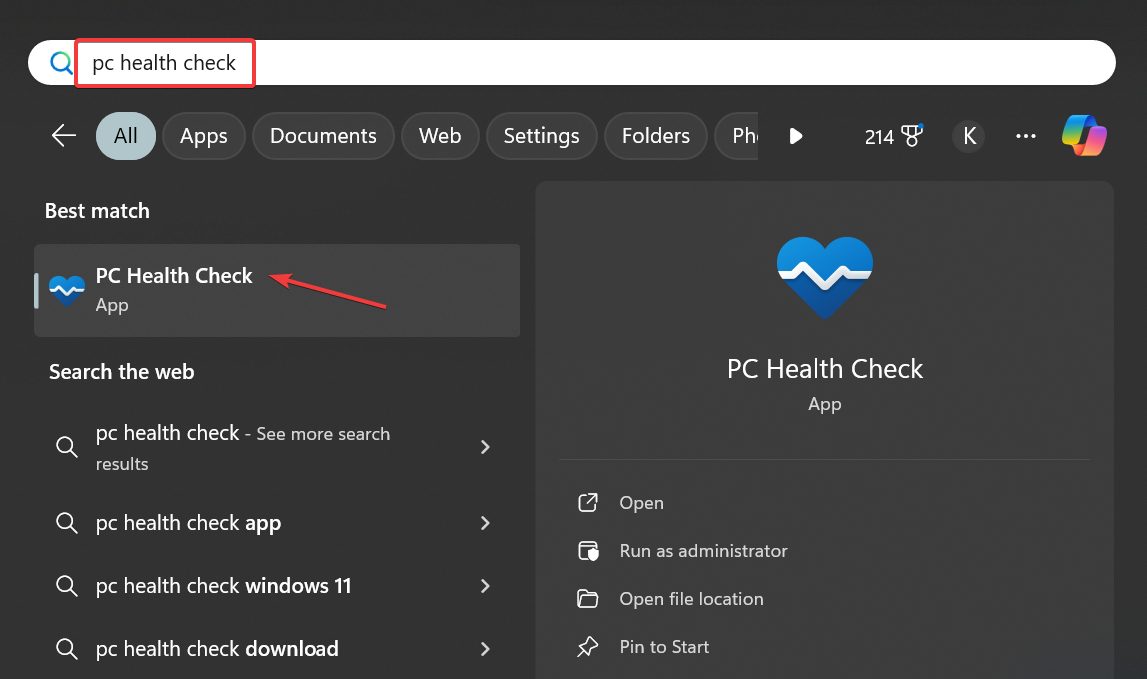
  1. Press Windows + S to open Search, type PC Health Check app in the text field, and click on the relevant result.launch for pc health check update
  2. After launching the app, wait for a few seconds. You will receive a prompt if an update is available.pc health check app
  3. Confirm the update installation and let the process complete. It shouldn’t take more than a minute.

The PC Health Check app automatically identifies any pending updates and prompts you to install them. This saves both time and effort on your part!

2. Reinstall the PC Health Check app

  1. Press Windows + R to open Run, type appwiz.cpl in the text field, and hit Enter.
  2. Select Windows PC Health Check from the list of installed apps and click on Uninstall.uninstall
  3. Follow the on-screen instructions to complete the process.
  4. Once done, reboot the PC for the changes to come into effect.
  5. Now, download the PC Health Check app’s setup and follow the on-screen instructions to complete the installation.installing

If PC Health Check fails to find a new version, it’s time you reinstall the app. This way, the older version gets replaced with the latest PC Health Check app. At the time of writing, the latest version is 3.9.2402.14001.

I recommend you periodically check for updates, as Microsoft is committed to the app’s development. And by not updating, you miss out on critical upgrades and enhancements!

For those concerned, the PC Health Check app is safe, as confirmed by our experts in a detailed examination.

For a detailed guide on using and updating the PC Health Check app on each system, see the comprehensive walkthrough for Windows 11 PC Health Check app features and updates and the step-by-step instructions for updating and using the PC Health Check app on Windows 10.

Did you manage to update the PC Health Check app using our methods? Drop a comment below and let us know.

LG Gram 17, one of the best productivity laptops around, is $600 OFF

Picture yourself searching for a new laptop and coming across the LG Gram 17” Lightweight Laptop. This is no ordinary laptop; it’s a wonder of modern technology with an Intel® Evo™ Edition—Intel® Core™ Ultra 7 processor, Windows 11 Home, 16GB RAM, and huge storage on an SSD that reaches up to 1TB.

All these features are packed into its slim black design. Now what? It has been marked down to $999.99 from its original price of $1,599.99. Yes, you saw it correctly—a discount of $600.00! And as a bonus, LG is adding a complimentary portable monitor and TONE FP5 earbuds to your deal. This special offer is available until June 30, so there’s a little hurry involved in the time frame.

The LG Gram 17” is not just a list of numbers and details. It’s about the feeling you get when using it. When you see its 17” WQXGA (2560 x 1600) Anti-Glare IPS Display, you see a big screen that gives more life to your work and fun activities without any disturbing glare from light sources around you.

The screen that doesn’t reflect is a game-changer, particularly if you spend many hours in front of your computer. The laptop’s visuals are also stunning, with as much as 99% coverage for the DCI-P3 color gamut.

But now, let us see what lies beneath. The Intel® Evo™ Edition powered by Intel® Core™ Ultra 7 155H processors and Intel® Arc™ graphics makes this laptop strong enough to handle any task. The laptop is ready for all these challenges, be it non-stop productivity, creation, or amusement. This device has 16GB LPDDR5X RAM and a 1TB NVMe Gen 4 M.2 SSD, making it a strong machine that offers speed and space.

If you’re thinking about how durable it is and how long the battery lasts, LG has some information for you. The LG gram has cleared 7 different MIL-STD 810H Tests for durability, which says it can handle everyday use’s tough demands. As far as keeping it running, LG’s testing in March 2023 showed very good video playback time, but this can vary depending on how you use it.

Okay, what’s the hook? There isn’t a catch. This offer is too good to pass up, especially considering the additional benefits of getting a portable monitor and earbuds for free. However, keep in mind that such offers are not always available.

If you need a new laptop that is powerful, high-performing, and easy to carry around with its 17″ screen size, the LG Gram 17” Lightweight Laptop could just be what you want. The present discount makes this an ideal time for purchase.

You can get it from here. But if you’re a gamer and prefer a stronger laptop, you might want to check out Dell’s latest offer for one of its G16 gaming laptops—only $1,299.

The Alienware Aurora R16 is now $400 OFF, and if you want an over-the-top gaming PC, now is your chance

Do you dream about having a fancy, top-of-the-line gaming PC and a flashy OLED gaming monitor, all without spending too much? Dell has made your dream more achievable. They have cut the price of the Alienware Aurora R16 RTX 4080 SUPER gaming PC to $2399.99 from $2799.99 after an instant discount of $400. Hold on, it’s not over yet.

The Alienware Aurora R16 is not an ordinary gaming PC. It has an Intel Core i9-14900F CPU, a GeForce RTX 4080 SUPER 16GB GPU, 32GB of DDR5-5600MHz RAM, and a 1TB M.2 SSD. This combination can smoothly handle playing games in 4K resolution even when set to maximum settings and high frame rates.

The RTX 4080 SUPER provides a 5%-10% increase in performance compared to its prior version. This makes it a strong option for gamers who want to ensure their setup is ready for future advancements.

But if you ask about cooling, the R16 includes a 240mm all-in-one liquid cooler. This ensures that your system remains cool and quiet even when exposed to heavy gaming sessions. Additionally, the R16 chassis has been redesigned to reduce its volume by 40% compared with earlier models—it does this without compromising on airflow or cooling effectiveness.

Therefore, what makes picking a Dell or Alienware gaming PC so great? Apart from their superior performance and top-notch construction, the value for money that Alienware PCs provide is hard to find elsewhere. This includes both the regular sales they offer and good customer service. If you are an experienced gamer or someone new to high-end gaming computers, this deal might be too good not to take advantage of.

If you want to buy a monitor for this gorgeous PC all at once, scroll down. Dell will offer you the option to purchase the Alienware 34-inch curved monitor for just $499 instead of its regular $899. But if you prefer something bigger, and more immersive, then you might be interested in this LG UltraGear 45-inch curved gaming monitor, also on a huge discount these days.

OpenAI extends Microsoft’s Azure AI platform with an Oracle Cloud Infrastructure partnership

According to a recent press release, OpenAI made an agreement for partnership with Oracle Cloud Infrastructure (OCI) to strengthen Microsoft Azure AI platform. The importance of this collaboration lies in its scope for expansion. OpenAI, which is responsible for ChatGPT’s success, wants to extend its influence and potentialities; they are aiming towards OCI as a means of achieving this goal.

Microsoft’s Azure AI platform will benefit from Oracle’s Supercluster

Sam Altman, the big boss at OpenAI, has expressed his excitement about the partnership with Microsoft and Oracle. He thinks that OCI’s extension will make a big difference for Azure’s platform, providing OpenAI with an opportunity to expand in ways it never has before. Larry Ellison who leads Oracle also shares this sentiment of Sam Altman. He is throwing out the gauntlet, stating that the pursuit to construct the great large language model is creating huge requirement for Oracle’s AI infrastructure.

However, the crucial point is this: OCI has also attracted other major investments, indicating that it is becoming a significant hub for AI innovation. A multitude of AI explorers from different sectors are selecting OCI as their preferred choice to operate their AI workloads, from those in the list named Adept to xAI. OCI Supercluster is being used by these creators of change to extend the limits of what artificial intelligence can accomplish.

In the area of constructing and teaching big language models (LLMs), OCI is holding some keys. It can handle up to 64k NVIDIA Blackwell GPUs or GB200 Grace Blackwell Superchips, which means there’s plenty of power available for processing data and training AI models. Additionally, OCI offers extremely low-latency RDMA cluster networking and high-quality HPC storage choices. This means that companies starting out or already established can create and improve AI models with quicker speed and dependability like never before.

So, what does this imply for you and me? It signals that AI is not just an ephemeral style but changing, developing and becoming more aligned with our regular activities. Also, when we combine the resources and knowledge of giants such as OpenAI, Oracle, and Microsoft – it is very likely that the AI advancements in future will be truly groundbreaking.

What do you think about the new Open AI – Oracle partnership? Let’s talk about that in the comments below.

Microsoft Loop adds commenting on tables and boards, but also PDF exporting

Recently, Microsoft added filters to Loop, making it easier to search for the desired content. Now, they are adding the option to comment on Microsoft tables and boards, as we’ve found out from Microsoft’s Insider blog.

Actually, you may add comments to the cells within Loot tables and fields, and that might speed collaboration efforts in a project.

How do the Microsoft Loop new features work?

Everything should be very simple if we look at Microsoft’s instructions. To add a comment, simply right-click on the cell or field in question, select the New Comment option, type your thoughts, and hit Post. You can even edit or delete your comments as needed, though you can’t alter or remove comments made by others.

As we’ve highlighted above, Microsoft also added the option to Print & Export PDF. As you’ve already imagined, it’s an option that allows you to either print your work or save it as a PDF document for later sharing.

As you can see from Microsoft’s screenshot above, the feature is straightforward to use. Just open the page you need, click on the Settings and More (…) menu, and select the Print & PDF export option. From there, your browser’s Print dialog will pop up, allowing you to save the page as a PDF or send it to your printer.

We need to mention that right now, the new features are only available for insiders but they will probably be soon added to the stable version.

What do you think about the new Microsoft Loop features? Leave your thoughts in the comments below.

Skype partners up with Snap to enhance its camera capabilities with AR technology

In the era of digital communication, Microsoft has introduced a new feature, joining with Snap, to incorporate augmented reality (AR) technology into Skype. This partnership adds extra spice and amusement to virtual conversations on Skype.

According to the latest blog post, the availability of Snap’s AR Lenses enables users to enhance their chats with amusing, imaginative elements such as trying on virtual beards or disco glasses and even showering their conversations with raining hearts. It’s all about adding a touch of personal flair and fun!

Think of a Skype chat you have with a friend or family member. Now, with just one touch, you can transform your digital self into various AR effects.

Do you feel happy and want to show it by having a sparkling beard or maybe putting on some old-school disco glasses for fun? This connection is not only about enjoyment; it’s also about making each talk unforgettable and visually exciting.

To begin using these Snap AR Lenses, updating your Skype app is very easy. First, make sure to update the app on your device. Then, start a chat and tap on the camera symbol.

After that, click or touch the button with a smiling face to explore different Lenses. Pick the one you like the most, take a photo or video, and there it is, your message with augmented reality ready to be sent.

This function is not only for those skilled with technology; it’s made simple and easy to use, allowing anyone to personalize their digital conversations.

Whether you have an Android or iOS device, these fresh Skype Lenses are set up to improve your chats.

So, have you ever tried the new Snap AR Lenses on Skype? They’re an amazing method for making conversations lively and having a good time with those you care about. It’s also worth mentioning that you can now generate AI images directly on the platform.

With just several touches, you have the power to make moments that are not only talk but also memorable.

Chrome to allow moving Tab Search button to right side, like Side Panel

Ever since the Chrome Refresh 2023 update, some users have missed the Tab Search button’s familiar spot on the right side of the browser window. It’s now located by default on the left side. Google is giving you back control over its placement, and the change is currently being tested.

For those unfamiliar, Chrome has a built-in Tab Search feature. Clicking the dropdown arrow allows you to search through all your open and recently closed tabs. This can be a lifesaver if you have a lot of tabs open. The Tab Search interface also groups and shows specific tabs playing audio and video.

Tab Search Position changes

With the Chrome Refresh 2023 update, the Tab Search button was moved to the left side of the window. While this was likely done for design reasons, many users didn’t like the change.

The good news is, that you’ll soon be able to move the Tab Search button back to its rightful place on the right side. This functionality will be similar to how you can currently adjust the position of the Side Panel in the Appearance settings. Both the Tab Search position and Side Panel will have dedicated dropdown menus, giving you complete control over their placement.

While this might seem like a minor tweak, it’s a welcome change for users who rely on the Tab Search feature and prefer it on the right

How to Move the Tab Search Button to the Right

The exact method for changing the Tab Search button position is still under development, but based on the information available, it’s likely to be a simple process:

  1. Navigate to your Chrome settings.
  2. Visit the Appearance section.
  3. You should see a new dropdown menu specifically for “Tab Search Position.“
  4. Select “Show on right” to move the button back to its previous spot.
  5. Restart Chrome for the changes to take effect.
Tab Search position setting show on right dropdown
Side panel position show on right dropdown

With the option to move the Search Tabs button, Google allows you to personalize your browsing experience even more and customize Tab Search and Side Panel positions to your liking.

Related to Chrome, we have recently reported Google is looking to allow retaining Side panel width across browser restarts after resizing.

How to Download 7-Zip for Windows 11 on ARM

As the idea of Windows on ARM gains prominence, especially with Microsoft’s recent push for Copilot+ PCs, users are now looking for the ARM version of apps as they switch computers. While Microsoft has released many, third-party developers still lag behind. But what about 7-Zip for Windows 11 on ARM?

Surprisingly, there’s a dedicated 7-Zip app for Windows 11 on ARM, available for download on the official website. And the installation process of 7-Zip for ARM64 Windows isn’t any different!

How can I download 7-Zip for Windows 11 on ARM?

  1. Go to 7-Zip’s official download page, and then click the Download button next to the 64-bit Windows arm64 system for the latest app version.7zip windows 11 arm
  2. Run the setup (.exe) file and follow the on-screen instructions to complete the installation process. It shouldn’t take more than a minute.run installer

It’s this easy to install 7-Zip for ARM64, given the developer’s focus on Windows on ARM, the next big thing in the tech landscape!

Also, if you inadvertently download the Windows ARM64 version of 7-Zip on a regular version of Windows (maybe even vice-versa), the setup will throw the This app can’t run on your PC error. It’s a sign that the setup installs an incompatible app version!

Although, this isn’t something you should be concerned about as long as you are getting a suitable installer.

Besides, for the unversed, most apps developed for x64 and x86 bit system architectures run seamlessly on Windows 11 ARM, given the ARM64EC emulation in place. You are likely to get an error only for apps specially curated for the x64 or x86 system or with dependencies on hardware drivers.

Have you tried 7-Zip on Windows 11 ARM64? If so, share your review of the app’s performance on the new system architecture. Moreover, you can try out the portable edition and let us know your opinion!

Outlook will let go of its basic authentication for a stronger, more secure method

In a world where digital security is very important, Microsoft has decided to be more serious for users of Outlook personal email. On September 16, 2024, the big tech company said farewell to Basic Authentication in Outlook for the login method used in past times that only needed a username and password.

In a blog post, Microsoft says this step aims to increase safety and ensure that users’ emails and private information stay away from “bad actors.” But now, Microsoft is pushing people to use Modern Authentication methods in Outlook, including an extra layer of security. This modification doesn’t just affect Outlook; it also affects those who are still utilizing Hotmail.com and Live.com for their email accounts.

To help keep Outlook personal email accounts secure, starting September 16, 2024, Microsoft will no longer support Basic Auth, the method in which a person provides only their username and password to sign into their account.  As of September 16, 2024, Outlook will require that all those with a Microsoft email account use a mail or calendar app or the Outlook.com website which supports modern auth, such as the latest versions of Outlook, Apple Mail, or Thunderbird.  

Microsoft

You may wonder, “What exactly is modern authentication?” It’s a safer method of confirming your identity, moving away from the usual username and password. It has extra backend steps or tokens involved—this might sound complicated, but it’s designed to protect you more without causing you any trouble.

The change indicates that any application which does not back Modern Authentication will lose the capability to connect with these Microsoft email services.

But do not worry—Microsoft is here to assist. They have explained the changes and steps to take for a successful switch. The simplest way to adjust is to get one of the free Outlook applications for iOS, Android, Windows, or Mac.

These apps are already ready for Modern Authentication. Also, if you have Outlook 2021 (build 11601.10000 or above), there is no effect, and everything will work as usual.

Besides this big security update, Microsoft is also stopping the lite version of the Outlook web app that could be used with older web browsers on August 19, 2024.

The light Version of the Outlook Web App will no longer be supported after August 19, 2024. We understand accessing your Outlook.com account from anywhere is important. Many customers access Outlook.com from web browsers. While most customers access their personal email accounts through modern and current browsers, we were offering a lightweight version of the Outlook web app that was supported by older browsers. As we accelerate our security efforts to help better protect our customers, we are retiring the light version of the Outlook web app. This means that after 2024 customers will need to run the latest versions of a supported browser to run Outlook.com.

Microsoft

For those who still cling to old Windows Mail and Calendar apps, it’s time to bid farewell by the end of this year. They suggest users switch over to the new Outlook for Windows, which offers more features not found in these previous applications while being free as well.

Also, Microsoft will no longer support accessing Google Gmail accounts on Outlook.com as of June 30, 2024.

Furthermore, as part of the Cortana wind-down process, voice command functionalities such as Play My Emails and Voice Search will cease for Outlook mobile users by the end of June 2024.

So, what’s the bottom line? Microsoft is making big moves to protect your data, and they are not messing around. Although it may need some changes from you, these updates are made for your good. After all, can you ever be too secure in today’s digital age?

The KB5039213 update may cause the Windows 11 account picture error 0x80070520 again

Microsoft just released the June Patch Tuesday updates. The KB5039212 is for Windows 11 23H2 and 22H2 while KB5039213 is for Windows 11 21H2. As far as Microsoft is concerned, there are no known issues for the first one. However, KB5039213 is know to cause the error code 0x80070520 while you’re trying to update your account profile picture.

The Redmond giant acknowledged this issue in the release notes of the KB5039213 patch, but this problem is far from being new. We reported about this problem in April and it surfaced after the KB5036980 Windows 11 update.

How do I fix the profile picture error 0x80070520?

Unfortunately, as we’ve mentioned back then, Microsoft didn’t address the error code 0x80070520 that occurs when you try to change your profile picture in Windows 11.

However, we have a workaround that you may try to fix this ongoing issue. To do that, first, open the File Explorer, paste C:\Users\placeyourusername\AppData\Roaming\Microsoft\Windows\AccountPictures in the address bar and press Enter. Of course, you need to change placeyourusername with the actual name of the user. You may also navigate to that path manually.

Here, paste the new profile picture in .png format and restart your device. After that, the new image should be visible for anyone. Of course, you also have the option to uninstall the update.

We don’t know yet if this problem resurfaced among Windows 11 users, but if you encounter it, you know what to do.

Windows 10 is on its last leg, but with KB5039211 Microsoft is still adding new features to it

In this fast-changing world of technology, it is very important to maintain updated software. Therefore, when Microsoft releases its Patch Tuesday updates, it’s like an early Christmas for tech lovers and IT experts.

This June has been no different. Microsoft offered a range of updates that fix vulnerabilities and add some cool features. Let’s dive into the details, shall we?

The June 2024 update, KB5039211, is important for Windows 10 users. Specifically, users on versions 21H2 and 22H2 will see changes that Microsoft has made to improve security.

This covers a wide spectrum of safety issues and protects our systems from the most recent threats. But it’s not just about security; an exciting new feature has been added to the Snipping Tool, too—making it better for people who enjoy maintaining their work processes smoothly across different devices.

You can now edit photos taken with your Android device using the Snipping Tool on Windows PC. Think about it: you take a photo using your phone, then suddenly receive an editing suggestion on your PC to use the Snipping Tool for that picture. Useful, isn’t it? Microsoft has included this integration as an element of their bigger goal to enhance the connectedness and productivity of our digital existence.

It also addresses some irritating problems that users have been facing. For example, certain apps used to show a hidden window while sharing the screen, and this issue is resolved now. Disappeared. Or the problem of the Share button on USB controllers not cooperating with the Game Bar. Solved. Oh, and the lsass.exe troubles like crashes and memory leaks? All handled.

But it’s not just about happiness and positive things. Some issues remain, and the Copilot feature, which makes desktop icons move from one monitor to another like they are dancing or not being supported by a vertically positioned taskbar, is not resolved with KB5039211 on Windows 10.

Then we have a tale with Microsoft Connected Cache node discovery along with the problem of changing your user account profile picture that gives an error message when attempted. Microsoft is on it, though, and it promises fixes in future releases.

  • New! Microsoft is rolling out the new Snipping Tool feature. The feature is available when you link your Android mobile device to your PC. When you take a photo or screenshot on your Android device, a dialog on your PC prompts you to open Snipping Tool. To turn on this experience, go to Settings > Mobile devices. Choose to allow your PC to access your mobile devices and select Manage devices. Your PC will get a Cross Device Experience Host update in Microsoft Store. You need this for the feature to work. Finally, use the Add device option to link your Android phone.
  • This update addresses an issue that displays a hidden window. Its title bar has no content and no client area. This occurs when you share your screen using certain apps.
  • This update addresses an issue that affects the Share button on USB controllers. It might not work with Game Bar.   
  • This update addresses an issue that affects lsass.exe. It stops responding. This occurs after you install the April 2024 security updates on Windows servers.
  • This update addresses an issue that affects lsass.exe. It leaks memory. This occurs during a Local Security Authority (Domain Policy) Remote Protocol (LSARPC) call.

KB5039211 is delivered automatically through Windows 10 Update, so most people don’t need to do anything. But if you prefer to be hands-on, you can manually search for updates or download the package from the Microsoft Update Catalog.

The June 2024 Patch Tuesday update shows Microsoft’s continuous effort to maintain a safe and user-friendly ecosystem. The Redmond-based tech giant managed to fix no less than 51 vulnerabilities this month.

Every update to Windows 10 makes it slightly stronger, more secure, and better connected to our everyday tech habits. Therefore, let us look forward to smoother and safer computing experiences in the future.

Microsoft fixes 51 vulnerabilities in the June 2026 Patch Tuesday update

Microsoft has just published its June 2024 Patch Tuesday, which resolves a total of 51 flaws with 18 being remote code execution (RCE) vulnerabilities. Apart from these, they have also fixed one publicly disclosed zero-day vulnerability that was indexed as CVE-2023-50868 and could lead to CPU exhaustion in Azure systems if successfully exploited by an attacker.

Within the 51 discovered vulnerabilities, there are 25 flaws for elevation of privilege, three weaknesses in information disclosure and five bugs causing denial of service. The 18 RCE flaws are found in different components of Windows such as kernel mode drivers, Windows Distributed File System (DFS), Microsoft Streaming Service (MSS), Microsoft WDAC OLE DB provider for SQL and Azure SDK.

What is the most important fix in the June security update?

Microsoft has resolved 18 critical vulnerabilities. However, only one vulnerability named CVE-2024-30080 is considered critical. This is because it’s a remote code execution vulnerability in Microsoft Message Queuing (MSMQ).

Apart from the important issues, Microsoft has resolved seven weaknesses in Microsoft Office that could have been used for distant code execution, such as bugs within Outlook and other programs like Word or Excel. There were also problems found in SharePoint and the Microsoft Streaming Service.

A serious elevation of privilege bug and RCE bugs were fixed for Microsoft Dynamics 365 Business Central enterprise resource planning platform as well as Microsoft Dynamics 365 (On-Premises) customer relationship management software. Also, Microsoft Speech Application Programming Interface (SAPI) has been patched for similar risks.

Furthermore, Microsoft has addressed a vulnerability in Windows Cloud Files Mini Filter Driver that could enable an intruder to evade the sandbox and raise their privileges. This is the second instance where this type of flaw has been resolved within past many months.

The flaw with the code number CVE-2024-30085 was fixed by Microsoft in May, yet it seems that the patch they provided was not enough. Microsoft also patched the same flaw, with code number CVE-2024-30085, in May but now it looks like this fix didn’t work well.

As usual, the most straightforward method for installing recent updates is to look up Windows Update in your search bar and choose the option Check for updates. If you like to do it yourself, find these upgrades on Microsoft Update Catalog site.

What are your thoughts on the most recent Microsoft Patch Tuesday updates? Share them in the comments section.

Ad Blocker in Arc Browser: Everything You Need to Know

Ad blockers have become a vital functionality in browsers, and they often affect our decision when picking one. Of the many, Arc browser’s ad blocker is often said to be one of the most effective!

For the unversed, the Arc browser doesn’t come with a built-in ad-blocking functionality. Instead, it pre-installs the uBlock Origin extension on Windows devices, if the option is chosen during setup. Even on my device, the uBlock Origin extension came pre-installed on the Arc browser when I chose the default setup configuration.

How do I enable the ad blocker in Arc browser?

You don’t need to manually enable ad blocker in Arc. If the uBlock Origin extension is installed, the ad-blocking should automatically kick in on all websites except for the ones manually whitelisted or added to the list of Trusted websites.

arc browser's built-in ad blocker
Ad blocker in action on Acr Browser

When I tried the browser, it functioned the same as advertised without triggering any issues. As for the overall browser experience, that’s probably a topic for another day!

How can I disable a uBlock on Arc Browser?

1. For individual websites and webpages

  1. Go to the website that you want to disable ad blocking for.
  2. Click the Site Control icon next to the address bar and then choose the uBlock Origin extension.ublock origin extension
  3. Finally, click the Power icon to disable the uBlock Origin ad blocker across the website. If you want to disable it for the specific page, hold the Ctrl key and then click the Power icon.disable ublock origin arc browser ad blocker

2. For multiple websites

  1. Click the uBlock Origin extension icon near the top-right corner, and choose Open the dashboard option. adblocker dashboard arc
  2. Head to the Trusted sites tab, and add websites for which you want to disable the uBlock Origin ad blocker in the Arc browser to the list. Enter a single website in each row.turn off arc browser ad blocker for multiple websites

Is the Arc browser’s ad blocker good?

Upon testing Arc’s ad blocker and verifying the built-in settings, I found that it performs the intended job well. It was able to block all ads across websites, even the intrusive ones that capture a large section of the screen.

Additionally, the modern-looking UI (user interface) enhances the browsing experience, though it might take some time for new users to get used to the changes. The Settings section, however, is quite similar to Google Chrome, given that they are both Chromium-based browsers.

arc settings

But Arc is still in its infancy in the Windows ecosystem, having released only a few months ago. So, if I had to pick a browser with built-in ad-blocking, it would probably be Opera.

What can I do if the Arc browser ad blocker is not working?

1. Make sure the uBlock Origin extension is installed

  1. Launch the browser, click the Arc icon near the top left, select Extensions from the menu, and then choose Manage Extensions.extensions
  2. Verify that you have uBlock Origin listed here and that the extension is enabled.troubleshooting arc browser ad blocker
  3. If uBlock Origin is not listed, open the Chrome Web Store.
  4. Now, search for uBlock Origin, open the listing, and click on Add to Chrome to install the extension.install arc browser ad blocker
  5. Again, click on Add Extension in the confirmation prompt.
  6. Once the extension is installed, verify whether ads are now blocked on the Arc browser.

2. Check the list of trusted websites

  1. Launch Arc, click the Site Controls button, and select uBlock Origin from the list of extensions.ublock origin
  2. Click on Open the dashboard icon.
  3. Go to the Trusted sites tab, and make sure the websites displaying ads are not listed here. If you see any such websites, remove them.troubleshoot arc browser ad blocker

3. Reinstall the Arc browser

  1. Press Windows + I to open Settings, go to Apps from the navigation pane, and then click on Installed apps on the right.
  2. Click the ellipsis next to Arc and then select Uninstall from the menu.remove arc browser
  3. Again, click on Uninstall to confirm the change.
  4. Once done, reboot the PC for the changes to apply.
  5. Finally, download Arc from the official website, run the setup, and reinstall the browser with the default configuration in place.

If that doesn’t work, there must be some leftover files triggering issues. So, you should use an effective software uninstaller tool to get rid of all leftover files and Registry entries.

By now, you know everything about the ad blocker in the Arc browser, ranging from enabling/disabling the feature to troubleshooting issues.

Besides, if it doesn’t seem like the best fit and you don’t want to compromise on the functionalities, discover our top picks for Arc browser alternatives or browsers with built-in VPN and ad-blocker!

What’s your review of the ad blocker in the Arc browser? Share with our readers in the comments section.

MediaTek will probably launch their Arm-based Copilot+ PC chips next year

Allegedly, MediaTek is getting ready to join the group of Windows on ARM devices. This possible action might change how things are now because most of this area has been led by Qualcomm processors and somewhat by Macs powered with Apple Silicon through virtualization software.

Reuters, citing undisclosed sources, writes that MediaTek’s entry into this arena isn’t just a passing idea but an organized plan hoping for release during the second half of 2025. This might be the start of a fresh period for competition and creativity within the ARM-based Windows PC sector.

Why is this an important development for Copilot+ PC?

For people watching the Windows on Arm path closely, it wasn’t a secret that Qualcomm had an exclusivity deal to deliver Arm chips for Windows computers. But as that period will end next year, MediaTek could enter with its own Arm chip made for Copilot+ PCs. This would be based on the designs of ARM already present in other devices. It’s likely that this situation might make things easier during development time at MediaTek; however we don’t yet know if these processors will become part of Copilot+ PC program or not.

MediaTek’s entrance in this market is significant for two reasons. It could bring more variety to the kinds of chips used in today’s Windows computers, which have mainly included those made by AMD and Intel with Qualcomm as only option for ARM type processing power up until now. If we see MediaTek join alongside them – or possibly Nvidia and AMD too later on – it might greatly change things around giving people greater selection possibilities. Arm’s prediction of getting 50% of the PC market in 5 years sounds a little more plausible now.

However, even though there aren’t many Copilot+ PCs available right now, the future seems hopeful with more devices and form factors coming in. Microsoft and MediaTek have remained silent, not offering any comments about these changes, but a lot of things can happen in a year.

Here’s The Best Gaming Browser For Windows 11

Sure, everyone uses a browser for everyday tasks but have you ever considered getting a gaming browser? The best gaming browser is out there for your Windows 11, and we’ll help you narrow down the top-tier contenders.

Key features to look for in a gaming browser

  • Cross-Platform compatibility – When playing a game, how easy is it to switch from one device or OS and pick up from where you left off? If your browser offers these synchronisation capabilities then it’s a go-ahead.
  • Performance optimization – How well does the browser respond when reloaded? How’s the resource consumption? Some browsers come with built-in performance optimization features so that your CPU overhead is not through the roof and you’re not experiencing frequent lag. For instance, our Opera vs Firefox CPU usage analysis reveals which one is a CPU hogger.
  • Security and privacy – Are you feeling secure with your data on that browser? You’re likely sharing some personal information so you need to be sure there are no anti-tracking or phishing incidences.
  • Gaming extensions and plugins – Extensions make the browser world go round and enhance your gameplay. So how well does your choice of browser integrate with these additions? 
  • Developer support and regular updates – So your browser meets all other requirements but how often is it updated? Are the developers prompt in bug fixes? If not, then the browser is only as good on paper.

Before you go downloading any browser, you need to have your non-negotiables fulfilled. Once a browser satisfies these requirements, you can go ahead and install it. Remember that your device’s hardware specs also play a key role in all this.

Other notable features you may want to look out for include an intuitive interface but if its performance is great, you can overlook some components.

What is the best gaming browser for Windows 11?

We’re going to test out several browsers and see how well they respond to our recommended browser games. We’ll be checking for:

  • Load times
  • Smooth scrolling
  • CPU and RAM usage
  • Packet loss
  • Network stability

For context, I’m on Windows 11 Pro and the following are my hardware specs: 

  • Processor – Intel Core i5 with 4 cores at 2.50GHz speed (not overclocked)
  • RAM – 8GB
  • GPU – Intel
  • PC model – Lenovo

Other notable factors that may play a part include internet speed and mine is at 23 and 24 for download and upload speed respectively. I’m on a wireless connection and my latency is also 2 ms.

Before playing, I made sure all my graphic drivers were up-to-date, my OS and the browsers too.

We’ll be playing Tanki Online, an online multiplayer game on all browsers for good measure.

Opera GX – Very fast and customizable

Opera GX was the first browser created specifically for games and gamers. Due to this, it comes with some pretty neat features which we will take a look at below.

Loading was fast. CPU overhead was negligible at around 11%. When it comes to security, Opera GX blocked the game for security reasons and I had to give permission to continue playing.

Despite having built-in security features, this prompt made me feel like Opera GX cared about my privacy and security.

Opera GX allows you to allocate RAM and CPU toward your browser, so when playing a game, you can just increase them to ensure it runs smoothly.

The performance was really good, with smooth movements and clicking. Opera sync also came in handy when I switched over to my mobile.

It’s a bit ironic that Opera GX and Chrome use the same Chromium engine but the performance metrics are higher for Opera GX. Overall, the game was smoother on Opera GX.

Other noteworthy features include:

  • Anti-tracking features
  • Numerous integrations
  • Can use extensions from the Chrome Web Store
  • Browser data sync across devices
  • CPU and RAM limiter
  • Integrated Discord and Twitch

Opera GX

Try Opera GX and get the full browser gaming experience without crashes or lagging.

Google Chrome – Secure browser

chrome

First impressions: The game took a few seconds to load. Approximately 15 seconds. It would probably perform better if I was on an a wired internet connection.

I did not receive a security prompt on whether I wanted to proceed with the game but let’s assume Chrome’s built-in safe browsing and security settings already did its inspections in the background.

I have adblockers installed on all browsers but since Google Chrome is my default browser, it has a little bit more extensions compared to the others so this would explain why it is a bit slower than the rest. It is a fact that browser extensions tend to slow down your browser.

Navigating the game was quite smooth but there were slight delays when releasing bullets. CPU usage shot up to 33%. Again, it was probably high because of the additional plugins.

Once the game was closed, there was some bit of lag on my device but it was quickly resolved once I closed that tab. I switched to Chrome on my phone to see if I could pick up from where I left off on my PC and synchronization had already been done.

Overall, Chrome did well but could’ve been better with a little bit of adjustments on my part.

Other noteworthy features include:

  • Excellent browsing speed
  • Clean interface
  • It is secure

⇒ Get Chrome 

Firefox – Lower-end devices browser

Loading was average. Could’ve been better. No security checks too. Firefox had some lag. Moving the tanker was a bit hectic and shooting was delayed a bit which ultimately caused my tanker to get blown up.

The game was also not easy on my CPU as it registered highs of 65%. I also noticed that this particular game was not forgiving on memory on all browsers so you might want to clear your cache and cookies once you’re done playing.

Of all the browsers, I had the least favorable experience with Firefox. However, I’m sure with a few tweaks, anyone can have an immersive gaming experience.

Further, Firefox has been known to perform well in the face of adversity so if your hardware specs are subpar, you could easily get away with it and the performance would remain unchanged.

Other noteworthy features include:

  • It is secure
  • Has an add-ons store
  • Sync feature

⇒ Get Firefox

Microsoft Edge – Windows-optimized browser

Microsoft Edge was the slowest to load. I almost reloaded the page thinking it was stuck. Again, still based on the Chromium engine, it is surprising that it took that long to load. However, loading was the only issue.

As far as playing is concerned, I had the most fun playing on Edge. The gameplay was smooth and fast. I eliminated a few players, learnt some new shots and played a couple more games.

I’d say Microsoft Edge had an edge over other browsers probably because Microsoft has been working tirelessly to optimize its performance making sure it can handle resource-intensive tasks like playing online multiplayer games.

It was also forgiving on CPU usage so once the game has loaded, you have nothing to worry about.

Overall, I’d say, Microsoft Edge is a pretty good choice if you’re looking to enjoy gaming.

Other noteworthy features include: 

  • Fast and secure
  • Intuitive interface
  • Many customization features

⇒ Get Microsoft Edge

Brave – Privacy-based browser

brave

Everyone knows Brave is the privacy-focused browser so at least your information is safe here. Loading was more or less similar to Opera, playing was pretty smooth with no lags.

Because of Brave’s many built-in features that optimize it for elevated performance, CPU usage was also low at 9%. Overall, the gameplay was smooth but if you’re not used to the interface, it might confuse you a bit.

Other noteworthy features include:

  • Fast and secure
  • Brave rewards for earning tokens
  • Tab search

⇒ Get Brave

Safari – iOS-based browser

safari

Not to forget the people over at Apple. Safari is pretty much an iOS and MAC-friendly one so its results whether good or bad, there isn’t much of a choice. The above browsers work well on iOS devices but Safari is the one that has been optimized specifically.

Playing the game was smooth and the loading was fast.

Other notable features:

  • Offers a privacy report
  • Has a tab preview feature
  • Compatible with Chrome extensions.

⇒ Get Safari

From these results, each browser has its strengths and weaknesses but nothing a little tweaking won’t do. In fact, we have some tips on how to make your browser games run faster. So while all these findings may be true, they’re also subjective.

This means preference also plays a big role. You may have to sacrifice some security settings for a better gaming experience but all that is up to you. But because we’re big on security, we’d recommend you optimize your PC for gaming instead of compromising on its security.

Try out these browsers for your gaming in Windows 11 and let us know which one you’d award the top spot. And because we’d like to compare our results, share them with us in the comment section below.

Slack is now supported on Windows on Arm, meaning you can use it on Copilot+ PCs

Amidst a changing technological landscape, Slack takes a notable step forward by launching its beta edition for Windows on ARM devices. This action signifies more than just “being up-to-date;” it signifies the future of computing.

Following the arrival of version 4.38.87, Slack can be accessed as an original app on Windows computers that uses ARM processors. Users who are excited to try this beta version can get it from Slack’s official website. The promise that it will be available on the Microsoft Store soon is also there.

10 June 2024

What’s new

  • Slack for Windows on ARM is currently in beta and available for download from our website. We’re still busy adding features and making adjustments to the app, but keep your eyes peeled for it appearing soon on the Microsoft Store.
Slack

This shows the direction of computer use that focuses on being energy-efficient but still strong. Computers with ARM processors are known for their long-lasting battery life and efficiency in performance — they’re stirring up the tech world.

We will soon see the release of the initial Copilot+ PCs, which are powered by Qualcomm’s newest Snapdragon processors. Surface Pro 11th Edition and Surface Laptop 7th Edition, along with other products from top manufacturers such as HP, Acer Inc., Lenovo Group Ltd., and AsusTek Computer Inc., promise improved battery life and performance—particularly for everyday consumers.

However, there’s more to this story. Gossip is spreading about another round of ARM-powered computers, now intended for business use. Qualcomm is also broadening its Snapdragon X processors to include a more extensive variety of devices, suggesting a future that includes not only laptops but also all-in-ones and mini PCs.

Slack’s choice of backing Windows on ARM shows the increasing number of apps providing native ARM64 versions. As more applications join this, the possibility of Windows on ARM matching its x86 alternatives is getting closer.

It is a thrilling period for both technology fans and experts because we are witnessing a new era in computing history. With Slack’s inclusion, the push for a faster and stronger future in computing keeps growing.

HP ProBook’s firmware issues might be caused by Windows Update

Picture this: You have recently updated your HP ProBook, hoping for better results and possibly some fresh characteristics. Instead, you are met with a laptop that is not working. According to Neowin, some individuals who own the HP ProBook 445/455 G7 found their gadgets bricked after installing a firmware update.

The one to blame? Firmware version 01.17 is no longer on HP’s website. Only version 01.16.00 Rev.A remains the latest available one there. In the middle of this confusion, an email from HP suggested how serious this problem could be and requested two PCs be sent for further study at their lab in the USA.

The technician blamed Windows Update for sending out this problematic firmware. However, many users claim they got it through other methods, such as HP’s Support Assistant app or from HP’s support site.

The situation has trapped users, with some charged €400 for a repair they did not make. It is reasonable for trust in HP to drop, particularly when it comes to updates.

HP appears to know about the problem, but its current reaction does not provide much comfort for those out of warranty. The community is now waiting, hoping for a resolution that does not require them to pay.

Always be careful when handling firmware and BIOS updates. They carry a level of risk; if something goes awry, it can become quite disastrous.

If you own an HP ProBook and face this issue, many others likely have similar problems. HP might want to take responsibility and provide a just solution to all, regardless of warranty, but the company hasn’t said anything about it for now. However, it will most likely release an official statement these days. Nobody should be made to pay for a mistake they did not commit.

What do you think about this?

Opera Not Working With Twitch: 12 Best Fixes You Should Know

Is Opera not working with Twitch? You can try these troubleshooting methods to fix the issue yourself.

Due to incompatibility between Opera and Twitch, you’ll see the following error when you sign out:

Opera Not Working With Twitch

Moreover, while you’re signed in, you’ll keep facing the following issues on Twitch:

  • You can’t subscribe to channels.
  • Twitch channel streams won’t load.
  • The channel points redemption feature doesn’t work.
  • You can’t personalize the channel name color.
  • Twitch overlays will malfunction.
  • Points won’t be added to your profile for watching videos on channels.
  • Twitch sidebar won’t work properly.

Worst of all, once you sign out, you can’t sign back in. If you’ve ever faced this problem with Opera and Opera GX, I’ve got just the solution for you.

How To Fix Opera Not Working With Twitch

Simply follow these steps:

Try Private Window Mode

  1. Go to the Start Menu and look up the Opera browser icon.
  2. Right-click on it and select the New private window option.
New private window
  1. On the Private window mode, type twitch.tv manually in the address bar. Don’t use the auto-populated URL.
  2. Now try to sign in again.

Use VPN

Use any Opera VPN extension or system-wide VPN to sign in to Twitch.

Here are some options to choose from:

  • Browsec is a third-party browser extension.
  • Opera Free VPN is a built-in tool.
  • NordVPN is a premium system-wide service.
  • Windscribe is a free system-wide VPN.

Here’s how you can use the native Opera VPN:

  1. When the browser is open, click on the Opera icon in the top left corner.
  2. Find and select Settings on the context menu.
Opera settings
  1. In the Opera Settings screen, scroll down to the Advanced section and click on that.
  2. You should now see the Opera VPN tool.
  3. Switch the slider to the right to activate it.
Enable VPN
  1. Now, check if you can log in to Twitch.

Delete On-Device Site Data

You can also try to remove site-specific cookies, cache, and temp data by following these steps:

  1. Navigate to the Twitch TV website on Opera.
  2. Click on the padlock icon in the top-left corner of the address bar.
  3. Now, click on the Cookies and site data drop-down menu.
Cookies and site data
  1. On the Cookies and site data dialog, click Manage on-device site data.
Manage on-device site data
  1. The On-device site data dialog box will show up in the middle of the top Opera menu bar.
  2. Click the trash or delete icons for the following items in the dialog box:
    • twitch.tv
    • www.twitch.tv
    • amazon-adsystem.com
    • scorecardsearch.com.
  3. Click Done to save the changes.
On-device site data
  1. Try logging in again.

Disable Third-Party Extensions

Users have often linked the Opera not working with Twitch glitch to third-party browser extensions. So, you should try disabling them:

  1. Click on the Extensions icon in the top-right corner of the Opera browser.
  2. On the context menu, click on the Manage extensions link.
Manage extensions link
  1. You should now see the Opera Extensions screen.
  2. Click on the All tab to show every add-on you’ve added.
  3. Scroll down through the list to find and disable all extensions linked to Twitch.
  4. For example, on the Twitch Text Emotes – temotes extension, click on the Disable button.
Disable extension
  1. Repeat the steps for the rest of the third-party add-ons.
  2. Now, restart Opera and see if you can log in to Twitch.

Clear Browser Cache

  1. Press Ctrl + Shift + Delete to bring up the Clear browsing data dialog.
  2. Navigate to the Advanced tab.
Go to advanced
  1. There, checkmark the following boxes:
    • Browsing history
    • News usage data
    • Cookies and other site data
    • Cached images and files
    • Site settings
    • Hosted app data.
  2. Now, hit the Clear data button.
Clear data for advanced

Disable and Re-Enable JavaScript

  1. Press Alt + P on Opera to bring up the Settings screen.
  2. In the Search settings field, type Java.
  3. You should see two on-screen results as shown in the screenshot below:
Settings search
  1. Click on the Security settings.
  2. On Security, select Manage V8 security.
  3. V8 optimizer’s default settings should be Sites can use…
  4. Click on Don’t allow sites…
Settings search
  1. Now, go back to the initial Settings search screen.
  2. Click on the second search result — Site settings.
  3. Scroll down to the Content section and click on JavaScript.
Content Javascript
  1. The default selection should be Sites can use JavaScript.
  2. Select Don’t allow sites to use JavaScript.
Don't allow javascript
  1. Restart Opera and log in to Twitch.

Disable and Re-Enable Graphics Acceleration

  1. Launch the Opera Settings screen.
  2. In the Search settings field, type Acceleration.
  3. You should see the Use graphics acceleration when available option.
  4. If the setting was disabled previously, enable it.
  5. Likewise, if it was enabled previously, disable it.
  6. Hit the Relaunch button.
Use graphics acceleration when available

However, keep in mind that this setting can lead to high CPU usage while streaming when it’s enabled.

Fix Third-Party Cookies Settings for Twitch

If you keep the third-party cookies setting disabled, you can allow cookies to Twitch exclusively by following these steps on Opera:

  1. Press Alt + P to launch the Settings menu.
  2. Type Cookies in the Search settings field.
  3. Click on the Third-party cookies setting option.
third party cookies
  1. The Block third-party cookies should be active.
  2. In the Sites allowed to use third-party cookies, click on Add.
Add exclusions
  1. Add the complete URL of the Twitch website in the dialog box that follows.
  2. Click Add to confirm.
Add a site
  1. Restart Opera.

Reset Opera Settings

  1. Launch the Opera Settings window by pressing the Alt + P keys on the keyboard.
  2. Scroll down to the Advanced section and click on that.
  3. Scroll to the bottom of Opera Advanced Settings.
  4. You should see the Reset settings section.
  5. Click on the Restore settings drop-down menu.
Reset settings
  1. The Reset browser settings dialog will pop up.
  2. Hit the Reset button.
Reset browser settings

Opera Update & Recovery

  1. On the top-left corner, you’ll find the Opera icon. Click on that.
  2. In the context menu that opens, select Update & Recovery.
Opera menu
  1. Click on the Check for update button.
  2. Once updated, hit the Recover button.
Update and recover
  1. Follow the on-screen instructions.
  2. Make sure you’ve restarted the Opera browser before logging in to Twitch.

Try a User-Agent Switcher‎ Extension

A user-agent switcher‎ app enables your device to approach a website server as a different browser. If you prefer to use Opera and Twitch isn’t working, you can use this extension to access the Twitch server as a Firefox or Chrome user:

  1. Install the User-Agent Switcher extension from the Opera add-ons marketplace.
user agent switcher
  1. Now, click on the Extensions menu in the top-right corner, and select the User-Agent Switcher add-on.
click user agent list drop down
  1. To select a different user agent, click on the Chrome drop-down menu and choose from options, like Chrome, Internet Explorer, Safari, Firefox, etc.
  2. The user-agent version on the top of the list is the latest update of the selected browser. For example, Firefox 69.0 for Windows as shown in the screenshot.
  3. Click on the Apply button.
Apply user agent change
  1. Now, try to log in to Twitch with the spoofed user agent.

Uninstall and Re-Install Opera

Finally, if nothing else works, you’ll need to uninstall the Opera app. But before doing that, you should set up an Opera account if you haven’t done it already to sync browser settings, bookmarks, etc. Later, when you re-install the browser, you can restore backups by simply logging in to the Opera account.

To set it up, do the following:

  1. Click on the Opera Account in the top-right corner of the Opera address bar.
  2. Hit the Sign In button.
opera account
  1. You can set up an Opera Account using any personal, work, or school email. I suggest you to stick to a personal email.
  2. Alternatively, you can sign in using Google, Facebook, and Apple accounts.
google sign in
  1. After logging in, you should see the Get an Opera account dialog.
  2. Click on the Create account button.
create account
  1. You should now see the welcome screen.
  2. Keep Opera open and idle for 10 to 15 minutes for browser data synchronization.

To uninstall Opera, go to the Start Menu on your Windows PC and search for Apps and features. Then, scroll down the list of installed apps and find Opera. Click on the app and hit Uninstall.

Uninstall Opera

Now, download Opera from the official website and reinstall it.

How To Fix Twitch Not Working on Opera GX

Before trying the troubleshooting ideas mentioned above for Opera, do the following on Opera GX:

  1. Navigate to the Opera GX address bar and type opera://update.
  2. Update the browser.
Opera gx update
  1. Again, go to the address bar and enter the following URL:
    opera://settings/content/all?searchSubpage=twitch
  2. You should see the Privacy and security settings page for Twitch TV.
  3. There, click on the delete icon for all the available options, like twitch.tv, ext-twitch.tv, etc.
delete twitch tv
  1. Restart Opera GX and try to log in to the Twitch website before trying the Twitch sidebar or Twitch extension.

Summary

So, now you know how to fix Opera not working with Twitch. Follow these methods in the exact order as outlined above to avoid wasting time on unnecessary troubleshooting. Additionally, you can try Opera’s special gaming themes for a cooler look while streaming.

If the article helped, feel free to comment below. Likewise, if you’ve got any feedback or want to share a better technique that I missed, share those in your comments.

Windows 11 KB5039312 allows users to share local files with others quickly

In the continuously progressing realm of Windows, Microsoft has been quite active in releasing numerous updates and characteristics expected to improve user experience greatly. The Windows 11 KB5039312 update is one good instance; it brings a share button straight into the Search function on the Start menu.

This characteristic, accessible only via File Explorer or specific applications, allows users to distribute files directly from their search outcomes with a single tap.

Sharing will begin in Windows Share, making it simple to select devices or contacts for sharing. This tiny yet powerful feature makes sharing easier in a natural and straightforward way.

But there is more. Microsoft has also been working on the Phone Link app. They have added OCR capabilities, which can scan text within images on your phone and auto-suggested replies for messages.

This will reduce the need for typing and improve overall efficiency, particularly when you are busy moving around. Phone Link update requires version 1.24051.98 or later, but after you have it, these features are ready to use and enhance your messaging experience.

It is required that the Phone Link be updated to version 1.24051.98 or later, but when you do this, these features become available to make your messaging smoother.

There is a unique update related to Nearby Sharing. Now, this feature demands that Wi-Fi and Bluetooth be turned on to work smoothly, ensuring no interruption occurs while sharing files near each other’s devices.

The Windows 11 KB5039312 update could benefit you if you frequently use voice commands. This brings enhancements to Voice Access and Narrator. You will also have access to a fresh command within Windows Search that permits locating files or applications with only your voice.

Moreover, Voice Access’s self-restart function guarantees that it is always available, even if there is a sudden shutdown.

These changes are ready for beta testers and will be more widely available in the next few weeks. This shows that Microsoft is serious about improving and extending what Windows 11 can do to make it better suited for various uses and more convenient for users.

These updates aim to make small aspects of your digital life easier, from sharing files to speaking out text on your PC or simply signing in to Windows 11.

Every single time they make an update, Microsoft isn’t only dealing with problems; they’re improving how we use our personal computers by adding more and more features into it.

Valorant will have a limited beta on Xbox consoles starting June 14th

Greetings, gamers! Are you aware of the current information? Valorant, a tactical shooter that we have all been playing on our PCs and getting pumped up with adrenaline, is now coming onto consoles. You understood correctly! Those clever Riot Games people who created this tactical marvel have announced that Valorant will be available on Xbox and PlayStation.

Can you believe it? The timer has started, and the Valorant limited beta version is planned to begin on June 14th on Xbox consoles. If you are as thrilled as I am, it will make you happy knowing that registrations for this beta are now open. So, if you want to get in on the action before anyone else does – take advantage of this opportunity by heading straight over to their website and signing up yourself.”

Since its debut in 2020, Valorant has been a special treat only for PC players. This game shines with its 5v5 tactical shootouts. However, this exclusive status will alter soon because the Valorant beta version will be accessible on Xbox Series X, Xbox Series S, and PlayStation 5 in some regions, such as the US, UK, Canada, Europe, and more.

There is no need to fear. Riot Games assures us that the list will include other regions after this first introduction. However, they have kept us in suspense about when the complete version will be accessible on consoles.

We’re holding a Limited Beta to make sure VALORANT is console-ready, and we won’t close the doors until we’re confident that our servers and code are fully locked and loaded. That said, we will give you as much advance notice as we can when we do settle on an end date, including updating this article and sharing the details on our social channels.

Riot Games

Moving on, those who succeed in getting into the beta have an extra treat. You can welcome five friends to come along and try out Valorant with you on a fresh platform. However, there’s a little twist: console players won’t be able to cross-play with their PC buddies.

Riot Games explained this decision, saying it’s to maintain the game’s competitive fairness. But they don’t leave us with any information. Cross-platform progression is a yes, which signifies that your Valorant account will match up on both PC and console—ensuring you maintain what you’ve achieved, like progress, skins, and other items.

For those who are unaware, Valorant is not a regular shooter. It’s an online multiplayer game in which two groups of five players compete against each other—one group attacks while the other defends. The aim?

Acquire victory in 13 rounds, which is possible by eliminating the other team or finishing objectives-related tasks. Valorant’s varied agents make it distinct – every agent has unique skills that could change the outcome of a battle.

Now, it’s time to ask yourself: Are you ready for Valorant on consoles? This is an opportunity for all players, whether they have a long history with PC gaming or are just starting in this game.

Get prepared by signing up for the beta and marking your calendars – June 14 will be an important day. Let’s make history together in the world of Valorant. See you on the battlefield!

Avowed will have a third-person perspective, allowing gamers to have a more immersive experience

In the video game realm, where tastes can be very different from person to person, you do not often find a game that aims to please such a wide variety of players. Yet, Obsidian Entertainment is committed to this path with their forthcoming RPG, which is avowed.

Scheduled for release later in 2024, Avowed represents an interesting development by providing gamers with a novel and encompassing choice: they can choose between first-person and third-person viewpoints while playing the game.

Avowed’s director, Carrie Patel, has verified this information. She shared this detail during an Xbox podcast. This decision creates talk and enthusiasm, particularly for people who may feel uncomfortable with the first-person view or the wider viewpoint provided by the third-person.

Now, let’s discuss the changes in player experience. First of all, it’s about making a choice. Whether you have difficulty with motion sickness when using first-person views or prefer to observe your character’s armor and gear from a third-person angle, Avowed provides options for everyone.

This flexibility is different from Obsidian’s previous game, The Outer Worlds. It only had a single-person viewpoint that remained constant. From this, it’s evident that Obsidian is paying attention to the desires of its community and making changes accordingly in Avowed.

And there is more; the game also introduces many new elements to improve gameplay. It has things like changing daytime, which makes it feel more real, and a group camp where characters can talk with each other—these details show that the game offers an involved experience.

In addition, players will be empowered to create their character’s abilities and attributes in any way they like due to the classless progression system. This means you can pick and mix different skills from various paths, creating a unique character without being restricted by traditional classes.

If there is a time when someone feels remorse for their decisions regarding how they shaped or improved their character, no worry – because there exists an option called respec. This allows you to change your character’s skills and attributes without starting all over again from the beginning.

The excitement around Avowed is strong, and you can see why. The Obsidian team’s dedication to making a game that looks great and is full of love with details shows well. As we look forward to more information about its release date, one fact remains certain: Avowed has all the signs of being a game that not only accepts player choice but promotes it.

So, are you ready for the third-person gameplay in Avowed? As you can see in the trailer above, displayed at this year’s Xbox Games Showcase, Avowed appears to offer various elements to attract different types of players.

Maybe you prefer strategic combat, a focus on immersive storytelling, or just exploring breathtaking worlds—whatever your preference, Avowed seems to have something for everyone.

And with its release not too far away now, the countdown begins to step into those shoes (or maybe viewing from slightly above) of your next great adventure awaits!

Microsoft’s new VALL-E 2 text-to-speech synthesis achieves human level performance

Microsoft has come up with VALL-E 2, a new model that takes human-like speech synthesis to another level. This is not just an improvement; it’s a big step forward in making computer-generated voices sound more natural and high quality. The creation of this advanced technology marks significant progress from previous versions like VALL-E, which were already at par with human speech patterns but still lacked some crucial elements such as intonation control or avoiding monotonous tone repetition.

The researchers fixed the token repetition issue and more

The latest development overcomes these limitations by introducing fresh aspects like Repetition Aware Sampling and Grouped Code Modeling – all aimed at enhancing stability and efficiency during the process of generating spoken words through machine learning techniques. But what does this mean? Well, let’s dive into the details and find out.

One of the sampling problems is token repetition. Sometimes, the model can produce repetitive sequences which might cause stability issues and infinite loops as mentioned above. This method known as Repetition Aware Sampling takes decoding history into account for more stable and reliable results. Have you ever heard speech synthesis that doesn’t sound quite correct? This feature is here to fix that.

Next is Grouped Code Modeling, a method that focuses on efficiency. By grouping together codec codes, it can greatly shorten the sequence length. This approach speeds up inference and deals with issues related to modeling of long sequences. Think about a situation where you have to quickly synthesize a long speech; this feature makes it possible without losing quality.

VALL-E 2 will talk just like a human

These are not merely technical terms; they empower VALL-E 2 to produce speech that is extremely natural, even for intricate sentences. The model’s elegance lies in its simplicity: it only needs a simple set of speech-transcription pairs for training. This makes the process of collecting and handling data much easier.

According to the technical paper of VALL-E 2, on the LibriSpeech and VCTK datasets, the new LLM showed better results in terms of speech robustness, naturalness and speaker similarity. It is the initial model to reach human equality on these tests. The new version can produce very good quality speech which deals well with complicated and repeated sentences.

VALL-E 2 holds great promise for aiding people who have difficulty speaking, but its possible uses are not limited to these areas alone. Think of being able to give a voice to someone who struggles with talking because of conditions like aphasia or amyotrophic lateral sclerosis. Yet, we should not overlook the dangers of misuse, like voice spoofing or impersonation. It is very important for practical uses of this technology to have rules about approving speakers and recognizing if a speech is real or made by computer.

Could you, for instance, have all your e-books on your PC narrated by Morgan Freeman? You probably could. Publishing them online? That would be a totally different story, and you shouldn’t be able to do that for the obvious reasons.

What do you think about VALL-E 2 and speech synthesis? Let’s talk about that in the comments below. We’ve learned about this from AIM.

Get this G16 Gaming laptop from Dell at just $1,299

Among the many gaming laptops, the Dell G16 Gaming Laptop appears to be an interesting option. It especially appeals to people who want a mix of strength and capability. Its main engine runs on 13th-generation Intel® Core™ processors, and it looks ahead using a lively 16″ QHD+ display.

It has been created to make gamers feel deeply involved in their virtual worlds like they never have before. However, what makes Dell G16 different from others in this competitive market?

The NVIDIA® GeForce RTX™ 4070 graphics card is a game-changing element. It promises excellent visual results and guarantees smooth game running on high settings. This is very important for gamers who desire both detail and fluidity in their gaming experiences.

Picture yourself jumping into your preferred game and experiencing it at its best without delays or graphical sacrifices. That’s the promise of the Dell G16.

The laptop also offers good choices regarding memory and storage. It can have as much as 32GB DDR5 RAM and a 1TB PCIe NVMe SSD, showing its potential to handle not only current games but also upcoming ones that will require more from the system.

This allows you to open many applications simultaneously without any problems, and loading times are noticeably quicker. Have you experienced the kind of gaming where each second of loading feels like a lifetime? Now, those days might be over with this setup.

But it’s not only about the inside. The Dell G16’s design also says a lot about what it can do. You can find this laptop in Metallic Nightshade, and its look is smooth and contemporary, which matches its strong components.

Also, a 1-Zone RGB Backlit Keyboard adds to the overall mood by making gaming in dark settings easier and more atmospheric. These little details can boost the joy of playing games, making it feel even more engaging and fun.

Connectivity is a strength of the Dell G16. It has many ports, such as Thunderbolt™ 4, HDMI 2.1, and several USB 3.2 Gen 1 ports for easy connection with peripherals or external displays. This feature is important to gamers who wish to establish a battle station with multiple monitors or connect their laptops quickly to a high-speed Ethernet network to compete competitively in games (like Fortnite).

Have you ever faced a condition where your laptop’s port did not match, and you had to find an adapter? The Dell G16 may lower the frequency of such moments.

The 6-cell, 86 Wh battery gives you freedom to game on the move without needing a plug socket for power all the time. Even though gaming laptops don’t usually have long-lasting batteries, being able to move around for some hours can make a big difference for people who enjoy playing games in various locations.

To sum up, the Dell G16 Gaming Laptop is a strong example of Dell’s dedication to offering gamers high-quality laptops packed with features that do not compromise performance or design.

The laptop has impressive specifications, a stylish look, and considerate details, which make it worthy for anyone who wants a better gaming experience. Whether you fight aliens, speed cars, or explore big open worlds – the Dell G16 is made to create an amazing moment in your gaming universe.

You can get it from here. And if you’re looking for something just as powerful but less expensive, we’ve got this refurbished Lenovo for you, but you need to hurry up because only one is available.

Microsoft uses the Known Issue Rollback to fix the Windows 11 taskbar issue

If you’ve followed some of the latest update developments, you know that Microsoft acknowledged Windows 11 KB5037853 to cause some weird taskbar issues. For some, it was going haywire and glitching up; vanishing unexpectedly; or simply becoming unresponsive when clicked upon.

Just restart your computer to fix the taskbar issue

Microsoft applied a method known as Known Issue Rollback to solve this issue. This means they can correct problems from afar, and you won’t need to take any drastic actions like removing updates. If you are only a usual user, then no action is required from your side at all. The fix should self-apply, but it may require up to 24 hours to take effect. If you’re becoming restless, a restart could hasten the process.

Now, for the IT admins, there is a bit more work. Microsoft has made available specific group policies to tackle the taskbar matter on managed computers. Here’s what you need to do:

IT administrators can resolve this issue by installing and configuring the special Group Policy listed below. The special Group Policy can be found in Computer Configuration > Administrative Templates > <Group Policy name listed below>.

For information on deploying and configuring these special Group Policy, please see How to use Group Policy to deploy a Known Issue Rollback.

Group Policy downloads with Group Policy name:

Microsoft also mentions that you need to install and configure the Group Policy for your version of Windows, and you will also need to restart the machine for the policies to take effect.

So, if you have been battling with your taskbar, the time for relief has hopefully arrived. If you still have Windows 11 taskbar issues, let us know in the comments below.