As per the latest surprise, Octopath Traveler 2 is available on Xbox consoles and arrived with the popular Xbox Game Pass. This unexpected release has caused a lot of excitement among fans because this game was first launched on PlayStation consoles, Windows PCs, and Nintendo Switch in February 2023. The original Octopath Traveler has also returned to the Xbox Game Pass, attracting even more gamers to its beautiful JRPG setting.
Next, we discuss why this unveiling is significant. Firstly, Octopath Traveler 2 uses Square Enix’s unique “HD-2D” visual approach. This art style combines pixel-based and contemporary graphical improvements to give the game its special and attractive look.
It makes the game visually distinct and provides an additional sentimentality for people like me who were raised on traditional 16-bit RPGs.
The game itself is an expansive adventure. It has eight different characters with unique stories and missions. This format promises numerous hours of exploring, combat in turns, and understanding the story.
What’s more? As an Xbox Game Pass member, you can now start playing this adventure without paying anything extra.
Additionally, Square Enix’s choice to release Octopath Traveler 2 on Xbox and include it in Game Pass shows a bigger pattern of this company shifting towards making its games available on multiple platforms.
This method broadens the game’s audience and provides players with more chances to enjoy these deep adventures with stories, no matter what console they use.
So, what does it mean for you? If you like JRPGs or want a complex and interesting game, then Octopath Traveler 2 can be the best option.
The arrival of this game on Xbox and Game Pass is a major victory for those using Xbox as it adds to their collection of high-quality games. Because of the high praise for this game and its distinct “HD-2D” style, it offers a new experience yet is also reminiscent.
To end, no matter if you’re new to this Octopath Traveler series or a past follower, the unexpected start of Octopath Traveler 2 on Xbox and Game Pass gives you a chance that should not be overlooked.
Its great storytelling, stunning art style, and interesting game mechanisms make it a trip worth taking. And who can tell? You might find your next favorite game. And if we’re lucky, we can play it on the new Xbox handheld console, which is reportedly in the works.
However, the latest changes to the Windows 11 Photos app are affecting the loading time, according to a report by Windows Latest. The redesigned app now takes up to 20-25 seconds to load, with users stuck on the Getting things ready screen.
Upon closer investigation, Windows Latest found that the switch to Windows App SDK is to be blamed for the increased loading time. The same applies to other apps using the modern development framework!
The good news is that the latest Windows 11 Photos app is limited to the Insider channels. So, only a few would be affected by the change. But as it rolls out to stable channels in the coming weeks, there will be far more reports of the Windows 11 Photos app loading slowly.
Besides, Microsoft hasn’t altogether deprecated the older Photos app. You can still download Microsoft Photos Legacy from the Microsoft Store!
Why did Microsoft switch to Windows App SDK for Photos?
If the Windows App SDK development framework affects the loading time, why exactly did Microsoft switch to it from the traditional UWP? That will be the question on everyone’s mind!
There are several reasons for this, ranging from increased compatibility with newer versions of the OS to improved performance to the ability to seamlessly deliver updates. Additionally, the new Photos app now runs at the medium integrity level, providing it with more system privileges.
If we stack up all these benefits against slow loading time for Windows 11 Photos, it’s not too disappointing. And perhaps Microsoft will work on improving the loading time in future updates!
In my opinion, for now, the integration of Copilot in Photos and other AI-powered features should be a change we should be happy about. If history tells us anything, a severe backlash will force Microsoft to work on the slow loading of the Photos app on Windows 11.
What do you think? Share with our readers in the comments section.
Microsoft wants to make sure that its advancements are accessible to all people, including those with disabilities. The company’s commitment is shown by its active request for feedback from individuals with different kinds of disabilities. Their goal is to design products and services that truly include everyone.
This way benefits not only people with disabilities but also improves the overall user experience for all users. According to its blog, Joanna Briggs and Faris Mango, who work at Microsoft, are taking charge. They do this by carrying out usability studies that include everyone, using the methods of Microsoft’s inclusive design approach. This shows how accessibility has become a crucial part of the way they make their products.
Feedback is essential for making technology accessible. Microsoft understands that involving their employees who have disabilities in the process of developing new products and features gives them important insight that can help improve user-friendliness for everyone.
It’s not just about following the rules for accessibility; it also includes grasping how people with disabilities really live and using this knowledge as a motivation to innovate.
The concept of “solve for one, extend to many” in technology design means that when we create features to help people with disabilities, it makes the product better and usable for everyone. When a product is made accessible from its beginning state, it becomes more flexible and can be used by a greater variety of users. For instance, captions made for videos are helpful for people who cannot hear or have trouble hearing and in places with a lot of noise or when you can’t use audio.
Microsoft teams try to understand and fulfill their users’ different requirements by putting themselves in their situations. This empathetic method ensures that the technology they make is functional and truly enhances people’s lives. When Microsoft makes sure its products are accessible, it is not only following rules but also participating in creating an internet that includes everyone.
Microsoft’s mission for accessibility is not a single step. They are always working to improve and find new methods, taking input from various users and applying inclusive design to their work. From using AI to updating the Voice features in Windows, this sets an example of what it signifies to make technology that serves everyone without limitations or exclusions.
With people like Joanna Briggs and Faris Mango putting in their efforts and taking comments and principles of inclusive design on board, Microsoft ensures its items and services are reachable by all. It drives digital change inclusively.
You can start Plex Server without login by modifying the group policy or setting it up in the Windows task scheduler. It’s a useful configuration for users who want to ensure their media server is always accessible, even after a reboot.
I’ll walk you through the setup steps, so let’s begin!
How To Start Plex Server Without Login
I’ve covered two methods:
Modify Group Policy
This method will only work if the last interactive user doesn’t log out before the restart or shutdown. Follow the below steps:
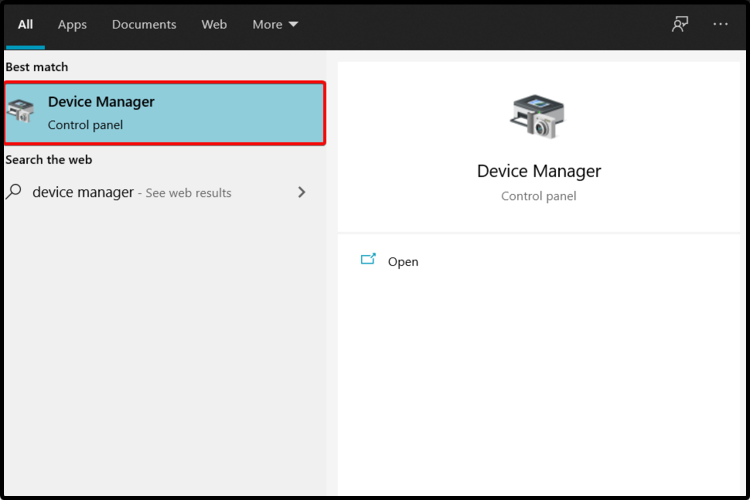
Type “Edit group policy” on the search bar beside the Windows icon and press Enter.
Double-tap “Computer Configuration.”
Double-click “Administrative Templates.”
Open “Windows Components.”
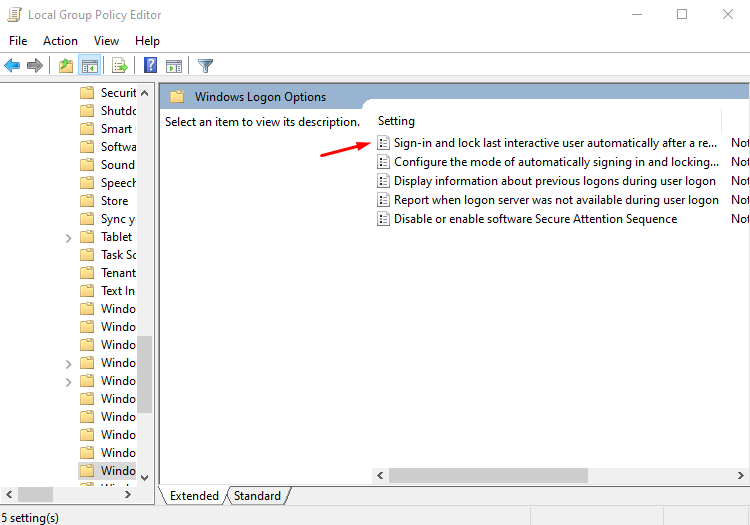
Scroll down to locate “Windows Logon Options” then double tap on it.
Double-click “Sign-in and lock last interactive user automatically after a restart.”
Another tab will open. Select “Enabled” and save changes by clicking the OK button.
Set Up Plex in Windows Task Scheduler
Here’s what to do:
Press the Windows icon + R, type “taskschd.msc,” and press Enter or OK.
Click on “Create Task” in the right-hand panel.
In the “General” tab, name your task (e.g., “Start Plex at Boot”). You can select “Run only when user is logged on” or “Run whether user is logged on or not.” Tap OK.
Move to the “Triggers” tab, and click “New.”
Select “At startup” from the drop-down menu beside “Begin the task.” Tap OK.
Go to the “Actions” tab and click “New.”
Tap “Browse” and select the Plex executable file from your PC. Once done, tap OK to save your new task.
Now, Plex will launch automatically when your computer boots up.
You can now start Plex server without login in by following the above simple steps. This configuration ensures that your media server remains accessible at all times. Enjoy uninterrupted access to your Plex Media Server, no matter when or how often your system reboots!
KTC, an upcoming technology force, has revealed a series of OLED monitors and introduced an innovative mobile screen that can be considered groundbreaking at Computex 2024.
This new OLED gaming monitor, specially made for gamers, has a 48-inch monster and 32-inch and 27-inch little brothers beside it. Each shows UHD resolution and refresh rates up to 240Hz (yes, that’s right). The smoothness and visual delight these monitors offer could change how we understand gaming.
And KTC didn’t just stop at that; they also made a smart monitor. According to the press release, this 32-inch A32Q8 is like a master of all things, being both a professional monitor and streaming TV with help from Google TV. Swapping from work to play on one screen is now a smooth, uninterrupted experience.
KTC also introduces a series of LCD monitors at Computex 2024. For people who love details, they have an H32T13 office monitor and a U27T6 gaming monitor, both of which give excellent image quality. The high-grade touch and carbon fiber materials used in the U27T6 provide it with a top-notch feeling while still maintaining its toughness and performance standards.
Now, we shouldn’t overlook the gamers who thrive on speed. The ultra-high refresh rates of H25X7 and Q24T09 gaming monitors show KTC’s dedication to pushing boundaries. The H25X7, with its 360Hz refresh rate, provides a level of smoothness and responsiveness that is tough to match.
And possibly the most interesting of all KTC’s advancements is A32Q7 PRO, a 32-inch smart portable board. It is not just any monitor; it acts as a mobile screen that can be taken with you for enjoyment and work purposes wherever you go. This device is light in weight, simple to use, and has Google TV functionality, making it an excellent choice for presenting projects or viewing films on the move when a big screen is required.
At Computex 2024, many other cool tech things were revealed. Asus, for instance, is working on Project Dali, a technology that uses e-paper to animate the back lids of laptops. MSI also debuted its brand-new AI PCs alongside a new handheld gaming console, and the star of the show, Colorful Colorfire MEOW, is a series of laptops inspired by cats. Yes, that sounds crazy, but they’re actually good-looking and powerful too.
Now that we know that all the manufacturers unveiled their new Copilot+ PC laptops, we created the lists with all their models, availability and prices so you know what to expect.
ASUS is one of the first early-adopters of both Qualcomm’s ARM chips as well as AMD’s new AI CPUs. The company is trying to cover all the needs of laptop users with devices starting from $999 to premium ones up to $2,699.
While the Qualcomm and AMD laptops are already available for preorder, we will have to wait a few more months for the Intel laptops.
Here’s the list of the major manufacturer’s new AI laptops
We need to mention that HP also has the EliteBook 800 and 805 Series G11 that fall under the same Intel Core 5 & 7 with Ryzen PRO configurations. Although HP mentions that they were launched in April for prices starting at $1,469, we didn’t find them in their store.
Snapdragon X Elite X1E-78-100/ Qualcomm Adreno GPU
16 GB LPDDR5X
14.5-inch, 3K (2944 x 1840), OLED
70Whr
Buy
$1,289
We collected all the data from the manufacturer’s press releases and listings on their respective web pages. We hope that our list will help you in selecting the best option for you, but keep in mind that manufacturers may change any of this data prior to the final releases of their devices.
What do you think it will be the best option for you? Let us know in the comments section below.
Google has acquired Cameyo, which can prove revolutionary as it will make legacy applications accessible and easy to manage within the Chrome ecosystem.
Let’s give a quick introduction to those who don’t know Cameyo. Cameyo is a virtual application delivery platform that lets you access and run Windows applications remotely from any device without installing them. You can access the Windows app from a web browser or via a native client on various devices, including Macs, Chromebooks, and more.
Naveen Viswanatha, Head Of Product, ChromeOS Commercial Solutions, said:
We are thrilled to welcome the Cameyo team to Google. As ChromeOS continues to support customers with their transition to a more secure and seamless computing experience, Cameyo has offered a valuable virtualization solution for enterprise customers to deliver key legacy applications via the cloud. Following our partnership over the past few years, we’re looking forward to working more closely with the team to support more customers in their transition to deploy ChromeOS. More to come soon.
Last year, Cameyo and Google partnered to integrate Cameyo’s VAD service with ChromeOS, allowing Windows apps to run on Chromebooks. With the latest news, it seems Google is committed to preparing Chromebooks for their enterprise and business customers to run legacy Windows apps without Windows OS.
What does it mean for ChromeOS users?
In the official blog, Google called ChromeOS and Cameyo a perfect pairing and said:
ChromeOS has long been committed to providing users with the best possible experience for virtual applications. Recognizing the potential of VAD, we partnered with Cameyo last year to launch a seamless virtual application delivery experience fully integrated with ChromeOS—with local file system integration, ability to deliver virtual apps as progressive web apps (PWAs) and enhanced clipboard support. These features ensure users can seamlessly access data and files in a secure, easy, and familiar way within virtual apps.
This means ChromeOS users can use legacy apps without the hassle of installations and updates. IT admins will gain more control over application management and need to worry less about security risks.
Google also mentioned how the acquisition of Cameyo will assist businesses access web-based apps:
Simplifying application deployment: Virtualized applications can be easily deployed and accessed across your organization, regardless of device or location.
Enhancing security: Both ChromeOS and Cameyo provide zero trust security, and together deliver deep protection of data and systems from vulnerabilities.
Improving productivity: Employees can access the applications they need quickly and easily as a PWA directly from the ChromeOS shelf, without the frustration of compatibility issues, slow performance, or virtual desktops to navigate.
Reducing IT costs: Streamlining application management, support processes, and removing infrastructure requirements translates to significant cost savings over time.
Here is what Mario Zúñiga, IT Director, Digital Workplace at Sanmina, said on this acquisition:
Deploying apps with ChromeOS and Cameyo is remarkably simple. Session management, load balancing, failover, etc.—it’s all handled by Cameyo, so all we had to focus on was the apps we wanted to publish. It was very easy to get set up, and ongoing management is a breeze —especially when compared to traditional virtual desktop approaches. Cameyo is a key element to enabling our long-term Chrome Enterprise strategy. The fact that Cameyo has deep partnerships and integration with Chrome Enterprise and Google Cloud makes this an even more strategic fit.
What do you think about Google’s acquisition of Cameyo? Share your views with our readers in the comments section below.
Of late, it’s starting to look like Microsoft is not too concerned about Windows 10. A series of recent updates failed to install, and Microsoft, although formally acknowledged the problem, has yet to patch things. Right now, three Windows 10 updates throwing an install error are KB5034441, KB5037849, and KB5037768!
As for KB5034441, reports of installation issues have been ongoing ever since the update was released, i.e., almost 5 months. And it’s mostly the 0x80070643 update error.
On its part, Microsoft initially talked about releasing a fix and asked users to temporarily ignore the update. But the Redmond-based tech giant soon backtracked and then wanted users to manually fix the 0x80070643 error in Windows 10, because it reportedly isn’t patchable.
To fix it, they had to manually resize the recovery partition to at least 250 MB or, ideally, 750 MB, the steps for which are listed in Microsoft’s official blog. This approach fails on two levels. First, the process is fairly technical for regular Windows users, and second, even manually resizing the partition doesn’t fix the KB5034441 update error in many cases.
Users furious over frequent update errors in Windows 10
Upon encountering errors with multiple updates on Windows 10, many have started to believe that it’s a tactic by Microsoft to force users to upgrade to Windows 11. Others think it’s just a lack of focus on Microsoft’s part.
Here’s what a few had to say:
I too am having the same failure for KB5037849 from 2-3 days ago and just trying again and sure will fail again. and the KB5034441 I have given up on. We should NOT have to mess around resizing Partitions. I think Microsoft are doing this deliberately because they want people switch to Windows 11. KB5037849 is stuck at 1% download and going nowhere !!
For me, one downloads but fails too install but the other claims it downloads but never does the % download step and just goes too install but then says failed. Also can’t find anything on how to resize anyways. Besides we shouldn’t need to be fixing Microsoft’s mistakes.
I increased size of Recovery Partition to 2GB but still the Update will not install or even download.
Microsoft Update KB5034441 keeps failing to update since Jan. 2024. Microsoft recommends you partition your hard drive to make space for the update. People have partitioned their hard drive and they still get the error trying to update. I am not going to ruin my computer anyways.
Our simple workaround for the 0x80070643 error with KB5034441
Since we have established that resizing the Recovery Partition doesn’t always work, it’s time to discover another fix that, surprisingly, gets the job done and is relatively easier to execute. All you have to do is perform an in-place upgrade on Windows 10.
To perform a repair upgrade, download the Media Creation Tool from Microsoft’s official website > run the setup > accept the license terms > choose the Upgrade this PC now option > click Next > wait for the download to complete > then proceed with the installation.
Performing an in-place upgrade on Windows 10
An in-place upgrade doesn’t affect the stored files. But we recommend you back them up using an external storage to be on the safe side.
I personally believe that Microsoft should do a lot more to get rid of these Windows 10 update errors because a majority of the user base is still on the iteration. According to Statcounter, Windows 10 commands 63.86% of the market compared to 27.64% by Windows 11!
What do you think? Share with our readers in the comments section.
Have you experienced online meetings that seem to go on forever, where you only occasionally unmute yourself to laugh at a joke and then promptly mute again? Microsoft is preparing some features to simplify your life if this sounds familiar.
Microsoft Teams will soon have an update focused on improving mute controls specifically designed for people using it with Windows. You can easily mute or unmute yourself by tapping the Windows taskbar icon. This clever feature removes the annoyance of constantly changing screens while on a call.
MacBook users already have a similar capability for Teams on their devices. Microsoft released it earlier this year.
According to the Redmond-based tech giant, a microphone icon will appear on a call, making muting or unmuting yourself super simple with just one click.
Also, we have something for those who enjoy using shortcuts. A new keyboard shortcut (Windows logo key + Alt key + K key) is now available for muting and unmuting, improving the process.
If you have Teams Public Preview or Microsoft 365 Targeted Release access, these features are waiting for you already. And it sounds like if you don’t have these groups yet, Microsoft won’t make you wait too long to get your hands on the updates.
IT administrators may have to adjust for the mute feature to work in Microsoft Teams in Windows, but once they do, the system is ready for a smoother call experience. This update is among many from Microsoft, which always tries to improve user feedback and shows that they hear and will change accordingly.
Therefore, during your Teams call, a basic touch or shortcut can suffice if you suddenly need to silence yourself quickly to avoid embarrassing background noises. It’s incredible how technology progresses in making our digital interactions slightly more convenient, right?
Opera failing to install might be something you expect but we bet Opera failed to uninstall was not on your bingo card.
Apps can refuse to get kicked out of your system even after trying to uninstall them using different ways. Some of the most common reasons for this behaviour include associated background processes that are still running, permission issues or registry errors.
Sometimes, you might have started with a corrupt installation and everything went downhill from there or a conflict with your security software.
How do I completely remove Opera when it’s failed to uninstall?
1. Kill Opera background process
1.0 System processes
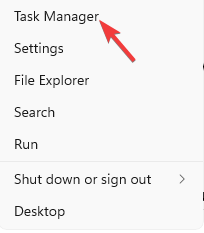
Right-click on the Start button and select Task Manager.
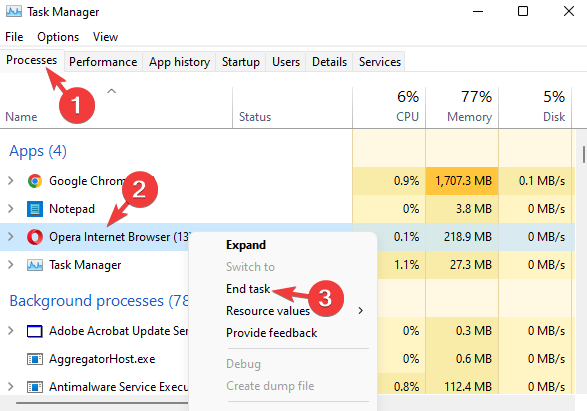
Under the Processes tab, look for Opera.
Now, right-click on it and select End task.
1.1 Browser processes
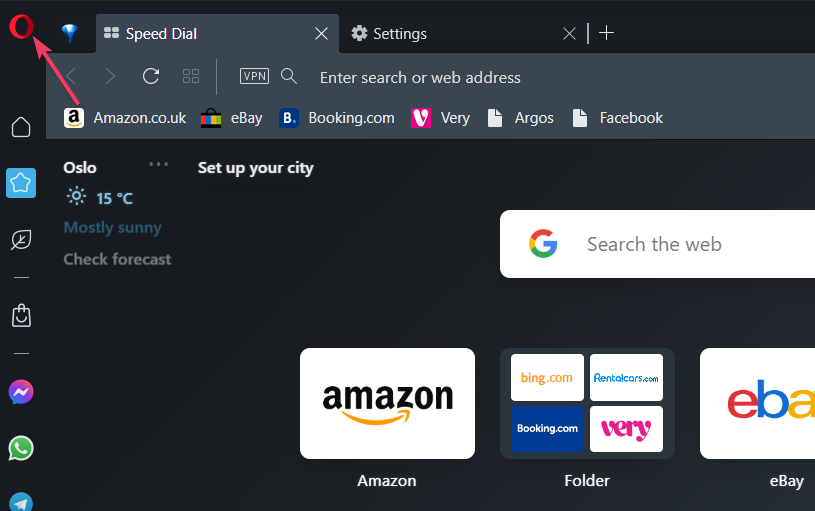
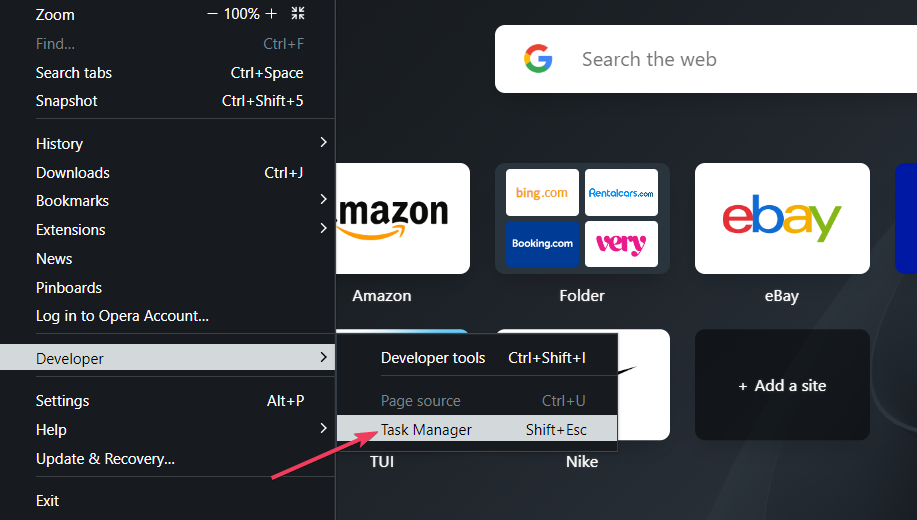
Click the red O (Opera) button at the top left of the browser.
Select the Developer menu.
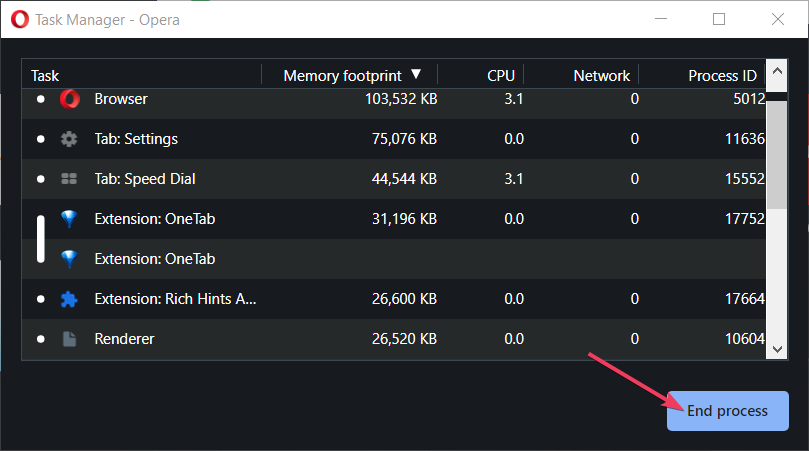
Click Task Manager to view the window directly below.
Select a process, webpage, or extension there to disable.
Press the End process button.
Try uninstalling Opera again and see if the issue persists.
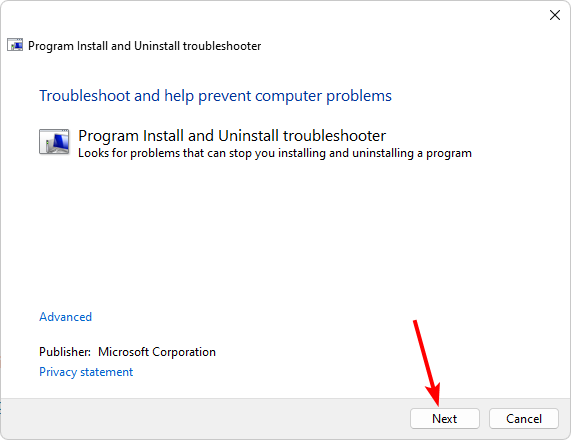
2. Run the Program Install and Uninstall troubleshooter
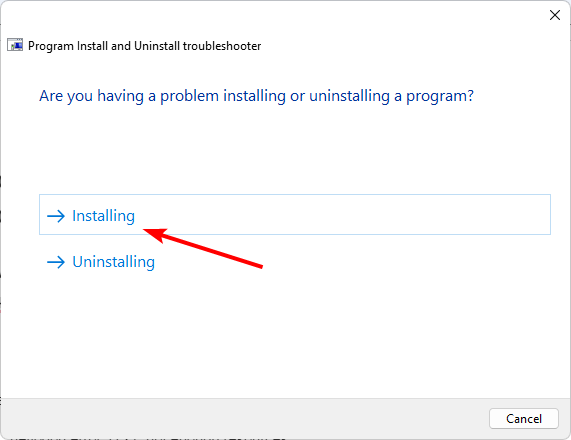
You’ll be asked whether you have a problem installing or uninstalling a program. Select one option.
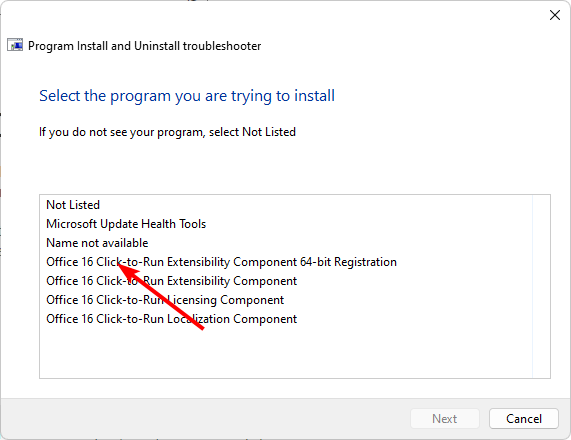
Next, you’ll be asked to select the program that is not installing. Pick the Opera from the list.
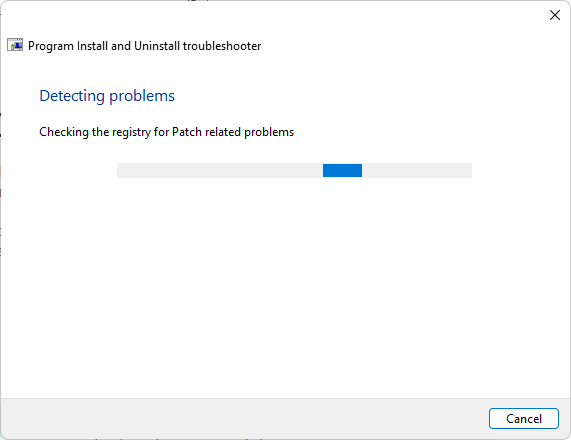
The troubleshooter will start scanning for problems.
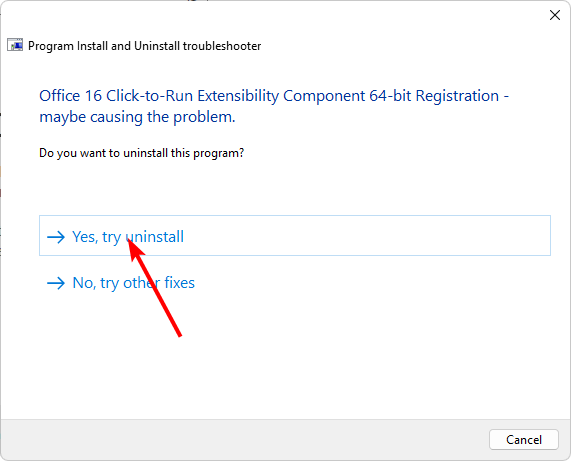
Once it completes, you’ll be presented with two options. Pick either and wait for the troubleshooter to recommend fixes.
3. Remove corrupt registry entries
3.1 Delete files from File Explorer
Ensure you’re using an account with administrative privileges then hit the Windows + E keys to open File Explorer.
Navigate to the following location paths and delete all files: C:\Windows\tempC:\Users\yourusername\AppData\Local\tempC:\Program Files\Opera C:\Program Files (x86)\OperaC:\Users\yourusername\AppData\Local\Programs\Opera
3.2 Delete Autoupdate tasks from Task Scheduler
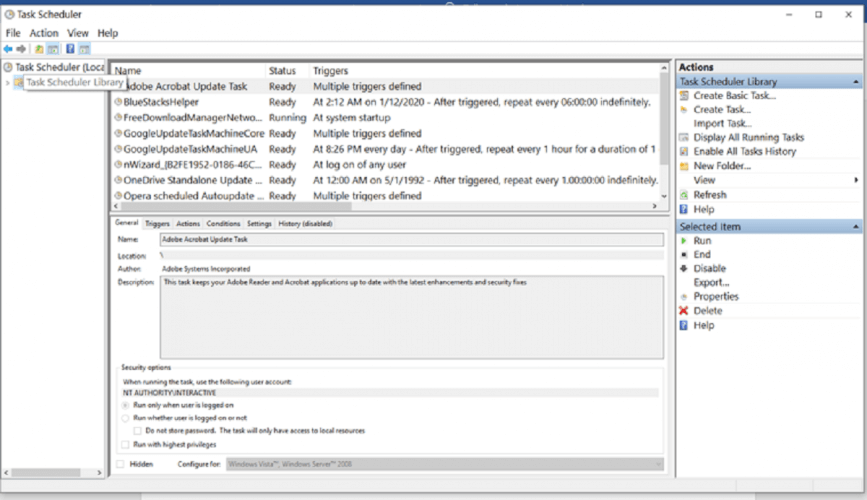
Open the Start menu by hitting the Windows key. Type task scheduler in the search box, then click on the result to open the app.
Click the Task Schedule Library on the left.
Right-click on any Opera Update Task if available then hit Disable from the right-side panel.
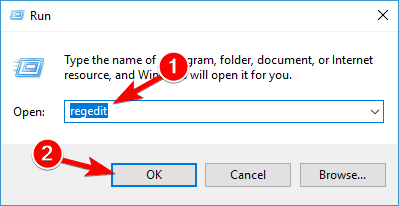
Press the Windows + R keys and type regedit. Click OK or press Enter to start Registry Editor.
When Registry Editor starts, navigate to the following keys in the left pane and delete them: HKEY_LOCAL_MACHINE\SOFTWARE\WOW6432Node\Microsoft\Windows\CurrentVersion\UninstallHKEY_CURRENT_USER\SOFTWARE\Microsoft\Windows\CurrentVersion\UninstallHKEY_CURRENT_USER\SOFTWARE\Microsoft\Windows\CurrentVersion\RunHKEY_LOCAL_MACHINE\SOFTWARE\WOW6432Node\Microsoft\Windows\CurrentVersion\RunHKEY_LOCAL_MACHINE\SOFTWARE\RegisteredApplicationsHKEY_CURRENT_USER\SOFTWARE\RegisteredApplicationsHKEY_CURRENT_USER\SOFTWARE\Opera SoftwareHKEY_LOCAL_MACHINE\SOFTWARE\Clients\StartMenuInternetHKEY_CURRENT_USER\SOFTWARE\Clients\StartMenuInternetHKEY_CURRENT_USER\SOFTWARE\Classes\OperaStableHKEY_CURRENT_USER\SOFTWARE\ClassesHKEY_LOCAL_MACHINE\SOFTWARE\Classes\OperaStableHKEY_CLASSES_ROOT\OperaStable
Note that not all keys or subkeys will be available so if you can’t find it, just move on to the next one.
4. Use an Uninstaller program
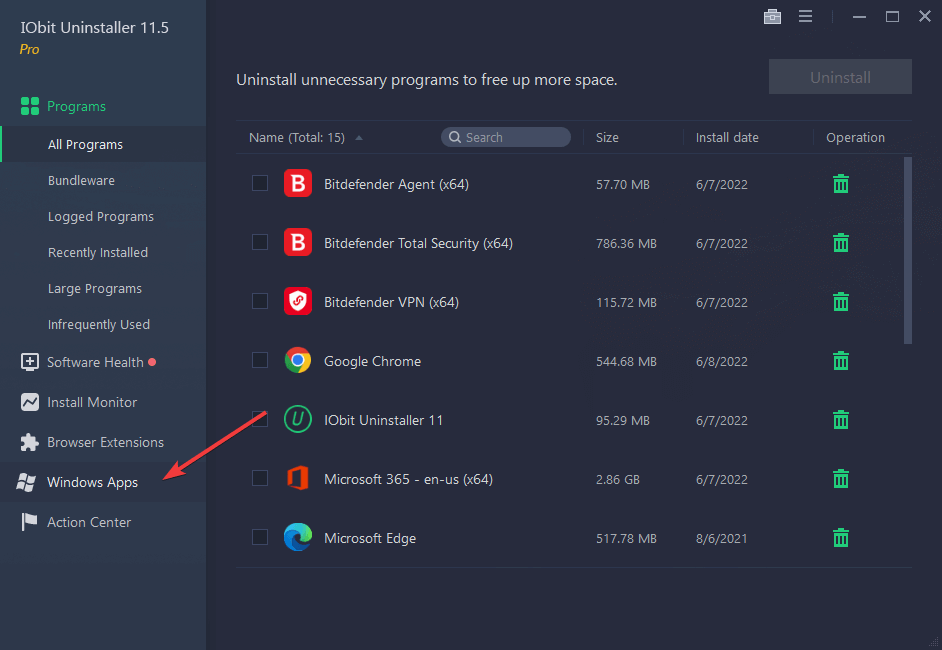
Launch the IObit Uninstaller application from your desktop or via Windows search.
Go to Programs and select thepreferred subcategory.
Browse the list to find the app you want to remove.
Select it and click on the trash icon. Wait for the process to complete.
The good thing about using IObit uninstaller is that it’s so good at its job. If you had installed any plugins on Opera, it also uninstalls them. It also removes leftover files, folders, and registry entries.
Using an uninstaller tool is a more convenient way of removing programs that won’t uninstall because of their advanced features. If you were to do it manually, you might have first to find out why the program is not uninstalling before proceeding. This can take a lot of time and doesn’t guarantee success at the end of it all.
Additional tips and preventative measures
Always download software from legitimate sites. Cracked or modified versions tend to be bundled up with malware that make uninstallation such a difficult task. Also, keep your software updated to avoid such issues.
Clear app cache regularly as over time, it can become corrupt and affect the uninstallation process. It may also interfere with the normal operations of the program hence why your Opera is not working at times.
Use system maintenance tools to keep an eye on your PC’s health and any issues that may potentially cause such problems.
While leaving the Opera program in your system is an option, leaving an unused app can have consequences later on. Leaving leftover files from an incomplete uninstallation can accumulate over time and corrupt the registry.
You’ll notice random PC shutdowns, an excruciatingly slow laptop or even BSoDs. You may also experience problems with reinstallation.
If you were not using your Opera browser efficiently, when you’re ready to reinstall it again, make sure Opera Browser Assistant is part of the package. Opera is one of the faster browsers so if you don’t know where to start, this assistant can help improve your user experience.
That marks the end of this article but we’re curious to hear about your experience. Has Opera or any other app failed to uninstall? What was the solution that fixed it for you? Let us know in the comment section below.
In the gaming world, full of thrills and expectations, there is a rising rumor about The Last of Us Part 2 coming to PC. Naughty Dog—the creators of this game who received much critical praise—have already done the work needed to bring this adventure to computer screens.
However, one exciting twist in the story keeps followers anticipatory. Sony’s choice to push back the start date seems strategic, possibly connected to wanting the game’s release time with the season two airing of HBO’s The Last of Us TV adaptation, which we predict will happen in 2025.
This method is not surprising for people who have kept up with how Sony markets its story-based games. They do this by releasing their popular single-player hits on the computer, which helps them increase the number of players and attract more gamers to the PlayStation system.
This strategy seems smart because we already know about the good results from other PlayStation exclusives that came to PC. Nevertheless, this waiting game also has some disadvantages for the excited fans anticipating the post-apocalyptic adventure of Ellie and Joel on their PCs.
The Last of Us Part 2 has been remastered for PlayStation 5, so we can get an idea of the quality of the PC port. But still, the question is: Will the PC version be based on this latest remaster or on the original PS4 release? Considering recent trends to bring polished versions onto fresh platforms, it seems probably the earlier one.
But think about it, why this delay? It seems that Sony wants to prevent the problems of quick releases. They may have learned from the game The Last of Us Part 1, which had a rough start on PC.
They are probably being careful and making sure that the PC version is very good, without any performance problems that could hurt how people receive it. Additionally, the move to include PlayStation Network accounts in their PC releases enhances their plan to combine console and computer gaming. God of War is already asking for such a thing, but gamers are not receiving the news lightly.
As we near 2025, the excitement for the second season of the TV show The Last of Us Part 2 and its release on PC keeps growing. This shows how popular this series is and that Sony wants to give good experiences everywhere.
So, even if it takes more time than we thought before, things are looking like they will be worth waiting for: an integrated mix between story-telling and playing that has fascinated many millions.
MSI, in the world of tech, has recently introduced a splendid series of laptops that run on AI. And believe me when I say this: they are not timid. Equipped with AMD’s Ryzen 9 AI chips, these devices could be any technology lover’s aspiration—meant to suit everyone from gamers or content creators to professionals always on their feet.
Think about owning a laptop that is not just obedient but also thinks ahead of you since it has AI included within it! MSI is promising that future, and it’s looking bright.
If you are a gamer or creator, then the MSI Stealth A16 AI+ is for you. This laptop not only has the strength of an AMD Ryzen AI 9 HX 370 processor and Nvidia GeForce RTX 4070 GPU but also it’s about its design that will make your eyes sparkle with joy.
A slim magnesium-aluminum alloy body houses a colorful 16-inch QHD+ screen, which assures excellent visuals when playing games and working on creative undertakings. A clever cooling system that balances performance and noise guarantees a calm experience, whether you’re engaged in game warfare or modifying your newest video art.
But what if you’re into making things instead of just playing games? The MSI Creator A16 AI+ is here for you, giving you space for creativity with its touch screen and pen compatibility. It’s like having a digital studio right before you, equipped to materialize your thoughts into reality. It has identical strong insides to the Stealth but is particularly designed for individuals who sketch, create, or modify things.
In the family of these laptops, we also have the MSI Summit A16 AI+, which focuses more on business. It emphasizes mobility and productivity, showing off a 360-degree hinge and touch screen that are very flexible in use. Picture yourself flipping your laptop into a tablet for an impromptu presentation or writing down notes with the MSI Pen – practical! And, with safety abilities that safeguard your work, it is similar to having a personal assistant who is always watchful.
For professionals who want only the finest, they can go for MSI Prestige A16 AI+, which has an OLED display that shows colors vividly and brings out details. It’s not just about looking good; it’s about performing at your best with up to 32GB of memory and 2TB storage capacity. Whether you are doing calculations or making presentations, this laptop is made to match your pace while still being light enough for carrying anywhere you wish to take it along with you.
We must also mention unique edition laptops such as MSI Stealth Mercedes-AMG Motorsport versions. These combine top-notch technology with luxurious design, symbolizing your appreciation for performance and fashion.
If you are a gamer, creator, professional, or admirer of the superior elements in tech, MSI’s fresh series has got you covered. It offers a peek into forthcoming times when your laptop comprehends you somewhat more accurately. And if you don’t want to get one of these laptops, consider the new handheld gaming console from MSI, Claw 8+ AI.
It could make each job somewhat simpler and every project slightly more enjoyable. And in this global situation where we constantly need to perform more tasks for various reasons, who wouldn’t desire that?
The Dell XPS (eXtreme Performance System) series is one of the most popular from the USA-based manufacturer. Every model features a premium design and comes with a host of user-oriented features. To cater to a larger set of consumers, Dell has now slashed the prices of XPS 14 and XPS 16 by $200!
So, if you have been planning to get a Dell XPS laptop, this price cut is the perfect opportunity!
Although the price reduction has been enforced permanently, purchasing the laptop right away gets you immediate access to state-of-the-art design, impressive performance, sufficient storage, longer battery life, crystal clear display, and a high-definition webcam.
The series offers a perfect blend of all vital aspects and parameters, which is evident in the customer reviews!
The second is the design. Both Dell XPS 14 and XPS 16 feature a Touch Function Row, allowing you to seamlessly switch between media and function keys, having only the icon you frequently use on the front. Besides, an all-metal body and the Gorilla Glass 3 display enhance the visual appeal and keep the laptop’s weight under check!
Base configuration for Dell XPS 14 and XPS 16
Dell XPS 14
Dell XPS 16
Processor
Intel Core Ultra 7 Processor 155H (24MB Cache, 16 cores, up to 4.8 GHz)
Intel Core Ultra 7 Processor 155H (24MB Cache, 16 cores, up to 4.8 GHz)
Graphics
Intel Arc graphics
Intel Arc graphics
Storage
512GB M.2 PCIe NVMe SSD
512GB M.2 PCIe NVMe SSD
RAM
16GB LPDDR5x Dual Channel, 6400MT/s
16GB, LPDDR5X, 6400MT/s
Operating system
Windows 11 Home
Windows 11 Home
Display
14.5″ FHD+ (1920 x 1200) InfinityEdge non-touch display, 500-nit
16.3″ FHD+ (1920 x 1200) Infinity Edge, Non-Touch, Anti-Glare, 500-nits
Battery
Up to 21 hours
Up to 28 hours
Camera
1080p at 30 fps FHD RGB-IR camera, works with Windows Hello
I recommend you get the Dell XPS laptop that best meets your requirements at the earliest after the price cut. At the price range, it’s a steal deal one wouldn’t want to miss!
When picking between the two, remember that there won’t be much of a difference in the performance. It’s the bigger display and extended battery life in XPS 16 that makes it $200 costlier than XPS 14.
If you are a seasoned gamer, I would recommend getting a top-rated Windows 11 game laptop. These combine the latest iteration’s gaming-oriented settings with curated hardware support to deliver the best experience!
What are your initial thoughts about the Dell XPS 14 and XPS 16? Share with our readers in the comments section.
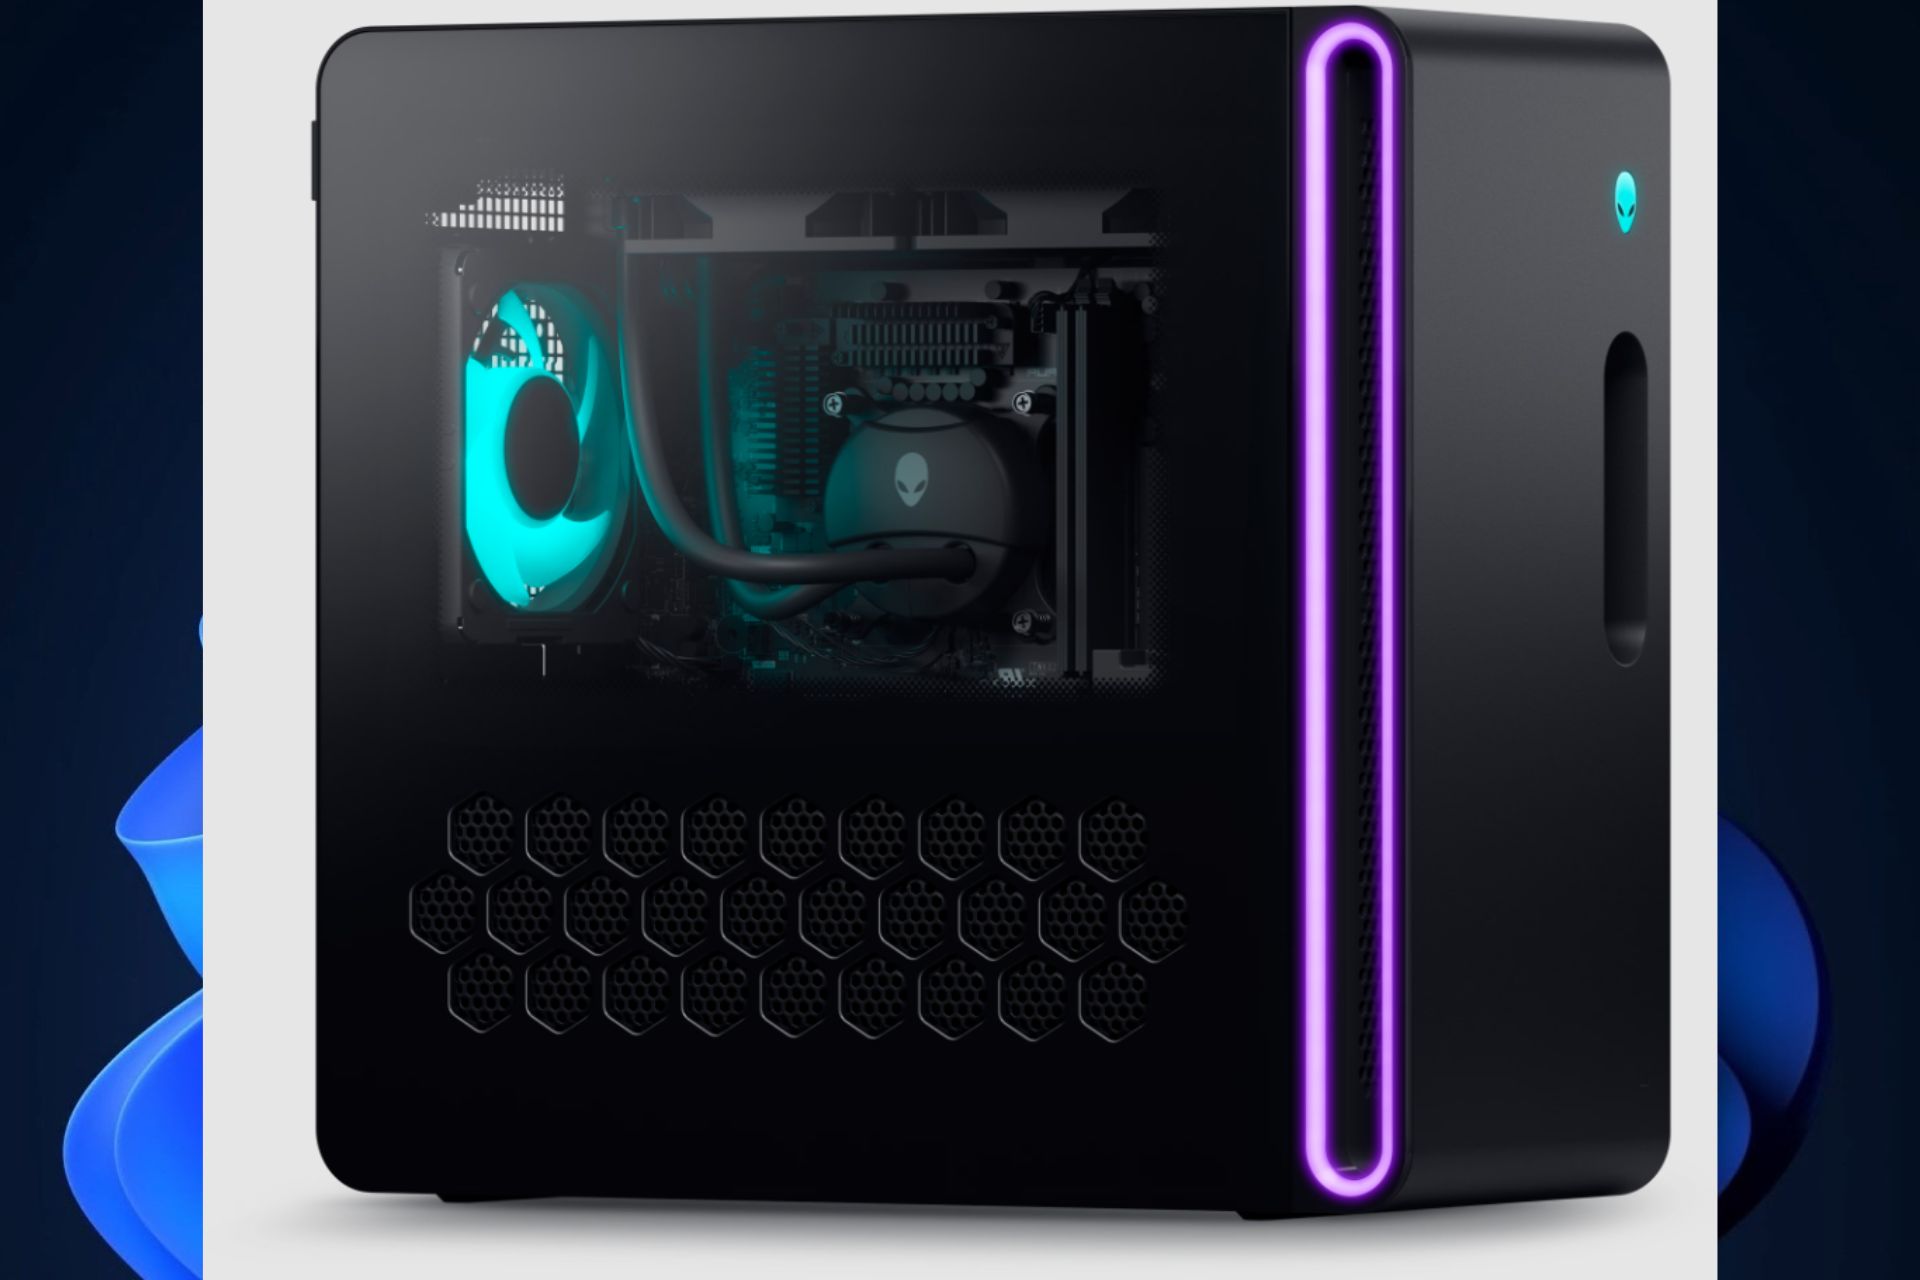
Have you ever longed to have not just any ordinary gaming setup but one that delivers the best experience and offers an amazing deal, too? Dell has answered your prayers with its bundle featuring an Alienware Aurora R16 Radeon RX 7900 XTX Gaming PC and a 34″ Alienware AW3423DWF QD OLED gaming monitor.
And you know what? It only costs $2649. So, let’s examine more closely why this offer is irresistible.
First and foremost, the Alienware Aurora R16 Gaming PC is a monster. It carries an Intel Core i7-14700KF CPU and an AMD Radeon RX 7900 XTX GPU. This setup gets support from 32GB of DDR5-5600MHz RAM and a 1TB NVME SSD. But for those who may not understand the tech talk, this implies that the PC is very quick and can manage any game you give, even on 4K resolution.
Now, let’s talk about the monitor. The Alienware AW3423DWF, which is 34″ in size, is simply amazing. It has a quantum dot OLED panel. This technical term means that this monitor gives you brighter images and more precise colors than regular ones of the same kind. It’s ideal for gaming, with its widescreen, quick response time, and high refresh rate of 165Hz. Moreover, HDR True Black 400 is certified to experience deep blacks and lively colors.
Now, you may ask, why Dell or Alienware gaming PC? The answer is simple: strength and performance. But it goes further than that. They are also famous for their beautiful design and good cooling systems, and they come prebuilt.
This last point can be very helpful since not everyone wants to build a PC from scratch—it is often seen as a complex job! Moreover, the Alienware brand is known for its excellent customer service and build quality, making it a trustworthy option for gamers.
This package is an excellent deal for those who wish to enhance their gaming setup. The Alienware Aurora R16 Gaming PC and the 34″ OLED monitor provide a mix of power, efficiency, and attractiveness that can be challenging to locate elsewhere—particularly at this price range. So, if you have been contemplating getting a new gaming PC, now might be the right moment.
But if you’re looking for a gaming laptop, you might want to consider the popular Razer Blade 15 and 18. They’re also offering a discount these days.
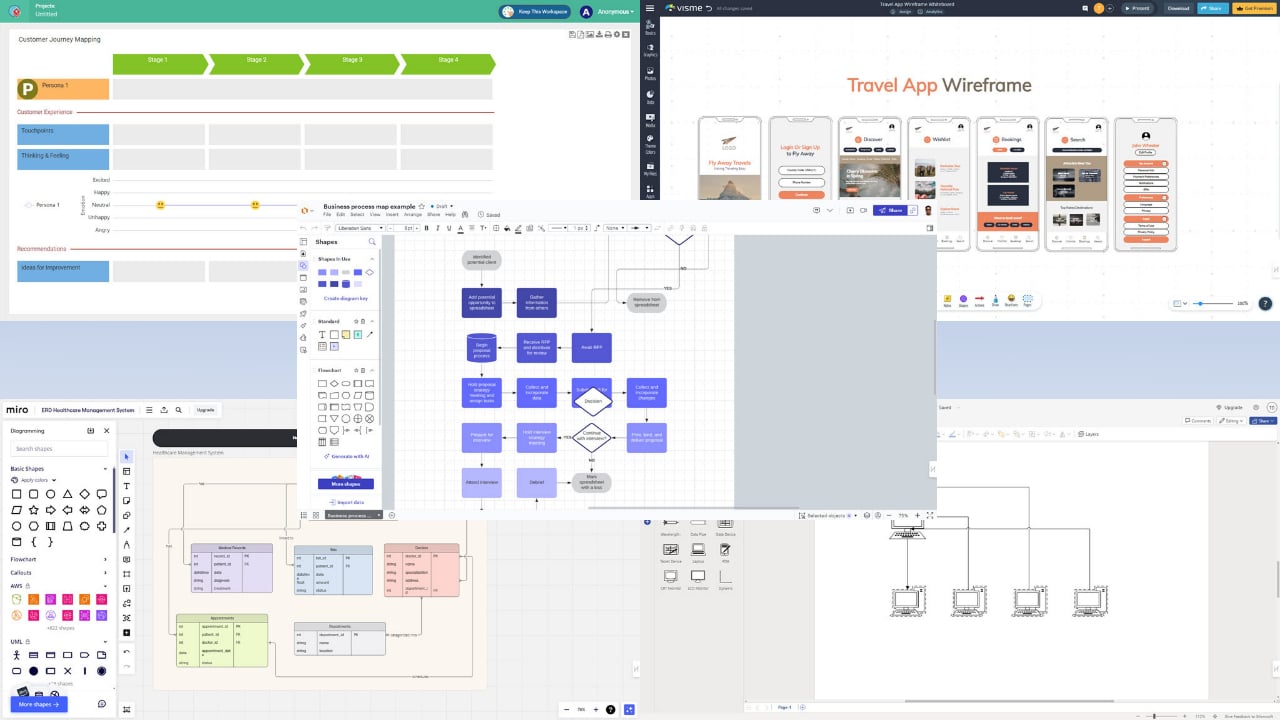
The best network design software will allow you to easily visualize data as blueprints, networks of elements, or flowcharts.
With network diagram software, you can draw a visual relationship between people, processes, computer network assets, and more. Such apps use various data boxes, connectors, and logical input shapes to tell a story from raw data.
You can benefit from it if you’re a:
Individual looking to simplify tasks in daily life
Teacher or corporate trainer
Project manager
Information technology infrastructure admin
Business analyst
Mobile app, web app, and desktop software developer
Business operations manager
Digital and field marketing manager
Quality assurance professional
Financial analyst.
To help you with your choice, I’ve tested more than 15 options available on the internet. However, only the following six tools have made it into this ultimate list. Here, you’ll learn their best features, functionalities, pricing, pros, and cons to make a data-driven decision.
Why Do You Need Network Design Software?
A reliable network design tool at home, school, and work can help you:
Create a step-by-step visual guide for various tasks.
Microsoft Visio is the most popular and trusted diagramming and vector graphics application. It stands out from the crowd for its versatility and ease of use. Overall, it’s a great tool for creating detailed network designs, flowcharts, process workflows, etc.
Moreover, Vision comes with an extensive library of templates, diagramming elements, and shapes. Its integration with other Microsoft Office apps also enhances collaboration and productivity.
Find below its notable features:
User-friendly interface that lets you draw complex diagrams with drag-and-drop functionality.
Since it’s a part of the Microsoft Workspace apps, you’re already familiar with its UI.
Enables multiple users to work on the same diagram simultaneously on the web version.
It integrates with external data sources, such as Excel and SQL Server, to create dynamic, data-driven diagrams.
It offers cloud storage to back up raw and finished diagramming projects online.
Pricing: It’s included with Microsoft 365 F3 subscription for $8.00 per user/month with an annual payment plan. If you find the Visio edition too basic, you can go for special subscriptions starting at $5.00 per user/month (annual subscription). Alternatively, you can get Visio Standard 2021 for a one-time cost of $309.99.
Pros
Cons
User-friendly interface.
No free trials are available. You must subscribe with a credit card to get the one-month free offer.
Offers one month free if you buy a paid subscription.
Require a robust PC or Mac for on-premise deployment.
A large library of templates and shapes
The web app often behaves choppy and sluggish.
Easily integrates with most MS Office apps and services.
Accessing the web interface is often challenging because of random Microsoft 365 security challenges even on the same PC or Mac.
Real-time collaboration with role-based access for maximum security.
Visme is a great network design software because of its extensive device support feature. You can install its app on a PC, Mac, tablet, and smartphone. Additionally, you can use its web app on ChromeOS and Linux.
Furthermore, Visme gives you more options for data visualizations with network diagrams than just static images. You can create animated presentations, videos, social media graphics, reports, mockups, and more.
Here are its best features:
A digital whiteboard with real-time collaboration.
You can invite people to your diagramming workspace with different access rights.
Pre-configured charts and graphs for quick data visualization.
A vast library of icons and animated characters to make your network designs professional and attractive.
Visme AI for generative diagrams, images, content, and more.
You can use Visme AI to edit and enhance outdated or flawed network diagrams.
Pricing: You can get started with the Basic package for free. It offers basic features and templates. To unlock its full potential, you can upgrade to the Starter plan for just $12.25 per user per month (annual subscription).
Pros
Cons
Unlimited free trial available.
The free plan adds a Visme watermark to your designs.
There’s a brand kit section to store graphic assets to standardize designs.
Single Sign-on (SSO) & 2FA security features are only available with the Enterprise subscription.
Offers real-time collaboration on the desktop and web apps.
Doesn’t work offline. You’ll need a fast internet to use the app seamlessly.
Light-weight desktop and mobile apps.
Comes with a moderate learning curve.
The desktop app can easily integrate with system GPU to handle high-end and large network diagrams.
The Visem AI requires credits. The subscription isn’t enough to use the AI.
Canva – Best for Interactive Whiteboarding and Visual Collaboration
Canva is an excellent choice for network design and visualization due to its user-friendly interface and interactive whiteboard capabilities. Known for its drag-and-drop simplicity, Canva allows users to create complex diagrams, flowcharts, and network designs effortlessly. It is ideal for professionals, educators, and teams that need to visualize ideas quickly and collaboratively.
Canva stands out with its extensive template library and graphic elements, which make creating professional-looking designs straightforward. Its online whiteboard supports real-time collaboration, allowing multiple users to brainstorm, design, and refine diagrams together seamlessly.
Here are its key features:
Drag-and-Drop Interface: Easily create professional diagrams without any design experience.
Extensive Template Library: Access thousands of customizable templates for network diagrams, flowcharts, mind maps, and more.
Real-Time Collaboration: Work with team members on the same project simultaneously, no matter where they are.
Multimedia Integration: Add videos, images, icons, and other visual elements to enhance your diagrams.
Export Options: Download designs in multiple formats including PNG, PDF, and SVG for easy sharing and integration into other platforms.
Cross-Platform Access: Available on desktop, mobile, and web, making it accessible on any device.
Pricing: Canva offers a free plan with basic features suitable for most users. For advanced functionality, such as premium templates and brand kits, Canva Pro starts at $12.99 per user per month on an annual subscription.
Pros
Cons
User-friendly interface with no learning curve
Limited advanced diagramming features compared to specialized tools
Lucidchart is a cloud-based diagramming tool. It’s known for its intuitive interface, robust feature set, and vast library of templates. As a web app, you can use it on any device for network design, flowchart making, blueprint design, etc.
It also offers real-time collaboration capabilities through workspace invitations and role-based access controls. Multiple users can work on a single project from remote locations. Moreover, Lucidchart integrates with business and work apps such as Google Drive, Microsoft Office, and Atlassian tools.
Learn below its notable features:
Easily create complex network diagrams on a drag-and-drop diagramming canvas.
Shapes connect with one click with arrows or other connecting lines.
There’s a smart and free-flowing snapping feature that shows the alignment of a new shape with pre-existing ones as you move them on the canvas.
Link data directly to your diagrams from various sources for real-time updates and insights.
Track changes and access previous versions of your diagrams, if a new version doesn’t look good.
Multi-cursor collaborative view where each cursor displays the users on the workspace in real-time.
Cloud storage to save your work on the Lucidchart platform for easy access from different devices.
Pricing: A free subscription plan is available with limited features. Paid subscriptions start from $7.95 per user per month.
Pros
Cons
User-friendly drag-and-drop interface.
Doesn’t work offline.
A forever-free plan is available for evaluation.
You can’t install it on a PC or Mac.
Real-time collaboration capabilities.
A steep learning curve for beginners.
Seamless integration with popular tools.
Data linking for real-time updates.
Extensive library of templates.
Mobile apps are available for Android and iOS devices.
Visual Paradigm stands out as a network design software with its robust modeling capabilities. For example, you can draw UML, BPMN, and ERD diagrams. Due to this technical depth, the tool is a favorite choice for professionals.
It’s also highly suitable for Agile projects. It offers built-in templates for Agile, Scrum, PMBOK, scaled Scrum, Agile backlog & sprint, user story mapping, etc. Furthermore, the software includes a complete suite of enterprise architecture tools, like process design, customer journey map, TOGAF ADM, DoDAF / NAD / MODAF models, and more.
Here are the major features of this network diagram tool:
Works online as a cloud-based web app.
Provides a wide range of customizable templates and shapes to kickstart projects.
Works offline as a standalone desktop software.
Offers an intuitive drag-and-drop interface that simplifies complex network design tasks.
Integrates with major development environments like Visual Studio, Eclipse, and IntelliJ IDEA.
Pricing: Its paid subscriptions start from $6 per user per month. Alternatively, you can get a perpetual license for $99 per device.
Pros
Cons
Free trial available with limited features.
You’ll need to invest considerable time to learn the app interface and functionalities.
No need to register or sign up to use the web app edition.
Requires a powerful system for optimal performance for the desktop app.
Supports real-time online collaboration.
Limited offline functionality for the standalone PC app.
Includes 100+ diagramming concepts.
Only available for Windows PCs.
Links with a built-in spreadsheet for diagramming from data.
You can make diagrams in Miro as a data analyst, business leader, and cloud architect. It’s also excellent if you’re trying to make complex workflows, processes, and network maps more efficient and memorable. Moreover, you can get started from a proven template that the internal Miro experts have designed.
Best of all, you can export all of your past designs as VSDX file formats and import those to Miro to enhance them. Migrating from your old diagramming tool is pretty simple.
Here are some of its major features:
Drag and drop diagram designing.
Real-time online collaboration.
It offers a workspace feature for brainstorming, mind mapping, etc.
Miro has an online whiteboard with interesting shapes like virtual sticky notes, circles, and more.
Role-based access, organization policies, and granular access control help you protect IP rights.
Pricing: You can start with the Free plan to check out the interface and features. If you find it beneficial, you can try the Starter plan for $10 per user per month.
Pros
Cons
You can record your work on the drawing board to make training videos on diagramming.
There’s an intermediate-level learning curve for beginners.
Integrates with apps and platforms for corporate and business activities.
For both web and desktop apps, you’ll need a fast internet connection to avoid slow performance.
There are board reactions so collaborators can share their emotional views on designs.
Large diagrams might slow down the PC or web app.
Dedicated icons for tools and platforms like Azure, VMware, Salesforce, Google Cloud, etc.
During my tests, I considered the following factors to choose the best network diagram tools:
Security and privacy: I only chose apps with security measures like SSL and HTTPS encryptions to safeguard your data.
Ease of use: All of these tools have an intuitive interface and user-friendly design to minimize your learning curve.
Compatibility: You can easily import your own network diagram files, integrate with business apps, connect data sources, and more.
Collaboration: I’ve ensured that some of the listed apps offer real-time visual collaboration with designs and diagrams.
Affordability: All of the apps I’ve chosen are affordable for individuals, startups, small businesses, and medium businesses.
Scalability: You can easily scale up and down as your need for diagramming projects increases or decreases.
Export options: I’ve kept in mind that you need a wide range of image and file export options when using network design software.
Accessibility: All of the tools mentioned here maintain standard accessibility features for users with special needs.
Platform support: I’ve prioritized apps that are compatible with a wide range of operating systems.
Summary
So, now you know everything you need to pick the best network design software for your needs. I included tools you can use professionally and in your everyday life.
Give them a try and feel free to share your experience in the comment box below.
Microsoft is once again in the spotlight, but this instance does not involve software or operating systems. The tech giant is now encountering a different type of examination from the Federal Trade Commission (FTC) and the Justice Department. It’s about artificial intelligence (AI) and a deal that the regulatory authorities could have missed.
The FTC is looking deeper into Microsoft’s actions, particularly its purchase of AI skills from Inflection AI. The transaction, which Microsoft valued at a handsome $650 million, was said to have united Mustafa Suleyman—an AI expert—and his group with Microsoft.
According to the latest reports, the FTC worries that Microsoft could have planned this deal in a way to avoid an official review. If the FTC believes so, it may delay Microsoft’s significant AI action.
But there are more irons in the AI fire for Microsoft. The company is being examined along with OpenAI and NVIDIA because of their “dominant roles” in this industry. This is important as these companies are leading the way with AI technology that changes how we interact with the digital world.
The connection between Microsoft and OpenAI is particularly significant due to a $13 billion investment and technological alignment.
What is behind the FTC and Justice Department’s sudden interest? It appears that the quick progress and probable effects of AI technology have attracted government focus. They are seeking to confirm that too much power in AI does not gather among a few players, which might hinder competition and creativity.
The way these investigations are going could establish future methods for AI companies to function and cooperate. Microsoft, in particular, will need to carefully handle these legal matters as it tries to grow its AI skills while avoiding any disagreement with regulators.
In a world that’s increasingly centered around AI, it is very important to monitor these investigations. The way these investigations go could shape the future of AI, affecting not only how companies make and use these technologies but also our interactions with them as users.
Picture a place where gaming laptops flaunt high-quality specifications and exhibit their characteristics on their surfaces—or, in other words, casings.
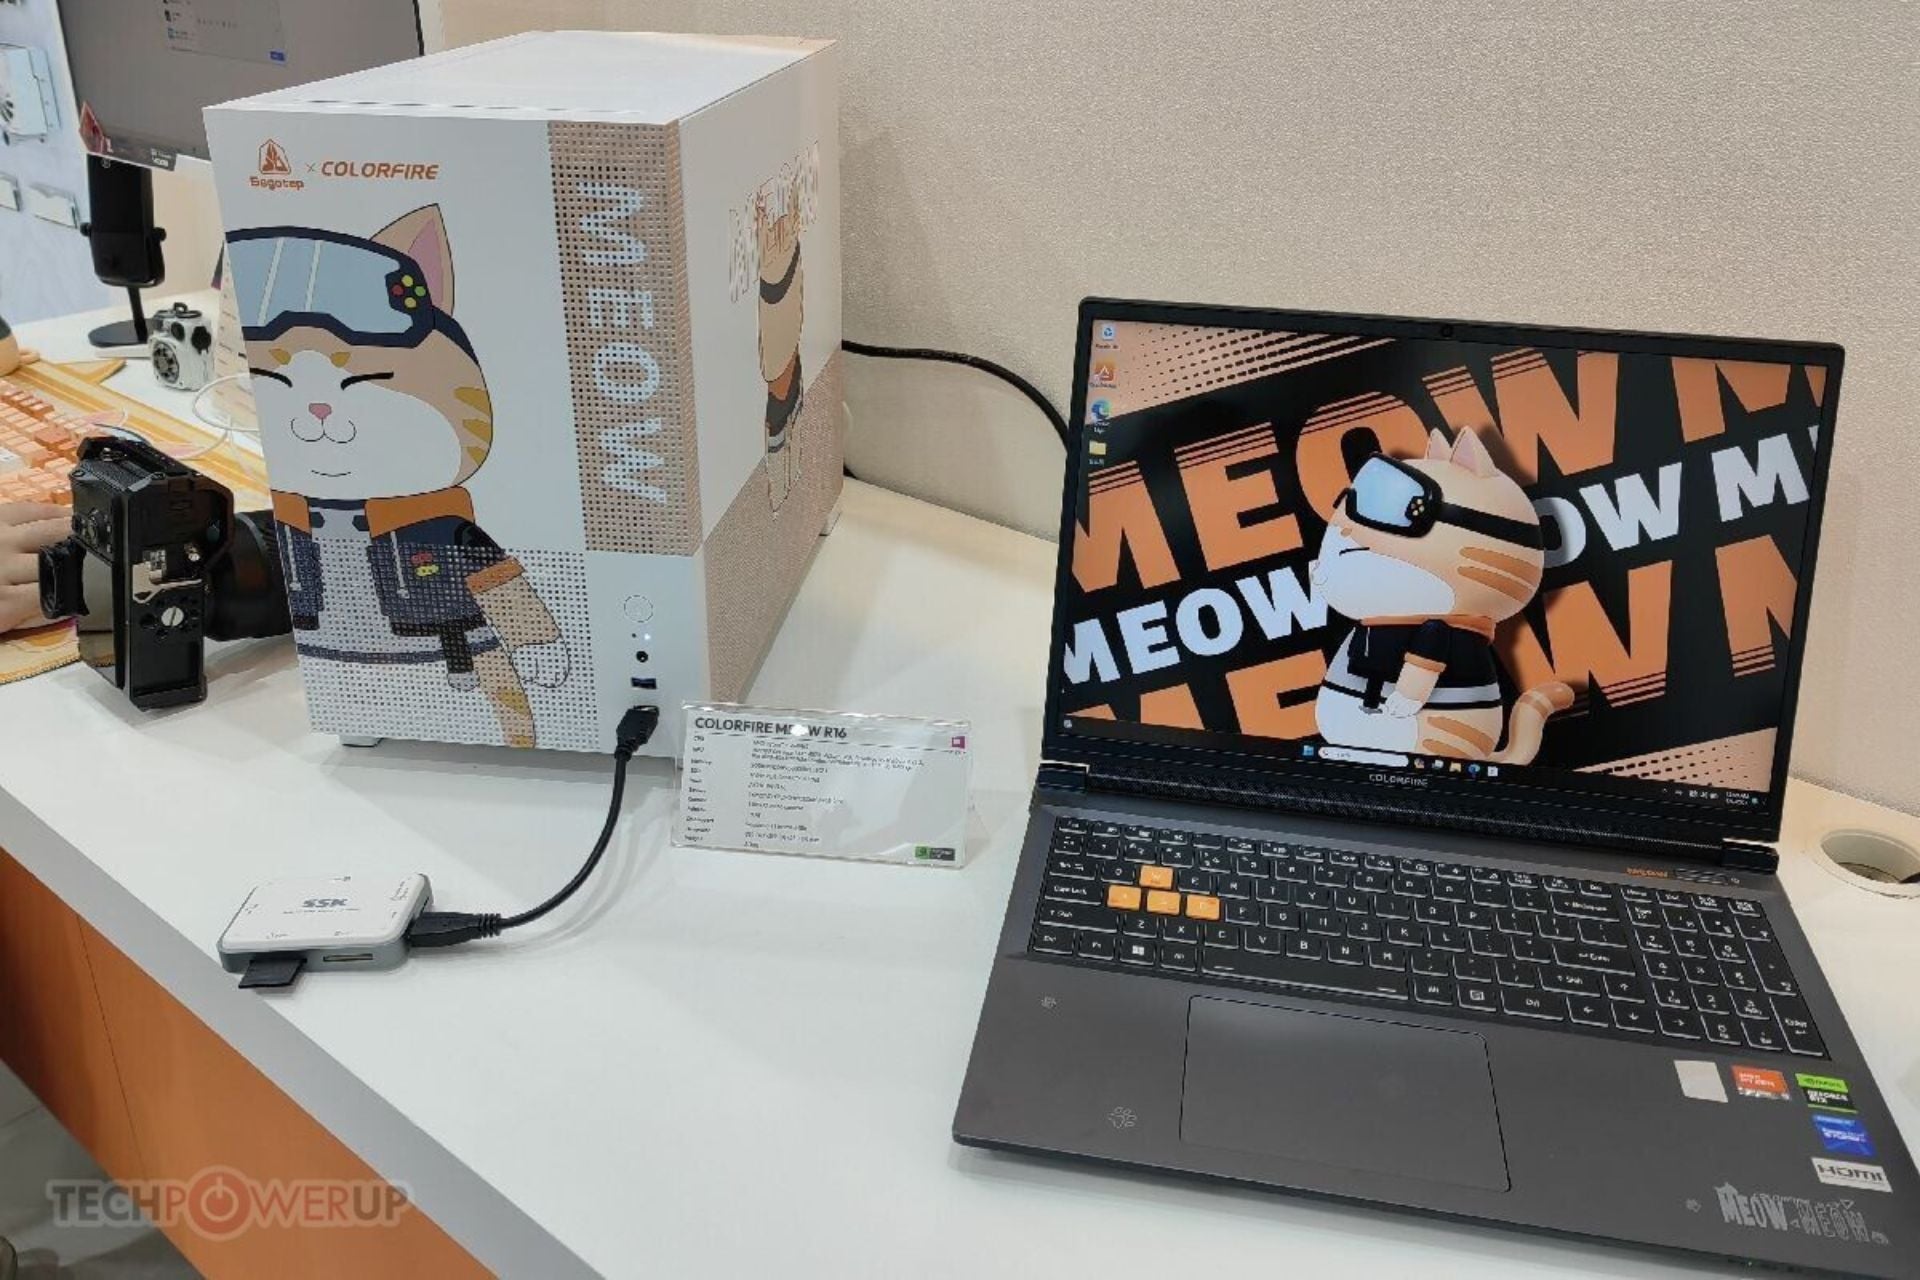
This is exactly what we see occurring as the Colorful Colorfire MEOW gaming laptops move from China’s market to the global stage at Computex 2024 (via TechPowerUp). These are not typical game machines; they combine strong power with a playful design inspired by cats. Now, let’s dive into what makes these laptops purr.
These machines have a powerful AMD Ryzen 7 8845HS processor at their core. This processor is a beast in its own right, promising to handle even the most demanding games easily.
Combined with up to an RTX 4070 GPU and other high-end components these laptops possess – it’s clear they aren’t just about looking good; they are designed for performance, too! Just picture yourself turning up all settings on your preferred game and playing it without interruptions – this is what you can expect from a laptop like this. That’s the kind of smooth, immersive gameplay the MEOW series promises.
Cooling is very important for gaming laptops; the MEOW series appreciates this. With dual turbo fans and a 6-heatpipe solution, these laptops are designed to remain cool in high-demand situations.
This guarantees that performance remains steady even during intense gameplay sessions. Additionally, performance control software allows you to adjust settings according to your preferences, finding the ideal equilibrium between power and noise.
Now, let us discuss displays. The MEOW R15 has a 15.6-inch IPS display with a resolution of 2560×1440 pixels and a 165 Hz refresh rate. Moving forward to the bigger size of MEOW R16, it has a screen of 16 inches with a refresh rate of 240 Hz and a resolution of 2560×1600 pixels. Both guarantee a 100% sRGB color gamut, ensuring a visual treat for gamers and those who enjoy watching shows.
In terms of design, these laptops are a fun tribute to people who love cats; they have small notes of orange and patterns resembling paw prints that give an element of playfulness to the typically serious style found in gaming laptops. How do you see it? It’s like a refreshing twist on the usual black-and-red gaming look.
On a different note, Colorful has not yet revealed the cost and when these laptops will be available. We are all waiting to know if they will be reasonably priced as they are cute.
In a universe where gaming laptops frequently look similar, the Colorful Colorfire MEOW series is unique (and so are the Asus laptops embroiled by the new Project Dali design, which animates their back lids). It’s not only about performance but also has character and reminds us that technology can simultaneously be fun, lively and strong.
So, are you prepared to demonstrate your gaming skills and affection for cats using one of these laptops?
PC Gamer’s Dave James spotted what makes a great news for gamers: Qualcomm chips are supporting AMD’s FidelityFX Super Resolution (FSR 2.2) upscaling tech. He spotted the feature going through the graphics settings for games like Baldur’s Gate and Metro Exodus.
However, that is incredibly strange since Qualcomm has touted their own Game Super Resolution (GSR) simply because it was better than AMD’s FSR 1.0 and FSR 2.0 was not suitable for mobile.
James also allegedly asked AMD about this and they were not in the loop about this development. However, that’s not something out of the ordinary because AMD’s FSR is open source so all manufacturers can use it. What is remarkable though, is that AMD made the upscaler for x86 based chips, not Arm, and according to James’ story, the feature not only works, but it does a pretty good job.
There are sure a lot of upscalers on the line and we’ll just have to wait for some real benchmarking test to see which one performs best and for which games and chips. So many variables, right? Here’s the full story from PC Gamer.
What do you think about Qualcomm supporting the AMD FSR tech? Let’s talk about this in the comments below.
Have you ever been overwhelmed by tech specs and product particulars and felt somewhat confused? You’re not the only one.
Today, I’m exploring Razer’s newest gaming laptops—Razer Blade 18 and Razer Blade 15 are being discussed here, too; let me simplify it for you as simple as your beloved comic book.
The Razer Blade 18 is similar to a superhero among gaming laptops. It presents an 18-inch 4K 200Hz display, which sets it apart. Picture yourself playing games on this laptop. The image quality and fluid motion are so clear that you feel like you’re becoming part of the game itself.
This laptop provides more than just an enticing display; it’s backed by an Intel Core i9-14900HX processor and a GeForce RTX 4090 GPU, guaranteeing it delivers a strong kick to manage any game you throw.
If this still doesn’t make you exclaim, “Whoa!” Then, there is the inclusion of Thunderbolt 5 connectivity, permitting connection with more than one 4K display for increased immersion during gaming sessions.
Now, let’s talk about the Razer Blade 15. It’s like a sidekick to every superhero, but don’t let that make you think it’s not impressive. It has a 15-inch QHD 240Hz display shows stunning visuals and smooth gameplay.
It has a powerful Intel Core i7-13800H processor and a GeForce RTX 4070 GPU, which balances performance and mobility. This type of laptop is made for gamers who want top-level power but also desire to play games while traveling.
Each laptop has its advantages, like free Joyplot Chroma Laptop Skins for a limited period. This makes your gaming setup not only high-performance but also fashionable. Do not overlook the full customer support and 14-day risk-free return policy, which guarantee satisfaction with your purchase.
So, if you are a serious gamer searching for the next major revelation or an individual who enjoys luxurious technology experiences, then Razer Blade 18 and Razer Blade 15 could be good options.
The cost might be a bit high, with prices for the Blade 18 starting from $4,499.99 and those of Blade 15 currently at a reduced rate of $1,799.99 (an impressive $1000 off), but considering what specifications and attributes these devices offer, it may very well prove to be a worthwhile investment in your case.
It seems Razer is at the forefront with these two models in gaming laptops, which are always changing. If you’re into gaming or streaming, or even if you want to browse and do other things digitally – these laptops are made to enhance your experience. So, what is your opinion? Is it time to take your gaming to the next level with Razer Blade 18 or Razer Blade 15?
You might also want to invest in a new handheld gaming console. If that is the case, consider XPG NIA, which was revealed at Computex this week.
Have you ever encountered difficulty recalling an unending array of passwords for various websites and applications? Microsoft has presented a resolution that could potentially simplify your online existence greatly.
In Windows 11, they have introduced Passkeys, which hopes to say goodbye to the typical password system many find vexing. This is not only a matter of ease, but it also shows advancement in making security stronger and login simpler for users with different devices.
If you have a website or application that allows Passkeys, go to your account settings and select the option to make a Passkey. Windows will ask if you want to keep this locally saved if you are using Windows Hello; however, there is no such limitation here.
If it suits you better, you might keep your Passkey on an iPhone, iPad, Android device, or even a FIDO2 security key. The main goal is to make the logging-in process smooth and easy, whether you are sitting at your desk or moving around.
If you’re having trouble using this new way of logging into Windows, Microsoft has made it easier for you to understand how passkeys work. The Redmond-based tech giant updated the Passkeys page with a comprehensive FAQ.
It’s very easy—choose the option ‘Sign in with a Passkey.’ If you have saved your Passkey on a local device that is protected by Windows Hello, you will use Windows Hello to sign in.
People who saved their Passkey on a phone or tablet must scan a QR code or use Bluetooth for authentication. It’s that easy and designed to work smoothly across all your devices.
But how do you handle these Passkeys? Microsoft has considered this, too. On your Windows device, go into the Settings app, and there you will see an option saying, “View and manage saved Passkeys.” This implies that you can delete any Passkeys that are not being utilized or required anymore, making your digital life organized and safe.
Passkeys provide a more secure and easy-to-use solution than normal passwords, which can be difficult to recall and frequently suffer from phishing attacks.
They’re exclusive for every website or app, designed to resist phishing attempts. Moreover, the fact that you can employ your Passkey on multiple devices brings a level of convenience we all have yearned for.
However, it is important to mention that for Passkeys to be effective, the website or application you are attempting to access must be capable of supporting this feature.
In a time when digital safety is crucial, the new Passkeys feature in Windows 11 by Microsoft offers a solution that can make our internet interactions safer and simpler.
This change might be just what we need to enhance online security. So why not experiment with it and witness the potential benefits yourself?
Microsoft announced a new Sticky Notes app recently and it’s now part of the OneNote app for people who use Microsoft 365. The interesting thing about this new version is that it will be automatically installed on stable builds of Windows so you can’t miss out on this upgrade.
This new Sticky Notes, which is a Win32 app and not based on the Windows Universal Platform like the previous version, is more robust and does not rely on web technology. If you already have the OneNote desktop client, then it will automatically install for you. You’ll find shortcuts to the app in the Start menu, making it easily accessible.
What’s new about Sticky Notes?
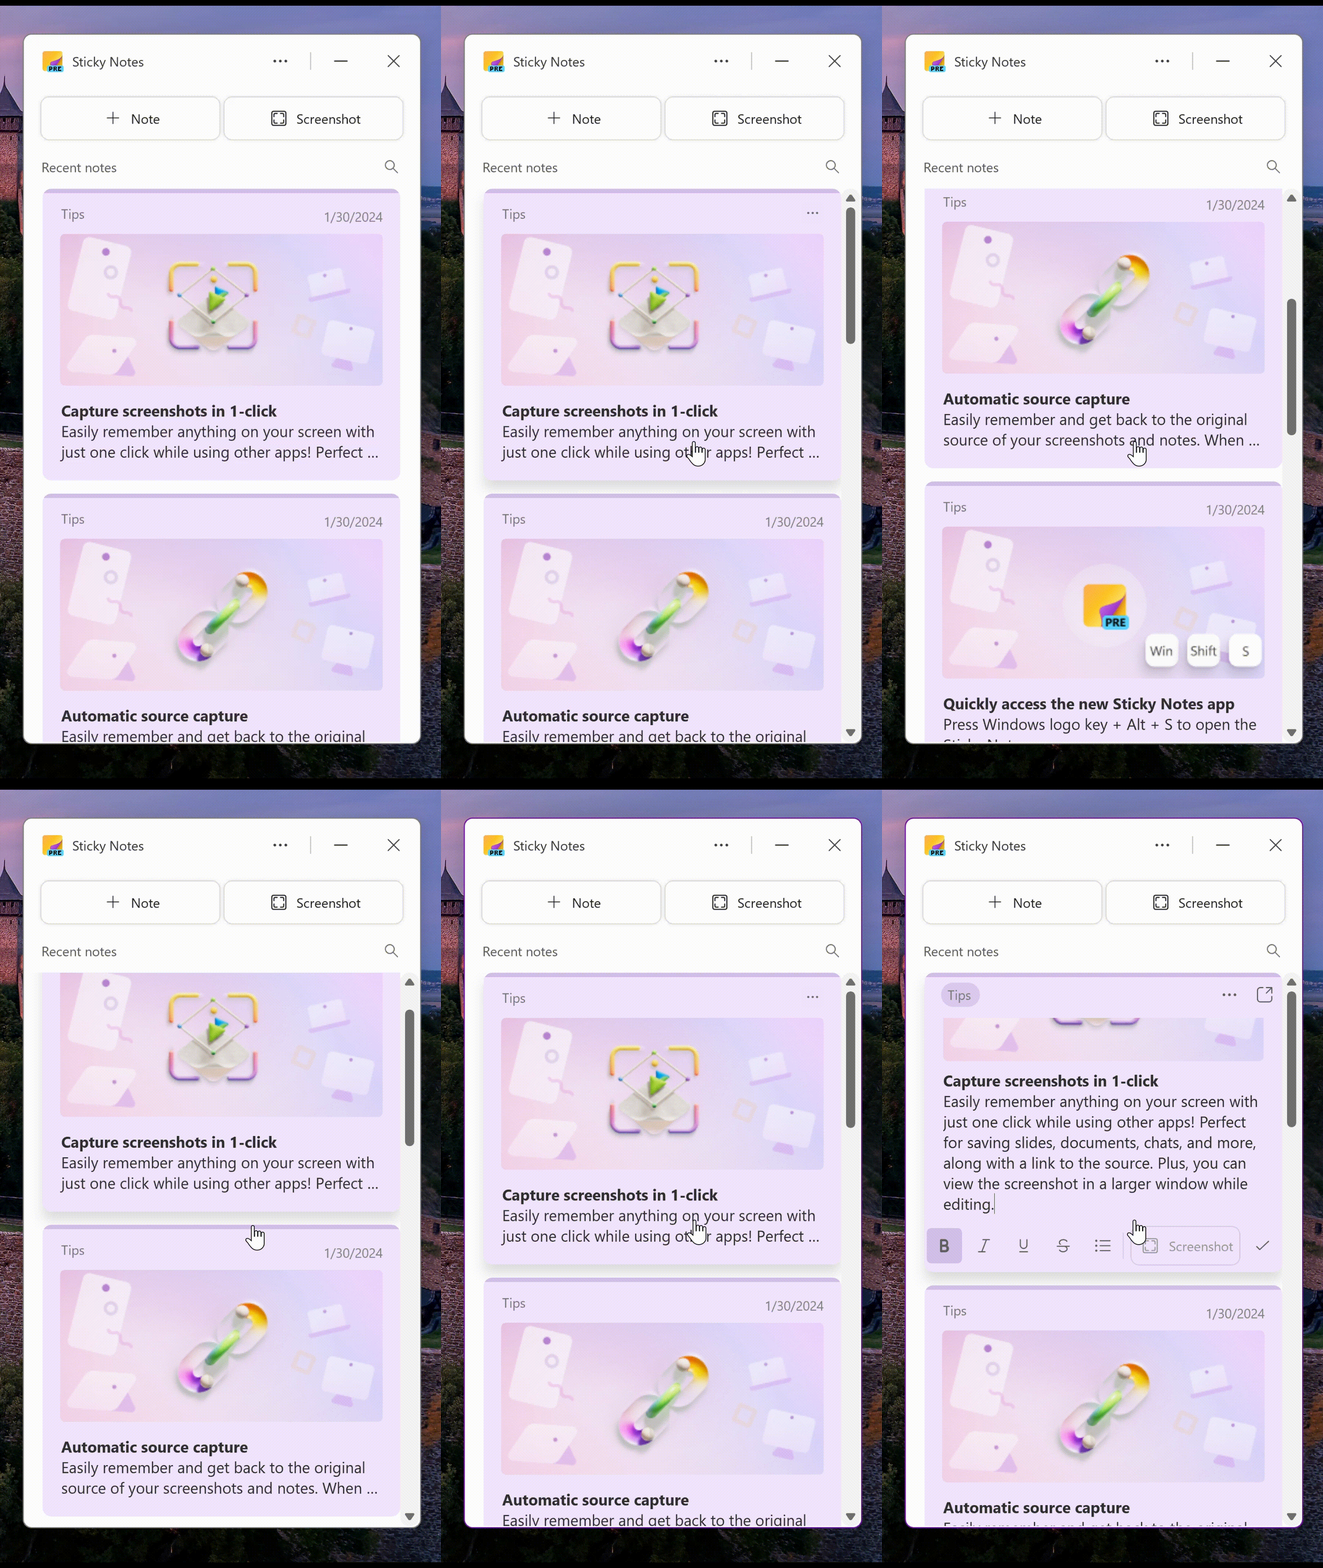
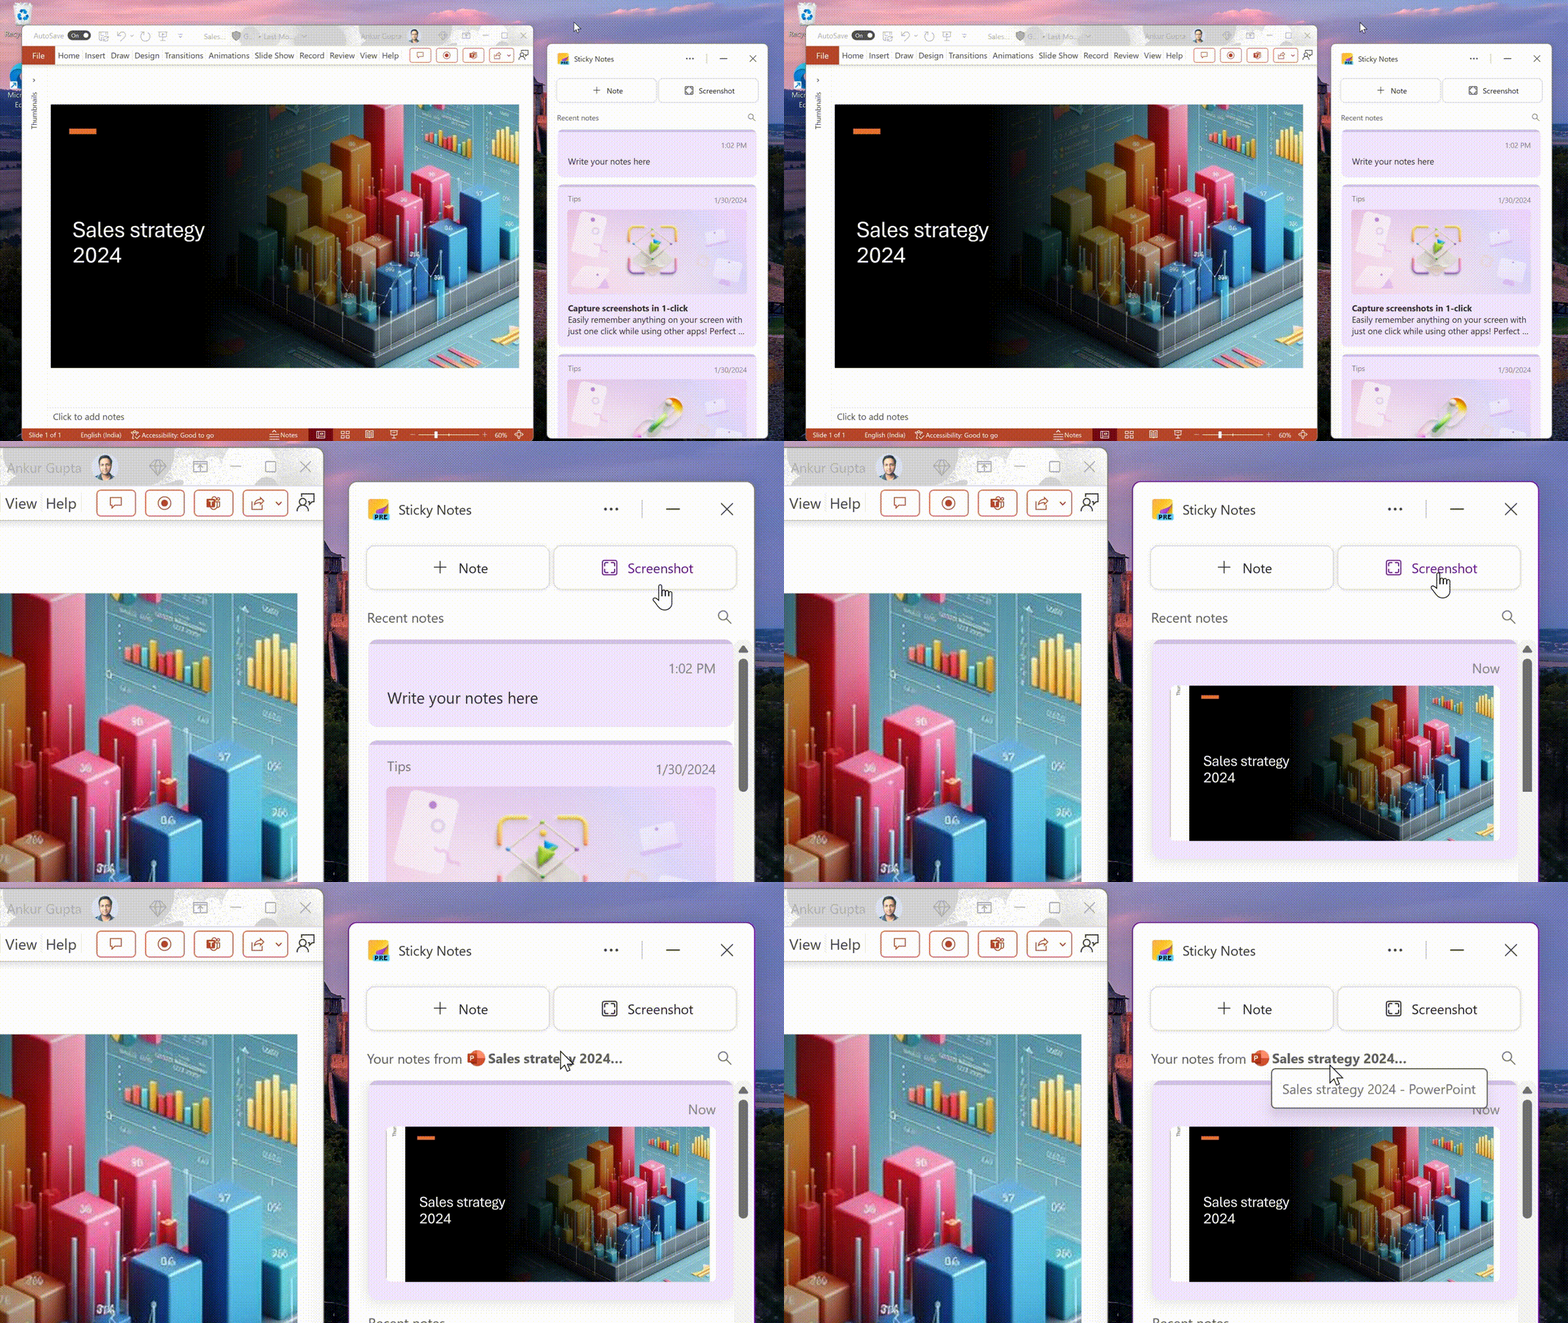
But now is when it becomes fascinating. The fresh Sticky Notes app has the ability to take screenshots, but not in a manner you probably expect. Instead of capturing your whole screen by pressing a button, it directs its attention towards the active window. This becomes very useful if you want to keep in mind certain details without the mess of everything else displayed on your screen.
Additionally, it recalls the place where you took a screenshot from like URL of webpage and lets you insert text into these snapshots. Worried about privacy? You can easily disable this feature in the app’s settings.
A feature that is still being perfected but shows great potential is the app’s OCR function. This allows you to recognize and duplicate text from pictures, an important tool for people who frequently deal with text in images. Every screenshot you take will be preserved within your Sticky Notes account – so if there are any particular ones which come in handy later on, they can easily be downloaded again whenever necessary.
Microsoft has also enhanced multitasking with the new Sticky Notes. You can view screenshots in full screen or dock the app on one side of your desktop. Nonetheless, they have recognized a problem related to the Dock to Desktop functionality when using multiple monitors and are attempting to resolve it. If you can’t discover Sticky Notes v2, ensure that you have upgraded OneNote from the Microsoft Store.
So, what is your thought? Do these changes make you want to try Sticky Notes? Let us know what you think in the comments below.
Internet Download Manager is our go-to tool for boosting the download speed, and the user-friendly interface makes it all the popular amongst Windows users. The Internet Download Manager’s latest release, Version 6.42, Build 11, brings a wide array of improvements to the app.
According to the latest update’s release notes, it addresses download issues for many video streams, fixes assembly problems with different video types, and patches a host of bugs.
– Fixed problems with downloading for several types of video streams. – Fixed problems with the assembly of several video types when videos could not be played after downloading. – Fixed bugs.
If you already have the Internet Download Manager, it should automatically check for Version 6.42, Build 11, and prompt you to update the app. In case that doesn’t happen, you can manually update IDM.
To manually update Internet Download Manager, open the app > click on the Help menu > select Check for updates > click on Update now if a new version/build is available > then wait for the download to complete.
Updating Internet Download Manager (Image source: IDM)
IDM also makes it to our list of the best download managers for Windows. Now, with Internet Download Manager version 6.42, build 11 here, you will find a more streamlined experience, witness improved performance, and encounter fewer errors!
If you face any issues after downloading the latest release, share them with our readers in the comments section.
In the fast-paced realm of tech and gaming, where the hunt for new ideas never seems to halt, Adata has made its presence known with an intriguing new product. Remember the new XPG Nia handheld we covered some days ago?
Well, the company displayed the XPG Nia at Computex. It is a handheld gaming PC that doesn’t simply join an already-filled marketplace as another participant.
Now, we have the eye-tracked foveated rendering and swappable DRAM as its special features. These characteristics will greatly improve playing games on portable gadgets. But let’s look more closely at what makes this device interesting.
Foveated rendering takes inspiration from the VR universe. It employs eye tracking, where only the part of the screen you are looking at is rendered in high resolution, and peripheral areas are displayed in lower resolution.
This smart method saves computer ability and could improve performance. The XPG Nia uses this technology with the help of a front camera, which is quite a unique feature for handheld gaming devices. But there is one thing to note.
Because this device’s screen is held at a distance from your eyes, that’s not as close as VR headsets, and it could be possible that foveated rendering might not have a strong effect on improving performance. It’s an interesting experiment, but will it pay off? Only time will tell.
The XPG Nia has a unique quality that many other handheld gaming PCs lack: it offers upgradeable memory. This means you can switch out the RAM, supporting up to 64GB of LPCAMM2 LPDDR5X RAM. It’s great for long-term use and adjusting performance, as this kind of customization isn’t common in devices for portable gaming.
Inside, the Nia runs on an AMD Zen 4 Phoenix APU. This shows that it adopts new and advanced processing tech for better performance but with a special touch on its design and function.
The tool also has a tiltable display, which is good for ergonomics and might help with cooling, too. This shows attention to both comfort and performance aspects.
But consider this idea: because of its creative elements, the XPG Nia is more than just a device for playing games. It provides us with a sneak peek into what handheld gaming might look like in the future, where adaptability and efficiency are equally important.
This tool is scheduled to be launched in 2025, and although details about its cost have not yet been revealed, enthusiasm for it is already gaining momentum.
The part about the modding community is thrilling. Adata wants to release 3D design files and pinout details, motivating users to make their own cases or add-ons. This “circle computing” method not only lengthens the product’s lifetime but also offers a realm of modification and originality.
For the future, XPG Nia is a daring advancement in handheld gaming PCs. It aims for top performance and user adaptability, breaking existing norms and prompting us to envision more flexible and involved gaming experiences. How will it compete against Asus Rog Ally X, Steam Deck, Legion Go, or even the new Xbox handheld reportedly in the works?
But will it manage to disrupt this market? That remains to be seen, but it’s a device worth watching.
In what it’s becoming a ridiculous twist, a fresh tool called TotalRecall has surfaced that can pull out each data bit stored by Microsoft’s Recall feature. It has its own GitHub page and everyone can use it.
Here’s the whole story about Windows Recall
Let’s recap this saga really quickly so we can have a broad picture of this privacy mishap: Recently, Microsoft announced Recall, an AI feature for Copilot+ PCs to take a snapshot on everything you’re doing on your PC, to provide Copilot with data that will help you in your local searches. When users started threatening to leave Windows 11 due to privacy concerns, Microsoft said that Recall is harmless and you can disable anyway.
A few days later, a few developers discovered that Recall stores everything in a plain text database that can be accessed as easily as opening it. So, we got to present day, when a researcher even created the script that really does a great job in hacking Recall by automating the job in a totally elegant way.
The TotalRecall script made hacking Windows Recall even easier
So, picture a tool with such strength that it can go through your computer’s digital memories, finding screenshots, text data, and even coded messages you believed were secured. TotalRecall, made by a researcher named Alex Hagenah, is an important example that highlights Recall’s weaknesses.
The TotalRecall risks are not only about personal privacy but also involve broader concerns. In a time when cybersecurity is critical, this tool highlights the necessity for strong security actions to safeguard our digital marks. Now, we’re sure that Hagenah didn’t put TotalRecall on GitHub to encourage people to hack Windows Recall. It is an encouragement for Microsoft to take action about these safety problems before Recall’s full release.
However, TotalRecall is not the single voice sounding alarms. Another cybersecurity researcher named Kevin Beaumont has made a website for searching Recall databases, too; he hasn’t yet released it in hopes that Microsoft will reply. Controls like switching off screenshot saving and pausing Recall are mentioned in Microsoft’s documentation, but these steps might not be sufficient to ease worries about possible misapplication of this tool.
The worse part about all this is that Microsoft didn’t have any reaction to all this issue apart from the fact that they keep repeating that Recall can be disabled.
If you want to know how Microsoft have got themselves into this giant mess with Recall, here’s what the documentation says between the lines:
you, the customer, are a simpleton who doesn’t want to be an AI genius yet. Have a caveman mode. pic.twitter.com/ir8HJ10fVN
In an X post, Beaumont highlights the fact that Microsoft thinks it’s the organization’s responsibility to secure this feature, and they might not be prepared for such a complicate task. Luckily, we have a guide on how to disable Recall in Windows 11 and we recommend doing so when the feature is released.
The debate between Recall and TotalRecall is part of a larger conversation about the tension between innovation and privacy. We do not know yet whether Microsoft will listen to Hagenah and Beaumont. However, one thing is sure—discussions on digital privacy and security continue.
Let’s discuss about Windows Recall and privacy implications in the comments below.
For an enhanced gaming experience, improved frame rate, and better visuals, earlier this year, Microsoft introduced Automatic Super Resolution, an AI-powered feature, in Windows 11. Since then, it has been exclusive to Windows insider builds and disabled by default!
But as the feature makes way to more devices, Microsoft has revealed the system requirements for Automatic Super Resolution, abbreviated as Auto SR. Here’s what Microsoft’s official page tells us:
System Requirements
1. A Copilot+ PC with a Snapdragon X Series processor with Hexagon NPU and an integrated GPU. 2. Windows 11, version 24H2 or later. 3. Latest graphics and neural processor drivers. To manually check for updates, go to Start > Settings > Windows Update, then select Check for updates. 4. A display resolution of 1080p or greater. 5. Latest version of Auto Super Resolution Package.
Game Requirements
1. DirectX 11 or DirectX 12 2. Emulated x64 or Arm64 native platforms.
As you can see, Copilot+ PC (set to launch on June 18, 2024), dedicated NPU (Neural Processing Unit), integrated GPU, Snapdragon X Series processor, and Windows 11 24H2 are all a must for Auto SR support. This limits compatibility with Auto SR to a small set of devices.
Microsoft, in the future, may ease the system requirements, but I am not too hopeful about it!
The reason is that an NPU and integrated GPU allow Automatic Super Resolution in Windows 11 to perform all visual enhancements locally on the device without sending data to external servers or the cloud, thus boosting privacy and security.
The good news for now is that even in its infancy, Auto SR supports a wide range of games. These include BeamNG.drive, Borderlands 3, Control (dx11), Dark Souls III, God of War, Kingdom Come: Deliverance, Resident Evil 2, Resident Evil 3, Sekiro Shadows Die Twice, Sniper Ghost Warrior Contracts 2, and The Witcher 3.
For the complete list and compatibility status of Auto SR with available titles, visit Worksonwoa, an open-source website that lists supported games based on data shared by Microsoft.
Any game that supports Automatic Super Resolution in Windows 11 will trigger a quick notification on launch that reads, Auto SR is on.
Auto SR notification for supported games(Image source: Microsoft)
Besides, the dedicated Automatic Super Resolution settings in Windows 11 allow you to manually enable/disable the feature for individual games or across titles, or reconfigure the game-specific Auto SR settings.
MOZA Racing comes with a game-changer for those who love Xbox and PC racing games. The MOZA R3 Wheel and Pedals bundle contains the R3 base unit, ES steering wheel and the SR-P Lite pedal set. But what makes it stand out in the crowded market of racing sim peripherals?
Why should I get the new MOZA R3?
To begin, the R3 base unit is a technological wonder. With 3.9 Nm of Direct Drive power, it’s made to deliver a high-end racing system that is adaptable and strong. You can connect this unit to your desk using the clamp provided or incorporate it into an entire racing setup – regardless of which you choose, this R3 bundle will work with Xbox Series X|S, Xbox One and PC without any complex installation needed for immediate use. The base part, made of aviation aluminum alloy, guarantees long-lasting quality and enhances the feel of steering force for full immersion.
Coming next is the ES steering wheel, a work of art on its own. This equipment has an official approval from Xbox and it perfectly combines console performance with MOZA Racing’s direct drive technology. The appearance isn’t everything here because this wheel is sturdy too: it features ISF grips that are tough as well as an aluminum alloy framework which guarantees durability.
Also, MOZA’s racing-grade quick-release system makes changing wheels for various racing experiences simple and speedy. Together with an RGB sequential shifter light indicator plus 22 programmable buttons – this wheel does not just look good but delivers too.
But, a racing wheel is not complete without good pedals. The MOZA SRP Lite Pedals finish the R3 Bundle and are made with precision to respond accurately to every footwork you make. These pedals use high-strength steel in their construction and have an ultra-sensitive angle sensor that gives you the real race track feeling while playing games at home. Also, you can adjust the distance between pedals and shape of output by using MOZA Pit House software. This means making your gaming experience more personal has never been simpler.
Now, we come to the main topic – cost. The MOZA R3 Wheel and Pedals package price is $399.00, and it’s a pretty good deal when you see that Logitech’s G PRO Racing Wheel starts from $800. However, to be fair, Moza’s R3 Wheel an Pedals is more likely to compete with Logitech G923 TRUEFORCE Racing Wheel which is $350 right now.
Is the MOZA R3 Bundle Worth It? If you are just starting to learn about racing wheels, it might seem more reasonable to begin with something less expensive like an already used Logitech G923 as your initial entry into this area. However, in case one has already become interested in racing and wants to enhance their experience by purchasing a better wheel for their simulator setup; then indeed the R3 bundle is very tempting. MOZA promises to deliver quality and innovation in its products, thus this is a buy that may change your racing experience.
What do you think about the new MOZA R3 Wheel and Pedals for Xbox and PC? Tell us all about that in the comments below.
In the last few months, Microsoft has been removing older, legacy features in Windows 11, with programs like WordPad and Windows Driver Verifier GUI being deprecated. The latest to the list is Steps Recorder (psr.exe), a feature that has been part of the Windows ecosystem for over a decade.
Steps Recorder is no longer being updated and will be removed in a future release of Windows. For screen recording, we recommend the Snipping Tool, Xbox Game Bar, or Microsoft Clipchamp.
Although I haven’t used it much, Steps Recorder is a great tool, especially for admins and the help desk. The program records every activity on the device and presents it in the form of annotated steps, along with a screenshot dedicated to each step and a clear timeline.
Also, towards the end, you find data specific to the on-screen app, providing valuable insights into the troubleshooting process.
Steps Recorder in Windows 11
I agree that Steps Recorder isn’t the best of the tools in Windows 11, more specifically in terms of UI (User Interface). It hasn’t evolved much over time, offering the same interface as the older versions.
On the other hand, the alternatives are much better in terms of performance and streamlined with the overall OS experience, be it Snipping Tool, Xbox Game Bar, or Microsoft Champ. But they sure lack automatic annotation capabilities!
Microsoft has, in the latest Windows update, added a banner to Steps Recorder that reads, The tool is being phased out, to inform users of the change. However, it hasn’t yet disclosed the actual deprecation date or the OS update that enforces the change. I would guess that it’s, most likely, Windows 11 24H2.
Many users disapprove of Microsoft’s decision to deprecate Steps Recorder in Windows 11
As Microsoft works hard to make Windows 11 a user-oriented and streamlined OS, the deprecation of Steps Recorder comes as a surprise. Because many long-time Windows users frequently rely on the built-in screen recorder.
Surprisingly, Microsoft Support also, at times, asks users to capture data with Steps Recorder because of the way it presents each step. Here’s what a few of them said:
This cracks me up because MS still has you use PSR to capture data when troubleshooting. Just did it last week to document a case I’d opened with them. They also had me use PowerPoint to capture video, but only PSR captures where you click.
That is honestly a massive disappointment. I love PSR.
It was the only tool that could capture images from programs that prevent screen capture and printing. Too bad.
I think this is a mistake. MS are probably doing this because their telemetry indicates it’s hardly ever used. However I think this is more due to the dact that hardly anyone knows it exists..
In my experience, Microsoft is likely phasing out Steps Recorder because it’s not as popular as the existing alternatives. And given the legacy code, maintaining and updating the feature is too much of a hassle for Microsoft.
If you want to continue using Steps Recorder (psr.exe), Microsoft has confirmed that it would work in Windows 11 versions prior to the early 2024 release. So, disabling Windows updates is an option, although not the most viable one!
What do you think about Microsoft deprecating Steps Recorder in Windows 11? Share with our readers in the comments section.
Microsoft released a firmware update for Surface Pro 7+, which addressed the camera performance issue that was caused by a lack of storage.
The update is available for Surface Pro 7 Plus devices running Windows 10 October 2022 Update, Version 22H2 or higher, and Windows 11 version 22H2 and newer.
Addresses camera performance issues caused by inadequate memory or storage capacity.
The update also includes the following components; you will receive updates for components compatible with your device. Here is the list:
Windows Update Name
Device Manager
Intel – Camera – 60.22000.5.15512
Intel(R) TGL AVStream Camera – Cameras
Intel Corporation – System – 60.22000.5.15512
Intel(R) Imaging Signal Processor – System devices
Intel Corporation – System – 60.22000.5.15512
Intel(R) Control Logic – System devices
Intel Corporation – System – 60.22000.5.15512
Surface Camera Rear – System devices
Intel Corporation – System – 60.22000.5.15512
Surface IR Camera Front – System devices
Intel Corporation – System – 60.22000.5.15512
Surface Camera Front – System devices
Intel – Extension – 60.22000.5.15512
Intel(R) TGL AVStream Camera – Extensions
Surface – Extension – 60.22000.5.15512
Surface IR Camera Front – Extensions
Surface – Extension – 60.22000.5.15512
Surface Camera Rear – Extensions
Surface – Extension – 60.22000.5.15512
Surface Camera Front – Extensions
The Redmond tech giant also mentioned three things that you should remember before updating:
Once installed, you can not uninstall firmware updates and can’t revert to an earlier version.
If you missed the previous updates, installing the latest update will add them to your Surface.
Once you have installed the updates, you must restart your devices to complete the process.
To install the update on your device, go to Settings>Windows Update and click Check for updates. Alternatively, you can also manually install the update from this website.
You only need to choose the version compatible with your device’s OS. Once you’ve done this, double-click the file to initiate the installation. The file size is 1.1 GB, so ensure you have enough space.
Have you installed this firmware update for Surface Pro 7+? If so, share your experience with us in the comments below.
Installing a printer driver allows you to print your documents and for the Epson L380, there are several ways you can install these crucial drivers for your Windows 7, 10, and 11 devices.
How can I install the Epson L380 printer driver?
1. Download and Install from the manufacturer’s website
Select your OS from the Operating System list. In most cases, it detects your Windows version but it can be incorrect so make sure you manually select for Windows 7, 10 or 11.
Now, download the driver.
Open the installer file and install it on your computer.
Next, click on the taskbar’s magnifying glass icon.
Type Control Panel within the search tool that opens.
Select Control Panel to open that window.
Next, select Large Icons on the View by drop-down menu.
Click Devices and Printers in the Control Panel.
Then press the Add a printer button.
Choose the L380 printer on the Add a device window, and press the Next button to install it. If not available, you’ll have to add it manually by clicking on the The printer that I want isn’t listed option.
Press the Next button and follow the on-screen prompts.
Hit the Finish button after the printer has been added.
Open the Start Menu, type Device Manager, and hit Enter.
Expand Print queues.
Right-click on the one you need, and select Properties.
Select the Driver tab and click on Update Driver.
Choose to Browse my computer for drivers.
Navigate to Let me pick from a list of available drivers on my computer.
Click onHave Disk…, and locate your driver file.
Select Next and wait until the installation is completed.
Find the Epson device you want to update.
If you don’t have the driver in your files, right-click on the device and choose Update driver.
Click on Search automatically for drivers.
Finish the update process.
3. Install drivers from Windows Update
Connect your Epson printer to your Windows 11 computer using a USB cable.
Press the Windows + I keys to open the Settings app.
Then, click on Windows Update and select Advanced options.
Then, check Optional updates for available updates.
Now, select Driver updates and click on Download & Install.
Restart your computer.
4. Use a driver installer software
If you don’t want to do trial and error on how to download drivers for the Epson L380, use a a driver updater. There are a few specialized software that will make this task way easier for your.
All you have to do is download your chosen tool and leave the rest to it.
To download the drivers, connect your L380 printer to your PC, and the tool will identify missing drivers, match your device with the correct ones, and install them for you.
Wrapping up
For more models, check out how to download the Epson L130 printer driver, Epson et-4850 and Epson L360. We wrap up here but let us know which method is your go-to when downloading drivers in the comment section below.
Since its inception and integration into Microsoft 365, Microsoft Copilot has been recognized as a powerful tool for streamlining workflow in the Microsoft 365 ecosystem.
However, not all business workflows can run on Microsoft 365 apps, and that’s where Copilot extensibility can help! Organizations needing tailored bot solutions can now extend Copilot for Microsoft 365 or construct a custom one according to their needs.
How can I build a custom Copilot?
This can be achieved by leveraging the power of Microsoft Teams as a collaboration platform and Generative AI technology to develop a custom copilot, typically a conversational bot in Teams but using LLM technology at its core.
As a result, it efficiently comprehends and responds to user queries, creating dynamic and immersive interactions.
The latest version of Teams Toolkit version 5.8.0 comes with pre-built templates that integrate with Azure AI Search, Teams AI Library, and more, allowing developers to build custom Copilots
The three types of pre-built templates provided are:
Basic AI ChatBot: Build a basic AI chatbot for Teams using Teams AI library.
AI Agent ChatBot: Build an AI agent chatbot for Teams to make decisions and perform actions based on LLM reasoning. The AI Agent template allows you to start from scratch or use the OpenAI Assistants API.
Chat with your data: Expand the AI bot’s knowledge with your content to get more accurate answers to your questions. Chat with your data supports Azure AI Search, Microsoft Graph Search with Microsoft 365 and SharePoint content, and custom OpenAPI data ingestion options.
Along with these, the March and April prereleases significantly improved the user interface, application templates, and language support, addressed critical bugs, and expanded functionality.
If you want to use Teams Toolkit, you can download & install the latest version of the software and test the new features and improvements.
Have you tried creating a custom Copilot using Teams Toolkit version 5.8.0? Share your views with our readers in the comments section below.
Microsoft is developing a feature with Feature ID 398984, adding a search to Outlook for Android’s settings. This is another step in optimizing user experience and streamlining navigation within the Settings menu.
Outlook: Adding search to settings on Outlook for Android
We recently rolled out updated settings on Outlook for Android. To make the settings experience even better, we are now adding thew ability to search within settings so that you can find exactly what you are looking for
Feature ID 398984 was added to the Microsoft 365 roadmap site on June 4, underscored by the Redmond tech giant’s commitment to refining its product. With this change, you will be able to locate specific settings without much hassle.
The company will roll out this feature starting in July 2024, and it will be available for all users worldwide for all cloud instances.
If you’re considering using Outlook on Android but haven’t yet, this guide will help you effortlessly set up an email account and get started with Outlook.
What do you think about the search functionality in the Settings menu on Outlook for Android? Share your views with our readers in the comments section below.
Gone are the days when you had to physically burn a program to a CD or DVD drive and then copy it to your PC. WinCDEmu has changed the game by removing physical disks from the equation and now allows users to mount disc images, hassle-free.
What are the main features of WinCDEmu?
Accessing contents – This is one of the major reasons why anyone would need WinCDEmu. Just like physical discs where you burn disc images and view them on your PC, WinCDEmu serves the same purpose.
App installation – Some software companies distribute their applications in disc images for security purposes or due to their large size. To install such programs on your device, you’d need WinCDEmu.
Backup and restoration – CDs can also be used as backup options so if you’ve stored your data here, mounting WinCDEmu will allow you to backup or restore any data.
Scalability – Your needs tend to change over time so if you ever need to create more virtual drives, WinCDEmu allows you to create an unlimited amount of virtual drives of course subject to your available resources.
Vast disk image support – WinCDEmu is compatible with multiple image formats and can easily mount ISO, CUE, NRG that integrates with your version of Windows.
How do I download and install WinCDEmu?
Navigate to your browser and download the latest version from the WinCDEmu homepage.
Locate the downloaded file in your Downloads folder and double-click on it to run.
Confirm the installation and the next install prompts.
If you have Windows Security on, confirm installation too.
Once installed, locate it in your File Explorer, right-click on your ISO or IMG file and mount.
Limitations of using WinCDEmu compared to traditional CD/DVDs
Unavailable physical media – Although physical discs have their own issues, opting for WinCDEmu opens up legal compliance issues. Whatever disc image you’re mounting must be duly licensed or you risk legal repercussions.
Strict system requirements – Your device must meet WinCDEmu system requirements unlike physical discs which just require a compatible device and are generally universally acceptable.
Unsupported disc image formats – WinCDEmu supports a wide range of disc image formats but there are also unsupported formats that may fail the compatibility test with your device.
Software conflicts – It’s not often that physical disc would present software conflicts. However, WinCDEmu may not augur well with other like programs in your device.
Security risk: WinCDEmu is available on multiple sites so it’s easy to download it from an untrusted site that bundles the software with malware. Once it gets into your system, your system will be exposed to security risks.
Degraded performance – If you have an older PC, chances are that installing WinCDEmu can have an impact on its overall performance. CPU and memory usage are likely to be through the roof.
Steep learning curve – Yes WinCDEmu is convenient but it is not a common tool. If you’re not used to CD emulator software, you may find it hard to set it up or even troubleshoot any issues.
Use WinCDEmu’s portable version where possible since it doesn’t require installation.
Ultimately, your choice to go with WinCDEmu will be dependent on your specific requirements. If it were up to us, we’d say it’s a pretty good choice. It’s easy to use, open-source and compatible with most OSes.
However, if it doesn’t meet your needs, you’re free to explore other virtual drive software that may or may not offer advanced features. At the end of the day, your needs are unique so if you need to mount ISO files, you can leverage specific software that can help you do it.
That’s all we had on WinCDEmu but we’re keen to hear your experience with it. What are the good and the bad so far? Let us know in the comment section below.
Microsoft released a new and improved Visual Studio Resource Explorer to make managing resources in .NET applications easier and faster.
Here are the changes made as compared to the Legacy Resource Editor:
Feature Comparison:
Feature
NEW Resource Explorer
LEGACY Resource Editor
Grid View of Resources
✅
✅
Add/edit/delete resources
✅
✅
Search
✅
❌
Single view for resources across solution
✅
❌
Edit multiple resource files at once
✅
❌
Edit multiple locales at once
✅
❌
Dark mode and VS theme support
✅
❌
string.Format pattern validation
✅
❌
Warnings and validation of resource data
✅
❌
Combined view for string and media resources
✅
❌
Datagrid zoom-ability
✅
❌
The revamped Resource Explorer has overcome issues like being unable to edit multiple resource files and locales at once. Let’s discuss them in detail.
What are the new features of Visual Studio’s Resource Explorer?
Ability to load multiple files
With the new and improved Resource Explorer, you can load multiple files and view all localizations simultaneously within the same view.
Now, when you open the Resource Explorer, you will get a comprehensive overview of all the resources you have stored with the locales of each file.
You can also control and configure which locales will be visible in the Datagrid. With the new interface, you can compare translations side by side and even edit them in place.
Improved search and filter
You can now search across different .resx files; the results can highlight every occurrence of your search term.
The new search filter can help you locate a specific locale, resource group, or corner of your project. It also allows you to select a subset of files.
Comments, Validations, and warnings
You can now add comments to each translation of a resource, which will be visible at once in the data grid. This will provide context, a backstory, or a reminder for yourself or the persona managing the app’s resources.
Comments can bridge the gap between resource managers and translators, ensuring clarity in the translation context. Third-party services or colleagues from different teams can add notes or explanations alongside translations.
The new Resource Explorer in Visual Studio can detect missing translations and issue targeted warnings. It is important for apps to support multiple languages, ensuring no gaps in localization.
Placeholder Validation ensures that fields are not left blank or misformatted, promoting smooth deployment and runtime experiences while keeping resource creation on track.
Accessibility and Assistive Technologies: We’ve fine-tuned every pixel to ensure compatibility with screen readers and assistive technologies. Everyone deserves an inclusive coding experience!
Zoom: No more squinting at the tiny grid view trying to decipher resource details. Our new grid view provides precision at your fingertips with the built-in zoom capabilities – simply use your mouse wheel or keyboard shortcuts to zoom in and out.
Dark Mode: Say goodbye to eye strain! Our revamped Resource Explorer now boasts a sleek dark mode that’s easy on the eyes. Whether you’re all-too familiar with late-night coding sessions or you simply prefer a more stylish interface, the dark theme sets the stage for focused productivity. Dive into your resource management tasks with confidence, knowing that your eyes are well taken care of.
The revamped Resource Explorer is enabled by default in the 17.11 Preview 2 and later versions. To open it, you can click the Resources folder in the Solution Explorer or go to View>Other Windows > Resource Explorer
Have you tried using the new Visual Studio’s Resource Explorer? If so, share your experience with our readers in the comments section below.
These tools would benefit hobbyists, fish stores, and aquascaping professionals who want to create and design a unique and custom aquarium.
After thorough research and testing, I chose the top seven tools to help you design, visualize, and experiment with your layout. You can make detailed plans before you invest in the equipment or aquatic life.
I’ve also added a step-by-step guide you can follow to create an aquarium easily.
Autodesk Fusion 360 is a well-known cloud-based software used for 3D modeling, FEA, PCB, CAM, and CAD product design and manufacturing. Most design engineers prefer to use this platform to create models of their ideas.
Autodesk Fusion 360 can also convert CAD files to a suitable format for 3D printing. This makes it crucial for organizations that rely on additive manufacturing.
In terms of visualizing 3D concepts, it can help you communicate with stakeholders for faster prototyping.
Furthermore, some of its standout features include:
Direct Modeling
Sketching
Surface Modeling
Mesh Modeling
Parametric Modeling
Rendering
Freeform Modeling
PCB Design Integration and Layout
2D and 2.5D Machining
Design to Manufacture
Meta additive manufacturing
Fused Filament Fabrication.
You can easily integrate Autodesk Fusion 360 with MeshMixer and repair the faulty 3D designs before printing. Compared to pre-designed mockups in other programs, this software creates photorealistic renderings for marketing and branding visuals.
Pros:
Ideal for technical design jobs
Design flexibility
Offers affordable subscription packages
Supports the outputs of other drawing programs
Its History timeline feature is a lifesaver
Cons:
Sometimes get laggy
Uses an extensive amount of system memory
Upload the 3D model to Fusion 360 cloud before viewing it
AutoCAD is another popular computer-aided design product developed by Autodesk. This software contains a comprehensive set of tools mainly used to create, edit, and document 2D and 3D designs.
Moreover, it helps engineers and designers to produce detailed and precise models, schematics, and drawings.
Some of its basic features include dimensioning, layer management, annotations, and editing and drawing tools.
Furthermore, you can automate repetitive tasks and custom routines using AutoLISP. This feature also enhances the overall efficiency of AutoCAD.
Pros:
Precision in 2D and 3D modeling
Offers extensive customization options
Provides a comprehensive toolset for drafting and design
Unlike other 3D systems, Autodesk Inventor is a feature-based parametric system that can create 3D parts, 2D drawings, and assemblies. In addition, it helps you construct your required model and visualize it before building the products.
Its parametric modeling is object-driven and a bit different from AutoCAD modeling. To be more specific, Autodesk Inventor controls everything by either dimensions, parameters, or relationships.
For example, to move a hole position within a block, you have to change the dimension or its relevant relation in a parametric system.
Some of the other key features of Autodesk Inventor are:
Assembly modeling
Drawing creation
Shared view collaboration
BIM Interoperability
Work with non-native data
Automated frame design
Model-based definition
Design configurations.
Pros:
Offers an extensive set of features for mechanical design and engineering
Easily integrates with other Autodesk products
Contains built-in simulation and analysis tools for validating designs
4. Sketchup – Easy 3D Modeling With Extensive Library
Sketchup is a versatile 3D design and modeling software suitable for various industries, such as interior design, architecture, construction, engineering, and 3D printing. This tool allows you to create, modify, and visualize 3D models with real-time interactivity.
Additionally, Sketchup is based on parametric modeling. That means you can create objects that change and adapt with respect to pre-defined rules.
This tool also includes surface rendering and drawing layout functionality. Moreover, Sketchup supports third-party plug-ins from its Warehouse.
Pros:
User-friendly interface
Provides an extensive online repository of 3D models and components
Large and active community
Offers a free web-based version
Support various rendering plugins
Cons:
Contains limited advanced features
Its free version has export limitations for certain file formats
Tinkercad was developed with the aim of creating and designing an accessible 3D design tool. It has an extensive set of shapes divided into 11 categories. Moreover, it allows you to modify the added shapes.
You can also import a 3D model you found online in OBJ, STL, or SVG format. Additionally, you can share your created cricut projects or 3D models with others through popular 3D printing websites, such as Cults, MyMiniFactory, and Thingiverse.
Unlike other Autodesk products, Tinkercad doesn’t require high-end hardware or memory. All you need is a stable internet connection and a browser.
6. SCAPE IT – Beginner-friendly Aquascaping Editor
SCAPE IT is an online aquascaping editor that lets you define a layout for your aquarium. This web app provides all the critical information you might need, too. For instance, the necessary mass of plants or the amount of light you need.
Moreover, SCAPE IT is based on these four main features:
Substrate: Refers to the bottom layer or ground where plants will root.
Background: Acts as a backdrop for your aquarium design.
Hardscape: Refers to the non-living, structural elements you’ll place in the aquarium.
Plants: Contains various plants that help to design the aquaspace.
To be more specific, it provides an easy way of aquascaping for beginners. This web app works pretty well in all modern browsers, mobile devices, and on your desktop.
Pros:
Easy to use, especially for beginners
Contains pre-built elements to design an aquarium
Provides details related to must-have elements
Supports both pre-defined and custom tank sizes
Separately organizes the aquarium into different categories
Allows you to order the end product through its partners
MyAquariumBuilder is a platform designed for aquarium hobbyists to help them plan, create, and share their aquariums with others. It offers 3000+ products and also provides the option to compare items.
Specifically, MyAquariumBuilder supports the following equipment:
Tanks (includes lights and filters)
Stands
Heaters
Hoods
Livestock of Fish, Invertebrates
Decorations: Substrate, Plants
Accessories
CO2
Thermometers
Nets
Food
Algae Cleaners
Pumps
Siphones
Additives.
When you select any of the above equipment, MyAquariumBuilder adds it to the onscreen aquarium prototype to check the overall look and functionality. Moreover, this web app also integrates with Amazon to add these items directly to the cart.
Pros:
Plan everything, from tank to fish, in one place
You can easily create an onscreen prototype of your dream aquarium
Offers extensive library with over 3000 products
Amazon integration makes it easy to find and buy the selected equipment
Cons:
Might not offer the level of detail or design flexibility compared to dedicated design software
I’ll demonstrate the process with the SCAPE IT web app. Follow these steps:
1. First, navigate to the SCAPE IT website and click on the Create new layout button.
2. Define the Width, Depth, and Height of your layout.
3. Set the Background and adjust the layout Substrate.
4. Click to add the required stones.
6. Add desired woods.
7. Select and add plants.
View the final look of the aquarium.
How I Chose the Best Aquarium Design Software?
During testing, I prioritized the following points to choose the above tools:
Ease of use for beginners
A mix of 3D modeling software for detailed design and web-based apps for more accessible options
Cross-platform compatibility
Sharing and collaboration features.
So now you’ve all the crucial info related to the best aquarium design software. Feel free to let me know which one you liked the most in the comments below!
In the lively realm of digital advertising, Microsoft Advertising has made another move by introducing a series of updates to help advertisers improve their experience and make their campaigns more effective after the Redmond-based tech giant revamped the platform with a new design earlier this year.
June, in particular, saw remarkable changes. Features were launched to smoother ad operations and provide fresh ways of reaching audiences. Let us delve into these updates and comprehend how they mold the future of advertising on Microsoft’s platform.
To begin with, Video and Connected TV ads have arrived in the Microsoft Advertising Editor. This is a groundbreaking development for advertisers who want to engage audiences with lively video content.
You can now manage your Video and Connected TV ads in bulk using Microsoft Advertising Editor. With this update, you can create your campaigns and upload your video creatives directly in Editor. To get access to this feature, make sure that you have updated to the latest version and select “get changes”. Note that when using Editor to manage these campaigns, device targeting for your campaigns will be created automatically based on the campaign type you are creating (i.e. video or connected TV).
Think about being able to control your campaigns collectively, upload creatives straight in the Editor, and have device targeting arranged for you automatically. It’s about ensuring your brand’s story reaches people, whether they are watching their favorite shows on Netflix, Hulu, and other platforms or just casually surfing the web.
As for Netflix, Microsoft has opened up Netflix inventory for Connected TV ads. It is available in numerous important markets, such as the US, Canada, Europe, and Latin America.
This implies that advertisers can integrate their brands into Netflix’s award-winning content to offer an unforgettable brand experience to highly involved viewers. But first, ensure your video creative is high quality and that you have approved the Netflix inventory policy.
In the area of AI, Copilot from Microsoft Advertising is causing ripples. It allows you to make and modify banner assets for display ads. This tool uses generative AI to suggest images and copy assets depending on your landing page URL, which reduces the time and work required for campaign creation. Moreover, this help driven by Artificial Intelligence will soon expand to Video ads.
Big news for people who run smart shopping campaigns: Microsoft is moving these campaigns to Performance Max. They say the process will keep your setup, reports, and history of how well it performs as you are used to – but there might be a brief period of learning for the campaigns after they have been upgraded. If you want to change over sooner, an option is also available.
Microsoft Advertising’s platform has improved its language range. It can now help in six more languages, such as Thai and Turkish. This is a step towards making the system easier for advertisers worldwide.
Hey, did you hear the latest buzz in gaming? This June, Xbox gamers are in for a treat as they can grab Tell Me Why free of cost. What adds to the uniqueness of this giveaway is that it’s not only for Xbox players—PC gamers can also participate since the game is free on Steam.
Now, if you are asking why this matters, I will tell you. On consoles, free games are difficult to find. If we compare it with the PC gaming world, where getting things for free is more common.
Normally, players who use a console get their hands on “free” games through services that require a subscription, such as Xbox Game Pass or PS Plus. However, there’s a trick to it—you’re not technically owning these games even if they’re accessible for no extra cost because once your subscription ends, so does access to those titles.
When your subscription ends, you can no longer play them. So when a game like Tell Me Why becomes free without ties attached, this is worth celebrating.
The game Tell Me Why is a story-driven adventure in which you explore a family secret set in pretty Alaska. It’s made by DONTNOD Entertainment, which also created the Life is Strange series, so get ready for emotional stories with this one!
The game’s main character is transgender, which makes it special because such representation was not often seen in big-budget video games before.
The game’s emphasis on player choice implies that your choice will determine the story, providing a personalized experience within its engaging narrative.
It might not be for everyone, especially if they prefer quick-action games instead. But people who like Life is Strange or those interested in good stories should take time to try it out. And with no cost until June’s finish, there is no reason not to have it.
Therefore, if you are an Xbox enthusiast or a PC gamer, do not miss the opportunity to obtain your copy of Tell Me Why. This game provides an exciting story and promotes the values of variety and inclusiveness. And who can say what will happen? It might just become one of your favorites.