The Qualcomm Snapdragon X Series laptops (Copilot+ PC) are not performing well in gaming tasks

The Qualcomm Snapdragon X Series laptops have not been very impressive in gaming performance. The excitement surrounding these laptops was understandable; they are the initial models for Qualcomm’s Snapdragon X processor – a chip made specifically for combining top computer abilities with excellent connectivity features.

But as events unfolded and gamers put them through their paces, it didn’t turn out exactly how many people had anticipated – particularly those within the gaming community.

Qualcomm’s Snapdragon X Series laptops were introduced with great excitement. They claimed to transform the laptop world with their 4nm process technology, which allows them to have as many as 12 Oryon CPU cores and speeds that can turbo boost up to 4.3 GHz.

The best part? An included Adreno graphics unit and Neural Processing Unit (NPU), which is currently leading by providing 45 trillion operations per second. Sounds impressive, right? Well, it is, until you start looking at its gaming chops.

It is the 3D performance that matters. According to reports regarding gaming, the laptops did not showcase as a top-tier option despite having powerful processors. People who reviewed and used them initially noted that although Snapdragon X Series performs well in overall performance and long battery life, when it comes to graphics performance—even with x86 emulated software running on it—this chip’s weak point cannot be hidden.

Playing games on these laptops has given me a varied experience. You have the Adreno GPU filled with promise, but it doesn’t quite live up to the high-powered performance gamers desire. Then, there are problems related to ARM emulation errors and games not permitting resolution alterations to match screen dimensions, resulting in subpar frame rates. It’s obvious that Qualcomm’s Snapdragon X is not intended for hardcore gaming, and this could disappoint some people.

Yet, it isn’t completely disastrous. The Snapdragon X Series has many good aspects, particularly in connectivity and working while traveling. Furthermore, Qualcomm is not a company that stops progressing. As AMD and Intel continue to compete, these differences in gaming performance are expected to be improved in the next versions.

If you’re looking for a laptop that can do a bit of everything but isn’t truly powerful in gaming, the Snapdragon X Series might be what you need. However, it’s good to manage your gaming hopes or search elsewhere.

Riot Client Error Not Found: 7 Tested Ways to Fix

Running into the Riot Client Error Not Found issue can be frustrating, especially when you’re eager to jump into your favorite game. Don’t worry; I’ve compiled a straightforward guide to help you troubleshoot and fix this problem.

How do I fix the Error not found in Riot Client?

1. Reinstall the Riot Client

  1. Open the Start menu and click on Settings (the gear icon).
  2. Select Apps, go to Installed apps, then scroll down to find Riot Client
  3. Click on it, and select Uninstall.
  4. Follow the prompts to completely remove the client from your system.
  5. Open your web browser and go to the official Riot Games website.
  6. Click on any game and download it to get the latest Riot Client.
  7. Run the downloaded installer and follow the prompts to reinstall it.

Reinstalling the Riot Client can resolve many issues by providing a fresh installation, removing corrupted files, and ensuring you have the latest updates. We also have a guide on how to completely uninstall the Riot Client on Windows 11.

2. Set Compatibility Mode

  1. Right-click on the Riot Client shortcut on your desktop or in your Start menu.
  2. Select Properties from the context menu.
  3. Go to the Compatibility tab.
  4. Check the box that says Run this program in compatibility mode for and select an older version of Windows from the dropdown menu (such as Windows 8 or Windows 7).
  5. Click Apply, then OK.
  6. Double-click the Riot Client shortcut to launch it.

Running the Riot Client in compatibility mode can help if the client is having issues with your current version of Windows.

3. Update the graphics drivers

  1. Press Win + X and select Device Manager.
  2. Expand the Display adapters section, right-click on your graphics card and select Update driver.
  3. Choose Search automatically for updated driver software.
  4. Follow the prompts to install any available updates.
  5. Restart your computer.

Keeping your graphics drivers up-to-date can resolve issues related to rendering and display, which may be causing the black screen.

4. Disable Vulkan

  1. Open the Riot Client installation directory. This is usually located at C:\Riot Games\Riot Client.
  2. Locate the Config folder, then open the LeagueClientSettings.yaml file with a text editor like Notepad.
  3. Find the line that says vulkan: true.
  4. Change it to vulkan: false.
  5. Save the file and close the text editor.
  6. Restart the Riot Client.

Disabling Vulkan can help if your GPU does not support it, preventing the black screen issue.

5. Clean Reinstall of Wine Platform (Linux only)

  1. Open a terminal.
  2. Run the following commands:
    • snap refresh --beta wine-platform-5-staging
    • snap refresh --edge --devmode leagueoflegends
    • snap remove --purge leagueoflegends
    • snap install leagueoflegends --beta
  3. Wait for the installation to complete.
  4. Delete the following folder: ~/snap/leagueoflegends/common/.wine/drive_c/Riot Games/Riot Client
  5. Edit the following file: ~/snap/leagueoflegends/common/.wine/drive_c/Riot Games/League of Legends/Config/LeagueClientSettings.yaml
  6. Change the line upgrade-ready: false to upgrade-ready: true.
  7. Save the file and start the game again.

A clean reinstall ensures that no residual files interfere with the new installation, helping to resolve persistent issues.

6. End task in Task Manager

  1. Press Ctrl + Shift + Esc to open Task Manager.
  2. Go to the Processes tab and locate any Riot- or League-related processes (such as RiotClientServices.exe).
  3. Right-click each process and select End Task.
  4. Close Task Manager and try launching the client again.

Ending the background tasks related to Riot can clear up any conflicts or issues stemming from frozen or malfunctioning processes.

7. Adjust firewall and antivirus settings

  1. Open your antivirus software and navigate to the settings.
  2. Find the section for firewall or exceptions.
  3. Add an exception for RiotClientServices.exe and any other Riot-related executables.
  4. Save the changes and close your antivirus software.
  5. Go to the Windows Firewall settings:
    • Open the Start menu and click on Settings.
    • Select Update & Security, then Windows Security.
    • Click on Firewall & network protection, then Allow an app through firewall.
  6. Add the Riot Client to the list of allowed apps.
  7. Save the settings and restart your computer.

Adjusting your firewall and antivirus settings ensures that they are not blocking the Riot Client from connecting to the internet or functioning properly.

Following these steps should help you resolve the Riot Client Error Not Found issue. You might also get more information from our guide on what to do if the Riot Client is not opening.

Do you have any suggestions? Leave a note in the comments below.

Error Parsing HTTP Request Header: 3 Ways You Can Fix it

When developing and using Tomcat, you might often encounter Error parsing HTTP request header. This error will prevent your project from running, but it can be fixed.

How can I fix the Error parsing HTTP request header?

Before we start, make sure that your server is configured to handle HTTPS requests. Also, ensure that you’re accessing the server using the right protocol, so try HTTPS instead of HTTP and vice versa.

1. Remove the listener

  1. Open the server.xml file.
  2. Locate the following listener: <Listener className="org.apache.catalina.core.AprLifecycleListener" SSLEngine="on"/>
    listerner code remove
  3. Remove it and save the changes.
  4. You can also try changing maxHttpHeaderSize by using this code: maxHttpHeaderSize=”1048576″
    maxHttpHeaderSize set

2. Modify application.properties

  1. Open the application.properties file.
  2. Now add the following lines:
    logging.level.org.springframework.web: trace
    logging.level.org.apache: trace

    loggin.level.org configuration
  3. Save changes.

You can also set the max header size by adding one of the following lines: server.max-http-header-size=64kb server.maxHttpHeaderSize = 102400

This solution works if you’re using SpringBoot.

3. Modify the application.yml file

  1. Open the application.yml file.
  2. Locate the following lines and remove them:
    spring:
      main:
          lazy-initialization: false

    lazy-initiation false configuration

This solution also applies to SpringBoot.

This error message can prevent your application from working correctly, but in most cases, it can be fixed by switching from HTTP or HTTPS or vice versa.

In web development, HTTP errors are fairly common, and we covered HTTP error 431 and HTTP error 413 in previous guides.

Before you go, we also have a guide on HTTP error 302 that might interest you. Did you manage to fix the Error parsing HTTP request header message? Share with us the solution that worked for you.

SyncToy Alternative: Top 5 Tools for Effortless File Synchronization

Are you looking for the most suitable SyncToy alternative? It’s a reliable tool for synchronizing files on Windows, but other options match SyncToy’s capabilities and offer more advanced features and better performance. 

They can sync files for personal use, business needs, or cross-platform operations. Today, I’ll discuss the best five alternatives to help you find a perfect option for your file synchronization needs.

Let’s begin!

Best 5 SyncToy Alternatives

After testing 15 tools, I singled out five that stood above the rest. Here are my picks:

FreeFileSync – Best for Real-Time Synchronization

FreeFileSync

FreeFileSync is an excellent SyncToy alternative, known for its open-source nature and high efficiency. It provides a simple, intuitive interface that makes it easy for users to set up and manage synchronization tasks. 

Intuitive interface

Another standout feature is its cross-platform compatibility, supporting Windows, macOS, and Linux. This makes it an ideal choice for users who operate across different systems, unlike SyncToy, which only works with Windows. 

Cross-platform compatibility

FreeFileSync’s real-time synchronization feature is a significant upgrade from SyncToy, allowing files to update instantly as changes occur. 

Real-time synchronization

FreeFileSync also supports various storage solutions, including local drives, network shares, and cloud services. Additionally, it supports batch processing for syncing large volumes of files. 

Batch processing

Pros:

  • Free to use with community support.
  • Supports Windows, macOS, and Linux.
  • Updates files instantly as changes occur.
  • Works with local drives, network shares, and cloud services.
  • Efficiently handles large volumes of files.

Cons:

  • Advanced features may be complex for beginners.
  • Since it’s open-source, it may have occasional stability issues.

Get FreeFileSync

GoodSync – Best Premium Option

GoodSync

GoodSync is a premium SyncToy alternative for file synchronization and backup. It’s a highly reliable and efficient solution across multiple devices and platforms. It supports more OSs than SyncToy, including Windows, macOS, Linux, Android, and iOS.

Compatibility

The tool’s intuitive interface and customization options make it easy for users to set up and manage complex synchronization tasks. GoodSync also provides detailed reports and logs to help you monitor the status of your sync operations and troubleshoot any issues that arise.

User-interface

Real-time and scheduled synchronization ensures that your files are always up-to-date without manual intervention. Also, you can filter backups.

Schedule

While GoodSync is a paid solution, its advanced features, reliability, and comprehensive support make it a superior alternative to SyncToy for users who require a professional-grade synchronization tool.

Pros:

  • It’s compatible with Windows, macOS, Linux, Android, and iOS.
  • Easy setup and management of synchronization tasks.
  • Keeps files up-to-date without manual intervention.
  • Helps monitor and troubleshoot sync operations.
  • Offers customization and filtering options.

Cons:

  • Requires a subscription for individuals or businesses.
  • Advanced features might be overwhelming for basic users.

Get GoodSync

SyncFolder – Best Free Option

SyncFolder

SyncFolder is a straightforward yet effective SyncToy alternative. It’s well-suited for users who need a simple solution without extra features. Despite its simplicity, SyncFolder has strong synchronization capabilities. 

It supports one-way and two-way sync and real-time synchronization, unlike SyncToy.

One-way and two-way sync

Moreover, it supports local drives, network shares, and external storage devices. The tool’s lightweight design ensures that it runs efficiently without consuming excessive system resources.

Storage

It also allows you to move and save photos and videos from a mobile device to a computer. However, you must install and run the SyncFolder Photos companion app on your mobile device or tablet.

Transfer through internet

It may lack some of the advanced features found in other SyncToy alternatives. However, it’s still a great choice for users who need a straightforward tool.

Pros:

  • User-friendly interface.
  • It instantly updates files as changes occur.
  • Works with local drives, network shares, and external storage.
  • Allows file transfer from mobile to computer via the internet.

Cons:

  • Lacks advanced options found in other tools.
  • It might not be suitable for complex synchronization needs.

Get SyncFolder

SyncBack – The Most User-Friendly Option

SyncBack

SyncBack is a powerful SyncToy alternative that stands out for its versatility and user-friendly interface. It also has a scheduling feature like SyncToy, so that you can automate your tasks. It’s useful for regular file backup.

Schedule

SyncBack also excels in terms of customization options. Users can create profiles for different synchronization tasks.

Create profile

Additionally, SyncBack supports cloud storage services, FTP, and network drives, providing more flexibility in where and how you store your data.

Pros:

  • Easy to navigate and set up.
  • Automates backup and synchronization tasks.
  • Allows detailed profiles for different sync tasks.
  • Compatible with cloud services, FTP, and network drives.

Cons:

  • Some features are only available in premium versions.
  • It can be demanding on system resources during large syncs.

Get SyncBack

Syncthing – Best for Peer-to-Peer File Synchronization

Syncthing

Syncthing is an open-source SyncToy alternative that focuses on peer-to-peer file synchronization. It offers a secure, decentralized solution for keeping files synchronized across multiple devices. One of its standout features is its strong emphasis on privacy and security, with all data transfers being encrypted end-to-end.

Syncthing’s cross-platform compatibility is another advantage. It works on macOS, Windows, Linux, FreeBSD, Solaris, OpenBSD, and Android. It’s ideal for users who need to sync files across several devices. 

Syncthing's cross-platform compatibility

Pros:

  • Free with community-driven development.
  • Secure and decentralized synchronization.
  • End-to-end encryption for data transfers.
  • Supports different Operating Systems including macOS, Windows, Linux, and Android.
  • Updates files instantly across multiple devices.

Cons:

  • Setup and configuration can be complex.

Get Syncthing

How I Chose the Best SyncToy Alternative

I considered these factors during my research:

  • Key features like real-time synchronization, cross-platform compatibility, and support for various storage solutions.
  • User-friendly interfaces and straightforward setup processes.
  • Stability, efficiency, and the ability to handle large volumes of files.
  • Advanced settings, scheduling, and detailed sync profiles.
  • Data encryption and secure transfers for tools offering peer-to-peer synchronization.
  • Pricing.

Choosing the right SyncToy alternative depends on your specific needs. Consider factors like ease of use, features, and cost to find the perfect one. Each tool on this list offers unique strengths to improve your file synchronization experience. So, if SyncToy isn’t working anymore or it doesn’t please you, you have plenty of other options.

Since it’s complicated to change folder path in SyncToy, why not use one of these great alternatives instead?

Since the software is discontinued, you might get Cannot access internal metadata error in SyncToy or other problems, so using a different software might help you with that.

Which one did you like the most and why? Feel free to share your opinion in the comments!

Microsoft is apparently thinking of adding Copilot to Edge’s Crypto Wallet

In today’s fast-paced world of ever-evolving technology, Microsoft’s Edge browser is not lagging far behind. Its recent move to incorporate Copilot into its crypto wallet is a significant stride towards the future.

Combining artificial intelligence and cryptocurrency management could alter how we handle digital currencies. But let’s delve more into this, okay?

According to Windows Latest, a feature called “msCryptoWalletCopilot” was shown in Microsoft’s Edge Canary build. This new aspect hints at a time when Copilot will help with browsing and managing your crypto assets.

Although we could not see this feature as anticipated, it’s the idea that matters most—having a Copilot for your crypto wallet may suggest you are informed about what’s happening in cryptocurrencies and receive portfolio analysis and management advice. But money is sensitive, so we doubt Copilot’s ability to handle this delicate task.

Microsoft has been considering the crypto wallet for quite some time in Edge. The intention is to create a smooth experience for managing cryptocurrencies.

Think about your crypto wallet being available as a Progressive Web App (PWA), pinned straight onto your Taskbar or Start menu, accessible without even launching the browser. This idea is more than just convenient; it’s about effortlessly incorporating cryptocurrency into our regular digital activities.

Nevertheless, the path to include Copilot in Edge’s crypto wallet is unfinished. Even with the leaks and discussions, Edge’s stable channel has not yet received this. However, it shows Microsoft’s desire for innovation by trying even in unknown areas, like managing cryptocurrencies through a browser.

Also, we must not overlook that Edge is not the pioneer in this field. Brave Browser has already been involved with crypto wallets and even recently included support for Bitcoin.

The merging of Copilot with Edge’s crypto wallet is a hint at the future, where AI helps not just surf the web but also handle digital money matters. It would not be the first time, though: for instance, we recently discovered Microsoft plans to integrate Copilot in Edge’s Screenshot tool.

Still, this journey isn’t finished yet, and the feature has not shown itself fully, but the potential for a more joined-up digital experience could be seen soon. Paying attention to this space makes us think about what comes next for Microsoft Edge and its engaging experiences with Copilot.

8 Ways to Use the Excel IFERROR Function and Improve Your Spreadsheet

Excel’s IFERROR function is a lifesaver when it comes to handling errors in your spreadsheets. Whether you’re dealing with division by zero, missing data, or lookup failures, IFERROR can help keep your data clean and user-friendly. Here are some practical examples and easy steps to master the IFERROR function in Excel.

How do I use the Excel IFERROR function?

1. Basic Use of IFERROR

  1. Open Excel and select the cell where you want the result.
  2. Enter the formula where you suspect an error might occur. For instance, enter =A1/B1. If B1 is zero, Excel will return a #DIV/0! error.
  3. To catch this error, modify your formula to use IFERROR and press Enter: =IFERROR(A1/B1,"Error in calculation")

Using this function, if there’s an error in the calculation, Error in calculation will be displayed instead. This helps avoid displaying the raw error to users, making your spreadsheet look cleaner.

2. Using IFERROR with VLOOKUP

  1. In the cell where you want the result of the VLOOKUP function, start typing your VLOOKUP formula: =VLOOKUP(A2, B2:C10, 2, FALSE)
  2. If the lookup value in A2 is not found, VLOOKUP will return a #N/A error. To handle this, wrap the VLOOKUP function with IFERROR (press Enter to run the formula): =IFERROR(VLOOKUP(A2, B2:C10, 2, FALSE),"Not found")

With this formula, if the lookup value isn’t found, Not found will be displayed instead of the #N/A error. This is useful when you want to provide a more user-friendly message when a lookup fails.

3. Handling multiple errors

  1. If you have a formula that can result in multiple errors, use IFERROR to handle them. For example, consider the formula =SUM(D5:D15). If the range contains errors like #N/A, the sum will fail.
  2. Modify your formula to handle errors using IFERROR: =SUM(IFERROR(D5:D15,0))
  3. Press Ctrl + Shift + Enter to enter it as an array formula if you are using Excel 2010 or earlier. In Excel 2013 or later, just press Enter.

This formula will replace any error in the range with 0 before summing, thus preventing the overall SUM function from failing.

4. Suppressing Division by Zero errors

  1. In the cell where you want the result, type your formula that includes division, for example, =A1/B1.
  2. To prevent errors when B1 is zero, use the following IFERROR function and press Enter to run it: =IFERROR(A1/B1, 0)

By using this formula, if B1 is zero, the function will return 0 instead of the #DIV/0! error. This is useful in avoiding disruptions in calculations due to division by zero.

5. Requesting user input before calculation

  1. If you want to prevent calculations until a user provides specific input, start with your formula, such as =A1/B1. This will give an error if B1 is empty.
  2. Modify your formula to use IFERROR and provide a message: =IFERROR(A1/B1,"Please enter a value in B1")
  3. Press Enter.

This formula displays a custom message prompting the user to input a value instead of showing a calculation error. It ensures that users are aware of missing inputs needed for accurate calculations.

6. Nesting multiple IFERROR functions

  1. If you need to perform sequential lookups and handle errors at each step, start with your initial VLOOKUP formula: =VLOOKUP(A2,Sheet1!A:B,2,FALSE)
  2. To handle multiple sheets, nest IFERROR functions with this fformula and press Enter: =IFERROR(VLOOKUP(A2,Sheet1!A:B,2,FALSE),IFERROR(VLOOKUP(A2,Sheet2!A:B,2,FALSE),"Not found"))

This formula will check Sheet1 first, and if the value is not found, it will proceed to check Sheet2. If it’s still not found, Not found will be displayed. This ensures all possible sources are checked before concluding the value is missing.

7. Using IFNA for specific errors

  1. In your VLOOKUP formula, replace IFERROR with IFNA if you only want to catch #N/A errors and not other types of errors: =IFNA(VLOOKUP(A2, B2:C10, 2, FALSE),"Not found")
  2. Press Enter.

By using IFNA, only the #N/A errors will be caught and handled, while other errors will still be displayed. This is useful when you want to distinguish between different types of errors in your data.

8. Summing while ignoring errors

  1. In the cell where you want the sum, start with the SUM function: =SUM(D5:D15)
  2. To ignore errors in the range, use IFERROR inside the SUM function: =SUM(IFERROR(D5:D15,0))
  3. Press Ctrl + Shift + Enter to enter it as an array formula if you are using an older version of Excel. In newer versions, just press Enter to run it.

This will ensure that errors within the range are treated as 0, allowing the SUM function to calculate correctly without being interrupted by errors.

By mastering the IFERROR function, you can make your Excel spreadsheets more robust and user-friendly. Remember to always validate your data inputs and consider using data validation rules to prevent errors from occurring in the first place.

Copilot+ PCs’ capabilities are pretty awesome. Here’s everything you need to know about them

Visualize a future when your PC does not just function as a machine but also acts as a creative collaborator. With the introduction of Copilot+ PCs, Microsoft wants to make this dream a reality.

According to Microsoft, these are not regular computers; they represent an advancement into an environment where artificial intelligence (AI) blends smoothly with your everyday duties to accomplish what you deemed unachievable before. Let’s dive into what makes these machines extraordinary.

To begin with, Paint has a feature called Cocreator. Have you ever felt like an artist at heart but struggled to bring your ideas onto the canvas? With Cocreator, this could change.

You begin by creating a basic sketch or providing a text prompt, and AI works its charm to convert it into remarkable artwork. It’s as if you’ve got an artistic master there with you, reacting to each of your changes instantly. And what’s more? No subscription fees or token limits. Create to your heart’s content!

And lastly, the Photos app has a feature named Restyle Image. Picture this: you have personal photos on your device and can transform them with one click. Do you desire to view pictures from your holiday in cyberpunk or pixel art style? Just say the word, and AI will take care of it. It’s more than just using filters; it’s about changing your memories into styles that you couldn’t imagine before.

And let’s not even start with Image Creator. Want ideas for a project or to see various visual appearances? Image Creator makes countless images from your input. From creating a sci-fi book cover to brainstorming dessert ideas, there are no limits. And yes, you got it right – all of this is free and fast.

Live Captions changes everything. In our global community, dealing with language differences is a common challenge. Now, everyone can effortlessly follow along and participate in any conversation or event. Live Captions could change audio from 44 languages into English subtitles immediately.

No matter if it’s a video call, podcast, or movie, everyone will understand! It’s like having your own translator with you all the time.

And, when we wish to appear and speak in our finest manner for video conversations, the Windows Studio Effects function is a real help. It includes items such as background blur and portrait light along with voice focus. This way, you always stay at your top level. Whether it’s a room with low light or an energetic café scene; Studio Effects will adapt to the setting you are in.

Microsoft says Copilot+ PCs are not just computers. They are built to be your partners in creativity, productivity, and connectivity. From artists to professionals and everyone else, these machines aim to make your digital life easier but also more colorful and exciting.

Therefore, will you be ready to experience Copilot+ PCs and their new capabilities? The future is present now; it’s time for you.

If you haven’t used Microsoft Mesh, now it’s time, as the new features blend reality with avatars seamlessly

Have you ever considered attending a meeting, not as yourself but as a digital version that shows your reactions and can be worn in different attires? Now, Microsoft Mesh is bringing this concept to life for Teams users. I must say, the future of virtual collaboration appears very interesting!

Microsoft Mesh has been progressing on a course to change how we communicate in the digital sphere, and its most recent modifications show no signs of stopping this development.

The AI is making avatar creation easier. Do you recall when forming a digital representation of yourself seemed like science from outer space? Microsoft Mesh listened and brought in an AI-driven answer that forms your avatar by examining a photo that you upload.

This implies that you can select from three avatars that closely resemble yourself, rendering it an effective and enjoyable procedure.

But how will you show your feelings in a meeting? In a blog post, Microsoft says avatars will have emotes starting in July. So, think about this: a thumbs up or nod to show agreement, all expressed by your digital proxy. Also, Microsoft is including a wardrobe enhancement.

In July, we will add emotes as another way to express yourself in the 3D immersive spaces built into every Teams meeting. While you’re in an immersive space, select the “reactions” button in the menu bar at the bottom center of the immersive space view. Find the new emotes below the original Teams reactions and begin expressing yourself during meetings.

Microsoft

Now, if the meeting demands it, you can abandon the casual appearance and opt for more formal attire.

New immersive spaces are coming for customization lovers. Whether for a thinking session or a meet-up, Mesh in Teams is preparing to provide areas for different purposes with interactive activities and flexible seating options.

Moreover, it’s not only about aesthetic appearance within the digital realm. Advancements in content sharing and avatar interactions are also being introduced to guarantee that your virtual existence is equally useful and striking.

From better legibility of shared materials to personal limits for avatars, Mesh ensures that collaboration always stays central in its virtual areas.

For event organizers, custom experiences are becoming high-end. Think about easily setting up your event, placing objects in the space, and moving between rooms to interact with smaller groups. This customization is expected to make virtual events more interactive and personal.

Microsoft Mesh is working towards a future where virtual meetings and collaborations are necessary and enjoyable.

With AI-powered avatars, expressive emotes, and immersive spaces, digital interaction possibilities seem limitless. And what more? These updates are rolling out soon, so get ready to meet the digital you!

StartAllBack on ARM: How to Install & Run it

StartAllBack is a must-have for some Windows 11 users, but many are wondering if StartAllBack is working on ARM. In today’s guide, we’re going to answer this question.

How can I install StartAllBack on an ARM device?

1. Use regular setup

  1. Visit the StartAllBack website.
  2. Click the Download button at the bottom.
    download button startallback website
  3. This will download the setup file.
  4. Start the setup file and follow the instructions on the screen.

As you can see, you can install StartAllBack on an ARM device just like on any other. The setup will recognize the version of OS you’re using and install the appropriate version.

2. Use the command line

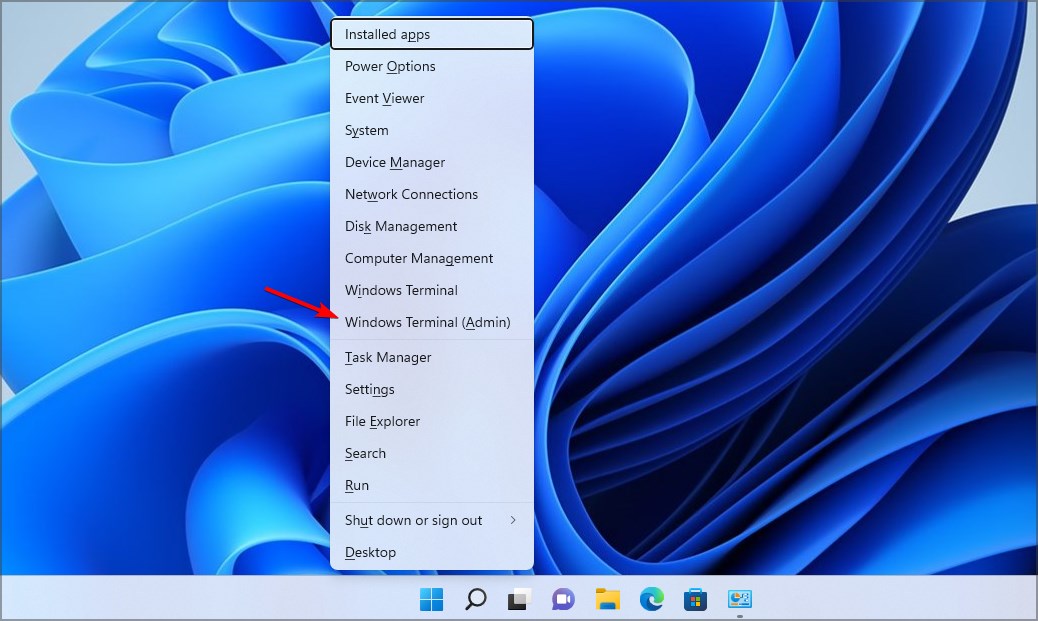
  1. Press the Windows key + X and choose Windows Terminal (Admin).
    windows terminal admin start menu
  2. Once it opens, run the following command: winget install startallback
  3. Follow the instructions on the screen.

This method is more straightforward and faster, so if you’re comfortable using the command line you can use this method instead.

How much does StartAllBack cost?

This software requires a license, and you can get a license for $5.

What is the difference between StartAllBack and Start11?

Start11 offers more customization options related to the Start Menu. On the other hand, StartAllBack can also customize your File Explorer. To learn more, we have an entire guide on Start11, so don’t miss it.

As you can see, StartAllBack will work on ARM, so you can use it on any Windows platform. In case you encounter any issues with it, we also have a guide on how to disable StartAllBack, so you might want to check it out.

Microsoft Edge may integrate Copilot into the Screenshot tool

Microsoft is testing a new feature for the built-in Screenshot tool (formerly known as Web Capture) in Edge browser to allow sending captures to Copilot to get an explanation. If you’ve found Circle to Copilot useful, this will similarly help you. The new “Ask Copilot” option for Edge Web Capture is being tested in Canary.

Currently, when you capture a region on screen using the Screenshot tool, you’ll be presented with Copy, Save, and Markup options. The Canary update introduces a fourth option: “Ask Copilot.” This integration utilizes the power of Microsoft Copilot, a handy AI assistant that lives within the Edge sidebar.

Here is how to send web content captures to Copilot in Edge

  1. Click on the Screenshot icon on the toolbar
  2. Click Capture area, select a region by drawing
  3. In the pop-up menu, you’ll now see a new option: “Ask Copilot.”
  4. Selecting this option sends your screenshot directly to Copilot’s sidebar.
  5. Copilot analyzes the captured content and provides relevant information based on your prompt.
Ask Copilot option in Screenshot capture

While Copilot in Edge Sidebar, already comes with the ability to add screenshots, the Copilot integration in Edge built-in Screenshot tool means deeper integration and better usage of AI assistant for screenshots.

While the “Ask Copilot” context menu option already allows you to explain, summarize, and expand highlighted text on demand, Microsoft is now adding that functionality to Edge screenshots as well.

This feature is currently under testing in Microsoft Edge Canary on select users via Controlled Feature Rollout (CFR). As with any CFR, there’s no guarantee it will make it to the stable version of Edge.

While Microsoft Edge is a better browser based on Chromium, Microsoft has started forcing Windows 11 users with a 3D banner to set Edge as the default browser. If you use Edge, there is an unofficial way to make it feel lighter and faster.

Microsoft Designer’s new Restyle Image turn your photos into pieces of art

Did you ever want to add some jazz to your pictures with just a few clicks, turning them into fascinating art? Microsoft Designer offers a handy feature named Restyle Image that claims to do exactly this. It’s like having a magic wand for your photos; ordinary becomes magnificent.

It’s a tool that can make a big difference, whether you want to jazz up your social media accounts or add more style to your presentations.

User-friendly interface. You begin by uploading your photo, and then you choose a style you like— pop art, flat illustration, or even something more avant-garde. With just a single click, Microsoft Designer will create several options for you to decide on.

Restyle Image lets you reimagine, restyle and recreate your images in a new light by uploading an image, choosing from a set of styles (such as pop art, flat illustration, papercraft, stylized 3d, and more), and describing any customizations you want to see.  You can easily turn your photos into stunning works of art!  

Microsoft

You may now make slight alterations to your image, such as inserting text or other adjustments. Subsequently, you can download it and utilize it in any desired location.

However, this feature is not limited to profile pictures. It can also be used to create unique avatars, produce eye-catching cover photos on social media platforms, or transform a special photo into artwork.

Additionally, it can help in creating more interesting and interactive educational materials. Imagine turning a snooze-worthy presentation into something that captures everyone’s attention.

You can try different styles and pictures—the more you use Restyle Image, the more creative ways will appear. If at any point you feel unsure of what to do next, look in Explore Ideas for a wide range of suggestions.

However, remember a few hints and techniques. Photos with only one person are better; it lets the AI concentrate on correcting those facial details. The tool is now available in English, but more languages will be added soon. Also, watch out for those pesky misspelled words in your AI-generated images.

Could this come to Paint Cocreator? Who knows, but until then, Restyle Image is prepared and accessible to every Microsoft Designer user. So, why not give it a try and explore what incredible things you can create? And remember to let the world see your finished works of art. Who knows? Your feedback might help shape the future of this fantastic tool.

Skype for Business Server Subscription Edition will be released in 2026

In the fast-moving technology world, Microsoft’s recent news about the future of Skype for Business has grabbed attention. The big tech company has shared details of its next important version, Skype for Business Server Subscription Edition (SE), which is planned to be released in 2025 Q3.

This is a noteworthy step as it shows progress in developing Skype for Business and highlights Microsoft’s dedication to offering strong communication options for businesses.

Skype for Business Server SE, the next release of Microsoft Skype for Business Server, will be available for download from the Microsoft 365 admin center (previously the Microsoft Volume License Service Center) in early Q3 of 2025.

Microsoft

As we approach the end of life for the existing Skype for Business Server 2019 edition, Microsoft is preparing to launch its eighth cumulative update—CU8—probably in the second half of 2024. This upcoming release brings with it some interesting features, including Persistent Chat (PChat), where users can create topic-centered discussion rooms with ongoing conversations.

This attribute, dependent on user inputs, demonstrates Microsoft’s commitment to improving company cooperation and interaction.

Nevertheless, time is running out for Skype for Business Server 2019 and its precursor, the 2015 iteration. They are both nearing their end-of-support date of October 14th, 2025.

As a replacement, we have Skype for Business Server SE, which intends to provide an effortless changeover with matching hardware specifications and operating system demands. It also offers a similar licensing model to SharePoint Server Subscription Edition or Exchange Server Subscription Edition.

This means there will be no service disruption when businesses upgrade because the current infrastructure can handle the new edition.

In the official blog post, Microsoft suggests a two-step upgrading procedure for organizations utilizing the older Skype for Business Server 2015. They advised shifting to Skype for Business Server 2019 and applying for the CU8 upgrade late this year.

This method prepares businesses for eventual change to SE of Skype for Business Server and guarantees they can enjoy the newest characteristics and enhancements during transition time.

Skype for Business Server SE is greatly awaited by businesses worldwide, eager to use its improved features to foster better communication and cooperation. Microsoft’s history of providing high-end technology solutions gives hope that the future of business communication will be even brighter.

As we approach the release date, tech people wait with anticipation to see how this new product will transform their work in connecting, communicating, and collaborating within the business field.

Fix: Network Error When Using the Patch Function in Power Apps

Encountering a network error when using the Patch function in Power Apps is usually caused by issues with a SharePoint list column that is required, and the Patch function is not passing any value to it, or it’s not doing that with correct data.

How do I fix the network error when using the Patch function?

1. Make sure that the Mail column is populated

  1. Verify that each record’s Mail column has a value.
  2. Replace https://<base_site_url>/_layouts/15/UserPhoto.aspx?Size=L&AccountName= & Mail with just an empty string “” for the Picture field.

Ensuring the Mail column is not blank helps SharePoint identify the Person. This solution fixes common data population issues directly related to the Mail column, preventing the error.

2. Validate the required columns

  1. Check if any columns in your SharePoint list are set as required/mandatory.
  2. Make sure you’re passing a value to each mandatory column using the Patch function.
  3. Validate that the data type passed in the Patch function matches the column type (e.g., number for number columns, date for date columns).

This solution addresses issues related to missing or incorrectly typed data, ensuring all required fields are correctly filled and reducing the chances of encountering network errors.

3. Use the Monitor tool

  1. Open Power Apps Studio.
  2. Go to Settings > Advanced Settings > Monitor.
  3. Run your app and perform the action that triggers the Patch error.
  4. Observe and note any detailed error messages or network requests to get more insights into why the operation is failing.

Using the Monitor tool can provide additional insights into the network requests and errors happening behind the scenes, which helps in pinpointing the exact issue causing the error.

4. Handle Multiple Patches Safely

  1. Use variables to store intermediate results for each Patch operation.
  2. For each Patch:
    • First, check if the operation was successful.
    • If not, handle the error and avoid further operations.

Here’s an example:

ClearCollect(PatchResults, 
    ForAll(YourDataCollection, 
        Patch('YourList', Defaults('YourList'), { Title: ThisRecord.Title })
    )
);
If(
    IsEmpty(Errors('YourList')),
    Notify("Patch successful", NotificationType.Success),
    Notify("Patch failed: " & Concat(Errors('YourList'), Column & ": " & Message), NotificationType.Error)
);

Handling errors in batch operations ensures that you can safely process multiple records and handle failures gracefully without stopping the rest of the operations.

5. Refresh Data Sources

  1. Open Power Apps Studio.
  2. Locate the Data tab on the left panel.
  3. Select your data source (e.g., SharePoint list or SQL table).
  4. Click Refresh to refresh the connection.

This step helps in resolving any stale data connection issues which might be causing the network error during the Patch operation.

6. Use SubmitForm Instead of Patch

  1. Open Power Apps Studio and select your form.
  2. Add a button and set its OnSelect property to SubmitForm(FormName).
  3. Ensure all mandatory fields in the form are filled before submission.

Using SubmitForm can sometimes bypass issues that occur when using Patch, especially with complex forms and mandatory fields, ensuring smoother data operations.

7. Update SharePoint List Settings

  1. Go to your SharePoint site.
  2. Navigate to the list settings.
  3. Under Advanced settings, enable Allow Management of Content Types.
  4. Update the settings for the Title column to remove required status if not needed.

Adjusting list settings and making content types manageable ensures proper alignment of form data with SharePoint list configuration, fixing potential conflicts causing the error.

8. Check Column Types and Constraints

  1. Ensure the data types passed in the Patch function match the expected types in SharePoint.
  2. Verify that there are no list or column validation rules being violated during the Patch operation.

Matching data types and fulfilling validation constraints ensures that your Patch requests are compliant with SharePoint’s schema, reducing the chances of errors.

9. Update Power Apps to Latest Version

  1. Open Power Apps Studio.
  2. Check for updates and move to the latest authoring version by following the instructions in the link Power Apps Studio Versions.

Updating to the latest version resolves any issues related to bugs in earlier versions, ensuring smoother operation of Patch functions.

By following these solutions, you’re tackling common causes of the Patch function’s network error, ensuring your app operates smoothly and efficiently.

Did you manage to fix the problem? Let us know in the comments below.

StartAllBack Causes Black Screen on Windows 11 [Solved]

If you are using StartAllBack, there have been widespread reports of the app triggering a black screen on Windows 11. My research suggests that the issue is related to the recent changes in Windows 11 22H2 and how Microsoft is trying to block customization attempts in the OS.

This is evident as Microsoft has started blocking upgrades upon detecting StartAllBack on the PC. When installing a newer OS version using the setup, you are informed that StartAllBack causes security and performance issues on Windows.

But you don’t necessarily have to uninstall StartAllBack. Multiple solutions and workarounds allow you to continue using the app, at least for the time being!

How do I fix the StartAllBack black screen?

Tip icon Tip
If you come across the Hold Escape key to prevent StartAllBack from loading message at startup, press the Esc key and let Windows boot normally. You can then launch StartAllBack.

1. Update the StartAllBack app

  1. Launch the StartAllBack app, go to the About tab, and click on Check for updates.update to fix startallback black screen
  2. If a newer version is available, wait for the installation to complete, and then restart the PC.

If you can’t access StartAllBack and are stuck on a black screen at startup> press Ctrl + Shift + Esc to open the Task Manager > click on Run new task > enter chrome.exe and hit Enter > visit StartAllBack’s official website > download the latest app version.

chrome from task manager
Launching Google Chrome from Task Manager to update StartAllBack

2. Disable all taskbar customizations in StartAllBack

  1. Launch StartAllBack, and go to the Taskbar tab from the navigation pane.
  2. Disable the toggle next to Use enhanced classic taskbar, and click on the Restart now option to apply the changes.use enhanced classic taskbar

3. Uninstall recent Windows updates

  1. Press Windows + I to open Settings, go to Windows Update from the left pane, and then click on Update history.windows update
  2. Scroll down to the bottom and click on Uninstall updates.
  3. Click the Uninstall button next to the update installed right before the black screen first appeared.uninstall OS update to fix startallback black screen
  4. Again, click on Uninstall to confirm the change.

Often, when StartAllBack causes a black screen after updating Windows, it’s the latest OS version to blame. And if a newer version of the app is not available, you can always uninstall the Windows update. Previously, we have seen conflicts with KB5028182 and KB5034123!

4. Perform a system restore

  1. Press Windows + S to open Search, type Create a restore point, and click on the relevant result.
  2. Click the System Restore button.restore
  3. Select the Choose a different restore point option and click on Next.
  4. Pick a restore point created before the black screen issue first appeared and click on Next.restore to fix startallback black screen
  5. Verify the restore details, click on Finish, and then confirm the change.
  6. When the PC restarts after a restore, check for improvements.

5. Uninstall StartAllBack

  1. Press Windows + R to open Run, type appwiz.cpl in the text field, and hit Enter.
  2. Select StartAllBack from the list of apps, and click on Uninstall.uninstall
  3. Make sure to tick the checkbox for Delete settings and license data, and then click on Yes.delete settings to fix startallback black screen
  4. Once done, reboot the PC for the changes to come into effect and look for improvements.

We also have a complete guide on how to properly uninstall StartAllBack and get rid of it for good.

If nothing previously worked, uninstalling StartAllBack and deleting all the configured settings should get things up and running. Don’t lose hope, you can always reinstall StartAllBack when the developers release a version compatible with the installed Windows 11 update.

In the meantime, you can switch to one of our top picks for Windows 11 customization software and personalize the OS experience!

Which fix worked for you? Share with our readers in the comments section.

Nvidia surpasses Microsoft, and it’s now the biggest company on Earth

As we predicted, Nvidia has risen to the top of the world market, surpassing Microsoft as the public company with the most value globally. According to reports, this stunning result appeared when the trading day ended: Nvidia’s stock price jumped by 3.6%, increasing its market capitalization to an amazing $3.34 trillion.

However, Microsoft experienced a small fall in its share value, reaching $3.32 trillion. This is a situation that not many could have foreseen. This is especially true when we consider Nvidia’s beginnings in the small gaming world, where it gained fame for producing powerful graphics chips.

Even more interesting is the mutual relationship between Nvidia and Microsoft. Microsoft’s role in Nvidia’s narrative is not that of any other company; it serves as a significant customer, depending extensively on Nvidia’s GPUs to power its AI services, such as Copilot, in its data centers.

This dependence is not occasional; approximately 80% of AI data centers use Nvidia’s GPUs, including those from big players like Google, OpenAI, and many others. The wide acceptance of Nvidia chips shows their strong presence in the AI chip market, which has been experiencing significant expansion due to the rise of AI.

At the beginning of this month, Nvidia’s worth crossed over $3 trillion for the first time. It even surpassed Apple to become the second most valuable public company globally. When trading ended that day, Apple was in third position with a market capitalization of about USD 3.29 trillion. The fast rise in Nvidia’s worth is not only due to its market cap but also to changes happening in big tech companies and the importance of AI and machine learning.

Nvidia’s 10-for-1 stock split, which aims to make its shares more readily available to a larger group, shows the company’s ambitions. Jensen Huang, Nvidia’s co-founder and CEO, has watched his net worth skyrocket to around $118.4 billion, putting him on the list of the world’s wealthiest people. This financial success is strong evidence that Nvidia has greatly influenced the tech field and played a key role in the current AI revolution.

In this ever-changing market, Nvidia and Microsoft show how the paths of hardware makers and software giants are closely connected. With Nvidia now in first place, it’s fascinating to observe how these tech giants will shape computing’s future, as well as AI and more. The big question is: What will Nvidia do with its new role as the world’s highest-valued public company?

Microsoft introduces new Copilot capabilities to Microsoft 365 for education

During summer, when freedom fills the air and people enjoy holidays, educators and students might be taking a rest. Yet still, at Microsoft, the gears of innovation keep turning to bring fresh wave features for customers using Microsoft 365 Education.

Envision a universe where making lesson plans. That’s the future Microsoft is crafting for educators and students alike.

Microsoft has told the world that they are going to bring in Copilot, which they plan to integrate with their Microsoft 365 Education services.

This is a big step toward increasing productivity and changing how we do things in education. Educators will be able to make content – this is the big thing. They can use Copilot with many Microsoft 365 for Education apps like Teams, Word, Outlook, and OneNote. With these tools, preparing educational materials takes less time and becomes more efficient.

An impressive quality is the function of educators making quizzes in Microsoft Forms with Copilot. By only telling them what they want to examine, Copilot will write a quiz, providing correct answers and detailed solutions automatically.

This makes creating quizzes easier and guarantees that they are well-made and related to the educational material taught in class.

And thoughts on feedback? In a blog post, Microsoft says they’re ready to introduce a private viewing feature that allows educators to utilize AI to give customized feedback, using students’ advancement and assignment instructions as references. This could change how feedback is given innovatively, making it more specific and valuable for every student.

Educators review, edit, or discard suggested student feedback, which is based on individual student progress, rubrics selections, or assignment instructions. Educators can start by selecting initial rubric scores and then add the corresponding draft feedback directly into student Word documents in the form of comments or share overall feedback in a Teams Assignment.

Microsoft

Students also have something to gain from this technological progress. They will use a fresh Learning expansion built to assist them in learning particular subjects and assessing what they know about them.

This instrument can potentially revolutionize how students interact with and comprehend educational material.

These progressions from Microsoft are important changes in the future, indicating how education is given and felt. Combining AI with educational instruments not only simplifies teaching and learning but also offers fresh chances for individualized education.

It’s a vision of a forthcoming period where technology and education combine to form a setting that fosters each student’s potential. Thus, while the summer sun descends and the academic year approaches, we are prepared for a change in the educational environment. This makes returning to school an event awaited with excitement and eagerness.

How to Import Bookmarks in Arc Browser?

Importing bookmarks is essential to tailor your browser environment according to your needs, as it helps you access saved websites and links from other browsers. Here, we will discuss simple steps to import bookmarks in the Arc browser.

How can I import bookmarks in the Arc browser?

  1. Using the Arc icon
Note icon NOTE
Arc allows you to import bookmarks from Chrome, Firefox, Brave, Edge, Safari, Opera, Opera GX, and Vivaldi.

  1. Launch the Arc browser.
  2. Click the Arc icon from the top of the browser, then select the Import from Another Browser option from the context menu.Import from another browser - arc browser import bookmarks
  3. On the Import from your old browser window, select the browser from which you want to import, then choose the Profile and click Next.import browser
  4. On the following page, choose the profile you want to import your data. If you select My Existing Arc Profile, you will be able to replace existing cookies with imported cookies. Choose accordingly. Once you have done this, click Import.Import bookmarks
  5. Click Finish.

2. Using an HTML file

  1. Launch the Arc browser. Click the New tab icon, type arc://bookmarks/ in the address bar, then press Enter.Arc bookmarks import
  2. You will get the Bookmarks page. Locate the three-dots icon next to the Search bookmarks box and select Import bookmarks from the drop-down list.Import bookmarks context menu
  3. Next, in the following window, navigate and select the HTML file to import, and click Open.Open - import bookmarks Arc
  4. Once done, you will see the Imported folder on the Bookmarks page.

If you often deal with Bookmarks and like to keep them organized, you must know about these Windows Bookmark manager tools for your computer

To conclude, importing bookmarks from the Arc browser is simple and can be done in two ways. If you have an HTML file, you can use the second method to import directly from the browser and follow the first one.

If you want to import bookmarks from Internet Explorer to Chrome, you can check out this guide with detailed instructions.

Have you tried importing bookmarks to the Arc browser? If so, share your experience with our readers in the comments section below.

Windows 11 Version 24H2 (KB5039239) is now out for Copilot+ PCs and devices that were using 24H2 Builds

In the busy tech world, Microsoft has made a major jump with Windows 11 version 24H2 KB5039239 – also called the 2024 update. But not everyone will get this update immediately.

This fresh software is being released for Copilot+ PCs, and it raises questions about when or if other devices can receive this change, too. People and technology lovers are now excited and interested in Microsoft’s new step.

Windows 11, version 24H2 is targeting Copilot+ PCs devices and devices that were previously using Windows Insider 24H2 builds.

Microsoft

What’s new in this update? Initially, it tackles an issue that could make a big noise. When you connect a Bluetooth device, sometimes the volume is set to maximum without warning. Picture how much surprise and potential ear discomfort such a scenario may cause!

Moreover, it solves an issue that stopped games utilizing BattlEye anti-cheat from being played on Arm64 devices. But there’s more to the story.

Microsoft is also improving the Copilot experience on Windows by allowing it to act like a usual app by resizing, moving, and snapping the window feature. This is a significant step towards integrating AI more seamlessly into the operating system.

However, why the exclusivity? The update is now available under KB5039239 and build 26100.863, but it can be accessed only by people with Copilot+ devices. This leaves some parts of the Windows community in a difficult situation because they are using Intel and AMD PCs.

If they are very excited about testing Windows 11 24H2 KB5039239, it is suggested that they try the Release Preview Channel. However, this version of Windows 11 might have some bugs.

For gamers and app users, the news is a blend of optimistic and pessimistic. The update pledges to resolve some problems in the gaming realm, but we have information that there’s an issue with downloading and playing Roblox on Arm devices from the Microsoft Store. What’s the workaround? Downloading the game directly from Roblox’s website.

Intel and AMD PC users might feel left out, but there is hope for them. Microsoft plans to make Windows 11 24H2 available for these devices in late September or early October. Be patient for now, as the existing preview versions could lack some smoothness in the experience.

In the bigger picture, this update shows that Microsoft continues to improve Windows 11. They are working on AI connections and improving users’ experiences.

However, the slow release of updates and current restrictions for devices without Copilot+ show how hard it is to ensure that new changes work smoothly across different kinds of Windows PC ecosystems.

Microsoft knows about the 0x80070005 error that doesn’t let users upgrade from Windows 11 Pro to Enterprise, and a fix is coming

In the digital world, Windows 11 is a symbol of modern computing. But recently, an odd issue has caught the attention of everyone from casual users to IT professionals. Microsoft has recognized a problem in their system’s update process—especially when people try to move from Windows 11 Pro to Enterprise Edition.

Normally, this path is supposed to be easy and full of better functions, but it now encounters an obstacle marked by the “0x80070005” error code. A strange hiccup has arisen within the digital domain, where Windows 11 functions as a symbol for contemporary computing. This recent event has caught significant attention from casual users and professionals in the IT field.

It is correct that Microsoft acknowledges a snag exists, particularly when users attempt to promote their experience by upgrading from Windows 11 Pro to Enterprise edition; this trip, usually smooth and filled with promises of improved characteristics, now faces an impediment identified as the “0x80070005” error code.

The code may seem confusing, but actually, it translates to an “Access Denied” message. This can be a frustrating stop for people excited about using the special features of the Enterprise edition.

The complication’s origin lies in the April 2024 Patch Tuesday update, known as KB5036893. This update was not ordinary; it marked the arrival of Moment 5, a major feature upgrade for Windows 11 23H2.

Still, while it was a step forward, it also initiated problems, such as the popularly known error 0x80070005 during the Pro to Enterprise upgrade. Microsoft engineers identified this update as something that might be causing the problem.

This finding helps us better understand the matter but also raises questions about how strong these important patches are.

The symptoms for people trapped in this problem are clear. When they try to upgrade, it always fails, and we can see that easily through the LicenseAcquisition scheduled task inside Task Scheduler.

This is where you find “Access denied error (error code 0x80070005),” a strong indication of the barrier preventing upgrading. What does Microsoft say about this? They promise to solve it, waiting for a Windows update to fix the issue. Until then, you can also try our guide for this particular error.

However, this mistake is not the only one. The scenario in Windows 11 is now full of other problems, too. These range from a bug that causes high CPU usage related to the Phone Link app to an oddity where shared folders in OneDrive turn into internet shortcuts. Even the Photos app isn’t functioning properly due to conflicts with non-admin-based Windows groups or CSP policies.

Among these digital hardships, Microsoft’s dedication to solving such issues provides a small ray of optimism. This big tech company knows how to handle the complications of software updates and their unforeseen problems.

While users wait for the solutions, this story highlights the complex balance between progressiveness and steadiness in the operating systems sector. The story of moving from Windows 11 Pro to Enterprise, even if it got stuck for a while, shows that technology always changes and people aim for perfection in this digital era.

How to Check and Manage Browsing History in Arc Browser for Windows

Navigating through your Arc Browser history can be a breeze if you know the right tips and tricks. Whether you’re trying to revisit a recently closed tab or find a page you visited days ago, these methods will help you master your browsing history efficiently.

How to Find Your Browsing History in Arc Browser

1. Open Tab history using the Arc menu

  1. Click on the Arc menu button from the top-left corner and hover your mouse over Tabs.
  2. Now, hover the pointer over Archive and select View History.

It’s a four menu hovering trick, but it’s not as it looks and you will quickly get the hang of it. Thankfully, there’s also a shortcut for this. Read about it below.

2. Access History using the shortcuts

  1. Click on the Arc icon to open the browser.
  2. Press Ctrl + H (Windows) or Cmd + H (Mac) on your keyboard.
  3. This keyboard shortcut will directly open your browsing history.

Using keyboard shortcuts provides a fast and direct way to access your browsing history, especially helpful for users who prefer not to use the mouse.

3. Check History using the back and forward buttons

There’s another trick that also works very easily. While you’re on a tab, long left click on the Back button in the top part of the window. This will show you the last websites you’ve visited before your reach the current page.

Similarly, if you’re long clicking the Forward button, it will show you the websites you visited after you’ve been to the current one and came back.

How can I use Tab History in Arc Browser

1. Search and order results

First of all, you can search through the browser history using keywords, but you may also choose to show the results ordered by Date or by Group.

2. Delete history

As you might have imagined, you may select a few history items to delete them. Just mark several, and the Delete button will show up at the top-right corner of the window.

3. Check tabs from other devices – Arc Browser can also sync the tabs in several devices and in the Tabs from other devices section, you will be able to see and delete those too.

4. Delete all browsing data – If you click on Delete browsing data, you will be redirected to an external tab to clear all the browsing data from Arc.

By following these steps, you will be able to effectively locate and manage your browsing history in the Arc browser, ensuring quick access to previously visited pages.

If you’re interested in other privacy feature, read our guide on how to open an Incognito window in Arc Browser.

You may also find more about Arc Browser’s ChatGPT integration and how it all works.

Well, now that you know how to check and manage browsing history in Arc, let’s talk about it in the comments below.

Arc Browser Keeps Crashing: 3 Ways to Stop it

Arc browser keeps crashing for many users, and that can prevent you from browsing the web or using the browser entirely. Luckily, this issue can be easily fixed.

What can I do if the Arc browser keeps crashing?

Before we start, ensure you have the latest version of the browser installed with the latest updates. If the browser crashes on startup, try to quickly change the open space when starting it.

1. Delete temporary files

  1. Make sure your browser is closed.
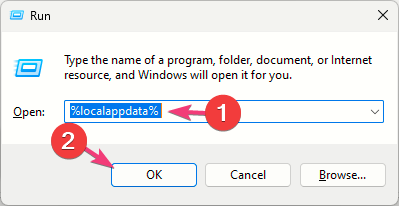
  2. Press Windows key + R and enter %localappdata%. Click OK.
    localappdata run dialog
  3. Next, navigate to the following path: \Packages\TheBrowserCompany.Arc_ttt1ap7aakyb4\LocalCache\Local\Arc\
  4. Delete all files inside of the Arc folder. Additionally, you can copy them to a safe location before removing them.
  5. Try to start the browser again.

2. Disable IPv6

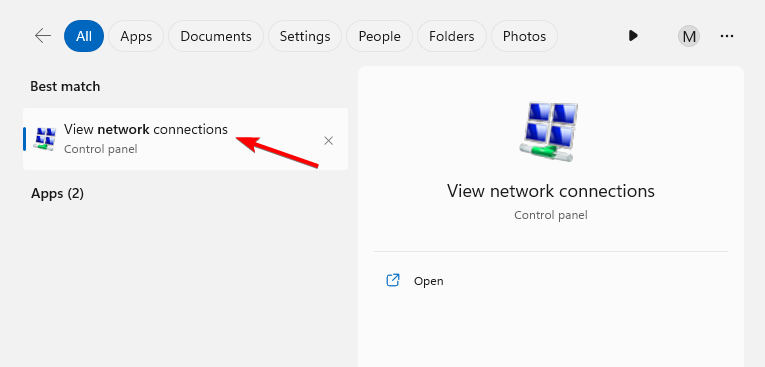
  1. Press the Windows key + S and type network. Select View network connections.
    view network connections windows 11 search results
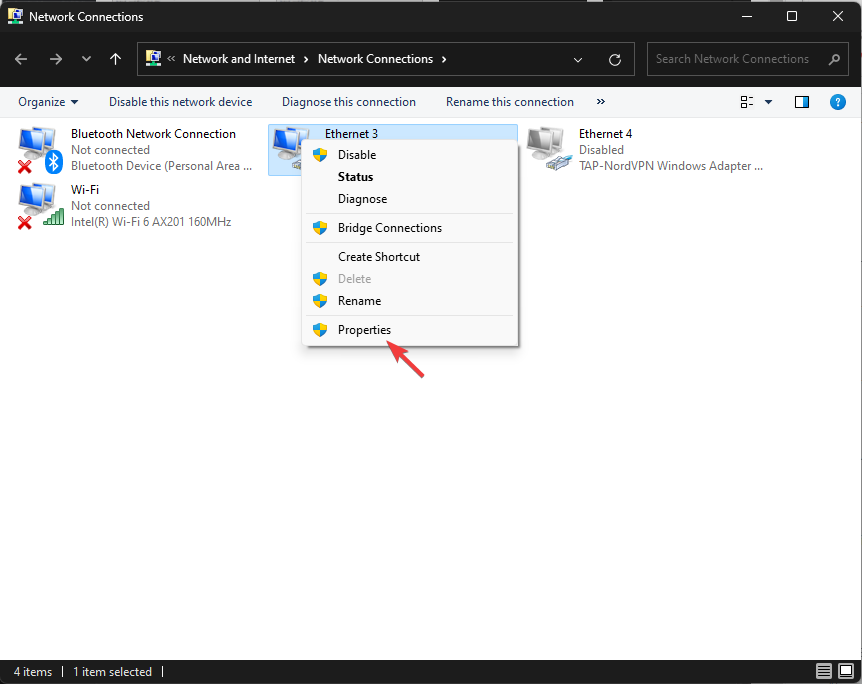
  2. Next, right-click your current connection and choose Properties.
    Network Connection properties context menu
  3. Locate Internet Protocol Version 6 (TCP/lPv6) and uncheck it. Click OK to save changes.
    ipv6 disable connection properties
  4. Save changes.

3. Reinstall the software on the system drive

  1. Press the Windows key + X  or right-click Start Menu and choose Apps and Features.
    apps and features menu
  2. Locate the Arc browser on the list. Click the three dots next to it and choose Uninstall.
    uninstall an app windows 11 settings app
  3. Follow the instructions on the screen to complete the process.
  4. Next, install the application again, but be sure to install it on the system drive.

For more information, we have a great guide on how to download Arc browser, so don’t miss it.

Do keep in mind that this is a relatively new browser, so it’s prone to issues, and many reported that the Arc browser is not closing and for some users Arc browser is not working at all.

What solution did you use to stop Arc browser crashes? Let us know in the comments below!

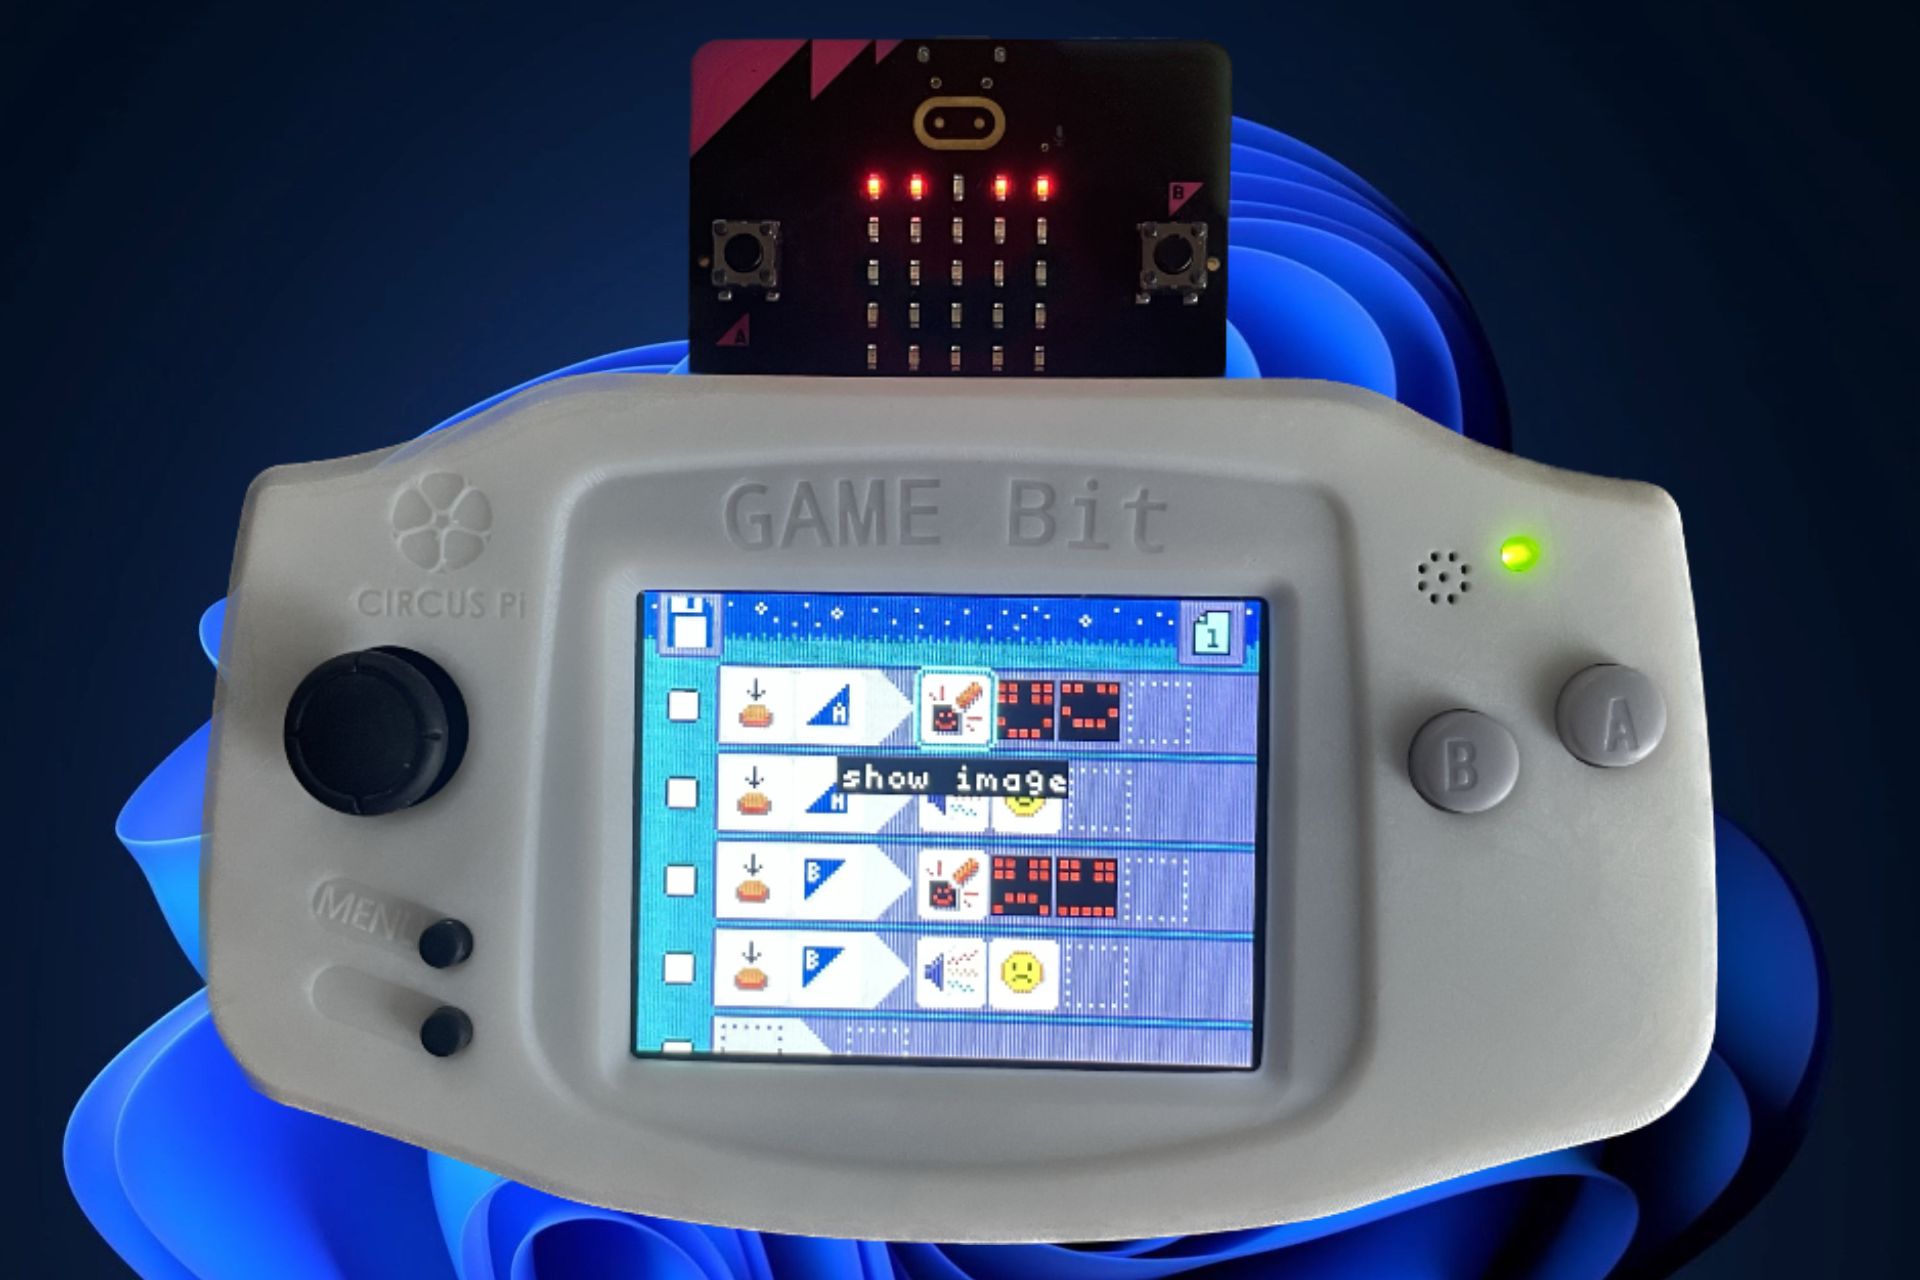
Microsoft teases micro:bit, a small card that allows users to code anywhere in the world

In the middle of a forest or on the bus, have you ever thought about programming a tiny computer without needing anything except for that device? It appears as though Microsoft Research has been working to make this possible with MicroCode – an innovative tool designed specifically for BBC micro:bit and its little gadget, which more than 10 million students are already using in 60 plus countries. But before diving into the nitty-gritty, let’s set the scene.

In a blog post, Microsoft says the BBC Micro:bit is a small computer with features enjoying great popularity in education, particularly among kids aged 11 to 14. It has buttons, sensors, LEDs (lights), a microphone, and a radio antenna. It runs on batteries, so you can use it anywhere to learn.

But, there is a problem. Usually, to program the micro:bit, students require an ongoing internet connection and a computer. This isn’t particularly suitable for learning in nature or staying concentrated without interruptions from the internet.

Now, this part is where it gets really interesting. MicroCode is a portable programming method that allows you to program the micro:bit wherever and whenever, even if you don’t have an internet-connected computer. Two important improvements make this possible.

First, the micro:bit V2 has more power and can handle a small color screen that’s not built in like before. Second, there is the Arcade shield—a low-cost device powered by a battery into which you insert your micro:bit, giving it a color screen and inputs for live programming on the go.

Now, you might ask, “How simple is this setup to use?” The team selected the Kodu visual programming model because it’s easy and efficient for instructing little kids and novices. They even made a small edition of the Kodu editor, particularly for micro:bit V2, which lets users fully use the device’s hardware characteristics while creating straightforward programs.

The whole system is combined inside the micro:bit V2’s lasting memory. This implies that you can continue modifying your programs even if the device is not connected to the internet.

However, the question remains: Does it function as promised? To investigate, education researchers at Lancaster University tested MicroCode in three different schools in the UK.

The outcome of these trials was encouraging. MicroCode didn’t just interest children; it also made them feel they had power over what they learned and how. Teachers perceived physical computing as an opportunity to include it in a more extensive curriculum, thus breaking traditional barriers to computing education.

Looking to the future, MicroCode is on its way to changing how we perceive programming within education. It can be used with the Jacdac plug-and-play system, making connecting sensors and actuators simple.

This feature offers a new level of interactive projects responding to their surroundings. Moreover, discussions are happening about fresh MicroCode backpack kits that could aid learning in additional environments.

A single interesting advancement is MicroData, a fresh application that concentrates on data science. It helps students gather and study environmental information or evaluate chemical responses instantly. This active, hands-on learning could change how we teach subjects, making them more interesting and related for students.

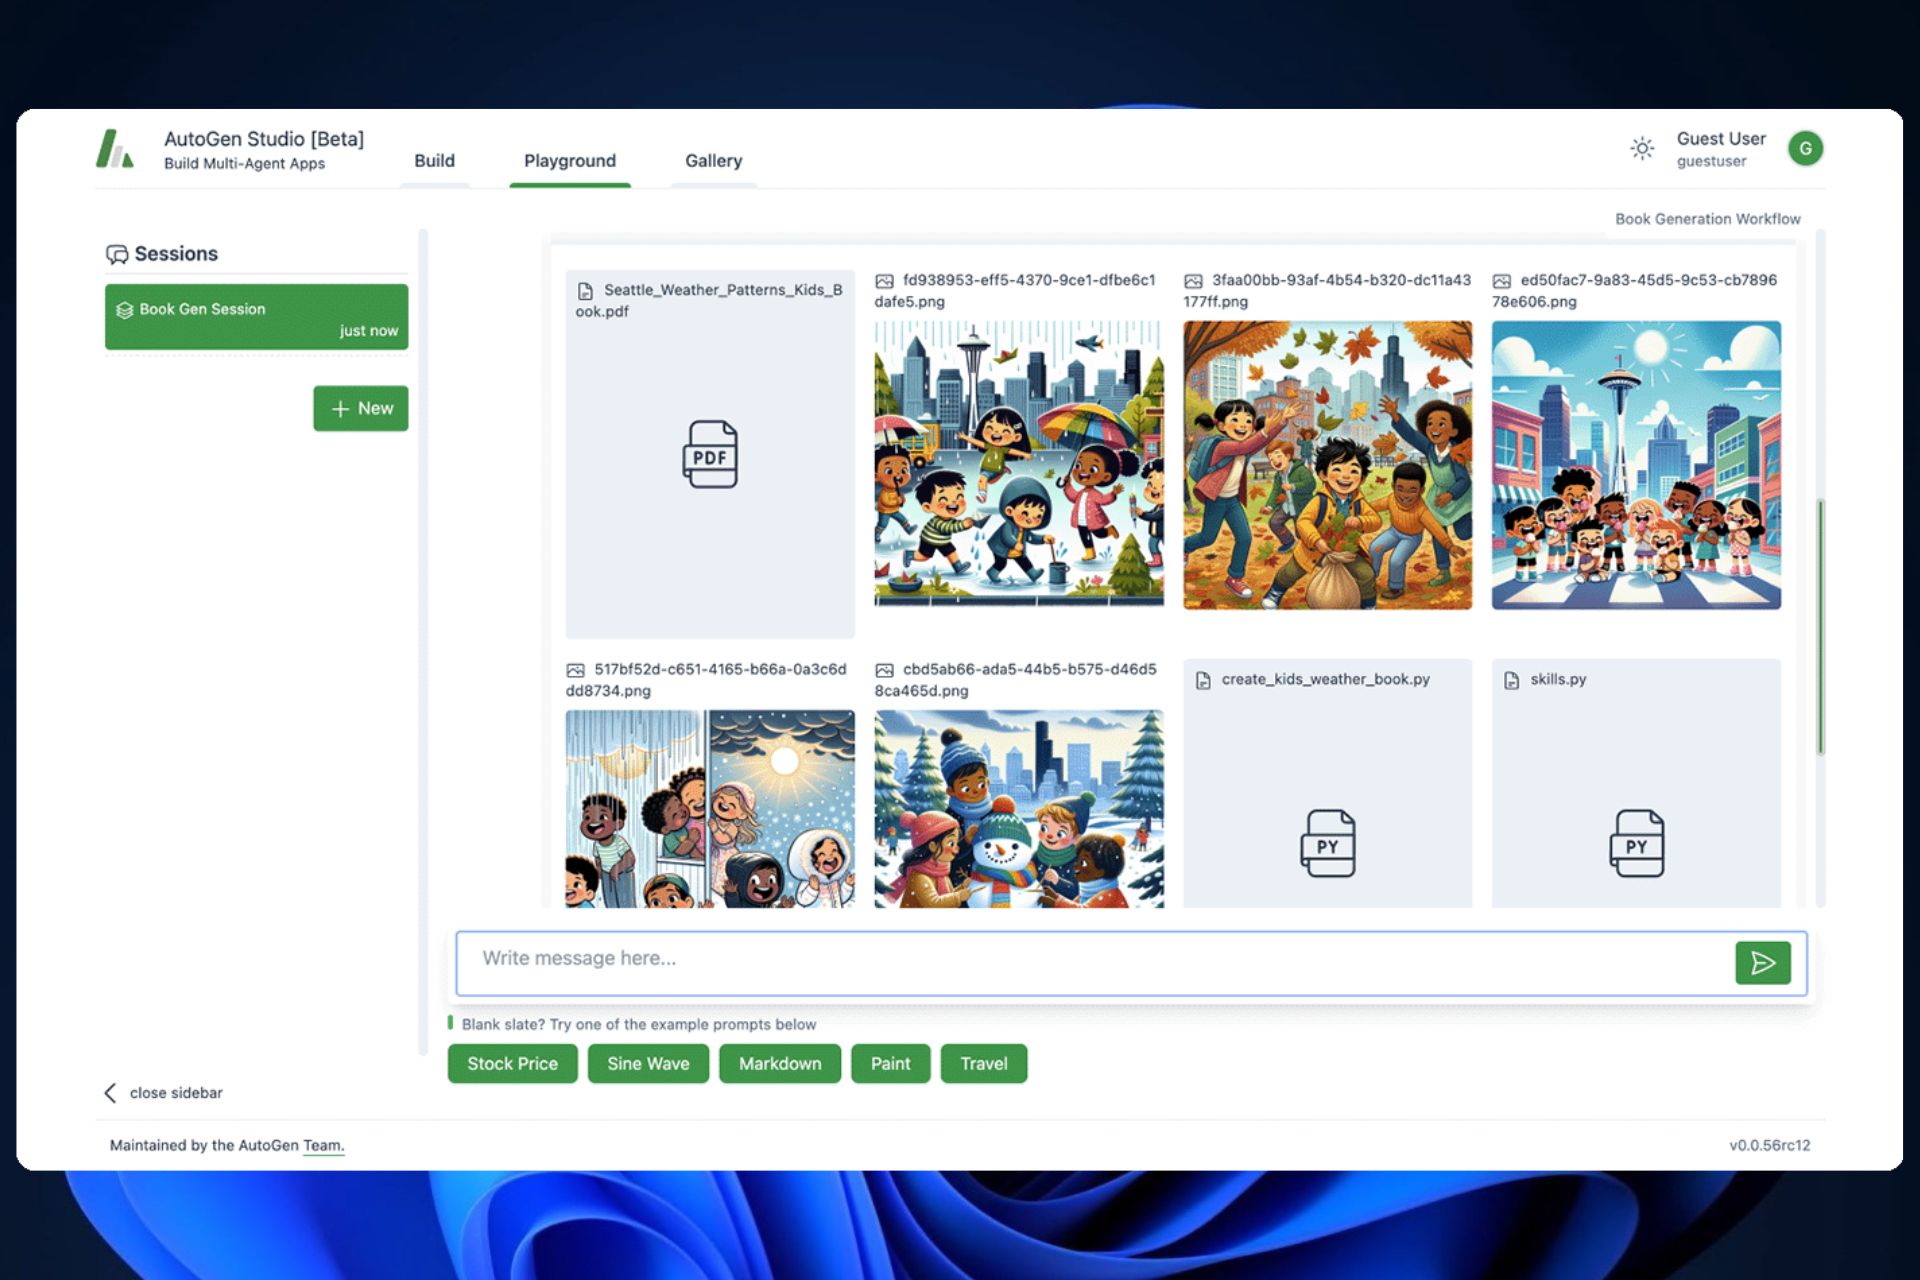
MicroCode can be found on GitHub if you are keen to see it. There is also a version for web applications, which is especially useful if someone does not have a shield. If you’re interested in building AI applications, you should check out AutoGen Studio.

There are huge discounts on Xbox 360 games, and this might be the last chance to own them for good

In the changing gaming world, Microsoft has brought a surprise that Xbox fans all over the globe are talking about. They have made a big sale on Xbox 360 games. It isn’t just any normal discount deal—it’s like giving away these games for almost nothing because they’re so cheap now!

As time passes and we approach July 29th, 2024, Microsoft plans to close down its online store specifically for people using an older console system called “Xbox One S” or earlier versions such as “Xbox Elite.” This is the last chance for gamers who want their favorite game before it disappears forever at these incredibly low prices.

For people who have kept their Xbox 360, this sale brings back memories of the past. The discount range is from 40% to an amazing 95% off! Just think about how exciting it would be to play Resident Evil again or enjoy all that adrenaline from the Need for Speed series once more. And don’t we all love those creative LEGO games? It’s like a dream for gamers.

However, there’s an interesting twist to this. A few of these gems are near to getting removed for good, which implies that you might not get another opportunity to possess a part of the gaming past. The original Xbox games are also available, such as BLACK – if your console has an internal hard drive, then it’s possible to play them too!

You could ask, “What do I get from this?” If you enjoy digital collections, this sale is a treasure trove. Games with titles such as Burnout Crash! and many AAA games for 90% less are a chance to own a digital part of Xbox history. Additionally, for those who are purists, the appeal of playing these games on their first console is an experience that is becoming more and more scarce.

The list of games at reduced prices is long and incorporates different kinds of interests. From the thrilling actions in Batman: Arkham Asylum to the big strategy of Tropico 5, there is a game for all. And if you have moved on to Xbox Series X/S, no worries.

Below, you can see an updated list of all the newly added discounted Xbox 360 games:

  • 1942: Joint Strike
  • Adrenalin Misfits
  • Air Conflicts: Secret Wars
  • Batman: Arkham Asylum
  • Batman: Arkham City
  • Batman: Arkham Origins Blackgae – Deluxe Edition
  • Bionic Commando
  • Bionic Commando Rearmed
  • Bionic Commando Rearmed 2
  • Birds of Steel
  • BLACK
  • Brink
  • Bulletstorm
  • Burnout 3: Takedown
  • Burnout Crash!
  • Cars 3: Driven to Win
  • Choplifter HD
  • Dark
  • Darkstalkers Resurrection
  • DarkStar One
  • Dead Island
  • Dead Island Riptide
  • Dead Rising
  • Dead Rising 2
  • Dead Rising 2 Off The Record
  • Deathspank
  • Devil May Cry 4
  • Devil May Cry HD Collection
  • Dishonored
  • DmC Devil May Cry
  • Dustforce
  • Fight Night Round 3
  • Frogger: Hyper Arcade Edition
  • Alien Spidy
  • Anna – Extended Edition
  • Dollar Dash
  • Giana Sisters; Twisted Dreams
  • Mighty No. 9
  • Harry Potter for Kinect
  • Homefront
  • Leedmees
  • LEGO Batman 3: Beyond Gotham
  • LEGO Harry Potter
  • LEGO Harry Potter: Years 5 – 7
  • LEGO Jurassic World
  • LEGO Marvel Super Heroes
  • LEGO Marvel’s Avengers
  • LEGO Star Wars: The Force Awakens
  • Metal Gear Solid 5: Ground Zeroes
  • Metal Gear Solid 5: The Phantom Pain
  • Metro 2033
  • Metro: Last Light
  • MicroBot
  • Middle-Earth: Shadow of Mordor
  • Mortal Kombat Arcade Kollection
  • NCAA Basketball 09 March Madness Edition
  • Need For Speed Most Wanted
  • Need For Speed Rivals
  • NFS Undercover
  • Ninety-Nine Nights 2
  • Omerta – City of Gangsters
  • Plants vs Zombies Garden Warfare
  • Puzzle Chronicles
  • Red Faction: Guerilla
  • Remember Me
  • Resident Evil
  • Resident Evil 0
  • Resident Evil 4
  • Resident Evil 5
  • Resident Evil 6
  • Resident Evil Revelations
  • Rocket Riot
  • Rush’N Attack: Ex- Patriot
  • Skyrim
  • Spare Parts
  • Street Fighter 3: Third Strike Online Edition
  • Street Fighter 2 HF
  • Street Fighter x Tekken
  • Strider
  • Super Street Fighter 2 Turbo HD Remix
  • The Evil Within
  • The Fancy Pants Adventures
  • The LEGO Movie Videogame
  • Tornado Outbreak
  • Track & Field
  • Tropico 3
  • Tropico 5
  • Warp
  • Wing Commander Arena
  • Yie Ar Kung Fu

Even though Xbox 360 games are in the spotlight, some have been enhanced or converted to new systems. This provides an element of nostalgia with contemporary features.

We are nearing the end of the store’s life, and it is a mixed feeling for fans of Xbox 360. But when there are such good deals available, it becomes difficult not to see the positive side. If you have been wanting to finish your collection or go back again through those gaming moments that were most enjoyable for you, this could be an excellent opportunity.

Maybe there are some classics from old times that you missed out on discovering. Now might be the best chance we get! So, why not jump in and discover what gems you might encounter? It’s a chance that doesn’t repeat frequently.

This excellent HP OMEN Gaming Laptop is now $500 OFF

Picture yourself as someone who plans to buy a fresh gaming laptop, and you’ve just come across an offer that appears almost too good. The HP Omen 16-inch gaming laptop, normally valued at $1,300, can now be purchased for only $800. This marks a substantial cut of 38%, taking away an entire $500 from its initial rate. So, what is it about this offer that should catch your eye? Let’s look at the details which may make it especially interesting for gamers and tech fans.

To start, the HP Omen isn’t merely a gaming laptop. It’s a trendy technology with strong performance, with its AMD Ryzen 5 7640HS processor and 16GB memory. It also has space for storing files on its 512GB SSD (Solid State Drive). But what’s making waves here is the Nvidia GeForce RTX 4050 graphics card with 6GB of dedicated VRAM. This setup can manage basic to decent gaming on the move.

Now, it might not be at the top like the highest-end gaming laptops available in the market. But still, there are many things to love about this laptop. First, it has a 16.1-inch full HD screen with a 144Hz refresh rate—say goodbye to any motion blur, even during the fastest games! Moreover, with 250 nits of brightness and anti-glare properties, your eyes will feel relaxed during game time.

The added features also enhance the gaming experience. The HP Omen is equipped with an HP Wide Vision 720p HD camera and built-in dual array digital microphones from a high-quality brand. This is ideal for streaming or talking with friends while playing games on your laptop. Additionally, audio by Bang & Olufsen and support for DTS:X Ultra ensure your games sound as good as they look on this device.

Moreover, it includes a complete 4-zone RGB backlit keyboard with 26-key rollover anti-ghosting key technology. This means you can press up to 26 keys simultaneously without any key getting missed. This is not everything; it also contains a full-size RGB backlit keyboard with 4 different zones, each with its color effect. The anti-ghosting technology for keys is very powerful, allowing the user to touch up to 26 buttons without letting any button slip away.

This is a good option for someone searching for a trendy, inexpensive gaming laptop with the newest technology. It’s available for just $800, which is a great deal. But remember, these types of offers won’t be around forever. If you are intrigued, it may be wise to take action soon. Who knows how long this price will remain?

When it comes to gaming laptops, the blend of power, design, and cost can be a delicate balance. However, you occasionally stumble upon an offer that ticks all these boxes. This cut-price HP Omen 16-inch gaming laptop deal is one such rare find. If you’re an experienced gamer or new to PC gaming, this laptop gives a good beginning point and doesn’t cost much money.

Get it from here.

How to Export and Import Policies in Group Policy Editor

If you want to apply the same Group Policy settings on multiple computers in your network, you can Export and Import them from gpedit.msc instead of setting the same policies on the system separately.

How can I export and import policies from gpedit.msc?

1. Using the File Explorer

  1. Press Windows + E to open the File Explorer window.Copy content - gpedit.msc export policy
  2. Navigate to this path: C:\WINDOWS\System32\GroupPolicy
  3. Copy all the files in the folder and save them in a pen drive or cloud.
  4. Now paste them to the folder on the destination PC. Click Yes or Continue if you get a UAC prompt.
  5. On the destination PC, press Windows + R to open the Run dialog box.CMD
  6. Type cmd and press Ctrl + Shift to open the Command Prompt with administrator rights.
  7. In the Command Prompt window, type the following command and hit Enter: gpudate / forceupdate GPU

If the Group Policy is not applying your changes, you can explore our detailed guide to know how to fix the issue.

2. Using the Microsoft Management Console

1. Export the policy

  1. Press Windows + R to open the Run dialog box.mmc - gpedit.msc export policy
  2. Type mmc and click OK to open the Microsoft Management Console.
  3. On the console, click File from the menu at the upper left corner, then click Add/Remove snap-in.Add remove snap in
  4. From the Add or Remove Snap-ins window, select Security Templates, and click Add, then OK.OK - gpedit.msc export policy
  5. Now, under Console Root, you will see Security Templates; click it to expand, then right-click the element and select New Template from the context menu.New twmplate - gpedit.msc export policy
  6. In the following popup, enter a custom name for the template.Name the template
  7. Next, expand the template you created and configure all the policies how you want.
  8. Once done, right-click the template, then click Save as from the context menu.Save as
  9. Select the location where you want to save the INF file, then click Save.
  10. Copy and paste this file to the destination PCs where you want to implement these policies.

If you can’t find the Management console on your computer, follow these simple steps in this guide to install it.

2. Import the policy

  1. On the destination PC, press Windows + R to open the Run dialog box.cmd - gpedit.msc export policy
  2. Type cmd and press Ctrl + Shift to open the Command Prompt with administrator rights.
  3. In the Command Prompt window, type the following command after replacing PathToINF with the path where you pasted the INF file and hit Enter: secedit /configure /db %temp%\temp.sdb /cfg <em>PathToINF</em>
  4. Restart your computer to save the changes.

In conclusion, using File Explorer and Management Console on Windows 11 is the easiest way to set the same group policies on different computers without physically being there.

If you want to export Group Policy settings on a Windows 7 computer, we have a separate guide for you. Did you find this guide useful? Let us know in the comment section below.

How to Open an Incognito Window in Arc Browser

Navigating the Arc Browser’s Incognito mode can seem daunting at first, but with a few simple steps, you can master private browsing on Windows. Quick note: On Arc for Windows, you can open a whole new incognito window, but you can’t open a new incognito tab.

How do I open a new incognito window on Arc Browser?

1. Using the Arc Browser menu

  1. Open Arc Browser in Windows.
  2. Click on the menu (Arc) button and select New Incognito Window from the list.
  3. In the new window, you will see Incognito written in the top-left corner and that’s how you know if you’re running an Incognito window in Arc Browser.

However, please note that the incognito mode will only keep your browsing history private from the other users who are using the same device, not from your ISP, employer or the websites you’re visiting. If you want to stay completely anonymous, you will need to use a VPN.

2. Using the Arc Browser hotkeys for quick actions

While this solution focuses on desktop, it’s useful to know hotkeys if you switch between platforms:

  1. Open New Incognito Window:
    • On Windows: Press Ctrl + Shift + N.
    • On macOS: Press Command + Shift + N.

Knowing these hotkeys can enhance your browsing efficiency, ensuring you can quickly switch to private browsing as needed. And while you’re at this, we have an extended list of Arc Browser commands that may come in handy.

How do I block cookies in Incognito mode in Arc?

  1. Click on the Menu button from the top-left corner of the window and select Settings, or paste arc://settings in the address bar and hit Enter.
  2. Now select Privacy and security from the left pane and click on Third-party cookies from the right.
  3. Here, you will have the option of blocking the third-party cookies while you’re browsing in Incognito mode on Arc.

While this is a very useful privacy feature, please note that some websites will lose some of their functionality, or you will even be rejected access until you disable cookie blocking.

How do I open an Incognito window in Arc Browser on iOS?

  1. Open Arc Browser: Tap on the Arc Browser icon on your iOS device’s home screen to launch the app.
  2. Access the Menu: Tap the three horizontal lines or the Menu button, usually located at the bottom or top right corner of the screen.
  3. Open Incognito Window:
    • Scroll through the menu options until you find New Incognito Window.
    • Tap on it to open a new window where your browsing history will not be saved.

This solution allows you to browse privately on the Arc browser, ensuring that your browsing history and cookies are not stored on your device.

To sum all this up, you can open an Arc incognito window by selecting it from the menu, or by pressing Ctrl + Shift + N while using the browser. If you’re looking for more tips, here’s our guide on how to manage bookmarks and pinned tabs in Arc.

Mastering these solutions will enhance your use of Incognito mode in the Arc Browser, ensuring better privacy and efficiency whether you’re using iOS or other platforms.

The Photos app might be malfunctioning for some Windows 11 users, says Microsoft

Did you sometimes feel like scratching your head and wondering about the newest oddities and characteristics of Windows 11, version 23H2? You are not the only one. Microsoft is launching fresh updates to sprinkle their ongoing innovation onto our devices, assuring new experiences and AI abilities.

If you’re excited to explore these updates, there is an easy way to do so. Go to Settings > Windows Update and turn on the switch that says, Get the latest updates as soon as they’re available.

But remember, this option will only be seen if your Home or Pro device already has Windows 11, version 23H2, with all its recent updates installed. If you are in a managed environment, your IT department could have to activate this choice for you via policy.

Moving forward, let’s get to the specifics. We have a small hitch with the Photos app. Few users found that when they update the app from Microsoft Store, it simply doesn’t start up. Instead of the gallery, you may encounter a spinning circle that later vanishes into the ether.

If your device has updated the Microsoft Photos app from the Windows store on or after June 4, 2024 (version 2024.11050.29009.0 and above), you might face issues starting the application. On launching the app, it might display a spinning circle, after which it might disappear. If you have the Procmon monitoring tool installed in your device, this error might display as Access Denied error on Process Exit (‘Exit Status: -2147024891’). 

Microsoft

This problem appears to be connected with policies restricting non-administrator users from installing packaged Windows applications. However, Microsoft is working on it and assures a solution for the Photos app will be included in a forthcoming release.

Lastly, there is the interesting situation with the Microsoft Copilot app. After updating Edge, some users saw this app appearing in their installed apps list. It seems that an update which was planned to prepare for upcoming Copilot features unexpectedly uncovered the app on certain devices earlier than anticipated. The positives? This has been fixed with later Edge updates.

So, if you were wondering why it appeared out of nowhere – don’t worry about that anymore because we’ve handled it!

For those who like keeping track of these details and possible problems, Microsoft suggests using the Feedback Hub app. It is an easy way to report issues straight to Microsoft. When you require help, the Get Help app in Windows can assist, or you can contact Microsoft Support directly for assistance.

In the end, for people who can speak many languages and users from around the world, the Windows update website is in 11 different languages. Hence, if you aren’t comfortable with English as your primary language, it could be useful to change to any of these supported ones for simpler browsing.

Switching to the newest Windows 11, version 23H2 updates, might have hiccups, but Microsoft is trying to fix them.

Whether you find a problematic app or see an unexpected guest in your installed apps list, answers are coming soon. Also, it’s important that you provide feedback, which influences the direction of these updates. Make sure to utilize those feedback tools!

Bing Wallpaper Not Changing the Desktop Background [Solved]

Microsoft’s official Bing Wallpaper app automatically sets the image from Bing as the desktop background every day. But for many of us, the Bing desktop background is not changing or stops updating!

If you are wondering why the Bing wallpaper is not changing, it’s likely due to a bug in the app or OS, corrupt system files, misconfigured settings, missing privileges, or incorrect date and time.

To start with, make sure you have the Bing Wallpaper app, as Microsoft has discontinued the older Bing Desktop app. Also, verify that you have a stable Internet connection and reboot the PC!

What can I do if Bing Wallpaper’s desktop background is not changing?

1. Add Bing Wallpaper to startup apps

  1. Press Ctrl + Shift + Esc to launch the Task Manager and go to the Startup apps tab.
  2. Select BingWallpaper.exe from the list of applications, and if it reads Disabled under the Status column, click on Enable.enable startup to fix bing desktop background not changing
  3. Restart the computer and check whether Bing Wallpaper is still not updating.

2. Set the correct date and time

  1. Press Windows + I to open Settings, go to Time & language from the navigation pane, and then click on Date & time.date & time
  2. Choose your time zone from the Time Zone dropdown menu, and click the Change button to manually set the date and time.
  3. Set the correct date and time, and click on Change to confirm.correct time
  4. Reboot the PC for the changes to come into effect and check for improvements.

3. Clear the Bing Wallpaper’s cache

  1. Press Windows + E to open File Explorer, and navigate the following path, where Username is the active profile name:C:\Users\Username\AppData\Local\Microsoft\BingWallpaperApp\WPImages
  2. Press Ctrl + A to select all the files, then hit Delete, and choose the appropriate response in case a confirmation prompt appears.delete Bing Wallpaper cache
  3. Now, press Windows + S to open Search, type Internet Options in the text field, and click the relevant result.
  4. Click the Delete button under Browsing history.delete browsing history
  5. With Temporary Internet files, Cookies, and History ticked, again click on Delete at the bottom.delete to fix bing desktop background not changing
  6. Reboot the PC and check for improvements.

When Bing Wallpaper is not updating the desktop background automatically every day, you should clear the app data. Often, this data goes corrupt, and subsequently, Bing Wallpaper stops working!

4. Modify OverrideWallpaper in Registry

Tip icon Editor’s tip
Before you start making changes to the Registry, create a restore point. This way, if you inadvertently modify the wrong keys, there will always be the option to revert the PC to the previous stable configuration.
  1. Press Windows + R to open Run, type regedit in the text field, and hit Enter.registry editor
  2. Click Yes in the UAC prompt.
  3. Paste the following path in the address bar and hit Enter: Computer\HKEY_CURRENT_USER\Software\Microsoft\BingWallpaperApppath
  4. Double-click the OverrideWallpaper entry on the right.
  5. Enter 1 under Value data and click on OK to save the changes.modify to fix bing desktop background not changing

If the Bing Wallpaper’s Daily wallpaper refresh setting keeps turning off, setting 1 as the Value data for the OverrideWallpaper string should do the trick!

5. Reinstall the Bing Wallpaper app

  1. Press Windows + R to open Run, type appwiz.cpl in the text field, and click OK.appwiz.cpl
  2. Select Bing Wallpaper from the list of apps, and click on Uninstall.uninstall to fix bing desktop background not changing
  3. Follow the on-screen instructions to uninstall the app.
  4. Reboot the computer to apply the changes.
  5. Finally, you can reinstall Bing Wallpaper from Microsoft’s official website.

For a few, a quick reinstall didn’t work, and they had to rely on a reliable software uninstaller tool to get rid of all leftover files and Registry entries before reinstalling Bing Wallpaper.

By now, you should have Bing Wallpaper properly running if it was not automatically changing the desktop background. If the problem persists, the only likely possibility is a temporary server issue or a bug in the app itself. For both of these cases, you should contact Microsoft support for more help!

Before you leave, discover our top picks for Windows 11 wallpaper apps, and see if any of these would be a perfect fit for your PC.

Which fix worked for you? Share with our readers in the comments section.

How to Manage Bing AI Chat History

If you use Bing AI chat or now renamed Copilot but are concerned about your privacy, you may want to view or delete your search history to maintain control over your digital footprint. This guide can help!

How can I see my Bing Chat history?

  1. Launch the Microsoft Edge browser on your PC and sign in to your Microsoft account.
  2. Type Bing or Copilot in the search bar.
  3. Go to the Copilot tab to launch Bing AI Chat or Copilot.Copilot tab - bing ai history
  4. To access your chat history, click the Hamburger menu and select Search history from the context menu.Search history- Copilot tab - bing ai history
  5. You will get a list of activities that you can go through.

You can also click the three dots icon, then choose the Export or Share option to export or share recent activities with others via email and social media platforms.

How can I edit my Bing Chat history?

  1. Launch the Microsoft Edge browser on your PC and sign in to your Microsoft account.
  2. Type Bing or Copilot in the search bar.
  3. Go to the Copilot tab to launch Bing AI Chat or Copilot.Copilot tab - bing ai history
  4. You will see the list of recent searches under Recents; go to a search entry and hover over it to get options.
  5. Click the Edit icon and make the changes.Edit- bing ai history

Remember that you can only make changes to the recent searches.

How can I delete my Bing Chat history?

  1. Launch the Microsoft Edge browser on your computer and sign in to your Microsoft account.
  2. Type Bing or Copilot in the search bar.
  3. Click the Copilot tab to launch Bing AI Chat or Copilot.Copilot tab - bing ai history
  4. You will see the list of recent searches under Recents; go to a search entry, hover over to get options, and click Delete to remove it.Delete Recent
  5. Click the Hamburger menu and select Search history from the context menu.Search history- Copilot tab - bing ai history
  6. You will get a list of activities. Select the one you want to delete and click the Delete icon.Delete
  7. To delete the multiple entries, place a checkmark next to them and click the Clear button from the top of the page.Clear - Copilot tab - bing ai history
  8. You can also click Clear all from the right side to delete all the entries.

How can I turn off Bing AI Chat search history?

  1. Launch the Microsoft Edge browser on your PC and sign in to your Microsoft account.
  2. Type Bing or Copilot in the search bar.
  3. Click the Copilot tab to launch Bing AI Chat or Copilot.Copilot - bing ai chat history
  4. Click the Hamburger menu and select Search history from the context menu.Search history- Copilot tab - bing ai history
  5. Toggle off the Show new searches here option on the search history page.turn off - Copilot tab - bing ai history
  6. Click Turn off.

Managing your search history on Bing AI Chat (now Copilot) is important to maintain privacy and keep your interactions safe.

If you use Bing Chat often, you must know the tricks and features that elevate its functionality, check out this detailed guide.

Also, many users have complained about Bing chat not working or the chat history disappearing. This could be due to a slow internet connection or browser cache. Read this guide to learn more.

Did you find the post helpful? Share your thoughts in the comments section below.

How to Fix Bing Not Working on Windows 11?

Many users have complained that Bing is not working on their Windows 11 computers. This issue could occur due to a slow internet connection, DNS issues, an outdated browser or Windows, or corrupted cache and cookies on Edge. To fix it, check your internet connection and Bing server status, then make sure your Windows is up to date.

How can I fix the Bing not working issue on Windows 11?

1. Force close Edge

  1. Press Ctrl + Shift + Esc to open the Task Manager.End task - bing not working on windows 11
  2. Click the Processes tab from the left pane, select Microsoft Edge, and click End task.

Now, restart the Edge browser as you do and check if Bing is working on your Windows 11 computer.

2. Update your Edge browser

  1. Launch the Edge browser.
  2. From the top right corner, locate and click three dots.About Microsoft Edge - bing not working on windows 11
  3. Choose Help and Feedback, then About Microsoft Edge from the subcontext menu. This will bring your Microsoft Edge to the latest version.

3. Clear cache and cookies

  1. Open the Edge browser.
  2. From the top right corner, locate & click three dots and select Settings. Settings  
  3. Click Privacy, search, and services and locate Delete browsing data.
  4. Click the Choose what to clear button.clear browing data - bing not working on windows 11
  5. Choose the Time range from the drop-down and select Browsing history, Cookies and other site data, & Cached images and files.Clear data
  6. Click Clear now.

Clearing the cache will remove the temporary internet files that help pages load faster. However, before performing these steps, you must save your personal files, such as Favorites.

Deleting the cookies and cache can also help you fix the Bing Chat is not working issue; read this guide for more details.

For a step by step walkthrough dedicated to Bing, see our guide on how to clear cache on Bing.

4. Disable or uninstall extensions

  1. Open the Edge browser.
  2. From the top right corner, locate & click three dots and select Extensions. Extensions
  3. You will see the Extension dialog box and select Manage Extensions.Manage extensions - bing not working on windows 11
  4. There will be a list of extensions; toggle off the ones you want to disable.Remove or clear extensions - bing not working on windows 11
  5. You can also click Remove if you want to uninstall them completely.

5. Reset the Edge browser

  1. Open the Edge browser.
  2. From the top right corner, locate & click three dots and select Settings.Settings
  3. Select Reset settings from the left pane.
  4. Click Restore settings to their default values.Reset settings - bing not working on windows 11
  5. Now, click Reset, then restart your computer to let the changes take effect.

Resetting the browser settings can eliminate other problems related to Bing, such as Bing Search results automatically scrolling; check the guide to learn more.

6. Repair the Edge browser

  1. Press Windows + I to open the Settings app.
  2. Go to Apps, then Installed apps.Apps - bing not working on windows 11
  3. Locate Microsoft Edge, then click the three dots icon and select Modify.Modify
  4. On the Repair Microsoft Edge window, select Repair.Repair Edge

If nothing helps, try changing your device’s DNS to Google DNS. Here is a detailed guide on changing the DNS server.

In conclusion, to avoid issues like Bing not working on Windows 11, you must ensure your Edge browser is updated and doesn’t have unwanted extensions or corrupted cache and cookies.

Did we miss any solution that helped you fix the issue? If so, share it with our readers in the comments section below.

Disable StartAllBack: 3 Ways to Prevent it From Loading

StartAllBack is a useful customization tool, but it can have certain issues, and sometimes you just need to disable StartAllBack. If you want to learn how to do that, keep on reading.

How can I disable StartAllBack?

1. Use the Taskbar

  1. Right-click the Taskbar and choose Properties.
  2. Next, navigate to Advanced and then check the Disable program for the current user.
    disable startallback for the current user advanced settings
  3. Save changes and restart your PC.

2. Disable it from startup

  1. Press Ctrl + Shift + Esc to open Task Manager.
  2. Navigate to Startup.
    startup tab task manager
  3. Locate StartAllBack and click on Disable.
    disable startallback task manager startup
  4. Restart your PC.

3. Uninstall the software

  1. Press the Windows key + I. This will launch the Settings app.
  2. Next, choose Apps and then Installed apps.
    installed apps settings app windows 11
  3. Locate the application on the list.
  4. Click the three dots next to it and choose Uninstall.
    uninstall an app windows 11 settings app
  5. Follow the steps on the screen to complete the process.

Use this option only if you weren’t able to disable the application in any other way.

StartAllBack is an amazing tool if you want to move or use a vertical Taskbar on Windows 11, however it can cause issues, and if that happens, you need to disable it.

You may also be interested in our guide on how to properly uninstall StartAllBack if you want to remove it completely.

If you want to learn more about this tool, we have a great guide on how to download and install StartAllBack, so don’t hesitate to visit it. If you’re concerned about the safety, we have a guide that anylzes how safe StartAllBack is, so don’t miss it.

If you’re using an ARM version of Windows, we’re pleased to inform you that installing StartAllBack on ARM is simple and straightforward, so don’t hesitate to give this software a try.

How to Export Bookmarks from Arc Browser?

Managing bookmarks is important for organizing your digital life, whether for work or personal projects. Exporting bookmarks lets you save and transfer your favorite links efficiently. Here, we will discuss steps to export bookmarks from the Arc browser.

How can I export bookmarks from the Arc browser?

  1. Launch the Arc browser. Click the New tab icon, type arc://bookmarks/, then press Enter.arc bookmarks website
  2. You will get the Bookmarks page with all the bookmarks listed.
  3. Next, locate the three dots icon next to the Search bookmarks box and select Export bookmarks from the drop-down list.Export bookmarks
  4. Save the .HTML file at a desired location on your computer.Save - arc browser export bookmarks
  5. Once saved, open your preferred browser; here, we are using Google Chrome.
  6. Click the three dots icon from the top-right corner, hover over the Bookmarks and Sites option, then click Import Bookmarks and Settings from the extended menu.import bookmarks
  7. On the Import bookmarks and settings dialog box, select Bookmarks HTML file from the drop-down list, and under Select items to Import, place a checkmark next to Favorites/Bookmarks, then Choose File.Import bookmarks  - arc browser export bookmarks
  8. Select the file and click Open. The bookmarks from the Arc browser will appear in the Bookmarks list under the Imported folder.Open - arc browser export bookmarks

If you are facing any issues with your bookmarks on Chrome, we have a separate guide with detailed solutions for you.

To conclude, exporting bookmarks from the Arc browser is similar to that of Google Chrome, as it is also based on Chromium.

These steps will download an HTML file that is compatible with other popular browsers, which means you can effortlessly import these bookmarks to any of your preferred browsers.

If you are looking to export bookmarks from Chrome to Opera, you can check out this guide with detailed instructions.

Have you tried exporting bookmarks from the Arc browser? If so, share your experience with our readers in the comments section below.

How to Use GPUpdate /Force Command to Update Group Policies in gpedit.msc

The GPUpdate /Force command is used to forcibly update group policies applied by your organization via gpedit.msc. Usually, policy changes are not reflected immediately, as they are set to be periodically applied in the background every 90 minutes.

However, with this command, you can apply the policies instantly. Let’s learn more about the GPUpdate /Force command!

How can I use the GPUpdate Force command?

  1. Press Windows + R to open the Run dialog box.cmd with admin rights
  2. Type cmd and press Ctrl + Enter to open the Command Prompt with administrative rights.
  3. In the Command Prompt window, type the following command and hit Enter: gpupdate /forcegpupdate foce - gpedit.msc
  4. It will take a minute or two for the changes to apply; once done, restart your computer.

What are the features of the GPUpdate Force command?

The GPUpdate Force command forcefully applies all policies in the company, whether new or old. It is handy when you need to ensure that all policy settings are in place, especially after making big changes. Here are its primary uses:

  • Immediate policy update – Forces the computer to refresh all the Group Policy settings, such as user policies, security settings, and scripts, without waiting for the typical 90-minute interval.
  • Troubleshooting – Resolves Group Policy issues by ensuring the latest policies are applied correctly, which can fix policy conflicts, errors, or inconsistencies on client machines.
  • Configuration changes – Ensure all the recent changes made in Group Policy on the domain controller are applied instantly to the client computer, which is useful in deploying new policies.
  • Remote updates – Using tools such as Remote Desktop Services or PowerShell, updates can be installed remotely, allowing admins to update policy settings across multiple computers without physically accessing them.
  • Logon scripts – Triggers the execution of logon scripts configured using Group Policy, which ensures any changes made to these scripts take effect instantly during the next logon session.
  • Force update sequence – Overrides the default behavior of Group Policy updates, which usually occurs at a set time or during user logon processes and system startup.

What is the difference between GPUpdate and GPUpdate force?

The gpupdate /force command is a very useful command that allows the administrators to re-apply policy settings, whereas gpupdate only applies to new policy settings.

Using the command with /force switch can significantly increase the load on Domain Controllers (DCs), particularly in an environment with a larger number of Group Policy Objects (GPOs). On the other hand, as gpupdate only implements the new group policies and changes, it reduces the workload on both domain and client controllers.

Remember to use the GPUpdate/Force command only when necessary to prevent unnecessary load on domain and client devices.

If you are facing issues like using GPUpdate/Force command not working on gpedit.msc, we have a detailed guide to solutions to help you fix it.

Do you use the GPUpdate /Force command to apply policies in gpedit.msc? If so, share your experience with our readers in the comments section below.

Microsoft wants to bring AI to telecommunications. What does this mean for us?

Microsoft is taking a strong lead in the changing world of telecommunications, becoming a symbol for new ideas and working together to shape how people connect and communicate. Microsoft’s deep grounding in technology and its always-forward-thinking approach show that its involvement in the telecommunications sector isn’t just about being part of it but about leading this change.

They are committed to strategic collaborations, like with TM Forum, and by contributing towards Open Digital Architecture (ODA), showing Microsoft’s determination for industry transformation. The company’s actions aspire to build a better connected and adaptable digital future, establishing fresh benchmarks while nurturing an atmosphere of transparent teamwork.

The telecommunications industry stands at a pivotal juncture, where the convergence of technology and communication is accelerating at an unprecedented pace. Microsoft’s role in this transformation is not just as a participant but as a leader, driving the conversation and action towards a more integrated and efficient ecosystem. 

Microsoft

Microsoft plays a transformative part in telecommunications by pushing for a unified and effective system. The TM Forum DTW24-Ignite event demonstrated this dedication. It emphasized the most recent patterns, difficulties, and creative solutions created through cooperation.

Microsoft’s ongoing involvement in catalyst projects, emphasizing Open APIs, ODA, AI, and automation, shows its dedication to change within the industry. These initiatives aim to enhance business efficiency, optimize end-user experiences, and promote sustainable growth.

The company’s participation in the ODA Accelerator represents a notable step forward. It will influence the development of an ODA-ready digital architecture that is modular, flexible, and resistant to future changes in the telecommunications industry.

Shifting from old systems to software based on cloud-native technology, Microsoft makes a digital changeover possible using standard components, information patterns, and Open APIs.

Establishing a telecommunications ecosystem on Microsoft Azure in the cloud indicates their commitment to promoting digital transformation within this sector.

Microsoft concentrates on empowering developers, utilizing tools such as the ODA canvas and accelerator and GitHub Copilot for Open APIs that are transforming development. Success stories from Orange and Lumen highlight how these tools can help developers build more efficiently and effectively.

The collaborations with TM Forum members and the notable projects above showcase Microsoft’s dedication to improving developer productivity and creativity.

Microsoft’s strategy for the telecommunications industry clearly emphasizes customer experience. The push to better customer engagement using technologies such as Microsoft Dynamics 365 Contact Center and Microsoft Copilot Studio reflects a commitment to utilizing generative AI for automated care bots.

These steps involve solving customer inquiries faster, improving network operations, and redefining communication methods through innovation. Microsoft’s strategy for the telecommunication field strongly emphasizes improving customer experience.

Their goal to enhance customer engagement via technologies like Microsoft Dynamics 365 Contact Center and Microsoft Copilot Studio shows their commitment to utilizing generative AI to assist with automated care bots, which resolve issues rapidly, optimize network effectiveness, and redesign how we communicate.

Another important part of Microsoft’s vision for the telecommunications industry is the change in network operations. Microsoft Fabric Real-Time Analytics, which allows us to understand big amounts of network data, is central to this transformation.

According to the Redmond-based tech giant, partnerships with Accenture and new introductions like Azure Programmable Connectivity demonstrate Microsoft’s dedication to improving network operations and following industry norms.

Finally, Microsoft Azure Synapse is launching a fresh database template for wireless. The goal is to reshape how data management works in telecommunications. This move, combined with partnerships formed with Tech Mahindra and LigaData, shows how Microsoft attempts to make operations more efficient, encourage invention, and facilitate a smooth fusion of services throughout the industry.

The journey of Microsoft with the TM Forum and ODA is a story in which they have consistently brought innovation and backing to the telecommunications field.

As Microsoft gazes into its future, its dedication to cultivating an environment of teamwork, technological brilliance, and mutual vision remains steadfast. They cordially ask the industry to take this thrilling voyage towards a more connected world.

Failed to Read Description Error in Services.msc [Solved]

In the last few days, I have come across several reports of the Failed to Read Description error in the Services.msc console. It’s usually followed by either Error Code: 2 or Error Code: 15100, and you won’t be able to make changes to the service’s properties!

Upon closer inspection, it became evident that the problem was triggered by misconfigured boot settings, issues with the Registry, corrupt system files, or conflicting applications for native Windows services.

As for third-party services that were recently deleted, the Failed to Read Description Error Code: 2 message is triggered after an incorrect uninstallation.

How can I fix the Failed to Read Description error in Services.msc?

1. Turn off fast startup

  1. Press Windows + S to open Search, type Control Panel in the text field, and click the relevant search result.
  2. Click on System and Security.control panel
  3. Now, click on Change what the power buttons do under Power Options.
  4. Click the Change settings that are currently unavailable option.power options
  5. Untick the checkbox for Turn on fast startup (recommended), and click on Save changes.disable fast startup to fix services msc failed to read description
  6. Restart the computer for the changes to come into effect.

Many on the dedicated Malwarebytes forum confirmed that disabling fast startup helped when encountering the Failed to Read Description, Error Code: 2 message with the Malwarebytes service. We verified, and it works with other third-party services as well!

2. Repair the corrupt system files

  1. Press Windows + R to open Run, type cmd, and hit Ctrl + Shift + Enter.command prompt
  2. Click Yes in the UAC prompt.
  3. Paste the following commands individually and hit Enter after each: DISM /Online /Cleanup-Image /CheckHealth DISM /Online /Cleanup-Image /ScanHealth DISM /Online /Cleanup-Image /RestoreHealth
  4. Once done, run the SFC scan with this command: sfc /scannowsfc scan to fix services msc failed to read description
  5. Finally, restart the computer.

If it’s the corrupt system files to blame for the Failed to Read Description error in Services.msc, running the DISM commands and the SFC scan will get things up and running!

3. Uninstall any unsupported or conflicting apps

  1. Press Windows + R to open Run, type appwiz.cpl in the text field, and hit Enter.appwiz.cpl
  2. Select any app that was installed, updated, or modified right before the error first appeared, and click on Uninstall.uninstall app to fix services msc failed to read description
  3. Follow the on-screen instructions to complete the uninstall process.
  4. Reboot the computer and check for improvements.

Often, third-party antiviruses and incompatible/unsupported programs trigger the Services.msc Failed to Read Description error. In one instance, it was even the AMD Driver Cleaner Tool, which has long been discontinued.

4. Modify the StringCacheGeneration DWORD in Registry

Tip icon Tip
Before you start making changes to the Registry Editor, create a restore point. This will help revert the PC to a stable configuration if things somehow go wrong. Also, do not make any changes other than the ones described below.
  1. Press Windows + R to open Run, type regedit in the text field, and click OK.registry editor
  2. Click Yes in the UAC prompt.
  3. Paste the following path in the address bar and hit Enter: HKEY_LOCAL_MACHINE\SYSTEM\CurrentControlSet\Control\MUI\StringCacheSettingspath
  4. Double-click the StringCacheGeneration DWORD on the right.
  5. Enter 38b under the Value data field, and click OK to save the changes.modify value data

If you see Failed to Read Description for a core Windows service, like BITS (Background Intelligent Transfer Services) or wuauserv (Windows Update Service), setting 38b as the value data for StringCacheGeneration will do the trick!

In case you don’t find the StringCacheSettings key or StringCacheGeneration DWORD, create them.

5. Use System Restore

  1. Press Windows + S to open Search, type Create a restore point, and click on the relevant result.
  2. Click the System Restore button.system restore
  3. Select the Choose a different restore point option and click on Next.
  4. Now, pick a restore point created before the issue first appeared, and click on Next.restore to fix services msc failed to read description
  5. Verify the restore details, click on Finish, and confirm the change.
  6. Once the process is complete, check for improvements.

6. Perform an in-place upgrade

  1. Go to Microsoft’s official website, choose the edition, and download the Windows 11 ISO.
  2. Right-click on the downloaded file, select Mount, and then click on Open.mount
  3. Run the setup.exe file.
  4. Click Yes in the UAC prompt.
  5. Click Next to proceed.windows 11 setup
  6. Now, click Accept to agree to Microsoft’s license terms.
  7. Finally, verify that the setup reads Keep personal files and apps, and then click on Install.in-place upgrade to fix services msc failed to read description

If nothing else worked, an in-place upgrade will fix the Windows service Failed to Read Description error. The end result is similar to reinstalling the OS, except that you won’t lose personal files and apps. Although, an in-place upgrade takes a few hours to complete!

In case this too fails, I would suggest reinstalling Windows 11. This way, all changes to the PC would be reverted to default. As for the stored files, you can move them to an external storage to avoid data loss.

Do you know any more fixes for the error? If so, share them with our readers in the comments section.

Microsoft released the Autogen Studio, a platform that builds AI agents on its own

In the busy space of technology and artificial intelligence, Microsoft Research has presented a creation that is gaining attention from developers and tech supporters. It’s called AutoGen Studio, which serves as a low-code interface to make building multi-agent workflows easier. Picture yourself making intricate AI applications without handling numerous lines of code. The Studio has been around since 2023, but the Redmond-based tech giant is releasing a demo these days.

Yes, AutoGen Studio guarantees just that. It is a framework based on Python’s AutoGen, which has already gained recognition in the industry for its capacity to define, set up, and combine AI agents into shared applications. AutoGen’s success can be seen in its release, which received appreciation from more than 290 community contributors and nearly 890000 downloads, showing how much people like using this product.

In a blog post, Microsoft says AutoGen Studio goes beyond this; it provides an interface that is easy for users and does not need much coding. This completely changes the game for developers and researchers, allowing them to concentrate on difficulties without dealing with complicated programming. The tool facilitates the quick creation of basic models, testing different methods, and deploying multi-agent solutions.

This makes solving tasks such as generating educational content or analyzing medical information straightforward and manageable. What’s interesting is the possible uses that AutoGen Studio brings. Think about having agents who can plan your holiday, handle money matters for you, or aid in fulfilling learning objectives – there are infinite opportunities, and AutoGen Studio is here to provide them.

So, what does this imply for the future of AI development? AutoGen Studio isn’t only simplifying the process; it’s making it more democratic. By decreasing entry barriers, AutoGen Studio encourages a broader range of creators to join in crafting AI solutions.

This could result in a rise in innovation, with more individuals from various backgrounds and thinking patterns joining the field. But, it’s crucial to understand that AutoGen Studio is still beginning its journey; even though it can be used for prototyping and research purposes, it isn’t yet fully prepared to handle production environments.

The reaction from the community towards AutoGen Studio has been very strong, gathering more than 154,000 downloads within only a few months. People use it for various purposes, such as travel planning and data visualization, without requiring complex programming proficiency. This early acceptance shows the tool’s possibility of changing how we do AI development.

Microsoft Research will concentrate on improving AutoGen Studio in the future. They are developing a fresh drag-and-drop interface that will simplify constructing and adjusting agent workflows even more.

This graphical method simplifies the procedure and makes it more instinctive, enabling developers to witness their workflows becoming active. Moreover, a gallery for the community is being developed where people can exchange their works, find new pieces, and gain knowledge from others’ creations.

In the AI world, working together and creative thinking are very important. AutoGen Studio is a big step towards making these aspects possible. It simplifies building and trying out multi-agent solutions, bringing fresh chances for tackling complicated issues.

With the development of tools and communities, there will be a wave of new applications that we could not even imagine before. The future for AI development seems bright, and AutoGen Studio is at the forefront.