Microsoft is bringing a new To-Do feature to Word on Windows, Mac, and the web

Microsoft has been bringing several new AI-powered features to its Office apps in recent months, such as the new Ideas feature that can now provide intelligent suggestions to users working on Excel documents. Word also comes with Editor, an AI-powered writing assistant that can be a very helpful resource during the writing process.

AI can be great for providing intelligent suggestions, but it can also help to reduce distractions. As an example, when you’re working on a Word document, there are probably times where you have to interrupt your flow to look for additional information. “When this happens, you likely do what research tells us many Word users do: leave a placeholder in your document and come back to it later to stay in your flow,” explained Jared Spataro, Corporate Vice President for Microsoft 365.

Well, Microsoft wants to make it easier for users who regularly create these kind placeholders in Word documents to keep track of all of them. The company will add a built-in To-do feature to Word, and the app will be able to create placeholders automatically when users type “TODO: finish this section” or “<<insert closing here>>” in Word documents.

Once Word automatically creates these placeholders in a document, the app will keep track of all of them and also display them on a dedicated panel when users come back to the document. Even better, Word users will be able to @mention coworkers within placeholders to ask them for help.

“Over time, Office will use AI to help fill in many of these placeholders. In the next few months, Word will use Microsoft Search to suggest content for a to-do like <<insert chart of quarterly sales figures>>. You will be able to pick from the results and insert content from another document with a single click,” explained Spataro.

This AI-powered To-Do feature is available today in the latest Insider build of Office for Mac, and it’s coming soon to Word for Windows and the web. To try it on a Mac today, you’ll need to be an Office 365 subscriber and join the Office Insider Fast Ring in the Microsoft Auto Update app.

Need a rugged Windows 10 laptop built for extremes? Check out the new Panasonic Toughbook 31

Panasonic has announced their new ultra-rugged laptop, the Toughbook 31, with an extremely durable build and running the Windows 10 operating system.

Interestingly, the new model will come with optional 4G LTE-Advanced and GPS connectivity, and will also some with 32 GB of DDR4 RAM and a 256 GB solid state drive. It also comes with in either Core i5 or Core i7 variants, and can be configured with  more than a day of battery life with an optional second battery that can be inserted into the media bay.

The Toughbook 31 is primarily targeted towards multiple industries including police, military, construction, and manufacturing industries where a laptop could easily be destroyed in their kinds of work. The new machine is expected to be released for $3,699 in December.

Could you use an extremely durable laptop for your hobbies or work? Your thoughts are welcome in the comment section below this post.

The latest in Wi-Fi security, WPA3, could be coming to Windows 10 19H1

The upcoming “19H1” update for Windows 10 will apparently bring support for WPA3, the latest Wi-Fi security standard that will replace WPA2 in the near future. Traces of the upcoming support were found in the freshly released Windows 10 SDK Preview Build 18272, the first SDK for Windows 10 version 19H1.

As spotted by MSPoweruser, the API updates detailed in the release notes for this new SDK include something about Windows Networking Connectivity and WPA3. To our knowledge, Microsoft hasn’t discussed WPA3 on Windows 10 yet, but this new API is a pretty good hint that the new protocol will be supported in the next major update for Windows 10

The Wi-Fi Alliance initially announced the new WPA3 protocol back in June, and the new standard will bring enhanced security protections while retaining interoperability with WPA2 devices. The new protocol is currently an optional certification for Wi-Fi certified devices, but the Wi-Fi Alliance says that support will become mandatory once market adoption reaches a certain point.

Mass Effect: Andromeda now plays in 4K on Xbox One X consoles

As part of today’s N7 celebration for the series, Mass Effect: Andromeda is being updated to support the full 4K ultra HD capabilities on the Xbox One X console. The patch, at almost 1.7 GB in size, is available right now for the consoles, and officially makes the game an Xbox One X Enhanced title.

Mass Effect is BioWare’s sci-fi third person shooter game, and Andromeda is the fourth installment of the series and the story takes place in the galaxy of the same name. While earlier reviews of the older series were very positive, the Andromeda iteration received more negative feed back from critics. Of course, that’s for you to decide if you haven’t tried it, so if you’re interested, check out the video below.

BioWare’s update for the game suggests the company hasn’t forgotten about the series altogether, although November 7 is the official date the gaming company celebrates the franchise. Either way, fans of the series should be pleased with the new patch, especially those running Microsoft’s top-of-the-line 4K console.

Do you enjoy playing Mass Effect: Andromeda? Does the update significantly improve your experience? Let us know in the comments below.

GRIP video game launches on Xbox One and goes straight to Game Pass

A new racing video game, GRIP, has just launched on the Xbox One and is now available to play either as a full purchase or as part of the Xbox Game Pass subscription service.

In addition to being available on Xbox Game Pass, GRIP is also Xbox One X Enhanced and supports 4K graphics when played on the Xbox One X. GRIP allows for four player local multiplayer matches or games with up to 10 racers when played online.

As an extra bonus, the Pariah Garage Kit DLC, which allows for more customization options, is currently completely free for all Xbox One gamers (link below).

Here’s the official store description:

Scale walls, ceilings and anything else you can get your tyres on to… as you master tantalising tracks, tricks and perform mind-blowing stunts to race your way across the cosmos. Customise your vehicle, utilise devastating weapons and exploit a destructible environment to ensure not only victory, but the complete annihilation of your opponents. Harnessing gravity defying physics alongside a bristling arsenal of outlandish weapons, GRIP delivers the fastest, most competitive racing experience ever. Featuring a killer soundtrack, furious speeds and intense action, GRIP is guaranteed to generate unforgettable gaming moments – online or offline – with nail-biting split screen racing and tournaments.

Are you going to buy GRIP outright or will you give it a go on Xbox Game Pass? Let us know which method you’ve decided in the comments below and then follow us on Pinterest for more Xbox gaming content.

GRIP
GRIP
Developer:
Wired Productions
Price:
$39.99


Pariah Garage Kit
Pariah Garage Kit
Developer:
Wired Productions
Price:
Free

Microsoft kills hotfix service, here are the alternatives

It would seem that the end is nigh for system admins and individual users of hotfixes, the single issue updates released by Microsoft’s engineering team in charge of the codebase.

Hotfixes, while never meant to be a permanent solution to software problems, were very useful for users who were facing a single issue with a program. It meant minor fixes could be dealt with quickly without the need to download large updates.

Hotfixes were also popular with advanced users who had a Microsoft Premium Support agreement. It was possible to request specific hotfixes by filing a ‘Design Change Request’. These hotfixes were also delivered by the same engineering team responsible for codebases.

Microsoft’s hotfix service is no longer available

That has now all changed as recent attempts by users to download hotfixes have been greeted with the following message:

The Hotfix service is no longer available. Instead you can find your fix or patch by upgrading to the latest update available for your product.
You can also obtain Microsoft drivers, software updates, and other support files by downloading them from the Microsoft Catalog, the Microsoft Download Center, or upgrade to Windows 10. Windows 10 contains the most up-to-date security and other features built right in.

Hotfix Service from Microsoft No Longer Available

In recent statements issued by Microsoft, it has said that hotfixes (and easy fix solutions) will no longer be available.

For many computer users, hotfixes were never a great idea, mainly because they could negatively affect the computer, causing more problems than the problem they were meant to fix.

In fact, they normally came with a disclaimer stating that they hadn’t been properly tested and that the user should take due care when installing them .

It seems that this has been in the pipeline for awhile now. Microsoft issues major updates for its operating systems twice a year and there are frequent cumulative updates, which contain the fixes hotfixes used to address. As this is now the case, the need for hotfixes has largely disappeared.

For those of you suffering from hotfix withdrawal, there is still some good news. Previous hotfixes are still available from the Microsoft Update Catalog, with all the relevant KB articles.

How long they will remain available is anyone’s guess, but as they will presumably become redundant over time, not long I suspect.

RELATED STORIES TO CHECK OUT:

Microsoft backs off plans to email “tips” to Office 365 business users after complaints

After announcing its plans to send Office 365 users emails with product training and tips on how to use the service, Microsoft has been forced to change its mind following user backlash (via ZDNet). As it turns out, enabling this feature for all Office 365 commercial users probably wasn’t such a good idea, even though Office 365 admins could still disable this service in the Microsoft 365 Admin center.

“Based on your feedback, we’re making some updates to the plan for users to receive helpful product training and tips via email,” Microsoft said in a message to Office 365 admins. “We want to take time to review your suggestions, so we are pausing the release of this feature.”

On Reddit, many Office 365 were worried that these “tips” could appear as phishing attempts by uneducated users. “You know every time one of those emails go out you’re going to get 25 emails about it that are asking if it’s a phishing attempt or spam though,” wrote one user. Others in the same thread complained about not having any control over the kind of product training that these emails would include. “I dont want my users reading tips and suddenly feeling empowered to use the system in ways we havent instructed them to,” wrote another Reddit user.

Microsoft’s note to admins suggests that the company hasn’t entirely given up on the idea of sending tips to Office 365 users. It would certainly be a good thing to make this feature entirely opt-in, while also giving Office 365 admins some control over the content that gets pushed to end users. Microsoft says that it’s currently reviewing suggestions and will share details about its updated plans in a future post for Office 365 admins.

Microsoft supports Linux admins by porting famous Windows Sysinternals suite, beginning with “ProcDump”

Microsoft has announced it is working to port tools from its Sysinternals utility suite to Linux. The suite of applications has gained an almost legendary status amongst Windows system administrators.

Yesterday, Microsoft employee David Fowler announced the release of the first Sysinternals tool for Linux, process dump creation utility ProcDump. Microsoft executive Mario Hewardt, Principal Program Manager for Azure diagnostics also confirmed that other apps are in the works, including Sysinternals’ famed ProcMon process monitoring utility.

Sysinternals was originally developed by an independent company, Winternals. It began life in 1996 and has grown into an extensive catalogue of free Windows management tools, allowing admins to monitor Windows’ internal file, networking and processing operations. The suite also assists developers in debugging Windows applications and aids security researchers in tracking the activities of malware.

Microsoft acquired Winternals in 2006, bringing the Sysinternals suite in-house. Winternals cofounder Mark Russinovich is now the chief technical officer (CTO) of Microsoft’s Azure cloud division.

Screenshot of ProcDump for Linux

The move to bring Sysinternals to Linux is significant for Microsoft in its ongoing pivot to the cloud. Under CEO Satya Nadella, the company has moved to embrace the wider cloud ecosystem beyond its own Windows infrastructure. That’s meant increased investment in supporting Linux systems across Windows and Azure, giving developers more options when choosing their technology stacks.

These efforts have paid off. In September, Scott Guthrie, Microsoft executive vice president of cloud and enterprise, told ZDNet that half of all Azure virtual machines now run Linux. That figure has increased from just 20 percent in 2015. Without the increased support for Linux on Azure, many of those VMs may have been created on competing clouds instead.

The porting of Sysinternals to Linux is another way for Microsoft to increase its hospitality towards Linux developers and workloads. Developers will be able to use familiar Sysinternals tools on both Windows and Linux systems, removing the need to learn two applications.

ProcDump is just the first application to become available. Its functionality revolves around creating program dumps when certain conditions are met. Developers can set up criteria to automatically create a process dump, such as when CPU usage exceeds 50%. The resulting data can be invaluable in determining why the application is consuming so much processor time.

The Linux version of the ProcDump application is open-source and available for download now. Installation instructions can be found in the GitHub repository. There are currently a few limitations when compared to the Windows version but the core of ProcDump is already functioning.

Giants Walmart and Microsoft team up for technology hub expansion

After some fast and furious quarterly earnings announcements, industry analysts are now drawing clearer lines between Amazon and Microsoft’s cloud services competition.

Both Microsoft’s Azure and Amazon’s AWS cloud services had slow growth to report for their FY19 Q1 and third-quarter earnings, respectively. However, Microsoft continues to gain market share and seemingly at the cost of potential AWS growth.

As big-name companies such as Walmart partner with Microsoft to make use of Azure’s cloud services, the trend may become more evident over time.

Back in July, Microsoft and Walmart announced a new ‘cloud factory that is being co-engineered by developers from both companies and planted in Austin, Texas.

During the time of the announcement, there were few details about how the partnership would work or the specific technologies that would be put into place.

Fortunately, Microsoft author Vanessa Ho just posted a blog about the expansion efforts of Microsoft and Walmart’s ‘cloud factory’.

The Walmart-Microsoft team – known internally as “4.co” for its location at Fourth and Colorado streets – will initially focus on migrating Walmart’s thousands of internal business applications to Microsoft Azure. The team will also build new, cloud-native applications. The collaboration will be part of a multi-year journey to modernize Walmart’s enterprise application portfolio, create more efficient business processes and decrease operational costs associated with legacy architecture.

Roughly, 30 technologists with varying specialties are coming together to upgrade Walmart’s business platforms using Microsoft AI, an internal natural language processor to handle 40 terabytes of unstructured text and machine learning to modernize its customers shopping experiences.

During an interview, executive vice president and enterprise chief information officer at Walmart, Clay Johnson, offered some further details about the company’s decision to use Microsoft Azure solutions.

With this partnership with Microsoft, we started talking, ‘‘Hey, what’s the best way to accelerate all the stuff we’re doing here? We need help and expertise. We want to move fast. How do we partner our smart people with Microsoft’s smart people?”

Then it was obvious: ”Why don’t we just co-locate the teams together.” We haven’t done something like this before with co-location, but I think the outcomes are going to be huge and strengthen our partnership even more. You’re going to see a lot more co-innovation around IoT, computer vision, big data and real-time analytics.

Aside from the obvious benefits of upgrading its various platforms with Azure infused services, Microsoft and Walmart also share a common competitor in Amazon that may also be propelling this new partnership.

Microsoft benefits from the 4.co (the name of the Walmart/Microsoft partnership) by experiencing scale they may not have previously done when deploying Azure services. According to Johnson, Walmart has 11,200 global stores and 2.2 million associates that will be affected by the platform upgrade in one way or another.

Walmart has a vested interest in leveraging its Microsoft partnership in a bid  to direct the next phase of consumer shopping, one in which Johnson believes will be a blended physical and online instance rather than the mainly online one Amazon offers today.

I think you’re going to see an omnichannel-type world that is a blend of e-commerce and brick and mortar, where consumers can have access to things at any point, any time. They can order online and pick up in the store or have it delivered same-day. You can see we’re starting to do that with our online grocery right now.

Amazon has seemingly acknowledged that future with its recent purchase of Whole Foods retail locations as well as the company testing a small brick and mortar presence as of late. It’ll be interesting to see if Walmart can port its foot traffic into the digital world with this new investment as well see what new lessons Microsoft learns with deploying Azure to a Walmart level scale.

Parallels Toolbox 3 for Windows and Mac brings new useful utilities on Windows and Mac

Parallels Toolbox 3, the latest version of Parallels’ suite of easy-to-use tools is launching today on Windows and Mac. Compared to the version 1.5 (for Windows) and 2.5 (for Mac) we tested last year, this 3.0 update brings a couple of useful new utilities on both platforms, as well as some welcome UI improvements.

“We’ve been getting very positive feedback from both PC and Mac users of Parallels Toolbox who consider it their “go-to” solution to quickly complete dozens of everyday computing tasks with a single click,” said Jack Zubarev, Parallels president. “Today’s customer-inspired new and enhanced tools added to Parallels Toolbox 3 make it an even more useful one-stop time-saving resource.”

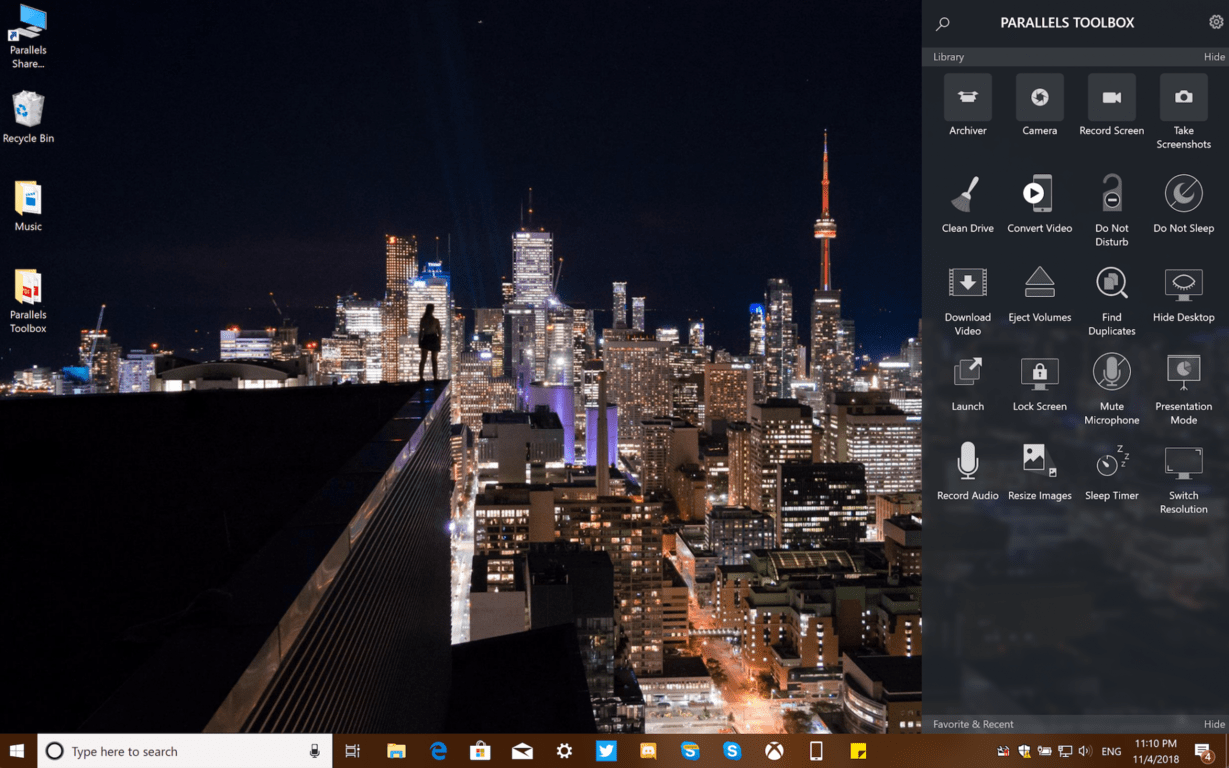
First of all, Parallels Toolbox 3.0 comes with a new search bar on Windows and Mac, allowing users to easily find the tool they’re looking for. Moreover, it’s also possible to choose which utilities appear in the pop up window, as seen in the above image.

For Windows users, this version 3.0 introduces two new tools for easily finding duplicates and batch converting images. A new “Sleep Timer” has also been added, letting users configure a countdown before their PC will go to sleep or shut down.

Parallels Toolbox 3.0 for Windows also improves existing tools like Download Video, which now supports downloading 4K videos from the web. Additionally, the Record Audio tool is now capable of recording from an external mic, as well as saving recordings in MP3 format.

For Mac users, Parallels Toolbox 3.0 brings three new utilities for easily uninstalling apps, reveal hidden files in macOS and see local times around the world. This latest release also brings improvements to some features like Annotate Screenshots and Record Audio, and the Parallels Toolbox app also supports the new dark mode in macOS Mojave.

Parallels Toolbox 3.0 for Windows and Mac is still available as a $19.99 yearly subscription, which includes free updates several times during the year. There are really a lot of time-saving utilities included in Parallels Toolbox, and you download a free trial of the latest version on the company’s website.

Windows 10 devices & Xbox consoles to get shopping cart & wish list features

After a combination of leaks, private testing, and random public testing, Microsoft has finally made an official announcement about the new shopping cart and wish list features that are coming to the Microsoft Store on Windows 10 PCs, web, and Xbox One consoles.

Both features (see above image) work the same as most other shopping cart and wish lists online, i.e. product pages will now feature options to add an item to a shopping cart or wish list.

Xbox Insiders will gain access to the shopping cart today for testing on Xbox One consoles while Windows Insiders are expected to begin their testing in the very near future. Public users, i.e. the average user, will gain the shopping cart experience in a few weeks.

The wish list feature is expected to launch in the immediate future to everyone on Windows 10 and web while Xbox Insiders will also be able to begin their console testing at the same time. Public Xbox One users will gain access to the wish list in a few weeks.

Shopping list and wish list functionality has been a long time coming for Windows and Xbox as both are available on almost every other online shopping experience.

Are you excited for these new features or do they not really interest you? Let us know in the comments below and then follow us on Pinterest for more Microsoft content.

How Windows 10’s virtual desktops keep me productive all day long

Windows has long been considered the most appropriate platform for productive work. Prior to Windows 10 though, the core desktop experience had gone without major innovation for several years. Changes between Windows XP and 8 focused predominantly on visuals. While Windows 7’s new taskbar and window management capabilities aided productivity, they didn’t do much to alter the desktop’s purpose.

With Windows 10 and its “do great things” marketing campaign, Microsoft finally went back to work on the Windows desktop. Coming with the reinstatement of the Start menu, the company began adding new features to the shell. One of those in particular stood out for me, because it’s already a core component of rival desktop environments: Virtual Desktops.

Creating desktops

The concept behind virtual desktops is simple: you can setup multiple independent workspaces to house different sets of windows. It’s something which will already be familiar to most Linux desktop users. Windows formerly required specialist, often cumbersome third-party software to enable something similar, before Microsoft added the capability natively with Windows 10.

When you create a new virtual desktop (press Ctrl+Win+D), you’re given a blank canvas to open a new set of apps and windows. The apps you had open on your first desktop aren’t visible on the new one and won’t appear on the taskbar. Likewise, any apps you open on the new desktop will be invisible on the original.

You can switch between virtual desktops using the Ctrl+Win+Left and Ctrl+Win+Right keyboard shortcuts. You can also visualise all your open desktops using Task View – either click the icon on the taskbar, or press Win+Tab. This gives you a handy overview of everything open on your PC, from across all your desktops. Hover over the desktop icons at the top of the screen to see the contents of each one. There’s buttons to add and close desktops if you’d rather not use the shortcut keys.

Virtual desktops in action

Enough of the feature recap – here’s why I place so much value on virtual desktops. I work at my desk for eight hours each day. During that time, I will usually work on multiple independent projects. Throughout the time, I’ve also got a set of open apps which I review during breaktimes and spare moments – OneNote, Outlook and a set of personal Firefox tabs. These are my primary windows, which aren’t connected to my work but are nonetheless referred to throughout the day.

Screenshot of Virtual desktops

As the day progresses, I’ll be switching between multiple ongoing web development projects. For each project, I open the source in my code editor, a set of console windows (using Windows Linux Subsystem to get a Linux shell), File Explorer to the project’s folder and a new Firefox instance for tabs specific to the project. Some projects may require additional apps.

I might work on two or three projects in a day and I don’t tend to close anything after it’s been opened. Many projects are interlinked, so I might need to refer back to something I worked on earlier in the day even after I switch project. With so many windows open, keeping everything organised would get cumbersome without virtual desktops.

Enter virtual desktops

The virtual desktop solution streamlines my entire workflow. Each project gets its own virtual desktop, housing only its windows. I can rapidly refer to other projects by just switching virtual desktop, without having to minimise or switch between apps. No matter how many windows I open on a desktop, they’re isolated and won’t appear anywhere else – keeping things controlled and avoiding the cognitive overload of having lots of visible tabs and windows.

On my first desktop, I keep my personal browser instance, ready to switch back to in the spare moments of the day. When on that desktop, I don’t see any work-related apps open, which makes it easier to disconnect for a moment and check my favourite blogs and forums.

Of course, some apps are useful to have on every desktop. One such example is Spotify. Although it’s not directly work-related, it’s useful to have Spotify available on all my desktops. Otherwise, I’d have to spend time switching to another workspace just to change tracks. A similar case is Outlook – I keep my inbox accessible on every desktop, to avoid unnecessary context-switching.

Screenshot of Virtual desktops

Fortunately, it’s easy to make a window visible on every desktop – just open Task View (Win+Tab), right-click the app and choose “Show this window on all desktops.” This will make the current window appear on every desktop – but not any future instances of the app. To make future instances show on every desktop (even after restarting your device), choose the “Show windows from this app on all desktops” option instead.

That’s it for me and virtual desktops, but I’d be interested to know how you use the feature. Although not an especially complicated concept, virtual desktops are more likely to be useful to power users and workers who spend all day on their device. If you only ever have a few apps open, you’re less likely to find the feature helpful.

For people like me who open dozens of windows during the day, virtual desktops provide a simple way to define contexts. There are several benefits to doing so, from faster window switching (it’s quicker to switch desktop than Alt-Tab through dozens of items), to reduced mental overheads. Too many windows and tabs affect your ability to focus on your current task – particularly when they’re spread across multiple distinct projects. With virtual desktops, the scope of my focus is always constrained to just the current project, as all unrelated windows are hidden out of sight and mind.

Windows 10 news recap: UWP bug allowed full file system access, Outings gets support for Windows Mixed Reality, and more

Welcome back to our Windows 10 news recap, where we go over the top stories of the past week in the world of Microsoft’s flagship operating system.

Outings, the mobile travel app from Microsoft Garage, is now compatible with Windows Mixed Reality headsets

The Microsoft Garage project, Outings, that acts as a personal travel guide, has now added support for Windows Mixed Reality, allowing you to discover places in Mixed Reality.

Legacy volume mixer may be getting muted in the future, replaced with a modern alternative in Windows 10 19H1

Microsoft looks to be getting rid of the classic Volume Mixer from Windows, as the latest Windows 10 Insider build brings a new, modern replacement to allow you to individually control the volume for different apps.

Windows 10 Volume Mixer

Windows 10 UWP bug allowed full file system access without asking permission

A bug in Windows 10 allowed UWP apps to access the full file system, except without the need for them to ask for permission. The bug is reported to have been fixed in the Windows 10 October 2018 update.

Family Guy Surface Product Plug

Two brothers steal 180 brand new Surface devices from Microsoft Building 88, get caught

You could say their crime was brought to the Surface. 2 brothers attempted to steal 180 brand new Surface devices, directly from Microsoft Building 88 in a bold move that got them caught. One of the brothers was a full-time Microsoft employee and used his keycard to gain access.

That’s it for this week. We’ll be back next week with more Windows 10 news!

Legacy volume mixer may be getting muted in the future, replaced with a modern alternative in Windows 10 19H1

The Volume Mixer in Windows has been an easy method of adjusting the volume for individual programs and applications, all without needing to adjust the master volume. For example, you could turn the volume down on Google Chrome and turn the volume up on Spotify, but keep the volume for other applications the same.

As Microsoft continues to consolidate legacy settings panels into its Settings app on Windows 10, the company now looks set to be muting the Volume Mixer dialog, instead adding a new “App volume and device preferences” screen to the Settings app.

Windows 10 Volume Mixer
Via Windows Latest

The new panel retains the ability of individually setting the volume for different apps, but also lets you choose the audio output device for different apps.

It is curently in testing with Windows Insiders. As of Windows 10 19H1, build 18272, right-clicking on the Sound icon in the taskbar and clicking “Open volume mixer” opens up the above new Settings panel.

THQ Nordic: Darksiders I & II to get Xbox One X enhancements

Fans of the Darksiders series, as well as those who have not played Darksiders I & II but are interested, could be about to be pleased, as THQ Nordic confirms that the 2 previous titles in the Darksiders franchise are to receive updates to enhance the experience on Xbox One X, according to THQ Nordic in a report with Wccftech.

Both games will run at native 4K, while diving you into smooth action with 60FPS.

Those wanting to pick up the Darksiders games can do so for just $90. THQ Nordic is offering a bundle of Darksiders III: Blades & Whip Edition that includes Darksiders Warmastered Edition and Darksiders II Deathinitive Edition.

Xbox One X enhancements will be available for all the games by the end of the month.

Microsoft to remove USB TV Streaming from the Xbox app on iOS and Android

As Microsoft slowly ditches its all-in-one media ethos for Xbox One, instead refocusing the console to be the centrepiece of gaming, the console is losing some features that it once had.

It all started with the removal of the “snap” function, allowing you to snap content to the side of another app or game. This could allow you to watch a video or engage in a video call while playing a game.

The next feature to be dropped will be USB TV Streaming to the Xbox app on iOS or Android. Microsoft is sending messages to users of USB TV Streaming to warn them that the feature will be removed in just 30 days’ time.

Xbox app removes USB TV Streaming
Credit: theicecreaman37 via Reddit

Strangely, it appears the Xbox app on Windows 10 will be retaining the feature, enabling you to continue USB TV Streaming to your Windows 10 devices, just not iOS or Android.

With the removal of this feature, some Xbox users are raising concerns about the number of features being removed, while others are worried about the HDMI-IN feature’s future for the next Xbox console, which allows another HDMI-enabled device to pass video through to the Xbox.

Did you ever use the USB TV Streaming functionality? What are your thoughts on its upcoming removal? Let us know your thoughts in the comments below.

How to Open Ex_file Files in Windows 10

While using Windows 10, you might have noticed an unknown ex_ file extension. Today, we’ll tell you more about this extension and show you how to open ex_ file extensions in Windows 10.

So, what is a .ex_ file? Although its name is quite unusual, this is just a compressed executable file, also known as .exe.

As you know, .exe files are used for all sorts of things, such as starting setup processes. Sometimes, developers compress the .exe file into a .ex_ file to make it smaller.

How can I open ex_file files in Windows 10?

As we said earlier, .ex_ files are just compressed .exe files, and you’ll have to decompress them to open them. Although this sounds a bit complicated, it’s a lot simpler than it sounds.

To decompress .ex_ file you need to do the following:

  1. Open Command Prompt. You can open Command Prompt by pressing Windows Key + R and typing cmd.
  2. When Command Prompt starts you need to navigate to the folder where .ex_ file is stored. In our example we’ll assume that .ex_ file is located in c:my documents. To navigate to a specific folder using Command Prompt type this and press Enter:
    • cd c:my documents
  3. After you’ve successfully changed the folder you need to type the following and press Enter to run it:
    • expand filename.ex_ c:newfilename.exe
  4. Make sure that filename.ex_ matches the exact name of your .ex_ file.
  5. Now close Command Prompt, and you can run your newly created .exe file.

Here’s Microsoft’s definition of an .ex_file:

Windows executable file renamed from “.exe” to “.ex_”; contains the exact contents of an .EXE file; commonly found on installation CDs, where the installer must first rename the file before executing it.

We also must warn you that .ex_ and ._ex files are different. While the former are compressed .exe files, the latter are sometimes used for spyware. Now that we know the .ex_ file extension, let’s see how to open .ex_ files.

If you get the message ‘Error Msg: Can’t Open Output File <filename.ext>’ while trying to perform step 3, you need to do the following:

  1. Right-click filename.ex_ and select Properties.
  2. Make sure that Read Only checkbox isn’t checked.
  3. Click Apply and OK and repeat the process.

Since a .ex_file is a compressed .exe file and you need to decompress it, maybe you want to learn more about file compression and decompression tools. Here are some posts that may interest you:

That’s about it, I hope this article helped to understand ex_file extension in Windows 10 better. You might also find this article on how to quickly open RBF files useful since it shows you how to use the built-in Notepad or a dedicated third-party program.

If you have any comments or questions, reach for the comments below.

How to Create a Restore Point from Windows 10 Desktop

Restore points are very useful features of Windows operating systems. All users should have at least one recent restore point created, no matter how hard they ‘exploit’ their PCs. Windows 10, just like all older versions of Windows, has its own option for creating a restore point, but we a simpler method.

All you have to do to create an instant restore point shortcut on your Desktop (or anywhere you want) is to perform one simple, few clicks-long trick.

This method isn’t strictly attached to Windows 10, as it can be performed in Windows 7 and Windows 8.1, also, but it’s most useful in Windows 10, especially in Windows 10 Preview.

Steps to create a Windows 10 Restore Point

Restore Point Creation Tool on Windows 10

Here’s how to easily create a restore point creation tool on your desktop:

  1. Right-click on Desktop, go to New, and select Shortcut
  2. In the ‘Create Shortcut’ wizard, enter the following command
    • exe /k “Wmic.exe /Namespace:rootdefault Path SystemRestore Call CreateRestorePoint “%DATE%”, 100, 7″instant restore point windows 10
  3. Click Next, and name your news shortcut by your desire

And there you go! You now have a restore point creation tool right on your desktop, and all you need to do to create a restore point is to run it. But, we have to note that it will only work if you open it as Administrator, so keep that in mind.

Once you run it, the Command Prompt window will open, and it will automatically begin the creation of the new restore point. You’ll need to wait a few moments for the process to complete, depending on your C: drive size. Once the creation is done, you should receive a “Method execution successful” message, and the new restore point will be created.

As we said, restore points are extremely useful, especially in Windows 10 Preview, because if you get stuck with a corrupted build, or some other kind of error, you’ll be able to restore to the previous working state of your computer easily.

There are also situations where you can’t create a restore point. Or, you managed to create one but you cannot use it. We already covered these problems in our troubleshooting guides.

So, if you need some solutions to fix restore point issues, you can check out the guides listed below:

Here’s how to fix error 0x800070002c-0x3000d on Windows PCs


5 solutions to fix error 0x800070002c-0x3000d

  1. Uninstall antivirus and defragment your hard drive
  2. Disable USB devices
  3. Clean boot your PC
  4. Run the Update troubleshooter
  5. Disable your antivirus/firewall

Sometimes upgrading to Windows 10 isn’t as smooth as you might think and errors can occur. One of these errors is error 0x800070002c-0x3000d which happens when you try to upgrade from Windows 7 to Windows 10.

Error 0x800070002c-0x3000d can prevent you completely from upgrading to Windows 10, but it seems that there are few solutions available that you can try.

Steps to fix error 0x800070002c-0x3000d

Solution 1 – Uninstall antivirus and defragment your hard drive

If you’re upgrading from Windows 7 or Windows 8, you might want to try uninstalling your current antivirus software before upgrading to Windows 10.

After you’ve uninstalled your antivirus, try to upgrade to Windows 10 again. If the problem persists, you might have to use a defragmentation tool in Windows and defragment your hard drive.

Solution 2 – Disable USB devices and unplug all USB peripherals

Before we start, make sure that you have removed all installed antivirus software.

First, we’ll need to disable USB devices that you don’t use.

  1. Go to Device Manager and locate Universal Bus Controllers
  2. Expand it, and disable USB devices that you’re not using such as your card reader, by right clicking it and choosing Disable.0x800070002c-0x3000d error windows 10 upgrade

Now unplug any USB peripherals that you don’t need. This includes external hard drives, printers, game controllers, etc.

Solution 3 – Clean boot your PC

Next, you need to enable Clean Boot:

  1. Press Windows Key + R and type msconfig and press Enter to run it.
  2. Make sure that you select to disable all startup applications.
  3. Next go to Services and select hide all Microsoft services.hide all microsoft services
  4. After all Microsoft services have been hidden select Disable All.
  5. Click Apply then OK.
  6. Restart your computer.

Also remember to turn off your internet connection after all the necessary files have been downloaded. You  can do that simply by unplugging your Ethernet cable or by unplugging WiFi dongle or simply by pressing the WiFi switch on your router.

Solution 4 – Run the Update troubleshooter

If the problem persists, you can also run the update troubleshooter. This is a built-in tool that automatically scans your system update files and fixes all the detected issues.

windows update troubleshooter

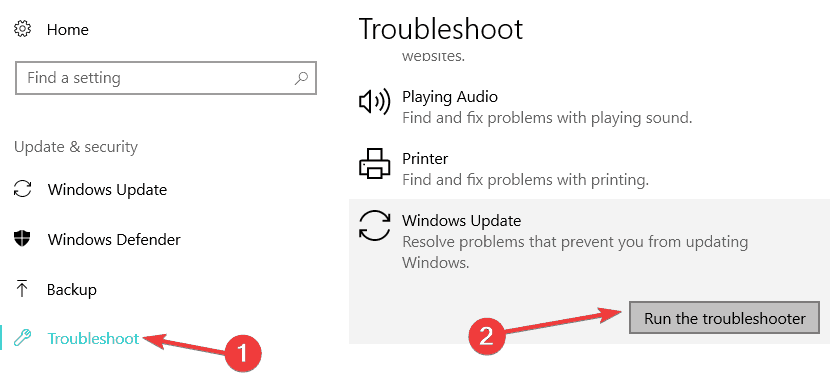
Go to Settings > Update & Security > Troubleshooter > run the Update troubleshooter.

Solution 5 – Disable your antivirus/firewall

Some users also confirmed that disabling their security tools helped them install the latest Windows 10 version. This means turning off your antivirus, firewall, malware and other security tools that you installed on your device.

Fix: Keyboard not working after Windows 10/11 rollback

Microsoft offers Windows 10 as a free upgrade for all Windows 8 and Windows 7 owners, but if you’re not pleased with Windows 10 you can easily roll back to the previous version of Windows. Several users reported that the keyboard isn’t working on their Windows after performing a rollback, so let’s see if we can fix that.

Keyboard not working after Windows 10 rollback

Keyboard issues can be a big problem, and speaking of these issues, here are some problems that users reported:

  • Windows 10 keyboard not typing letters – This can be an annoying problem, but you might be able to fix it by entering Safe Mode, so be sure to try that.
  • Keyboard and mouse not working Windows 10 – Sometimes both your keyboard and mouse won’t work properly and to fix this problem it’s advised to run the Hardware and Devices troubleshooter.
  • Keyboard not working windows 10 Dell, HP, ASUS, Acer, Toshiba laptop, desktop – This issue is usually caused by outdated drivers, so update them when you can and check if that helps.
  • Lenovo laptop keyboard not working Windows 10 – This issue occurs usually due to your keyboard driver, but you can fix the problem by reinstalling the problematic driver.

Solution 1 – Start Safe Mode

Users reported issues with the keyboard after rolling back from Windows 10, and if your keyboard isn’t working you might want to try starting Windows in Safe Mode. Safe Mode starts with default applications and drivers, therefore using Safe Mode can sometimes fix these types of errors.

To access Safe Mode, do the following:

  1. Open the Settings app by pressing Windows Key + I shortcut. Once the Settings app opens, navigate to the Update & Security section.
    Keyboard and mouse not working Windows 10
  2. Select Recovery from in the left pane. In the right pane, click the Restart now button.
    Lenovo laptop keyboard not working Windows 10
  3. Now choose Troubleshoot > Advanced options > Startup Settings. Click the Restart button.
  4. After your PC restarts, a list of options will appear. Press the appropriate keyboard key to choose the desired version of Safe Mode.

If your keyboard works without any problems in Safe Mode try starting Windows normally and check if the problem persists.

Solution 2 – Reinstall your keyboard driver

If your keyboard isn’t working after rollback from Windows 10, we suggest that you reinstall your keyboard driver. Reinstalling a certain driver is simple and you can do it by following these steps:

  1. Start Device Manager. Right-click the Start button and choose Device Manager from the list.
    Keyboard not working windows 10 Dell
  2. Locate the Keyboards section and expand it.
  3. Locate your keyboard, right click it and choose Uninstall from the menu.
    keyboard-windows-10-rollback-uninstall
  4. When the confirmation window appears click OK.
    keyboard-windows-10-rollback-confirm-uninstall

After the keyboard driver is removed you need to restart your computer. When your PC restarts the default keyboard driver will be installed and your keyboard should start working.

Solution 3 – Update your keyboard driver

According to users, sometimes your keyboard won’t work after Windows 10 rollback due to your drivers. Your keyboard drivers might be corrupted or out of date, so it’s advised to update them. You can do that by following these steps:

  1. Open Device Manager.
  2. Locate your keyboard, right-click it and choose Update driver.
    Keyboard and mouse not working Windows 10
  3. Now choose Search automatically for updated driver software.
    Windows 10 keyboard not typing letters

Windows will now try to find and download the best driver for your keyboard. This method doesn’t always work, but you can also try to manually update your keyboard drivers. To do that, just follow these steps:

  1. Open Device Manager, locate your keyboard and choose Update driver from the menu.
  2. This time choose Browse my computer for driver software.
    Lenovo laptop keyboard not working Windows 10
  3. Now select Let me pick from a list of available drivers on my computer.
    Windows 10 keyboard not typing letters
  4. Now you just have to select the driver that you want to use and check if that solves your problem.

Another way to update your drivers is to use third-party software that would allow you to update all your drivers automatically with just a couple of clicks.

Once your keyboard drivers are up to date, the issue should be resolved.

⇒ Get Fortect Driver Updater

Solution 4 – Copy the Driver folder from a working computer

Few users reported that they managed to fix this problem by copying driver folders from a working PC. Bear in mind that you need a working computer that uses the same operating system that are you currently using. For example, if you’re using the 32-bit version of Windows 7 be sure to copy these folders from another 32-bit Windows 7. To copy these files you need to do the following:

  1. Go to C:WindowsSystem32 folder and locate the drivers and DriverStore folders and Blue DRVSTORE file. If you can’t find the last file just copy the first two.
  2. Put those files on a USB flash drive and connect it to your PC.
  3. Paste those folders to C:WindowsSystem32 folder on your PC and overwrite the existing folders.

We have to mention that this procedure can lead to system instability, therefore it might be a good idea to back up your original drivers and DriverStore folders just in case. If some issues emerge, you might have to restore the original folders in order to fix it. If the keyboard still isn’t working or if you have any issues after copying folders from a different PC, you might have to reinstall Windows in order to fix these problems.

Solution 5 – Run Hardware and Devices troubleshooter

If your keyboard isn’t working, the problem might be a minor glitch on your system. Sometimes these glitches can occur, and the quickest way to deal with them is to run Hardware and Devices troubleshooter. To do that, just follow these steps:

  1. Open the Settings app and go to the Update & Security section.
  2. Pick Troubleshoot from the left pane. In the right pane, select Hardware and Devices and click Run the troubleshooter button.
    Windows 10 keyboard not typing letters
  3. Follow the instructions on the screen to complete the troubleshooting process.

After the troubleshooter process is finished, check if the problem is still there. This is a simple solution, but it might help you out with this problem, so feel free to try it out.

Solution 6 – Modify your registry

According to users, sometimes your keyboard might not work if there’s an issue with your registry. To fix this problem, it’s advised that you manually edit your registry by doing the following:

  1. Press Windows Key + R and enter regedit. Press Enter or click OK.
    Keyboard and mouse not working Windows 10
  2. When Registry Editor opens, head over to the following locations:
    ControlSet001ControlClass{4D36E96B-E325-11CE-BFC1-08002BE10318}
    ControlSet002ControlClass{4D36E96B-E325-11CE-BFC1-08002BE10318}
  3. For both of these keys you need to find and edit UpperFilters value. Simply change the value to kbdclass. If there are any other values inside UpperFilters, remove them and leave only kbdclass.In case UpperFilters value isn’t available, simply right-click the empty space in the right pane and choose New > Multi-String Value. Set the name to the UpperFilters and change accordingly.
    Keyboard not working windows 10 HP
  4. After making these changes, restart your PC and check if the problem is resolved.

We have to warn you that modifying the registry can be potentially dangerous, so we advise you to export both these keys before modifying them. If any issue occurs after modifying these keys, use the exported keys to restore the registry to its original state.

We know that this is a bit advanced solution, so if you’re not familiar with Registry Editor and you don’t know how to edit your registry, perhaps you should just skip this solution.

Solution 7 – Perform a System Restore

In case that the problem with the keyboard is still there, you might be able to solve it simply by performing a System Restore. In case you don’t know, System Restore is a useful feature that allows you to restore your system to an earlier date and fix many problems along the way. To do that, just follow these steps:

  1. Type system restore in the search field. Choose Create a restore point from the list.
    Lenovo laptop keyboard not working Windows 10
  2. When the System Properties window appears, click the System Restore button.
    Windows 10 keyboard not typing letters
  3. Click the Next button in the System Restore window to proceed.
    Keyboard and mouse not working Windows 10
  4. If available, check Show more restore points option. Now you just have to choose the desired restore point and click Next.
    Keyboard not working windows 10 ASUS
  5. Follow the instructions on the screen to finish the restoration process.

Once your PC is restored, your keyboard should start working again.

Rollback from Windows 10 can sometimes cause certain issues, but we hope that you managed to fix keyboard issues after using some of our solutions.

Windows Community Toolkit 5.0 released with new tools for developers

While Microsoft may be publically touting Progressive Web Apps as a viable alternative to the more traditional app development, the company is still heading its bets with UWP and .NET developers.

Senior Program Manager for the Windows Developer team, Nikola Metulev just announced that developers can now make use of Windows Community Toolkit v5.0 as soon as this week.

I’m excited to announce the next major update of the Windows Community Toolkit, version 5.0. This update introduces the new WindowsXamlHost control built on top of the new XAML Islands APIs to simplify adding built-in or custom UWP control to a WPF or Windows Forms desktop application. Alongside, this version introduces new WinForms and WPF controls that leverage the WindowsXamlHost interfaces to wrap UWP platform controls such as the InkCanvas and the MapControl.

Some of the standout features of today’s announcement also include an update to WindowsXamlHost, wrapped UWP controls for the WindowsXamlHost interface, a new TabView control,  support for Weibo publishing and Twitter and LinkedIn .NET framework support.

For anyone new to Windows Community Toolkit usage, Microsoft has built a sample app that will help walk developers through the new features and typical workflow of the service. To try out the Windows Community Toolkit Sample App or just read over the details of this weeks update, head here for more info.

How to really delete your Microsoft Edge browser history on Windows 10

If you’re looking to delete your browsing history in Microsoft Edge, there’s a way to get rid of everything: passwords, form information, and all the websites you have ever visited. Most of this information is stored on your Windows 10 PC only. However, if you use Cortana, some of your personal information is stored in the Microsoft cloud.

Microsoft provides a detailed list of what types of info you can delete in Edge, including what gets deleted, and where it’s stored. When you delete your Microsoft Edge browser history, all of the following items get deleted from your Windows 10 PC, with the exception of your browsing history, which you will also need to delete from the Microsoft cloud.

  1. Browsing history
  2. Cookies and saved website data
  3. Cached data and files
  4. Tabs I’ve set aside or recently closed
  5. Download history
  6. Autofill data (includes forms and cards)
  7. Passwords
  8. Media licenses
  9. Website permissions

Here’s the solution you need to delete all your browsing history in Microsoft Edge. Please note: you need to have an Edge browser window open to use the keyboard shortcuts.

1. Go to the menu in Microsoft Edge (Alt + X)
Microsoft, Windows 10, Edge, Microsoft Edge,

2. Go to History (CTRL + H)Microsoft, Windows 10, Edge, Microsoft Edge,
3. Go to Clear history.

Microsoft, Windows 10, Edge, Microsoft Edge,

4. Select all of the items you want to delete from your history. You can also select an option that will delete your browser history in Edge automatically every time you close your browser. Select Clear to clear all the selected items from your browser history in Edge.

Microsoft, Windows 10, Edge, Microsoft Edge, privacy

5. Now that your browser history is deleted from your Windows 10 PC, you have to delete your history from the Microsoft cloud. If you use Cortana and want to clear browsing history that’s stored in the cloud, select Change what Microsoft Edge knows about me in the cloud.

Microsoft, Windows 10, Edge, Microsoft Edge, privacy

From there, you will be taken to the Microsoft privacy dashboard. The privacy dashboard allows you to control your information and how it is used by Microsoft for all types of activities, including browser history, apps and services, voice, search, media, locations, and much more. There is quite a large amount of data that you can control and delete.

For this example, we just need to delete our Edge browser history. This is what you need to do.

1. Go to browsing history and select View and Clear Browsing History.
Microsoft, Windows 10, Edge, Microsoft Edge, privacy

2. Select Clear activity to delete your browsing history from the cloud.

Microsoft, Windows 10, Edge, Microsoft Edge, privacy

3. Microsoft will provide a prompt to notify you of the following:

  • Cortana will have a harder time helping you complete tasks and providing personalized suggestions.
  • Your experience with Microsoft products and services may be less relevant and personalized.
  • If you want to stop your browse history from being saved, you can always open an InPrivate window in Microsoft Edge.

If you are sure you want to clear your browsing history, select Clear.

Microsoft, Windows 10, Edge, Microsoft Edge, privacy

4. That’s it, you’re done. If you want to check if your browsing history is indeed gone, you can go back into your browsing history on the Microsoft privacy dashboard and you should see a screen like this:
Microsoft, Windows 10, Edge, Microsoft Edge, privacy

As mentioned before, the Microsoft privacy dashboard is a place where the Redmond tries to be as transparent as possible with what they do with your data. You can delete more data from other Microsoft services, including Cortana, Xbox, Office 365, Skype, and even LinkedIn.  You can also change other privacy settings, download your data, or change your advertisement settings. Take a look for yourself here

Microsoft Whiteboard to soon enable dark theme “blackboard” option

Microsoft Whiteboard, the company’s creative collaboration app available on Surface Hub, Windows 10, iOS and the web will soon get a dark theme option. Ian Mikutel, Senior Product Manager, Microsoft Whiteboard, Microsoft OneNote) announced the news on the dedicated UserVoice website today, saying that “more background options, including a dark ‘blackboard’ option” would be coming “soon.”

Adding a dark theme option to all Microsoft apps seems to be a real trend these days. File Explorer, Microsoft To-Do and Sticky Notes are three noteworthy examples on Windows 10, and we also learned earlier this week that Office for Mac was getting a dark theme option as well.

As the original piece of feedback highlighted on the Whiteboard’s suggestion portal, a “blackboard” mode really makes sense on the Surface Hub, a device sized like an authentic blackboard. However, more background options will definitely be welcome on all platforms where Microsoft Whiteboard is currently available.

Microsoft Whiteboard


‎Microsoft Whiteboard

Microsoft Edge is getting a Privacy Badger browser extension soon

Microsoft’s Edge browser has been derided for not having all of the functionally Google’s Chrome browser has built up over the past 10 years, despite being developed by the company who arguably won the browser wars back in the day.

However, it seems slowly but surely, Microsoft’s Edge browser is gaining support from third-party browser extension developers to help circumvent some of its latest criticisms.

The sought-after Privacy Badger web extension is making its way to the Edge browser soon, according to the developer’s GitHub announcement. (via MSPU)

Hi everyone, I have good news.
After further internal discussion, we’ve decided we can go ahead and publish in Microsoft Store. The next step should be putting together a pull request with fixes for Edge.
Thanks a lot for your support!

Perhaps, those “further internal discussions” had to do with Microsoft recently becoming the arbiter of one of the most trafficked open source communities to date, where much of Privacy Badger’s code resides.

However, the more likely story is that even with Edge’s modest user numbers, the audience was still attractive enough for Privacy Badger developers.

Adding Privacy Badger to the Microsoft Store gives its Edge browser another parity win with other popular modern browsers such as Google Chrome and Firefox.

As of now, Privacy Badger developers have not announced a release date, but I’m sure Microsoft marketing will be giving this popular, open source cookie blocker some love when the time comes.

Microsoft starts upgrading more users to Skype 8 after dropping support for classic app

After Microsoft dropped support for its Skype Classic app on the desktop yesterday, the company has started pushing more users to its new cross-platform client today. Peter Skillman, Director of Design for Skype and Outlook announced the expanded rollout this morning, highlighting some of the new Skype v8 features along the way. Fans of the old Windows app may need some time to adjust to the new desktop version, but it does come with several useful new features such as built-in Call Recording, access to third-party apps (Skype Add-ins) within conversations and more.

If you miss the more compact design of the Skype Classic app, Skillman also emphasized today that the Skype team is currently working on a “more compact mode” for Skype v8. Unfortunately, the new desktop app also doesn’t support Split View mode as of today, though Microsoft has recently brought it back in preview form in Skype for Windows 10. This separate client is just like Skype v8, but it ships with the Windows 10 October 2018 update and integrates with Windows 10 features like MyPeople or the native Share menu.

Microsoft is now almost done rolling out Skype v8 on all platforms, and the modern experience is also launched in preview on the web earlier this week. The company is still have some work to do to achieve complete feature parity with the Skype Classic app, but the Skype team is now iterating fast with the help of Skype Insiders.

FIX: Windows 10 Update Failed Error 80072EE2

If you still didn’t download your free copy of Windows 10 you definitely should do it now! I hope the download process will be smooth.

Just in case anything goes wrong, I’m going to show you the solution for one of the most common errors which appear while a new Windows 10 update is downloading. Let’s talk about error 80072EE2.

This is how you can solve error 0x80072ee2

Solution 1 – Run the Windows Update Troubleshooter

Probably the simplest solution for this problem is running the Windows Update Troubleshooter. But I’m not sure how effective it is, so if it doesn’t solve the problem, go and try some other solutions listed below.

Here’s how to run the Windows Update Troubleshooter:

  1. Go to Search, type troubleshoot and open Troubleshooter
  2. Click on Fix problems with Windows Update under System and Securitywindows update troubleshooter control panel
  3. Wait for the wizard to complete the check and see if the problem is resolved.

Solution 2 – Use a third party repair tool

In order to fix this Windows update error, you can perform automatic repair using a specialized repair tool capable to fix Windows issues.

By choosing this software, it’s possible to run deep scans and find the system files or components that generate this kind of issue. Once detected, it will fix the issue automatically and restore your PC.

This being said, you will get a detailed report of what issues you need to repair and fix the corrupted software files efficiently.

Solution 3 – Delete the Software Distribution folder

Probably the best solution and the solution that proved to be the most effective for the error 80072EE2 is deleting Software Distribution folder. So, here’s how to delete it safely:

  1. Go to C:WindowsSoftwareDistributionDownload folder and delete everything in itSoftwareDistribution
  2. Now right click on the Start Menu button and open Command Prompt (Admin)
  3. Enter the following command and press Enter: exe/updatenow
  4. Go to Windows Update and check if the problem is solved

Solution 4 – Manually reset Windows Update components

If none of the above solutions helped you to solve the error 80072EE2 problem, you can try to reset Windows Update components manually. You can find the instructions for that on Microsoft’s page.

But I have to tell you that it’s a complicated process, so if you’re not sure what you’re doing, you should ask someone else for help. Also, don’t download fixing tools from that page, because they work on Windows 7 and Windows 8 only.

Solution 5 – Reset System’s Proxy Server

If your Windows 10 computer was recently infected with spyware or any kind of viruses, you should know that if you were using third-party software to remove them, that software might have modified some settings in Internet Explorer to use a proxy server. Here’s how you can reset the setting:

  1.  Click on Start Button and type in the Search box “Command Prompt”
  2. Open Command Prompt and you need to type the following command “netsh winhttp import proxy source=ie”. (Without the quotes.)
  3.  Restart your Windows 10 computer for the changes to take effect.

Some users confirmed that this solution worked. Maybe it will work for you as well.

Solution 6 – Change MTU settings

If you don’t know what MTU stands for, you should know that the Internet’s Transmission Control Protocol (TCP) uses the MTU to determine the maximum size of each packet in any transmission.

Also, If in your Windows 10 computer the MTU setting is not correctly set up, this can cause the 80072EE2 error. The good news is that there are not many occasions when this error occurred because of an MTU incorrect setting.

Anyway, there is a simple way to correct this. Here’s how:

  1. Click on Start Button and type in the Search box “Command Prompt”
  2. Type in “netsh interface ipv4 show subinterface” and press Press Enter.
  3. Type in “netsh interface ipv4 set subinterface “Local Area Connection” mtu=1458 store=persistent”. You should replace Local Area Connection with the name that appeared in the “Interface” column from steps 2-3 and press Enter key.
  4. Restart your computer and then test again.

That would be all, I hope at least one of these solutions helped you to solve the error 80072EE2.

If you have any other Windows 10-related issues you can check for the solution in our Windows 10 Fix section.

Skype focuses on accessibility with latest version 8.0 updates

Microsoft has released another round of updates for their new Skype v8 app for desktop devices including Windows and Mac systems. The company says it has made the new changes to improve the app’s accessibility features. Here’s the full list.

  • Focus assist, which announces when you receive an incoming call for keyboard only and screen reader users.
  • Screen reader announcements from users in the active call list.
  • Navigational focus announcements within the contact list and settings to improve flow.
  • Announcing the name, content, and actions of a pop up dialog.
  • New message announcements when users are in another chat.
  • Smoother navigation that takes a more natural left-to-right and top-to-bottom path.
  • Displaying additional information when sending and receiving messages. For example, Skype now announces when messages are sent and when messages you attempt to send have failed.

Microsoft has also created an accessibility guide to help people move from the classic Skype over to the new version. The company officially ends support for the classic app as of today, and legacy mobile version will be discontinued shortly after.

Are you enjoying the new Skype experience, and do you think these improvements will make Skype better? Let us know in the comment section below.

Xbox One exclusive Sunset Overdrive could soon be released on Windows

Sunset Overdrive, the open-world third-person shooter that launched exclusively on the Xbox One back in 2014 could soon make its way to Windows PCs. A Windows version of the game has recently been rated by the ESRB, and Windows Central is reporting today that the PC release is “near.”

While Microsoft or developer Insomniac Games have yet to confirm the PC port, an official announcement could be coming at Microsoft’s XO18 event on November 10. With its post-apocalyptic setting, unique art style and fun gunplay, Sunset Overdrive received some quite praise at the time of its Xbox One debut, and the Xbox One exclusivity almost seemed like a missed opportunity. It would be pretty great to see the game support Xbox Play Anywhere and cross-platform play between Xbox One and Windows 10, but a release on Steam would be even better.

Sunset Overdrive is currently free-to-play on Xbox One with Xbox Game Pass, and Microsoft previously gave it away with its Games with Gold program back in April 2016. This is really game that deserves to come back to the spotlight, especially after we’ve seen several Microsoft Studios games including ReCore and Super Lucky’s Tale being re-released on Steam.

Microsoft 365 recaps October advances: here’s what’s new

Microsoft has once again recapped  new features for the applications that come with their Office 365 subscription service, this time for October. The new updates mostly focus on improving productivity for tablets with styluses as well improving migration of data from Personal/Home to Business subscribers.

Perhaps the most interesting of changes is that Microsoft is allowing inked text and diagrams to be converted to printed text and boxes in Word and PowerPoint, which the company says leverages AI and language processing in the cloud. This is potentially a great way to improve productivity on tablets like the new Surface Pro 6, as typing and managing shapes and tables can be rather tedious on a touchscreen. Additionally, users can also make grammatical corrections and proofreading revisions with just their stylus by drawing the indicators on the document, which will be automatically corrected by the application.

An animated screenshot shows text in a Word document edited with a digital pen. The Ink Editor deletes a paragraph, inserts an ommitted word, and bolds a numerical figure.
Microsoft is improving proofreading on tablets though its inking tools.

Microsoft is also adding many other features to its Office apps. For example, users will be able to insert 3D animations into Word and PowerPoint documents to help create a better understanding when ideas seem to complex for static images. Additionally, those Word documents will also be easily converted into temporary web pages should the user wish to share the information in that way. While announced in October, animations will become available in November.

An animated screenshot showing an embedded animation of a hummingbird in PowerPoint.
3D animation will soon be inserted into Word documents and PowerPoint presentations.

The company is also making it easier for users to transition their data into the cloud with their new SharePoint Migration Tool, which will allow customers to migrate their personal SharePoint and OneDrive data over to SharePoint Online, OneDrive for business, and Microsoft Teams. And should the task prove more difficult than it sounds, Microsoft has a new help and support pane in the Office.com portal which can be accessed though a web browser.

Microsoft is allowing subscribers to try own the stylus proofreading and the drawings-to-diagrams features today, while most of the rest of the new features will roll out over the next few months.

Do you think these new features will improve productivity, especially on tablets like the Surface Pro 6? Please let us know what you think in the comment section below.

Latest Windows 10 19H1 Insider update 18272 breaks WSL, to be fixed next week

One of Microsoft’s most beloved additions to Windows 10, well at least it gets a lot of developer love, is WSL, or Windows Subsystem for Linux. With it, developers and administrators can get to a Linux command line directly from Windows without having to run a VM or a dedicated Windows box, and with half of all VMs on Azure running Linux, it’s a useful and necessary tool. However, with this week’s latest Windows 10 Insider build, 18272, WSL is broken:

A developer for WSL, Ben Hillis, and a program manager, Tara Raj, both confirmed on Twitter that the feature is broken in this build. At least we have a pretty good indication that there will be a new build next week, as according to the two it will contain a fix for the problem, so the issue, while annoying for some, will not (hopefully) be long lived.

If you have installed 18272 and are missing WSL, you can either roll back or wait a week for the next build, and if you haven’t yet installed 18272, you might want to wait.

We’ll have more on all the latest Insider build news as it happens, including the re-appearance of the Windows 10 October November 2018 Update, so be sure to keep coming back to OnMSFT.com!

Quick hands-on with Microsoft’s new Surface headphones

Microsoft’s Surface headphones are the latest addition to the growing family of Surface accessories, and I got the chance to go hands-on with them today at the company’s Future Decoded event in London. The Surface headphones were announced by Surface chief Panos Panay during last month’s Surface event in New York, and they feature the same premium design and attention to detail that you can find on other Surface devices.

During my quick hands-on, I found that the Surface headphones felt really comfortable, with their soft ear cups adjusting perfectly around my ears. The headphones also felt lighter than what I excepted (they weigh 0.64 lbs), and I could totally imagine wearing them for a long period of time without any discomfort.

The Surface headphones come with touch controls on the right cup: you can play, pause and change tracks by tapping the on-ear sensor, and it worked fine during my testing. To change volume, you just turn the dial on the right ear, and I found that the music sounded crisp even when turning volume up to the max. The headphones feature 40 mm Free Edge drivers and deliver what Microsoft calls “Omnisonic audio.” I’m not really a headphones expert, but I think the Surface headphones should please most music fans with their balanced, not too bass-heavy sound.

The Surface headphones have touch controls on the right cup, and you use the dial on the right ear to adjust volume.

I tried the Surface headphones in a very noisy environment, which was perfect for testing the Microsoft’s noise-cancelling technology. There are 13 different levels of noise cancellation on the headphones, and you can adjust them by using the dial on the left ear. This was actually my very first time trying noise-cancelling headphones, and I was quite impressed by the technology. I could still hear some background noise even after turning noise cancellation up to the max, but this is really something nice to have in a noisy environment like the one I was in.

The Surface headphones also integrate Cortana, but the digital assistant wasn’t enabled on the pre-production unit I tested. Microsoft says that Cortana will allow you to launch any music you want, start calls, set reminders, or even search the web. I’m not sure if this could be the headphones’ killer feature, but this sounds definitely nice to have.

The headphones use an USB-C port for charging, and there’s also a 3.5mm audio jack.

According to Microsoft, the Surface headphones should deliver up to 15 hours of battery life when connected via Bluetooth with active noise cancellation on, and they can be fully charged in less than 2 hours. The headphones use a USB-C port for charging, but they also come with a 3.5 mm audio connector if you want to continue using them after the battery drains. In addition to an USB cable for charging and audio cable, the headphones also come with their own carrying case, which looks pretty good.
The Surface headphones will be priced at $349.99 in the US, and they will start shipping on November 19 (pre-orders start on Nov 15). They should also be available in the UK before the end of the year, but there’s still no ETA or pricing details. Because of Cortana is still only available in select markets around the world, it’s still not clear if we can expect an expansion to other markets next year. That’s too bad, because they definitely seem to be the perfect audio accessory for Surface and Microsoft fans.

Microsoft has a hit on its hands with Xbox Game Pass, and analysts are starting to notice

Back in 2013 when Microsoft unveiled its Xbox One and the promise of an always connected and primarily digital gaming experience, the company was roundly mocked and panned for its seemingly overreaching ambitions.

At the time Microsoft proposed its online gaming distribution platform, companies such as Gamestop and other ambitious 3rd party studios looking to make a similar play denounced the company’s pitch.

Fast forward a few years, a couple of fundamental user-focused business strategies and advancements in the company’s cloud infrastructure and Microsoft seems to be revisiting a reality in which the Xbox platform evolves into a more digital gaming experience to a much more receptive audience.

While Microsoft’s Xbox Game Pass isn’t quite the cloud-based initiative proposed during the Xbox One unveiling, or like Sony’s actual cloud-based solution with PS Now, its implementation does offer Microsoft a platform expansion that should worry competitors.

The launch of Xbox Game Pass has been a relative success for the company as Microsoft chalked up a 44% growth in its gaming revenues annually. The growth of the Xbox division helped add an additional 9% or $2.74 billion to the company’s bottom line, making it the third fastest growing sector in Microsoft’s portfolio.

Microsoft’s Xbox One hardware hasn’t been flying off the shelves in any noticeable way as of late thus isolating the gains in Xbox revenue to software related initiatives such as an increase in Xbox Live and Game Pass subscribers.

What this means is, that Microsoft isn’t going to be walking away from Xbox Game Pass anytime soon, and in fact, is already strategizing ways to expand the ecosystem.

Xbox Game Pass

Over the past year, Microsoft has continued to blur the line between where it wants its gamers to enjoy their gaming experiences as it pitches both Windows PCs and Xbox’s as destinations. Microsoft’s gaming obfuscation can be viewed as a shrewd business strategy that’s leveraging its presence in both PC and console ecosystems, but the reality is that on-demand entertainment services are a trend that is crossing over into the casual gaming experience.

According to a report from the Motley Fool that uses a Newzoo survey to canvass the number of subscription gamers that exist today the data shows an increase in EA Access and Xbox Game Pass subscribers. EA Access garners 15% of family gamers subscriptions while Game Pass is a close second with 14%.

While Microsoft undoubtedly plans to use its upcoming Project xCloud platform to further entrench itself in digital and cloud gaming platforms, EA is looking to launch stave off the competition with its recently reported cloud service for Origin Acess.

Electronic Arts is also reportedly developing a new cloud service for Origin Access. That integration would allow subscribers to choose between downloading or streaming games, allow EA to expand the Origin Access ecosystem to tablets and smartphones, and possibly merge the two Access platforms on the Xbox One.

As both Microsoft and EA continue their strategic business tango with one another, companies such as Valve are left in the middle to fret about Microsoft or EA pulling their games from Steam to prioritize their very similar distribution platforms.

Whatever the outcome, investors are finally beginning to perk up at the potential of Microsoft’s digital gaming ecosystem as well as competitors taking notice of pervasive expansion happening within the confines of Microsoft’s Xbox platform.

Norton Antivirus doesn’t work in Windows 10/11 Insider builds

Having an antivirus software on your Windows 10 is quite important. However, it seems that Norton antivirus has a strange conflict with Windows 10. If you are a Norton user and you have issues with it on Windows 10 you might want to have a look at our solutions.

According to users that have Norton Security installed on Windows 10 they are unable to receive Insider updates. As you can see, this is a huge problem because it can leave your system vulnerable and at the same time, you won’t be able to try new features that Microsoft is planning to introduce.

Speaking of issues, Norton Security has already caused some issues with Windows 10 users, such as preventing them from upgrading to Windows 10 in the first place. This is probably due to some compatibility issues that Norton Security has with Windows 10, but is there a way to fix this?

Norton Internet Security isn’t compatible with Windows 10

At the moment Norton isn’t working with the Insider program, so you won’t be able to download Insider updates while having Norton Security installed.

The only solution so far is to completely remove Norton Security from your Windows 10. On the other hand, Norton works well with non-Insider version, so if you want to continue using Windows 10 with Norton Security just leave the Insider program.

If you want to continue being part of Insider program, then you’ll have to uninstall Norton Security and switch to a different antivirus program. Users suggest using Windows Defender in a combination with MalwareBytes, but if you want more protection you can switch to antivirus software such as ESET HOME Security Essential that works with Insider program.

As you can see, this can be quite a problem. Fortunately, it can be resolved by uninstalling Norton Security and switching to a different antivirus software. For example, you can rely on Windows Defender instead.

Avoid using third-party antivirus solutions on Windows 10 Insiders builds

As a quick reminder, antivirus solutions closely work with Windows 10 and requite in-depth access to the heart of the OS.

Antivirus developers simply cannot keep up with the rhythm Microsoft rolls out new Insider builds. Therefore, they cannot test their products in relation with Microsoft’s latest Windows 10 Insider build version.

For this reason, new Insider builds tend to break your antivirus leaving your computer vulnerable to threats. Again, the best approach is to use Windows Defender while you’re enrolled in the Insider Program.

RELATED POSTS TO CHECK OUT:

How to Fix Lenovo E420 Touchpad Issues on Windows 10/11

Often people are having issues with their touchpads, so it’s not uncommon to see Lenovo E420 touchpad issues on Windows 10. If you’re having issues with your Lenovo Thinkpad E420 laptop, you might want to have a look at our solutions.

How do I fix my touchpad on my Lenovo E420 laptop Windows 10?

Below are some troubleshooting steps to try before moving to the sophisticated solutions in this section:

  • Unplug other USB devices which may be interfering with your touchpad.
  • Change Power Management options and test different options to see which one works for you.
  • Run the SFC scan in elevated Command Prompt.

1. Update your OS and touchpad drivers

Before we start, we strongly advise you that you keep your Windows 10 up to date in order to eliminate any compatibility issues.

At the same time, make sure that you download touchpad driver for Lenovo laptop. If there are Windows 10 drivers available, make sure that you download them.

If Lenovo hasn’t released Windows 10 drivers, just download the latest ones. If this doesn’t resolve your touchpad issues, you might want to try something else.

2. Run SynTPEhn.exe and SynTPHelper.exe in Compatibility mode for Windows 7

  1. Go to the Synaptics folder located in Program Files.
  2. Find SynTPEhn.exe and SynTPHelper.exe files in that folder. You’ll need to repeat the following steps for both files.
  3. Right-click SynTPEhn.exe or SynTPHelper.exe and choose Properties from the menu.
  4. Go to the Compatibility tab.
  5. Check Run this program in compatibility mode for and choose Windows 7 from the list.
    Run this program in Compatibility mode
  6. Click OK and then Apply to save the changes.
  7. Now repeat the process for the other file as well.
  8. Restart your computer and check if the issue is resolved.

3. Run the Hardware & Devices troubleshooter

  1. Press the Windows key, type cmd, and select Run as administrator under Command Prompt.
  2. Type the command below and hit Enter to run it: msdt.exe -id DeviceDiagnostic
    msdt
  3. Finally, wait for the command to finish running.

As you can see, Lenovo E420 touchpad issues can cause a lot of problems. We hope that our solutions proved helpful.

Similarly, if your Lenovo IdeaPad touchpad is not working, too, check our detailed solutions to fix it.

Feel free to let us know the solution that helped you fix this issue in the comments below.

How to automatically launch an app when you login to Windows 10

Do you always open a particular program as soon as Windows has started up? Perhaps it’s your web browser or favourite email app. If so, you could save yourself a few clicks by getting Windows to open it for you automatically each time you login.

Windows always starts several programs by itself once you get to the desktop – you’ve probably seen your system tray fill up with icons from apps such as OneDrive and your antivirus software. Typically, these programs start in the background and are hidden by default, so you don’t see any windows open on your desktop. However, you can use the same mechanism to open apps of your choice.

Screenshot of creating a desktop shortcut

This is a really simple process but you need to know where to look first. To begin, you’ll need a shortcut to the app you want to open. The easiest way to do this is to copy an existing desktop shortcut. If you already have a shortcut to the app on your desktop, just click the icon and hit Ctrl+C to copy it to the clipboard. Otherwise, you can create a new shortcut by opening the Start menu, finding the app and clicking and dragging it across to the desktop.

To make apps open automatically, you can just add your shortcut to a special Windows folder. Windows automatically launches all the shortcuts in the folder when it starts, so all you need to do is copy and paste your shortcut in. Because the folder is in a system location, the hardest part is finding it.

Windows 10 Startup programs folder

Open File Explorer (you can press Win+E from anywhere in Windows) and click in the address bar at the top of the screen. Delete its contents, type “%appdata%” (without the quotes) and press enter. Depending on the apps you have installed, this folder may contain a lot of different subfolders – take care not to modify or delete anything here.

Find the “Microsoft” subfolder and navigate into it. From here, drill down through the directories into Windows > Start Menu > Programs > Start-up. Once you’ve arrived at this location, you can just copy and paste your app shortcut into the folder. Next time you login to Windows, the app will get started automatically.

Windows 10 Startup programs folder

If in the future you want to stop the app from automatically starting, you can just head back to the folder and delete its shortcut. Alternatively, you can also open Task Manager (hit Ctrl+Shift+Esc to launch it quickly) and visit the “Start-up” tab. Here, you should see entries for all the Start-up folder shortcuts you’ve added. Click the app you want to remove and then press the “Disable” button at the bottom of the window.

Task Manager Start-up page

Using this method means you can return to Task Manager to re-enable the app in the future. You won’t need to touch your shortcut again. Task Manager also displays apps which register themselves as start-up apps using internal Windows APIs, instead of the Start-up Start menu folder.

Start-up apps page in Windows 10 Settings app

In addition, newer versions of Windows 10 have a “Start-up” page within the “Apps” category in the Settings app. This replicates the functionality available in Task Manager, displaying simple on-off toggle buttons for each of your start-up apps.

One point to note is that this tutorial assumes you only want the app to open when you login. The app will not start for other user accounts on your PC. If you would like an app to open for every user, repeat the process above but substitute “%appdata%” with “%programdata%” in the instructions. You will need to be logged in as an administrator to save to this location.

Having applications launch automatically can make the start of your day just a little bit easier. As soon as your PC boots up, you’ll have your most-used apps ready and waiting on your desktop. Just remember that having a lot of start-up applications could significantly reduce system performance as they all load up.

FIX: Security settings need attention Windows 10/11 error

There’s a new Windows 10 Redstone build available for Windows 10 Insiders almost very week. However, it seems that some of them are having trouble downloading it.

Namely, some users reported on Microsoft Community forums that when they try to run Windows Update and download the latest Windows 10 Preview build, a strange error message saying “Your security settings need attention to get Insider Preview Builds” appears.

This error left a lot of users confused, because it didn’t appear in previous Windows 10 Preview builds. The prompt suggested a restart of the computer to get rid of this error, but even after the restart, nothing changed.

Microsoft remained silent about this issue, but luckily for all those who are encountering this problem, users managed to find a solution by themselves.

How to fix Your security settings need attention error?

1. Tweak your Registry

To get rid of this error message, and be able to download the latest Windows 10 Preview build, you need to perform one registry tweak. Here’s exactly what you need to do:

  1. Go to Settings, Update & Security, Windows Update, and then to Advanced Options
  2. Select Stop Insider Preview Builds
  3. Restart your computer
  4. When the computer starts again, open Registry Editor (go to Search, type regedit, and press Enter)
  5. Navigate to the following key:
    • HKEY_Current_UserSoftwareMicrosoftWindowsSelfHostApplicability
  6. Delete Error State, PilotInfoRing, and LastHR entriesYour security settings need attention to get Insider Preview Builds Error in Windows 10 Insider Preview
  1. Exit Registry Editor, and reboot your PC once again
  2. Now, go to Settings > Update & Security > Windows Update > Advanced Options again
  3. Choose Enable Insider Builds
  4. Enter your Microsoft Account info again, and follow on-screen instructions

After performing this registry tweak, you should be able to download the latest Windows 10 Preview build normally.

But we have to note that it may take up to 24 hours until you receive a new build, due to some technical reasons. So maybe you’ll have to wait a little, but you’ll get the latest build eventually.


2. Change EnablePreviewBuilds DWORD value

The second fix involves making a few minor tweaks in your registry. Namely, you need to locate the ‘EnablePreviewBuilds’ key and change its value to 1. But first, don’t forget to backup your registry and create a restore point just in case anything goes wrong. This is how you can do that:

  1. Launch the Registry Editor and locate this key:
    • HKEY_LOCAL_MACHINESOFTWAREMicrosoftWindowsSelfHostApplicability
  2. Now locate the EnablePreviewBuilds key > double-click it
  3. Go to Value data and change it to 1 > save the changes
  4. Now, open the Settings app > go to Update & Security
  5. Go to the Advanced options.
    Your security settings need attention to get Insider preview builds
  6. Hit the Fix me button > sign-in with your Microsoft account and follow the on-screen instructions.

3. Leave the Insider program

Some Insiders confirmed that leaving the program and changing their password helped them fix the problem. Once you’ve done that, simply restart your computer and enroll in the Insider Program once again. Check for updates to see if you can download the latest build.

We hope these solutions worked for you.

RELATED POSTS TO CHECK OUT: