Editing a DLL (Dynamic Link Library) file can be complex and should be done with caution, as it can affect the functionality of the software that relies on it. If you still, by any chance, you change its contents, make sure to create a copy and keep it safely.
How do I edit a DLL file?
1. Download a Hex editor
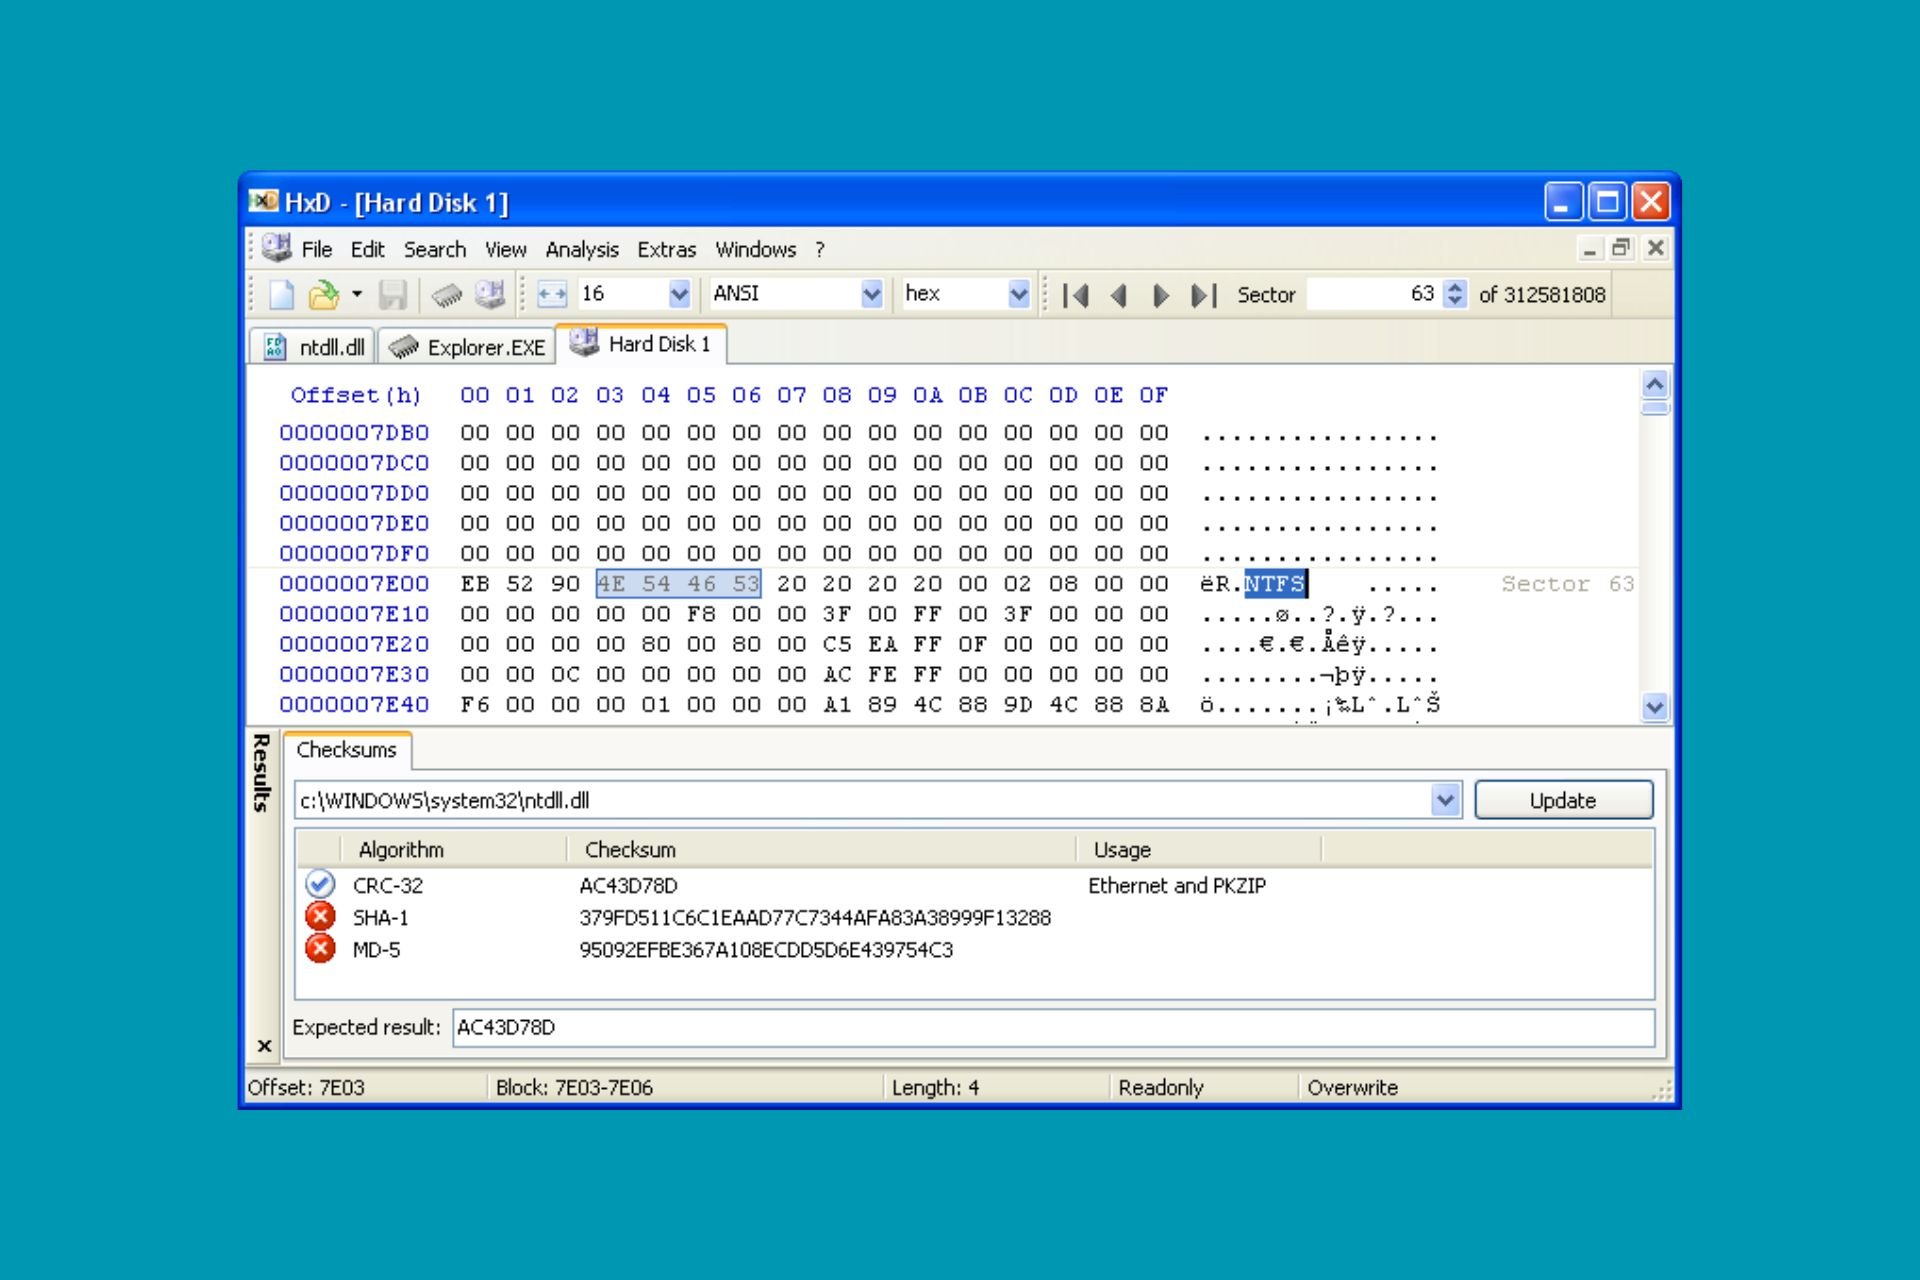
A hex editor allows you to view and edit the binary data of a DLL file. Some popular hex editors include HxD and Hex Workshop.
Download and install the hex editor of your choice.
2. Open the DLL File in the Hex Editor
DLL files are usually found in the C:\Windows\System32 directory or within the installation folder of the software that uses the DLL.
Make sure you have administrative privileges to access and modify these files.
Launch the hex editor.
Open the DLL file you want to edit by navigating to File > Open and selecting the DLL file.
Use the hex editor to make the necessary changes. Be cautious and only modify the parts you understand.
Editing DLL files typically involves changing values or strings within the file.
After making the necessary edits, save the changes by selecting File > Save or Save As to create a new version of the DLL file.
Replace the original DLL file with the edited version.
Test the software that uses the DLL to ensure it functions correctly with the modified file.
How do I edit a DLL using Visual Studio?
If you need to edit the code within a DLL file, you might need to use a decompiler to extract the code first. Here’s how you can do it with Visual Studio:
Launch Visual Studio and create a new project or open an existing one.
Use a decompiler like dotPeek or ILSpy to decompile the DLL file and extract the source code.
Once you have the source code, you can edit it within Visual Studio.
Make the necessary changes to the code.
After editing the code, recompile it to create a new DLL file.
Replace the original DLL with the newly compiled one.
Editing DLL files can be risky and should only be done if you are confident in your understanding of the changes you are making. If you need more detailed instructions or run into issues, feel free to ask!
The ERROR_NOT_LOCKED Windows system error appears when a process tries unlocking an already unlocked segment of the memory. The error code is 158 (0x9E), and the message reads, The segment is already unlocked.
The 158 (0x9E) system error is caused by incompatible applications, malware infection, corrupted system files, misconfigured Registry settings, or malfunctioning RAM.
Before you proceed to the solutions, restart the PC, update the affected app, and install all pending Windows updates. For most of you, this alone will fix the 158 (0x9E) The segment is already unlocked error!
How do I fix ERROR_NOT_LOCKED system error?
1. Repair the corrupt system files
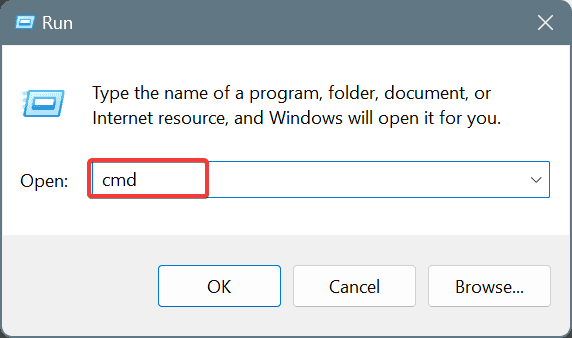
Press Windows + R to open Run, type cmd, and hit Ctrl + Shift + Enter.
Click Yes in the UAC prompt.
Paste the following DISM commands one at a time and hit Enter after each: DISM /Online /Cleanup-Image /CheckHealthDISM /Online /Cleanup-Image /ScanHealthDISM /Online /Cleanup-Image /RestoreHealth
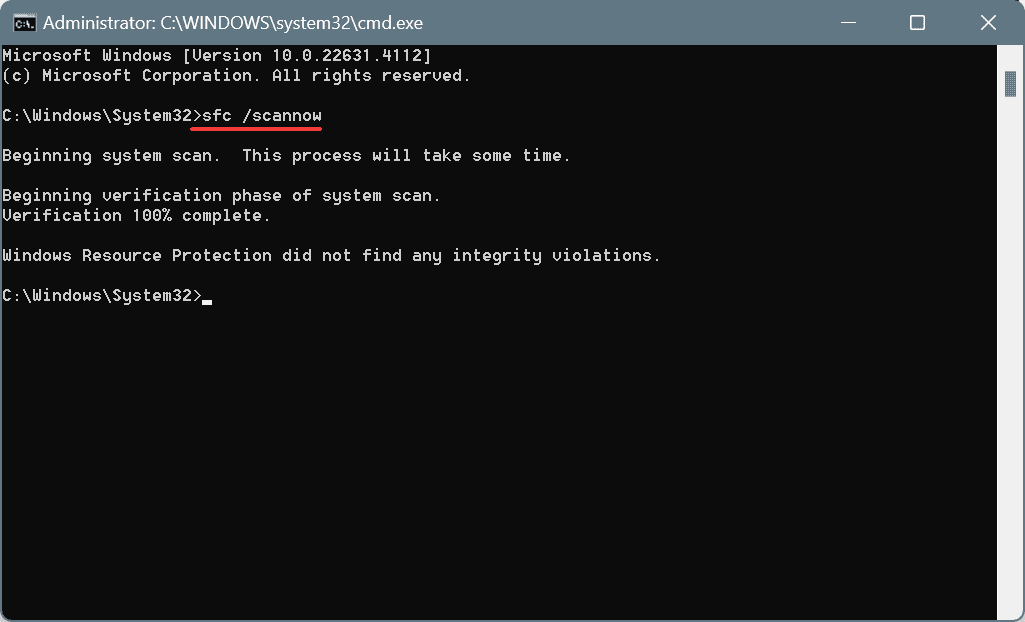
Now, execute this command to run the SFC scan: sfc /scannow
Finally, reboot the PC and check for improvements.
When Windows Memory Diagnostic can’t find any issues, I recommend using MemTest86+, an open-source RAM testing tool, to run a wide array of advanced scans on individual modules and detect even the smallest of problems.
If any of the RAM sticks are indeed malfunctioning, it’s best that you replace them with a new one, and this will fix ERROR_NOT_LOCKED in Windows.
4. Uninstall conflicting applications
Press Windows + R to open Run, type appwiz.cpl in the text field, and hit Enter.
Individually select any apps that were downloaded or updated around the same time the system error first appeared, and click on Uninstall.
Follow the on-screen instructions to complete the process.
Once done, restart the computer and check for improvements.
If a quick removal doesn’t fix the ERROR_NOT_LOCKED158 (0x9E) Windows system error, it’s best to use a top-rated software uninstaller to clear any leftover files, app cache, and Registry entries that might still be conflicting with the OS.
5. Perform a system restore
Press Windows + S to open Search, type Create a restore point, and click on the relevant result.
Click the System Restore button.
Select the Choose a different restore point option, and click on Next.
Pick the oldest restore point from the list and click Next.
Verify the restore details, click on Finish to start the process, and confirm the change.
Wait for the system restore to complete. It typically takes 10-30 minutes.
A system restore will revert all recent changes on the PC, taking it to a point of stability. Remember, it’s critical to choose a restore point created before ERROR_NOT_LOCKED first appeared.
And if this, too, fails, the last option is to reinstall Windows. Make sure to move critical files to external storage before you proceed with a reinstall in order to avoid data loss.
If the Firefox Incognito shortcut is not working on your PC, you’ll need to use your mouse to access it, and this can be inconvenient for some users. However, there is a way to fix this problem.
What can I do if the Firefox Incognito shortcut is not working?
Before trying anything else, ensure that Firefox is up to date.
1. Ensure that permanent private browsing isn’t enabled
Click the Menu icon and then choose Settings.
Next, select Privacy & Security in the left pane.
Lastly, ensure that Always use private browsing mode is unchecked.
Check if the problem is gone. If it is, you might have to prevent this application from starting with your PC. Or if you don’t use it, you can uninstall it.
If you want to continue using the app, you’ll need to modify its shortcuts by doing the following:
Open Razer Cortex settings.
Locate the Shortcuts section.
Change the Timer shortcut to something else.
3. Use the right Shift
Open Firefox.
Use right Shift + Ctrl + P.
The Private browsing window should now open.
This is just a workaround, but it works for many users, so feel free to try it if nothing else works.
How do I force Firefox to use private browsing?
This can be done by following the steps from Solution 1 and enabling Always use private browsing mode checkbox.
If Firefox Incognito is not working, it’s likely that your Firefox is outdated, or you might be having a software conflict, so you need to check which other apps use this shortcut and disable them.
The FATAL_ABNORMAL_RESET_ERROR blue screen generally occurs after an unexpected system reset and is caused by outdated drivers, corrupted system files, malfunctioning hardware, or buggy Windows updates.
Before you proceed to the solutions, install all pending Windows updates, disconnect non-critical peripherals, and disable overclocking, if any was applied previously.
How can I fix FATAL_ABNORMAL_RESET_ERROR?
Tip
If the PC doesn’t turn on due to the BSOD, boot Windows into Safe Mode and then apply the solutions listed below.
1. Repair the corrupt system files
Press Windows + R to open Run, type cmd, and hit Ctrl + Shift + Enter.
Click Yes in the UAC prompt.
Paste the following DISM commands individually and hit Enter after each: DISM /Online /Cleanup-Image /CheckHealthDISM /Online /Cleanup-Image /ScanHealthDISM /Online /Cleanup-Image /RestoreHealth
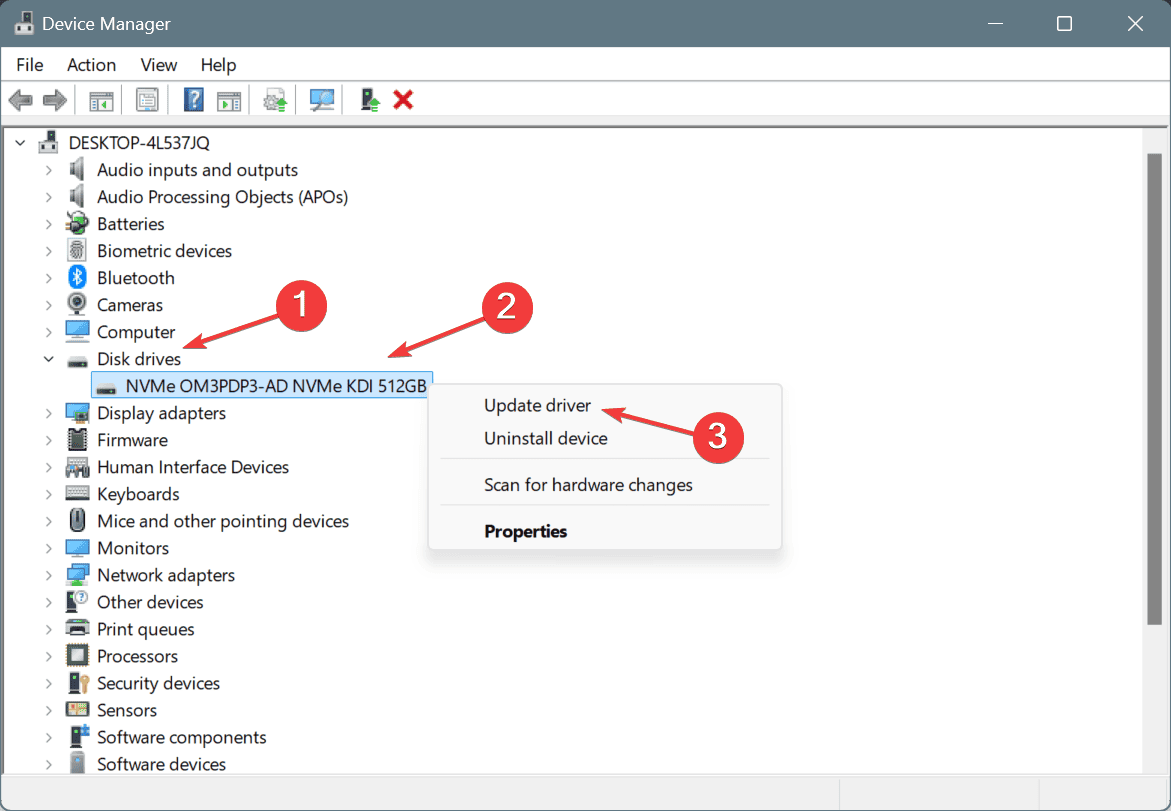
Press Windows + X to open the Power User menu, and select Device Manager.
Expand the entries here individually, right-click on the devices listed underneath, and select Update driver.
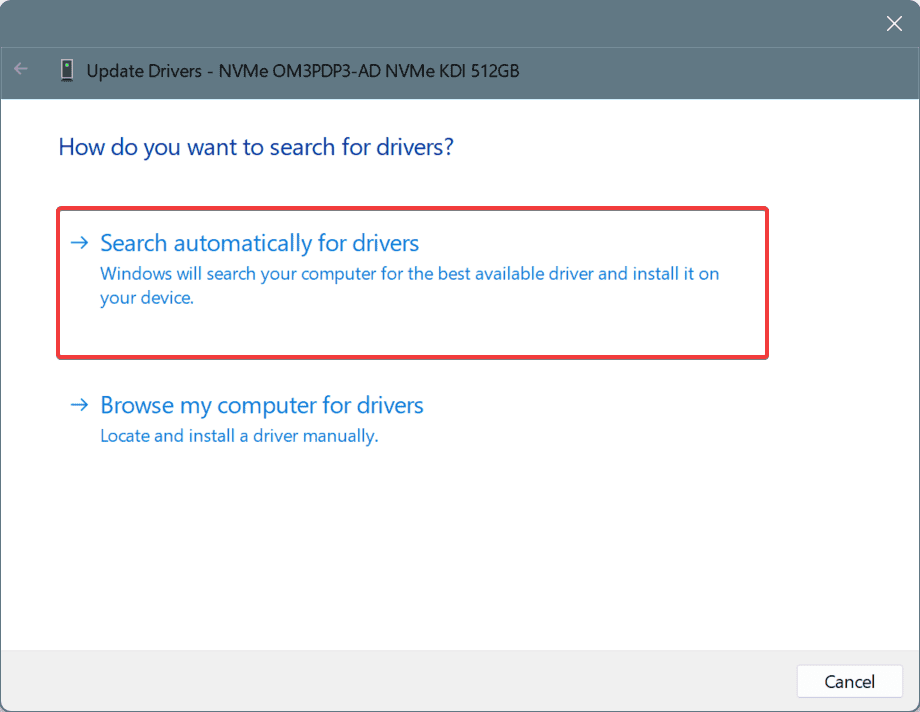
Click on Search automatically for drivers and wait for Windows to install the best locally available version.
Similarly, update all the other drivers and then restart the PC.
In 2 out of 5 cases, updating the drivers helped fix the FATAL_ABNORMAL_RESET_ERROR blue screen in Windows. If the OS can’t detect a better version, go to the manufacturer’s website, find out the new releases, and then manually install the latest driver!
3. Check for issues with RAM and Disk
3.1 Run Check Disk
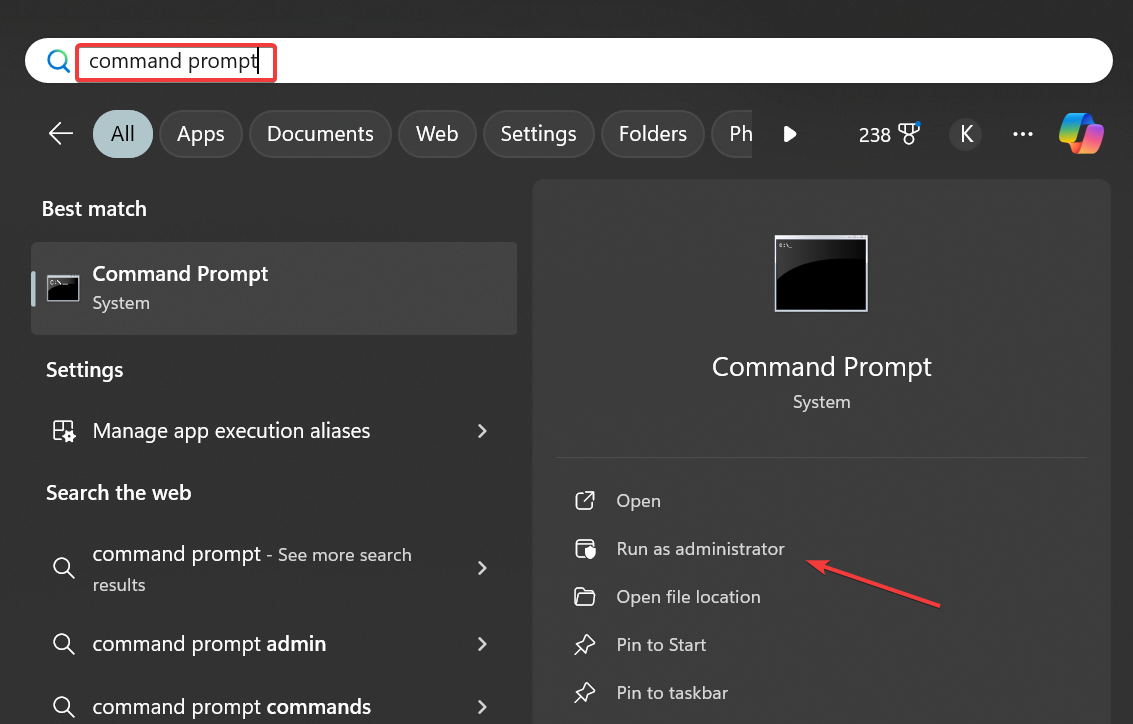
Press Windows + S to open Run, type Command Prompt, and click on Run as administrator.
Click Yes in the UAC prompt.
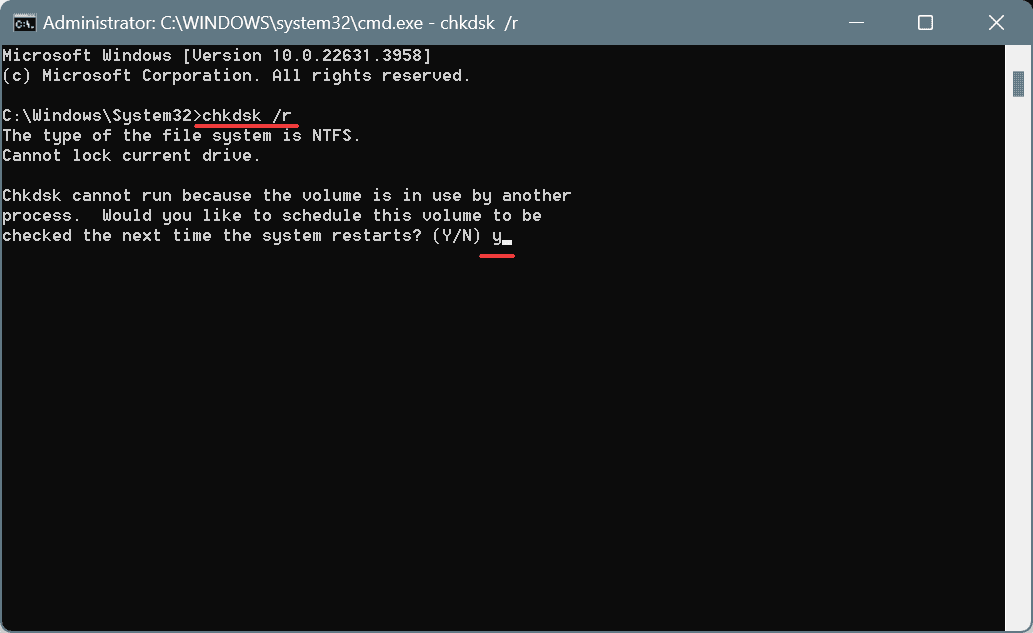
Paste the following Check Disk command and hit Enter: chkdsk /r
If asked to schedule the scan when you next restart the PC, press Y, hit Enter, and then reboot the computer.
The Check Disk utility, when run, will check for issues with the hard drive, including bad sectors, and repair them along the way, preventing further occurrences of FATAL_ABNORMAL_RESET_ERROR.
3.2 Run Windows Memory Diagnostic
Press Windows + S to open Search, type Windows Memory Diagnostic, and click on the relevant result.
If Windows Memory Diagnostic can’t detect any problems, you should use MemTest86+, an advanced memory testing tool that will run a series of scans on individual RAM sticks and find out all the issues.
In case any problems are found, replace the malfunctioning RAM stick with a new one!
4. Uninstall recent Windows updates
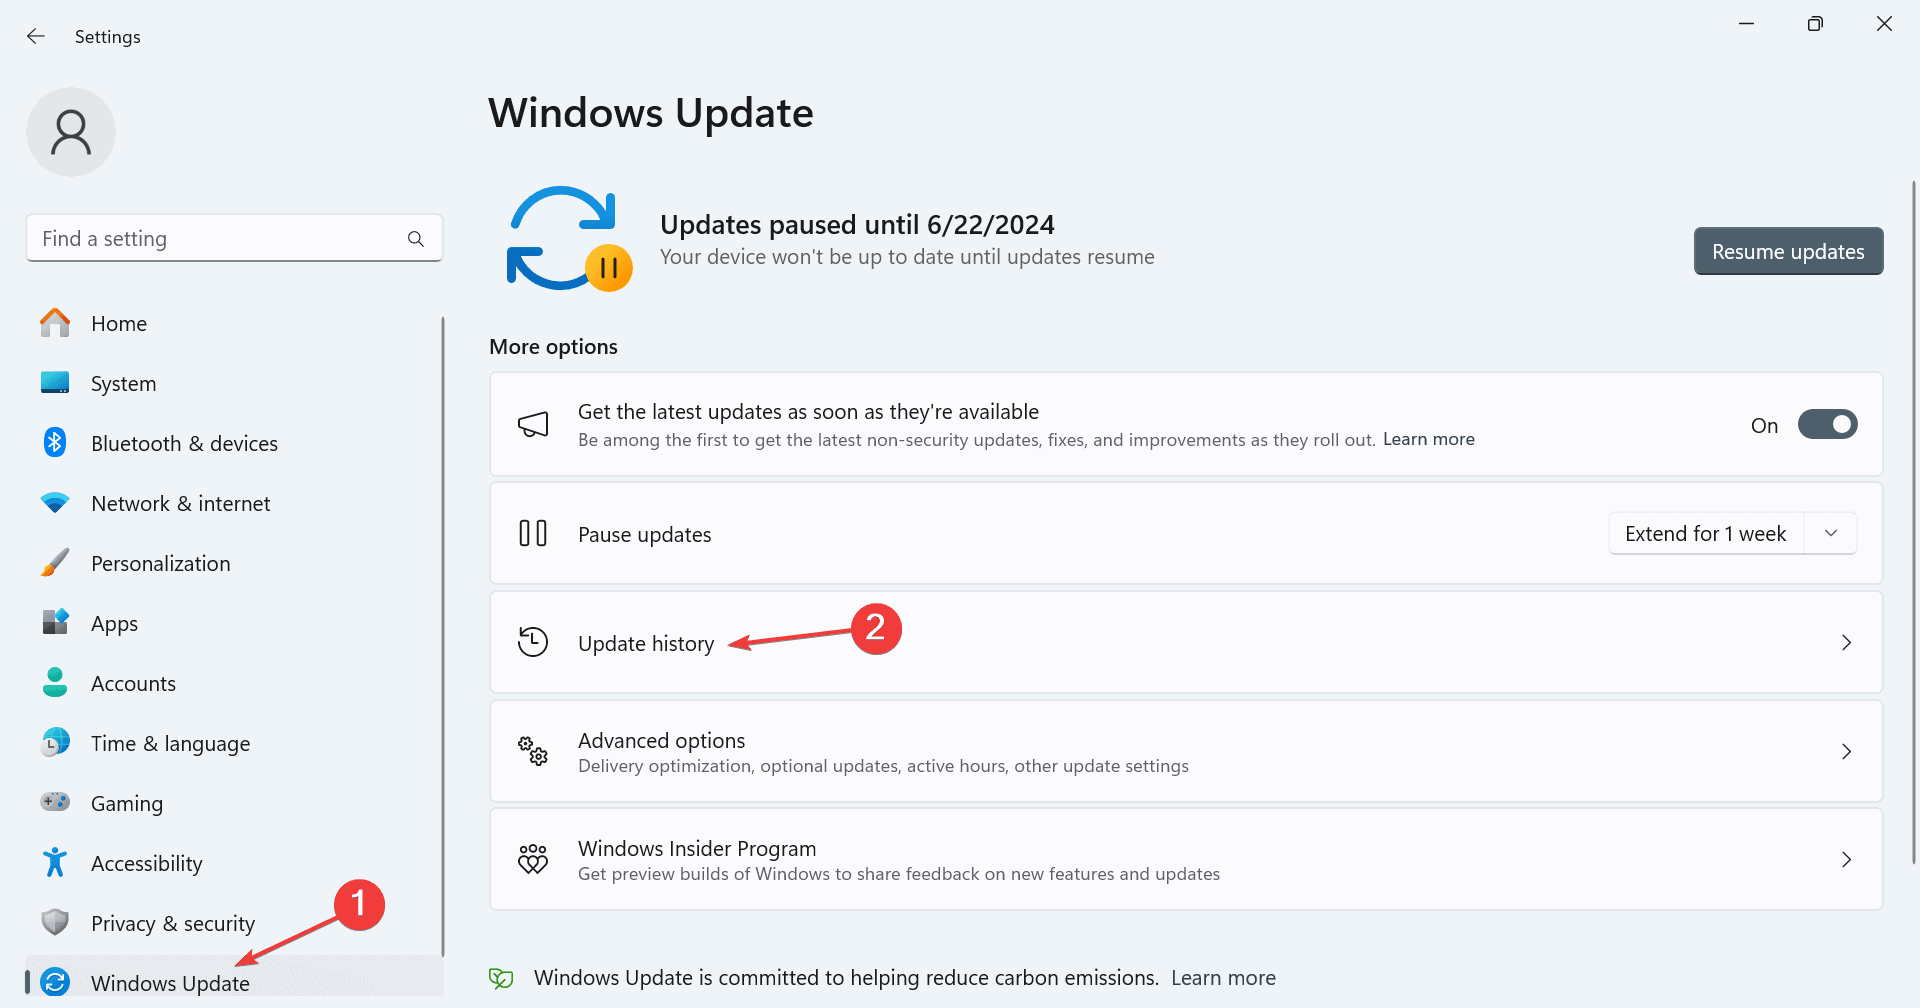
Press Windows + I to open Settings, go to Windows Update from the left pane, and click on Update history.
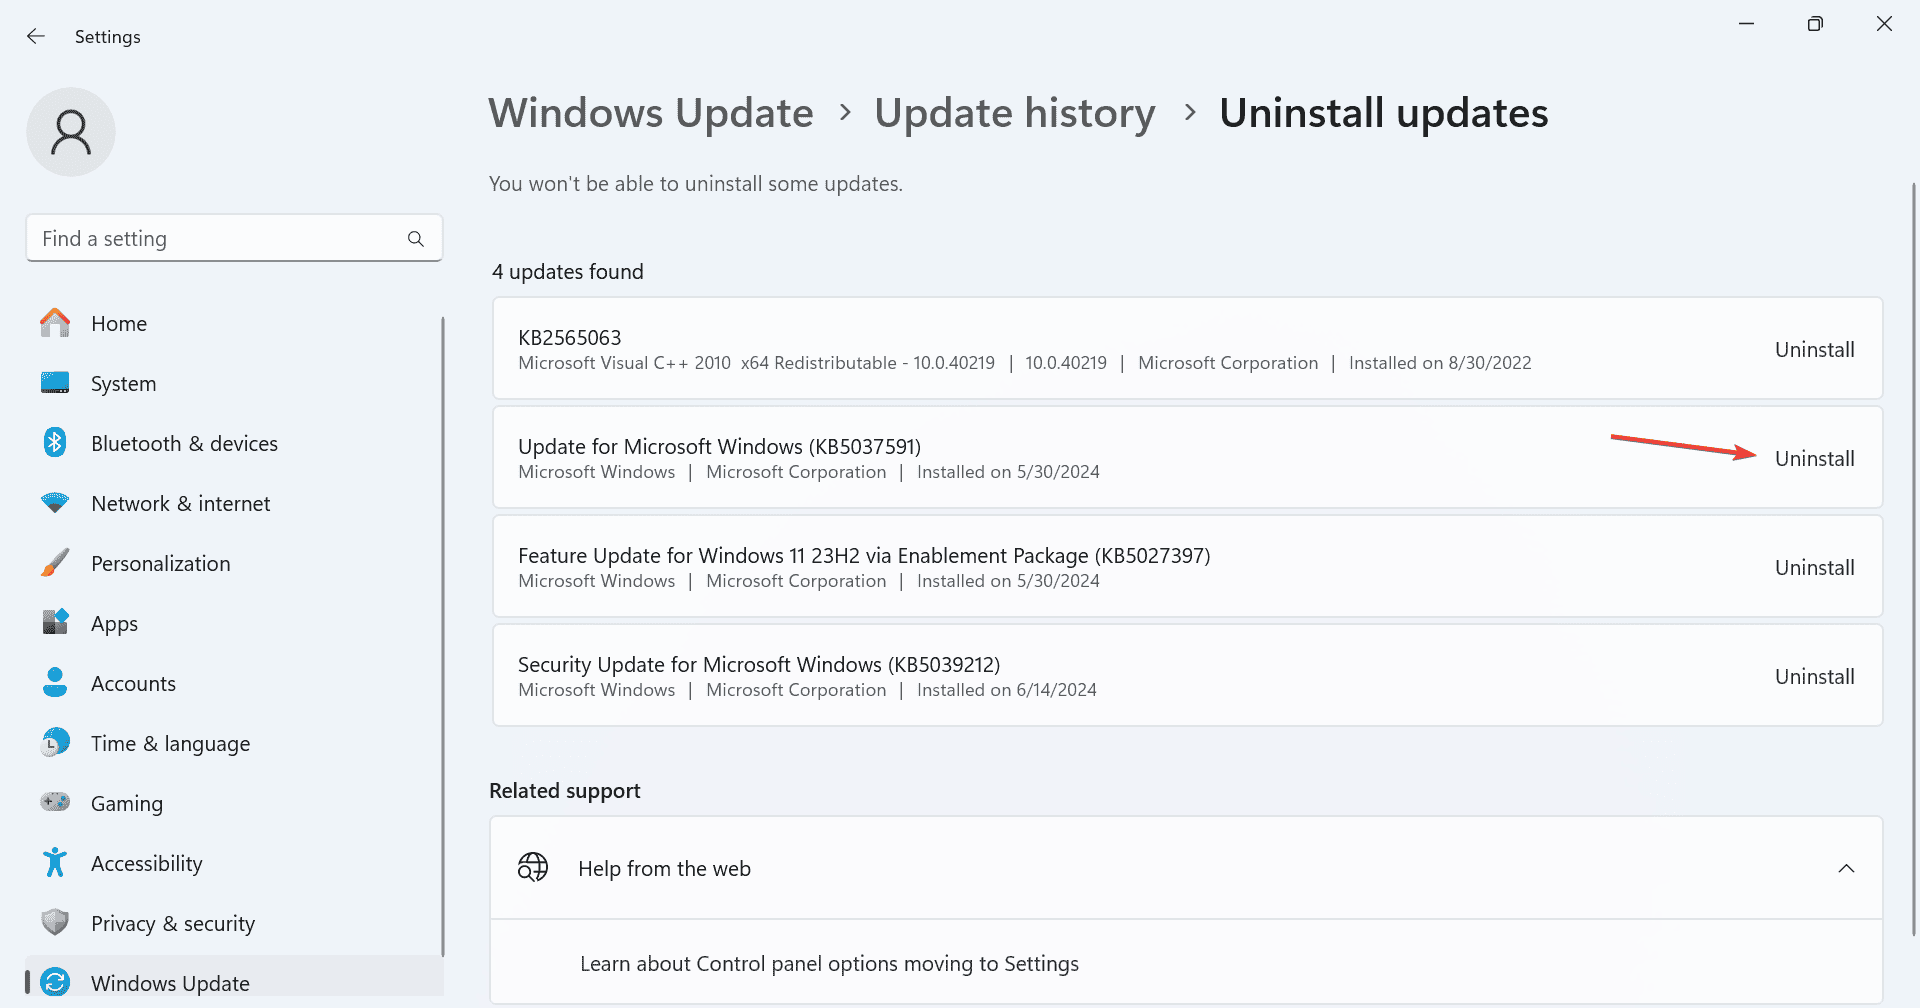
Scroll down to the bottom and click on Uninstall updates.
Click the Uninstall option next to the recently downloaded update.
Again, click Uninstall in the prompt to confirm.
Finally, restart the PC and verify whether FATAL_ABNORMAL_RESET_ERROR is fixed.
5. Reinstall Windows
If all else fails, the last option is to reinstall Windows on the PC. Before you proceed, I recommend moving any critical files to external storage in order to prevent data loss.
Once the PC boots up after a reinstall, you should no longer encounter the FATAL_ABNORMAL_RESET_ERROR Windows blue screen. If the problem persists, it’s most likely a hardware malfunction to blame, and you must visit a repair shop to get the components inspected for faults.
Before you leave, discover expert tips to make Windows run faster than ever and get things done quickly! We also have a new article on Error_Is_Subst_Target message, so don’t miss it.
If you know of more fixes for the error, share them with our readers in the comments section.
The UNSUPPORTED_INSTRUCTION_MODE BSoD has the value of 0x00000151. This blue screen error appears when there is an attempt to execute code using an unsupported processor instruction mode. Microsoft also includes an example for this bug check: executing classic Arm instructions instead of ThumbV2 instructions.
The error can spawn on the new ARM laptops or when coding a Windows on ARM app. The app you’re running is forcing the ARM SoC to perform a set of instructions that is not compatible with the OS.
How do I fix the UNSUPPORTED_INSTRUCTION_MODE BSoD?
The obvious solution here, and the only one possible is not to run that app or to wait for developers to adapt it to your CPU and OS. If you’re the one coding it, you’re having the same problems as the other programmers out there: matching ARM with Windows.
So to recap, stop using the app that is triggering this BSoD, because it’s clearly not compatible with the ARM SoC or Windows on ARM.
Although unlikely, the UNSUPPORTED_INSTRUCTION_MODE BSoD may also be caused by changes made to the Registry. If you did that lately, make sure to undo the change or import a previously saved Registry if you created one prior to this point.
So, this is how you fix the UNSUPPORTED_INSTRUCTION_MODE BSoD and hopefully, you managed to restore your computer to a normal working mode.
If you know about any working solutions for this blue screen error, let us know in the comments below.
If you have a PC that is several years old, you might be wondering what is the best Windows for an old laptop. In today’s guide, we’re going to answer this question, so let’s get started.
What is the best Windows for an old laptop?
1. Windows 11 – Perfect for devices that are up to 6 years old
Even though Windows 11 was released in 2021, it’s not too demanding in terms of hardware, and it should work on any device that is around 6 years old.
The system requires AMD Zen+ or Intel 8th generation processors, so most CPUs from 2018 should be able to handle it without too much hassle. Another requirement is TPM, and most motherboards and CPUs from that period fully support it.
Even if your device doesn’t meet the hardware requirements, you can still install Windows 11 on unsupported CPUs with a few tweaks, but be sure to have more than 4GB of RAM for a somewhat comfortable experience.
Windows 11 is actively maintained with security and feature updates, so if your device is using 2018 hardware, it should be able to handle it without issues.
2. Windows 10 – Great choice for devices older than 2018
If your device doesn’t meet Windows 11 requirements, or you aren’t getting the desired performance, then Windows 10 is the perfect choice for you.
The system will work on almost any CPU, and it requires a minimum of 2GB of RAM, which most PCs have. However, you’ll need at least 4GB to have a decent user experience after installing the necessary software.
It’s important to mention that Windows 10 isn’t in active development, so it’s not getting any new features, but it’s receiving security updates, at least until its end of life which is scheduled for October 2025.
Even though you can continue using your system after that date, Microsoft won’t release any security updates for it, and it will eventually prevent users from downloading copies of Windows 10, so you’ll be using a potentially unsafe version of Windows when that happens.
Last but not least, as the end of Windows 10 draws near, software developers will slowly move away from the platform and stop supporting the system altogether.
3. AtlasOS – A third-party modified version of Windows
Unlike previous entries on the list, AtlasOS is a modified version of Windows, and as such, it’s not officially supported by Microsoft. This means that users are running it at their own risk.
As for this OS, the developers claim that it is optimized for performance by removing background processes, telemetry, and other unnecessary features. It disables Microsoft account syncing, advertisements, activity history, and more.
Some default applications are removed, including OneDrive, Microsoft Edge, Windows Media Player, and most Windows Store apps. By doing so, developers promise lower CPU usage. As for RAM, the system uses only 1.5GB when idle.
As for the requirements, this version of Windows has similar requirements to Windows 10 or 11, so be sure to meet them if you want to run it.
Despite great performance, AtlasOS might not be as stable or secure as the official version of Windows, so use it at your own risk. To learn more, visit our guide on how to install AtlasOS.
Other great features:
Improved performance
Removes bloatware
Doesn’t have any unnecessary preinstalled applications
4. ReviOS – Modified version of Windows for gaming
ReviOS is another lightweight modified edition of Windows 11, and it allows you to bypass Windows 11 requirements out of the box, so it can run on older PCs as well.
The installation removes various preinstalled apps, including Photos, Camera, Widgets, Maps, Mail, People, and many more. It also disables ReadyBoost to reduce system latency.
ReviOS also disables various unnecessary background drivers and services. It also disables certain features such as Defender, SmartScreen, Smart App Control, Virtualization, etc. to boost the performance.
The developers claim that the system uses just 1.4GB on a 4GB system, which sounds impressive. ReviOS might not be as popular as other entries on the list, but it works the same way by disabling unnecessary components from your OS to improve performance.
However, just like with any modified Windows edition, always use caution, do your research, and use it at your own risk.
Unlike other entries on the list, Tiny11 requires you to create your own Windows 11. To do this, first, you need to download Windows 11 ISO on your own and use tiny11 to create a custom ISO file.
The script will remove various built-in apps, such as Clipchamp, News, Weather, Xbox, Alarms, etc. to reduce the size of your installation and improve the performance.
Just like with any other modified Windows 11 installations, this one isn’t supported by Microsoft, so you’re using it at your own risk.
However, the entire project is available on GitHub, and since you’ll be creating your own ISO from an official Windows 11 ISO, it means that tiny11 is likely safe to use.
Depending on your hardware, Windows 10 will probably be the best choice. Windows 8 and older aren’t supported anymore and aren’t available for download, so we wouldn’t recommend using them.
If you’re struggling to find the best OS for an old laptop with 4GB RAM, our choice would be Linux, especially older LTS versions of Lubuntu or Xubuntu which are less demanding.
Picking the best Windows operating system for an old laptop isn’t easy, since there aren’t too many options available, but if your hardware can handle it, go for Windows 11 since it will be maintained for at least several more years.
If you can’t run it, then Windows 10 is the right way to go, but keep in mind that the official support is running out, so you might have to consider custom Windows 11 ISOs.
The EXCEPTION_SCOPE_INVALID Blue Screen of Death (BSoD) appears due to corrupted system files, conflicting third-party apps, buggy Windows updates, or malfunctioning hardware. Microsoft’s official website tells us that the error is triggered after the detection of an internal inconsistency in exception dispatching.
Before you move to the slightly complex solutions, disconnect non-critical hardware/peripherals, install all pending Windows updates, and disable any overclocking if applied.
How can I fix EXCEPTION_SCOPE_INVALID?
Tip
If you are getting a BSOD upon turning on the computer, boot Windows into Safe Mode and then apply the solutions listed below.
1. Perform a clean boot
Press Windows + R to open Run, type msconfig in the text field, and hit Enter.
Go to the Services tab, tick the checkbox for Hide all Microsoft services, and then click on Disable all.
Next, go to the Startup tab, and click on Open Task Manager.
Individually select any non-critical apps that read Enabled under the Status column, and click on Disable.
Go back to System Configuration, and click on Apply and OK to save the changes.
Click on Restart now in the confirmation prompt.
Once the PC restarts after the clean boot, verify whether the BSOD is fixed. If yes, one of the disabled apps or services was the underlying cause. So, enable them one at a time, restart the PC after each, and as soon as the EXCEPTION_SCOPE_INVALID error reappears, the one reconfigured last is the problem.
Now, if it’s an app, uninstall it, and for a service, disabled it for the time being until an update is pushed out. For third-party services, you must contact the developer!
2. Run the DISM and SFC scans
Press Windows + S to open Search, type Command Prompt, and click on Run as administrator.
Click Yes in the UAC prompt.
Paste the following commands individually and hit Enter after each: DISM /Online /Cleanup-Image /CheckHealthDISM /Online /Cleanup-Image /ScanHealthDISM /Online /Cleanup-Image /RestoreHealth
Now, run this command: sfc /scannow
Finally, reboot the PC and verify whether the EXCEPTION_SCOPE_INVALID BSoD is fixed.
3. Uninstall conflicting applications
Press Windows + R to open Run, type appwiz.cpl in the text field, and hit Enter.
Select any app that was installed or updated around the same time the issue first appeared, and click Uninstall.
Follow the on-screen instructions to complete the process.
Restart the PC and check for improvements.
Sometimes, a quick app removal won’t work due to leftover cache, program files, and Registry entries. In this case, you must use a top-rated software uninstaller to delete all these in one go.
4. Check the RAM and disk for issues
4.1 Fix disk issues
Press Windows + R to open Run, type cmd, and hit Ctrl + Shift + Enter.
Click Yes in the UAC prompt.
Paste the following Check Disk command and hit Enter: chkdsk /r
If asked to run the scan on the next reboot, press Y, hit Enter to confirm, and then restart the PC.
After the scan is done running, check for improvements.
The built-in Check Disk utility can help repair trivial issues with the hard drive, including bad sectors, which can be the reason behind EXCEPTION_SCOPE_INVALID on your PC.
4.2 Inspect the RAM for faults
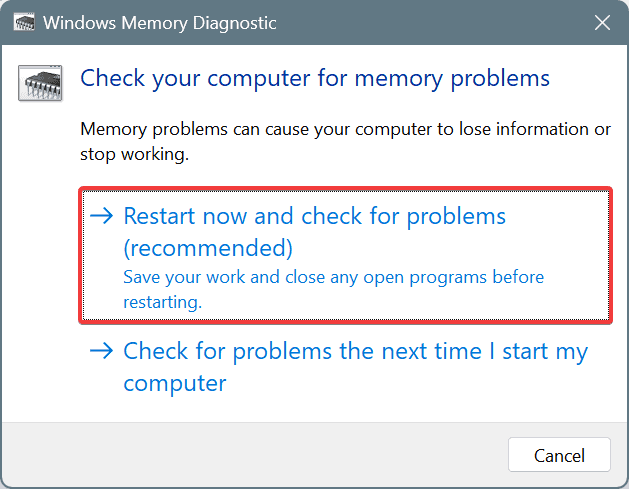
Press Windows + S to open Search, type Windows Memory Diagnostic, and click on the relevant result.
Click on Restart now and check for problems.
Once the PC restarts after running the scan, check the mdsched logs, and look for problems.
If Windows Memory Diagnostic can’t detect any faults, I recommend using MemTest86+, an advanced open-source RAM testing tool that will run a wide array of scans on individual memory modules and find even the smallest of issues.
In case any problems are detected, it’s best that you replace the malfunctioning module with a new compatible RAM stick.
5. Reinstall Windows
When nothing else works, the last option is to reinstall Windows from scratch. Since there’s a chance of data loss, I recommend moving any critical files in the system drive to external storage.
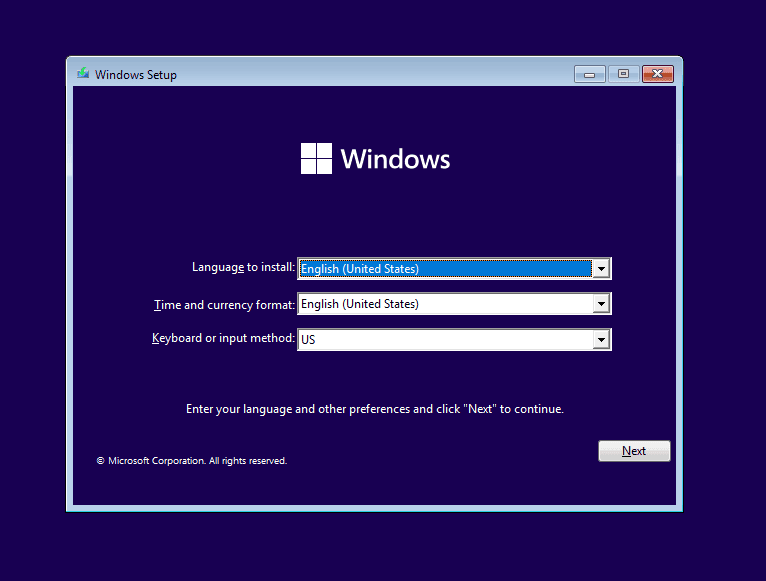
To reinstall Windows > download the Media Creation Tool from Microsoft’s official website on a working PC > connect a USB flash drive > run the downloaded setup > create a bootable USB > plug it into the affected computer > change the boot order to the flash drive > load the flash drive > follow the on-screen instructions to complete the process.
Reinstalling Windows from a bootable USB
After you are done fixing the EXCEPTION_SCOPE_INVALID blue screen in Windows, discover the causes for BSOD and take suitable measures to prevent such errors from reappearing!
ARM Windows 11 laptops are pretty successful so far, but not all the owners who tested them were completely happy with their performance. However, we have made a list with the best Windows ARM laptops you can buy right now and make your own decision.
Microsoft Surface Pro’s price starts from $1.000, but if you really want the best ARM laptop, you will have to go for the maximum configuration here.
We’re talking about Snapdragon X Elite SoC, and the OLED screen version. You may also choose to have 5G connectivity or not and that would be a $200 price difference. So, if you’re not travelling into places where you can’t find Wi-Fi, that is not worth buying for.
However, the difference between Snapdragon X Elite and Snapdragon X Plus is definitely worth the money. The 16 GB of RAM is non negotiable, but you can opt for 1 TB of storage instead of the 512 GB version.
You should also know that you should also invest in a keyboard to go with it, so you can really say you’ve got a laptop. The advantage of Microsoft Surface Pro is that it really shows that Windows 11 was configured pretty well to work with the ARM SoC.
About the battery, the specs say that it covers you for 14 hours of usage. We didn’t test it yet, but that is usually measured under ideal conditions, so you shouldn’t expect for more than 10-11 hours.
Dell XPS 13 weighs only 1.17 kg and has a thickness of 0.6 inches which makes it remarkable for portability.
The OLED screen with 3K resolution (2880×1800 pixels) looks great for any apps you would throw at it, but everyone who tested it said almost the same things: some Windows games are not launching at all and the Microsoft office apps are freezing sometimes.
However, that’s not a Dell XPS 13 thing. This is still a problem for all ARM laptops with Qualcomm Snapdragon X SoCs.
Other than that, you can configurate the laptop in the DELL store and while the starting configuration is priced at $1.000, you will surely be temped in upping the RAM to 32 GB for $100 and the non-touch LCD to an OLED 3K touchscreen for $300. That will bring you to $1.400, but you may also double or quadruple the 512 GB storage if you want.
We reviewed Samsung Galaxy Book4 Edge so if you want to know more details about this laptop, make sure to check it out. If you don’t, let’s just say that our conclusion was that it’s a pretty good personal laptop.
The best part about this laptop is the amazing AMOLED 16-inch display that is great for watching movies. However, that’s also its Achille’s heel because although it’s rated for 14 hours of battery life, we couldn’t get more than 10 hours on normal usage.
As with all other ARM laptops, it stumbles on Windows office apps, but it worked pretty good on a 3D game from Steam.
As for the ports, you get 1 USB3.2 and 2 USB4.0 ports, one MicroSD card reader, a HDMI 2.1 port that supports 4K@60Hz and an audio jack.
Traditionally, ThinkPad laptops from Lenovo have been designed for office and business work, and the ARM ThinkPad T14s Gen 6 is no exception. The 14-inch WUXGA display is certainly created for long hours work and the built-in fingerprint reader is a must when it comes to office and business purposes.
The laptop also comes with some dedicated features such as Dictation Toolbar for handy speech-to-text transcription. Of course, this is a Copilot + laptop so you also have a ready personal assistant at your fingertips.
Lenovo also worked on the keyboard to make it more convenient for writing. However, the manufacturer praises the laptop’s multiday battery life. We didn’t test it, but from online reviews, you get an average of 22 hours of battery life. Although it’s not multiday, it’s still great for a Snapdragon X Elite laptop.
HP EliteBook Ultra G1q is an ultralight business laptop and it might be great for that job. For once, you get a great 5 megapixel webcam that is great for virtual meetings or conferences.
However, HP totally ignored the personal needs here. There is no HDMI port on board. All you get is 2 USB-C ports, 1 USB A port and the three way audio jack.
The HP laptop also doesn’t include the latest wireless technology. You’ve got a Wi-Fi 6E (2×2) and Bluetooth 5.3 wireless modules on board. Say all you want but EliteBook Ultra G1q is in this top because the majority online reviews place it pretty high in demand because it’s sturdy and reliable.
If you’re a manager in a corporation, you’re probably going to be offered this laptop with your onboarding.
Should I buy an ARM laptop?
So, these are the top 5 ARM laptops right now. Their technical specifications might be very close, so you need to look at more subtle differences. We definitely recommend pick a few favorites and get your hands on them in a computer shop near you to get a real feel of what you’ll be getting.
Right off the bat, we tell you that ARM is not yet ready for Windows 11. There are a lot of issues to fix, starting from drivers and fine tuning applications. Also, a lot of software and game developers didn’t yet make adjustments for ARM and if they did, they are not yet completely adapted to the environment.
We also have a list of Copilot+ laptops and their specs, to help you make a more clear choice.
If you already have one of these laptops, tell us about your experience in the comments below.
Microsoft has officially announced the availability of the Microsoft 365 Document Collaboration Partner Program (MDCPP). This new program allows independent software vendors (ISVs) who offer cloud communication and collaboration platforms to make Microsoft 365 collaboration experiences available inside and outside meetings.
In a blog post, Microsoft says ISVs who join the program can enable customers on their platform to view, collaborate, and coauthor documents within Microsoft apps. This will expand the experience available in Microsoft Teams to new platforms.
Microsoft 365 Document Collaboration Partner Program will allow eligible ISVs to include collaborative Microsoft 365 app experiences in their preferred communication and collaboration platform.
The program includes a Web app option for real-time co-authoring, where eligible ISVs can provide simultaneous collaboration and editing of documents integrated into their preferred platform. This option, available today, allows for integrating Word, Excel, and PowerPoint documents from SharePoint and OneDrive for Business.
The program also includes a live app option in meetings, where customers can interact interactively and engage with PowerPoint Live and Excel Live in their preferred meeting solution.
With PowerPoint Live and Excel Live, meeting participants can interact and collaborate with documents in real-time, including editing and exploring papers directly in the meeting window. Presenters can also see rich presenter views, speaker notes, and other tools. This is coming soon.
Microsoft has already partnered with Zoom on MDCPP.
We continue the work with Microsoft as announced earlier this year to bring this to market for Zoom Workplace customers.
Windows 10 is scheduled to reach its EOS in October 2025, but Microsoft announced that it will extend its life for another 3 years with Extended Security Updates. Last year’s announcement also mentioned that these updates will come with a price and that the Redmond-based tech giant will reveal more in the future.
However, alongside those cumulative prices, which you can see below, the Redmond-based tech giant will also offer users one more year of ESU on Windows 10 for a lesser price: $30. According to the support page, the company says this should give those undecided enough time to consider transitioning to Windows 11 or a Copilot+ PC. You’ll be able to enroll for this option starting in 2025.
If you need more time before moving to a Copilot+ PC or other new Windows 11 device, a one-year Extended Security Updates (ESU) program for $30 will help protect your Windows 10 device. Enrollment for this program will open in 2025.
Microsoft has unveiled the prices for the Windows 10 ESUs. Hint: these updates are cumulative, and their prices will double each year, for those three years.
Those who decide to stay on Windows 10, will also have to pay the full price, even if they started to get the ESUs from Year 2 for instance – in which case, they’ll have to pay for Year 1, as well.
Without further ado, here is the price:
The base license will cost $61 per device for Year 1.
The $61 per device license will be activated with the 5-by-5 activation method: according to Microsoft, you’ll download an activation key and apply it to individual Windows 10 devices that you’ve selected for your ESU program.
However, the Redmond-based tech giant offers Windows 10 ESUs for free to those companies that use Windows 10 devices to access Windows 11 Cloud PCs through Windows 365, as the license will be included in the Windows 365 subscription with no additional cost.
Those organizations using a Microsoft cloud-based update management solution, such as Microsoft Intune or Windows Autopatch, can get a 25% discount, as part of a special offer. According to the company, this license will cost $45 per user (up to five devices) for Year 1.
Microsoft doesn’t consider Windows 10 ESU a long-term solution but more as a temporary bridge that gives customers and organizations time to fully upgrade their infrastructure to Windows 11.
Extended Security Updates are not intended to be a long-term solution but rather a temporary bridge. ESUs do not include new features, non-security fixes, or design change requests. The ESU program does not extend technical support for Windows 10. Technical support is limited to the activation of the ESU licenses, installation of ESU monthly updates, and addressing issues that may have been caused due to an update itself.
Microsoft
In the official blog post, the Redmond-based tech giant also published a list of solutions for those currently unable to migrate to Windows 11. It can be read here.
This is big news for companies looking to expand their webinars beyond the confines of their own infrastructure: Microsoft Teams’ Town Hall single events will soon support a maximum of 50,000 simultaneous attendees.
That is a big number, considering the previous (and current) attendee cap of the Teams’ Town Hall single events is only 20,000. We’re saying only, ironically, of course. Microsoft will add to that number a swooping 30,000 more attendees. Companies can host virtual live concerts if they want to.
According to the latest entry in the Microsoft 365 Roadmap, customers who want access to this staggering number must have a Teams Premium license, and some interactive features will be turned off for events with more than 20,000 attendees.
However, the quality and stability of events will stay high even with the increased audience, and organizations can get help hosting these large events from the Microsoft 365 Live Event Assistance Program.
Organizers of town hall instances can now reach wider audiences in a single event with an expansion to a maximum of 50,000 simultaneous attendees. This increase serves as a significant jump from the previous attendee cap of 20,000 for organizers with a Teams Premium license. The quality and stability of town halls up to this new limit will remain constant, providing high-quality and reliable content to participants. For events with more than 20,000 concurrent attendees, some interactivity features are disabled for all attendees. Organizations can get support for audiences up to 50,000 concurrent attendees by reaching out to the Microsoft 365 Live Event Assistance Program (LEAP) for assistance (Microsoft 365 Live Event Assistance Program – Microsoft Adoption). This feature is available for town hall organizers that have an active Teams Premium license.
The new attendee cap will impact the Desktop, Web, and Mac versions of the Town Hall platform, and it will be released in December 2024.
Coupled with the newest capability that will let users pause and move back and forth in Town Hall webinars and events, this new attendee cap could be the perfect feature for holding not only conferences but also special events with Microsoft Teams.
If you’re just witnessing YouTube opening on keypress or mouse click randomly on a PC or a Mac, you’re not alone. This issue can happen on any browser you may use as well. It’s certainly annoying for YouTube to open out of the blue and disrupt your work or gaming session, but we can help you fix it quickly.
If it’s not OS specific or browser specific, the issue is caused by an addon or extension of the browser and the name of the culprit is Ad Speedup.
This extension speeds up the video up to 16x when it detects an ad, but now it’s obviously bugged. If you’ve installed this extension, disable or uninstall it until the developers fix it.
What do I do if YouTube opens randomly?
As we mentioned above, you have to disable or uninstall Ad Speedup in your browser. To do that, click the menu button and select Extensions > Manage extensions in Chrome. You may also click directly on the puzzle piece icon from the top right of the window.
Here, look for Ad Speedup and click on Remove or click on the button to its right to disable it.
This is the simple method on how to disable or remove the extension on Google Chrome, but the process is similar on any other browser you may use. We also have a guide on how to remove stubborn extensions on Edge.
If you didn’t install Ad Speedup, but you’ve installed other extensions or addons lately, disable all of them and reenable them one by one to see which one is producing the random YouTube pop-up.
To recap, if YouTube is opening randomly in a new tab or window on your browser when you press a key or click with your mouse, disable or remove the Ad Speedup extension, or any extensions you might have installed prior to this issue.
If you’ve experienced this problem or have any questions, let us know in the comments below.
The api-ms-win-crt-conio-l1-1-0.dll file, developed by Microsoft, is a key part of Windows and is required to run several applications and games.
When it’s not found, you get an error message that reads, The program can’t start because api-ms-win-crt-conio-l1-1-0.dll is missing from your computer. Try reinstalling the program to fix this problem. But reinstalling the program often doesn’t fix things because the DLL file is not installed alongside the program.
For anyone wondering why api-ms-win-crt-conio-l1-1-0.dll is missing, it’s mostly due to corrupted system files, inadvertent file deletion (either manually or through a cleaner program), malware infection, or when the Visual C++ Redistributable is not available.
What can I do if api-ms-win-crt-conio-l1-1-0.dll is missing?
1. Manually replace the DLL
Your primary approach when the api-ms-win-crt-conio-l1-1-0.dll DLL file is missing should be to manually replace the file with a fresh copy from another working Windows PC with the same OS architecture (32-bit or 64-bit). The DLL is stored in either of these locations: C:\Windows\System32C:\Windows\System32\downlevel
Path for api-ms-win-crt-conio-l1-1-0.dll
All you have to do is go to this path on another PC > copy the DLL to a USB flash drive > connect the drive to the affected computer > transfer the DLL to these paths > restart your computer.
2. Install the latest Visual C++ Redistributable packages
Press Windows + R to open Run, type appwiz.cpl in the text field, and hit Enter.
Select all the Visual C++ Redistributables listed here individually and click on Uninstall.
Follow the on-screen instructions to complete the process.
Once done, go to Microsoft’s official website, and download the latest Visual C++ Redistributables. For 32-bit Windows, you will need the x86 version, while for 64-bit Windows, download both the x86 and x64 packages.
Next, run the downloaded setup and follow the on-screen instructions to install Visual C++ Redistributables.
Finally, reboot the PC and check for improvements.
Sometimes, when Visual C++ Redistributables is missing, or you have outdated versions installed, apps and games like Warhammer 40,000: Dawn of War III will have trouble locating api-ms-win-crt-conio-l1-1-0.dll. In this case, simply deleting the existing packages and installing the latest version will do the trick!
3. Run the DISM and SFC scan
Press Windows + S to open Search, type Command Prompt, and click on Run as administrator.
Click Yes in the UAC prompt.
Paste the following commands individually and hit Enter after each: DISM /Online /Cleanup-Image /CheckHealthDISM /Online /Cleanup-Image /ScanHealthDISM /Online /Cleanup-Image /RestoreHealth
Next, execute this SFC scan command: sfc /scannow
Finally, restart the PC and check for improvements.
Press Windows + S to open Search, type Windows Security, and click on the relevant result.
Click on Virus & threat protection.
Click on Scan options.
Now, select the Full scan entry and click on Scan now.
Wait for the scan to complete, and then check for improvements. It typically takes 15-30 minutes.
5. Uninstall conflicting third-party apps
Tip
This solution won’t download or restore the missing DLL but will prevent such errors from reappearing.
Press Windows + R to open Run, type appwiz.cpl in the text field, and hit Enter.
Select any third-party app installed or updated around the same time the issue first appeared, and click on Uninstall.
Follow the on-screen instructions to complete the uninstallation.
Restart the computer and check whether api-ms-win-crt-conio-l1-1-0.dll is now available.
In 2 out of 5 cases, a third-party file cleaner deleted the DLL file, which triggered the error message, necessitating the need to fix things. Also, if a quick removal doesn’t work, use a top-rated software uninstaller to get rid of any leftover files, app cache, and Registry entries.
6. Perform a system restore
Press Windows + S to open Search, type Create a restore point, and click on the relevant result.
Click the System Restore button.
Select the Choose a different restore point option, and click Next.
Pick the oldest restore point from the list, and click Next.
Verify the restore details and click on Finish.
Wait for the restore to complete, and then check for improvements. It may take 10-30 minutes.
7. Perform an in-place upgrade
Go to Microsoft’s official page, select the OS edition and product language, and then download the Windows 11 ISO.
Double-click the downloaded ISO, and then click Open in the confirmation prompt.
Run the setup.exe file.
Click Yes in the UAC prompt.
Click on Next to proceed.
Review Microsoft’s license terms and click on Accept.
Make sure the setup reads, Keep personal files and apps, then click on Install, and confirm the change. The in-place upgrade will take 30-90 minutes to complete.
When nothing else helps restore the api-ms-win-crt-conio-l1-1-0.dll file, an in-place upgrade will quickly fix things. Besides, it will make your PC run faster, given that all the system files will be replaced.
If you frequently face such issues, it’s best to use an effective DLL repair tool and restore all missing DLLs in one go!
For any queries or to share which fix worked for you, drop a comment below.
After teasing it earlier this year, Microsoft is finally bringing Copilot to the GCC environment in December, as we spotted in a recent entry to the Microsoft 365 Roadmap. The GCC (Government Community Cloud) environment encompasses all Government-Based customers for whom Microsoft already provides most of its 365 Suite and more.
The entry says Copilot for the GCC environment will be available in Teams (chat and channels), but will exclude the platform’s Compose section. It will also be available on Outlook (including the mobile version), Word, PowerPoint, Excel, and other Microsoft-based surfaces.
There is no preview scheduled, and the rollout is starting in December. Here’s what the entry says:
Bringing Microsoft 365 Copilot GCC, your AI assistant for work in the GCC environment. It combines the power of Large Language Models with your work content and context, to help you draft and rewrite, summarize and organize, catch up on what you missed, and get answers to questions via open prompts. Copilot generates answers using the rich, people-centric data and insights available in the Microsoft Graph. Microsoft 365 Copilot GCC is available in Teams (Chat and Channel) excluding Compose, Outlook (includes mobile), Word, PowerPoint, and Excel as well as other surfaces, including microsoft365.com.
Is Microsoft up to the task, though? We all know about the tech giant’s numerous security issues, and its being one of the most targeted companies in the world does not add to the amazement.
We’re talking about the GCC environment, where, naturally, quite sensible files with a lot of sensitive data are stored. And it is quite risky for Copilot to have access to them to provide these customers with summarizations, drafts, and so on.
However, the Redmond-based tech giant says it’s alright. In a blog post, the company prepared a lengthy plan that includes a list of Top priorities and phased rollouts of features so that Copilot can be used in 100% safe and secure situations.
According to this plan, Copilot will be integrated into 365 Apps such as Stream, OneNote, and Planner in 2025. Until then, it will be gradually released to the more important apps: Word, Excel, PowerPoint, Outlook, and Teams. It will use a GCC user’s Graph data, meaning Copilot won’t query the web to get live real-time web content.
It’ll be interesting to see if Copilot in GCC environments is as safe as Microsoft claims. I guess we’ll have to live and see.
Often users are wondering if is there a way to check Incognito history on Chrome, and in today’s guide, we’re finally going to answer this question, so let’s get started.
How can I check Chrome Incognito history?
1. Use Command Prompt
Press the Windows key + S and type cmd. Open Command Prompt.
Type the following command: ipconfig /displaydns
You’ll now see the list of DNS records on your screen.
While DNS records aren’t browsing history, you can still see which domains were visited using your PC.
No, it’s not possible to check Incognito history on Android. You might be able to get DNS records with specialized apps, but that’s as far as it goes.
Can I see Chrome Incognito history?
You can’t see Chrome Incognito history natively in the browser. However, you can find DNS records, but they offer minimal information.
Is Incognito history saved anywhere?
Incognito history isn’t saved anywhere on your PC, and this makes it hard to retrieve.
Can my employer see my Incognito history?
Yes, your employer can see your Incognito history on any business device or while using the company network.
As you can see, it’s almost impossible to check Chrome Incognito history, simply because the browser doesn’t save anything on your PC. The closest information you can get are DNS records, but they might be hard to read.
If you want to save your Incognito history, we have a great guide on how to export Incognito tabs, so don’t miss it for more information.
Back in August, Microsoft revealed that Windows Recall will be available to insiders starting in October after experiencing an indefinite delay earlier this summer. They’ve emphasized their commitment to delivering a secure and trustworthy experience, promising more details in a blog post when the feature becomes available to Insiders.
Update Aug. 21, 2024: With a commitment to delivering a trustworthy and secure Recall (preview) experience on Copilot+ PCs for customers, we’re sharing an update that Recall will be available to Windows Insiders starting in October. As previously shared on June 13, we have adjusted our release approach to leverage the valuable expertise of our Windows Insider community prior to making Recall available for all Copilot+ PCs. Security continues to be our top priority and when Recall is available for Windows Insiders in October we will publish a blog with more details.
This long-awaited characteristic was initially planned to be introduced on June 18th, and its arrival would have changed how we use our PCs tremendously because it can take screenshots of what’s happening on your screen at any time you want so that later when needed or searching for something in particular, users can find past information with ease.
However, it seems that the AI capability will be previewed in December after Microsoft’s Brandon LeBlanc told The Verge that Recall needs more polishing.
We are committed to delivering a secure and trusted experience with Recall. To ensure we deliver on these important updates, we’re taking additional time to refine the experience before previewing it with Windows Insiders. Originally planned for October, Recall will now be available for preview with Windows Insiders on Copilot Plus PCs by December.
Windows Recall was not without controversy. The reason? Security. It seems that the initial enthusiasm was rapidly replaced by worries from security professionals all over the internet. They sounded the alarm, cautioning that the Recall could be a source of vulnerability for hackers who might gain entry and access users’ private data.
Microsoft has carefully considered these warnings. They reasoned it is wise to first test Recall with a small group of Windows Insiders before making it available to everyone else.
We are adjusting the release model for Recall to leverage the expertise of the Windows Insider community to ensure the experience meets our high standards for quality and security. This decision is rooted in our commitment to providing a trusted, secure and robust experience for all customers and to seek additional feedback prior to making the feature available to all Copilot+ PC users.
Microsoft
Additionally, Microsoft is testing and adding more security features for Recall content. The “just in time” decryption is protected by Windows Hello Enhanced Sign-in Security (ESS). This implies that Recall snapshots will be decrypted and reachable only after the user authenticates themselves, thus providing an additional layer of safety.
Though the delay might not be satisfying for individuals waiting excitedly for Recall to come out, it shows Microsoft’s focus on security. The creation of Copilot+ PCs, Recall, and Windows is still under the watchful eye of their Secure Future Initiative (SFI). Therefore, when Recall is available, it will demonstrate itself as a strong virtual user safety.
However, not all Windows users are impressed with the tool, and many see it as spyware and call Microsoft to leave it behind. On Reddit, for example, many such forums have hundreds of replies, which is not a good sign if you ask us.
As the title says, Microsoft is trying to push this horrible feature out in October. We really need to make it loud and clear that this feature is a massive security risk, and seems poised to be abused by the worst of people, despite them saying it would be off by default. People can just find a way to get elevated rights, and turn the feature on, and your computer becomes a spying tool against users. This is just an awful idea. At its best, its a solution looking for a problem.
What’s your take? Do you agree with Microsoft’s decision to delay the Recall feature?
Microsoft is taking all the means to make Outlook a more inclusive platform, and the tech giant’s latest announcement proves it: Outlook for Web and Desktop will soon feature a name pronunciation label in the profile card.
According to the latest entry to the Microsoft 365 Roadmap, Outlook users can record and share the correct pronunciation of their name and put it on their profile cards so that others know how to pronounce it. The Redmond-based tech giant says this will spare everyone from awkward moments when they don’t pronounce their names correctly.
You can now record and share the correct pronunciation of your name, promoting inclusivity and helping colleagues avoid mispronunciations. With a click, you can play and listen to your colleagues’ name pronunciations. #newoutlookforwindows
Outlook is the first platform, and Microsoft Teams might soon follow: earlier this year, we discovered that the tech giant has actually patented a technology for it.
Outlook for Mobile will also soon be updated to let users choose their preferred pronouns. The Web version already has this option, but the Mobile version doesn’t.
The name pronunciation label in Outlook will be previewed this month, with a general release schedule to roll out in January 2025.
Some users have encountered gfsdk_txaa_alpharesolve.win64.dll error when trying to launch GTA 5, so in today’s guide, we’re going to take a closer look at this file and show you a few ways to fix it.
What is gfsdk_txaa_alpharesolve.win64.dll?
This file is a part of NVIDIA’s GameWorks SDK and it’s used for Temporal Anti-Aliasing in various games.
How can I fix the gfsdk_txaa_alpharesolve.win64.dll error?
Gfsdk_txaa_alpharesolve.win64.dll is a legitimate file, and it’s often used by GTA5, but other games can use it as well. If there’s any issue with it, the game won’t start at all, but hopefully, our solutions were able to help you.
OpenAI has launched the Advanced Voice Mode (AVM) for its generative AI chatbot, ChatGPT. It is available now to ChatGPT Plus and Team tier subscribers in the ChatGPT app on iOS and Android; the company will also grant access to enterprise and education customers starting next week, as announced in a post on X (formerly known as Twitter).
It’s worth noting that OpenAI has a daily limit for using the Advanced Voice feature, even on a desktop. The ChatGPT app will notify you when you have 15 minutes of Advanced Voice usage left for the day.
Advanced Voice Mode (AVM) is designed to make ChatGPT more conversational, allowing users to speak to the chatbot more naturally. For example, users can interrupt ChatGPT and have it respond more quickly; if ChatGPT is speaking, users can cut the chatbot off by speaking again.
Advanced Voice is rolling out to all Plus and Team users in the ChatGPT app over the course of the week.
While you’ve been patiently waiting, we’ve added Custom Instructions, Memory, five new voices, and improved accents.
With Advanced Voice Mode, OpenAI claims that ChatGPT can carry on a conversation for an extended period—up to an hour—without running out of things to say. Though AVM doesn’t support every language, ChatGPT can understand and respond to English, Spanish, French, German, Italian, Portuguese, Dutch, Russian, and Swedish.
To accompany the launch, OpenAI is introducing a new look for AVM in the ChatGPT app. Now, when AVM is available in the app, a blue pulsing sphere will appear next to the text box in ChatGPT. The idea is to inform users that they can start speaking to ChatGPT and receive a response.
In addition to the new design, AVM is gaining customization features. For one, ChatGPT users can issue commands to ChatGPT in different voices.
Also new is a “Memory” feature, which allows ChatGPT to remember details from a conversation and refer to them later. For example, ChatGPT can use Memory to recognise a user’s name and answer questions about the user in subsequent interactions.
OpenAI is also introducing more ways for ChatGPT to generate utterances. In the ChatGPT app, users can ask ChatGPT to deliver a joke, offer a compliment, tell a bedtime story and more.
OpenAI says that it’s improved the underlying generative model powering ChatGPT’s voice feature to better understand users and generate responses. The company claims that the model—which is based on OpenAI’s GPT-4o architecture—is faster and able to recognize a user’s speech more accurately.
It’s worth noting that AVM wasn’t available in every region ChatGPT supports. OpenAI said it’s launching AVM in select countries, but it won’t be available in the EU countries, Iceland, Liechtenstein, Norway, Switzerland, or the U.K. However, the tech giant announced in a tweet on X (formerly known as Twitter), that the capability is now available in these regions, as well.
Well yes.
All Plus users in the EU, Switzerland, Iceland, Norway, and Liechtenstein now have access to Advanced Voice. https://t.co/AC6mdd1Lkf
OpenAI first announced Advanced Voice Mode for ChatGPT in May, but the rollout was delayed due to legal challenges. Initially, AVM was a much different feature. OpenAI, at the time, said that it would allow ChatGPT users to create, train, and deploy custom conversational AI models in minutes, leveraging a combination of voice, text, and video inputs. However, the company was forced to scale back its ambitions following criticism that OpenAI’s approach to multimodal chatbots was invasive and could potentially be used to create deep fakes.
The result was the AVM that OpenAI introduced today. Despite the changes, AVM continues to be a differentiating feature for ChatGPT relative to rivals’ offerings.
Google, for example, last month introduced the similar-sounding Gemini Live—an upgrade to the company’s existing Google Assistant-powered chatbots that allows them to respond to user prompts more naturally and quickly. Gemini Live is available in several third-party apps on Android, including RBC, SoFi, TransferWise, and United Airlines, with more to come.
Many Call of Duty players experience Dev error 5820 in MW3, and the same issue is happening with Black Ops 6. Today we’ll show you a couple of potential solutions that can fix the problem.
What is error code 5820?
This is an error code that appears in Call of Duty, and it’s usually caused by your game settings.
How can I fix Dev error 5820?
Before we start, ensure that crossplay is enabled in your account settings on your device.
1. Change match settings
Open the game settings.
Next, locate Skip infiltration and enable it.
Ensure that the Match start time is set to 15 seconds.
2. Switch emblem and calling card
Open your COD profile.
Next, select Edit showcase.
Adjust the Emblem and Calling card.
If you’re in a party, all members will have to do this as well.
Keep in mind that the calling card and emblem mustn’t be set to random.
The SOC_CRITICAL_DEVICE_REMOVED bug check has the 0x0000014E error code. As you probably guessed, the error means that a critical SOC device has been unexpectedly removed or failed. The bad news is that this is often triggered by a hardware component malfunction or improper connection. If you just built a new PC and you’re booting for the first time, check all the connections and make sure that all the components receive enough power to work.
How do I fix SOC_CRITICAL_DEVICE_REMOVED?
1. Remove all external devices
The good news is that SOC_CRITICAL_DEVICE_REMOVED may also be caused by external devices.
Turn off the PC, disconnect all of them except for the monitor, mouse and keyboard (if they are wired) and turn on your PC to see if the problem has been fixed.
2. Reset the settings in BIOS
Turn on your PC and press the BIOS/UEFI access key (usually F2, Delete, F10, or Esc).
Depending on the BIOS, look for an option called Load Setup Defaults, Reset to Default, or Restore Factory Settings, then select and confirm the choice.
Save and exit BIOS (usually, by pressing F10).
Check if the PC is booting normally.
This BSoD may also be caused by problems with component detection and if you made any changes recently, this will return things to normal.
3. Use System Restore from Windows Recovery
Reboot your PC 3 times by using the power button until the Windows Recovery Environment window shows up.
Select Troubleshoot and click on Advanced Options.
Now, select System Restore.
Here, select a restore point before the SOC_CRITICAL_DEVICE_REMOVED bug check started to occur.
Follow the instructions to restore the system.
If the SOC_CRITICAL_DEVICE_REMOVED BSoD is caused by any software issues, restoring your system to a previous point will turn back things to when the system was working fine.
To conclude our guide, SOC_CRITICAL_DEVICE_REMOVED is most likely caused by a hardware issue and you should first check any connections and signs of component damage. If that’s not the case, the solutions above should have helped you fix the problem.
If you need more information, check our article on the causes of BSoD. Let us know if you have any questions on the comments section below.
The song information will appear in the extension window.
How do I identify music in Firefox?
To identify music in Firefox, you’ll need to use other web services that can do this, or you can use song identifier extensions for Firefox that we showed earlier.
As you can see, Shazam isn’t available for Firefox, so you’ll need to use these Firefox addons like Shazam.
Xbox has introduced a new feature called Natural Language Search to Insiders. As the name suggests, this feature lets players search for games using conversational language to find more relevant titles to play.
In the official release notes for this update, Microsoft says NLS can handle errors such as misspellings, acronyms, synonyms, and other variations better than traditional search services. Users are advised to try to feature with their preferred language.
Natural Language Search helps players find the right game for them using conversational language. This new search feature returns relevant results for queries such as “cozy farming games with fishing”, “FPS games with zombies”, or “puzzle games for kids”. Natural Language Search can also handle misspellings, acronyms, synonyms, and other variations much better than traditional search services.
Another new feature in this update is adding a thumbstick calibration tool in the Xbox Accessories app for the Xbox Elite Wireless Controller Series 2. This tool allows players to recalibrate the thumbsticks to ensure they work properly.
The thumbstick calibration tool in the Xbox Accessories app is now available for the Xbox Elite Wireless Controller Series 2. This feature allows players to recalibrate the thumbsticks on their controllers to ensure they are functioning properly for the best gaming performance.
To see if you gave this update, press the Xbox button, then go to Profile & system > Settings > System > Console info > OS version > Shell version. If the version number matches the above, you’re good to go. Remember, you’ll need to be enlisted in the Xbox Insider Program.
The TCPIP_AOAC_NIC_ACTIVE_REFERENCE_LEAK blue screen error comes with the 0x00000150 error code. The BSoD is triggered by the Active Idle Power Management (AOAC) that messes with the network card. Although disabling this power management feature will most likely fix this issue, it might also be due to a problematic network adapter driver or the malfunctioning of the network adapter.
How do I fix the TCPIP_AOAC_NIC_ACTIVE_REFERENCE_LEAK BSoD?
1. Disable AOAC using Command Prompt
Click the Start button, type cmd and select Run as administrator from the results.
Type the following command and press Enter to disable AOAC: powercfg -attributes SUB_SLEEP 7bc4a2f9-d8fc-4469-b07b-33eb785aaca0 -ATTRIB_HIDE
Restart your computer and check if the error persists.
Basically, the network card goes to sleep due to the power management settings and this command will ensure that that doesn’t happen anymore.
2. Update the network adapter drivers
Press Win + X and select Device Manager.
Expand the Network adapters category and if you find any driver with a yellow exclamation icon next to it, that’s most likely the culprit.
Right-click on your network adapter and select Update driver.
Select Search automatically for drivers and wait for the system to find and install the proper one.
If that doesn’t work, note the name of the driver and go to the manufacturer’s website and download the correct driver for your component and system.
Now, as you can see, updating your drivers is exactly as it looks, tedious and time consuming. Also, by getting the incorrect driver may lead to other unforeseen issues. We recommend using a driver updater tool that will automatically scan and update your drivers with just a few clicks.
Another way to fix this problem is by using Fortect, a that is specialized in fixing BSoD issues on your PC. It scans your system, identifies the problem and fixes it automatically with just a few clicks.
3. Restore your system to a previous point
Click the Start button, type system restore and select Create a restore point from the results.
Now, click the System Restore button.
Select a restore point that is dated before the TCPIP_AOAC_NIC_ACTIVE_REFERENCE_LEAK started occurring.
Follow the on-screen instructions to restore your system.
Restoring your system to a previous point will fix any problems caused by software conflicts. If the BSoD still appears, you should try resetting Windows to factory settings.
We hope that by applying the solutions above you managed to fix the TCPIP_AOAC_NIC_ACTIVE_REFERENCE_LEAK and now everything returned to normal. If the issue still persists, try replacing the network adapter if it’s a discrete module. If it’s built on the motherboard, you should contact a specialized repair shop or technician.
If you have any questions or suggestions about this BSoD, leave a comment in the dedicated section below.
A recent Windows 10 update, KB5043131, caused an issue that made certain apps inoperable. Microsoft acknowledged the issue, stating that the bug in the update prevented apps from launching on non-admin accounts.
The affected apps included Quick Assist, Microsoft Teams, Windows Narrator, and any app with UIAccess set to “true.” According to the official support page, the issue was observed after installing the September 2024 preview update released on September 24, 2024, or later.
The UIAccess attribute in an application’s manifest file requests that the application be granted higher privileges.
The bug affected systems with client versions of Windows 10 version 22H2. Microsoft said the issue was mitigated by the Known Issue Rollback feature, which undid the problematic bits of the update, but it might take up to 24 hours to propagate.
There is also a policy for IT admins that can be applied to undo changes and restore devices to a state when this error doesn’t happen. You can download it from this link.
A permanent solution for the KB5043131 happening in Windows 10, will be available in a future update.
Often Chrome incognito tabs disappear on Android, and this can be a problem since you’ll lose your entire session. However, there might few ways to circumvent this issue.
Why do my incognito tabs randomly disappear?
This happens if your device is low on memory or your phone is optimizing performance by freeing up your memory.
How do I stop Chrome from closing incognito tabs?
1. Ensure Google Chrome is in focus before you lock your phone
Start your private browsing session.
Now switch back to regular Chrome without closing incognito tabs.
Do not close or minimize Chrome.
Lock your device.
After doing that, your incognito tabs should still be there once you unlock your phone. Keep in mind that this isn’t the most reliable solution, but it’s worth trying out.
2. Lock your Incognito tabs
In Chrome, tap on three dots and choose Settings.
Next, head to the Privacy and security.
Enable Lock Incognito tabs when you leave Chrome.
This is also another workaround that might help you if Chrome Incognito tabs disappear on your device.
Do Incognito tabs close by themselves?
No, they will remain open as long as the Chrome process is running in the memory. But if your memory is cleared or you close the browser, the Incognito tabs will disappear.
So if you’re low on memory, sometimes Incognito tabs will close automatically on Android as your device tries to optimize its performance.
How do I make Chrome always open Incognito?
You can make Chrome open in Incognito by default simply by making a few changes to its shortcut. We have an entire guide on Chrome Incognito shortcut, so check it out to see how to do this.
How to recover incognito tabs in Chrome?
This isn’t possible natively, but it can be achieved with extensions. We wrote about this in our guide on how to export Incognito tabs in Chrome, so feel free to visit it.
This is a peculiar issue, but if Chrome Incognito tabs tend to disappear, it’s most likely that your device is doing memory optimization in the background and it’s ending certain processes while doing that.
Speaking of Chrome, a few users reported that Chrome Incognito keeps popping up, and we have a special guide that addresses this, so don’t miss it.
Microsoft 365 Backup, the Redmond-based tech giant’s platform for keeping corporate data safe, will receive a package of new policies and features that will further strengthen its security abilities—and probably also shatter some of the criticism Microsoft has been getting regarding the security of its products and services.
These policies and new settings will change how admins can use Microsoft Backup to ensure the security and well-being of their organization. For one, notifications will be impacted. A recent entry to the Microsoft 365 Roadmap says the Backup platform can soon be configured to receive email notifications for any risky changes to the backup settings.
Set of pre-defined administrators can be configured to receive email notifications for any potentially damaging changes to the backup settings or actions taken to ensure proper oversight of the tool in the organization.
Another new policy coming to Microsoft 365 Backup will let admins perform file-level browse/search and then restore. Admins will be able to browse for files across the server, apply filters to narrow results and restore the file to its original location by overwriting existing content.
Perform file-level browse/search and then restore using Microsoft 365 Backup. With this enhancement you will be able to browse for files across in a site from available daily restore points and apply filters to narrow results, restore at the original location by overwriting existing content or to a new place by creating a copy of the content.
Automatically backup all Exchange or OneDrive users and/or SharePoint sites in the tenant and have the tool automatically add new users/sites to the backup policy.
Create backup policies for your SharePoint, OneDrive, and Exchange data based on distribution lists and security groups memberships, and have the tool automatically update these policies based on dynamic membership changes.
Ability to permanently delete, after appropriate grace period, protection units from the backups. A protection unit is defined as a OneDrive Account, SharePoint site, or Exchange Online shared or user mailbox being protected in the Backup tool.
All of these new policies and settings are set to be released next year, though, between March and July. Fortunately, they won’t be sudden—something that admins are already used to when it comes to changes in the Microsoft 365 Admin Center.
All of them will have a preview available before the general release, which is useful for admins to learn how to use them.
KERNEL_LOCK_ENTRY_LEAKED_ON_THREAD_TERMINATION error is a BSoD with the error code 0x00000153. The blue screen error typically occurs due to RAM module issues. To quickly fix it, try reseating the modules or replace them with some that you know that work.
It can also be caused by issues related to system processes and drivers, or software conflicts and overclocking.
How do I fix KERNEL_LOCK_ENTRY_LEAKED_ON_THREAD_TERMINATION BSoD?
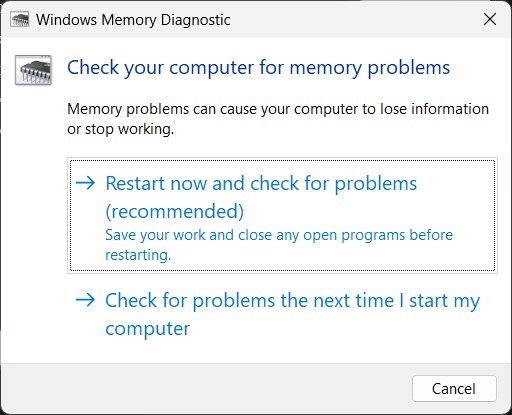
1. Use the Start menu
Click the Start button, type Windows Memory Diagnostic and open it.
You can select from the two below options:
Restart now and check for problems (recommended)
Check for problems the next time I start my computer
The tool will find any issues with the RAM modules.
Run a few tests and if the tool finds any problems with the RAM modules, try reseating them on the motherboard or replace them.
2. Update the drivers
Right click the Start button and select Device Manager.
Expand the categories and look for any exclamation marks next to any driver.
We also recommend clicking on View > Show hidden devices to make sure you see all the components.
Right-click on the component, and select Update driver.
Select Search automatically for drivers and allow the system to install any new ones.
If the yellow exclamation mark is still present, go to the manufacturer’s website and download the right driver for your component and system.
If you don’t find any problematic driver in the list, we recommend using a driver updater tool that will automatically scan and update your drivers.
We also recommend using Fortect, a complex tool that will automatically deal with BSoD issues on your PC and fix it with a few clicks.
3. Perform a System Restore
NOTE
Be aware that restoring your system to a previous point in time will also uninstall any applications you installed from that point to present time.
Click the Start button, type system restore and select Create a restore point from the results.
Now, click the System Restore button.
Select a restore point that is dated before the KERNEL_LOCK_ENTRY_LEAKED_ON_THREAD_TERMINATION started occurring.
Follow the prompts to restore your system.
Restoring your system to a previous point will fix any software-related issues. If this doesn’t solve the problem, you may also think about resetting Windows to factory settings.
We hope that by applying the solutions above you managed to fix the KERNEL_LOCK_ENTRY_LEAKED_ON_THREAD_TERMINATION and now your computer is running smoothly. However, as we mentioned in the beginning of this guide, the most likely culprits for this problems are the RAM modules.
If you need more information, check our article on the causes of BSoD. Let us know if you have any questions on the comments section below.
The Redmond-based tech giant is set to enable OSCI (as part of the EnableAllOcsiClients policy) for OneDrive tenants, which will ensure that the platform is perfectly synchronized with the Office suite.
In a recent entry to the Microsoft 365 Roadmap, the tech giant says tenants can disable the GPO policy, which includes OSCI. However, doing so makes it difficult to keep all internal versions of the Office files up to date.
However, with the new option, OneDrive tenants can turn the OSCI on, and features such as autosave, version history, real-time user collab, and even merging in the case of conflict can work with Office.
If a tenant has the (EnableAllOcsiClients) GPO enabled, Office and OneDrive are able to communicate smoothly. Right now, tenants have the option to disable the GPO, and when they disable the GPO, it becomes difficult to ensure that all internal versions of Office files are kept up to date so that features like autosave, version history, real time user collab, and merging in the case of conflicts can work.
In Edge, click the Menu button and choose Settings.
Navigate to Privacy, search, and services.
Select Choose what to clear every time you close the browser.
Select all options on the list.
Keep in mind that this isn’t an InPrivate mode, but since it will delete everything in your session as soon as you close your browser, it will work almost the same as private browsing mode.
How do I enable incognito extensions in Microsoft Edge?
Outlook for Mobile will be enhanced to support additional information on the account profile card, including a reachability panel, a hybrid location, and the ability to add preferred pronouns.
According to the latest entry in the Microsoft 365 Roadmap, the updated profile card will impact Android and iOS devices. This update will replace the events panel with the calendar in the app.
Reachability panel, hybrid location, and pronouns (read only) will be available on the Outlook profile card in iOS and Android. Events panel will be replaced with the calendar in Outlook mobile.
Users have been able to add their preferred pronouns in Outlook for quite a while now, but it wasn’t possible in the mobile version of the app. However, with this update, Microsoft will also bring it to Outlook for Mobile.
It will be available as a preview starting in January 2025, with a general release scheduled for February 2025.
In other news, Outlook for Mobile recently allowed users to choose their preferred fonts, adding an extra touch of personalization to their emails.
After the numerous bugs with the newest Windows 24H2 release, unfortunately, we can add one more to the list, related to the KB5044384 October 2024 non-security preview update. According to numerous Microsoft answers posts, KB5044384 simply fails to install. And when it does, you’ve got another thing going: the Windows Processes in Task Manager displays 0, even if you obviously are running a lot of them.
After installing this update, users will encounter an issue where the number of Apps, Background Processes, and Windows Processes in Task Manager display a count of zero, despite having active applications running. This issue appears specifically on the Processes page when the “Group by Type” view is enabled.
Normally, Task Manager displays the count of processes next to each group name (e.g., Apps, Background processes), providing users with a quick view of active processes. However, due to this issue, Task Manager instead shows (0) for each group, regardless of the actual number of running processes.
Is there a fix for KB5044384 issues?
The short answer is no, but Microsoft is looking for a fix. In the meantime, if you’re in the pretty large category of users that simply can’t install this update, consider yourself lucky. The 0x80070003 installation error is far less worse than the Task Manager bug it causes after its actual installation.
If you managed to install it and it causes the 0 Processes bug, go to Windows Update > Update history > Uninstall updates and try to get rid of it for the moment.
With all the Windows 11 24H2 update bugs, it wouldn’t be a bad idea to turn off the Get the latest updates as soon as they’re available option in Windows Update, at least until Microsoft releases some fixes for all these bugs.
As usual, we will keep you posted with any fixes and updates when they are available.
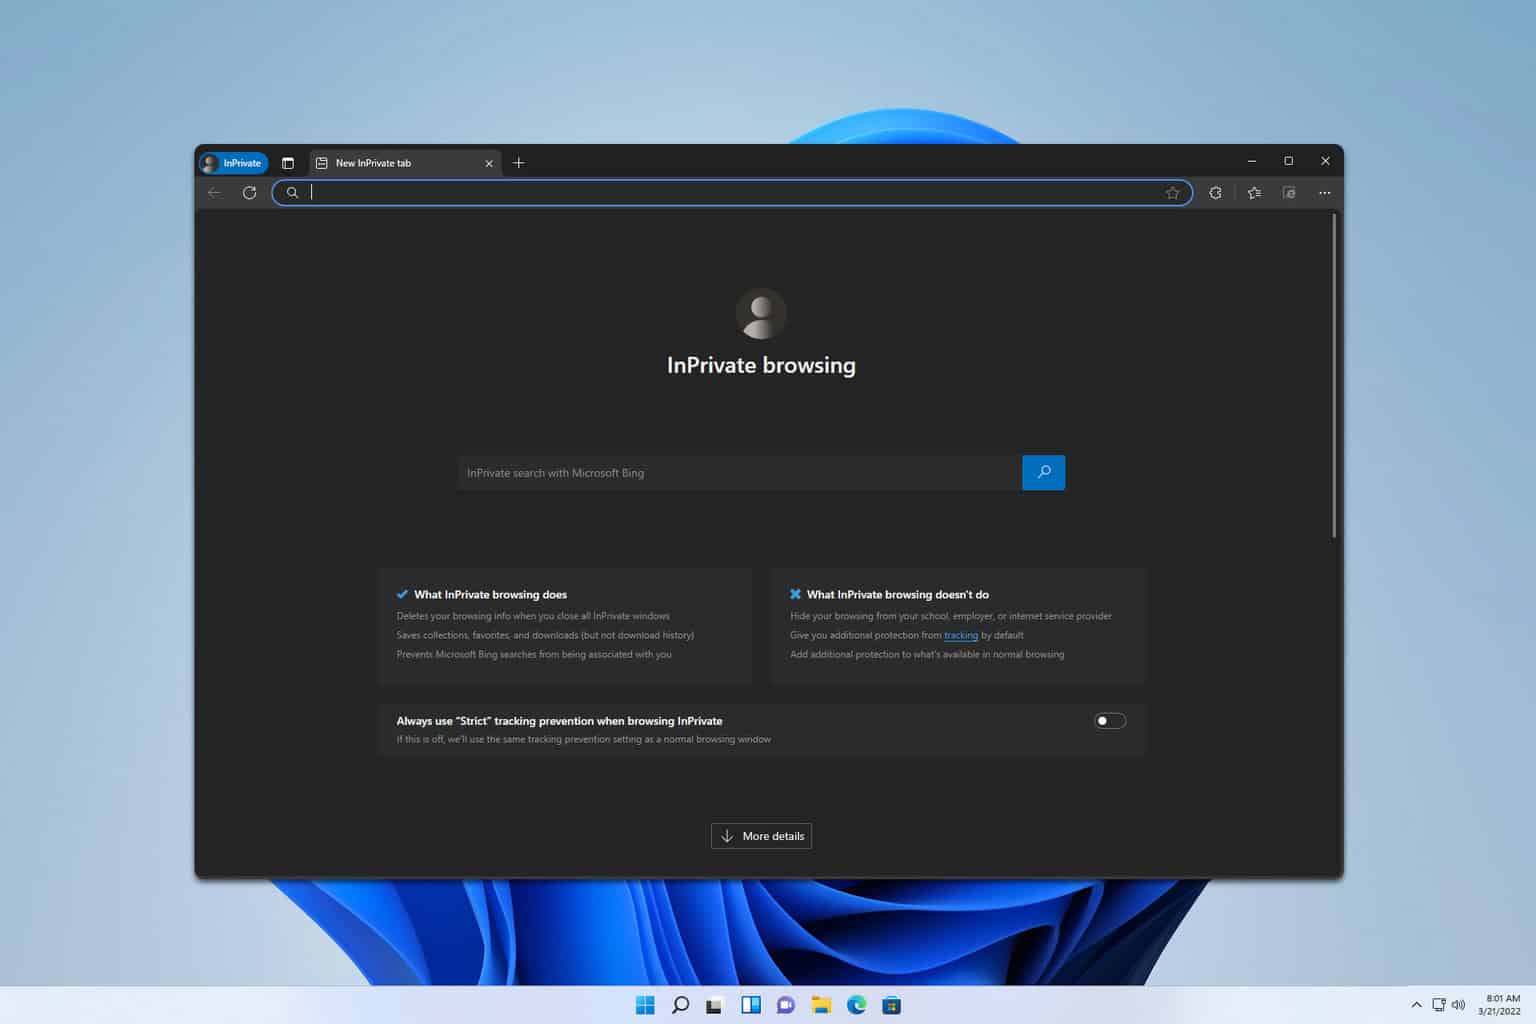
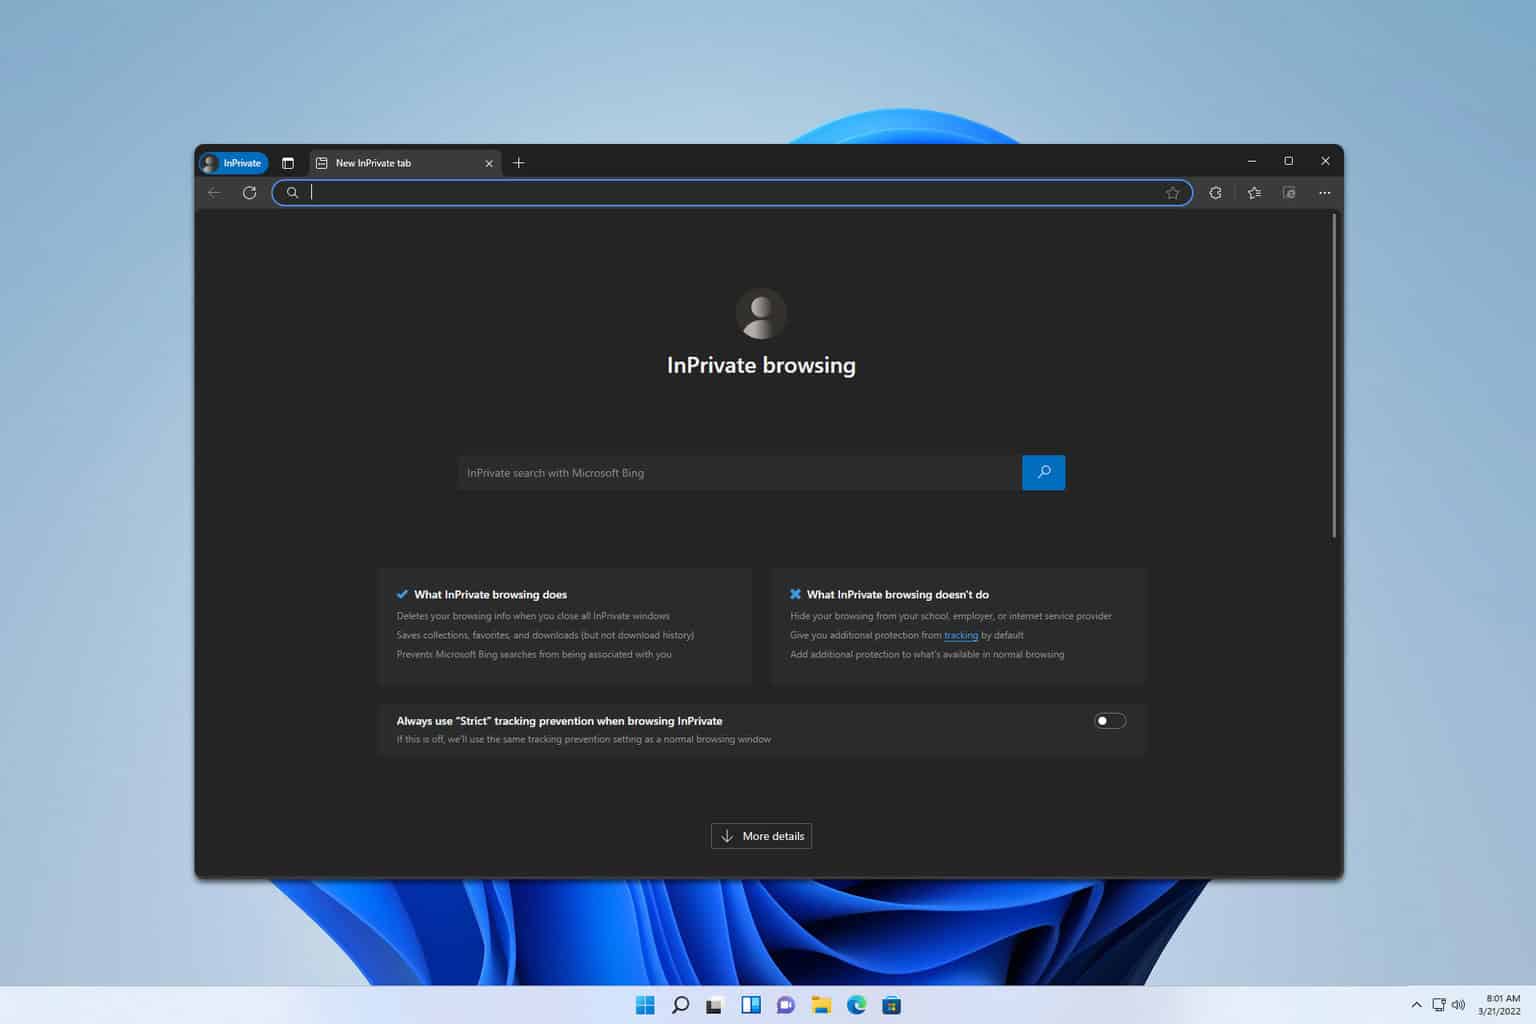
Developers and advanced users might want to start Edge Incognito using a command line and use it in their scripts. This is simple to do, and in today’s guide, we’ll show you a couple of methods you can use to achieve that.
How do I open Edge in Private Mode using the command line?
1. Use Command Prompt
Press the Windows key + S and type cmd. Select Command Prompt.
Run the following command to open the InPrivate window: start msedge.exe -inprivate
To open a specific website run: start msedge.exe www.windowsreport.com -inprivate
You can also use –new-window parameter to open another instance like this: start msedge.exe www.windowsreport.com -inprivate –new-window
2. Use PowerShell
Press Windows key + S and type powershell. Select PowerShell from the list.
You can run the following command to open a blank page InPrivate mode: Start-Process msedge.exe -ArgumentList "-inprivate”
To open a specific page, use: Start-Process msedge.exe -ArgumentList "-inprivate", "windowsreport.com"
Of course, you can open a new instance with the following command: Start-Process msedge.exe -ArgumentList "-inprivate", “-new-window”, "windowsreport.com"
You can do that by following the steps from our first solution, just be sure to exclude the -inprivate parameter in your commands.
As you can see, it’s pretty simple to start Edge Incognito using the command line, and you can do that from both PowerShell and Command Prompt in a matter of moments.
Microsoft released a new update to its Edge web browser for Dev channel users on desktop platforms. The update brings Edge version 132.0.2917.0 and introduces new features and bug fixes. The most notable addition is the ability to check the sync status from the profile settings page on the web.
Microsoft has added the synchronization status to the profile details section on the profile settings page in the new Edge. To access the feature, click on the user profile button in the toolbar and then click on “Manage profile settings.”
The new Edge 132.0.2917.0 update also introduces a new setting that lets you customize the colors of webpages and scrollbars with your preferred accent colors. To enable the feature, go to edge://flags and search for “webpage custom colors.”
The update also introduces a new alert that will let you know when the sync service is unavailable. This alert will appear on the new tab page when the service is down.
On the fixes front, the new Edge update squashes a bug causing the browser to crash on iOS when an image is pressed and held to move and then released, as well as a crash issue that occurred upon relaunch after closing both the main profile and the guest profile.
The update also fixes an issue where Edge crashes on Android devices when the New Tab Page (NTP) is returned after saving logs and where icons are cut off in the browser uninstall dialog.
You can refer to the official release notes for a complete list of changes. If you’re an Edge Insider using the Dev channel, you should be able to grab this update now by checking for updates in the browser settings menu.
In other news, Copilot in Edge may no longer track your shopping activities online, thanks to a new option that Microsoft added to the browser. Find more about it here.
The Quest 3S is Meta’s latest attempt to make standalone VR and mixed-reality gaming accessible to more people. It’s not an upgrade to the Quest 3, but rather a budget-friendly alternative, swapping out some components for less costly ones while keeping the essentials for gameplay and usability.
VR just got cheaper – Meet the Meta Quest 3S
Starting at $300 for the base 128GB model—compared to the Quest 3’s $500 for the 512GB version—the key question is: Do the compromises go too far, or has Meta managed to preserve the magic?
As someone who backed the original Oculus Developer Kit over a decade ago, I’m intimately familiar with this category; I’ve tested every major headset that matters. The Quest 3 is my go-to daily headset for gaming and productivity, but I also have a Pimax Crystal for high-fidelity PC gaming, a PSVR2 for the exclusives, and some pretty insane accessories—like a motion rig for racing and an omnidirectional treadmill. I know VR, and you can trust my opinions.
Design: Minor Tweaks to Keep Costs Down
From a design perspective, the Quest 3S doesn’t diverge too far from the Quest 3, with the obvious external change being in the front sensors. Gone are the Quest 3’s depth-sensing cameras, replaced by a simpler set of color cameras and an infrared emitter.
Depth perception is now handled entirely in software, which speaks to how much Meta has optimized their hardware—this software-driven depth still offers an impressive experience.
The passthrough video quality is superb, providing clear visuals in mixed reality, especially in good lighting. There’s also a new button near the volume control for quickly toggling into mixed reality mode; being able to jump back into the real world is great for new users, who can feel overwhelmed by fully immersive virtual environments.
However, there’s one major removal that will be a step too far for some: the 3.5mm audio jack. You can’t connect high-quality wired headphones or tactile feedback like a Subpac. Bluetooth is the only option for external audio. I’m not a fan of the built-in audio system, as it lacks bass—but there’s no denying the convenience factor, and most people will be happy with it.
Elsewhere, the Quest 3S uses the same adjustable fabric head strap as the Quest 3. While it’s comfortable enough and keeps the 514g headset secure, there are plenty of third-party solutions featuring ratcheting straps, cooling systems, or additional battery packs.
The controllers are similarly unchanged. The original Quest 3 removed the cumbersome tracking rings, leaving a smaller design that fits neatly into the palm of your hands. They’re some of the most comfortable controllers ever, but I still pine for something more substantial to better represent the feeling of holding a sword or a gun. Again though, there are plenty of third-party accessories or 3D-printable cases for the controllers (anything for the Quest 3 controller will work with the Quest 3S).
Controllers aren’t your only option, though. Lay them down on the desk, and hand tracking will automatically take over. Using simple gestures such as pinch to select or grab, you can navigate the OS and play some slower-paced games with only your hands. It works reasonably well for simple interactions, but I still prefer controllers.
Under the hood, the Quest 3S keeps the same CPU, GPU, and memory as the Quest 3, so performance won’t be an issue. Meta has discontinued the 128GB model of the Quest 3, but the 128GB version of the 3S should be ample unless you’re storing a vast library of movies. A 256GB version is also available at $100 more, but at that point, the value compared to the superior Quest 3 is debatable.
Personally, I’ve been fine with 128GB, keeping a mix of graphically intense and lightweight games. And if you’re mostly streaming from a PC, storage space is even less of a concern.
Visual quality: Fresnel lenses and slightly lower resolution
The biggest downgrade is in the visuals. The Quest 3S drops the resolution from 2064 x 2208 pixels to 1832 x 1920 pixels per eye—a roughly 10% reduction. In addition, Meta has opted for Fresnel lenses over the Quest 3’s pancake-style ones.
Fresnel lenses, known for their concentric rings, can produce minor visual artifacts like “god rays” or lens flares, which are noticeable in high-contrast areas of the screen.
But after spending thousands of hours with both Fresnel and pancake lenses, I can say the difference isn’t massive. Yes, if you’re watching movies and want the best possible image quality, you may notice the trade-off. But for VR gaming, it’s a minor compromise, and the immersive experience isn’t diminished. If this is your first VR headset, you won’t have been spoiled by the better visuals of other lens systems yet.
If you’re near-sighted and need to wear glasses, don’t jump straight in—you may scratch the lenses. Meta includes a “glasses spacer” in the box, which you should fit before using it between the facial interface and the headset body. This comes at the expense of a slightly smaller field of view, however. You can also purchase (unofficially) prescription lenses if you’d rather not risk it. If you’re long-sighted, you don’t need to wear your glasses; the focal distance is a few meters away.
Mixed Reality: The standout feature
The single most impressive feature of the Quest 3, in my opinion, is its mixed reality capabilities, and I’m happy to report that the Quest 3S delivers the same experience.
The color passthrough is outstanding, allowing you to double-tap or use the button to return to your real-world surroundings instantly. You can move around freely, even see your phone screen, and—provided you have the space—transform any room into a unique mixed-reality play area.
Lately I’ve been hooked on a warehouse-scale game called Laser Limbo, a laser-tag style game with PvE and PvP modes, where you map out your walls and obstructions, then augment them with virtual objects. It’s a system seller for sure, and the Quest 3S handles it flawlessly.
PCVR streaming: Unlocking high-quality VR gaming
The Quest 3S isn’t just a standalone VR and mixed reality device; it also supports PCVR gaming with Oculus Link, Steam Link, and Virtual Desktop (paid)—allowing you to enjoy the best of Oculus Desktop and SteamVR wirelessly. Virtual Desktop is my preferred method, as it provides the most customization options and best performance.
If the Quest library doesn’t have enough for you and you’re looking to access higher-fidelity PC games, wireless streaming is a game-changer.
Wireless game streaming from a PC isn’t just for VR either; if you want to play Civilization VI on an IMAX-size screen, you absolutely can.
Should you buy the Quest 3S?
Quest 3S buyers get Batman: Arkham Shadow included—a showcase game that lets you step into the shoes of the Dark Knight. Combat is intense and offers a surprising workout, while the rest of the game gives you plenty of satisfying Batman-style action, like throwing a Batarang or gliding over Gotham. It’s a fun addition that demonstrates the capabilities of the Quest 3S.
The Quest 3S is affordable, feature-rich, works as a standalone headset, and connects to your gaming PC for a massive library of SteamVR and Oculus desktop titles. It offers full-color passthrough mixed reality gaming, as well as immersive virtual reality.
If this is your first headset and the Quest 3’s price tag of $500 is a little too high, the Quest 3S at $300 is a steal. For seasoned VR users, the trade-offs are apparent, but they’re not deal-breakers.
Ultimately, the lens or screen technology doesn’t matter; it’s about the immersion and the emotional connection you feel. The Oculus Development Kit 1—a low-resolution, nausea-inducing headset by today’s standards—still brings back fond memories as my first taste of being so utterly and completely transported to somewhere else.
If the Quest 3S means Meta can deliver that incredible experience to more people at a lower price, it’s a win in my book.
Until you decide whether to go for it or not, check out some of the best VR software for PC. You might also be interested in some of the best reality headsets you can buy right now.
Do you already own a Meta Quest 3S? Let us know about your experience in the comments below.
Microsoft is expanding its widgets feature beyond Windows 11. The company is now testing MSN-powered widgets on the Edge browser’s new tab page, offering quick access to weather, finance, sports, and traffic information.
Widgets are small, dynamic cards that display information. They can be generally seen and accessed from the left corner of your Windows taskbar. Some widgets, such as weather, sports, stocks, calendar, and the News Feed within the Widgets board, require Microsoft Edge to work.
Microsoft tests MSN-Powered Widgets on Edge New Tab Page for Quick Access to Information
The latest Canary, Dev, and Release builds of Edge introduce a new feature that allows users to add widgets directly to the new tab page. These widgets, powered by MSN, provide quick access to a variety of information, including:
Weather: Real-time weather updates for your current location.
Traffic: Real-time traffic updates for your daily drive
Finance: Stock market news and information.
Sports: Scores and updates on your favorite teams.
How to Enable MSN Widgets on Microsoft Edge’s New Tab Page:
Open the Edge browser.
Open a New Tab.
Click the gear icon in the top-right corner of the new tab page.
Enable the “Show Widgets” and “Show Content” options.
Show widgets option in Edge NTP settings. image credit: WindowsReport
Once enabled, the four widgets appear on your new tab page at the bottom. Each widget offers its options. You can customize their appearance and the information they display.
MSN widgets on Edge New Tab Page with customization options. image Credit: WindowsReport.
You can turn off all widgets from Edge New Tab Page Settings or by right-clicking on a widget and selecting the “turn off all widgets” option. You can also hide a widget you don’t like or customize the widgets that appear on the New Tab Page in Edge by selecting the “manage widgets” option or by visiting this URL in the address bar.
Microsoft is making Edge more useful by adding widgets to the new tab page. This will make it easier for users to access information like weather, news, and sports scores directly from their browser. The feature is purely optional and not enabled by default in the first place.
Apart from this, Microsoft has removed Copilot’s shopping notifications setting from Edge, indicating that Copilot can no longer track users’ online shopping activities. Additionally, Microsoft is testing Instant Updates for Edge, which automatically installs updates in beta without requiring user intervention.