Fortnite video game updates with support for 120 FPS gameplay on Microsoft’s Xbox Series X console

Today’s update for the popular Fortnite video game is set to be an exciting one for players on all of its supported platforms as it adds a variety of seasonal items and activities to be enjoyed over the Christmas season in addition to some gameplay enhancements for both PC and new gen console owners.

After this update rolls out over the next few hours, those playing on Microsoft’s newly launched Xbox Series X and Xbox Series S consoles will be able to play Fortnite in 120 frames-per-second (FPS) if they so choose. Both consoles already supported 60 FPS so this will be yet another gameplay option for fans to experiment with.

It is worth noting that while the 60 FPS mode plays in 4K resolution on the Xbox Series X, playing in 120 FPS will bring the visuals down to 1440p. Both 60 and 120 FPS modes on the cheaper Xbox Series S console are locked at 1080p resolution.

On the other end of the technology spectrum, those playing Fortnite on a Windows PC with older or slower hardware can now try out a new performance mode via the game’s settings which will prioritise gameplay and speed over visuals.

December has been a big month for Fortnite. This month saw the end of the Marvel-themed Chapter 2 Season 4, the first ever Fortnite Crew monthly subscription, the addition of The Mandalorian’s Din Djin and Grogu with the launch of Season 5, and the arrival of Master Chief from the Xbox Halo video game franchise.

Are you a Fortnite fan? Let us know what’s excited you the most this month in the comments below and then follow us on Pinterest and Twitter for more gaming news.

Fortnite
Fortnite
Developer:
Epic Games Inc.
Price:
Free


Fortnite - 1,000 V-Bucks


Fortnite - Powerhouse Pack

FIX: TAP-Windows Adapter V9 error (4 foolproof solutions)

The TAP-Windows Adapter V9 is a network driver that’s essential for VPN connections.

More often than not, this network driver gets automatically installed along with VPN clients.

Usually, the driver’s default path is: C:/Program Files/Tap-Windows

However, certain users noticed that their internet connections don’t always work while the TAP-Windows Adapter driver is enabled.

What’s even more strange is that even disabling it wouldn’t work, as the TAP network driver would re-enable itself shortly after.

Therefore, users were still unable to establish a connection.

If that ever happened to you, check out some easy-to-follow suggestions that could fix your TAP-Windows Adapter V9 error.

How can I fix the TAP-Windows Adapter v9 error?

Use the Internet Connections Troubleshooter

The easiest fix would be using Windows’ built-in Internet Connections troubleshooter.

This tool can usually fix various connectivity issues, so it might be worth checking out.

Here’s what you need to do:

  1. Press the Win key
  2. Type troubleshoot
  3. Select Available Recommended troubleshooting
  4. Click the Available troubleshooters hyperlink
    troubleshoot TAP Windows Adapter V9 error
  5. Select Internet Connections and click Run the troubleshooter
    troubleshooter TAP Windows Adapter V9 error
  6. Select Troubleshoot my connection to the internet
  7. Go through the troubleshooting wizard’s steps

Reset the TAP-Windows Adapter Connection

Disabling and re-enabling the TAP adapter driver will (or better yet should) reset its network functions.

Furthermore, it may also fix the TAP-Windows Adapter V9 error and it’s a really simple task.

All you have to do is:

  1. Press the Win key on your keyboard
  2. Type network
  3. Select Network status
  4. Click on the Network and Sharing Center buttonnetwork and sharing center TAP-Windows Adapter V9 error
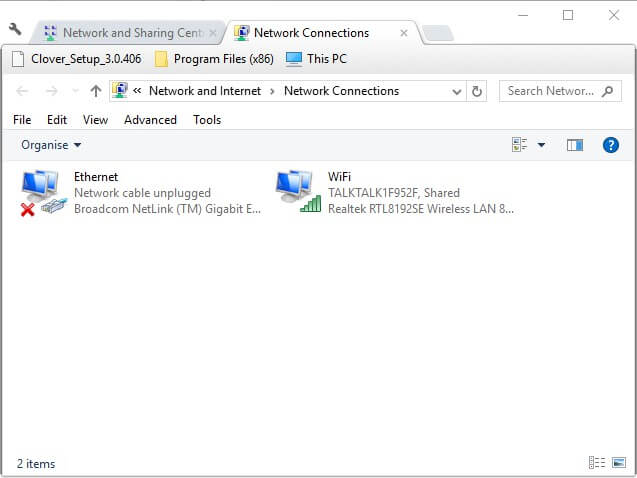
  5. Select the Change adapter settings optionnetwork connections
  6. Right-click the TAP-Windows Adapter
  7. Select Disable
  8. Right-click the TAP-Windows Adapter once more
  9. Select Enable
  10. Restart your PC and check if there’s any improvement

Reinstall TAP-Windows Adapter and VPN client

The best resolution for the TAP-Windows Adapter V9 error might be to reinstall the driver altogether.

However, considering that most TAP adapter drivers are a dependency for VPN clients, most VPN providers come with their own version.

Thus, it would be easier to just uninstall the TAP driver and your VPN client, and perform a clean install of both services after you’re done.

This is how you should reinstall your TAP driver and VPN client:

  1. Right-click the Start button
  2. Select Device Managerdevice manager TAP Windows Adapter V9 error
  3. Expand the Network adapters category
  4. Right-click the TAP-Windows Adapter V9
  5. Click on Uninstall device
  6. Select Uninstall to confirm
  7. Press the Windows key + R key combination
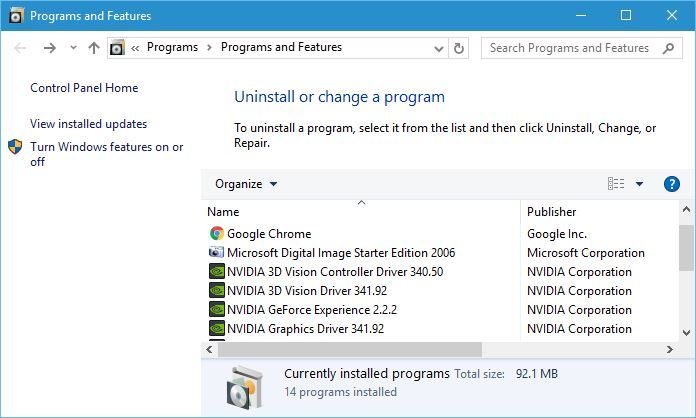
  8. Type appwiz.cpl and press Enterprograms and features TAP Windows Adapter V9 error
  9. Select your VPN software in the window
  10. Press the Uninstall button to remove it
  11. Proceed with the uninstallation
  12. Restart your PC shortly after uninstalling both services
  13. Reinstall your VPN software + TAP adapter driver

If you notice that reinstalling your VPN client and TAP adapter driver didn’t work, you might consider switching to a better alternative.

Private Internet Access, for instance, is an excellent VPN service that comes with its own TAP driver.

Furthermore, even if it stops working at some point, you can easily reinstall it directly from the VPN client’s configuration screen.

Private Internet Access

Private Internet Access

Did your TAP adapter driver stop working? Try using PIA as an alternative.
Check priceVisit website

Reset Windows 10

Apparently, resetting Windows 10 fixes the TAP-Windows Adapter V9 error in most cases.

You can reset Windows 10 and also keep your files. However, you’ll need to reinstall all the apps and drivers, as those will be swept clean from your PC.

Additionally, you’ll lose any configuration you did before resetting your PC.

Granted, this method is one of the most drastic ones, but it also gets the job done most of the time.

Follow these steps to reset your Windows 10 PC:

  1. Press the Win key on your keyboard
  2. Type Reset PC
  3. Click on the Reset this PC optionreset this PC Adapter V9 error
  4. Select Get startedchoose an option TAP-Windows Adapter V9 error
  5. Press the Keep my files button
  6. Click the Next button
  7. Select the Reset option to proceed
  8. Wait for the process to complete

Conclusion

To wrap things up, if you notice that your TAP-Windows Adapter V9 triggers various connectivity errors, there are some things you could try.

More often than not, reinstalling the TAP driver and VPN client will fix the issue.

However, you may need to go as far as resetting your PC altogether, so buckle up and don’t lose hope.

FIX: Hotspot Shield VPN stopped working (9 solutions)

Hotspot Shield has a huge fanbase, thanks to its blazing-fast speeds and the fact that it offers a free version.

So it’s not hard to imagine how devastating it must be for users when Hotspot Shield VPN stops working on their device.

Don’t worry: we thoroughly explored the functionality issues of this VPN service to help you repair the app and connect to a VPN server in no time.

How do I fix Hotspot Shield VPN if it stopped working?

Update the app

update Hotspot Shield VPN in Microsoft Store

It’s crucial to keep your VPN app updated to the latest version.

In addition to benefiting from the newest features, improvements and bug fixes, it’s also a good way to fix Hotspot Shield VPN if it stopped working on your device.

Users who downloaded the Hotspot Shield client from the official page can skip this step. That’s because the app gets updated automatically.

However, if you downloaded it from Microsoft Store, you might have to perform this checkup manually.

  • Open Microsoft Store
  • Click the three-dots button on the upper-right part
  • Select Downloads and Updates
  • Click the update button next to Hotspot Shield VPN

If you can’t update Store apps or encounter any other issues there, visit our Microsoft Store Troubleshooting Hub to fix any problem.

Check your Internet connection

A VPN service will have trouble connecting to the Internet if your network connection isn’t stable enough.

So you should verify your Internet speed and run multiple tests to determine the quality of your connection.

You might also want to consider switching to Ethernet mode if the Wi-Fi signal is poor on your notebook.

Hotspot Shield VPN has an integrated Internet speed tester that you can access from the main window. It measures your ping time, jitter and packet loss.

Make an exception for Hotspot Shield VPN in your firewall

Allow traffic for Hotspot Shield VPN in the Windows Firewall
  1. Press the Start button, type firewall, and select Firewall & network protection
  2. Click Allow an app through firewall
  3. Click Change settings (you need admin rights)
  4. Locate Hotspot Shield Free VPN in this list
  5. Enable the Private and Public options for its entry
  6. If the app isn’t listed here, click Allow another app to find it

Normally, Hotspot Shield VPN creates an exception for itself in the Windows Firewall when you install it.

However, if you’ve recently made significant changes to your security options, follow the easy instructions above to allow VPN traffic in your firewall for Hotpot Shield VPN.

Check if another VPN or proxy is running

fix VPN network adapter is being used by another VPN error in Hotspot Shield VPN

Hotspot Shield VPN won’t connect to a server if you have another VPN or proxy service running in the background. You can easily tell from the red banner that appears in the main window of the app.

To fix this problem, check if any other VPN or proxy apps are running in the background.

Keep in mind that manual VPN or proxy configurations you added using the Windows built-in features don’t apply here, so there’s a need to delete those.

We’ve noticed that the VPN network adapter is being used by another VPN. Disconnect the other VPN and try again message also appears if your TAP drivers are being used by the other VPN, even if the other VPN isn’t currently running.

In this case, you must completely uninstall the other VPN service before trying to connect with Hotspot Shield VPN again.

Change your DNS settings

  1. Right-click the Windows Start button and select Network Connections
  2. Click Change adapter options
  3. Right-click your Internet connection and go to Properties
  4. Double-click Internet Protocol Version 4 (TCP/IPv4)
  5. Select Use the following DNS server addresses
  6. Set Preferred DNS server to 8.8.8.8
  7. Set Alternate DNS server to 8.8.4.4
  8. Click OK
  9. Try to connect to a Hotspot Shield VPN server

Your DNS resolver might be not working properly, which could be why Hotspot Shield VPN isn’t connecting either. But you can easily fix this issue by changing your DNS servers on Windows.

In the example above, we listed the DNS servers of Google Public DNS. You can also try Cloudflare or OpenDNS.

Connect to another Hotspot Shield VPN server

connect to Hotspot Shield VPN locations

There might be a problem with the VPN server you’re targeting: too many connected users, the server is down for maintenance, or something else.

In that case, you can try to get Hotspot Shield VPN to work by simply connecting to another server. Make sure to explore multiple server options.

Reinstall the TAP-Windows driver

uninstall TAP Windows Adapter V9 from Device Manager
  • Right-click the Start button and select Device Manager
  • Expand Network Adapters
  • Right-click TAP-Windows Adapter V9
  • Select Uninstall device
  • Right-click any part of the screen and select Scan for hardware changes
  • Reinstall Hotspot Shield VPN
  • Launch the app and try to connect to a VPN server

If there’s a problem with the Windows TAP driver, it will prevent Hotspot Shield VPN from working properly. Using the steps above, you will force Microsoft to reinstall the TAP driver.

Then, you can reinstall Hotspot Shield VPN and try to connect to a server.

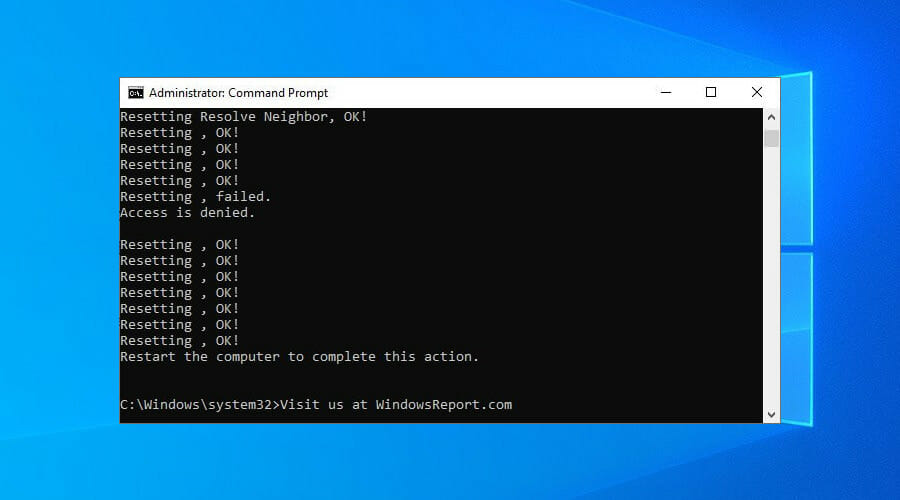
Flush your DNS and reset Winsock

flush DNS servers in Windows 10
  1. Run Command Prompt with elevated rights: press Ctrl + R, type cmd, hold Ctrl + Shift and press Enter
  2. Copy and paste the next lines (press Enter between each line)
ipconfig /flushdns

ipconfig /registerdns

ipconfig /release

ipconfig /renew

NETSH winsock reset catalog

NETSH int ipv4 reset reset.log

NETSH int ipv6 reset reset.log

exit

Restart your computer and try connecting to Hotspot Shield VPN.

The commands above are useful for quickly refreshing your network settings. It might be the reason why Hotspot Shield VPN stopped working properly on your Windows PC.

Switch to an alternative VPN service

PIA

If you can’t get Hotspot Shield to work, no matter what you try, perhaps it’s not 100% compatible with your device.

In that case, consider switching to an alternate VPN service that works with Windows, Mac, Android, iOS, Linux, and even routers: Private Internet Access.

PIA has a next-generation network of more than 21,800 VPN and proxy servers spread across 97 locations (76 countries).

It runs its exclusive DNS servers to protect your DNS queries and speed up your Internet connection.

More about PIA:

  • WireGuard and OpenVPN with up to 256-bit encryption
  • Unblock Netflix US for unlimited streaming
  • No IP, DNS or WebRTC leaks
  • A zero-logging privacy policy
  • 24/7 live chat support
  • 30-day money-back guarantee (no free trial)

Private Internet Access

If you are tired of fixing connection problems in Hotspot Shield VPN, consider switching to a more reliable VPN service like PIA.
Check price Visit Website

Conclusion

To sum up, you can try fixing Hotspot Shield VPN connection problems by updating the app to the latest version, checking the quality of your Internet connection, and ensuring that your firewall allows VPN traffic for this service.

Also, make sure that you don’t have another VPN or proxy running in the background.

Plus, you can change your DNS settings, connect to a different VPN server, reinstall the TAP-Windows driver, as well as refresh your network settings using CMD.

At the end of the day, if you still can’t get Hotspot Shield VPN to work, even after asking tech support for assistance, consider switching to a more reliable VPN service for your home network, such as Private Internet Access.

FIX: Can’t access TCP/IPv4 properties on PPTP VPN connection

Windows 10 may be a great operating system overall, but it also has its fair share of flaws.

Reportedly, some users can’t access TCP/IPv4 properties on a PPTP VPN connection.

Although this issue is not exactly common nowadays and is specific to older versions of Windows 10, it can still happen.

With that in mind, let’s see how we can restore the functionality of the TCP/IPv4 properties button with minimum hassle.

How to fix TCP/IPv4 properties button disabled

Update Windows to the latest version

Microsoft is aware of most major problems on Windows 10, and its development team is constantly working on fixes.

If you encounter the TCP/IPv4 properties button disabled issue, make sure you download and install the latest updates for Windows 10.

As with many other issues, installing the latest updates usually fixes this problem.

Thus, you can use Windows 10’s built-in Check for Updates tool to see if there’s any update available and apply it quickly.

Edit the rasphone.pbk file

All your VPN connection settings are stored in a certain file on your Windows 10 PC, called rasphone.pbk.

In order to fix the TCP/IPv4 properties button disabled problem, you can edit the file mentioned above.

Here’s how you can do that:

  1. Press Windows Key + R, type %appdata%, and press Enter
    tcp-ipv4-properties-pptp-vpn-appdata-run
  2. Navigate to the following path:
    • \Microsoft\Network\Connections\Pbk
  3. Locate rasphone.pbk and right-click it
  4. Open it with any text editor
  5. Edit the IpDnsAddress and IpDns2Address values
  6. Change the IpPrioritizeRemote=1 value to 0

If this seems a bit complicated, you can also create a rasphone.pbk file on another PC and transfer it to your computer.

Just create a VPN connection as you normally would on a different system and replace the rasphone.pbk file on your Windows 10 PC.

Create a new VPN connection

If none of the steps we’ve described above doesn’t seem to work, you can try creating a new VPN connection.

This doesn’t mean that you need to give up on using a PPTP VPN connection.

Just create a new one using the same credentials as your old VPN connection, and remove the previous, broken one.

After doing so, try accessing the TCP/IPv4 properties button on the new connection to check if everything is alright.

Use PowerShell

There’s another possible scenario where you can fix this issue by using PowerShell.

However, you should bear in mind that PowerShell is an extremely powerful tool.

If you’re not careful enough of have absolutely no idea what you’re doing, you could cause permanent damage to your operating system.

This is why we recommend you to sit this one out if you’re not confident in your PC skills.

If you’re ready to proceed and try to fix this problem using PowerShell, follow these steps:

  1. Press the Windows Key + S keys on your keyboard
  2. Type powershell
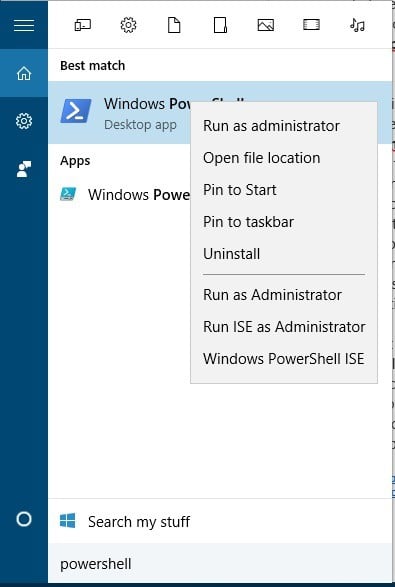
  3. Locate PowerShell on the list and right-click it
  4. Select the Run as administrator option
    tcp-ipv4-properties-pptp-vpn-powershell-admin
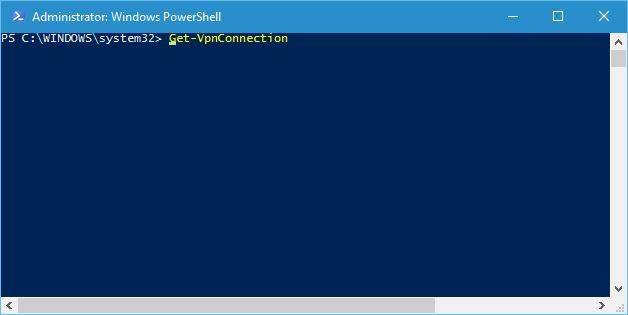
  5. Type Get-VpnConnection and press Enter
    tcp-ipv4-properties-pptp-vpn-powershell-1
  6. PowerShell should display a list of all the VPN connections on your PC
  7. Locate your current VPN connection and note it down it
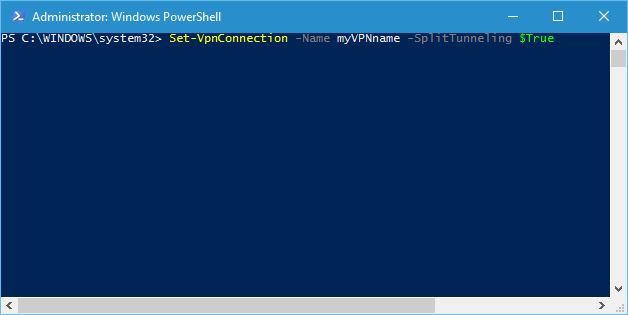
  8. Type Set-VpnConnection -Name xxxxx -SplitTunneling $True (replace xxxxx with the name of your connection) and press Enter
    tcp-ipv4-properties-pptp-vpn-powershell-2
  9. Close PowerShell
  10. Restart your PC and check if there’s any improvement

Reportedly, this method only works for VPN connections that don’t allow other people to use it.


Want to learn more about split tunneling? Check out our comprehensive guide on enabling it on Windows 10.


If your connection is configured in another manner, you might have to delete it and create one that meets the requirement described above.

Otherwise, you won’t be able to fix the TCP/IPv4 properties button not displayed by using the PowerShell method.

Conclusion

To wrap things up, if you can’t access TCP/IPv4 properties on a VPN connection on Windows 10, there are a few things you could do about it.

First and foremost, we advise you to download the latest updates, as it may be the best way to solve the issue.

If you notice that applying the latest Windows 10 updates didn’t work, make sure to try any or all of our remaining suggestions.

Google services are down, including Gmail, Drive and YouTube

In a world where everything goes to and from Google, it’s hard to imagine what it would be like if all of their services would suddenly collapse.

Well, this unlikely scenario has just become very very, as pretty much all Google services, along with YouTube, seem to no longer be operational.


Google services are experiencing a total failure

According to DownDetector, the service disruption have barely begun less than an hour ago, but the number of reports have easily exceeded 2000 already.

Of course, not only Google is down, but its services are as well, including Google Drive and Gmail.

Those using Google Drive are met by an error code 500, an error message that we’ve covered before in this step-by-step guide.

Gmail users have even more problems, since they are met with a variety of error messages, all of which were also covered in the articles below:

Lastly, those of you looking for some online multimedia entertainment will also have to wait it out, since YouTube has also been affected by this total Google collapse, so don’t be surprised if you encounter the Something went wrong error.


Google and YouTube had a similar outage back in August, and the outage lasted for several hours.

This occurrence does nothing more than to remind us of how dependent we are of Google as a service, especially now in the context of a global pandemic when Internet use is higher than ever before.

Unfortunately, no word has come out yet from any Google official regarding the issue, but we hope that it will be short-lived.

How have you been affected by Google‘s services being down? Let us know by leaving us your messages in the comments section below.

[wl_navigator]

How to troubleshoot Google Drive error 500

Google Drive error 500 is an internal server error. That is usually a general server-side error that arises on websites. Google Drive users often complain about internal server 500 errors on support forums.

When that issue arises, users can’t open Google Drive in their browsers. If that issue arises when you try to open Google Drive in a browser, follow the troubleshooting steps below.

How can I fix Google Drive error 500?

1. Refresh the page

First, try refreshing the Google Drive page by clicking the Reload button on your browser. The button is usually on the left or right side of browser URL bars.

Moreover, if you happen to be a Google Chrome user, then don’t hesitate to press the F5 hotkey to refresh the page.

Reload button google drive error 500

2. Enter an alternative Google Drive URL

Google Drive users have said they’ve fixed error 500 by entering the following line in the address bar:

https://drive.google.com/drive/

So, copy it with the Ctrl + C hotkey. Then, click in your browser’s URL bar, and press the Ctrl + V hotkey to paste that URL in.

Google Drive URL google drive error 500

3. Clear the browser’s cache

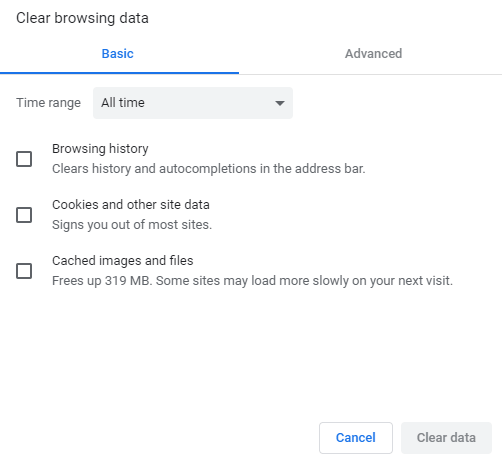
  1. Start by pressing the Ctrl + Shift + Del hotkey in the browser.
    Cached images and files option google drive error 500
  2. Then select the All-time option in the drop-down menu.
  3. Select the Cached images and files option.
  4. In addition, select the Cookies and other site data checkbox.
  5. Press the Clear data button.

Try clearing your browser’s cache, which will also clear the cached version of the Google Drive page. Therefore, refer to the above procedure in that regard.


4. Open Google Drive in another browser

Try opening Google Drive in an alternative browser. Chrome, Firefox, Internet Explorer, Edge, and Safari are browsers that are fully compatible with Google Drive.

So, make sure you’re utilizing Google Drive with one of these browsers as well.

The Google Drive page google drive error 500

If you are looking for a browser that emphasizes speed and keeps you away from such errors, then check out this dedicated list.


5. Is Google Drive down?

If none of the above suggestions resolve error 500 for Google Drive, there is a chance that Google services are down.

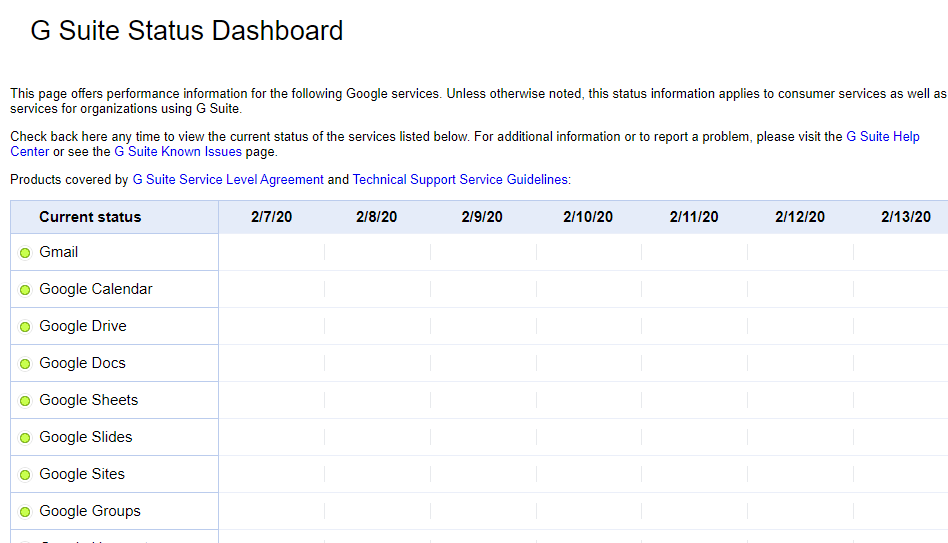
To check if that’s the case, open the G Suite Status Dashboard page. That page shows the current status of Google services.

A red circle for Google Drive will highlight that there’s currently a wider service outage for Google Drive.

G Suite Status Dashboard google drive error 500

If there is a service outage, there’s nothing you can really do to fix the matter. Wait for Google to resolve a server-side error. However, the above resolutions might occasionally fix Google Drive error 500 for some users.

Let us know which of the previously mentioned methods worked best for you by leaving us a message in the comments section below.

Office 365 admins can now exclude specific files from OneDrive sync

Last month, we reported that Microsoft was working on a new Office 365 policy that would allow admins to prevent users from uploading specific files to OneDrive or SharePoint. The Microsoft 365 roadmap entry indicates that a new OneDrive update (version 20.201) that supports this new policy is now rolling out for all users globally.

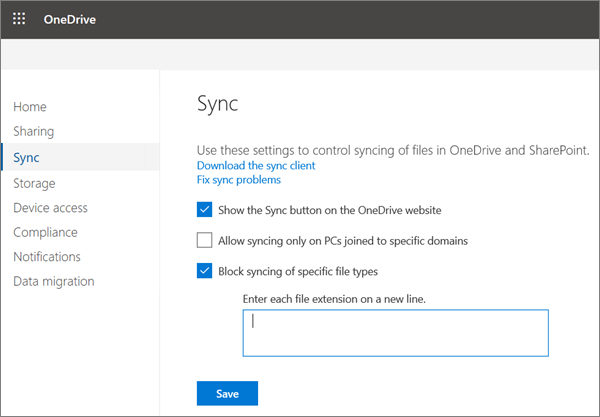
To block the upload of specific file types, you’ll need to go to the OneDrive Admin Center and click the “Sync” option available in the left pane. Now, select the “Block syncing of specific file types” option, and type all the file name extensions you want to block. Finally, hit the “Save” button on the Sync page, and restart the OneDrive sync app.

The Sync page of the OneDrive admin center

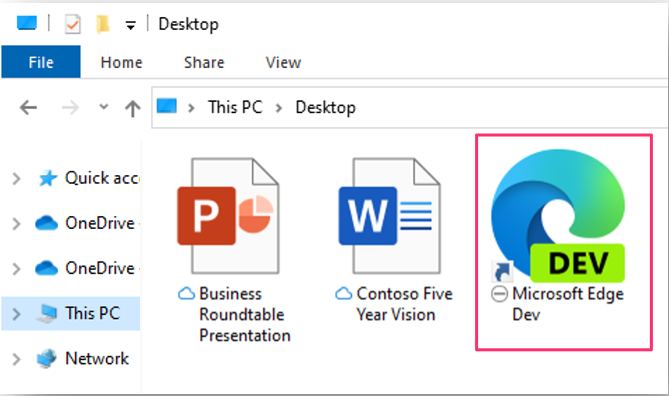
“If you enable this setting, the sync app doesn’t upload new files that match the keywords you specified. No errors appear for the skipped files, and the files remain in the local OneDrive folder. In File Explorer, the files appear with an “Excluded from sync” icon in the Status column. The OneDrive sync app must be restarted after this setting is enabled for the setting to take effect,” the company explained.

File explorer

Once this Group policy is enabled, users will still be able to upload excluded files from their local OneDrive folder by using the OneDrive for Business web app. However, the company recommends users to delete the excluded local file in the OneDrive folder to prevent a sync conflict with that skipped file. You can learn more details about this new Group Policy on this support page.

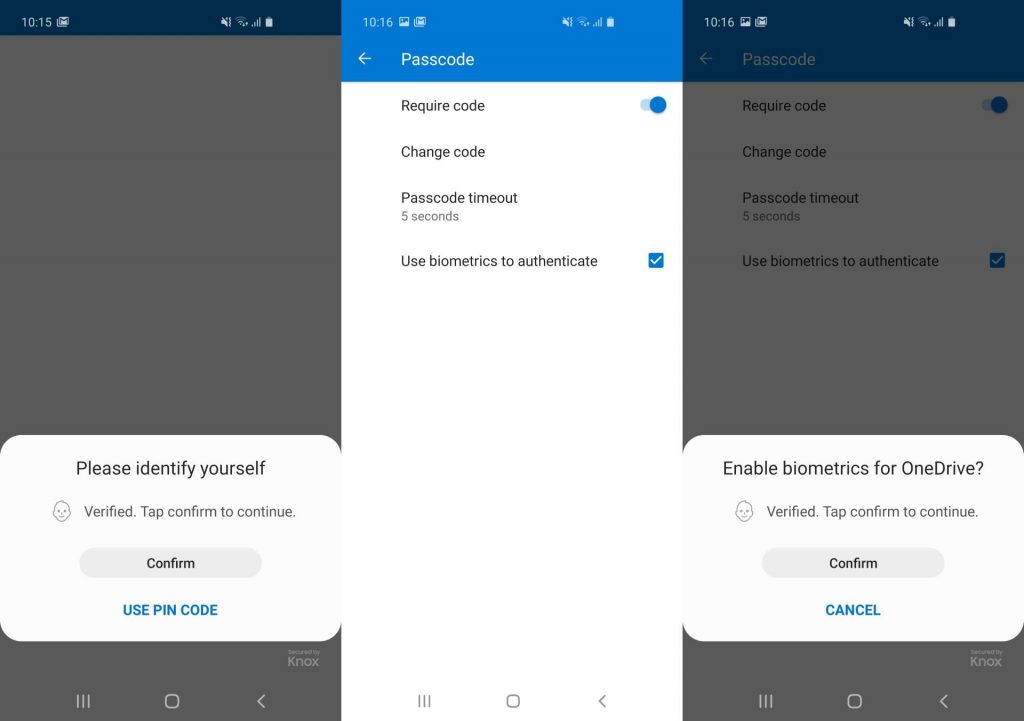
You can now sync passwords from Edge for Windows to Android

The Microsoft Authenticator app is regularly updated with new capabilities. With the latest beta build for Android devices, users can synchronize their passwords stored in the Edge browser for Windows.

The new feature makes it possible to securely transfer passwords between more devices that are linked to the same Microsoft account.

All passwords entered on Edge for desktop are automatically suggested on the smartphone as well. So, your precious passwords are now available pretty much everywhere you need to go.

There’s no wonder that users all over the world are excited to discover this new feature. Here’s what one of them says:

If you use the Microsoft Edge on PC and save your passwords on it, the Authenticator now can get these passwords and use on any app or browser on Android.

What should I know about securely syncing my Edge passwords?

passwords saved in Edge

Microsoft Edge already syncs bookmarks across your PC, Android, and iOS devices. Therefore, synchronizing passwords with Microsoft Authenticator is a nice addition.

After all, this is the new default browser on Windows 10. Plenty of users are already enjoying it on their PCs.

As a current Microsoft Authenticator, keep though in mind that the feature is still being tested. At the moment, not all users of the beta version have the chance to sync the passwords saved in their browser.

That’s a matter of waiting, assuming that you’ve registered for the beta program. As for those of you worried about their safety, the Authenticator app provides a high level of security when it comes to managing passwords.

What do you think about the fact that credentials that are saved on your Windows 10 PC can be available on your Android smartphone too? Let us know your opinion in the comments area below.

5 of the best rolling laptop bags for easy transportation

Standard laptop bags might be ok for short trips. However, users who frequently travel with their laptops might need rolling bags that they can pack more into.

This type of laptop bag features wheels and additional storage compartments that you can take it through airports and train stations with ease.

Rolling laptop bags come in different shapes and sizes. The best rolling laptop bags have nice aesthetic designs, organizer compartments, durable builds with quality fabrics, and plenty of storage space. These are some of the rolling laptop bags that are worth noting.

What are the best lightweight rolling laptop bags?

AmazonBasics Laptop bag

  • Good value
  • Lightweight and easy to carry
  • Spacious inner compartment
  • It doesn't quite fit 17.3-inch laptops

The AmazonBasics Laptop bag is among the more lightweight and slim-rolling laptop bags. This is a versatile bag that can fit 15.6-inch laptops.

Its velcro strap fully secures laptops. The AmazonBasics Laptop bag also includes an especially spacious inner compared that users can pack a lot into.


Solo Classic New York Bryant

  • Fits the biggest laptops
  • Comes with a five-year warranty
  • Good durability
  • Doesn’t include lockable zippers

The Solo Classic is a very stylish rolling briefcase bag that incorporates a padded compartment that can fit 17.3-inch laptops.

So, this bag can fit almost all laptops; and it includes additional front pockets to fit files, pens, notepads and more besides.

This is also a durable, long-lasting bag thanks to its polyester exterior.


Targus Compact Rolling Backpack

  • Durable polyester backpack
  • Secure storage side compartment
  • Includes a tablet pocket
  • Elastic straps included for clothing
  • Limited warranty

The Targus Compact Rolling Backpack is a bit different from the other bags with briefcase designs. This is a rolling laptop bag that’s also a backup. So, you can carry it as a backup or roll it around travel stations when it gets a bit too heavy.

This bag includes a padded sleeve that fits 15-inch laptops and a smaller pocket for tablets. Its main compartment can fit large folders and books.

The Targus Compact Rolling Backpack also has a front outer compartment and a zippered side pocket that are ideal for holding stationery items and phones.


Solo New York Walker

  • Premium leather design
  • Includes internal dividers for items
  • Lengthy five-year warranty period for the bag
  • It’s pricey

The Solo New York Walker is a rolling briefcase with a premium and stylish Colombian leather design.

It incorporates an expansive main compartment that can hold 15-inch laptops. This bag’s organizer section has a handy pen, card, and mobile slots. You can also fit additional items in its front section.


Heritage Travelware Streeterville

  • Durable 1680D polyester body
  • Includes lockable zipper compartments
  • Big enough to fit two laptops
  • Includes an organizer compartment
  • Its wheels can jam

The Heritage Travelware Streeterville is a large laptop roller bag that’s ideal for holidays and longer trips. This bag is large enough to hold a 17-inch laptop and an additional 15-inch laptop. This bag’s central compartment incorporates a padded PC pocket and straps for larger 17-inch laptops.

The Travelware Streetervile’s six compartments provide plenty of storage for clothes and other things. It incorporates extra mesh pockets for smaller items. Yet, this bag remains surprisingly lightweight (about 7.5 Ibs) for one of its size with many compartments.


Those are five of the best rolling laptop bags you can carry portable PCs and other things with. With their retractable handles and wheels, multiple storage compartments, and durable builds, they’re ideal bags for travelers or commuters.

Cyberpunk 2077 is reportedly profitable since day 1

There’s no denying that many players have been waiting for Cyberpunk 2077 to be launched ever since it was first announced 2 years ago.

The game has been through a lot of development, and the marketing around it has been extensive, drawing players ever closer to a world created by the same developers that brought your the Witcher series.

The product was then polished and tested extensively, which inadvertedly lead to delays, and despite being still being launched with numerous bugs, it still managed to break several records.

Well, all that hard work has apparently paid off, and we say that in a very literal sense.


Cyberpunk 2077 made it’s money’s worth back since launch day

CD Projekt Red has really outdone themselves this time, as they have announced in their 65/2020 financial report how the development and marketing costs for Cyberpunk 2077 have already been covered through pre-purchases and purchases made since the first day of launch:

The Management Board of CD PROJEKT S.A. with a registered office in Warsaw (hereinafter referred to as “the Company”) hereby announces that the estimated licensing royalties receivable by the Company in association with pre-order sales of Cyberpunk 2077 across all of its digital distribution channels have exceeded the sum of the following:

– total development expenditures related to the game, and

– the game’s marketing and promotional costs borne by the Company – either already incurred or anticipated for the remainder of 2020.


This report says a lot about the game, especially given how bug-riddled it turned out to be on all platforms.

However, CD Projekt Red took responsibility of the entire matter and have taken extensive measures to make sure that players are still satisfied with their product. 

This includes offering refunds, creating dedicated help pages for their most frequently found issues, launching hotfix after hotfix, and more.

All in all, one thing is clear: CD Projekt Red is pure profit from now on, even if the margin is slower due to the state of the game during release.


Were you expecting Cyberpunk 2077 to be so successful? Let us know what your expectations for the future are by leaving us your opinion in the comments section below.

[wl_navigator]

Xbox teams up with PlayStation and Nintendo to promote safer gaming

As video games are undoubtedly going to play a big role in the upcoming holidays, Xbox, PlayStation, and Nintendo are joining hands today to promote safer gaming. It’s not often that we see the three brands come together to push the video games industry forward, though the days when Sony blocked cross-play on Minecraft to protect younger players are now way behind us.

“At Xbox, we are aligned with both Nintendo, on behalf of the community of Nintendo Switch players, and PlayStation in our belief that protecting players online requires a multidisciplinary approach – one that combines the benefits of advanced technology, a supportive community, and skilled human oversight. We can accomplish more when we work toward the same goal, and so we will each continue investing in, evolving, and amplifying our approaches to user safety” wrote Dave McCarthy, Corporate Vice President, Xbox Operations.

Microsoft recently launched an Xbox Family Settings app to make it easier for parents to manage child accounts on the go, and Xbox consoles currently provide various controls to protect children playing games online. Sony and Nintendo also provide similar controls to protect vulnerable players using their consoles, though the three companies believe they can do even better by working together on making gaming safer for everyone.

Going forward, Xbox, PlayStation, and Nintendo have agreed on the following three principles that will guide all of their future work on safety features:

  • Prevention: Empower players and parents to understand and control gaming experiences.
  • Partnership: We commit to partnering with the industry, regulators, law enforcement, and our communities to advance user safety.
  • Responsibility: We hold ourselves accountable for making our platforms as safe as possible for all players.

“While the video game industry has a long history of taking steps to protect gamers, especially children, we recognize that no one company or industry will solve these challenges alone. We welcome others to make and share similar commitments to players everywhere,” McCarthy said today.

There are certainly more things that Xbox, PlayStation and other companies can do at the platform level to protect gamers, and in the case of Microsoft, Xbox online safety and privacy settings let you decide who can see your Xbox profile details and how people interact with you and your content. You can learn more about how to manage Xbox online safety and privacy settings on this support page.

What’s going on with the Tasks app in Microsoft Teams? Here’s a look at the renaming and the new changes

If you found yourself using the Microsoft Planner app in Microsoft Teams a lot, then we have an important update for you that you might or might not have already noticed. As part of a move for Microsoft to better align its products, there’s a big name change happening.

Even further, not only the name is changing. The icon is changing, too. So, what’s the big deal? Today, we’re going to explain the changes, and what it means for you in the long run.

What’s up with the name change?

Microsoft Planner In Teams Name Change

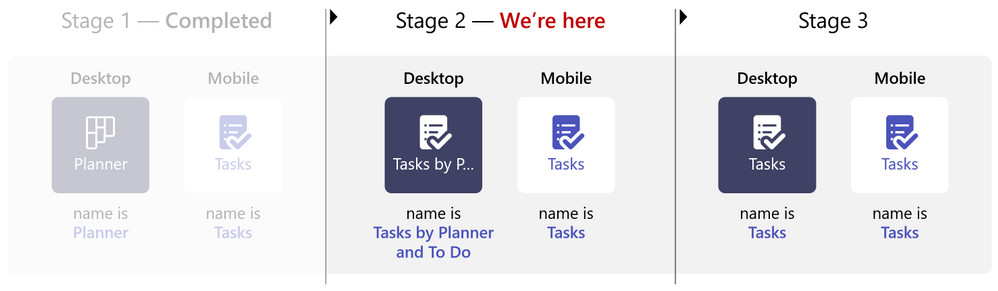
First things first, we’re going to explain the phases of Microsoft changing the name for the Planner app inside Microsoft Teams. According to Microsoft, this name change is coming in three stages, which you can see in the chart above.

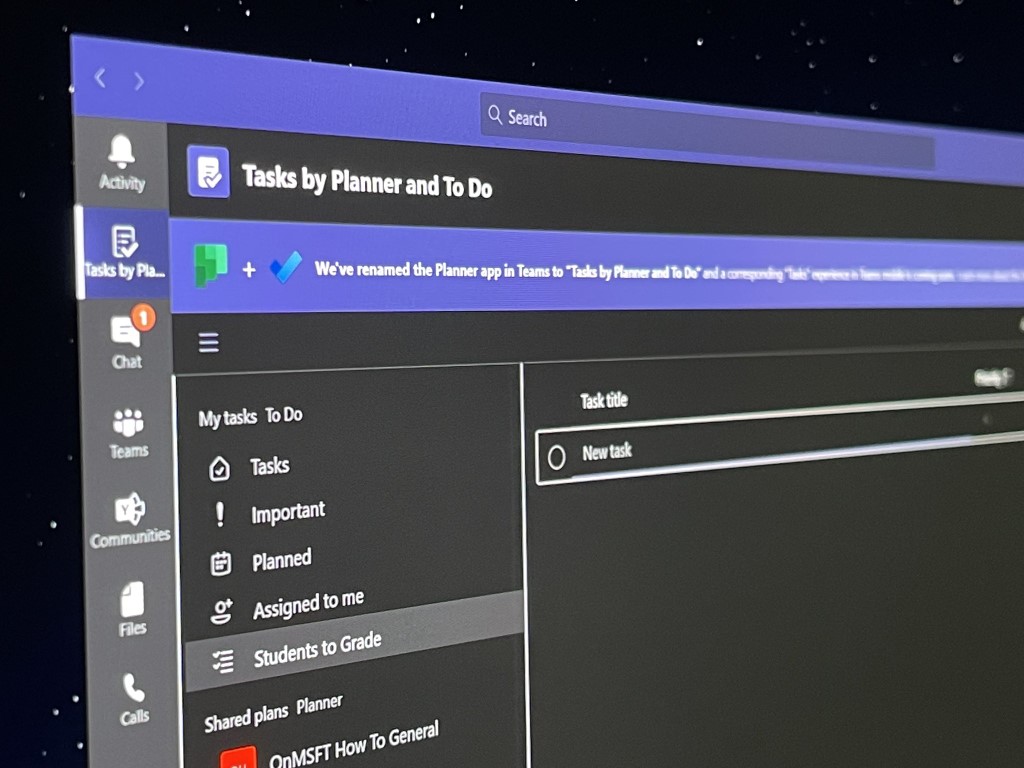
The first stage renames the mobile version of Planner in Teams to Tasks. This stage is now complete, and we’re now in the second stage of the changes. As part of this second stage, the desktop version of the Planner app in Teams is being renamed from Planner to Tasks by Planner and To Do. Eventually, the renaming will hit stage three, where it gets renamed to Tasks.

But why change the name now? According to Microsoft, this name change comes “help all customers easily find the new hero task management app in Teams.” Basically, Microsoft wants to put emphasis on all of its task management tools, and not just Planner. With the name change, Microsoft combines team tasks from Planner and individual tasks from To Do. Essentially, one hub for all your tasks.

What does this mean for me?

Okay, so what does this name change mean for you? Well, on the surface, there’s not a lot that you didn’t already enjoy. The name change does not affect the core functionality of Planner or Tasks in any way. According to Microsoft, the name and icon changes are just cosmetic. It doesn’t impact the Planner or the To Do standalone app. This name change is just about Teams, and putting both Planner and To Do, front and center on the collaboration platform.

We do want to note that the Tasks app in Teams does have some benefits over the old Planner experience, too. As we just explained, the Tasks app in Microsoft Teams brings together individual tasks from To Do and Outlook with your team tasks from Planner so you can more efficiently cross them off your lists. We’ll get into those in the next section.

What can I do in the Tasks app in Teams?

Microsoft Tasks App Microsoft Teams

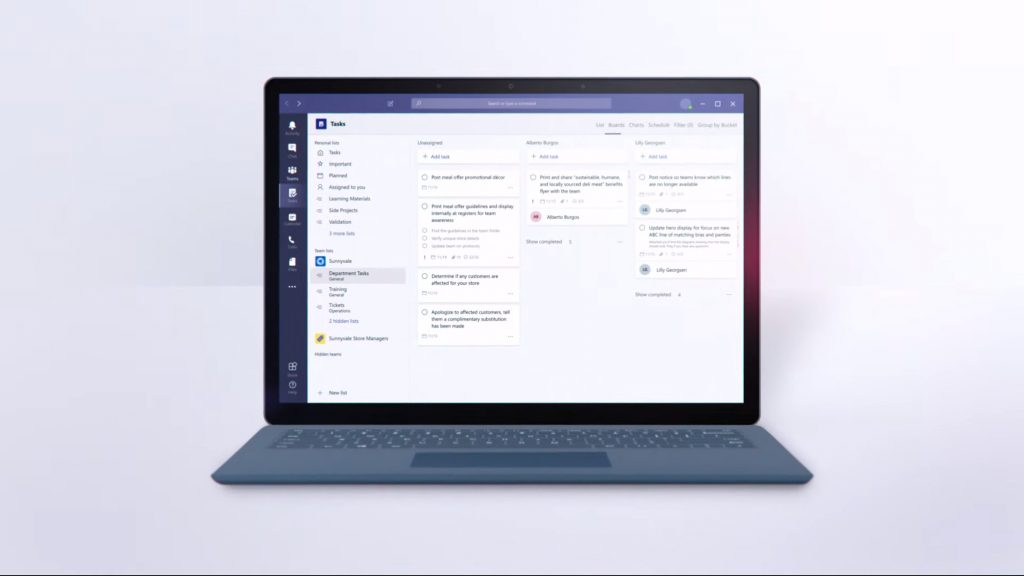
So, what can you do with the new Tasks app in Teams? The answer to that question is, a lot! Once you get the Tasks app in Teams, you’ll see the two core experiences — My Tasks, and Shared Plans. My Tasks will have your lists from your To Do app (work accounts only) and the tasks you’ve added to To Do and Outlook, or anything you’ve been assigned in Planner. The Shared plans, meanwhile, includes everything you’ve added in Microsoft Planner, that have been added to Teams.

We’ve previously explained how the Tasks apps works with Teams, so we invite you to check that out here, for more information. But, we do have a quick summary or why you might want to use it. Keep in mind that the Tasks app in Teams has a List view. It displays tasks and information from both To Do and Planner and anything associated with them in rows and columns. This also allows you to change many tasks at once. This wasn’t possible in either To Do or Planner before.

The final stage coming soon, so get used to it now!

Now that you know what’s going on with Tasks in Teams, we have a final note for you. The third stage of the icon and name change rollout of Tasks in Teams desktop is coming soon. It’s a good time to get used to it, as this is the new thing for Microsoft moving forward. Again, check out our guide for more about the Tasks app in Teams, and let us know your thoughts in the comments below.

Cyberpunk 2077 developers apologize for poor Xbox One/PS4 performance and promise frequent updates

Cyberpunk 2077, one of the most-anticipated games of the year was released last week on PC, Xbox, and PlayStation consoles, and today developer CD Projekt Red has apologized for the game’s poor performance on base Xbox One and PlayStation 4 consoles. Despite multiple delays, it’s safe to say that many consumers who purchased the game on consoles didn’t expect to see bugs and performance issues at such a level.

“First of all, we would like to start by apologizing to you for not showing the game on base last-get consoles before it premiered and, in consequence, not allowing you to make a more informed decision about your purchase. We should have paid more attention to making it play better on PlayStation 4 and Xbox One,” CD Projekt said in a statement today.

Following the release of a first post-launch update on all platforms last week, the Polish developer announced today that it will continue to patch the game. Another patch will be released “within the next 7 days”, with two “large patches” to follow in January and February. “Together these should fix the most prominent problems gamers are facing on last-get consoles,” CD Projekt Red said.

Last but not least, the developer is inviting customers who aren’t satisfied with the game to seek for a refund. “We would appreciate it if you would give us a chance, but if you are not pleased with the game on your console and don’t want to wait for updates, you can opt to refund your copy,” the company said today.

Last week, CD Projekt Red announced that 8 million gamers had pre-ordered Cyberpunk 2077 ahead of launch, and that profits had already surpassed the game’s development and marketing costs. Cyberpunk 2077 broke several records since launch including the most concurrent viewers for any single-player game on Twitch, and the game continues to enjoy great momentum despite the bad buzz.

We’ve been playing the game on PC, Xbox Series X, and Xbox Series S since launch, and we hope to publish our full review later this week. The game currently plays best on PC, but performance is also very solid on Xbox Series X|S consoles even though a fully-optimized version of the game for these consoles won’t be available until next year.

FIX: Can’t save game in Cyberpunk 2077 on Windows 10/11

Cyberpunk 2077 is the result of several years of work on behalf of CD Projekt Red, and the outcome is quite spectacular.

This massive Sci-Fi video game features a massive world to explore, incredible character customization options, and an amazing story.

However, all of these have in common one thing: a lot of work needs to be put into them, and many users have reported that they are having issues saving their game.

Since this game is so loved by many, we’ve decided to create this step-by-step guide that will show you exactly what needs to be done to make sure that your game progress gets saved.

How do I save my game properly in Cyberpunk 2077?

1. Modify your antivirus’ permission settings

Some antivirus tools block access of software to certain file locations by default as a safety measure, and in that case, your job is to simply modify your antivirus’ settings.

If you’re using Bitdefender, modifying your settings will be extremely easy, and it can be done as follows:

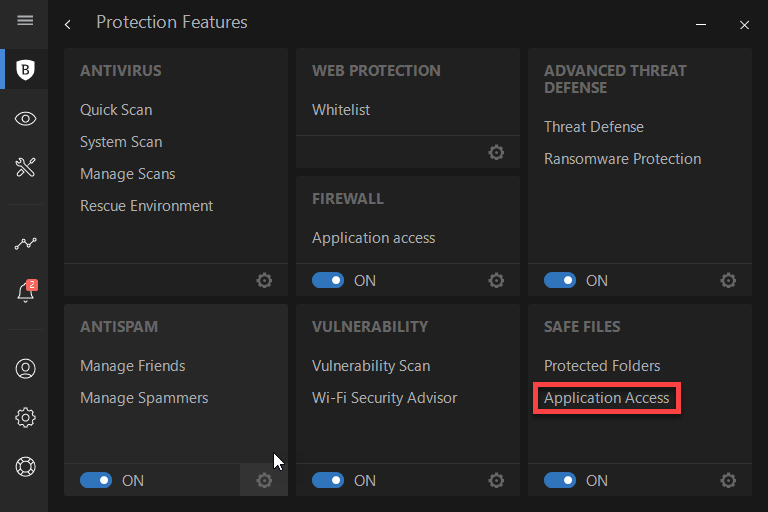
  1. Open the Bitdefender dashboard
  2. Access the Protection tab on the left
  3. Click on Application Access under the Safe Files applet
  4. Flag the check mark for Cyberpunk 2077
Bitdefender

Bitdefender

With Bitdefender, you gain complete and easy control over what your apps can access on your PC!
Check priceVisit website

2. Modify your Windows Defender settings

  1. Press Start
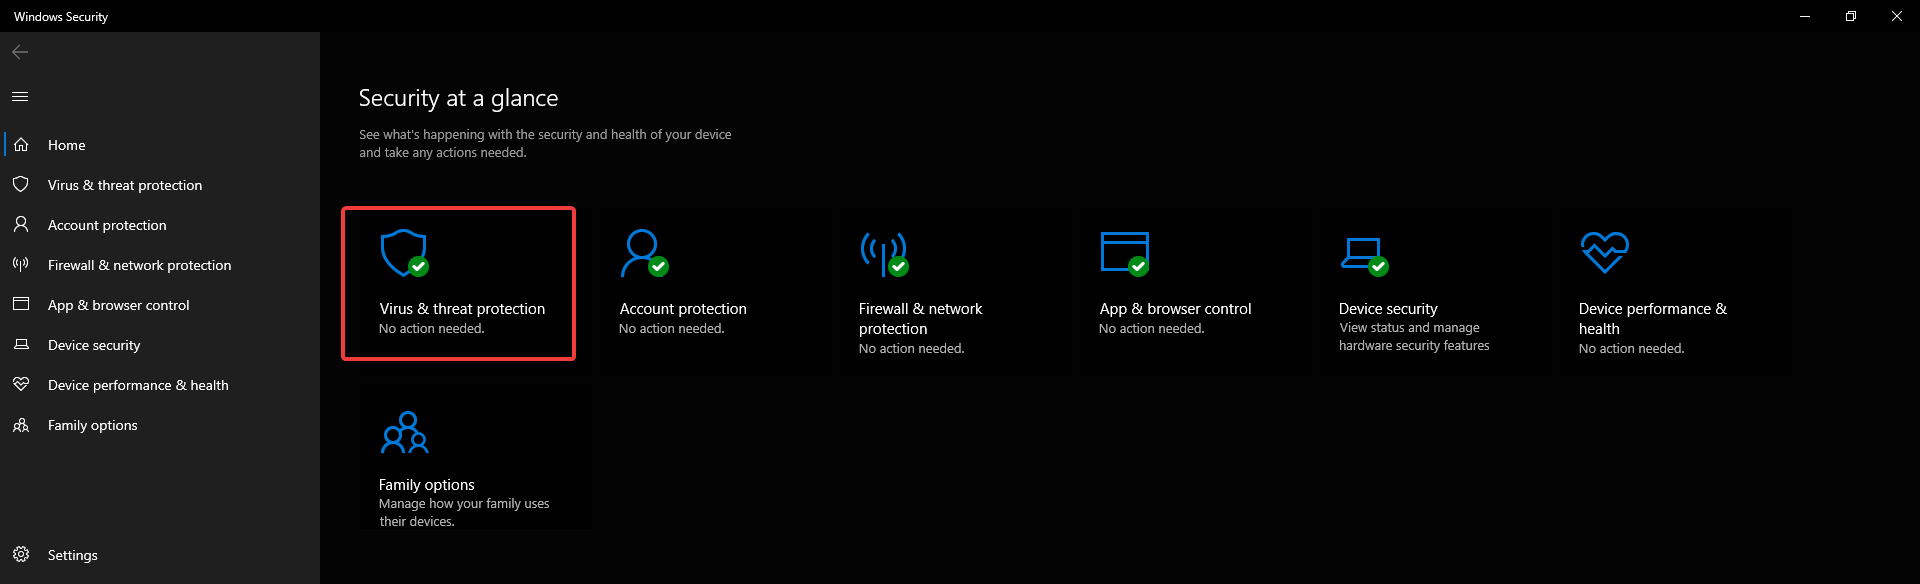
  2. Type in windows security to access the Windows Defender Security Center
  3. Go to Virus & threat protection
  4. Select the Virus & threat protection settings option.
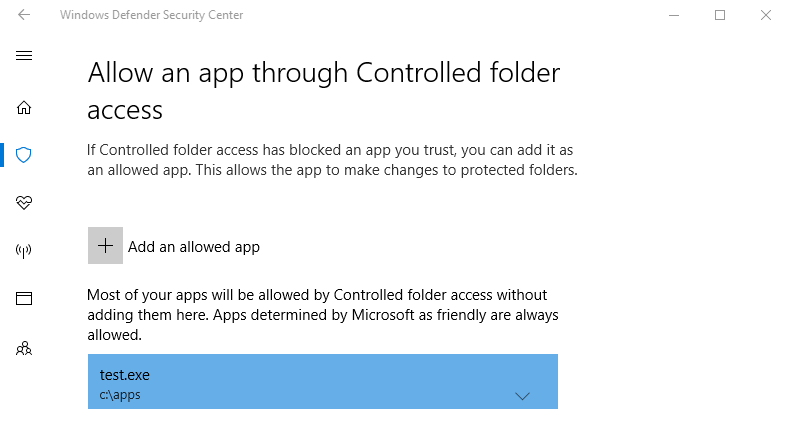
  5. Under Controlled folder access, click the Allow an app through Controlled folder access link
  6. Click the Add an allowed app button.

By following these steps, you should no longer have issues saving your game progress in Cyberpunk 2077 anymore.

However, keep in mind that it is not possible to save the game during combat, braindance and some quests, so make sure that is not actually the issue before proceeding with the troubleshooting steps below.

If you stumble across the Cyberpunk 2077 corrupted or missing scripts file error, we have the right solutions in the highlighted guide.

Which solution did you use to get rid of the game saving issue in Cyberpunk 2077? Let us know how you handled the problem by leaving us your feedback in the comments section below.

How to convert ZIP files to PDF in Windows 10 [Full Guide]

Sometimes you can’t use certain file types unless you convert them to a different format. This is a fairly simple process, and you just need to use specific software to convert the files.

In today’s article, we’re going to show you how to convert a ZIP file to PDF, and this is actually much simpler than you think, so let’s get started, shall we?

How can I convert a ZIP file to PDF?

1. Use WinZip

When it comes to ZIP files, WinZip is the best tool out there that can work with ZIP files. The software has a built-in feature that allows you to convert ZIP to PDF files with just a few clicks.

Regarding the supported file types, WinZip can zip any file, and it can extract ZIP, RAR, 7Z, TAR, TGZ, and other file types. The software also works as a file manager, and there’s even a file splitter feature available as well.

WinZip also supports file sharing, and it has support for cloud storage, which makes it one of the most versatile file archivers on the market.

Other great features:

  • Simple to use
  • File encryption
  • Compatible with most archive formats
  • File manager, file splitter
  • PDF conversion

WinZip

If you want to manage ZIP files better and convert them to PDF easily, give WinZip a try.
Free Trial Visit Website

2. Use ezyZip

  1. Visit the EzyZip page.
  2. Now click on Browse and select the ZIP file.
  3. Once the file is uploaded, it should be converted to PDF.
  4. Now you just have to download the PDF file.

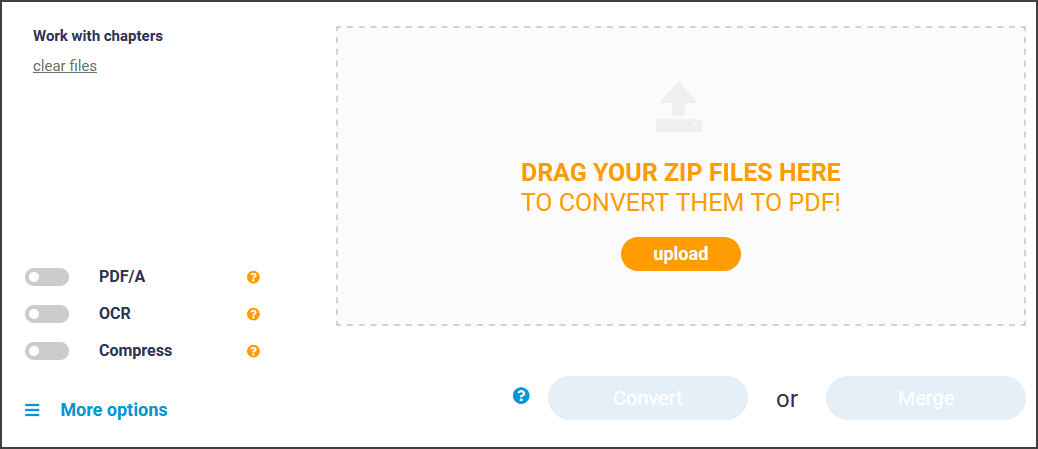
3. Use PDFEN

  1. Visit PDFEN website.
  2. Click the Upload button and select the ZIP file.
  3. Once the ZIP file is uploaded, click on Convert.
  4. After the file is converted, download it.

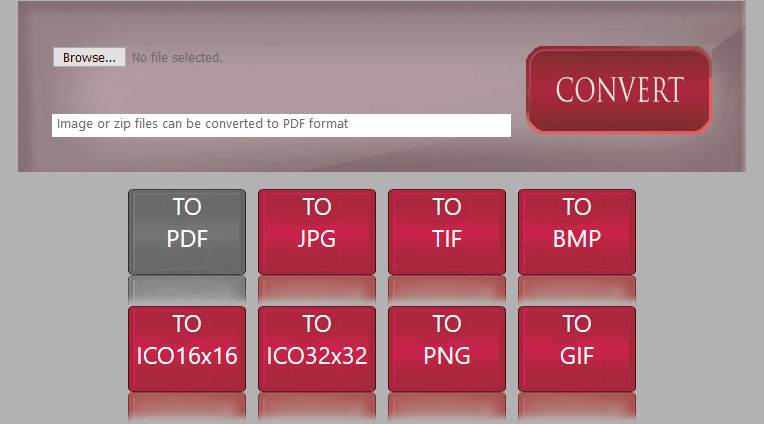
4. Use Convertstandard

  1. Visit Convertstandard website.
  2. Now click on Browse and upload the ZIP file.
  3. Make sure that the TO PDF option is selected and click on Convert.
  4. Once the file is converted, download it.

Converting ZIP files to PDF doesn’t have to be a complicated process, and if you wish to convert ZIP files, we suggest using WinZip software for the best results.

Which solution did you use to convert your Zip folders? Let us know your preferences by leaving us a message in the comments section below.

5 best 128-bit AES encryption software [Complete guide]

In a world where the data is the new gold, protecting the data has become more important than ever before. Encryption can help you protect information stored, sent and received.

This task is made easier by the AES encryption software. While 256-bit encryption software offers greater protection, 128-bit AES encryption provides quite sufficient security for your data.

The difference between 256-bit encryption and 126-bit encryption is the key length. Apart from the key length, both of these standards offer similar protection and for the most part, impenetrable.

In this article, we explore the best 128-bit AES encryption software that you can use to keep your most valuable data safe through encryption.

What is the best 128-bit encryption software?

WinZip

best 128-bit encryption software

If you have heard of WinZip before, you probably know it for its file managing capabilities. However, it also allows you to encrypt your zip archives with 128-bit encryption. You can also use 256-bit encryption if you want.

Apart from the encryption features, WinZip allows you to create zip archives with multiple files. Thus making it easier to move, share and organize multiple files at one place.

WinZip offers best in class file compression and can extract all the major file formats, including XZ, RAR, and TGZ. With the built-in repair tool, you can repair any damaged Zip archive.

Additional features of WinZip include easy sharing via email, cloud, social media, and IM, PDF conversion, watermarking, and Windows file management.

Key features of WinZip:

  • Best in class 128-bit encryption and 256-bit encryption.
  • Cloud backup feature
  • Windows file management
  • PDF conversion
  • Cloud integration with Google Drive, Dropbox, and OneDrive
WinZip

WinZip

Enjoy data archiving and 128-bit AES encryption with the help of this incredibly useful software utility.
Free trialVisit website

Folder Lock

best 128-bit encryption software

Folder Lock is a complete data protection solution for your PC and portable drives. This intuitive utility allows you to lock and password protects your files with Windows kernel level locking.

With Folder Lock, you can encrypt your personal files using 128-bit and 256-bit military-grade encryption to create storage lockers to keep your important files encrypted. These dynamic locks can grow in size as your data need increases.

It also comes with a backup option. You can upload all your private data onto a cloud server automatically in real-time. Furthermore, you can use Folder Lock to encrypt your USB/CD storage devices as well.

Key features of Folder Lock:

  • 128-bit and 256-bit encryption
  • External device encryption support
  • Automatic backup manager with real-time sync
  • Password lock files, folder, drives and programs
Folder Lock

Folder Lock

Encrypt your data and keep it safe from unauthorized access with the help of this extremely secure software utility
Check priceVisit website

AxCrypt

best 128-bit encryption software

If you are looking for an advanced encryption tool with simple settings, AxCrypt is a good alternative. It offers strong 128-bit and 256-bit encryption and comes with tons of other file management features.

This multilingual tools supports popular languages including English, Dutch, French, German and more. There are also cloud storage capabilities supporting popular cloud services such as Google Drive, and Dropbox.

The collaboration feature allows secure files to be opened by other AxCrypt users with their own password. The built-in password manager is a good addition and will enable you to access your credentials anywhere.

AxCrypt comes in both a free and premium version. The free version of the software is limited by features.

Key features of AxCrypt:

  • Excellent 128-bit and 256-bit encryption
  • Cloud storage support with automatic backup
  • Multilingual support
  • Password management
  • Mobile support

⇒ Get AxCrypt


CryptoExpert 

best 128-bit encryption software

Boasting fast on-the-fly operation, CryptoExpert is a Windows desktop encryption software that offers secure data vault for all your data. You can create files of 10 GB or more with your choice of encryption algorithm including BLOWFISH, CAST, 128-bit/256-bit AES encryption and more.

CryptoExpert offers transparent access to files, and folder and allows you to read and write encrypted files on the fly. All the secure vaults appear as local drives to all Windows application.

Key features of CryptoExpert:

  • Secure vaults of unlimited size
  • Multiple encryption algorithm
  • Transparent access to files and folders
  • Save unlock keys on external flash drives

⇒ Get CryptoExpert 


Kruptos 2 Professional

best 128-bit encryption software

Kruptos 2 Professional is a premium encryption software that can lock and encrypt all your sensitive files and folders including your photos, video, credit card data and tax returns in a safe vault.

Kruptos 2 Professional offers 128-bit and 256-bit AES encryption. Furthermore, you can read all the encrypted files from anywhere and on any device.

With its cloud encryption, you can encrypt your Dropbox, Microsoft OneDrive, Apple iCloud or Google Drive files with fully integrated and seamless cloud encryption and data shredding.

Key features of Kruptos 2 Professional:

  • Cloud encryption support for Dropbox, Google Drive and Apple iCloud
  • 128-bit and 256-bit encryption
  • Multi platform support
  • Built-in secure note editor

⇒ Get Kruptos 2 Professional


What is 128-AES Encryption?

AES (Advanced Encryption System) function by the use of asymmetric algorithm using 128-bit block encryption and supporting key sizes of 128.

It is used to secure sensitive materials and over the years has become de facto encryption standard for the private sector. AES security standard can be applied to restrict access to both hardware and software.

How good is 128-bit AES encryption?

AES-128 offers more than enough security margin for the near future. While 256-bit AES, in theory, appears to be stronger than 128-bit AES encryption, in practice 128-bit is good enough to secure all kinds of sensitive data.

The 128-bit symmetric key is computationally secure against a brute-force attack, and theoretically, it would take 1 billion years to crack the cryptographic key.

What is the highest level of encryption?

While there are multiple encryption algorithms today, AES 256-bit encryption is so strong that it has become the official encryption standard for the private sector.


Encryption software has become important when it comes to protecting sensitive data from hackers and privacy intruders.

All the encryption software listed in this article offer 128-bit AES encryption offering industry-standard safety, making it almost impossible to decrypt the encrypted data.

6 best Christmas gifts for cricket fans [Tech & Sports ideas]

Gifts are the best way to express love and gratitude to your loved ones. And, what better occasion than Christmas to find a suitable gift for each one of them.

There are deals and offers galore on Christmas gifts for Cricket fans, waiting for buyers to grab them at the earliest. From apparels and accessories, or food & drink to games and gadgets there are endless options to chose from.

Yes, there are gift choices even for those having a crazy cricket fan at home. Whether it’s a book on their favorite batsman or a mug with some quirky cricket statements, there’s a long list of such gifts. But what about gifting a tech gift relevant to the cricket fans this Christmas?

It wasn’t that tough after all to find some fun tech gifts for the cricket fans. Here we have listed our favorite picks to take a cue from.

What is the best gift for a cricket fan for Christmas?

Amazon Fire 7 Tablet

  • 7-inch IPS display
  • 16 or 32 GB of internal storage
  • Fast, 1.3 GHz quad-core processor
  • Up to 7 hours of autonomy
  • Only 1 GB of RAM

Amazon Fire 7 tablet sports a cool 7-inch screen with upto 8 hours of battery life. The larger screen with the extended battery life is perfect to keep your cricket nerves calm while on the go. What’s more?

This tablet also comes along with Amazon’s smart assistant, Alexa to answer questions, read cricket scores, play music, etc.

You can also ask Alexa about the latest news, seek help to manage the calendar, and lots more. For cricket fans, it’s about not missing a single update on the running match and this would make a perfect Christmas gift for them.


Bose SoundSport Wireless Bluetooth

  • Sweat-resistant
  • Bose active EQ
  • Bluetooth and NFC pairing
  • Up to 6 hours of battery life per charge
  • Not very sturdy

Bose SoundSport Wireless is a powerful set of Bluetooth headphones that give a tough fight to the Apple AirPods. Bose is already famous for its sound quality, and it maintains its reputation with these best sounding and highly-trusted earphones.

It generates a booming bass that enhances the cricket commentary listening experience.

Comfortable, easy to use, and great-sounding, these Bluetooth wireless headphones are a perfect tech gift for cricket fans in 2021.


Sony ICFP26 Portable AM/FM Radio

  • Built-in speaker and headphone jack
  • Telescopic antenna
  • Carrying strap
  • LED tuning indicator & LED battery status indicator
  • Not very good reception sometimes

Radio is still in, especially if it’s something like the Sony ICFP26 Portable AM/FM Radio. This sleek, little radio features DAB/FM and is available on a budget. This radio is compact enough to be slipped into your pocket.

It offers pretty good sound quality to keep up with the cricket commentaries on the move. From listening to music to sports, this portable sound package is perfect as a gift this Christmas.


TCL 55S517 55-Inch 4K Ultra HD Roku Smart LED TV

  • 4K resolution
  • Roku TV built-in
  • Dolby Vision high dynamic range (HDR)
  • Voice control remote
  • Poor customer support

To experience a visual extravaganza for the much-awaited cricket match, the latest HDR TV is a must. It’s a sheer pleasure to watch 4K sport on the new TCL 55S517 4K HDR TV with a 55-inch screen. The Dolby Vision high dynamic range (HDR) adds to the watching experience.

It offers great sound quality with amazing picture quality for the cricket fans to enjoy their match to the fullest. The voice control remote is another added bonus.


All-new Echo Dot (4th Gen)

  • Control your smart home - Use your voice to turn on lights, adjust thermostats, and lock doors with compatible devices
  • Call almost anyone hands-free
  • Multiple layers of privacy protection
  • Not as good assistant as Google's yet

Amazon Echo Spot is one of the most popular voice assistants available today. From answering questions, playing music, reading news, to reading cricket scores, it can do all that you can think of.

Not just that, it can also transform into a smarthome device by switching lights on and off or turning on the heating device. While it’s a great gift for families and children, it’s also a perfect Christmas gift for cricket fans.


Native Union Drop Wireless Charger

  • 10W non-slip fast wireless charging
  • Compatible with any Qi wireless-enabled devices
  • Includes 6.5-foot charging cable with genuine leather strap
  • Charges through 3 mm thick cases
  • Doesn't include a wall charger

A wireless charger is all that is required these days for people on the go. While smartphones are downright essential, keeping the battery charged at all times is equally important. So, for those who add cannot miss those cricket score updates wherever they are, Native Union Drop Wireless Charger serves the best.

This sleek wireless charging pad works with pretty much all the latest phone brands. It’s as easy as placing the phone on it and the charge is on.


Winter brings an exciting cricket season with some of the well-known international tournaments to watch out for. So, grab any of these Christmas gifts for cricket fans and help them keep up with their passion.

5 best tools to bulk compress images on Windows 10

Photos take a lot of space on our drives and in no time you will run out of space, especially if you have a small SSD or HDD installed. Of course, you can always buy an external drive for backup but that is not going to be for free.

The next, immediate solution that you can take is to performe a nice session of archiving your photos and other data on your drive. This will get you tons of free space in no time and will secure your data.

You can even store them easier on an external drive or in the Cloud if they are nicely archived. There are a lot of archiving tools out there that can help you to bulk compress images but we found only the best for you.


How do I compress multiple pictures in Windows 10?

WinZip

WinZip is by far the best tool if you want to archive your data and your photos. In fact, unzipping has become a synonym for archiving. It’s really fast to create the archives but it is also like a vault when it comes to your files.

That’s because it can encrypt them with banking-level technology. And after you finish with archiving and encrypting, WinZip is also offering cloud integration with OneDrive, Google Drive, Dropbox, and more. Just upload the files or send the link to anybody.

Winzip will also help you send some photos by creating special small volumes to be added as attachments. Do you have a really big stash of photos? Then you can even make the archiving process automatic.

And if you’re not yet convinced, you can try it before you buy it so just give it a chance.

WinZip

WinZip

WinZip will help you archive and organize your photo collection like never before.
Free trialVisit website

WinRAR

WinRAR is one of the most popular file compression software and its best feature is that it is the only one that can officially be used to create RAR files althou, of course, every other archiving software can uncompress them.

WinRAR’s speed and compression rate are pretty good so you should keep it in mind as a possible alternative for WinZip. Although it can archive your photo collection pretty fast, its user interface is not the most modern and appealing.

⇒ Download WinRAR


7Zip

7Zip is on our top 3 for a good reason and that’s because it can handle almost all compressed file formats you throw at it. And it also does a pretty good job at creating its own archives in the 7z format.

7Zip is able to compress huge files of up to 16 billion gigabytes but if you want it to produce a very compressed file you will have to wait a while because the tool is a bit slow.

Don’t expect too much from the interface either. It looks rather old and it’s full of context menu entries that may confuse you. But for free software, it will do.

⇒ Download 7Zip


PeaZip

best file shrinking software

What’s great about PeaZip is that in addition to regular compression and decompression you will be able to transform an archive format into another.

You can also use this nice too if you want to secure your files because it offers AES256 encryption doubled by a two-step authentication, and a password manager.

⇒ Download PeaZip


Ashampoo ZIP FREE

Ashampoo ZIP FREE can compress your images fast and easily and it supports creating and extracting a lot of archive formats including ZIP, 7-ZIP, CAB, TAR (TAR, TAR.GZ, TAR.BZ2, TAR.XZ), and the LHA formats.

The interface is fresh and modern and this tool also comes with a 256-bit AES encryption. What’s excellent about Ashampoo ZIP FREE is that you can have unlimited size of the archive, and unlimited files inside the archive if you use the ZIP and 7-ZIP formats.

It can also be used to repair broken ZIP files so it can come in handy for that kind of situations.

⇒ Download Ashampoo ZIP FREE


We hope you found our selection with the best tools to bulk compress images on Windows 10 extremely usefull and you found your match. Let us know in the comments section below how everything turned out with your image collection.

Windows 10 news recap: Minecraft with Ray Tracing leaves beta, Adobe Lightroom gets native Windows 10 on ARM support, and more

Welcome back to our Windows 10 news recap, where we go over the top stories of the past week in the world of Microsoft’s flagship operating system.

Outlook for Windows is getting text predictions in January

Similar to Outlook on the web or Google’s Gmail, Outlook for Windows is expected to receive a new text prediction feature in January. The feature will suggest words or phrases to save you having to write them manually, helping compose an email faster.

Outlook For Windows

Minecraft with Ray Tracing on Windows 10 goes out of beta, free content also available on Bedrock and Java editions

Minecraft for Windows 10’s Ray Tracing beta has now come to an end and the feature is available to all players with an Nvidia RTX graphics card. In addition, a variety of free content has been added to the Minecraft Marketplace which can be downloaded to see Ray Tracing in all of its glory.

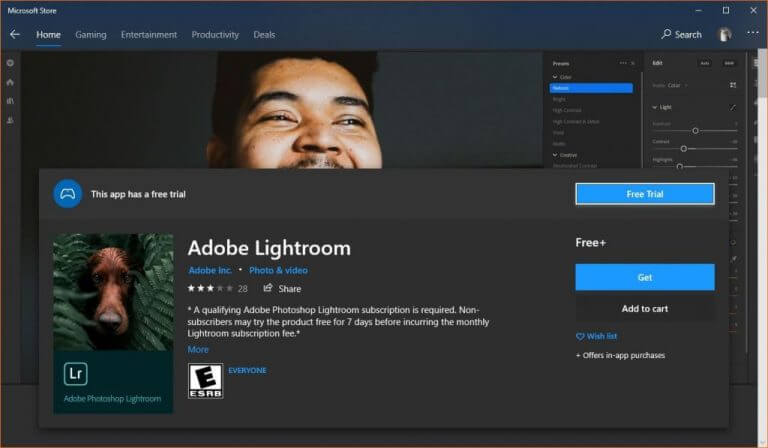
Adobe Lightroom gets native support for Windows 10 on ARM PCs and Apple Silicon Macs

Native support for Windows 10 on ARM PCs has arrived in Adobe Lightroom, in addition to Apple Silicon Macs. This new version of Adobe Lightroom brings a number of other improvements, notably for Mac users it adds support for ProRAW.

Adobe Lightroom For Windows 10 Launched Without Creative Cloud Requirement 528668 2

That’s it for this week. We will be back next week with more Windows 10 news.

How to unblock the Facebook website anywhere using 4 tools

Since it’s a social media site where people can connect and share ideas and events, Facebook is seen as controversial in many countries. It’s usually due to political or religious reasons.

As a result, you might not be able to access the online service at all if you’re living or traveling to these regions due to geoblocks. Examples include Bangladesh, Iran, China, and Egypt.

It’s not the end of the line, though. You can still unblock the Facebook website, online service and app using the tools below.

Please note that we don’t encourage you to use these software programs for bypassing government censorship if it means breaking the law. Use them at your own risk.

How can I unblock the Facebook website and get around bans?

Use a VPN

NordVPN can unblock Facebook

A VPN is the best way to bypass government censorship and access blocked websites.

It redirects you to another country where Facebook isn’t banned, making your ISP believe that you’re actually connecting from somewhere else.

Furthermore, a VPN encrypts your entire data traffic to make sure that your computer won’t leak your true IP address and location.

It’s challenging to find a VPN service with geoblocking features that can unblock the Facebook website, but we think that NordVPN nails it.

You just have to connect to a VPN server in a country where Facebook isn’t blocked (like the US), and then fire up you web browser or launch the Facebook app.

More about NordVPN:

  • Works with Windows, Android, Mac, iOS, Linux
  • OpenVPN and NordLynx (built around WireGuard)
  • Double VPN, Onion-over-VPN, and obfuscated VPN servers for anti-censorship
  • 24/7 live chat support
  • 30-day money-back guarantee (no free trial)
NordVPN

NordVPN

Use NordVPN’s powerful advanced features to bypass government censorship and unblock Facebook anywhere.
Check priceBuy it now

Use Tor

Specially built as an anti-censorship tool, Tor is an anonymous network that anyone can use for free to get around country bans and access restricted content, including Facebook.

All you have to do is download the Tor Browser, set up obfuscation mode at startup, and then unblock the Facebook website.

On the other hand, Tor isn’t as versatile as a premium VPN service like NordVPN (buy here). You can’t use it to unblock streaming content like Netflix, for instance.

Use Psiphon

use Psiphon

Psiphon is an Internet circumvention tool that uses a combination of several technologies to fight online censorship: VPN, SSH, and HTTP proxy.

It’s completely free to use. You can download Psiphon for Windows, Android, and iOS. Similar to a VPN, you just have to connect to a server location where Facebook isn’t blocked.

However, compared to NordVPN, Psiphon supports fewer servers in fewer countries. It doesn’t support Mac, Linux, routers, or 24/7 live chat support.

And you can’t use the cool anti-censorship featured provided by NordVPN (buy here), like staying connected to two VPN servers at once or disguising your VPN traffic to fly under the radar.

Use a proxy

We saved this option for last because it’s the least reliable for unblocking the Facebook website.

While a proxy server hides your IP address and offers some level of protection, it’s simply not as effective as a VPN, Tor, or even Psiphon. The encryption isn’t powerful enough.

Although there are numerous free proxy lists that you can find on the web, most ISPs have already identified and blocked them due to government requests.

If you still want to use a proxy server, we suggest checking out Shadowsocks.

Conclusion

To sum up, you can use a VPN, Tor, Psiphon or a proxy server to circumvent government censorship and unblock the Facebook website.

However, there’s no foolproof solution. And you could get in trouble for using any anti-censorship method if it means breaking the law.

What method are you using to defeat online censorship and unblock Facebook in your country? Let us know in the comment section below.

[wl_navigator]

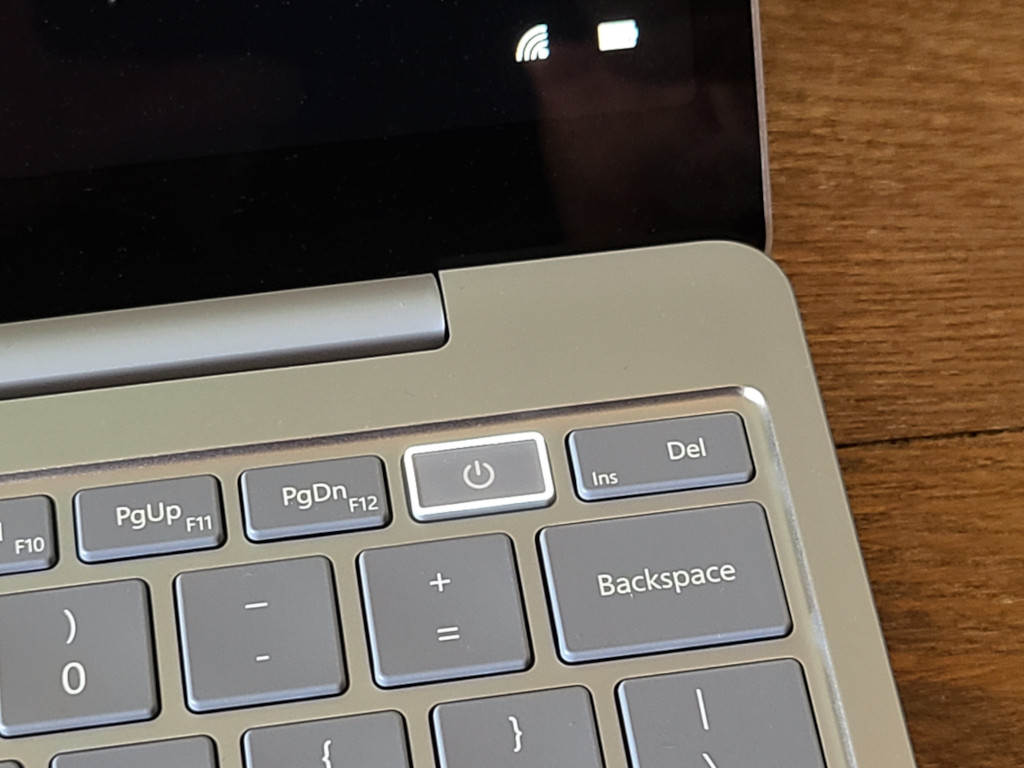
First Surface Laptop Go firmware release targets fingerprint reader improvements

Microsoft Surface Laptop Go owners are getting treated to the device’s first-ever firmware update today, which’s bringing some improvements to the Windows Hello experience among other things.

The Surface Laptop Go has been on the market for about two months and in that time, the device has been pretty self-sufficient and with Windows 10 S Mode out of the box, there has been little need for owners to venture into update land through any wants or needs.

However, for anyone like myself who has been using the Surface Laptop Go as an Insider machine, you may have noticed the device stop reading fingerprints after the latest release.

The fingerprint reader remains a completely useless glowing slap in the face to the Surface Laptop Go’s level of security for me, so much so that when attempting to reset the recognition, the device claims that it can’t even map to the button.

Hopefully, today’s firmware update 3.15.12011.10134 addresses this issue and also improves the “reader performance” as well. Other improvements rolled into this update include optimizations to the

  • Surface System Telemetry Driver – System Device
  • Surface Touch Firmware
  • Surface UEFI Firmware

The firmware update is gradually rolling out, so some devices may not be seeing the release just yet, but it should land in the Settings App soon enough for most. For those with less patience, you could also try downloading it from Microsoft’s Download Center as well.

Let me know in the comments below, if you own a Surface Laptop Go and if you’ve had any issues with its performance or features so far.

5 best Quickbooks card readers for laptop & desktop

QuickBooks is known as one of the main accounting software services created by Intuit in order to make the payment process faster and easier for both small and medium-sized businesses.

In order to take full advantage of the various benefits of the QuickBooks application, you need a high-quality card reader that can ensure a smooth work-flow and handle a multitude of transactions on a daily basis.

In this article we want to give you the best recommendations regarding a card reader for your QuickBooks package.

What is the best card reader to use with QuickBooks?

MagTek 21040145

  • Connectivity to system host through built-in USB cable
  • Two magnetic heads for reading in one swipe
  • Decode error alert through LED indicator
  • Missing mounting brackets

This three-track card reader from MagTek deserves a top mention because it comes with two magnetic heads that allow the card to be read in just one swipe regardless of what direction the magnetic stripe is facing.

You can swipe the card backward or forward at a speed of 60″ per second thanks to the complex configuration. Another perk is that the USB keyboard emulation sends data created for hosting systems and applications that allow keyboard input.


MagTek 21040140

  • Bidirectional configuration for quick transactions
  • LED indicator for spotting decoding errors
  • Connectivity to USB 2.0 port of a host device
  • No instructions manual

Another great card reader that works perfectly with Quickbooks is this smart device from MagTek. It provides a configuration that allows you to swipe the card backward or forward at a speed of up to 60″ per second.

It comes with two magnetic heads, which means that it can be read with one swipe without worrying about what direction the magnetic stripe is facing.

This three-track magnetic card reader provides a built-in, 6 feet USB cable that allows you to connect it to any type of PC.


MSR90 USB Swipe

  • Reliable for over 1,000,000 card swipes
  • Compatible with Windows OS, Mac OS, and many other USB capable operating systems
  • Small footprint to fit in tight places
  • Not compatible with two-track cards

This magnetic card reader has gained a reputation among users for being a great match with QuickBooks apps and services.

A device that consists of a USB emulation keyboard interface that doesn’t need any driver or software, in order to function. All you need to do is plug in and play.

It has the capacity to read up to 3 tracks of information: ISO7811, AAMVA, CA DMV and many other card data formats.

You’ll definitely get the job done much faster thanks to the bi-directional swipe reading feature that works even on damaged cards


Fdit Credit Card Read

  • Interface with USB emulation Keyboard
  • Operating temperature: -20 to +60
  • Compatible with: Windows XP, Windows7, Windows8, Linux
  • Cannot store the card data

This magnetic credit card reader is able to read up to three tracks of information when the card is swiped in either direction and works great with the QuickBooks services.

It offers compatibility with a variety of card formats such as ISO7811, AAMVA, CA DMV, and many others. The configuration system is very user-friendly and can be customized to your basic needs.


Honsdom USB Credit Card

  • Bi-directional swipe reading magstripe cards
  • LED indicator for code errors
  • ISO7811, AAMVA, CA DMV readability
  • Not suitable for a system that requires an encrypted reader

A pack of two magnetic credit card readers that offer QuickBooks compatibility and can read three tracks Hi and Lo coercivity magnetic stripe cards.

Thanks to the bidirectional swipe reading that works with TXT, notepad, Word, Excel, POS systems, you can rely on over 1,000,000 card swipes, an aspect that will improve your work-flow significantly. It also supports a multitude of card formats like ISO7811, AAMVA, CA DMV.

These magnetic credit cards offer compatibility with a multitude of USB operating systems like Windows and MAC OS.


As you can see there are a few aspects you should consider when it comes to a credit card reader that also offers QuickBooks compatibility and we presented you with some of the best options of the moment.

We’d also like to hear your opinion so please share your thoughts with us by using the comment section bellow.

FIX: Low FPS in Cyberpunk 2077

Cyberpunk 2077 is a Sci-Fi RPG created by CD Projekt Red, the same developers that brought the Witcher to the gaming world.

The game is an amazing display of how far technology has come, but it did get off to a rocky start at launch, being plagued by issues like crashes, not being able to launch and more.

Unfortunately, a lot of the players that did make the game work are complaining about performance issues, such as FPS drops, performance spikes, long loading times, and more.

Because the game is so popular, we’ve decided to look into several solutions that can se used to fix the problem, and we will be listing them to you in a step-by-step manner in the guide below.


How do I fix performance issues in Cyberpunk 2077?

1. Check your PC’s system requirements

Your go-to solution whenever you are facing performance issues in games is to check out whether your PC meets the minimum system requirements or not.

In fact, most of the times not having a powerful PC can prevent you from launching the game entirely.

That being said, check out the official system requirements of Cyberpunk 2077.


2. Lower your video settings

If your PC does meet the minimum system requirements but still has low FPS, then your next best solution is to simply play the game at lower video settings.

While the game will indeed no longer look as appealing, at least it will be able to play it.


3. Update your device drivers

err network changed update drivers

If your PC is powerful enough to run Cyberpunk 2077, it amounts to nothing if the drivers running it are outdated, especially the GPU‘s drivers.

That being the case, a good third-party software utility can come in handy to repair, update, and find all the missing drivers that your PC needs, and one such tool is Outbyte Driver Updater.

Outbyte Driver Updater automatically update drivers

Not only will it completely bring your PC up to date driver-wise, it is also incredibly easy-to-use, and lightweight.

Outbyte Driver Updater

Outbyte Driver Updater

Cyberpunk 2077 will run faster and better with updated drivers. Use Outbyte Driver Updater to boost your PC now!
Check priceVisit website

4. Verify the integrity of your game’s cache

4.1. GOG players

  1. Launch GOG Galaxy
  2. Go to the Owned games library menu
  3. Choose Cyberpunk 2077
  4. Select Customize
  5. Click on Manage installation
  6. Select Verify / repair

4.2. Steam players

  1. Start Steam
  2. Navigate to the Library section
  3. Right-click on Cyberpunk 2077
  4. Choose Properties
  5. Go to the Local files tab
  6. Click on Verify integrity of game files…

4.3. Epic Games players

  1. Start the Epic Games launcher
  2. Navigate to the Library section
  3. Look for the game click on the three dots 
  4. Select Verify

5. Update your PC

  1. Press Start
  2. Type in update and select Check for updates
  3. In the Windows Update menu, select Check for updates
  4. Download and install any updates if any are found
  5. Restart your PC

6. Upgrade your PC

This is arguably the most costly solution, yet it is a surefire way to ensure that performance issues in Cyberpunk 2020 will be a thing of the past.

If you don’ have the budget to replace the entire PC, here are some of the key components that can make a difference in terms of gaming performance:

⇒ GPU

⇒ CPU

⇒ HDD

⇒ SSD 

Note: replacing your PC’s HDD with an SSD will greatly decrease loading times if Cyberpunk 2077 is installed on it

If you do have the budget to replace your entire PC, there are several PCs out there that will run Cyberpunk 2077 like it were nothing.

For those that like gaming on the go, a gaming laptop is also a viable option.


By following these steps, you should be able to have a smooth experience playing Cyberpunk 2077.

Let us know if there are other tips you tried that worked by leaving us a message in the comments section below.

[wl_navigator]

How to use the Microsoft Lists advanced list editor

Microsoft Lists is a new data storage and organisation system that blends spreadsheets, databases and web apps together. Lists is really a new interface atop the existing SharePoint Lists infrastructure. We’ve previously shown how to create a new list within Lists itself; now, we’ll go in-depth on list configuration by using the SharePoint interface.
Screenshot showing Microsoft Lists settings

Lists does a good job of making itself as accessible as possible. The SharePoint backend is only revealed when you go looking for it. When you’re viewing a list, click the Settings icon in the top-right, then “List settings” to open the configuration options in SharePoint.

The SharePoint List Settings screen is much denser than what you get within the Lists app. You have extensive management options for customising the list’s fields, validation, permissions and metadata.

General Settings

Starting from the top, the “General Settings” contain global controls which apply to the list itself, or all data within the list. We’re not going to cover every option here as many of them are only used within the SharePoint Lists UI, not the Lists app.
Screenshot of configuring a Microsoft Lists list using the SharePoint settings interface

Some notable settings can be found in “Advanced settings”. “Item-level permissions” allows you to control what users can see on shared lists, such as all items or only items they’ve created themselves.
Screenshot of configuring a Microsoft Lists list using the SharePoint settings interface

The “Attachments” option can be used to disable the ability to add attachments to new items in lists, which is on by default. Further down the screen, there’s settings to control whether list items can display in search results and whether they can be downloaded to users’ devices.

Columns

Back on the main list settings screen, the “Columns” section is worth further attention. Clicking a column name will allow you to edit its properties. The options available here will depend on the column’s data type. Some examples you might see include the ability to set maximum character lengths (for text fields), set the default value for new items and toggle whether the field is a required input.
Screenshot of configuring a Microsoft Lists list using the SharePoint settings interface

Interactive data types, such as the multiple choice select component, will have more settings. These may include the ability to change the type of input used, allowing you to choose between radio buttons or a dropdown menu. Most – but not all – of these options are available when editing columns within the main Lists app. Using the SharePoint settings screen exposes all the possible settings, giving you the most control over how data is stored and presented.
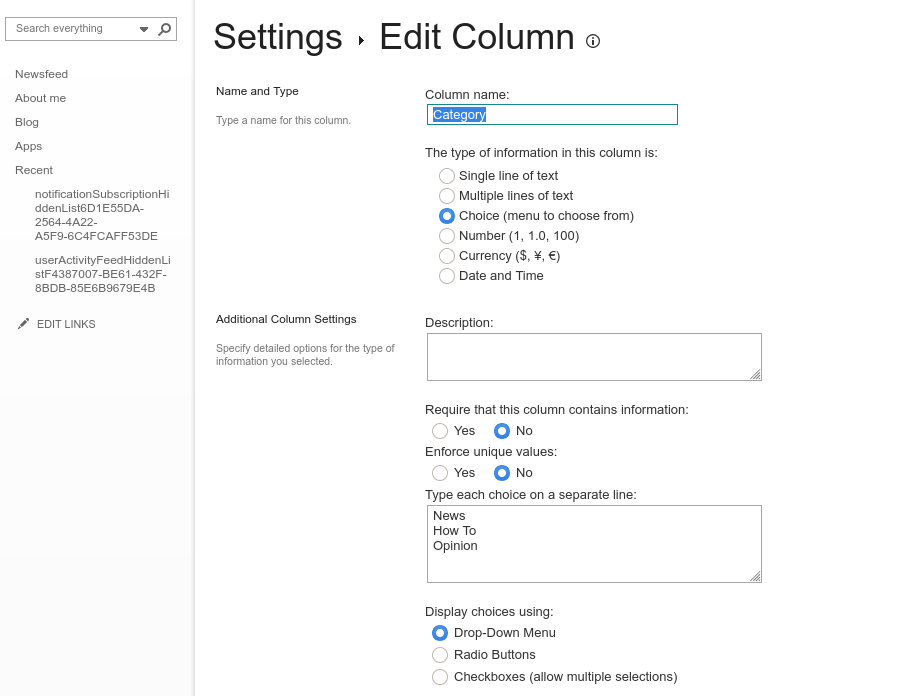
Screenshot of configuring a Microsoft Lists list using the SharePoint settings interface

You can create a new column using the “Create column” link on the List settings page. You’ll need to choose a column name, select the data type and fill out the settings fields for that data type. The “Add to default view” checkbox should be left selected to make sure the field shows up by default in the Lists interface.

Views

On the subject of views, you can manage these within the “Views” section at the bottom of the settings page. You can create new views and edit existing ones. A “view” defines the fields to show in the Lists UI. You start with a single “All Items” view by default. When you add additional views, you can access them in Lists by clicking the name of the current view in the top-right.
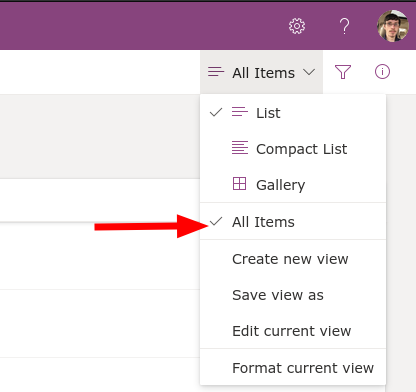
Screenshot showing Microsoft Lists view selection menu

The View settings screen allows you to choose which fields to display and the order to display them in. You can also set up the sorting order for rows of data and configure default filters. In the column selection section, you’ll see several off-by-default fields which are usually hidden. Turn them on to add default metadata to the List view, such as the name of the item’s author (“Created By”) or its modifiation time (“Modified”).
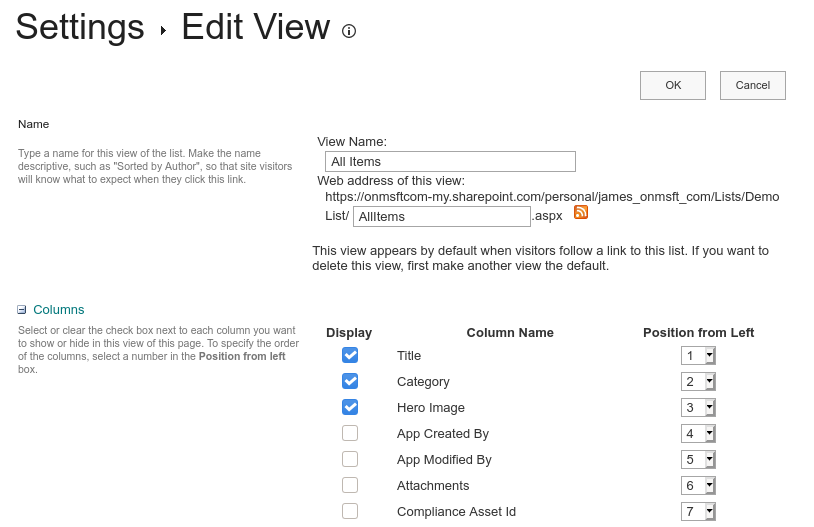
Screenshot of configuring a Microsoft Lists list using the SharePoint settings interface

Further down the view settings screen, you’ll find sections that allow you to configure whether totals are displayed at the bottom of columns, whether data should be grouped together and how many data items should be displayed on a single screen. The final section, “Mobile”, lets you choose whether to make this view available on mobile devices. The default lists for desktop and mobile can be set independently of each other, so it’s possible to provide a customised view for smaller devices.

Screenshot of configuring a Microsoft Lists list using the SharePoint settings interface

The SharePoint settings screens are far less accessible than Lists itself is. You may not need to use them often though, as the most commonly used capabiltiies are supported within Lists’ own configuration panels.
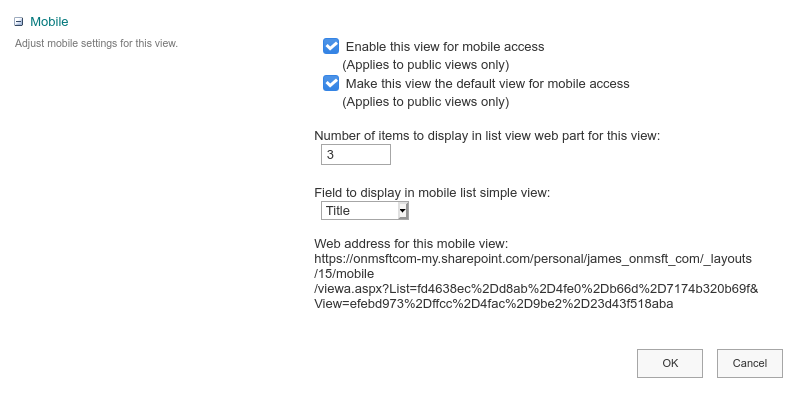
Screenshot of configuring a Microsoft Lists list using the SharePoint settings interface

The power of Lists comes in its versatility – you can get started with a basic list very quickly and then add more advanced capabilities over time. Eventually, you may reach a point where you need a SharePoint option that isn’t exposed in the Lists UI. When that time comes, click “List settings”, break through the Lists facade and begin utilising the capabilties – and complexity – of SharePoint instead.


New sleeping tabs feature in Edge lets you reduce CPU usage

Microsoft has been working hard to make Chromium Edge stand out and it started testing a feature in Edge Canary back in September.

This basically allowed users to freeze tabs in the background when not being used. This technology is based on Chrome‘s built-in freezing feature, which easily pauses scripts on a page when you’re looking at it.

Now, Microsoft is ready to deploy this feature to all users running Microsoft Edge Beta 88. As expected, it is meant to deliver a significant decrease in CPU and battery usage.

Numbers look quite promising. In fact, that’s precisely what Microsoft reveals:

Using sleeping tabs on Microsoft Edge typically reduces memory usage by 32% on average. It also increases your battery life as a sleeping tab uses 37% less CPU on average than a non-sleeping tab.

What’s this new sleeping tabs feature in Edge all about?

The new feature is meant to force inactive background tabs to automatically go to sleep. This releases system resources after a pre-defined amount of time.

Do note that that sleeping tabs in Microsoft Edge will make tabs go to sleep only after 2 hours of inactivity.

Even so, this makes a huge difference when it comes to redirecting those valuable CPU and battery resources for newly opened or active tabs, as well as other applications on your computer.

Average CPU

You should see a fade on the tab when it is asleep, so feel free to click it whenever you want to bring it back to life.

On top of all these, recent updates include an option to put tabs to sleep even after 5 minutes of inactivity and new group policies to manage sleeping tabs.

Keep in mind that you can find more related settings for this by entering edge://settings/system in the URL bar. Don’t forget to let us know your feedback on sleeping tabs in the comments area below.

Fix: Cyberpunk 2077 Doesn’t Launch

Cyberpunk 2077 is the latest rage in terms of RPG games, and many have awaited the official launch despite being delayed so many times.

Well, the game is out, but many users have been facing issues with it, many of them reporting that they are having problems launch the game in the first place.

Because the game is so popular, we’ve decided to create a step-by-step guide on how you can fix this issue, and finally make Cyberpunk 2077 launch properly on your PC.

How do I make Cyberpunk 2077 launch properly on Windows 10?

1. Make sure that your PC meets the minimum system requirements

One cannot deny that Cyberpunk is a mammoth of a game, and that you need a powerful gaming PC to run it properly.

That being the case, check out the official system requirements of Cyberpunk 2077:

If you notice that your PC is well-below even the minimum system requirements, then maybe your should consider some upgrades:

⇒ A better GPU

⇒ A faster CPU

⇒ An entirely new desktop PC

⇒ A powerful gaming laptop


2. Update your display drivers

Outbyte Driver Updater-Banner

As mentioned above, Cyberpunk 2077 need a powerful PC to run, the core being your device’s GPU.

However, it’s not enough to have the hardware if the device drivers are only, missing, or installed in a faulty way, and that is when a dedicated driver updater can come in handy.

Outbyte Driver Updater automatically update drivers

The best driver updater currently on the market is Outbyte Driver Updater, and not only will this tool scan your PC for outdated drivers, it will also fix the broken one, and find you the missing ones.

The program is lightweight, since the library of drivers is entirely online, and it is constantly updated to the latest version, so you know your PC will always be taken care of.

Outbyte Driver Updater

Outbyte Driver Updater

Your GPU’s drivers are the main cause of visual bugs, and games not launching. Play whatever you want by using Outbyte Driver Updater!
Check priceVisit website

3. Uninstall all Microsoft Visual C++ redistributables 

  1. Press Start
  2. Press control and launch the Control Panel
  3. Select Uninstall a program
  4. Select your Microsoft Visual C++ redistributables one by one, right-click them, and select Uninstall
  5. Go to Microsoft Support to download them again again and perform a clean reinstall

4. Disable apps with in-game overlay before launch

Since Cyberpunk 2077 is still relatively new, it may have issue interacting with apps that offer in-game overlay.

That being the case, disable these following apps:

  • GeForce Experience
  • MSI Afterburner
  • MSI Gaming app
  • Riva Tuner
  • Overwolf
  • Uplay
  • Fraps

5. Launch Cyberpunk 2077 in Clean Boot mode

  1. Press Start
  2. Type in msconfig and select System Configuration
  3. Open the Services tab
  4. Click Hide all Microsoft services
  5. Click on Disable all
  6. Open the Startup tab
  7. Click on Open Task Manager
  8. Select each item in the Startup tab, and disable them all
  9. Close the Task Manager
  10. Click OK
  11. Restart your PC, and try launching Cyberpunk 2077 again

By following these steps, you should be able to launch Cyberpunk 2077 properly, and enjoy another amazing RPG brought to your by CD PROJEKT RED.

Other gamers complained about Cyberpunk 2077 corrupted or missing scripts file but our guide will help you fix it.

Have you tried any other trick that worked that we haven’t covered? Let us know by leaving a message in the comments section below and we will update the article accordingly.

FIX: Cyberpunk 2077 has flatlined [Crash Error]

If you’re a fan of RPG games, especially the critically-acclaimed Witcher series, then you’re probably well-aware of Cyberpunk 2077, a brand new Sci-Fi RPG launched in December 2020.

Unfortunately, PC players got off to a rocky start since the game was still released with a lot of bugs despite several delays aimed at polishing the final product.

Because of the game‘s popularity, we’ve decided to compile a step-by-step guide on how you can solve many of these crashes.


How do I fix game crashes in Cyberpunk 2077?

1. Update your GPU drivers

Outbyte Driver Updater-Banner

Like most games nowadays, it is important that your PC meets all the system requirements if you want them to run properly.

Outbyte Driver Updater automatically update drivers

If your PC does meet the hardware requirements, make sure that the drivers are updated as well.

One great way of updating your drivers to the latest version fast and without issues is via a dedicated driver updater, and few on the market are as good as Outbyte Driver Updater.

Not only will this tool detect all of your missing, broken, or outdated drivers, but it will find them and download them for you as fast as your Internet speed allows it.

More so, the tool is designed to be used by all users, and it supports all drivers and hardware components thanks to the host of libraries that back it up.

Outbyte Driver Updater

Outbyte Driver Updater

Games won’t run if your GPU drivers are updated to the latest version. Make sure that isn’t an issues anymore with Outbyte Driver Updater!
Check priceVisit website

2. Update your PC

  1. Press Start
  2. Go to Settings (the cogwheel-shaped button)
  3. Select Updates & Security
  4. Select Check for updates
  5. Download the updates, if any are found, and restart your PC to apply them

3. Launch the game straight from the executable

3.1. GOG players

  1. Launch GOG Galaxy and log into your GOG account
  2. Go to Owned games and choose Cyberpunk 2077
  3. Select Customize
  4. Choose Manage installation
  5. Choose Show folder
  6. Go to bin, select x64, and launch the game from Cyberpunk 2077.exe

3.2. Steam players

  1. Launch Steam
  2. Go to the Library section
  3. Right-click on your game
  4. Select Properties
  5. Go to the Local files tab
  6. Click on Browse local files
  7. Go to bin, choose x64, and launch it from Cyberpunk2077.exe

3.3. Epic Games players

By default, the game’s launcher should be found in the following location:

C:Program FilesEpic GamesCyberpunk 2077binx64

4. Verify the integrity of the game cache

4.1. GOG players

  1. Launch GOG Galaxy and log into your GOG account
  2. Go to Owned games and choose Cyberpunk 2077
  3. Select Customize
  4. Choose Manage installation
  5. Click on Verify / repair

4.2. Steam players

  1. Launch Steam
  2. Go to the Library section
  3. Right-click on your game
  4. Select Properties
  5. Go to the Local files tab
  6. Click on Verify integrity of game files…

4.3. Epic Games players

  1. Launch Epic games
  2. Go to the Library section
  3. Go to the game click on the three dots next to it
  4. Select Verify

5. Reinstall the game

While the game is indeed massive and this solution will take a while, regardless of how fast your PC is, reinstalling the game is a sure-fire way of making sure that files will the installed correctly.

Just remember that while you are doing it, it would be best if you closed all other apps so that nothing interferes with the setup.


By following these steps, you should be able to get rid of any crashes when trying to play Cyberpunk 2077.

Do you know of any other solutions that you’ve tried and have proven to be useful? Let us know by leaving your feedback in the comments section below, and we will update the article accordingly.

[wl_navigator]

Rumor: Windows 10X has been compiled, could be ready for new devices early next year

Although Microsoft doesn’t like to publically talk about its next-generation operating system, Windows 10X, it seems as though the company has made some big internal progress on it. According to Windows Central’s Zac Bowden, Microsoft has apparently just complied a final build of Windows 10X.

As a reminder, while Windows 10X was once intended for dual-screen devices like the now-delayed Surface Neo, but Microsoft has re-worked its purpose. Now, the operating system is believed to be shipping on new lightweight and budget PCs only, which are expected to be seen sometime next year. This means rumor still has it that Windows 10X won’t be available for existing PCs or tablets like Surface Go 2.

Anyway, Bowden does offer an interesting note. December 10 was intended as the “final build” day for Windows 10X, but Microsoft isn’t quite done with the OS just yet. The company is still working on bug fixes between now and whenever new PCs start shipping with the operating system onboard.

With this in mind, it definitely looks as though 2021 will be exciting for Windows. While the Spring might again bring a small regular Windows 10 release, we could see Windows 10X launch alongside it, on new devices. Then, in the fall, see the rumored “Sun Valley” redesign with the “Cobalt” update.

Recap: The Game Awards packs big Xbox news, new trailers, gameplay footage and releases into its end-of-the-year show

Last night the gaming industry was treated to a host of news, trailers, and announcements as it celebrated the 2020 Game Awards.

With everyone’s eyes on the awards show, Microsoft took that opportunity to unload a ton of its end of year announcements in almost rapid-fire succession unveiling that Flight Simulator would be making its way to Series X|S consoles, Master Chief making an appearance in Fortnite, ARK II console exclusive, a reboot of Perfect Dark from its new studio The Initiative, and a lot more.

As for the show itself, Sony exclusive Last of Us II went home with seven awards ranging from Game of the Year to Innovation in Accessibility while other winners such as Animal Crossing: New Horizons took home Best Family Game and Microsoft’s Flight Sim owned the Best Sim/Strategy category.

We’ll save you the three-hour viewing and list of the winners from last night’s award show here (GameSpot has the full list).

Game of the Year

  • WINNER: The Last of Us Part II
  • Animal Crossing: New Horizons
  • Doom Eternal
  • Final Fantasy VII Remake
  • Ghost of Tsushima
  • Hades

Best Game Direction

  • WINNER: The Last of Us Part II
  • Final Fantasy VII Remake
  • Ghost of Tsushima
  • Hades
  • Half-Life: Alyx

Best Narrative

  • WINNER: The Last of Us Part II
  • 13 Sentinels: Aegis Rim
  • Final Fantasy VII Remake
  • Ghost of Tsushima
  • Hades

Best Art Direction

  • WINNER: Ghost of Tsushima
  • Final Fantasy VII Remake
  • Hades
  • Ori and the Will of the Wisps
  • The Last of Us Part II

Best Score And Music

  • WINNER: Final Fantasy VII Remake
  • Doom Eternal
  • Hades
  • Ori and the Will of the Wisps
  • The Last of Us Part II

Best Audio Design

  • WINNER: The Last of Us Part II
  • Doom Eternal
  • Half-Life: Alyx
  • Ghost of Tsushima
  • Resident Evil 3

Best Performance

  • WINNER: Laura Bailey as Abby (The Last of Us Part II)
  • Ashley Johnson as Ellie (The Last of Us Part II)
  • Daisuke Tsuji as Jin Sakai (Ghost of Tsushima)
  • Logan Cunningham as Hades (Hades)
  • Nadji Jeter as Miles Morales (Marvel’s Spider-Man: Miles Morales)

As for other reveals from the night, fans were treated to gameplay footage for Back 4 Blood, a new Cyberpunk 2077 Forza Horizon 4 DLC, Dragon Age 4 Endless Dungeon, new Warframe content, CoD: Black Ops Cold War Season 1 gameplay, a trailer for Elite Dangerous, Evil Dead gameplay, Elder Scrolls Online and so much more.

The three-hour event has been archived on YouTube for anyone who wants to comb through the piles of news, trailers, and gameplay shown during last night’s award show.

Outlook for Windows is getting text predictions in January

Microsoft is working on a new text prediction feature for Outlook for Windows that is similar to the web version of the app. The company has announced through the Microsoft 365 Admin center that the feature will begin rolling out to users in late January.

As the name suggests, text predictions will suggest words and phrases while the user is composing an email in English. Outlook users will be able to accept suggestions by pressing the tab or the right arrow key. If they continue to type while ignoring the suggestions, the text predictions will disappear automatically.

Suggestions

At launch, the feature will be on by default, and users will be able to turn off the text predictions by heading to the Mail options in Outlook for Windows. “Disabling this feature in Outlook for Windows will not affect text predictions in Outlook on the web or Outlook for iOS. Eventually, text predictions will support additional languages, which will not require an update to the application or settings.” the company explained.

The addition of text predictions will be a welcome one for Outlook users, and it’s handy for people who deal with a large volume of emails. Do you think that the new experience will help you to be more productive? Let us know in the comments down below.


Microsoft Lists – How to create a new list from scratch

Microsoft Lists is a data management solution mixing elements of Excel spreadsheets, Access databases and third-party low code solutions such as Airtable. In this guide, we’ll show you how to get started creating a new list from scratch – if you’re looking for a more general overview of Lists, try reading our Getting Started guide first.

Login to your work or school Microsoft 365 account and launch Microsoft Lists from the app launcher. Click the “New list” button at the top of the app, then select the “Blank list” option.

Screenshot of list creation in Microsoft Lists

Give your list a name and assign it a colour and icon. The latter two are purely decorational elements to help lists stand out against each other within the app’s UI.

Screenshot of list creation in Microsoft Lists

At the bottom of the form, you’ll need to choose where to save the list to. The default “My lists” option will result in a personal list which only you have access to. Within the dropdown menu, you’ll find the ability to save to a SharePoint team site. Selecting a site will make the list available to everyone with access to that site.

Screenshot of column creation in Microsoft Lists

Once your list has been created, you can begin to define columns of data. A single “Title” column is created by default. You can rename this by hovering its name, selecting “Column settings” and then choosing “Rename”.

Screenshot of column creation in Microsoft Lists

To add new columns, click the “Add column” button. You’ll need to choose a data type for the data you’ll enter in the column. A large variety of options are available. They vary from basic text to interactive elements such as a multiple choice selection.

Screenshot of column creation in Microsoft Lists

After you’ve selected a data type, a flyout pane will appear from the right. Here, you can name your column, add a description and set the default value for newly added cells. The exact options you’ll see here will vary depending on the data type you selected. There’s too many possible permutations to cover in one article – we encourage you to experiment with different data types, explore the settings which are available and evaluate the differences in how they display data.

Screenshot of column creation in Microsoft Lists

Once you’ve added some columns, you’re ready to start populating your list with data. Click the “New” button in the top-left to bring out the “New item” flyout from the right.

Screenshot of adding a new item to Microsoft Lists

You’ll need to supply values for each of the columns in your list. The form fields will automatically use appropriate inputs for the data type of each column.

Screenshot of adding a new item to Microsoft Lists

In our example, we’ve created a List which could be used to organise draft articles for OnMSFT. We write the title manually (Text column), select a Category from predefined options (Choice column) and add a thumbnail (Image column). Any item in a list can also have optional attachments associated with it.

Screenshot of Microsoft Lists UI

With some data in your list, you can now sit back and admire it. Lists automatically presents the data in each column using an appropriate format for the data type. This is where the real differentiation from tools like Excel occurs – although Lists requires a bit of time to setup, the result is a far more visual experience than the typical Excel spreadsheet supplies.

Lists combines the predefined structure of a database with the accessible presentation of a spreadsheet. At the same time, it offers interactive capabilities and seamless integration with services like low-code solutions such as Microsoft’s Power Automate and Power Apps. In future articles, we’ll introduce the advanced list editor which defers to SharePoint to provide even more control over how your data is stored and presented.

Firefox printing blank pages? Here’s a quick fix

Firefox browser has a built-in print function that allows you to print documents and web pages directly from the browser. However, several users have reported Firefox printing blank page issues recently.

Firefox can show blank previews and print blank pages if the configuration is corrupted. In some instances, Firefox prints only the second-page blank, and it can also occur due to incorrect page settings. Fortunately, you can fix this issue with a simple browser reset.

In this article, we explore a few troubleshooting steps to help you resolve the Firefox printing blank pages issue on your Windows computer.

What to do if Firefox prints blank pages?

1. Try a different browser

Before moving on to explaining how to remediate this issue, we must mention that it is very likely to not face it at all if you switch to a more stable browser with a smaller footprint.

We recommend Opera One because it has a very straightforward user interface that does not require much getting used to. You can customize it to your liking with themes and add-ons and create your own personal workspace.

The browser comes with a free VPN that will help you keep your browsing activity private and let you surpass geo-restrictions. It also has a built-in ad-blocker, social media and email integrations.

⇒ Get Opera One

2. Disable Firefox extension 

Enable Safe Mode 

Firefox printing blank pages
  1. Hold the Shift key on your keyboard and launch the Firefox browser. 
  2. When the Firefox Safe Mode dialogue appears, click Start in Safe Mode. This will start the browser in Safe Mode.
  3. Try printing a web page to see if the printing works in the Safe Mode. If it works, the issue could be occurring due to an incompatible extension. 

Stop the Firefox extension

Firefox printing blank pages
  1. Launch Firefox.
  2. Click the Menu icon and select Add-ons.
  3. Select the Extensions tab.
  4. Click the Disable button for all the extensions one by one to disable all the extensions.
  5. Relaunch the Firefox browser and trying printing again.

If you can print now without the blank page issue, open the Add-ons section again. Enable add-ons one by one till you find the problematic add-on. Click the Remove button to uninstall the add-on.

3. Check Firefox page settings

Firefox printing blank pages
  1. Launch the Firefox browser.
  2. Click the menu icon and select Print.
  3. From the print preview window, make sure Scale is set to Shrink To Fit.
  4. Next, make sure the Portrait orientation is set.
  5. Click on the Page Setup button.
  6. Click the Margins & Header/Footer tab and make sure the page margins are set correctly. The default setting is 12.7 mm.
  7. Click OK to close the window.
  8. In the Print Preview window, click Print.
  9. Select the correct printer and make sure Print to File is not selected.
  10. Try printing the page and check for any improvements.

4. Check for printer issue

Before resetting your Firefox browser, try printing the webpage using other browsers such as Chrome or Microsoft Edge. You can see whether your problem is with Firefox, your printer, or the website you are visiting.

If the page prints blank pages in other browsers, then the issue could be with the printer. Follow your printer’s troubleshooting instructions to fix the problem.

5. Reset Firefox printer setting 

firefox print second page blank
  1. Type about:config in the Firefox address bar and hit enter.
  2. Click on the Accept the Risk and Continue button.
  3. In the Search field, type print_printer.
  4. From the search result, click the Delete (trashcan) icon for the print_printer.
  5. Click the Firefox menu button and select Exit.
  6. Restart Firefox and try printing again to see if the error persists.

6. Reset all Firefox print settings

firefox print second page blank
  1.  Click the Menu button and select Help.
  2. Next, select Troubleshooting Information.
  3. Scroll down to Profile Folder and click on Open Folder. This will open a Profile Folder in Explorer.
  4. Keeping the Explorer window open, Exit/Close Firefox.
  5. In the profile folder, copy the prefs file and paste it into a backup folder.
  6. Open the original prefs file in a text editor like WordPad or WordPad++.
  7. Remove all lines in the prefs file that start with print_.
  8. Save the file by pressing Ctrl + S.
  9. Restart Firefox and check if the printing error is resolved.

If you see any other issues that might have occurred due to the edited file, replace the edited prefs file with the backup prefs file.

This isn’t the only issue you can encounter, and many reported An error occurred while printing in Firefox, so you might want to check it out for more information.

Tweaking the page settings and profile settings can fix the error. If the issue persists, reinstall the Firefox browser to fix the problem.

Extract CAB file in Windows 10/11 [Complete Guide]

CAB file is an archive file format that some still use. Although this is an archive format, it’s not as popular as ZIP or RAR, and users don’t know how to properly extract it.

In today’s article, we’re going to show you how to extract the CAB file on Windows 10 fast and without any issues.

How do I extract a CAB file in Windows 10?

1. Use WinZip

winzip extract cab file windows 10

WinZip is a well-known file archiver software, and it’s the best way to extract CAB files. The software offers native support for CAB files, and you can extract them simply by opening them with WinZip.

The software also supports ZIP, RAR, 7Z, TAR, ISO, IMG, and other popular archive formats. WinZip can compress any file type, and there’s an encryption option available, so you can easily protect your files.

WinZip can also be used to manage, backup, and split files; there’s even support for cloud storage sharing. WinZip is the best choice if you need a tool that can handle CAB files out of the box.

Other great features:

  • Can handle all popular archive formats
  • Native support for CAB format
  • File encryption
  • File management, file splitting
  • Cloud storage support
WinZip

WinZip

WinZip is a file archiver software that can easily open and extract CAB files.
Free trialVisit website

2. Use the command line

  1. Press Windows Key + X to open Win + X menu.
  2. Now select PowerShell (Admin) or Command Prompt (Admin).
  3. Now you need to run one of the several commands explained below.

You can use two commands to extract CAB files, and we’ll show you how each of these commands works.

Expand

Expand WindowsReport.cab -F:* C:\WindowsReport

Extract32

extrac32.exe WindowsReport.cab /L "C:\WindowsReport\"

These commands are helpful since they can extract CAB files without relying on any third-party software. However, you’ll need to have the same familiarity with the command line to use these methods.

If you’re not a fan of the command line, you should be able to open and extract CAB files like any other file simply by double-clicking it, and Windows should be able to handle it.

Want to know how to install a .cab file? Read this guide to find the easiest method to do so.

Extracting CAB files on Windows 10 is pretty simple, but we suggest using the WinZip software to extract and manage CAB files like a pro.

ARK II will be an Xbox Series X and S console exclusive and will star Vin Diesel

ARK II, a sequel to ARK: Survival Evolved, was officially announced today during The Game Awards. The game will star Vin Diesel, as a character named Santiago, and is set to be a console exclusive for Microsoft’s Xbox Series X and Xbox Series S consoles.

This means that owners of a last-gen Xbox One console will need to upgrade to a newer one if they want to experience this blend of prehistoric and Sci-Fi action.

“We are excited to be working with the Studios Wildcard team on bringing ARK II staring Vin Diesel exclusively to Xbox Series X|S consoles,” Xbox’s Aaron Greenburg enthused via his personal Twitter account.

Surprisingly, an ARK animated series was also announced today. The series will revolve around the character of Helena and will boast a rather impressive cast of actors ranging from David Tennant, Russel Crowe, and Gerard Butler to Michelle Yeoh, Karl Urban, and Elliot Page. On a personal note, it was a pleasant surprise to see Australia’s Deborah Mailman on the cast list. Some may recognise her from the Secret Life of Us, Redfern Now, Offspring, and The Sapphires.

In addition to the above trailer, two tracks from the game’s soundtrack have been made available to listen to for free via the game’s composer Gareth Coker. You can check them out below.

Are you excited for the ARK II game and animated series? Share your thoughts with us in the comments below and then follow us on Twitter and Facebook for more Xbox gaming news.

Fix: DISM error 1009 in Windows 10/11 [Initialization error]

DISM is a useful tool that can help you if you encounter any issues with your Windows installation. However, many users reported getting the DISM error 1009.

This can be a problem and prevent you from repairing your installation, but today we’re going to show you how to get rid of DISM error 1009 once and for all.

How can I fix DISM error 1009 an initialization error occurred?

1. Install the latest updates

  1. Press Windows Key + I to open the Settings app.
  2. Go to the Update & Security section and click the Check for updates button.check for updates dism error 1009

Once the latest updates are installed, the DISM errors will be resolved.

In case you can’t download the update, you’ll need to download and install the update manually. To do that find the KB code of the update you want to download. You can do that in the Update & Security section.

After getting the update code, follow these steps:

  1. Go to the Microsoft Update Catalog.
  2. Enter the KB code in the search field.

  3. Now download the update for your system and install it manually.

    update catalog dism error 1009

2. Perform an in-place upgrade

person using computer dism error 1009
  1. Download Media Creation Tool.
  2. Start the application and select Upgrade this PC now.
  3. Wait while the software prepares the necessary files.
  4. Follow the instructions on the screen until you see the Ready to install window. Now select Change what to keep.
  5. Make sure that Keep personal files and apps is selected. Click Next and follow the instructions.


After the process is finished, your system will be upgraded to the latest version and the Error 1009 the configuration registry database is corrupted message will be gone.


3. Reset Windows 10

in-place upgrade dism error 1009

In case all other methods failed to fix your problem, the only thing that you can do is to reset Windows 10 to default. This process will remove all installed applications and files and reset your system.

Performing a Windows 10 reset is simple, and we wrote an in-depth guide on how to factory reset Windows 10, so be sure to check it out and follow the instructions from it closely.

Error 1009 the configuration registry database is corrupted can cause a lot of problems, but we hope that you managed to fix it using one of our solutions.

[wl_navigator]

Microsoft’s new studio The Initiative unveils Perfect Dark reboot at The Game Awards

The Initiative, Microsoft’s new Xbox Game Studio based in Santa Monica revealed their first game at The Game Awards ceremony today. As it was previously rumored, this is a reboot of Perfect Dark, an IP previously created by Rare in 2000 as the spiritual successor to their critically-acclaimed Goldeneye 007 game on the Nintendo 64.

“With Perfect Dark, we’re aiming to deliver a secret agent thriller set in a near-future world,” wrote Darrell Gallagher, Studio Head at The Initiative today. “We have built the Perfect Dark team at The Initiative by bringing in some of the most talented game makers from around the industry who all share a passion for storytelling, world-building and creating memorable game experiences. With the full backing from Xbox Studios to re-imagine one of the best loved IPs from gaming history, we couldn’t be more excited to share some of our early ideas.”

We don’t have many details about this new Perfect Dark game for now, except that it will be an Action/Adventure First Person Shooter coming to Xbox Series X and S. The Initiative, which was only created two years ago, is planning to share more details in the near future. The new studio has already attracted many veterans from the video games industry since its foundation, and we can’t wait to see how all this top talent is going to bring this beloved IP back to life.