The exclusive semaphore is owned by another process [FIX]

If you’re getting the ‘ERROR_EXCL_SEM_ALREADY_OWNED‘ error code 101 with ‘The exclusive semaphore is owned by another process‘ description, follow the troubleshooting steps below to resolve it.

A system error that bears code 101 can occur in various scenarios. Sometimes just after a startup, but it’s mostly occurring in the midst of installation of programs in Windows and just after or during the system reinstallation. After the error prompt, the program will crash. It mostly occurs due to:

  • Missing DLL, EXE, or SYS files that are essential for programs.
  • Faulty device drivers related to a troubled program.
  • Outdated BIOS version
  • Malware infection.
  • Deleted registry values.

This error can impact all Windows versions and Windows 10 isn’t an exception.

Because of the multiple possible causes, we advise you to try the various troubleshooting steps we presented below, in order to resolve the issue at hand. Of course, the approach you should take depends on the appearance of the error.

How to fix ‘The exclusive semaphore is owned by another process’ system error

  1. Scan for malware
  2. Repair or reinstall the troubled program
  3. Update drivers
  4. Scan system with SFC
  5. Repair the registry
  6. Reinstall Windows

1. Scan for malware

Malware is the first obvious suspect when it comes to system errors. It’s paramount to keep your system clean and protected in order to avoid this and similar problems.

Moreover, even if you’ve enabled real-time active protection, there’s still a chance that the creeping malware comes from the data partition onto the system partition. That should be enough to show you how resilient those can be.

However, luckily, you can perform a deep scan and clean up your PC in a few easy steps. You can either use a 3rd-party antimalware solution or just turn to Windows Defender, the built-in system security tool.

Follow the instructions below to perform a deep scan with Windows Defender:

  1. Open the Windows Defender icon from the Notification area.
  2. Open Settings.
  3. Save everything before you start, to prevent the data loss.
  4. Locate Windows Defender Offline and click Scan Offline.windows defender offline scan
  5. Your PC will restart and the scanning procedure will last for approximately 15-20 minutes.

If your Defender definition base is up to date, you should easily locate and remove all possible viruses.

2. Repair or reinstall the troubled program

If the damage to a certain program is already grave enough to cause the system error 101, you should take a reinstall into consideration. Some applications have a restore option, so that’s the first thing you should look for.

However, if there’s no restore option available, reinstallation is the only solution. In addition, it’s highly advised to use some 3rd-party tool to remove remaining registry values, after uninstall. It’s the safest way to evade future system errors after the program is freshly installed.

If you’re uncertain how to reinstall the program follow the instructions below, and hopefully, the error will be avoided in future use:

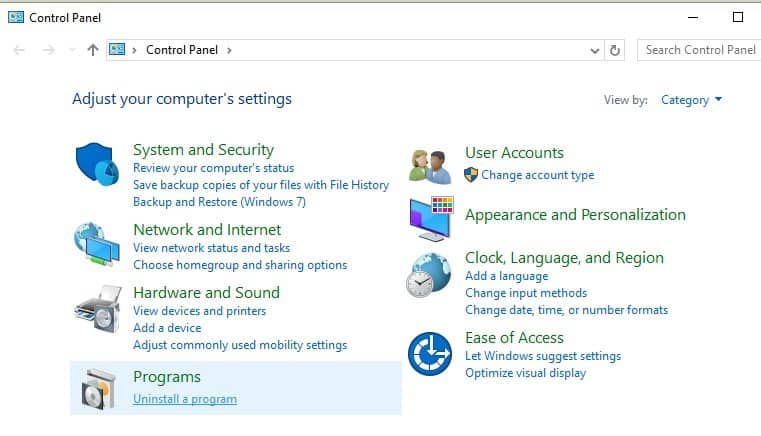
  1. Right-click Start and open Control Panel.
  2. In the Category view, choose to Uninstall a program.The exclusive semaphore is owned by another process
  3. Navigate to troubled, Windows-related program that caused the error prompt.
  4. Right-click and Uninstall it.
  5. Delete remaining folders and clean the registry (make sure to back it up before you run the cleanup tool).
  6. Restart your PC.
  7. Install the program and look for changes.

3. Update drivers

Outdated drivers can also cause this or similar system errors. For this exact error, it’s essential to have a proper driver that responds to a program you run. For example, if the program you run is somehow related to a GPU or sound card drivers that are faulty, there’s a chance that the program will crash.

Because of that, we advise you to follow the below steps and confirm that all drivers are properly installed:

  1.  Right-click Start and open Device Manager.
  2. If you locate any driver with the yellow exclamation sign, right-click and click Update Driver Software.
  3. In addition, you can navigate to the OEM’s site and download the drivers for various devices.

Have in mind that some manufacturers offer a driver bundle, which should speed the procedure substantially.

On the other hand, you might handle your PC drivers automatically with the right driver software. Plus, install or update all your drivers using specialized support from a driver expert like Fortect Driver Updater.

4. Scan system with SFC

However, if the ‘ERROR_EXCL_SEM_ALREADY_OWNED ‘, also known as system error 101, appears just after the startup, you can be sure that the system files are affected. Is it because of malware, badly installed updates, or misuse of certain system resources, we can’t be sure. Luckily, even though it sounds complex, there’s a simple solution for this problem.

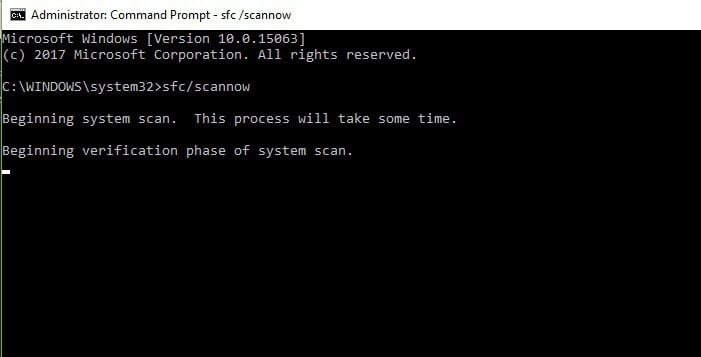
You just need to run the SFC command-line tool. This tool will check the files’ integrity and fix possible errors and corruption. If you’re not sure how to do it, check these instructions:

  1. Right-click the Start menu and open Command Prompt (Admin).
  2. In the command line, type or copy-paste the following command and press Enter:
    • sfc/scannow
The exclusive semaphore is owned by another process

3. After the procedure is finished, restart your PC.

If there’s any corrupted system file, SFC should fix it and restore its original state. Have in mind that the procedure may be lengthy, so it may take you some time.

5. Repair the registry

Now, we’ve come to a bit of dangerous ground. Even though it’s not easy to cope with system errors, the unknowledgeable use of the registry can cause you much more problems. However, if you’re used to registry tweaks, you’re probably backing up your registry frequently. If that’s the case, you should be able to resolve the problem. If it’s registry-related, of course.

And it often is, since the registry controls and configures all system processes. If the registry values are not appropriately set, there’s a great chance that something will go wrong, and eventually, the system errors will appear.

We’ll just try to inform you how to import pre-saved registry save and, hopefully, resolve the problem. For additional tweaks, you should check other sources, but we strongly advise you to act with caution.

  1. In the Windows Search bar, type regedit and press Enter.
  2. Open File and choose Import.
  3. Import saved registry configuration and apply changes.

With that, the problem should be resolved and the programs and system features should work just like intended.

6. Reinstall Windows

In the end, if the problem is persistent and the error reappears often, you might take the system reinstallation into consideration.

We’re aware that that’s not a preferred solution, but the appearance of system errors is a sign that something is wrong with your system. For that purpose, depending on the system you run, you should inform adequately and perform a reinstallation or take your computer to a service.

We hope this article will help you resolve your problems. In case you have any questions or suggestions, make sure to share them with us in the comments section below.

Protect yourself from web miners with the Anti-WebMiner for Windows

We have seen a slew of anti-virus products that help Microsoft Windows users keep the cyber threats and other malware attacks at bay. Today we will talk about Anti-WebMiner, a program that help you protect the system against various web mining scripts.

Web mining is a process wherein the cryptocurrencies in the system will be mined from the web browser. This is accomplished by a JavaScript that runs on sites that users visited and it makes use of hosts computing resources.


Mining per say is not actually an illegal practice, but doing so without the users content is simply not ethical. If the user is alright with sharing his computer resource then its fine. Let us get started and see how effective tis he Anti-WebMiner for Windows. The program in itself is not heavy and can be used to run and block known mining domains by referring to the operating system’s Hosts file.

The application user interface is pretty straightforward with an Install button. The Anti-WebMiner acts like a shield and redirects from the known mining domains which are notorious for loading scripts. The application can be run by clicking on the install button and this will also add the domains to the Windows Hosts file so that the domains will no longer be able to inject the JavaScript.

That being said, one can also remove the host entries by simply uninstalling the Anti-WebMiner. However, uninstall will only remove the entries of the program added to the host files while the other entries will be left intact. One can also manually add and remove the entries for the host files to block the web miners.

Thankfully the developer maintains the list of supported Hosts files on GitHub and the program will automatically pick up the new mining domains and changes to the existing ones. In a nutshell, the Anti-WebMiner is easy to use program that will prevent web miners from accessing your computing resources by using mining scripts.

RELATED STORIES TO CHECK OUT:

Trojan partially removed in Windows 10: Here’s how to remove it for good

One of the worst things that can happen while we use our Windows 10 device is to experience a malware attack. Technical cams and other malicious processes can jeopardize your security settings, allowing hackers to access your personal files.

Therefore, if you somehow detect a new malware or a Trojan, find the right security solutions for removing the virus as soon as possible. However, if your antivirus program cannot successfully complete the removal operation and if the Trojan is only partially uninstalled, this article may help you.

The reason why certain antimalware or antivirus programs cannot manage to entirely remove persistent Trojans or other similar threats is because they have a limited database. Each security tool contains a dedicated database where various malicious processes are added. So, when a scan is initiated, based on this database and on other specific algorithms the security software detects infected files from your Windows 10 system. If this database is not properly updated or configured, some Trojans might not be entirely deleted. And that’s when you will notice that everything you do is in vain.

You can also use security software that perform in-depth scans on your system. Usually, these tools can remove malware for good.

Anyway, don’t worry; there are a few tricks that once applied, the full scan and a malware removal process gets successfully completed. Here is what you need to do.

How to solve ‘Trojan partially removed’ security issue

  • Safe Mode with Networking
  • Remove the processes associated with the Trojan virus
  • Choose the right antimalware program
  • Initiate the scan and remove the malware

Go to Safe Mode with Networking

The first thing to do is to access Safe Mode. In Safe Mode all third party apps and processes are disabled by default. If you don’t disable the files associated with the malware, you might not be able to properly remove it. So, follow the next steps for rebooting Windows 10 into Safe Mode:

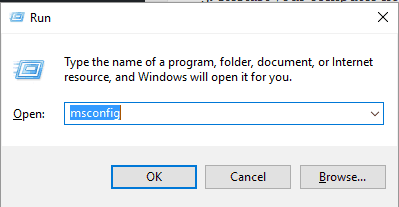
  1. Press the Win+R keyboard keys and in the Run box that will be displayed type msconfig. Press Enter in the end.msconfig windows 10
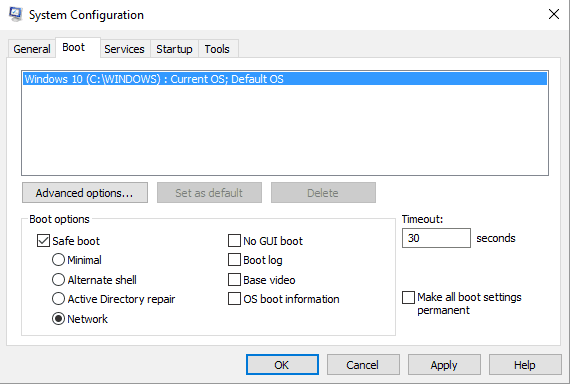
  2. From System Configuration select the Boot tab.
  3. Click on Safe Boot.Trojan partially removed
  4. From beneath pick Network and click OK followed by Apply in order to save your changes.
  5. Restart your computer now as Safe Mode with Networking will be automatically reached.

Remove the processes associated with the Trojan virus

You need to manually scan your PC between recent installed apps and processes. You might find something that shouldn’t be there; if you do, manually uninstall the files associated with the malware. Here is how you can complete this task:

  1. Click on the Cortana icon in order to launch the Search field.
  2. There type App & features and select the first entry that’s displayed.remove trojan files
  3. Just look between the installed apps and choose to delete the software that seems to be related with the Trojan.
  4. You can remove files easily – right-click on the file and choose ‘uninstall’.

Hint: the virus can also infect your browser. So, I strongly recommend you to remove any possible infected infections from your web browser clients. Depending on the browser you use, the extensions might be accessed differently.

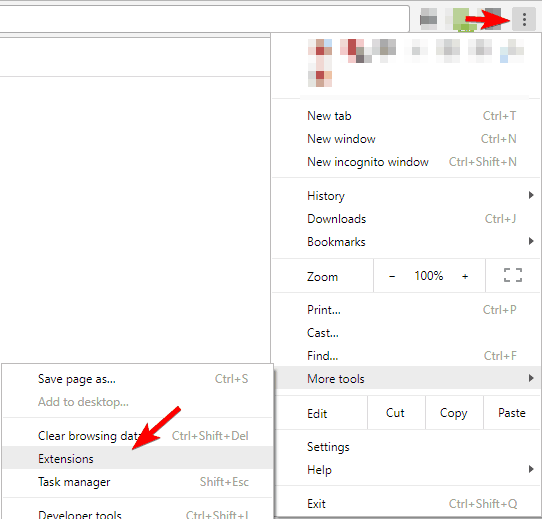
For example, for Chrome you need to access Tools – > Extentions; for Firefox press Shift+Ctrl+A; on Microsoft Edge press Alt+T – > Manage Add-ons – > Toolbars -> Extensions.

Moreover, a good idea will be to reset the browsers. It’s also recommended to delete the Chrome, Firefox and Microsoft Edge shortcuts and create new ones before starting any other security solution.

Finally, from Task Manager you can see the running processes, even the ones that are in the background. Select ‘End task’ for each process that is associated with the malware program.

Choose the right antimalware program

If you are currently using only Windows 10 default security programs, you might not be able to entirely remove the Trojan. You need to choose a complex and professional antivirus solution that can offer dedicated protection against the most common malware and malicious processes.

For more information on the best antivirus solutions to use on Windows 10, check out this article.

Of course, the best security apps are the paid ones (such as Avast, Norton, Bitdefender or Kaspersky), but you can also use free-distributed software such as Malwarebytes. Anyway, the goal is to download and install a program that can scan both the Windows 10 system and the web browser activity.

To keep your browser safe in the future, install one of these antivirus tools for browsing.

Initiate the scan and remove the malware

It’s important to apply the scan in Safe Mode. Otherwise ,the Trojan might block some security features and even the actual scan.

Once in Safe Mode and after manually removing any malicious files and apps, run the antimalware software. Choose to perform a full scan even if that might take a while – depending on how many files are stored on your computer. The antivirus software will detect infected files during this scan.

In the end you will have to select the files which you want to remove. Well, just make sure you remove everything from the scan log. And, when done, restart your Windows 10 device.

Conclusions

When a Trojan is messing with your Windows 10 system, or when you experience any other malware infection, you need to stop the infected processes as soon as possible. Afterwards, by using the right security tools you can remove even the most persistent viruses.

If you cannot manage to remove certain malicious apps and processes, drop us a line in the comments below offering as much information as possible. We will try to find the perfect security solutions for your problems.

RELATED STORIES TO CHECK OUT:

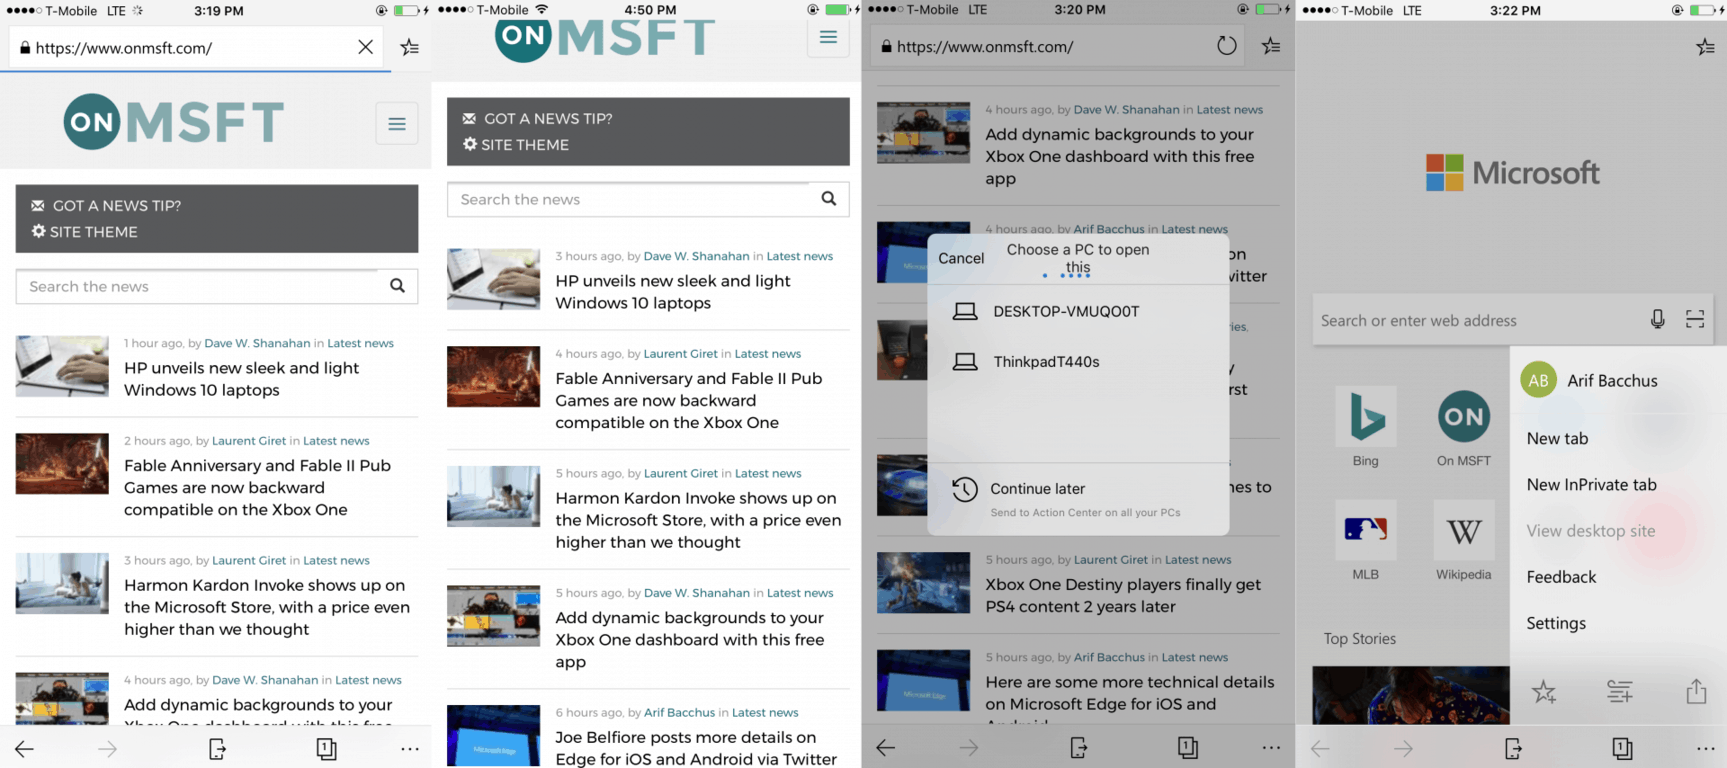
Hands-on with Microsoft Edge on iOS, an already pretty solid mobile browser for iPhone users

Today, Microsoft announced that their Edge web browser would be coming to Android and iOS. The iOS version of the web browser launched today to Windows Insiders, and we just got the chance to try the app on an iPhone. To get started with downloading Edge on iOS, you’ll have to sign up via a desktop running a recent Windows Insider build on this page, and provide Microsoft with your Apple ID. After you do so, you will eventually (within 24 hours) be sent a link containing the information necessary to download. You’ll have to download Apple’s Testflight app from the App Store and be running iOS9 or later on your device to proceed.

Downloading Edge

The main screen

The main screen of Edge on iOS is similar to what is currently seen on Edge in Windows 10: under the Microsoft logo, you’ll see the search/address bar and your most frequented sites, called “Top Sites.” In the address/search bar, there are also buttons to scan a QR code and to do a voice search. Voice search is a bit finicky at the moment, and we couldn’t quite get it to work right.

Your most frequented site can be found directly under the search/address bar, which is a convenient location. The default suggested sites can be altered by long pressing and choosing delete, or open in new tab or New InPrivate Tab. Top sites will change as you go.

Turned on by default, at the very bottom of the main screen are top stories. This area is focused on helping you keep up with the news and information. The address/search bar will fade as you scroll down through these stories, putting more emphasis on the top stories content, but users can disable top stories compete if they feel the need to do so.

Lastly, pressing the “…” icon will summon a small menu giving you the ability to sign in/out, or open new tabs. Signing out will disable features such as syncing bookmarks, so I do not recommend to use the Edge app without a Microsoft Account.

The main screen

User Interface and Continue on PC

From the bottom up, Edge on iOS very clean and concise, obviously inspired by what is seen in Windows 10 Mobile, and Windows 10. At the bottom of the screen, you’ll find an icon for Continue on PC (phone with arrow), an Icon for all tabs (boxes), and settings option (three dots). All of these options will fade as you scroll down web pages, giving you full access to the content on your screen. It’s really cool to see that Microsoft also included numbers on the new tab button to show how many active tabs you have open.

The Continue on PC button will summon a list of PCs where you can send the web page to, and the option to “Continue later” by sending web pages to the Action Center on all Windows 10 PCs. Except for a touch of Fluent Design, it’s a very similar experience to the previously released Continue on PC iOS app, but now it’s integrated right into the Edge web browser on iOS.

Browsing in Edge and Continue on PC

Managing Tabs and InPrivate Mode

To manage tabs, you just tap the tab icon on the bottom of the screen, or the “…” icon and then New Tab. Pressing on the new tab icon will show you a plus icon for a new tab, a preview of everything you currently have open, along with options to close all or switch to InPrivate mode. The tab previews also have a nice touch of fluent design which just looks really good on a device like the iPhone 7 Plus.

Interestingly, InPrivate Mode is handled right from the new tab UI, and you can easily switch back to a regular mode by pressing the new tab icon again and pressing “Tabs” on the top. Everything will be saved and there’s no need to head to a submenu or swipe like you have to do in Chrome on iOS, meaning switching back to a regular web session is just a short tap away. Lastly, the option to toggle to a desktop site is especially useful as well since sometimes mobile websites won’t load properly.

Managing Tabs

The Edge Hub UI

The Edge hub is where favorites, Reading list, books, and History are located and you can access it by tapping the button right to the address bar. Once you’re in, the icons are all self-explanatory, and you can delete certain entries by swiping left on whatever you would like to remove. The UI is just as clean as on Windows 10, especially because it features Fluent Design.

Edge Hub

Settings

There are not a lot of different settings to check, but the “Privacy” section includes options for browsing data, saved passwords, popup blockers, etc. You can also find the option to turn off the news feed in the setting menu, right with some advanced settings for changing the default search engine to Google or Yahoo. Lastly, there is menu to sign in with your Microsoft account of choice for syncing your favorites and reading list across devices.

Settings

At the end of the day, it’s great to see Microsoft bringing Edge to other platforms. This will not only help to increase the browser’s market share but also show iOS users that Microsoft is fully capable of creating well-designed apps on other platforms. We’re looking forward to trying Microsoft Edge on Android in the near future, and using this app along with the brand new Microsoft Launcher should be a pretty good experience for Microsoft fans making the switch from Windows 10 Mobile to Android. Because yeah, even if we like Microsoft Edge on iOS, it’s still not possible to set it as the default web browser on your iPhone.

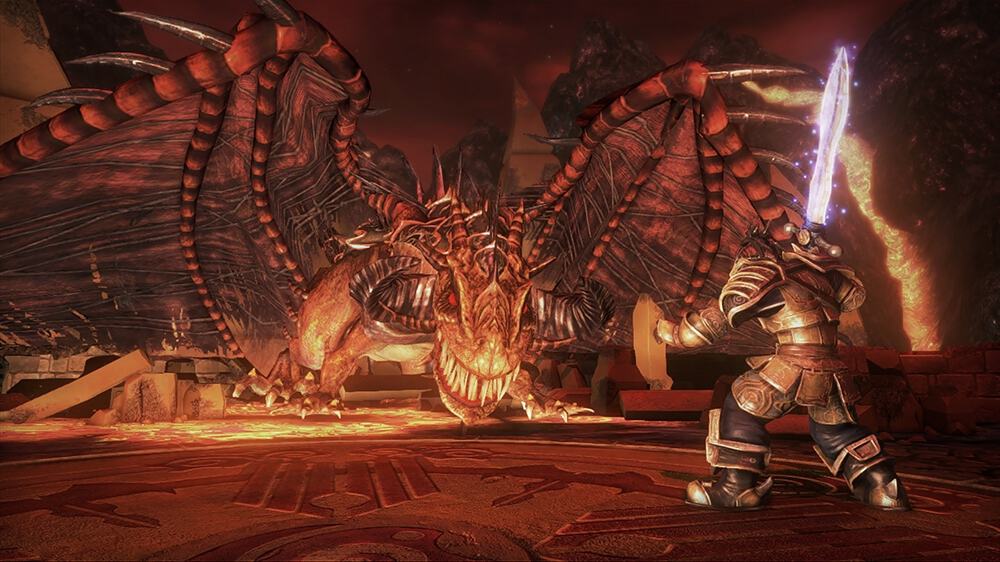
Fable Anniversary and Fable II Pub Games are now backward compatible on the Xbox One

Xbox’s Major Nelson has just announced that Fable Anniversary and Fable II Pub Games have been added to the Xbox One Backward compatibility list. The two Xbox 360 games join Fable II and Fable III, which were already backward compatible on the new console.

Fable Anniversary is a remastered version of Fable: The Lost Chapters, an extended version of the first Fable game released on original Xbox and Windows back in 2005. As for Fable II Pub Games, it’s a collection of three casino-style games that tie into the main Fable II game, which was released on the Xbox 360 back in 2008. You can find more details as well as Xbox Store links for both games below.

Fable Anniversary ($39.99)

As the best-selling RPG on the original Xbox, Fable pioneered every player’s choice having a consequence. With Fable Anniversary, a spectacular HD remaster of the original Fable, players will be reminded of why the franchise is so special and unique. All new textures and 3D models, an entirely new lighting system, a slick new interface, achievements, and all of the content from “The Lost Chapters,” make Fable Anniversary the definitive Fable experience for faithful fans and new players alike!

Fable II Pub Games ($9.99)

Unlock the full version of the Fable® II Pub Games and you’ll get all three great pub games that will also be in Fable® II! Each game has multiple variants, plus the ability to earn and transfer gold and unique items to your character in Fable® II (assuming, of course, that you also have Fable® II). Either way, you’ll also get access to minigames, leaderboards, achievements, and all the fun of these backroom games of chance!

It’s great to see that Lionhead Studios’ complete Fable Trilogy is now backward compatible on the Xbox One, and these games are still highly recommended for action-RPG fans. Fable II and III are already included in Microsoft’s Xbox Game Pass, and we hope these two other games will soon be added to the catalog.

Add dynamic backgrounds to your Xbox One dashboard with this free app

Despite a low rating in the Microsoft Store, Theme My Xbox is an app that allows you to personalize the background theme of your Xbox One. In a post on Reddit, the app developer, Jamie Moran, announced the ability to have dynamic backgrounds on your Xbox One on Twitter. Have a look at what Theme My Xbox can do to your background on Xbox One.

Theme My Xbox has a number of themes and backgrounds to choose from, and even lets you create and upload your own custom themes and backgrounds via the developer’s website. In addition to the dynamic background functionality, the most recent update to Theme My Xbox added new icons, a new UI, the ability to save your favorites. There are plenty of categories to choose from; TV, Anime, gaming, movies, and more.

Download Theme My Xbox on Xbox One.

Lenovo ThinkPad 25 Anniversary Edition unboxing and a quick first look

Over the past few months, we’ve been doing reviews of various Lenovo devices and have been especially thankful for the opportunity granted to us by the world’s largest PC manufacturer. As our reviews of the X1 Yoga Gen 2, the Mixx 720, and the ThinkPad 470S/T470 have shown, Lenovo has always mastered design and left a positive mark on the laptop industry for businesses and consumers alike. Today, to commemorate the 25th anniversary of ThinkPad, and honor years of heritage, Lenovo unveiled the ThinkPad 25 Anniversary Edition. We were lucky enough to get our hands on with a unit the same day it was announced, so here’s an unboxing and quick look at the all the nostalgic features on this very special device.

Bento Box:

This special laptop comes packaged in a very special bento inspired box. A semi-glossy black color on the outside, and red on the inside, there are two flaps to open the box once the top lid is taken off. Quite obviously, even the packaging pays homage to the original ThinkPad in 1992, which was also inspired by the simplicity of the bento box. Of course, included in the box are three extra TrackPad pointers, which are what ThinkPads have long been known for.

A very special keyboard:

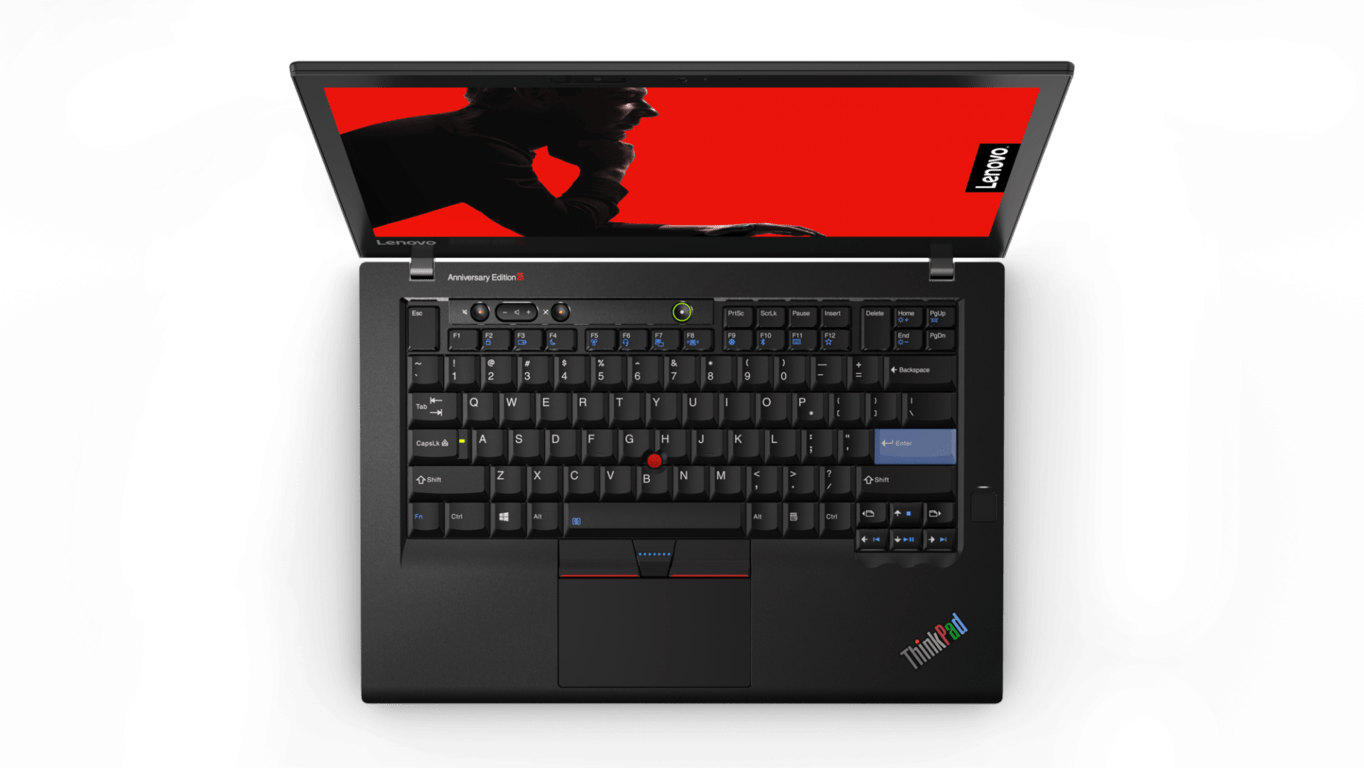
The keyboard on the ThinkPad 25 Anniversary Edition is inspired by the classic 7-row ThinkPad keyboard. As you can see from the photo below, the backlit keyboard brings back some classic features from ThinkPad past. This includes the way the keys are shaped, as well as the blue “Enter” key. Other classic keyboard features include dedicated buttons for audio controls, embedded media controls in navigation arrows, and sculpted cutouts for the navigation arrows. There’s also a modern Touch FingerPrint Reader built right into the side of the keyboard.

Classic Logo and design:

Along with the special packaging, and special keyboard, the design of the ThinkPad 25 Anniversary Edition also pays homage to the past. Although based off the chassis of the T470, the device has a soft, rubberized finish on the keyboard and shell, as well as a special RGB ThinkPad logo.

Specs and Conclusion:

We just recently received our review unit, so we will be spending more time with it in the days ahead, and bringing you a full review. For now, we can reveal that the unit is powered by the powerful Intel 7th Generation Core i7-7500U processor clocked at 2.7GHz, with GeoForce 940MX graphics, and 16GB of RAM. It also features a 14-inch FHD (1920 x 1080) touchscreen display, 512GB SSD, and a Windows Hello Camera.

Keep it tuned in right here to OnMSFT for more on the ThinkPad 25 Anniversary Edition in the days ahead! And please. do let us know your thoughts in the comments below, or if you have any special requests for us to explore in our final review.

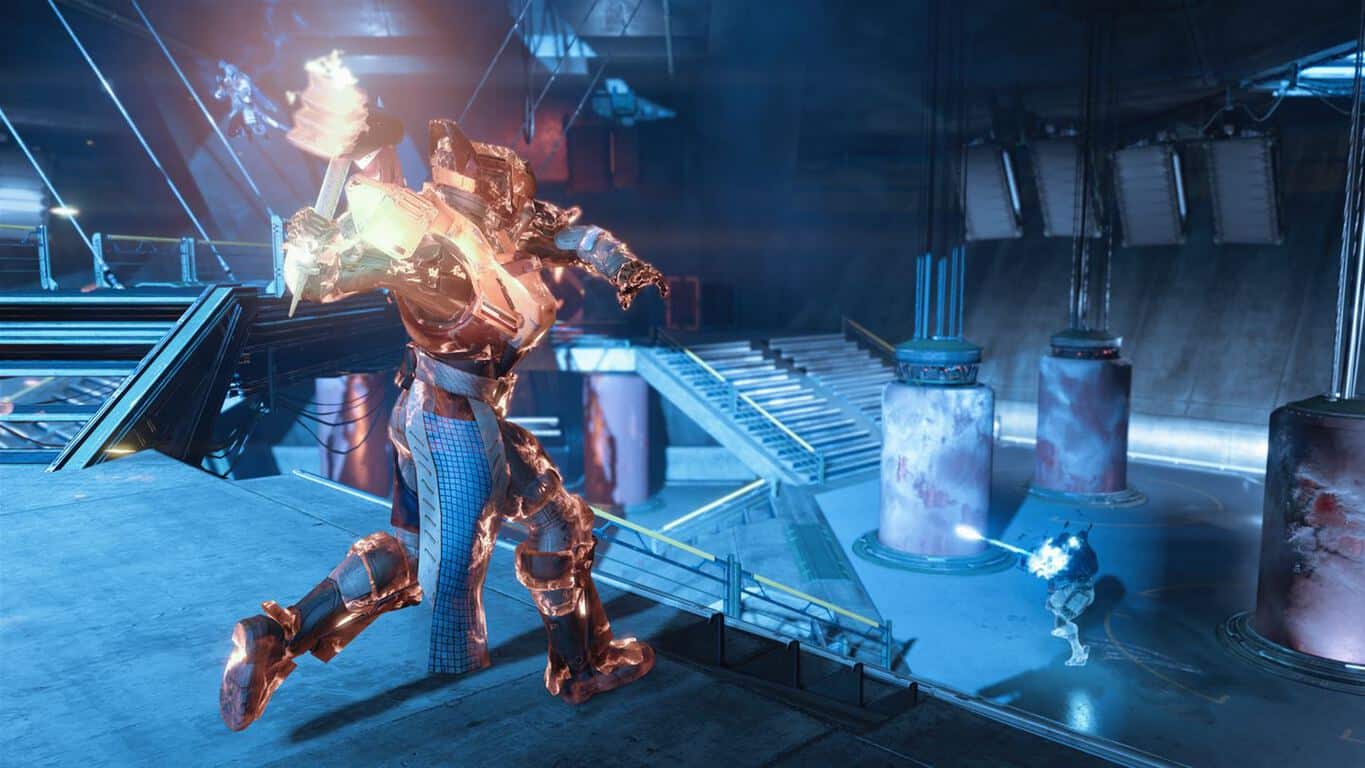
Xbox One Destiny players finally get PS4 content 2 years later

If you’re still playing the original Destiny game on your Xbox One, you can finally access all equipment, cosmetic items, missions and areas that have been exclusive to the Playstation 4 version of the game until now (via Kotaku). This marks the end of Sony’s marketing deal with Destiny publisher Activision, and it happened just four weeks after the release of Destiny 2 on Xbox One and Playstation 4.

It’s nice to see that Destiny fans on Xbox One can finally enjoy the game’s full content, and the full list of previously exclusive items can be found on Reddit. Unfortunately, Sony’s partnership with Activation continued with Destiny 2 (as well as for other upcoming games such as Call of Duty: WW2), which means that Xbox One gamers will once again be second-class citizens for quite a while. Marketing deals like these are not as bad as timed exclusives, but it’s still a tough pill to swallow for players who spend close to $100 on premium game bundles.

Lenovo unveils ThinkPad 25 Anniversary Edition

After a full two years of anticipation, and collecting customer feedback through social media, Lenovo today took the wraps off the ThinkPad 25 Anniversary Edition at an event at the Yamato Labs in Japan.

The ThinkPad 25 Anniversary Edition celebrates a heritage of design and engineering innovation and includes retro features from ThinkPad past. The design of the unit is based off the modern ThinkPad T470 chassis, but also includes classic features such as three TrackPoint caps, backlit 7-row ThinkPad Classic keyboard, dedicated volume buttons, multiple status LEDs and a multicolor logo.

“ThinkPad design creates a powerful and synergistic relationship between form and function. It balances sophisticated aesthetics, thoughtfully crafted user experiences and renowned engineering in order to deliver superior product… 25 years after the introduction of the original 700C, the latest X1 Carbon is immediately recognizable as a ThinkPad”—   David Hill, former Chief Design Officer, Lenovo

Inside, the Thinkpad 25 Anniversary Edition is powered by the Intel Core i7-7500U processor with discrete NVIDIA GeForce 940MX graphics. The touchscreen display comes in at 14 inches, and is full HD, definitely coming a far way from the original ThinkPad 700C. Pricing on the unit starts at $1899, limited quantities will be available, and there will be an exclusive discounted Lenovo.com price on October 5th.

[You can check here for our hands-on and unboxing of the unit]

List of Forza Motorsport 7 compatible wheels and gamepads

If you’re planning to purchase Forza Motorsport 7, don’t forget to first check the list of compatible peripherals. If you already own a gaming wheel, make sure that it’s on the official list of compatible wheels. Otherwise, you’ll need to buy a new one.

Thanks to multi-USB support, FM7 is compatible with more than 30 gamepads and racing wheels.

Forza Motorsport 7 compatible wheels

  • Fanatec CSR Wheel
  • Fanatec CSR Elite Wheel
  • Fanatec ClubSport V2 Wheel
  • Fanatec ClubSport V1 Wheel
  • Fanatec CSL Wheel
  • Fanatec ClubSport V2.5 Wheel
  • Logitech G29 Wheel
  • Logitech Driving Force Pro Wheel
  • Logitech G25 Wheel
  • Logitech Driving Force GT Wheel
  • Logitech G27 Wheel
  • Logitech MOMO Wheel
  • Logitech G920 Wheel
  • Thrustmaster RGT Wheel
  • Thrustmaster T100 Wheel
  • Thrustmaster T500 RS Wheel
  • Thrustmaster T300 Ferrari Wheel
  • Thrustmaster T300 Ferrari GTE Wheel
  • Thrustmaster T300 Ferrari Int Wheel
  • Thrustmaster T300 RS Wheel
  • Thrustmaster T300 RS GT Wheel
  • Thrustmaster T150 Wheel
  • Thrustmaster T150 Pro Wheel
  • Thrustmaster TS-PC Racer Wheel
  • Thrustmaster TX 458 Wheel
  • Thrustmaster TX Leather Wheel
  • Thrustmaster 458 Spider Wheel
  • Thrustmaster TMX Wheel
  • Thrustmaster TMX Pro Wheel
  • Thrustmaster TS-Xbox Wheel
  • Mad Catz Pro Wheel

When it comes to gamepads, the list of compatible peripherals include:

  • Microsoft Xbox 360 Controller Gamepad
  • Microsoft Xbox One Controller Gamepad
  • Microsoft Xbox One Elite Controller Gamepad
  • Microsoft Xbox One S/X Controller Gamepad
  • Sony Dual Shock 4 Gamepad

Having a compatible FM7 wheel helps you to avoid various technical issues such as input lag or game crashes.

Have you installed FM7 on your PC or Xbox One console? Use the comment section below to tell us more about your experience.

RELATED FORZA MOTORSPORT STORIES TO CHECK OUT:

Join the Mahakam Ale Festival in Gwent on Xbox One

Gwent: The Witcher Card Game updated on Microsoft’s Xbox One consoles this week with a variety of card changes and the launch of its first special event, the Mahakam Ale Festival.

This special event will run for the next week or so and provides players with several special matches to master, after which they’ll be rewarded with a new avatar, border, and title. This update also added the ability to change the card shown on a user’s profile and single player campaigns will now grant experience points. Numerous cards were also slightly changed. You can view the changelog here.

Gwent is a free-to-play digital card game based on the popular The Witcher video game series. Are you a fan of Gwent and do you like these recent updates? Let us know in the comments below.

You might not get a free Kinect adapter with the Xbox One X

Surprising almost nobody, there will most likely not be a free Kinect adapter coming with the Xbox One X. The news came out with a tweet earlier in the week, in which Aaron Greenberg addressed the issue in a roundabout way. Greenberg answered the question by referencing a program run for most of last year, in which Kinect adapters were issued for free.

The Kinect has been all but phased out after its nearly immediate failure after launch, so this shouldn’t be a huge shock to anybody. You probably can’t expect to see any more Kinect-enabled games coming, so an adapter like this will most likely not be making an impact either way. If you really need one of these peripherals, they should be available on their own for a pretty small pice.

Munich, Germany, once an open source champion, begins moving back to Microsoft

After promoting the use of free open source software in recent years, the German city of Munich is reportedly planning to move back to Microsoft solutions, starting with Exchange for email and calendars. According to a report from TechRepublic, the Munich City Council decided to switch from open-source groupware Kolab to Microsoft Exchange this Spring, just after the council also started reconsidering its use of Linux, a custom version of Ubuntu in favor of Windows 10.

While a spokesman for Munich city council didn’t comment on the matter, Günther Meyer, co-chairperson of the Pirate Party in Munich shared that “they have already been working on Exchange for some months. A migration to Outlook will start in the near future.” If this work is being done behind the scene, for now, Matthias Kirschner, president of the Free Software Foundation Europe (FSFE), explained that “it was agreed that the final decision will be made by the city council members after they receive a calculation of the costs.”

The city of Munich spent a lot of time and money to replace Microsoft’s solutions with open source software, favoring the latter wherever possible. It’s not clear why the council is now considering moving back to Microsoft, though a recent study from Accenture revealed various problems affecting employees and IT staff. “The LHM [city of Munich] works with obsolete, partially unsafe, usually extremely cumbersome IT, leading to lots of wasted time and productivity,” the report stated.

Last month’s Azure downtime in Europe was caused by a faulty fire alarm

Last month, some Azure users in Northern Europe were experiencing issues with connecting and managing resources hosted in the region. Noted by Fortune.com, it turns out that the issue was linked to a faulty fire alarm in a data center.

Microsoft explains the root cause of the problem on a post to the Azure status history page, saying, “during a routine periodic fire suppression system maintenance, an unexpected release of inert fire suppression agent occurred.”

Of course, once the fire suppression agent was released, the systems in the data center did what they were designed to do. A shutdown of Air Handler Units was initiated in order to contain and keep the data center safe, also forcing an eventual restart of the system.

Turns out during the restart process, ambient temperatures went up too high, forcing an auto shutdown or restarts of systems in the zone to prevent a bigger meltdown and center-wide overheating. Microsoft explains:

While conditions in the data center were being reaffirmed and AHUs were being restarted, the ambient temperature in isolated areas of the impacted suppression zone rose above normal operational parameters. Some systems in the impacted zone performed auto shutdowns or reboots triggered by internal thermal health monitoring to prevent overheating of those systems.

Microsoft immediately knew about the situation, and in 35 minutes, everything was back to normal, although it took as many as seven hours for some customers to come fully back online. The company said that facility power was not impacted, but additional time was required to troubleshoot and recover due to some systems in the zone not shutting down in a controlled matter.

Intel working on bringing the 2018 Winter Olympics to Windows Mixed Reality

At Microsoft’s event yesterday in San Francisco, a plethora of Windows Mixed Reality related announcements were made. One of the smaller and less highlighted moments from the event is the fact that Intel will be working on bringing the 2018 Winter Olympics to Windows Mixed Reality (via The Verge.)

A representative from Intel appeared in virtual reality at Microsoft’s event to make the announcement, but not many other details or a demonstration of the technology were provided. It is not immediately clear how Intel will be accomplishing this, but one can assume it will be similar to the way NBC streamed broadcasts from the 2016 Rio Olympics in virtual reality on the Samsung Gear VR headset via the NBC Sports app.

This will obviously be a big win for Microsoft, as the company and it’s partners have plans to launch a wide range of Windows Mixed Reality headsets on October 17th, well before the Winter Olympic games. All Windows Mixed Reality headsets are now available for pre-order, and 20,000 apps and games will be ready in the Windows Store for when the headsets launch on October 17th.

Microsoft’s Alex Kipman gave a great Windows Mixed Reality demo yesterday, and you can watch it here

Microsoft held a Windows Mixed Reality event in San Fransisco yesterday, where HoloLens inventor Alex Kipman unveiled the company’s vision for virtual reality. While there was no live stream yesterday, Microsoft has since published a video of the event and it’s a must watch to understand what Microsoft wants to achieve with its new platform.

In the 35 minutes video, Kipman explains how Windows Mixed Reality will work on the first headsets from HP, Acer, Lenovo, Dell and Samsung to be released later this Fall. Kipman’s demo explains how to interact with UWP apps and holograms, and he also explains other use cases such as gaming and the social VR platform AltspaceVR that Microsoft recently acquired.

Don’t be mistaken by the “Windows Mixed Reality” branding though, the first head-mounted displays to be released later this month will all be “classic” VR headsets with opaque lenses. However, Kipman explained last year that “over time all devices will start looking more and more like HoloLens,” which remains the only untethered headset with a translucent lens on the market today.

Do you expect the first Windows Mixed Reality headsets to be a hit with consumers, or do you think virtual reality and mixed reality will remain a niche market for quite some time? Let us know below.

The Xbox One S Minecraft Limited Edition Bundle is now available

We’re just a few weeks away from the launch of the Xbox One X, however, the Xbox One S shouldn’t be overshadowed, especially for Minecraft fans who can finally purchase Microsoft’s beautiful Minecraft Limited Edition console. This is truly the ultimate Minecraft collector’s bundle, and it will be available in limited quantities. The $399 bundle includes the Limited Edition 1TB console with a Creeper Xbox Wireless Controller, an Xbox One S Vertical Stand as well as digital codes for Minecraft plus its Redstone Pack bonus content.

The custom-designed console is really gorgeous to look at, and you can watch Xbox’s Graeme Boyd unbox it in the video below:

Along with the Limited Edition Gears of War 4 Xbox One S console, this Minecraft Limited Edition bundle truly shows Microsoft’s great attention to detail (the console also features Minecraft system sounds) and it will probably be a must-have for avid Minecraft players and collectors. Sound off in the comments if you’re interested in purchasing this limited edition bundle while it’s available.

FIX: The pipe state is invalid error

System errors such as ERROR_BAD_PIPE aren’t that common, but they can still occur on almost any PC. Speaking of which, you can easily recognize this error because it comes with The pipe state is invalid error message.

This error can cause some problems, and today we’re going to show you how to fix it on Windows 10.

How to fix The pipe state is invalid error?

1. Restart the PC

If you’re experiencing this error, one of the fastest solutions is to restart your PC. According to users, restarting your PC will temporarily fix this problem, so if you’re seeing this message once in a while, be sure to try this solution.

If this error is a constant problem on your PC, you should definitely try some other solution from this article.

2. Uninstall problematic applications

  1. Press Windows Key + I to open the Settings app.
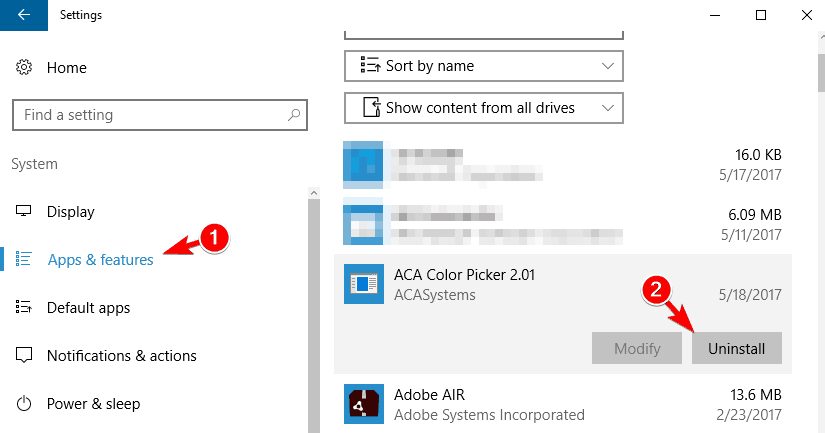
  2. Once the Settings app opens, go to Apps & features. List of all installed applications will appear. Select the problematic application and click on Uninstall.
    uninstalling applications

If you don’t want to use the Settings app, you can remove applications by following these steps:

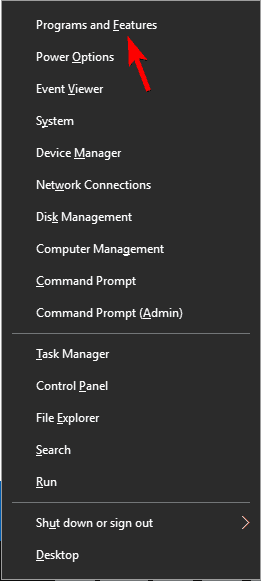
  1. Press Windows Key + X to open Win + X menu. Select Programs and Features from the menu.
    programs and features
  2. Programs and Features window will now appear. Select the problematic applications and double click them to remove them.
    removing programs

This error is usually caused by third-party applications, and to fix it you need to find and remove the problematic applications. Few users reported that Adobe applications were causing this problem on their PCs, so you can try removing them.

Keep in mind that any other application can also cause this problem to appear. The problem can be caused by recently installed or updated applications, so you might want to try removing them.

3. Enter Safe Mode

  1. Open Start Menu and click the Power button.
  2. Press and hold the Shift key on your keyboard and choose Restart from the menu.
    restart your computer
  3. List of options will now appear. Click on Troubleshoot > Advanced options > Startup Settings. Click the Restart button.
  4. Once your PC restarts you’ll see a list of options. Select any version of Safe Mode by pressing the appropriate key.

When Safe Mode starts, check if the problem appears. If not, it’s possible that the issue is caused by third-party software or a bad driver.

Safe Mode is a special part of Windows that runs with default applications and drivers. As a result, Safe Mode is perfect for troubleshooting so you can use it to fix many problems.

4. Perform Clean boot

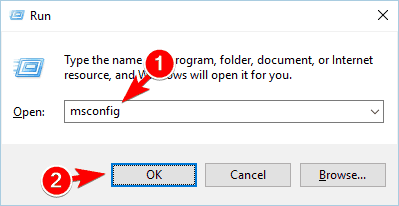
  1. Press Windows Key + R and enter msconfig. Press Enter or click OK.
    open msconfig
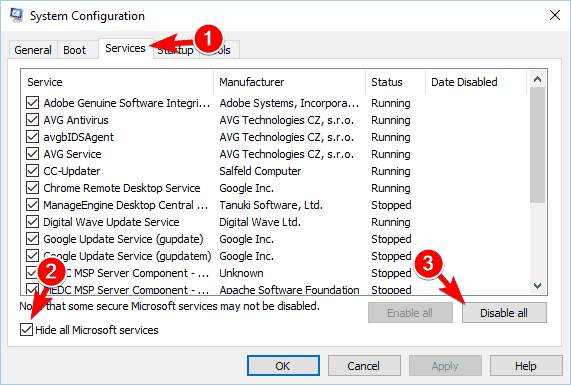
  2. Go to Services tab. Check Hide all Microsoft services checkbox and click on Disable all.
    disable services
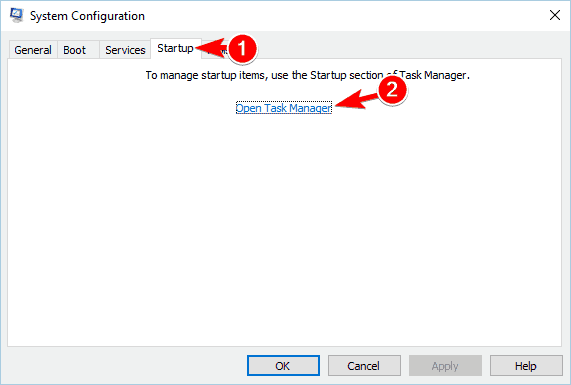
  3. Navigate to Startup tab and click on Open Task Manager.
    open Tasak Manager
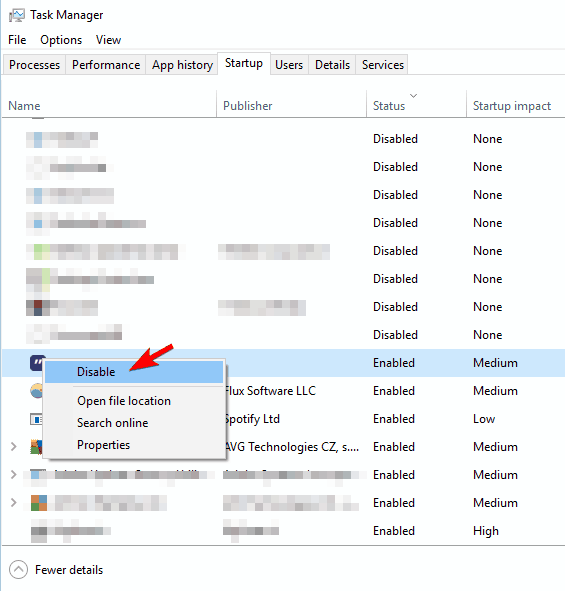
  4. A list of startup applications will appear. Right-click each application on the list and choose Disable from the menu. After disabling all startup applications, close Task Manager.
    disabling applications in task manager
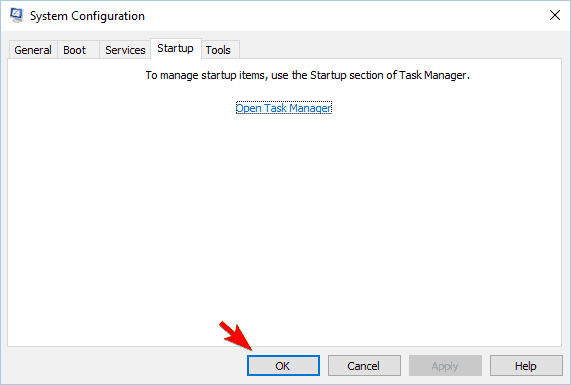
  5. Go back to System Configuration window and click Apply and OK.
    applying the modifications in task manager
  6. After doing that, restart your PC or log off and log back into your Windows 10 account.

Once you log back in again, check if the problem still persists. If not, it means that one of your startup applications or services is causing this problem.

To find out which service or app is the problem, you need to repeat these steps and enable disabled services and applications one by one or in groups. Keep in mind that you’ll have to restart your PC or log in to your Windows 10 account to apply the changes.

Once you find the problematic application, you need to remove it or update it to the latest version and check if that solves the problem.

5. Check your PC for malware

In some cases, The pipe state is invalid error that can appear due to malware infection. If you suspect your PC is infected by malware, we urge you to perform a full scan.

To be sure that all malware is removed, it might be a good idea to try using two different malware removal tools. If you find any malware on your PC, remove it and check if that fixes the problem.

There are various malware tools on the market but TotalAV is the most trustful solution to eradicate advanced malware or prevent it from harming your system.

6. Perform System Restore

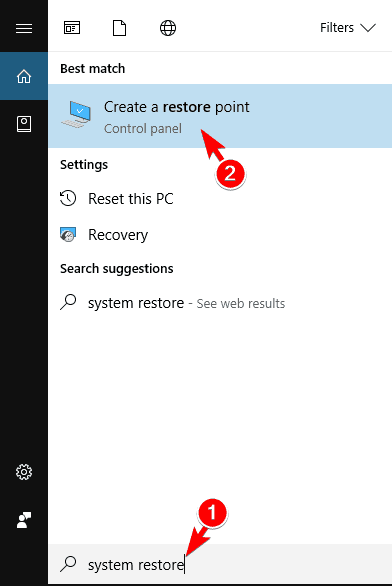
  1. Press Windows Key + S and enter system restore. Choose the Create a restore point option from the menu.
    create a restore point
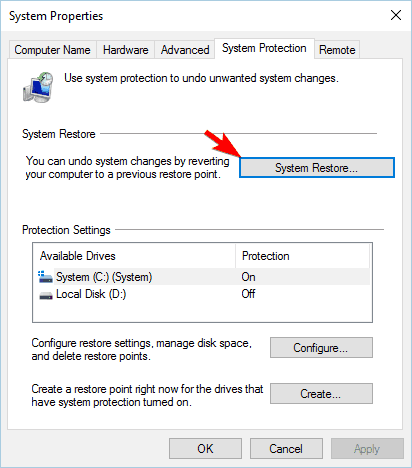
  2. System Properties window will now appear. Click on System Restore button.
    system restore option
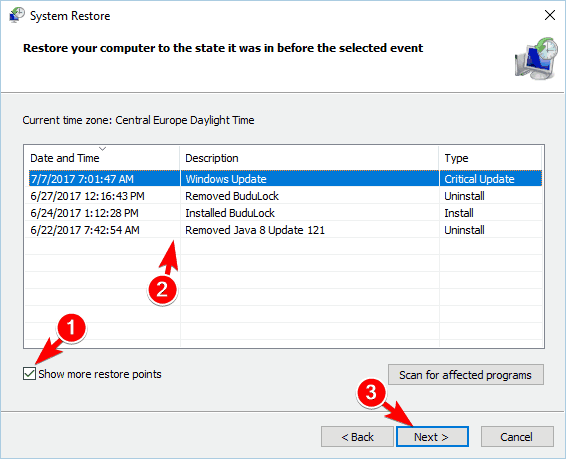
  3. When System Restore window opens, click on Next. Check Show more restore points option and choose the desired restore point. Click Next to proceed.
    perform a system restore
  4. Follow the instructions on the screen to complete the process.

After restoring your system, check if the problem is resolved.

7. Create a new user account

  1. Open the Settings app and go to Accounts section.
    create a new account on the PC
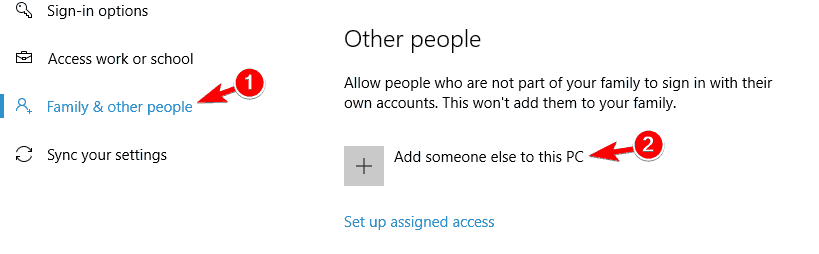
  2. Go to Family & other people section in the left pane. In the right pane, click on Add someone else to this PC button.
    adding another user
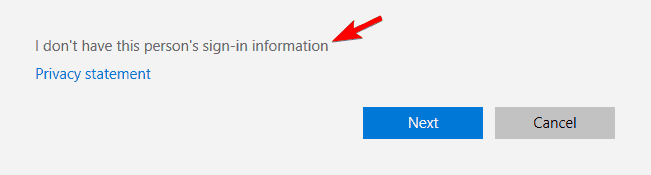
  3. Click on I don’t have this person’s sign-in information.
    no sign in information
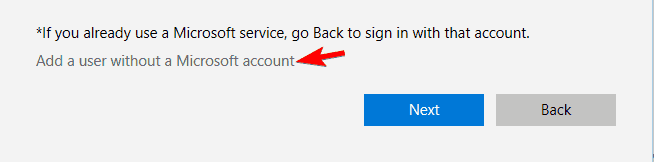
  4. Now choose Add a user without a Microsoft account.
    add a new user without a Microsoft account
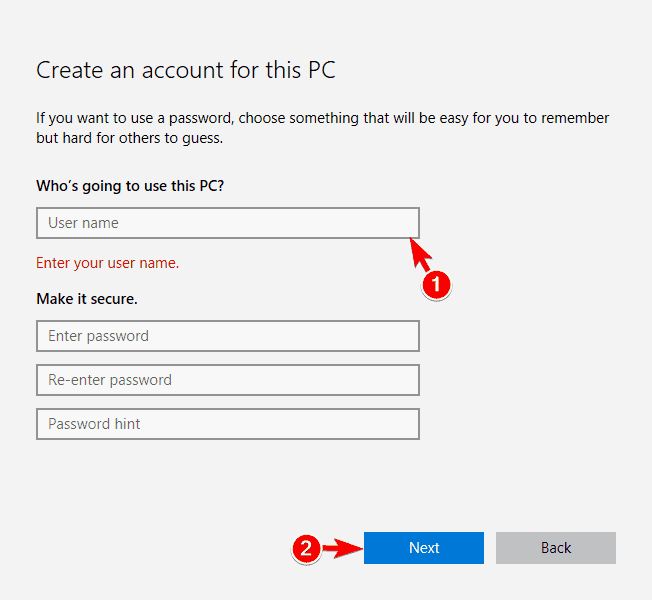
  5. Enter the desired user name and click Next.

After creating a new user account, switch to it and check if the problem still persists. If not, you’ll have to transfer your personal files to the new account and use it as your main account.

ERROR_BAD_PIPE and The pipe state is invalid aren’t serious errors, and they won’t cause too much trouble on your PC. These errors are relatively simple to fix, and you can fix them by using one of our solutions.

How to fix webcam connection issues on Windows 10/11

One of the salient features people look for in a computer or laptop besides price, functionality, and performance, is accessories such as webcams.

This is a little but important part of your computer, because its functionality helps you especially with video calls on apps such as Skype, Facebook Live, and others.

In recent times, users across the world have raised concerns when their webcams didn’t work mainly upon upgrading to Windows 10.

However, the cause may not always be due to the upgrade, but due to antivirus software blocking webcam, or your webcam driver is outdated.

If you’re having webcam issues on Windows 10, here’s how you can fix it.

Camera won’t connect on Windows 10 [FIX]

  • Disable antivirus access or permissions
  • Roll back the webcam driver
  • Uninstall your webcam driver and scan for any changes on your hardware
  • Revert to previous Windows version
  • Update your webcam driver manually
  • Reinstall the webcam
  • Use Microsoft System Restore
  • Contact the manufacturer

Solution 1: Disable antivirus access or permissions

If the issue is from an antivirus software blocking your webcam, do the following:

  • Open your antivirus application
  • Go to Settings
  • Choose settings related to blocking access or permissions
  • Disable those settings

Solution 2: Roll back driver

If your webcam driver is outdated, do the following:

  • Right click Start
  • Select Device Manager
  • Go to Imaging devices and click the arrow to expand the list
  • Right click on your webcam
  • Choose Properties
  • Locate Driver tab then select Driver details button

fix webcam connectivity issues

Find a file name with stream.sys. If you have this on your computer, then your webcam needs to be replaced as this shows it was designed prior to Windows 7. If not, then roll it back by going to Roll Back Driver using these steps:

  • Select Device Manager
  • Go to Imaging devices and click the arrow to expand the list
  • Right click on your webcam
  • Choose Properties
  • Locate Driver tab then select Roll Back driver
  • Click Yes

Once roll back is finished, reboot your computer and try to open webcam again.

If this doesn’t work, go to the next solution.

Solution 3: Uninstall your webcam driver and scan for any changes on your hardware

Follow these steps to uninstall the driver:

  • Select Device Manager
  • Go to Imaging devices and click the arrow to expand the list
  • Right click on your webcam
  • Choose Properties
  • Select Driver tab
  • Click Uninstalldelete webcam driver
  • Click Delete the driver software for this device
  • Click Ok

Once you have uninstalled, go to Device Manager then under Action menu, click Scan for hardware changes. This will scan and reinstall updated drivers.

Reboot your computer then try launching Webcam again. Try the next solution if this doesn’t work for you.

Solution 4: Revert to previous Windows version

This is one of the fastest ways to resolve the issue but you have to do it within the 10 days window after upgrading to Windows 10. This means that if you had an earlier version of Windows prior to the upgrade, then you performed the upgrade, you can only revert to your previous version within that period. Otherwise you’ll have to make do with the new version.

Here’s how to roll back to your previous Windows version to continue enjoying your webcam:

  • Go to Settings
  • Click Updates and Security
  • Click Recovery
  • Select the Go back to an earlier build tab
  • Click Get started
  • Click Next when asked why you have chosen to revert your software

Once you do the above, follow the instructions to return to the previous version for your device.

Solution 5: Update your webcam driver manually

Follow these steps to manually update your driver:

  • Download the latest Windows 10 driver for your computer’s integrated camera. If your computer’s manufacturer hasn’t released a Windows 10 driver, download earlier versions for Windows 7 and 8 – they’re compatible with Windows 10.
  • Double click on the file to install the driver

READ ALSO: How to set webcam as Windows Desktop background

Solution 6: Reinstall the webcam

In order to reinstall the driver, especially for HP users, do the following:

  • Right click Start button
  • Select Device Manager
  • Go to Imaging devices and click the arrow to expand the list
  • Right click on your webcam
  • Choose Properties
  • Select Update Driver Software
  • Reboot your computer

Launch the camera again to check if this resolves the issue.

Solution 7: Use Microsoft System Restore

If none of the above issues has worked, use Microsoft System Restore to revert to when your it worked properly. If this recurs, then your webcam has either been unplugged, or the computer itself needs to be serviced.

Solution 8: Contact the Manufacturer

As a final resort, you can contact your device’s or computer’s manufacturer to find out more about how to resolve the issue.

RELATED STORIES TO CHECK OUT:

Teens more likely to act to protect online safety, Microsoft study shows

According to a new Microsoft study, teens are more likely to police themselves when it comes to online safety.

In the Microsoft study, there were some interesting findings, namely:

Nine in 10 teens polled said they acted in response to an online risk; nearly two-thirds (65 percent) said they stood up for others in the digital space, and more than three quarters (77 percent) asked for help when they encountered online abuse. That compares to 84 percent of adults who acted in response to an online risk, 59 percent who defended someone else and 60 percent who asked for help. Teens outpaced adults across all three categories. In addition, 56 percent of teens said they knew where to go for help with an uncomfortable online situation, compared to just one-third of adults.

The Council for Digital Good (CDG) released a video on their manifesto, and what you do on the web has an effect on your overall branding of who you are. The video provides a common sense approach to the web and what you can do to protect yourself from the negative implications of posting online.

Last month, CDG council members created a myriad of presentations, artwork, and more on how to make better choices when it comes to representing yourself online. making changes for the better when it comes to online life. Here is a video that was created at the latest CDG meeting last month by Rees Draminski.

Microsoft’s study, titled “Civility, Safety and Interaction Online — 2017” polled teens, ages 13-17, and adults, aged 18-74, on digital civility in an effort to “encourage safer and healthier online interactions.” In all, 11,584 people were polled on their interactions online.

One company, Thorn, asked for feedback on their recent PSA about sextortion. Sextortion is Thorn is a company that fights human trafficking and focuses primarily on child sexual exploitation. Thorn’s PSA is meant to educate teens and adults on what sextortion is and how to combat it. Here is Thorn’s PSA video below.

While it is important for young people be guided by their parents, teachers, and other adult figures on the importance of recognizing what is good to post online and what is not. The CDG is a valuable resource for both teens and parents to understand their digital rights and responsibilities, risks and benefits of their online communications and transactions, and to recognize the personal implications of their online presence.

Windows 10 Fall Creators Update RTMs with 16299.15, but where’s the “prominent announcement?

Late last night, Microsoft pushed out Windows 10 Insider Build 16299.15 to Fast Ring Windows Insiders. Shortly after, reports surfaced on the web that the build was the RTM version of the Windows 10 Fall Creators Update. Well, Microsoft has still not come out and made anything official yet, and we’re left wondering where is the “prominent announcement” of RTM that the head of the Windows Insider Program long promised.

Fueling the RTM saga is Windows Insiders now having the option of completely leaving the Insider program after installing build 16299.15. This option was not available on any prior builds, and just like with the development of the Windows 10 Creators Update, usually only happens when RTM is near. Additionally, Microsoft even revealed that the company will be servicing this very Fast Ring build with cumulative updates moving forward. With the disappearance of the build watermark also in consideration, this is similar to how things work on the Production Ring, perhaps again hinting that the latest build may be RTM.

Microsoft has been shy about revealing when builds are RTM in the past. This this, though, was supposed to be changed for this year since Dona Sarkar revealed to a Windows fan that Insiders would clearly know when an RTM build has arrived.

For now, we’ll just be keeping an eye on Dona, and will be assuming that 16299.15 might as well be considered RTM. Of course, things may be subject to change and become clearer once Dona or Microsoft speak up, so it’s best to keep tuned for more information in the days ahead.

Australians are getting even more Xbox Onesies

Microsoft Australia’s Xbox Onesies became a hot geeky collector’s item when they were announced out of the blue last year and the company is looking to repeat the hype with a follow-up onesie inspired by Forza Motorsport 7 which just launched on Xbox One today.

These new Xbox Onesies are similar to the first ones but are more form-fitting and look more like race car driver uniforms than gamer casualwear. Here’s the special reveal trailer that went live this morning on the Xbox Australia YouTube channel.

While most of the original Xbox Onesies were given to gaming journalists, it looks like consumers will be given a chance to own these new ones as a special giveaway promotion is planned for the Xbox Australia Facebook page next week. No specific details have been released but interested gamers are encouraged to keep their eyes on the Facebook page for the competition announcement. It’s probably safe to assume that, like most Xbox Australia competitions, this giveaway won’t be open to non-Australian fans.

Are you hyped for these new Xbox Onesies? Share the hype in the comments below.

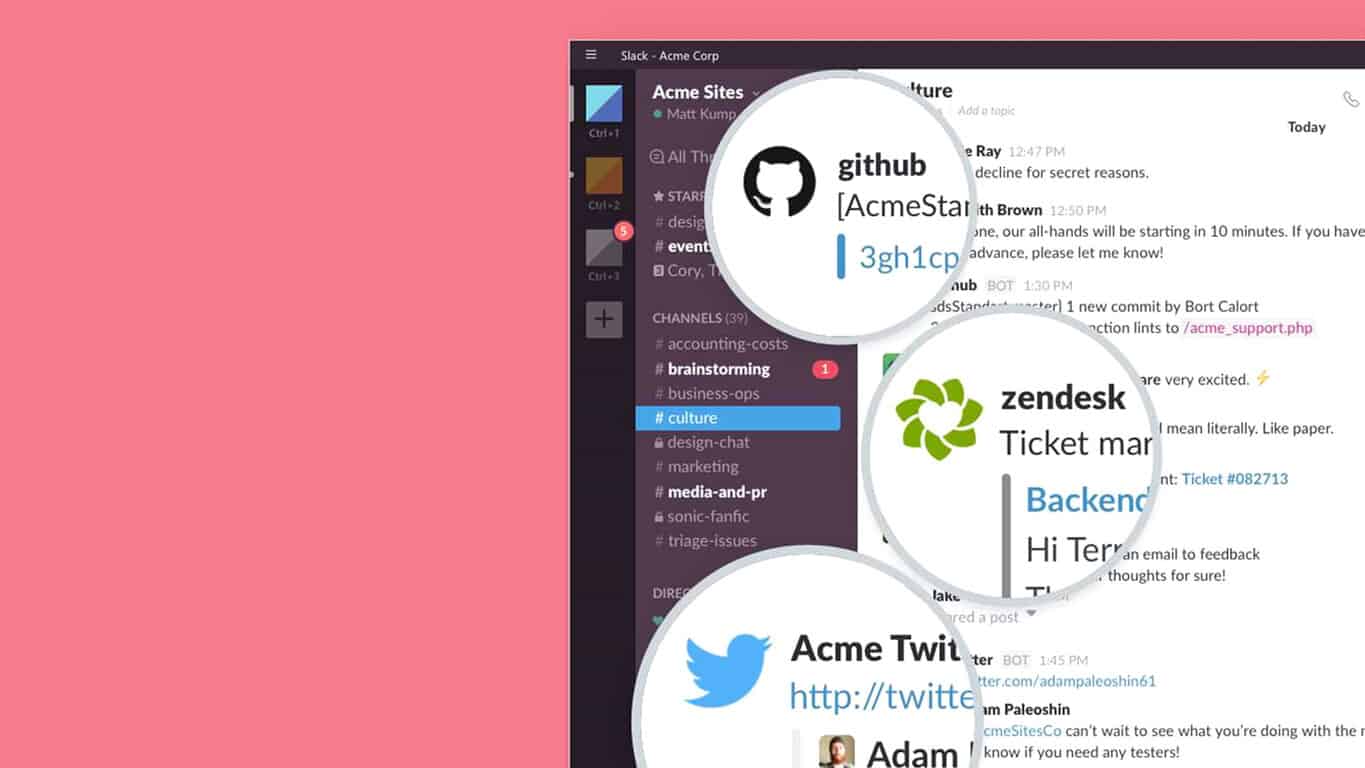
Windows 10 Slack app update fixes Japanese input & adds extra security

The official Windows 10 Slack app has just updated to Version 2.8.1 which is more of a refinement of the previous 2.8.0 update than a major one with significant changes. This update is quite important though as it fixes the input for Japanese which was completely broken in the previous update and also added some extra security to help keep data safe. Here’s the full release notes:

Previously in Slack app releases: we fixed the Japanese input in 2.6.3. Then we re-broke it in 2.8.0. And now it’s fixed again. Stay tuned for the next thrilling instalment.

Added bonus: An Electron update improving security. A precautionary measure, but it’s always good to be up to date.

Slack is a team collaboration service that has been gaining a lot of traction in the last year or so due to its workflow management and variety of apps on offer. Do you use Slack? Let us know in the comments below.

Slack
Slack
Price:
Free

Dragon’s Dogma: Dark Arisen is now available on Xbox One

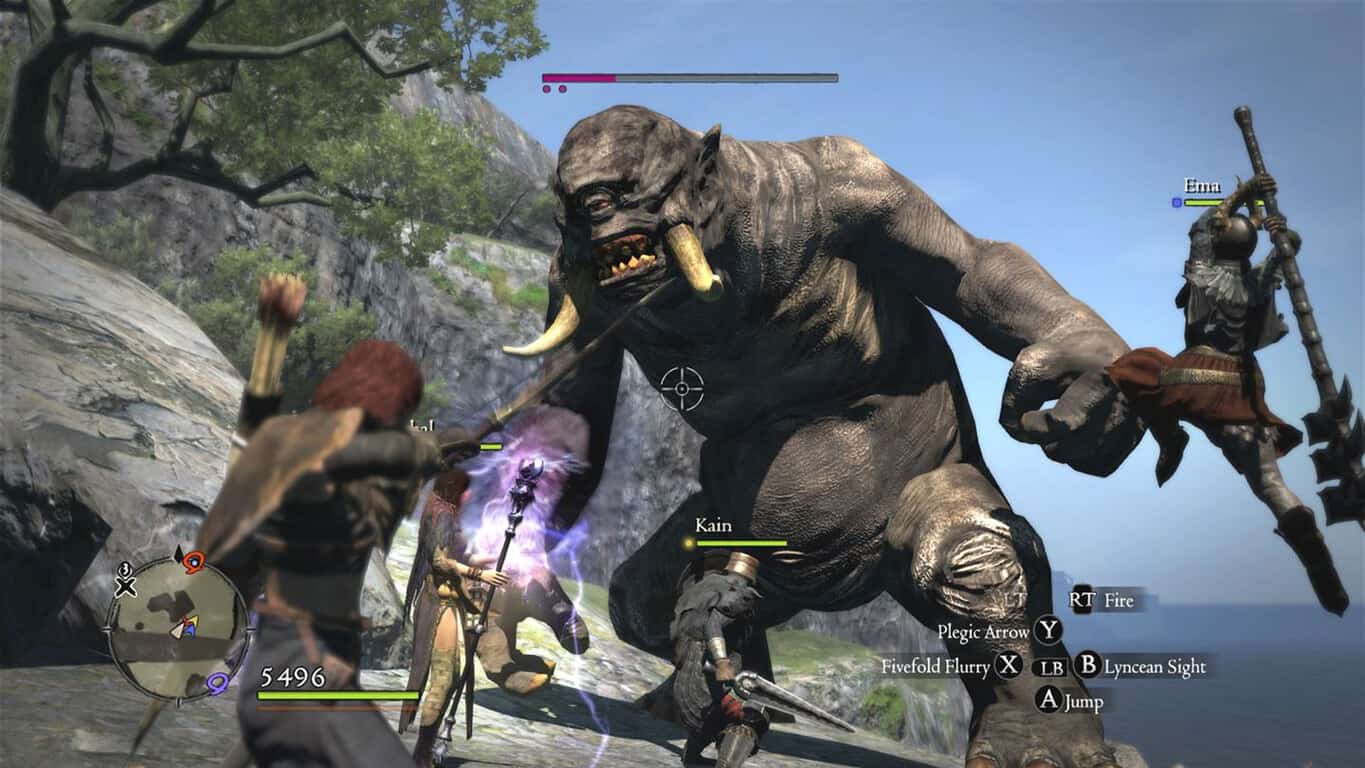
Dragon’s Dogma: Dark Arisen is now available to play on the Xbox One family of gaming consoles. The title is a re-release of the original Xbox 360 game but features improved graphics and refined controls. Here’s the official game description:

The critically acclaimed action-RPG Dragon’s Dogma: Dark Arisen combines exhilarating and deep combat with the freedom to explore the huge open world of Gransys in 1080p HD graphics. Choose between nine different classes and embark on your own adventure along with three AI companions, known as Pawns. Use the deep combat system to wield devastating skills and magicks to take on fabled monsters or climb onto them for an up close and personal attack! All previously released paid DLC is included, making this the ultimate version of Dragon’s Dogma: Dark Arisen.

Buy Dragon’s Dogma: Dark Arisen on Xbox One

Have you been waiting for Dragon’s Dogma: Dark Arisen to come to Xbox One? Let us know in the comments below.

How to solve Microsoft Band “network error something went wrong”

Microsoft Band was proclaimed dead by the company in 2016. The Band was treated to two iterative upgrades but apparently, Microsoft’s first fitness band failed to take off. Last year the company had announced that it’s not coming up with a Microsoft Band 3 and it has stayed true to its promise. That being said the current Microsoft Band owners are apparently facing a niggle or two, the most common one seems to be the “Microsoft band network error something went wrong.”


The error message is indeed vague and has left the users in a lurch. The problem here seem to be the region settings, Microsoft Band was released only in selected regions and if you are using the band outside of these regions the error message pops up. Yet another pain point is that the companion app will not appear on the store and even for this you need to indulge in a little workaround.

How to get the Microsoft Health App on Windows Store?


The companion app is quintessential, be it the Microsoft Band or any other fitness bands. In order to download the Microsoft Health App from the Windows Store one needs to change the Country/Region to “United States” or other regions wherein Microsoft Band is supported. Once this is done the Health app should appear on the Windows Store and you should be able to install and run the app.

It is advisable to reboot the phone after changing the region. It is at this juncture that the app displays the following error message “Microsoft band network error something went wrong. Please Check your network connection and try again.” The resolution to this problem comes in multiple folds and I will detail out every step below,

Before we jump to conclusions, the connectivity on your phone might actually be the culprit. Check your LTE signal strength or even better perform a Speedtest to know the exact speed. Also, try switching between multiple connections including your home WiFi. Yet another quirk of the app is that it doesn’t accept special characters if your name has a special character just remove it and try again. In order to do this, you need to head over to the Microsoft Account and check your display name under the “Basic Info.”

Other Troubleshooting Steps

Another possibility is that your phone’s primary language may not be English (United States.) Once again you can head over and change the language settings. The troubleshooting methods above are primarily for the Windows phone, however, one can try the same on Android and iOS devices as well.

Breaking it down, the primary culprit here is the language setting of the device, be it any operating platform try toggling with the settings. Another possible issue is also a flaky Bluetooth connection, yes Microsoft Bands are known for having Bluetooth connection issues.

All said and done its only fair to warn you about the consequences of changing your Region and language. Expect things to go topsy-turvy, the Cortana language changes, the Netflix region changes and moreover the updates will roll out in accordance with the newly set Region. The best way to stay out of this mess is to use the desktop app/web dashboard which apparently hasn’t inherited any of the problems.

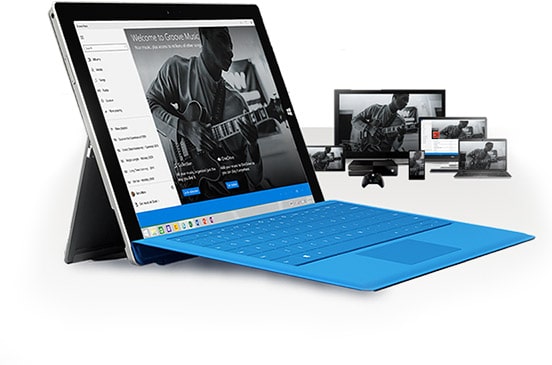
Microsoft sheds another consumer facing product in Groove

I’ve written about it time and time again that Microsoft’s low-key efforts in maintaining but not promoting its music streaming service would come to a head, and today the company has clarified what that end looks like.

According to a post on Microsoft’s Windows Blogs, users are now being ushered out the door as the company looks to turn its once evolving music streaming service into a glorified media player.

Music Pass support in Groove and music purchase in the Windows Store to be discontinued; the Groove Music app will continue to support playback and music management of owned content.

More specifically, those who used to invest in Groove Music will now be shown the door to Microsoft’s “expanding” partnership with Spotify through January 31, 2018.

*An update to the Groove Music app including the ability to move music to Spotify, will be available for Windows Insiders beginning this week. The Groove Music app update for Windows 10 and Xbox One devices will roll out broadly the week of October 9, 2017 and will enable Groove Music Pass customers to move existing music collections and playlists to Spotify. Groove Music Pass content will be available to move to Spotify until at least January 31, 2018.

In a bit of compassion, the Windows team details the steps necessary for Groove users to transition their libraries over to Spotify, at which point, some may be entitled to a 60-day free trial of Spotify’s premium service.

1. Launch the latest Groove app: Log into the latest Groove app version from the Windows Store or Xbox One. Once you’re signed into your account, you’ll see a pop-up window from Spotify with instructions on how to login or create a Spotify account.

2. Log in to Spotify:

If you have an existing Spotify account, you’ll be prompted to input your username and password.
If you’re new to Spotify, and on your PC, you’ll be asked a few basic questions to help you create an account, starting with a username.

3. Move your music: After signing into your Spotify account, we’ll move your music collection and playlists from Groove Music to Spotify.

4. Play music in Spotify: The process of moving your music to your Spotify account will take a few minutes. After completing step three, you’ll be able to listen to your music library in the Spotify app!

It should be noted that Spotify’s premium service offers a few more features and ubiquity for the same relative price of Groove.

While the reasons for Microsoft’s departure from the music streaming wars are many and varied, the specific timing may leave many current Groove users a little bemused as Groove has always been seen as a loss-leader for the overall well-roundedness of the Windows ecosystem.

Update: For those concerned about pre-paid annual subscriptions, what’s going to happen to the app after January or happens to already have redeemed a different 60-day premium offer, here is Microsoft’s accompanying FAQ full of details. 

Microsoft’s Story Remix is slowly getting the features it teased months ago

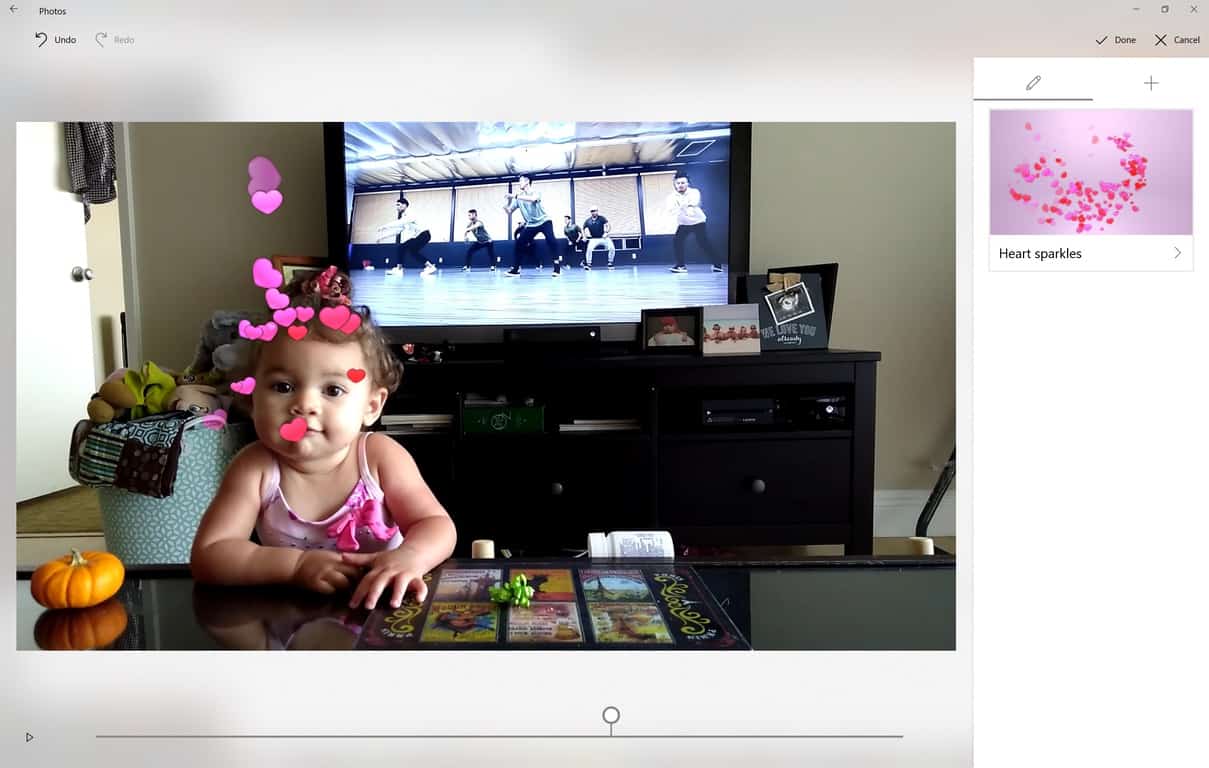
Despite Microsoft’s procrastination regarding the slip in its development roadmap for its new photo and video editing experience in Photos (formerly know as Story Remix) the Windows team continues to deliver updates to the software for testers ahead of the official Fall Creators Update.

Depending on which Insider ring release testers might be on, new video editing features should be hitting their desktop in the next few days that include many of those jaw-dropping effects demoed during Microsoft’s developer conference back in May.

For the past few months, the Windows team has bounced features back and forth between users on the Skip Ahead, Slow, and Fast Ring release cycles, often times deferring “new” features on the Slow Ring for internal development reasons.

However, starting as early as this past Sunday, the Photos app has been updated with the newest Video editing features many have been clamoring for since Microsoft teased the many months ago.

After a quick five minutes playing around with the app, I can anecdotally attest to the ease of use in adding the features to a video thanks to a quick tutorial the app walks users through.

I used a quick couple of videos taken this weekend to test out the new 3D effects and anchoring features, but for those looking to do a bit more work, the app suggests using 2 or more videos to get better results. It should be noted, that a Photos add-on automatically installs itself from the Windows Store when adding the visual effects for the first time.

I’ll need to do a more in-depth testing of the app once I get a chance to upload a collection of photos and videos into an album, but my preliminary experience with the app left me with a positive outlook on the Windows team efforts so far. The layout of Photos editing feature is simple and straightforward and as far as feature richness, it’s akin to the old Window Movie Maker days. Perhaps, in the future, users will gain even more granular editing features, but for now, Microsoft could release this version of the Photos app and be fine.

Forza Motorsport 7 review: A rewarding game for the ultimate racing fan

After a full year of hype, the moment Forza and Xbox fans have been waiting for is finally here. Forza Motorsport 7 is now available, and while it certainly does have a fair share bit of faults, it is a true display of the power of Xbox. Complete with an awesome career mode, impressive graphics, a comprehensive list of cars/tracks, Forza Motorsport 7 lives up to all the talk. I’ve finally had a chance to get some more hands-on time with the Xbox One version of the game, and what follows is a look at the good, the bad, and other impressions of this year’s Forza Motorsport title.

Writers Note: Microsoft initially provided me with an early access copy of Forza Motorsport 7 Ultimate Edition two days before it launched to the public. Now that I’ve had more time to play, this is a follow-up to my first impressions post from a few days ago.

The Good:

Forza 7 is a game for ultimate racing fans who like attention to detail and want to be rewarded for winning races. Including impressive graphics and improved engine sounds, this game is a definite keeper. Race fans will also appreciate the way the career mode is formatted, the mass selection of cars and tracks to race with, and the way cars handle as they would in real life.

Rewarding career mode:

As I previously described in my first impressions post, career mode is the best part of Forza 7. I won’t be revisiting the specific details, but for a more detailed look, read my original post. At the end of the day, career mode takes many ideas from real world racing, such as earning series points and making your way through different types of sections and series.

What makes Forza 7 career mode unique is instead of just grinding for money, players are racing for glory and the chance to be rewarded and unlock the best and fastest cars. If the wins keep coming, Milestone Rewards are even given for an extra boost of cash or some cool cars. Plus racers also earn a Car Collection score for buying new vehicles. Just as in real racing, players need to earn things as they go, and every win helps with the goal of becoming the ultimate race car driver and collector.

You’ll need to go through various series

In career mode, there’s extra meaning to the driver. For the first time in Forza the game features the ability to make things personal and customize the way a driver looks. As I hinted at before players are able to unlock “Driver Gear” to alter the looks of drivers, be it with wacky space suits, or the some much more classy items based on popular culture. A bit gimmicky, yes, but still very appreciative since players can finally put a look to the otherwise faceless driver.

At the end of the day, some may find this career format and the rewards or car collection system frustrating, but it’s one of the main areas of the game. AI settings can be turned down, and players can adjust the friction or braking assists to make things easier throughout the career mode, but this is really a game for those who like to earn things as they go.

Even if opting for an ultimate edition of the game there is definitely need to spend extra time in the career mode series to earn a way to buy new cars. Yes, the Forza Edition cars and Mods will help you earn more money, but it’s more rewarding and fun to see the cars unlock the standard way as career mode progresses.

The main menu

Mouthwatering graphics:

The big talk with Forza Motorsport 7 were improved graphics and support for 4K resolution on Xbox One X. On Xbox One, though, the game runs at a solid 60 frames per second without any issue. New players to Forza will right away appreciate the difference in the graphics over a game like Project Cars 2. Long-time players, on the other hand, will especially feel a big difference from Forza titles past.

Tracks and environments are more lively than ever, creating a very immersive racing experience. The grass and environments at certain race tracks are sharp, and there is extra attention to detail throughout the game. Track lights from night racing at Daytona International Speedway will shimmer in the windshield when you’re passing down the front stretch, the sand from Dubai Circuit will come up onto the track, and there are even reflections in puddles when racing in the rain. With Forza 7, it’s the small details that count.

Let’s not forget the interior details of the cars. This year there is an alternate cockpit view, bringing you closer to the dashboard as ever. Although it cuts out the mirrors from view, I especially liked this angle, since it allows me to watch the miles on the odometer roll up when I raced. It’s oddly satisfying and is another area where Turn 10 pays attention to the smallest details in Forza 7.

Lastly, for the first time ever, Forza 7 features a dynamic weather system. When racing at tracks with support for dynamic weather, there’s thunder and lighting during pouring rainstorms. Cars will even handle differently in the grueling conditions. Plus, from the way dirt and grub build up on my windshield when racing in the rain, it’s definitely realistic.

Realistic sounds:

Just as how the graphics are great, the sounds in Forza 7 are also amazing. Unlike in Sony’s Gran Turismo series, the cars in Forza do not sound like blenders. Each of the cars has their own unique sound, so if you’re really obsessed with cars, you’ll actually able to differentiate the manufacturers and car models just by listening to the engine sounds.

For me, it was absolutely glorifying to turn up my volume to 100% and listen to the realistic roar of NASCAR stock car engines roaring at Daytona, or the electric buzzing from Formula E cars racing at Le Mans.

Other areas of the game also see sound improvements. When my car slammed the apex at certain tracks, I heard the noises from pebbles slamming into my chassis. And, when I went in full out demolition derby mode, I heard crunching noises when parts came flying off my car. Oh— and let me not forget the cool way that in-game music plays from the speakers throughout the race track for a nice effect when you drive by at speeds of 100 MPH.

A wide variety of cars and tracks:

Shipping with over 32 tracks, Forza 7 is a race fan dream come true. With the game including tracks such as Daytona and Le Mans, for the most part, players will be racing at REAL race tracks. With a few fictional exceptions (like Rio and Dubai), Forza 7 brings gamers to the same tracks where famous race car drivers built their careers. Plus, since career mode is as in-depth as it is, and since tracks have different layouts, the racing is less monotonous throughout career mode.

Of course, the other main talk behind Forza 7 are the 700+ cars. Covering manufacturers from Ariel to Volkswagen, the car list is another reason why Forza 7 is a race fan’s dream come true. Players can race almost any car they can think of, and even included in the list are some obscure race trucks. And when not racing, cars can be explored in Forza Vista for a showroom like experience. There’s even the chance to rent the cars in free play mode, if a player is absolute eager to try out a new car.

Finally, the game also features the largest collection of Ferraris and Porsches ever, which is great because not everyone has the real world money to amass these cars for their actual garage.

This is my favorite of the cars

Realistic car handling:

Using the standard Xbox controller, the cars handle just as they would in real life. With all assists turned off, I struggled to keep hold of a Porsche as I barreled down the turns after the long straightaway at Le Mans. And In the initial races with my Volkswagen, I was easily cruising on a Sunday afternoon drive. I particularly felt this difference in handling when I was racing in my 2013 Dodge Ram and took a corner too hard, losing braking and almost flipping over the car.

The Bad:

As much as I’ve praised Forza 7 thus far, there are a few issues with the game which have troubled me. Drivatars are horrible, online play is lackluster, loading times are a bit prolonged, and the music is terrible. Check out why below.

Drivatars:

Present since Forza 5, Drivatars, the computer-driven cars you race against, are once again making a return in Forza 7. I’ve always had a love and hate relationship with Drivatars and it once again bothers me in this years Forza game. Despite having new options to limit aggression in Forza 7, Drivatars still race poorly.

Most times, and even with the settings turned up, they will still put you into the wall or cut the track and cause massive pileups. Turning the settings to max difficulty will improve the way Drivatars race, but it also makes it impossible to win races. This is mainly due to the way that the tech behind Drivatars work— the cloud records your driving habits and will create a virtual copy of it for others to race with. Seems as though most people who play are reckless, apparently.

No level of difficulty can fix stupid

Online play:

In Forza 7, online play in the multiplayer hopper lobby is based on homologation. Similar to real-world racing, this means that there are certain tire compounds, width, horsepower, weight and PI limits before you enter an online lobby to race. Meant to cut down on those who use super-powered cars to get to the top of the leaderboard, it is supposed to make the racing fair. It also intends to put an extra emphasis and reward on car tuning, but, unfortunately, most gamers just looking for some fun online (myself included) care less for this.

Pressing the multiplayer button from the main menu randomly places you into a selection of lobbies grouped by class and car type. Even with my fast internet connection most times I found myself frustrated just waiting to get paired to join a race. Anyway, once I got connected I was racing against the same people of my skill level with the same type of cars. While a good idea on the surface, it quickly became frustrating. I was not able to pull away from the field since I did not tune my cars like everyone else. Plus, there’s also the idiot trolls who wrecked me and spun me out for no apparent reason.

Homologation sucks

For the best experience I recommend playing the game online with friends or finding serious fans via Xbox’s Looking for Group feature. While not available at the time of writing, other multiplayer areas of the game are set to open up soon. This is including the Forzathon, which is supposed to be an e-sports type event, as well as leagues, so I am sure things will be getting better soon!

Loading…:

Being the masterpiece it is, the loading times in Forza Motorsport 7 are very lengthy. Based on the track and condition sometimes I was waiting up to 2 minutes to be loaded into a race, especially in multiplayer. It’s not a big of a deal for me, but it’s slightly annoying, especially when I was eager to just get into a race. Luckily, the menus are available while things are loading, so I was able to busy myself with changing settings instead of just staring at a loading screen.

The loading menu is not boring at least

The Music:

Forza 6 featured a great soundtrack by composers Kaveh Cohen & Michael Nielsen. Sadly, the music in Forza 7 is lackluster. After a while, Forza 7’s generic rock background music got very boring. There’s also no word on a timeline for when you’ll be able to play your own tunes from Groove Music in game, but it is still “coming at a later point” per most recent reports.

Other tidbits/ issues:

As great as Forza Vista was in Forza 6, it is a bit limited and shaved back in Forza 7. You can no longer explore the engine details or open hood or trunks on all the cars like in Forza 6. The cool narrations and descriptions of the cars have also been eliminated as well. It is indeed a bit sad, but considering that you can now use Forza Vista in the pits, I guess It’s something to settle with.

Forza Vista on a NASCAR in the pits

Of the 32 tracks, only some tracks have dynamic weather, including Brands Hatch, Hockenheim, Homestead, Le Mans, Maple Valley, Nurburing, Sebring, Silverstone, Spa, Top Gear, and Virgina Raceway. It’s still a significant amount compared to other racing games, but I was hoping that more tracks would support the feature.

A look at some of the tracks

In Forza 7, the 700 cars are divided into collection tiers: Common, Uncommon, Rare, Super Rare and Legendary. You move up through these tiers by buying more cars and winning races in career mode. Some tiers are only unlocked by winning certain prizes in the game. This might be a bit of a gimmick to most players, but at the same time, it puts more value on winning, after all, not everyone in real life will get the keys to a Ferrari handed to them right away.

Locks, locks everywhere

Lastly, Forza 7 comes with a new “Prize Crate” system. This system allows you to use in-game credits and purchase extras which will help you in your journey in the game. There are car crates, driver gear crates, and mystery crates. These are all in-game microtransactions to be purchased using the in-game money. I’m not a big fan of the crate system, as I think it’s basically equal to cheating your way to winning the game. The items in the crates can give you mods to help you earn more credits, and new crates and special offers will show up from time to time. Why buy these crates when you can be spending more time in the game enjoying the racing?

Crates everywhere

Conclusion:

At the end of the day, Forza 7 is a dream come true for anyone who is a fan of racing. It offers up the chance to simulate a real-life career mode, and it brings realistic looking cars and tracks front and center. Yes, it does have some faults, but nothing is ever perfect. The game is worth picking up since you can put hours of time to enjoy your racing career and the path to the Forza Drivers Cup.

Final Score: 9/10


Windows 10 build 17004 brings Fluent Design’s Reveal effect to the table

Microsoft pushed out build 17004 to Windows Insiders in Skip Ahead while the company is also busy preparing for the Windows 10 Fall Creators Update RTM.

The build includes a new feature and various minor improvements for Microsoft Edge, and a few fixes from the recently released Redstone 3 builds.

Speaking of Edge, the browser doubled the number of users in a single year, and the Fall Creators Update will definitely give it another boost.

Fluent Design gets a new feature

The company is adding Fluent Design’s Reveal effect to the All Apps list in the Start Menu. The Reveal Effect will light up the item the mouse is hovering over.

Microsoft Edge main improvements

  • The issue where typing a web address into the address bar sometimes cleared the text and didn’t result in a page navigation was fixed.
  • The issue where the tab previews for PDFs were black was fixed.
  • The issue where “Open with previous pages” wouldn’t recover tabs was also fixed.
  • The issue where Ctrl + Click on a link in PDF wouldn’t open the link in a new tab was fixed.
  • The issue from the recent flights where Alt + D would not bring input focus to the address bar when some keyboards were active was solved.
  • Input improvements
  • The issue with the Enter key not working as it should in Facebook Messenger was fixed.
  • The problem that resulted in the Delete key on the full touch keyboard inserting a period in UWP apps was fixed.
  • The issue that resulted in a stutter when you selected long strings in single line editable text boxes was fixed.

Microsoft also introduced a new color wheel to Color and High Contrast Settings to help users get a feel for the effect of each of the available color filters.

There are more fixes and improvements and to check them all out go to Microsoft’s official blog and have a look at the complete list of novelties that come along build 17004 for PC.

RELATED STORIES TO CHECK OUT:

Unknown Device ‘acpi\ven_smo&dev_8800’ error: Fix this error within minutes

After updating your Windows computer you might get some errors related to the drivers that are installed on it. Also, you might have to update or uninstall and reinstall some of these drivers in order to fix system errors. However, in other situations, while verifying the installed apps and drivers you might find some unknown entries within the Windows 10 system and such situation might refer to the ‘acpiven_smo&dev_8800’ unknown device driver.

If you notice the ‘acpiven_smo&dev_8800’ missing driver, don’t panic. Unlike other error messages, is not a malicious software.

It’s exactly what I’ve already outlined above – a missing device driver that’s not recognized by the Windows 10 system. Unfortunately, in this case the Windows system cannot install the driver automatically, so you will have to take matter into your own hands. For more information on how to fix other missing Windows 10 drivers, check out this article.

Note: this unknown driver is specific to Dell and refers to Motion Sensor or Free Fall Sensor or Digital Accelerometer hardware.

Fix Unknown Device ‘acpiven_smo&dev_8800’ in Windows 10

  1. The unknown driver can be located through Device Manager.
  2. You can access Device Manager by using the Windows search console: click on the Cortana icon and type Device Manager and select the first result.Unknown Device ‘acpiven_smo&dev_8800
  3. From Device Manager, under Other Devices you will most likely find the Unknown device entry.Unknown Device ‘acpiven_smo&dev_8800 fix
  4. If you right-click on this field and choose Properties you can find further details, such as its Value, which should be acpiven_smo&dev_8800.
  5. Now, at this point you need to access the Dell official web page from where you should download and install the drivers related to Motion Sensor, Free Fall Sensor or Digital Accelerometer hardware.
  6. Apply these drivers manually and afterwards restart your computer.

That’s it. Now you know that the Unknown Device ‘acpiven_smo&dev_8800’ entry is nothing but a Dell driver which cannot be automatically detected and installed by the Windows 10 system. Therefore, you have nothing to worry about; just install the driver manually and the problem’s solved.

RELATED STORIES TO CHECK OUT:

Windows 10 news recap: Cuphead is here, Windows 10 S for Enterprise and more

Welcome back to our Windows 10 news recap. We are continuing the trend of our weekly “Windows 10 news recap” series where we go over the top stories of the past week in the world of Microsoft’s flagship operating system.

Cuphead is now available on Xbox One, Windows 10 and Steam

The long-awaited game, Cuphead, is now available for people to download and play. As well as being on Xbox One and Steam, the game is also available on Windows 10 through the Windows Store.

Cuphead on Xbox One and Windows 10

Microsoft is tailoring a new edition of Windows 10 S for Enterprise users

Following the launch of Windows 10 S for personal customers, aimed as an alternative to Google’s Chromebook lineup, Microsoft is now targeting enterprise users with its slimmed-down version of Windows 10.

Windows 10 Build 2017

Microsoft working to resolve issue where some stock Windows 10 apps won’t update

Some users are experiencing issues updating built-in Windows 10 apps. Microsoft has now said it is working to resolve the issue.

Microsoft Power BI Desktop now available in the Windows Store on Windows 10

As more apps and Win32-based programs are ported to the Windows Store, Microsoft has now added its Power Bi desktop app to the Store.

Power BI

That’s it for this week. We’ll be back next week with more Windows 10 news!

How to fix OneDrive for Business low disk space

OneDrive is Microsoft’s online storage solution for Windows users. This client offers great syncing features that can be used for making different backup operations as you can use a large amount of online storage space.

However, you may come across certain problems when using this Microsoft service, including low disk space issues. In this article, we will list the best solutions that you can use to fix this problem.

Fix Windows 10 OneDrive for Business low disk space problem

One of the main problems is that OneDrive for Business is consuming hard disk space when it syncs the files with the online folders. So, if your hard disk space is limited, you might experience a low disk space issue when trying to sync your files. Of course, you can use various methods to free up disk space.

Here is how we can choose to save files online only.

Use OneDrive for Business Next Generation Sync Client

  1. First, download the OneDrive for Business Next Generation Sync Client on your Windows 10 device. Hint: this is the latest release of OneDrive for Business (OneDrive.exe) – so, you might have to make the transition from Groove.exe to onedrive.exe. Of course, if you already use onedrive.exe you can already resume the following steps.
  2. Install the software by following on-screen prompts.
  3. Go to the OneDrive client and create a new folder.
  4. There, put all the files that must be synced.
  5. The sync process will be initiated; wait until it’s completed.
  6. Next, locate the OneDrive Next Gen Sync Client icon on the task bar (just click on the arrow that’s located near your clock).
  7. Right-click on that icon and go to Settings – > Account – > Choose folders.
  8. Make sure you uncheck the folder that was previously created.
  9. Click OK for saving your settings.
  10. This folder will be now removed from your Windows 10 device.
  11. However, your data will be still saved on the OneDrive online space.

The same process can be completed by right clicking on the OneDrive icon from Task Bar and selecting ‘unlink’. That’s how you can ‘tell’ OneDrive not to sync folders on your hard drive.

Now, you will be able to access your synced files or to upload further data to that particular folder only by going to onedrive.live.com. The goal is to uncheck the folder that you synced. In this way, the content will remain saved only online and not on your hard drive.

We’re afraid you will have to repeat this process each time you decide to sync something through OneDrive for Business.

That’s how you can fix the OneDrive for Business low disk space problem. Feel free to use the comments field from below if you have other similar issues while using your OneDrive client on Windows 10.

RELATED STORIES TO CHECK OUT:

‘Get to Chrome Faster’ is Google’s latest attempt to win over Edge users

Chrome browser has often been criticised for consuming excessive computing resource and also for being sluggish at times. Google has been working on improving the speeds and it has now started an informative campaign called the “Get to Chrome Faster.” This campaign is set to educate users on how to make the Chrome default browser of the system.

get to chrome faster

In all likelihood, the campaign seems to be centred at increasing the Chrome installations on the Windows 10 machines. As we are already aware, Windows 10 comes with Microsoft Edge as the default browser and apparently quite a lot of users don’t know how to change the default browser. The default browser can be changed by heading over to the Settings application but again it’s not that easy for everyone.

Speaking of changing default browsers, in case you’re planning to buy a Windows 10 S laptop, keep in mind that you won’t be able to change the default browser and search engine.

Can Google convince Edge users to switch to Chrome?

‘Get to Chrome Faster’ is a web page that launches itself in the new tab every time the browser is started. The “Get to Chrome Faster” comes with two sections, one to set Chrome as the default browser while the other one is to pin the browser to the Windows taskbar. Furthermore, the web page elucidates on how to change the default browser to Chrome. Strangely enough, the screenshot used for explanation shows the “Microsoft Edge” as the default browser, something that’s not always right.

Well, the confusion looms large as the guide asks Windows users to click on “Microsoft Edge” under the web browser. This is not essentially right as one might have already changed the default browser to say Firefox or maybe Opera One. The instructions to pin the Chrome browser are also half-baked. However, the users should not have a problem changing the default browser considering the fact that they have already done it before.

Thankfully the “Get to Chrome faster” promo page doesn’t appear once you click on exit. Technically there is nothing wrong in Google pushing their Chrome browser for the Windows 10 users, however, I just wished that the instructions had been clearer rather than just taking a shot at the Microsoft Edge.

RELATED STORIES TO CHECK OUT:

Only part of a ReadProcessMemory or WriteProcessMemory request was completed [Fix]

Computer errors can appear once in a while, and while some errors aren’t serious, others such as ERROR_PARTIAL_COPY can be a problem. This error usually comes with Only part of a ReadProcessMemory or WriteProcessMemory request was completed message, and today we’re going to show you how to fix this error on Windows 10.

How to fix ERROR_PARTIAL_COPY error?

Fix – ERROR_PARTIAL_COPY

Solution 1 – Edit your registry

According to users, they are getting Only part of a ReadProcessMemory or WriteProcessMemory request was completed message while trying to install games or applications from an optical drive.

To fix this problem users are suggesting making a few changes to your registry. We have to mention that this solution applies only if you’re using IDE drives, so if you’re using a SATA DVD drive you can skip this solution.

Before we start fixing the problem, first we need to check your DVD drive information in Device Manager. To do that, follow these steps:

  1. Press Windows Key + X to open Win + X menu. Choose Device Manager from the list.
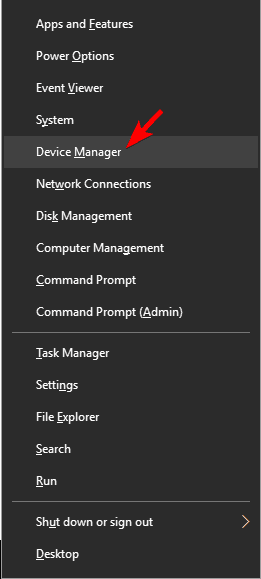
  2. Navigate to the IDE ATA/ATAPI controllers section and expand it. Locate your DVD drive on the list and double click it to open its properties.
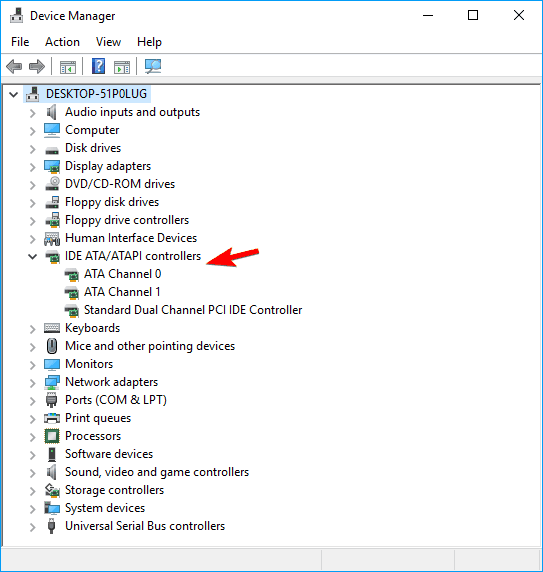
  3. Go to the Advanced tab and check if your drive is in PIO mode. If the drive is in the PIO mode, you’ll need to make few changes in your registry.

To make changes to your registry, do the following:

  1. Press Windows Key + R and enter regedit. Press Enter or click OK to start Registry Editor.
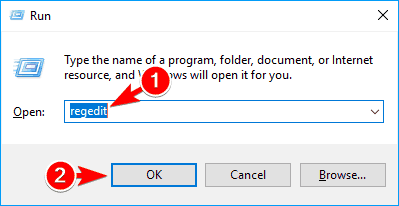
  2. Optional: Before we start modifying the registry it’s advised to create a backup just in case. Your registry has important settings in it, and if you don’t change it properly you can cause stability issues. To prevent these problems from appearing, it’s always a good idea to create a backup of your registry. This is rather simple, and to do it you need to go to File > Export.
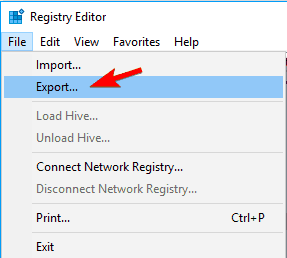
    Select All in the Export range section and enter the desired file name. Choose a safe location for your backup and click on Save.
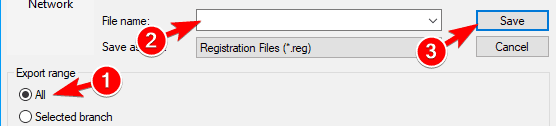
  3. In the left pane, navigate to HKEY_LOCAL_MACHINE\SYSTEM\CurrentControlSet\Control\Class{4D36E96A-E325-11CE-BFC1-08002BE10318} key and expand it. You should see several subkeys available. Select the key that represents your DVD drive.
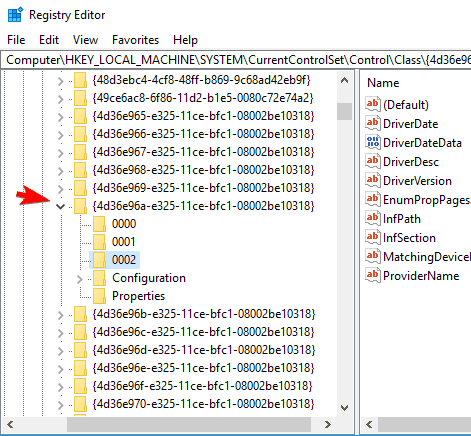
  4. In the right pane, locate MasterIdDataChecksum or SlaveIdDataChecksum values and delete them.
  5. After doing that, close Registry Editor and restart your PC.

After making changes to the registry the problem should be fixed and you’ll be able to install your applications again.

Several users reported that setting the Transfer mode to PIO only can also fix this problem. To do that, repeat the steps from the beginning of this solution and change the Transfer mode to PIO only. Save changes and check if that solves the issue.

Solution 2 – Install the latest drivers

If you’re getting this error while installing certain applications from an optical drive, you might want to try updating your drivers. If your drivers aren’t the latest, you might experience certain issues, therefore we strongly advise you to install the latest chipset drivers for your motherboard.

To do that, visit your motherboard manufacturer’s website, locate your motherboard model and download the latest chipset drivers for it. After installing the latest drivers, check if the problem still appears.

Otherwise, there are specialized driver tools that can manage all aspects of your PC drivers. If you need automated support to update old drivers or fix corrupted ones, then the perfect resolution is to use Outbyte Driver Updater.

Solution 3 – Check your security software

Antivirus tools are a necessity, but sometimes they can interfere with your operating system and cause this and other errors to appear. To fix the problem you need to check your antivirus settings and disable the problematic features.

If you’re not familiar with system security, you might have some problems finding and disabling the problematic feature. Few users reported that they fixed the problem by setting their antivirus to low restriction mode, so be sure to try that.

If you can’t find the feature that is causing this problem you’ll need to disable your antivirus entirely. If that helps, you might want to keep your antivirus disabled while you install the software. After you install the desired application turn your antivirus back on again.

Lastly, you can also try removing your antivirus software. Keep in mind that your PC won’t be unprotected even if you uninstall your antivirus. Windows Defender works as a default antivirus on Windows 10, so it will start automatically once you uninstall your antivirus. Some antivirus tools tend to leave certain files and registry entries behind after you uninstall them.

To remove these files it’s recommended to use a dedicated removal tool. Many antivirus companies offer these tools for their software, so be sure to download one for your antivirus.

After uninstalling your antivirus, check if the problem still persists. If not, you might want to switch to different antivirus software or update your current antivirus to the latest version and check if that solves the issue.

Several users reported that the cause was the BitDefender AntiRansomware tool, so if you have it installed try removing it and check if that solves the problem. Another common cause for this problem can be Kaspersky antivirus, so if you have it installed, remove it using the dedicated removal tool.

Solution 4 – Perform a Clean boot

As previously mentioned, certain applications can interfere with your operating system and cause this problem to appear. Often these apps will start automatically with Windows and cause the problem as soon as you turn on your PC. To find the problematic application, you need to perform a Clean boot. This is relatively simple and you can do it by following these steps:

  1. Press Windows Key + R and enter msconfig. Press Enter or click OK.
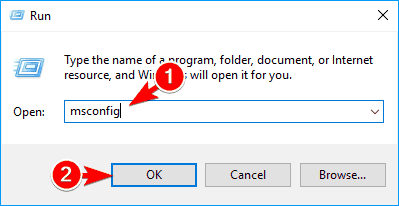
  2. System Configuration window will appear. Go to Services window and check Hide all Microsoft services checkbox. Now click on Disable all button.
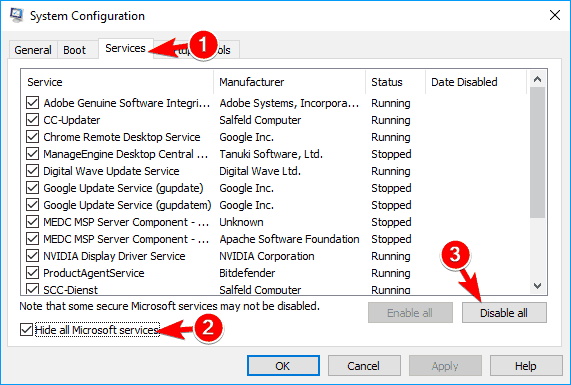
  3. Navigate to the Startup tab and click on Open Task Manager.
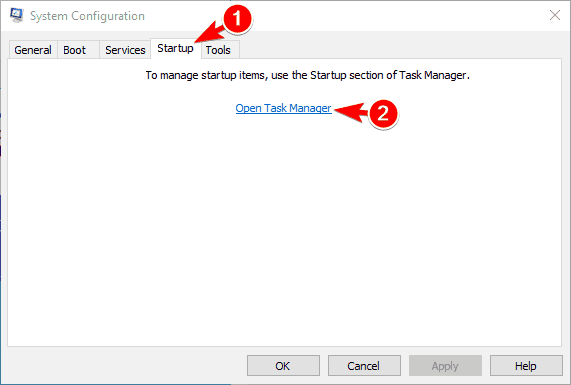
  4. When Task Manager opens, you’ll see a list of startup applications. Select any item on the list and click on Disable button. Repeat this step for all items on the list.
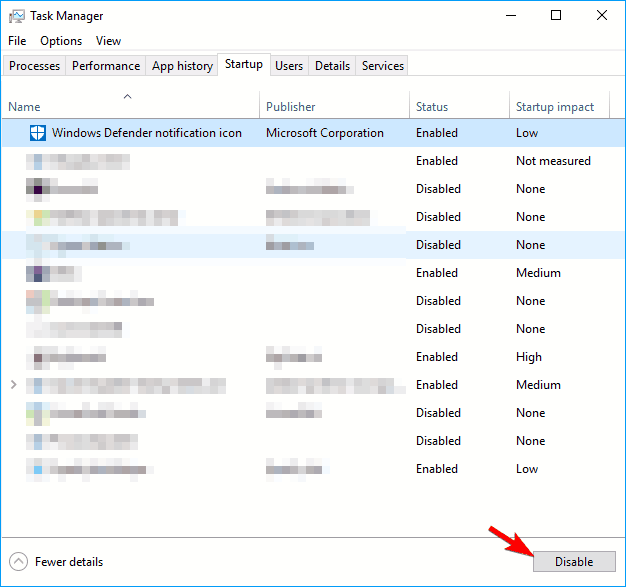
  5. After disabling all startup items, close Task Manager and go back to System Configuration window. Click on Apply and OK to save changes.
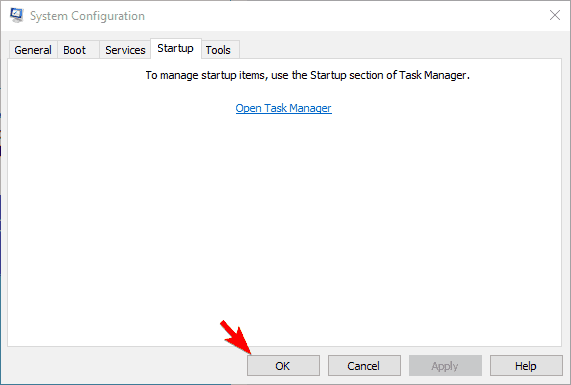
After doing that, restart your PC to apply the changes. When your PC restarts, check if the error appears again. If not, you need to repeat the same steps and enable applications and services one by one or in groups. Keep in mind that you need to restart your PC or log off and back on once you enable a set of services or apps.

After you find the problematic application, you can keep it disabled or remove it. If you need to use this application, we advise you to update it to the latest version and check if that solves the problem.

Solution 5 – Install the latest updates

Windows 10 is a great operating system, but it has a few bugs and compatibility issues. If you’re getting this error, we advise you to install the latest Windows updates. By default, Windows 10 automatically installs the necessary updates, but sometimes you can miss an important update due to certain errors. If that’s the case, we advise you to check for updates manually. To do that, follow these simple steps:

  1. Press Windows Key + I to open the Settings app.
  2. Go to Update & security section and click on Check for updates.
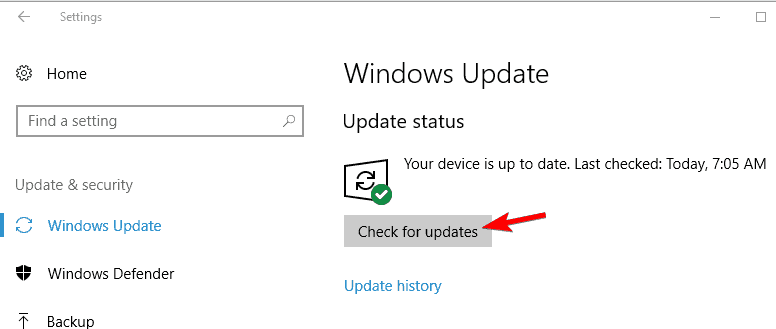
  3. Windows will now check for available updates. If any updates are available, they’ll be downloaded automatically in the background.

After updating Windows to the latest version, check if the problem is resolved.

Solution 6 – Run the application as administrator

Sometimes this error can appear while trying to run certain applications. According to users, the error occurs because you don’t have the necessary privileges to start the application. To temporarily fix the problem, you can try running the application as an administrator. This is relatively simple and you can do it by following these steps:

  1. Locate the application that is giving you this error.
  2. Right click the application and choose Run as administrator.
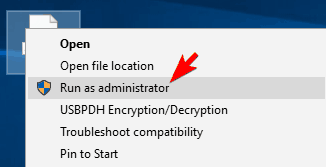
After doing that, the application should start without any problems. Keep in mind that this is just a workaround, so you’ll have to repeat it every time you want to run this app. To make this process more straightforward you can set the application to always run with administrative privileges. To do that, follow these steps:

  1. Locate the problematic application, right click it and choose Properties from the menu.
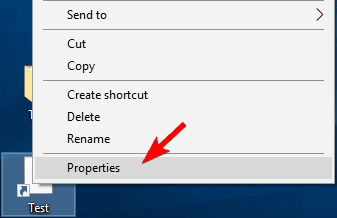
  2. Go to Compatibility tab and check Run this program as an administrator option. Now click on Apply and OK to save changes.
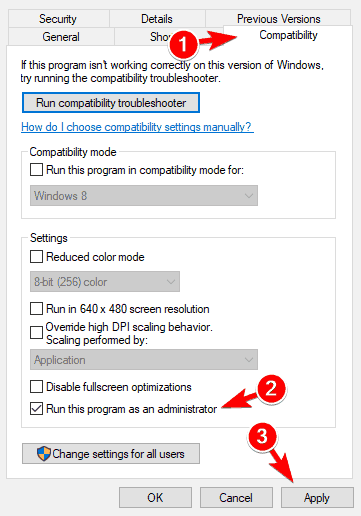
After doing that, the application will always run with administrative privileges fixing the problem entirely.

Few users reported that this method doesn’t work for them unless they set the application to run with administrative privileges for all users. This is relatively simple, and you can do it by following these steps:

  1. Locate the problematic application, right click it and choose Properties.
  2. Navigate to the Compatibility tab. Click on Change settings for all users.
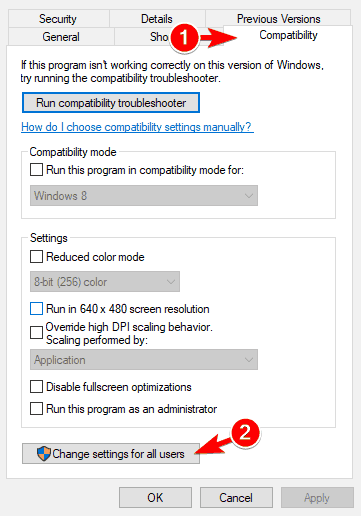
  3. Check Run this program as an administrator. Click Apply and OK to save changes.
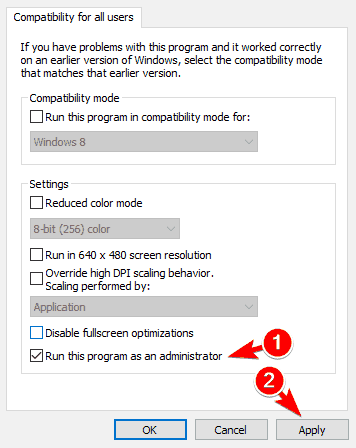
After making these changes the problem should be resolved completely.

Solution 7 – Start Chrome in Incognito Mode and remove the problematic extensions

Several users reported that this error occurs while using Google Chrome. According to users, the problem might be related to third-party extensions. To check if the problem is related to your extensions, you need to start Chrome in Incognito mode.

This model runs with default settings and without extensions, and if the problem doesn’t appear while using it it’s possible that one of your extensions is causing the problem. To start Chrome in Incognito mode, do the following:

  1. Click the Menu button in the top right corner.
  2. Choose New incognito window from the menu. Alternatively, you can start the incognito window by using Ctrl + Shift + N shortcut.
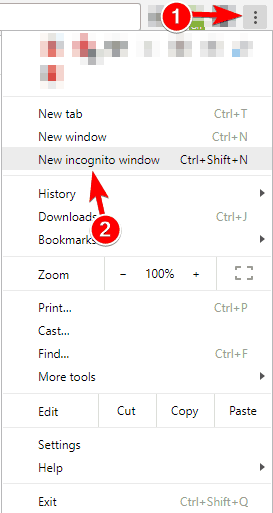
After you open the Incognito window, check if the issue appears. If not, it’s possible that the cause is one of the installed extensions. To fix the problem, you need to disable all extensions by doing the following:

  1. Click the Menu button in the right corner.
  2. Choose More tools > Extensions.
  3. When Extensions tab opens, disable all extensions by unchecking Enabled checkbox next to the extension name.
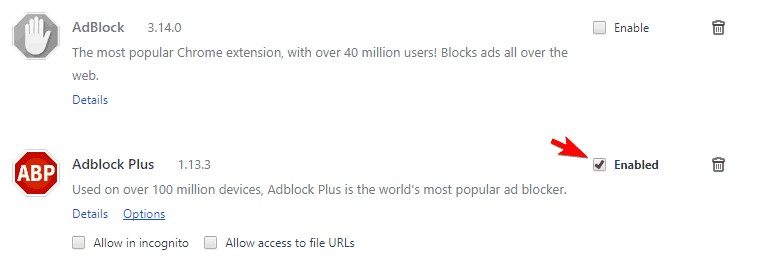
After disabling all extensions check if the problem still persists. If not, it’s certain that a single extension is causing this problem. To find out which extension is causing this error, you need to enable extensions one by one until you find the problematic one. After doing that, you can disable it, uninstall it or update it to the latest version and check if that solves the issue.

Solution 8 – Close all Chrome processes and reinstall it

If you’re having this error with Google Chrome, you might want to try reinstalling your browser. Before you do that, you need to end all Chrome processes by doing the following:

  1. Close Google Chrome.
  2. Press Ctrl + Shift + Esc to start Task Manager.
  3. Once Task Manager starts, go to Processes tab, locate Google Chrome process, select it and choose End task. There might be multiple Chrome processes available, so be sure to end them all.
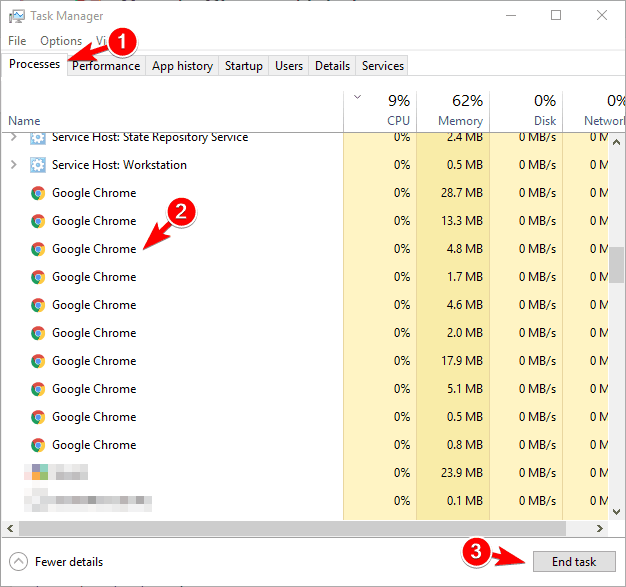
  4. After ending all Chrome processes, you need to uninstall Chrome from your PC.
  5. Lastly, you need to download and install Chrome again. Some users are suggesting to download offline Chrome installer, so you might want to try that.

After installing Chrome again, check if the problem still persists.

Solution 9 – Create a new Chrome profile

In some cases, this error can affect Chrome if your user account is corrupted. To fix this problem, you need to create a new user account and check if that solves the issue. To do that, follow these steps:

  1. Click the Menu icon and choose Settings from the menu.
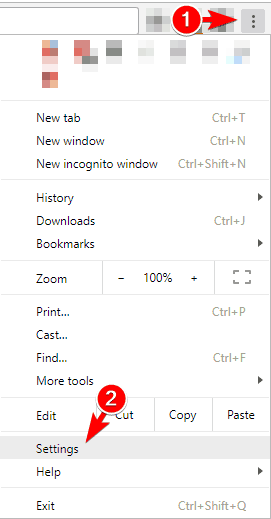
  2. In the People section click on Manage other people.
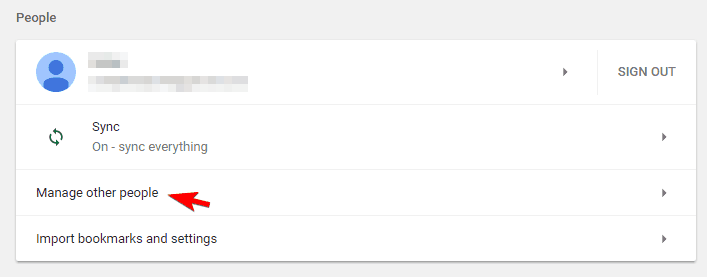
  3. Click on Add person.
  4. Enter the desired name and choose your icon. Now click the Save button.
After doing that you’ll have a new user profile ready. Check if the problem appears on a new Chrome profile. If not, you should try to export your browsing data from your old profile and import it to the new one. After that, you can switch completely to the new profile and use it as your main one.

Solution 10 – Check your antivirus and firewall

In some cases, your antivirus software can interfere with Google Chrome and cause this error to appear. To fix the problem, be sure to check your antivirus and firewall settings. Sometimes these tools can accidentally block Chrome causing this error to appear.

To fix the problem be sure to check if Chrome is added to the list of trusted applications. If not, be sure to add it and check if that solves the problem. Alternatively, you can disable your antivirus and firewall as a temporary solution.

Solution 11 – Scan your PC for viruses

This error can occur in Google Chrome sometimes due to certain viruses. Malware can disguise itself as a Chrome extension and cause this and many other errors to occur.

To check if you have any malicious extensions, be sure to download and use Chrome Cleanup Tool. In addition, we strongly recommend scanning your PC with a malware removal tool.

Hence, for a strong anti-malware service, it’s ideal to employ effective antiviruses with the highest detection rate. In this way, you stay guarded against online threats that may hide in your Chrome browser.

Solution 12 – Reset Google Chrome

If this error still appears on Google Chrome, you might want to try resetting Chrome to default. Before we start, we have to mention that this process will delete all your extensions, themes, browsing history and favorites, so keep that in mind. To reset Google Chrome, do the following:

  1. Click the Menu button in the top right corner and choose Settings.
  2. When the Settings tab opens, scroll all the way down and click on Advanced.
  3. Scroll down to the Reset section and click on Reset.
  4. A warning message will appear. Click on Reset button to start the reset process.
After Chrome resets to default, check if the problem is resolved.

Solution 13 – Enable inheritance for certain files

According to users, they reported this problem with .sqm files. In most cases, this is an inheritance issue, but you can fix the problem by changing the security settings. To do that, follow these steps:

  1. Locate the problematic .sqm files.
  2. Right click the problematic file and choose Properties from the menu.
  3. Go to Security tab and click on Advanced.
  4. Click on Enable inheritance button and then click Apply and OK to save changes.
Be sure to repeat these steps for all problematic .sqm files. After making the necessary changes, check if the problem still persists.

Solution 14 – Check your RAM

In some rare cases, this error can be caused by a problematic RAM module. According to users, they had this problem with their PC but they managed to solve it by replacing their RAM. Before you replace your RAM, we strongly advise you to use tools such as MemTest86+ to test it.

If MemTest86+ finds any problems with your RAM, you should definitely replace it. In addition, you might want to try using a single memory stick in order to find the problematic memory module.

Keep in mind that this solution requires you to open your computer case, so if your PC is under warranty or if you don’t know how to do it properly, we advise you to skip this solution. Hardware problem is the least likely cause for this error, but few users reported that replacing their RAM fixed the problem. This is an unlikely solution, so use it only if other solutions can’t fix the problem.

Solution 15 – Perform System Restore

Another way to fix this problem is to perform System Restore. This is a useful feature that allows you to restore your PC to its previous state. The feature is simple to use, and if this problem started appearing recently you might be able to fix it by using system restore. To do that, do the following:

  1. Press Windows Key + S and enter system restore. Choose Create a restore point from the menu.
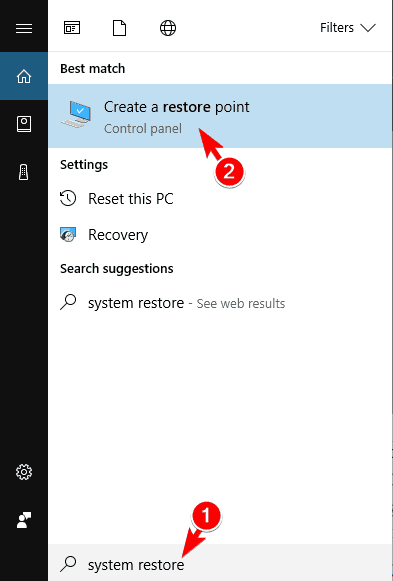
  2. System Properties window will appear. Click on System Restore button.
  3. When System Restore window opens, click on Next. If available, check the Show more restore points option. Select the desired restore point and click Next.
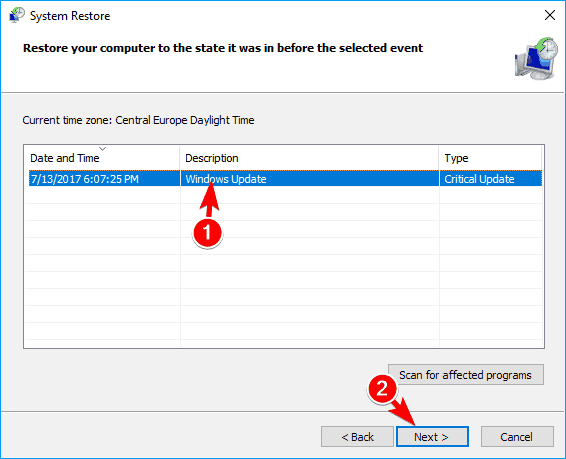
  4. Follow the instructions on the screen to complete the restoration process.

After restoring Windows to the previous state, check if the error still appears.

Solution 16 – Perform an in-place upgrade

If you’re constantly getting Only part of a ReadProcessMemory or WriteProcessMemory request was completed message, you might want to try performing an in-place upgrade.

Thanks to this process you’ll repair your Windows installation and fix any potential problems. Before we start, we advise you to create a backup just in case anything goes wrong. To perform an in-place upgrade, do the following:

  1. Download Windows 10 ISO from Microsoft’s website.
  2. Mount the ISO file simply by double clicking it.
  3. Open the virtual drive and double click on setup.exe.
  4. Follow the instructions on the screen to complete the upgrade. You’ll probably be asked to choose if you want to keep your personal files and apps. If this option doesn’t appear, click on Change what to keep and select Keep personal files and apps option.

After the in-place upgrade is finished, check if the problem still appears.

Solution 17 – Reset Windows 10

Another solution that might fix this problem is a Windows 10 reset. This is similar to clean install, therefore we urge you to back up your important files before proceeding. In addition to backup, you’ll need to create a Windows 10 installation media using the Media Creation Tool. After creating your backup, you can reset Windows 10 by doing the following:

  1. Open Start Menu and click the Power button. Press and hold the Shift key on the keyboard and choose Restart from the menu.
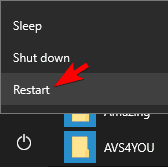
  2. Choose Troubleshoot > Reset this PC > Remove everything from the menu.
  3. If the installation asks for installation media, be sure to insert it.
  4. Choose the desired version of Windows and select Only the drive where Windows is installed > Just remove my files.
  5. Review the list of changes that reset will perform. Once you’re ready to start, click on Reset.
  6. Follow the instructions on the screen to complete the reset.

After the reset process is finished, you’ll have a fresh installation of Windows 10. Now check if the problem still appears. Keep in mind that this is a drastic solution since it will remove all files from your system drive, so use it as a last resort.

Fix – “Only part of a ReadProcessMemory or WriteProcessMemory request was completed user profile”

Solution 1 – Remove the sqm file

According to users, this problem can sometimes occur with user profiles. It seems that a specific sqm file is causing this problem, therefore it’s advised to find and remove the problematic file. After removing the problematic file the issue should be completely resolved.

Solution 2 – Copy the Default Profile from a different PC

Several users reported this error while creating new user profiles. If this error occurs with new user profiles it means that your Default profile is corrupted. To fix the problem you’ll need to copy the Default user profile from a working PC. On the working PC, go to the C:\Users directory. Locate the Default folder. If this folder isn’t available, go to View tab and check the Hidden items option.

After doing that the Default folder will appear. Copy that folder to a USB flash drive or any other removable storage. Paste the folder to the C:\Users directory on the problematic computer. If asked to overwrite the files, choose Yes. After doing that you should be able to create new user profiles without any problems.

Solution 3 – Change your security settings

Your security settings can sometimes interfere with Windows and cause this error to appear. Apparently, there’s a problem with the Default user profile, and this is the main reason the error appears. To fix the problem, you need to do the following:

  1. Navigate to C:Users directory.
  2. Look for Default directory. If the directory isn’t available, you need to reveal hidden files and folders. To see how to do that, check the previous solution.
  3. Right-click Default directory and choose Properties from the menu.
  4. Go to Security tab and click on Advanced.
  5. Click on Change permissions button.
  6. Check Replace all child object permission entries with inheritable permissions from this object. Click Apply and OK to save changes.

After saving the changes your security settings will change and you’ll be able to create new user profiles without any problems.

Fix – “Only part of a ReadProcessMemory or WriteProcessMemory request was completed” run as different user

Solution – Use runas /netonly command

According to users, they encountered this error while using runas command. This command allows you to run applications as a different user and it can be rather useful. However, this command can also cause certain errors to appear. If you’re getting an error message while using runas command, try using runas /netonly command instead. Few users reported that this command fixed the problem for them, so be sure to try it out.

Only part of a ReadProcessMemory or WriteProcessMemory request was completed message can cause some problems on your PC. This error can prevent you from running certain apps and creating new user accounts. Even though this error can cause some problems, you should be able to fix it by using one of our solutions.

Microsoft to unveil Office 2019 previews in mid-2018

The upcoming Office 2019 is set to launch sometime in the second half of next year, Microsoft announced at its Ignite event in Orlando. The company also said that preview builds will become available in the middle of next year.

Office 2019 will bring with lots of new features

Even if Microsoft is in love with the cloud, the company knows not every customer is ready to immerse itself in the cloud. Because of that, Office 2019 will bring lots of new and exciting features that won’t be cloud-specific, with the company itself describing the suite as a valuable upgrade for customers who feel like they need to keep some or all of their apps and servers on-premises.
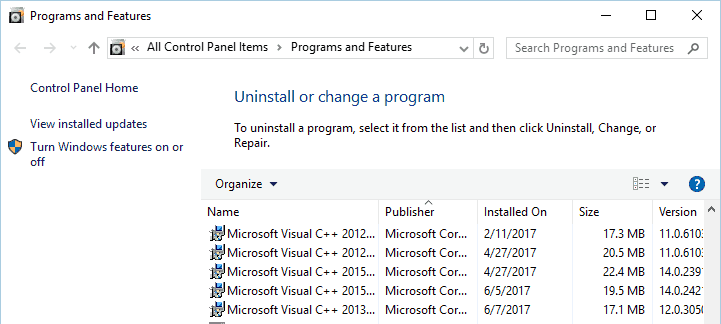
For now, we don’t have much about the upcoming Office 2019, so it’s pretty hard to tell you exactly what new features are on their way and what new improvements the company will use to lure more users into upgrading to the newest version of Office.
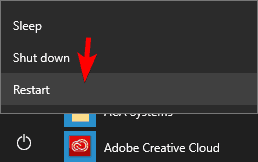
Confirmed improvements and new features for Office 2019

The company promised that more information about Office 2019’s new features would arrive in the following months, but Microsoft already confirmed perpetual versions of Office applications (Excel, Word, PowerPoint, and Outlook) and servers (Skype for Business, Exchange, SharePoint).

Office 2019 will also include new user and IT functionality for customers who aren’t ready to switch to the cloud. These include the following:

  • New improved inking features that will allow you to work more naturally (tilt effects, pressure sensitivity, ink replay)
  • New charts and formulas for making data analysis for Excel more powerful
  • Visual animation features such as Zoom and Morph for adding polish to PowerPoint presentations

Server enhancements will bring updates to IT manageability, voice, usability, and of course security. More details are scheduled to come in the upcoming months.

As you can see, there’s plenty of features worth waiting for!

RELATED STORIES TO CHECK OUT:

Gifting games on Xbox Store is now available for Alpha Insiders

Xbox Store gifting is one of the most requested features from Xbox gamers, especially since it is a ‘taken-for-granted’ feature on Steam, for example.
Both Windows Store and Xbox Store do not support gifting as yet, but earlier this month Microsoft confirmed during a conversation at PAX West that game gifting and wishlists were coming soon.

Looks like, it is actually coming soon. Reddit user liamcurtis1718 has shared a screenshot of Xbox Store listing with an option to buy the game as a gift. Another user on the thread has confirmed that on clicking the ‘Buy as Gift’ button, you’ll have the option to send it to a friend on your friend list or you can enter an email address.

It makes sense for the game gifting feature to arrive for the general public soon with the holiday season fast approaching. Also, since the Xbox Store and Windows Store are essentially the same, the feature would probably be functional across both store fronts at the same time.

The feature is live for Alpha Insiders on Xbox One. If you’re an Insider, let us know in the comments if it is reflected on your storefront.