Microsoft’s Windows Admin Center, the web-based app for managing Windows servers, has released a new public preview version: the 2410 Preview. This release is the next chapter in the platform’s evolution, bringing a slew of new features and enhancements the team has worked on for the past few months.
Windows Admin Center 2410 Preview is being touted as a pivotal release due to the migration of the platform’s backend to .NET Core.
The new preview features a backend built on .NET Core 8, the latest version of Microsoft’s open-source, cross-platform development framework, which was teased earlier this year. The migration to .NET Core 8 brings enhanced security and improved cryptography to Windows Admin Center, along with support for HTTP/2, a major revision of the web protocol that powers websites and web applications.
In the move to .NET Core 8, Windows Admin Center 2410 Preview ditches the Katana web server in favor of Kestrel, Microsoft’s recommended web server for ASP.NET Core applications. Kestrel is designed to provide faster load times and a more responsive user experience, and it supports HTTP/2 for reduced latency for the app.
One of the most critical changes in Windows Admin Center 2410 Preview is adopting a microservices architecture. Gateway plug-ins in the platform now run their collection of sub-processes under the app service manager to make API communications more resilient.
Switching to a microservices model makes Windows Admin Center more flexible, scalable, and performant. Instead of extending the platform’s backend directly, developers can build microservices to run in containers (software packages that include everything an app needs to run, like libraries and other dependencies) and make them available to the app through APIs.
The team has also made several changes to the app’s UI elsewhere in Windows Admin Center 2410 Preview. The virtual machines tool in the app has been updated with a “light” mode that reduces the number of columns in the default view, the ability to toggle off the detailed view for VMs, and more. The release improves the performance of VM power operations (like start and pause) and de-prioritizes certain operations during the initial load of VMs to make the list appear more quickly.
The installer—which was already updated as part of Windows Admin Center v2 (the legacy and current GA version of the app)—has been made more flexible with additional customization options. For example, users can now set network access settings and select trusted hosts from within the installer.
The 2410 Preview also introduces a data migration experience that automatically copies user and environment data from the previous build to the new build, except for four items: proxy credentials, WebSocket Origin configurations, Azure registration, and extensions.
Windows Admin Center 2410 Preview is now available on the app’s download page. However, it’s not recommended for production environments because it’s a preview build. See the full release notes here.
ERROR_JOIN_TO_JOIN often comes with the following error code 138 (0x8A) and the following description: The system tried to join a drive to a directory on a joined drive. In this guide, we’re going to show you how to fix it.
How can I fix ERROR_JOIN_TO_JOIN?
1. Ensure that your VPN is using the correct settings
Right-click the Sophos VPN client in your system tray.
Choose Settings and select Use config file settings.
Save changes.
2. Change Eclipse settings
Open Debug Configurations in Eclipse.
Next, Expand GDB SEGGER J-Link Debugging and choose remote_Debug_Segger.
Check your router before Sophos and make sure the Sophos port isn’t blocked. Your firewall can also block specific kind of traffic thus causing the problem, so check that as well.
Manually specific the path to bundled multiarch GDB. It should reside in X:\path\to\CLion\bin\gdb\bin\gdb.exe
Error ERROR_JOIN_TO_JOIN is somewhat rare, and it usually affects developers, but if you encounter it, be sure to try the solutions from this guide.
Microsoft Store is introducing a brand new experience for Windows Insiders, featuring updates to the product pages and much more.
The new product page experience on the Microsoft Store shows an immersive hero image on Halo Infinite’s page. Microsoft says the update is rolling out now to all Insiders and will start hitting non-Insiders soon.
The standout feature in this release is a new, more visually appealing product page experience. The new product pages are designed to look better and be more immersive. Microsoft says that the pages for apps and games will now show a video when available.
In cases where a video isn’t available, the new design will display a “beautiful hero image” instead. To ensure you aren’t hit with unexpected video, you can toggle video autoplay off in the Store settings.
The new immersive product page experience is rolling out now to Windows Insiders via the Microsoft Store’s version 22409.
In other news, the Redmond-based tech giant recently enhanced the Microsoft Store with a separate download page that allows users to see everything they’ve downloaded from the platform.
The VHD_BOOT_HOST_VOLUME_NOT_ENOUGH_SPACE BSoD comes with the value of 0x00000136 and it occurs when the system can’t boot from a VHD (virtual had drive). The problem is that the VHD doesn’t have enough space to expand. Especially if you are using a dynamic VHD (VHDX), you need enough space on the drive for it to expand when initializing the booting sequence.
How do I fix VHD_BOOT_HOST_VOLUME_NOT_ENOUGH_SPACE?
1. Create a VHD with enough free space
On a system that already has a OS installed, click the Start menu, type disk management and select Create and format hard disk partitions.
In the Disk Management tool, click on Action and select Create VHD.
Select Dynamically expanded from the options below, then allocate less space than the full amount available on your drive. For instance, if you have a 32 GB or 40 GB drive, allocate 15 GB or 20 GB maximum.
Then, use the partition to install the desired OS and boot from it.
The VHD_BOOT_HOST_VOLUME_NOT_ENOUGH_SPACE because if you’re using the Fixed size option, the system will allocate the maximum size of your partition and it won’t be able to expand if the partition you’re mounting it on doesn’t have any free space.
2. Resize the VHD using PowerShell
On a system that has a Windows OS installed, click the Start button, type powershell and click on Run as administrator from the results.
Type or paste the following command while changing the actual path for your VHD file: C:\> Resize-VHD -Path c:\BaseVHDX.vhdx -ToMinimumSize
If you want to resize the VHD to 20 GB the command is: C:\> Resize-VHD -Path c:\BaseVHDX.vhdx -SizeBytes 20GB
Please note that if the VHD you’ve already created has the minimum size of 40 GB, you won’t be able to reduce it to 20 GB, because it can’t get lower than the minimum you’ve selected with the Disk Management tool.
Also, if you’re using the VHD on an external drive, make sure that that drive has more space than the minimum size of your VHD. Basically, most users have this problem because they are booting from a VHD that is installed on a small external drive which doesn’t have space for extending.
Many users noticed msdia80.dll in their C or D drive and they are concerned about this file. In today’s guide, we’re going to take a closer look at it and see what this file does.
What is msdia80.dll?
What is msdia80.dll used for?
This file is a part of Microsoft Debug Information Access and it comes with Microsoft Visual C++ 2005 runtime. It’s used by debugging tools to get access to the program database.
Is msdia80.dll a virus?
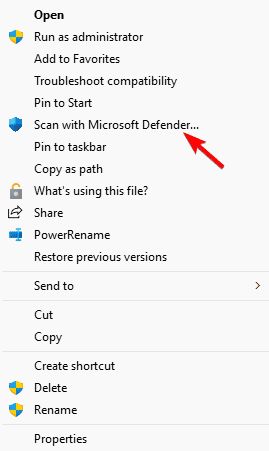
No, this file isn’t malware, as it comes preinstalled with Microsoft Visual C++ 2005 runtime. You can always scan it just to be sure by doing the following:
Locate the DLL file.
Right-click it and choose Scan with Microsoft Security.
Wait for the scan to finish.
Where to put msdia80.dll?
By default, the file should be in C:\Program Files (x86)\Common Files\microsoft shared\VC
You can move it by following these steps:
Locate the msdia80.dll.
Next, copy the file to C:\Program Files (x86)\Common Files\microsoft shared\VC
If asked to overwrite the file, it means that it’s already there, so you can skip the process.
If the file isn’t there, it will not be copied.
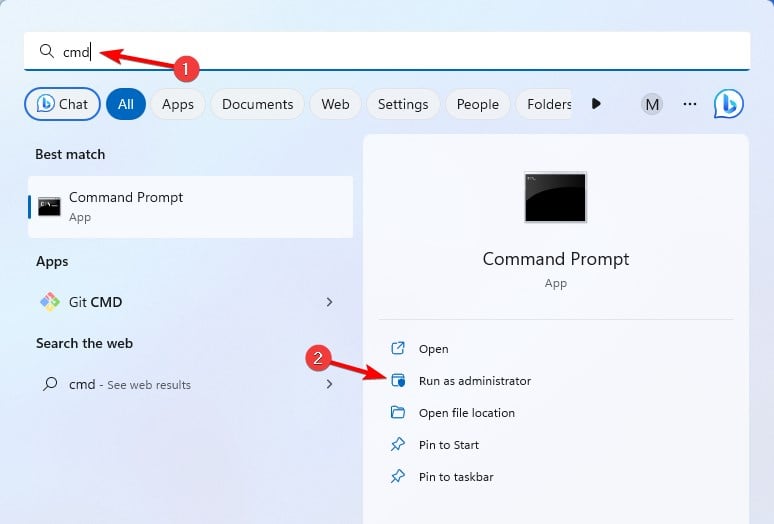
Next, press the Windows key + S, type cmd and click on Run as administrator.
Run the following command: regsvr32 "C:\Program Files (x86)\Common Files\microsoft shared\VC\msdia80.dll"
Is it safe to delete msdia80.dll?
If the file is already and the correct location in the VC directory, you can go ahead and delete it, since it’s usually placed at this location by mistake.
Even if it’s not in the right directory, you can still remove it since it won’t cause any issues.
Msdia80.dll is harmless, and in most cases, it won’t cause any issues to your PC, so you can just leave it be.
This isn’t the only unknown file you can encounter and many reported that msvcp140d.dll was not found, but we have a guide that addresses it. We recently wrote about what to do if setupapi.dll is missing, so feel free to check it out.
Many users reported fusion.dll on their PC, and if you’re not familiar with this file, in today’s guide we’re going to take a closer look and show you what it does, so let’s get started.
What is the fusion.dll file?
Fusion is a system library, and it’s associated with .NET Framework. It’s often used to bundle different components with applications.
Is fusion.dll malware?
As previously stated, this file is associated with .NET Framework, so it’s a legitimate file. However, it’s often used to pack installers and unwanted applications, or sometimes even malware, so this is why some antivirus software labels it as harmful.
While the file itself isn’t malicious, it can be used for malicious intent, especially if you download copyrighted software from third-party sources.
How can I remove fusion.dll?
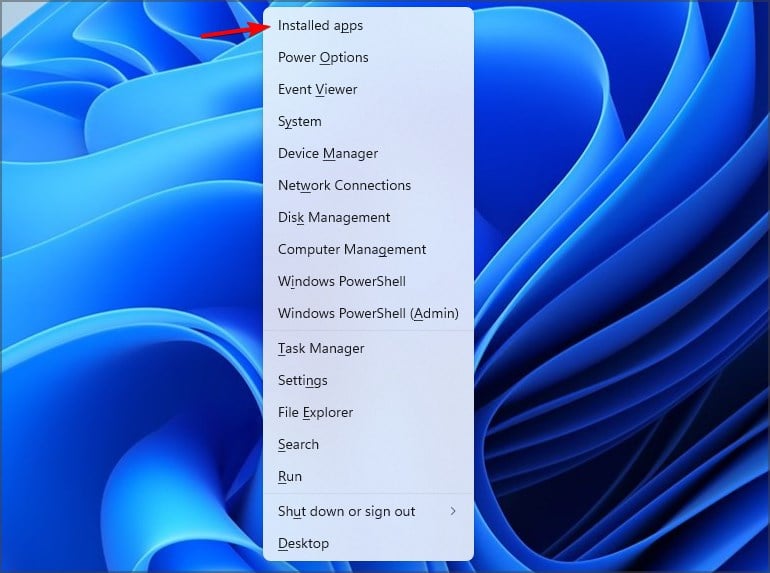
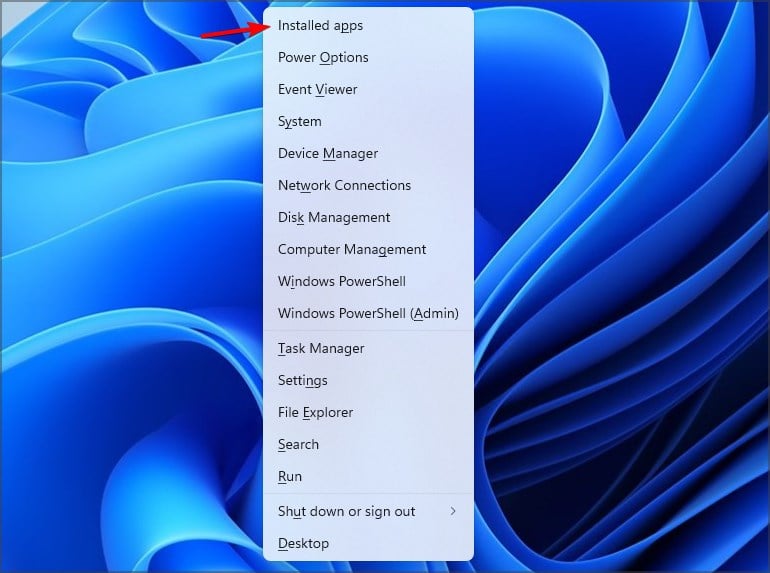
Press the Windows key + X and choose Installed apps.
Locate the application that is using this file.
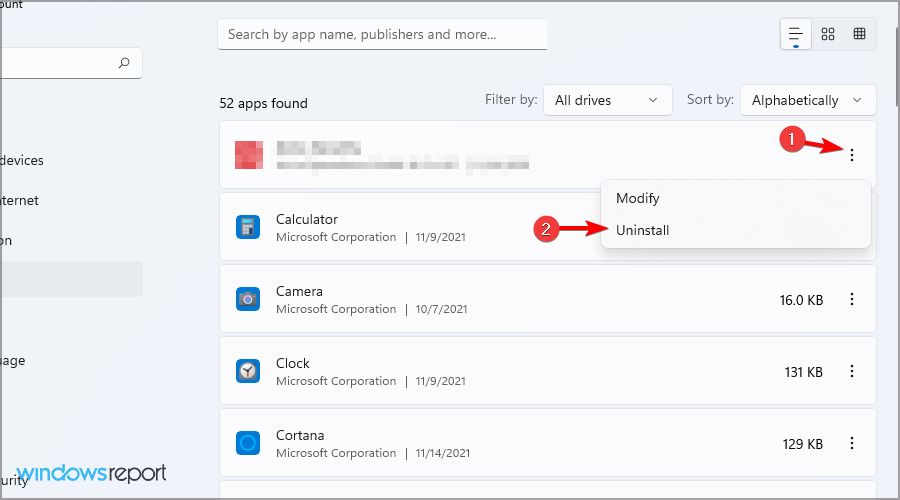
Click the three dots next to it and choose Uninstall.
Follow the instructions on the screen.
To identify the application that is using this file, just check your antivirus logs and you’ll be able to find it.
As you can see, while fusion.dll isn’t malware, it can be used for spreading unwanted software or malware, so if you notice that any application is using it, you should probably uninstall it, unless you trust it entirely.
Good news for Firefox users: Firefox Nightly now supports the Mica transparency effect natively on Windows 11, and thanks to some quick commands, you can easily enable it on your Windows devices.
The Mica transparency effect has been a selling point for many browsers, including Edge and Chrome, but Mozilla Firefox hasn’t officially supported it. You can enable it in Windows 11, sure, but you’ll need to download and install some GitHub packs first.
Either way, according to this Reddit user, Firefox Nightly, a Beta Channel of the Firefox browser—think Dev Edge, but for Firefox—now natively supports the Mica effect, and you can enable it quickly by turning on three commands.
Microsoft Teams has introduced a new feature that enhances the look and feel of virtual meetings and calls – the frosted glass background effect. This feature is designed to allow Microsoft Teams users to brand their company’s meetings and calls professionally and visually appealingly, a capability that the Redmond-based tech giant released a while ago.
The feature allows you to upload a transparent PNG background image, which Teams then converts into a frosted glass background. You can manually upload individual frosted glass backgrounds.
If you’re a Teams Premium admin, you can also upload frosted glass backgrounds for your organization and assign those backgrounds to different teams based on customization policies.
For the best video appearance, Microsoft suggests using an image without transparency. Non-transparent backgrounds will fully replace your actual background. This may look a little jarring to the eye if the lighting conditions in the actual background differ significantly from the lighting conditions in the background replacement. The frosted glass, by contrast, creates a more natural look where the person and background share lighting conditions.
This effect is reminiscent of the corner office with a frosted glass wall. Meeting participants can turn on the “adjust brightness” filter in Teams video settings to further enhance this effect. You can choose different frosted glass backgrounds for other teams within your organization.
This level of customization allows each team to have a unique identity while maintaining a cohesive overall brand.
To ensure consistency across all Teams calls, Teams admins can enforce the use of specific background effects by marking a background as required in the Teams Admin Center.
Here’s what you need to keep in mind if you want to brand your Teams meetings with the frosted glass background effect , according to Microsoft:
Resolution: Use 1920×1080 pixels for a high-quality background.
Avoid full opacity: Colored content, such as logos, looks best with a little transparency. Microsoft recommends 75% opacity.
Gaussian blur: A Gaussian blur of radius 2 works well to simulate a bit of depth of field in the scene.
Stencil mid-gray foreground: For grayscale PNG with transparency, Microsoft recommends having the full image in mid-gray (value 128) so that the transparency pattern is visible on both light and dark backgrounds.
The DYNAMIC_ADD_PROCESSOR_MISMATCH BSoD comes with the 0x00000130 error code and it occurs after you install a new CPU. The error means that the new processor is not compatible with the current configuration.
Of course, this usually should lead you to the logical conclusion that you need to buy a new compatible motherboard and/or components. However, there are a few things you can try before going to that decision.
How do I fix DYNAMIC_ADD_PROCESSOR_MISMATCH?
1. Reset BIOS to default settings
Restart your PC and enter your BIOS/UEFI during startup (usually by pressing F2, Del, or Esc).
Here, look for an option such as Load Setup Defaults or Load Default Options to reset BIOS.
Save the settings and exit (usually, by pressing F10).
The DYNAMIC_ADD_PROCESSOR_MISMATCH BSoD may also be triggered by a mismatched detection between BIOS and Windows that confuses the system. It would also be a good idea to update the BIOS to the latest firmware.
2. Check the processor configuration
Press the Windows key + R to open the Run dialog box.
Type msconfig and press Enter to open System Configuration.
Go to the Boot tab and click on the Advanced options button.
Now, check the Number of processors checkbox and select the maximum number of processors available from the drop-down menu.
Click on OK and then Apply to save the changes.
Restart your computer for the changes to take effect.
Usually, the DYNAMIC_ADD_PROCESSOR_MISMATCH BSoD won’t let you boot Windows normally, but if you can, indicating the exact number of cores will force Windows detect your CPU properly. You may also try starting Windows in Safe mode and try the solution if the normal boot is not working.
To conclude our guide, the DYNAMIC_ADD_PROCESSOR_MISMATCH bug check is bad news and you will need to rethink your hardware configuration. However, the solutions above may fix the problem if it’s caused by a BIOS and Windows mismatch.
Tell us in the comments below if our solutions helped you fix the DYNAMIC_ADD_PROCESSOR_MISMATCH BSoD on your PC.
A while ago, Microsoft allowed organizations to enhance their Teams experience with custom engine agents and bots that use corporate data to help employees get work done faster.
According to a recent entry in the Microsoft 365 Roadmap, the Redmond-based tech giant will enhance these custom engine agents and bots to stream responses similar to Microsoft Copilot.
They can now give you real-time updates as they work, just like Microsoft Copilot. They can show parts of their response as they create it, making everything feel quicker and more interactive.
Custom engine agents and Teams bots can now stream responses like Microsoft Copilot. They can provide real-time updates on their actions while delivering parts of the response as they generate it, making interactions feel faster and more engaging.
The capability is set to be released in December 2024.
In other news, Microsoft Teams will also be enhanced to detect phishing attacks in the messaging tool automatically. We don’t know yet if users can create a bot to let you know when it happens, but Microsoft will most likely allow it.
The INVALID_EXTENDED_PROCESSOR_STATE BSoD comes with the 0x00000131 error code and it points to an invalid combination of parameters was detected when saving or restoring the extended processor state.
This error is usually triggered by a CPU or RAM module malfunctioning. If it appears after overclocking, you should check the CPU and memory for overheating and not insist on powering the system. If you can’t fix the cooling solution yourself, ask for professional help. You may also try reseating the RAM modules on your motherboard. If that is not your case, apply the solutions below.
How do I fix the INVALID_EXTENDED_PROCESSOR_STATE BSoD?
1. Reset BIOS to default settings
Enter your BIOS/UEFI settings during startup (usually by pressing F2, Del, or Esc).
When you are in, look for an option such as Load Setup Defaults or Load Default Options to reset BIOS.
Save the settings and exit (usually, by pressing F10).
If you’ve made any recent changes to your BIOS, especially regarding overclocking, resetting it to default settings will fix the INVALID_EXTENDED_PROCESSOR_STATE BSoD.
2. Use the Startup repair option
Reboot the system three times by using the Power button on your PC/laptop to start the Windows Recovery Environment.
After it starts, click on Troubleshoot, then select Advanced settings and opt for Startup repair.
Accept the selection to recover your system and boot normally.
If INVALID_EXTENDED_PROCESSOR_STATE is caused by OS corruption, this option will restore the boot image.
3. Restore your system from boot
Reboot the system three times by using the Power button on your PC/laptop to start the Windows Recovery Environment.
Here, go to Troubleshoot > Advanced options and select System Restore.
Next, select a restore point prior to the INVALID_EXTENDED_PROCESSOR_STATE BSoD and confirm your selection.
Recovering your system from a previous restore point will fix any software related issues. The downside is that any app you installed after that point will be lost and you will have to reinstall them. If the System Restore did not complete successfully, check the highlighted link for our dedicated guide on how to fix it.
You may also use Windows Recovery Environment as shown above to uninstall any recent Windows updates, if INVALID_EXTENDED_PROCESSOR_STATE started manifesting after a Windows update.
To conclude this guide, unfortunately, usually the INVALID_EXTENDED_PROCESSOR_STATE is caused by a hardware problem with the CPU or RAM. In that case, you will have to look for professional help. However, if you’re lucky and the BSoD has a software cause, the solutions above will help you fix it.
Let us know in the comments below if our solutions helped you fix the BSoD.
PowerPoint will enhance your presentations with improved template support based on Copilot. This support will ensure that you have visually appealing and professional slides that match your brand’s look and feel.
This means every time you start a new presentation using these improved templates, Copilot assists in creating consistent and visually striking slides, making your presentations more engaging and on-point with your brand identity.
According to the latest entry in the Microsoft 365 Roadmap, the improved Copilot template support in Microsoft PowerPoint is scheduled to roll out this month. Basically, you won’t have to worry about finding the best template for your corporate presentations—Copilot will do it for you.
Once you update your template(s) to PowerPoint’s best practices, your templates will work even better with Copilot. You’ll get beautiful on-brand slides every time you open your optimized template and create a presentation with Copilot.
The enhancement is set to be released on Desktops and Mac devices.
In other news, Copilot recently got a new UI, and despite the improved design, users do not like the functionality at all.
Microsoft is slowly but surely removing old Windows features and components, and one of those components is WordPad.
With the release of Windows 11 24H2, WordPad has been entirely removed, and those users who still use the app today should consider this before upgrading to the latest Windows version.
Microsoft Rewards has announced a new sweepstakes called The Ultimate Giveaway: A Million Dollar Sweepstakes.
Members in the US, Canada, UK, France, and Germany can participate for a chance to win $1,000,000. The sweepstakes is open until December 31, 2024, and two $10,000 winners will be in each participating country.
In a blog post, Microsoft says members can claim a free entry from the Ultimate Giveaway landing page. More activities will be released each week, offering chances to earn additional entries. Members can also earn up to 200 entries throughout the period. No purchase is necessary to enter.
For every member who enters the sweepstakes and earns 50 or more bonus entries, Microsoft Rewards will donate $5 to two charities, UNICEF and World Wildlife Fund, up to $500,000 each.
Members can track their entries by visiting a dedicated page and logging into their Microsoft account. They can also share their entry link with friends to earn up to 50 additional entries for each friend.
If you’re a member of the Microsoft Rewards community, you can now enter the giveaway on the Microsoft Rewards website. You can also follow Microsoft Rewards Support on X now, as the platform will most likely post updates about the Sweepstakes there.
What would you do with $1M? Let us know in the comments below!
Microsoft has launched its latest Xbox Series X and S models, the new versions announced earlier this year, with new hardware, and let us say, they’re exactly what this series needed.
Xbox Series X and S now come in white
The crown jewel of this new lineup is the Xbox Series X special edition, boasting a hefty 2TB hard drive and cloaked in an enigmatic Galaxy Black. This design isn’t just about aesthetics; it’s a nod to the infinite possibilities that gaming represents, with a color scheme that evokes the mystery and allure of the cosmos. Priced at $599.99 in the US and €649.99 in most of Europe, it’s a premium offering for those who want the best.
But what if you’re leaning towards something a bit more minimalistic? Microsoft’s got you covered with a white-colored Xbox Series X with a 1TB hard drive and a sleek, diskless design. This digital-only console, announced already, is available for pre-order at $449.99. It offers a modern take on gaming for those who prefer digital libraries over physical collections.
Image credit: Microsoft
Talking of Galaxy Black Xbox Series X, it features a disc drive and launches at $599.99. The Special Edition Xbox Series X has 2TB storage and a revamped design. Xbox hardware chief Roanna Sones talks about the new model and says:
This new special edition Xbox Series X delivers the same speed, performance and features of Xbox Series X, but with twice the storage and a unique design. Drawing inspiration from constellations and the spirit of exploration and adventure that outer space evokes, the special edition console in Galaxy Black features a silver, grey, and green celestial effect representing thousands of games and millions of gamers playing on Xbox.
Image credit: Microsoft
Not to be overlooked, the Xbox Series S debuts in white, mirroring its bigger sibling’s design language but at a more accessible price point of $349.99. This is a clear signal that Microsoft is catering to a wide range of gamers, ensuring an Xbox that fits every preference and budget.
According to the latest reports, Microsoft has introduced a new design for the motherboard on the white Xbox Series X and new 2TB models: the system-on-a-chip (SoC) is smaller now and there is a new cooling solution, a copper heat pipe.
All three models were shipped on October 15 in many countries, with a second wave following on October 29. This global launch underscores Microsoft’s ambition to connect gamers worldwide and offer a unified gaming experience that transcends borders.
Have you decided which Xbox will be your next portal to adventure? Whether you’re drawn to the vastness of space with the Galaxy Black edition or prefer the clean lines of the digital-only models, Microsoft made sure you have options to choose from.
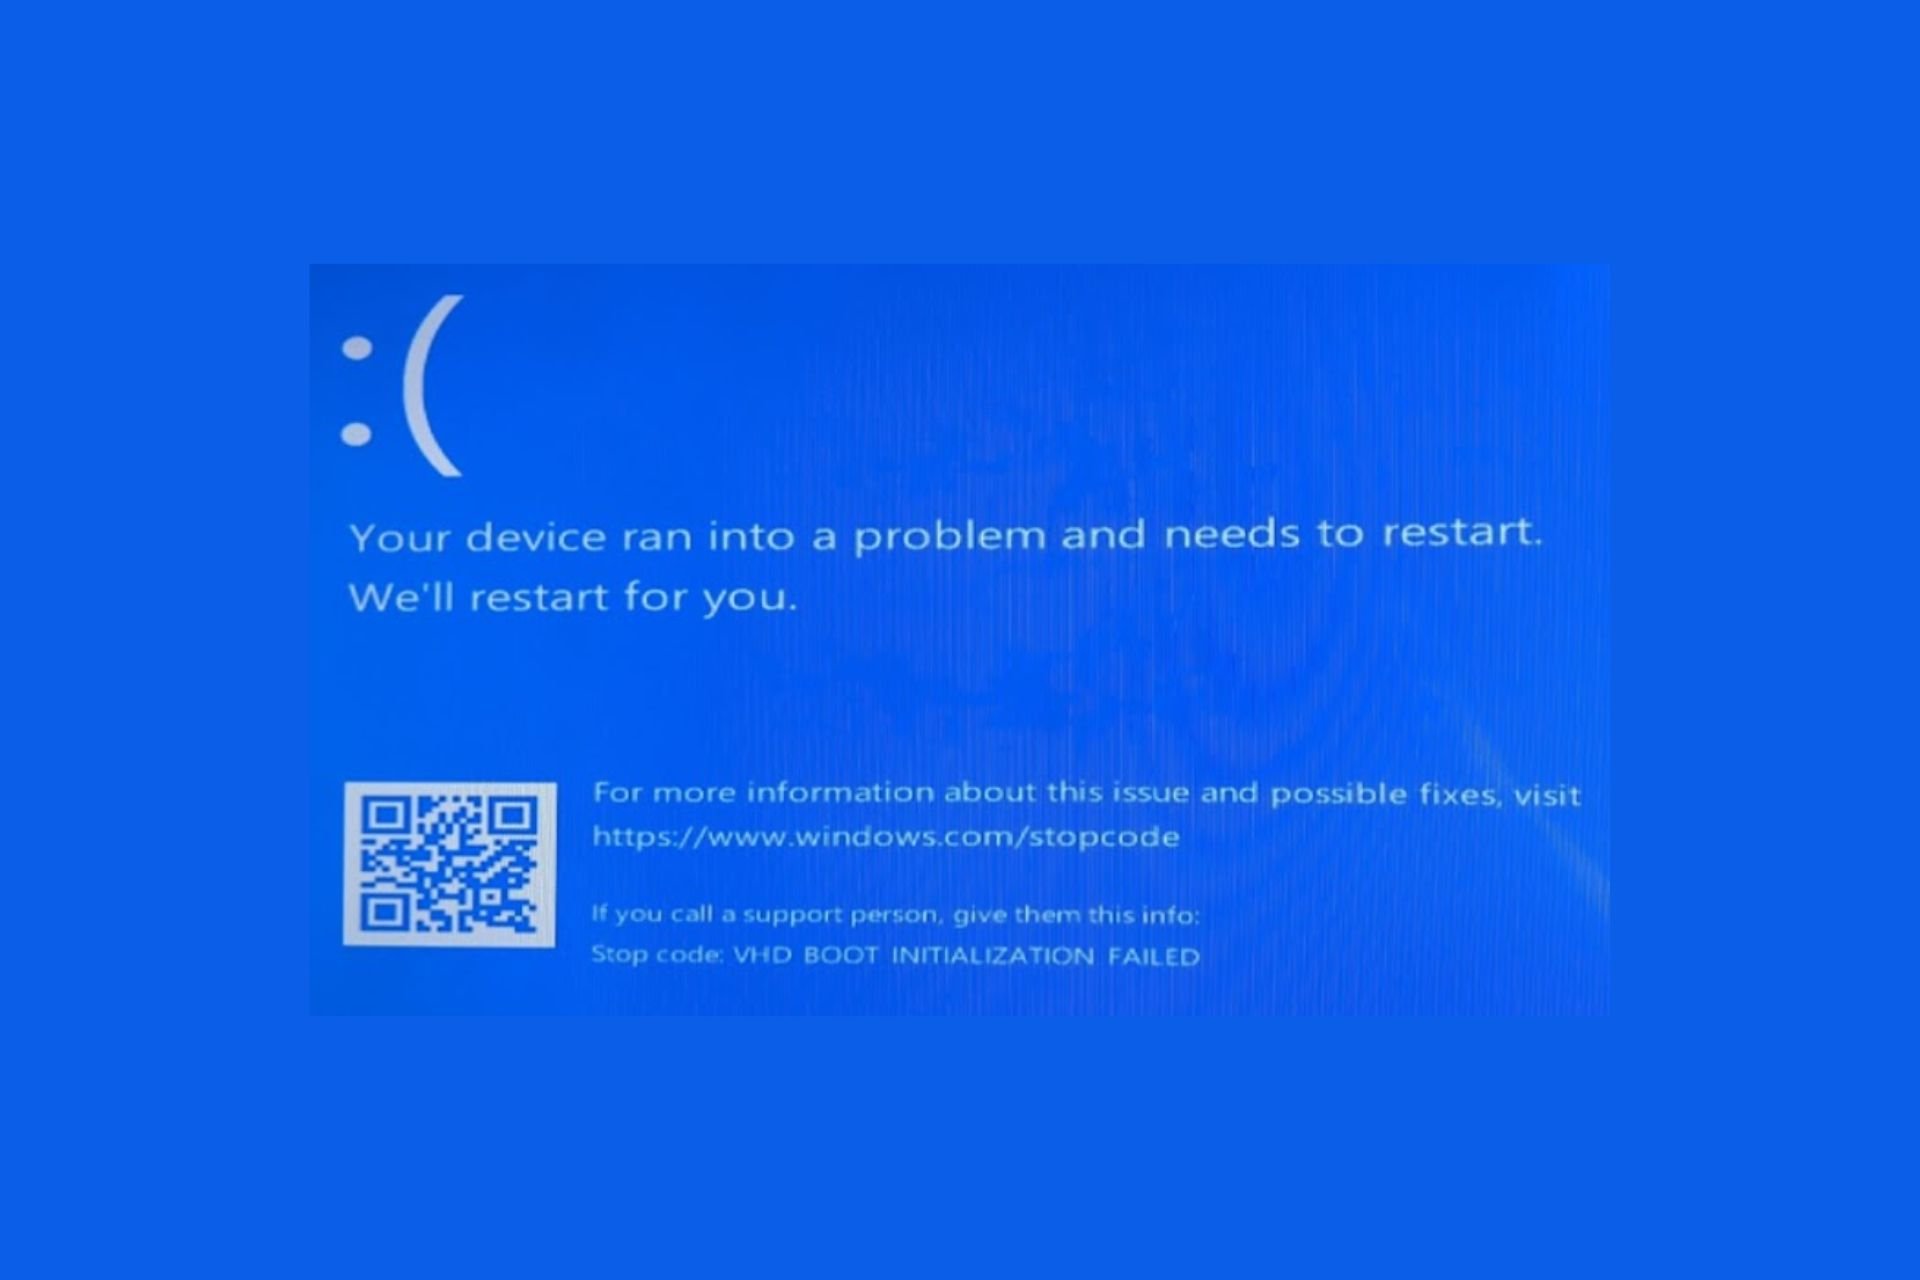
The VHD_BOOT_INITIALIZATION_FAILED BSoD comes with the error code 0x0000012F (0x12F) and occurs when the system couldn’t boot from a VHD. VHD stands for Virtual Hard Disk, but particularly, this issue may appear when booting from an external SSD in USB 3.0 mode. In this case, using a USB 2.0 cable will help you boot normally.
First, check if the VHD is configured correctly and try installing it on a different partition on an internal drive if possible. Also, this problem appears when using Ventoy or Lexar external drives, so you may also try installing the VHD on another external drive/ USB stick.
How do I fix VHD_BOOT_INITIALIZATION_FAILED BSoD?
1. Update or reenable the drivers
Right-click the Start button and select Device Manager.
Expand the Universal Serial Bus controllers section, right click on the USB 3.0 and USB 3.1 drivers and select Update driver.
Next, click on Search automatically for drivers and follow the on-screen instructions to install any new drivers if available.
You may also opt for disabling and reenabling the drivers in Step 2.
If this doesn’t work, go to your external drive manufacturer’s website and download the correct driver for your device and system. USB 3.0 is a pretty new standard and Windows still doesn’t have all the updated drivers from all manufacturers, so this method may help you fix the problem quickly. As we mentioned above, another solution is to use a USB 2.0 cable on a USB 3.0 or USB 2.0 port instead.
2. Enable USB Always on in BIOS
Restart your PC and press the designated button to enter BIOS (usually it’s F2, Tab or Esc, but it may be different on your machine).
Here, go to the Power settings or Advanced settings and look for an option called USB Always on and enable it.
Save the settings and exit BIOS (usually, it’s the F10 key).
VHD boot initialization failed also occurs when the USB port is not powered fast enough during initialization or when the system turns back from sleep or hibernation. Turning on this feature will fix the problem, but that will also mean that all your USB ports will be always on.
You may also adjust the settings in Windows 11 USB Selective Suspend to prevent the OS from cutting the power to your USB ports.
To conclude this guide, if you’re getting the Ventoy VHD boot initialization failed, try installing the correct driver or try using another drive. Also, try with a USB 2.0 cable or another port and enable USB Always on in BIOS.
Another recommendation is to ensure minimum possible space when creating a VHD or VHDX image. You may also check our guide on how to fix the VHD_BOOT_HOST_VOLUME_NOT_ENOUGH_SPACE BSoD that may occur in this process.
If you know about other solutions to fix the VHD_BOOT_INITIALIZATION_FAILED BSoD, let us know in the comments below.
The NETIO_INVALID_POOL_CALLER with error code 0x00000126 indicates that a system driver or component is trying to perform an operation related to memory that is not allowed in the current scenario. The error usually appears due to incorrect memory handling in drivers or software, bugs in the affected driver, or corrupted memory.
First, ensure your Windows is updated to the latest version, and analyze the minidump files using tools like BlueScreenView or WinDbg.
How can I fix the NETIO_INVALID_POOL_CALLER error?
1. Update the device driver
Press Windows + R to open the Run console.
Type devmgmt.msc and click OK to open the Device Manager app
A list of system components will appear. Click on them one by one to expand the category, and look for a driver that has a yellow triangle with an exclamation mark inside it.
Right-click the driver and select Update driver from the context menu.
Click Search automatically for drivers. Windows will try to find the most compatible version of the driver for your device.
Type msconfig and click OK to launch the System Configuration window.
Go to the Boot tab, and under Boot options, place checkmarks next to Boot and Network.
Click Apply, then OK to save the changes.
Click Restart to reboot your PC in safe mode with networking.
Your device will function with minimal drivers, and as you select Network, you can access the internet. If you don’t see the error in safe mode, the problem may be linked to a driver or software that only runs in normal mode.
5. Restore system settings to the previous version
Press the Windows key, type control panel in the search box, and click Open.
Choose Large icons for View by, then click Recovery.
Click Open System Restore.
Select Choose a different restore point in the System Restore window and click Next.
Choose the restore point created before you encountered the NETIO_INVALID_POOL_CALLER error, then click Next.
Press Windows + I to open the Windows Settings app
Go to System, then select Recovery.
Under Recovery options, locate Reset this PC, then click the Reset PC button.
On the Choose an option screen, choose Keep my files.
Next, on How would you like to reinstall Windows page, choose Cloud download.
On the Additional settings page, check the Current settings. If you want to make any changes, click Change settings. Once you are ok with the settings, click Next.
Click Reset to start the process.
The process may take some time, and your device will restart several times, so don’t turn off your computer. Windows will download the latest version from the cloud and reinstall the operating system while saving your files. Once completed, you will get to the login screen to log in to your device, check for Windows updates, and reinstall applications.
In conclusion, to fix the NETIO_INVALID_POOL_CALLER with error code 0x00000126, you can update device drivers, uninstall conflicting apps, restart your PC in safe mode, restore your computer to the previous version, or reset your PC.
If you have any suggestions or questions about the error, feel free to mention them in the comments section below.
The TOO_MANY_RECURSIVE_FAULTS error with code 0x0000011E appears when your system has encounters a large number of nested faults or exceptions, usually resulting in a recursive loop.
The issue could be caused by incompatible drivers, third-party software conflicts, incorrect system settings, or faulty hardware. First, ensure your computer has the latest version of Windows and BIOS/UEFI firmware is up to date.
How can I fix the TOO_MANY_RECURSIVE_FAULTS error?
1. Boot your PC into safe mode
Press Windows + R to open the Run console.
Type msconfig and click OK to open the System Configuration window.
Switch to the Boot tab, locate Boot options, and place checkmarks next to Boot and Network.
Click Apply, then OK to save the changes.
Click Restart.
Your Windows will restart in safe mode with networking. The computer will work with minimal drivers so that you can eliminate the real reason of the error.
2. Update the device driver
Press Windows + R to open the Run window.
Type devmgmt.msc and click OK to open Device Manager.
You will get a list of system components. Click on them one by one to expand them, and look for a driver with a yellow triangle and an exclamation mark inside it.
Once located, right-click the driver and choose Update driver from the context menu.
Click Search automatically for drivers.
Windows will try to find your device’s latest or most compatible version of the driver. Follow the on-screen prompts to complete the process.
If there is more than one problematic driver, you can follow these steps again, or you can use a third-party driver updater tool. You can also head to the manufacturer’s website to download and install the latest driver manually.
3. Run the SFC scan
Press the Windows key, type cmd in the search box, and click Run as administrator to launch Command Prompt with administrative permissions.
Copy & paste the following command to scan and repair/restore the corrupted system files and press Enter: sfc /scannow
Wait for the command to execute, then restart your computer to let the changes take effect.
4. Uninstall recently installed software
Press Windows + I to open the Settings app.
Go to Apps, and click Installed apps.
Locate the app you recently installed, click the three-dot icon, and choose Uninstall from the context menu.
Click Uninstall again to confirm. You can use the same steps to delete other conflicting apps from your computer to fix the TOO_MANY_RECURSIVE_FAULTS error.
5. Restart your computer in a clean boot environment
Press Windows + R to open the Run window.
Type msconfig and click OK to launch the System Configuration window.
Navigate to the Services tab, select Hide all Microsoft services, and then select Disable all to disable all third-party services.
Go to the Startup tab and click the Open Task Manager link to launch Task Manager.
On the Task Manager window, locate & select each Enabled item one by one, then choose Disable, then close the window.
On the System Configuration window, click Apply, then OK to confirm the changes.
Click Restart.
6. Reinstall Windows
NOTE
First, make sure you have a reliable internet connection. Then, keep an external storage device with at least 8 GB of available space handy. Then, back up your important data to another location.
When the download is complete, double-click the tool from the desktop to open and select Yes on the UAC prompt.
You will get the Windows 11 Setup page; click Accept to agree to the license terms and agreements to proceed.
Click Next.
Select USB flash drive, and click Next.
Choose a language, edition, and architecture (64-bit or 32-bit), and click Next.
Ensure the USB drive you want to select is displayed, then click Next.
The installation media will be created; once you see the Your USB flash drive is ready message, click Finish.
6.2 Reinstall Windows
Connect the flash drive to the affected computer, then press Windows + E to open the Windows File Explorer window.
Select the drive with the installation media, locate and double-click setup.exe, and click Yes on the UAC prompt.
Click Next.
Click the Accept button to agree to the terms of the agreement and license.
Click Change to specify what you want to keep or delete. Select one of the following options, then click Next:
Keep personal files and apps – Allows you to keep your data, apps, and settings.
Keep personal files only – Allows you to keep your data and settings but removes the installed apps.
Keep nothing – Deletes all personal data, settings, and apps.
Select Install to reinstall Windows 11 on your computer and get rid of TOO_MANY_RECURSIVE_FAULTS error.
In conclusion, to fix the TOO_MANY_RECURSIVE_FAULTS BSoD error, restart your computer in safe mode, update device drivers, uninstall recent software, perform a clean boot, or reinstall Windows on your device.
If you want to learn more about BSoD errors and their causes, we have a detailed guide for you; don’t forget to check it out! We have covered another BSoD issue, Error_not_joined, so check it out to learn more about it.
If you have any other questions or suggestions about this BSoD error, feel free to mention them in the comments section below.
The WORKER_THREAD_RETURNED_WITH_BAD_PAGING_IO_PRIORITY with error code 0x00000129 points out issues in threading and I/O operations in a Windows environment. This error can indicate that a worker thread attempted to use an invalid setting for I/O priority, which controls how the system manages input and output operations.
This error might cause performance-related issues, such as a slow PC and high CPU usage. To fix it, first ensure you have the latest version of Windows installed. Then, run a malware scan using a reliable antivirus tool.
How can I fix the WORKER_THREAD_RETURNED_WITH_BAD_PAGING_IO_PRIORITY error?
1. Update the device driver
Press Windows + R to open the Run console.
Type devmgmt.msc and click OK to open Device Manager.
You will get a list of system components. Click on them one by one to expand the category, and look for a driver with a yellow triangle and an exclamation mark inside it.
Once located, right-click the driver and choose Update driver from the context menu.
Click Search automatically for drivers.
Follow the on-screen prompts to complete the process.
If there are multiple problematic drivers, you can follow the steps mentioned above to update the others. If Windows cannot find a driver for your device, you can download it manually from the manufacturer’s website. You can also download a reliable driver updater tool to install the latest version of the driver easily.
2. Run the SFC scan
Press the Windows key, type cmd in the search box, and click Run as administrator to launch Command Prompt with administrative rights.
Type the following command to scan and repair the corrupted system files and press Enter: sfc /scannow
Wait for the command to execute, copy & paste the following command to repair the Windows OS files, and hit Enter: DISM /Online /Cleanup-Image /RestoreHealth
Once the scan is complete, restart your computer to confirm the changes.
3. Run the CHKDSK scan
Press the Windows key, type cmd in the search box, and click Run as administrator to launch Command Prompt.
Type the following command to check the disk drive and fix any found errors and press Enter: chkdsk C: /f
If your system drive is in use, you will be prompted to schedule the scan after the restart; type Y to agree and hit Enter.
Your computer will restart, and the scan will run automatically during the boot process. You can see the progress bar when it checks the drive.
4. Run the Windows Memory Diagnostic tool
First, close all the tabs and save all the work on your computer, press the Windows key, type the windows memory diagnostic tool in the search box, and click Open.
Select Restart now and check for problems.
Your computer will restart, and the tool will check the RAM for the issues. A progress bar will appear on the screen to inform you of the scan status.
Once the test is complete, your PC will reboot, and you will see the results after logging in.
If you want to see the detailed results, launch Event Viewer, then go to Windows Logs > System. Look for events with the source named MemoryDiagnostics-Results.
In case you have encountered another BSoD error like Error_not_joined recently, so don’t miss it for more information.
In conclusion, to fix the WORKER_THREAD_RETURNED_WITH_BAD_PAGING_IO_PRIORITY BSoD error, you can update device drivers, uninstall recent software, restore your computer to the previous version, run a CHKDSK scan, and more.
If you have any suggestions or questions about the error, feel free to mention them in the comments section below.
The ATTEMPTED_WRITE_TO_CM_PROTECTED_STORAGE with error code 0x0000011C typically indicates a process attempted to write to a protected area of the system’s configuration manager storage. This error might occur for various reasons, including incompatible or outdated drivers, missing or corrupted system files, invalid registry entries, malware infection, or hardware conflicts.
To fix it, restart your computer, remove any new hardware, and check if the problem goes away. Then, run a malware scan using a reliable antivirus tool. Next, go to Event Viewer and look for errors when the blue screen occurs to learn more about the issue.
How can I fix the ATTEMPTED_WRITE_TO_CM_PROTECTED_STORAGE error?
1. Boot your computer into safe mode
Press Windows + R to open the Run window.
Type msconfig and click OK to open the System Configuration window.
Switch to the Boot tab, locate Boot options, and place checkmarks next to Boot and Network.
Click Apply, then OK to save the changes.
Click Restart.
Your Windows will restart in safe mode with networking. The computer will work with a minimal set of drivers, but you can still access the internet. Now, check if you still see the error.
2. Update the device driver
Press Windows + R to open the Run window.
Type devmgmt.msc and click OK to open the Device Manager app.
You will get a list of system components. Click on them one by one to expand, and look for a driver with a yellow triangle with an exclamation mark inside it.
Once located, right-click the driver and select Update driver.
Click Search automatically for drivers.
Follow the onscreen instructions to complete the process.
If there is more than one problematic driver, you can follow the same steps to update the others. In case Windows cannot find a driver for your device, you can head to the manufacturer’s website to download it manually. You can also download a reliable driver updater tool to download and install the latest version of the driver easily.
3. Run SFC & DISM scans
Press the Windows key, type cmd in the search box, and click Run as administrator to launch Command Prompt with elevated rights.
Copy & paste the following command to scan and repair the corrupted system files and hit Enter: sfc /scannow
Wait for the command to execute, type the following command to repair the Windows OS files, and press Enter: DISM /Online /Cleanup-Image /RestoreHealth
Once the scan is successfully complete, restart your computer to let the changes take effect.
4. Uninstall the conflicting apps
Press Windows + I to open the Settings app.
Go to Apps, then click Installed apps.
Locate the app you recently installed, click the three-dot icon, and select Uninstall from the context menu.
Type msconfig and click OK to open the System Configuration window.
Go to the Services tab, place a checkmark next to Hide all Microsoft services, and then click Disable all.
Switch to the Startup tab, and click the Open Task Manager link to launch Task Manager.
On the Task Manager window, locate each Enabled item one by one, then select Disable.
On the System Configuration window, click Apply, then OK to save the changes.
Click Restart.
6. Run the CHKDSK scan
Press the Windows key, type cmd in the search box, and click Run as administrator to launch Command Prompt with elevated rights.
Copy & paste the following command to check the disk drive and fix any found errors and hit Enter: chkdsk C: /f
If your system drive is in use, you will be prompted to schedule the scan after the restart; type Y to agree and press Enter.
The scan will run automatically during the boot process, and you will see a progress bar when it checks the drive.
7. Run the Windows Memory Diagnostic tool
First, save all the work on your computer, press the Windows key, type the windows memory diagnostic tool in the search bar, and click Open.
Select Restart now and check for problems.
Your computer will restart, and you will see the progress bar as the tool checks the RAM for issues.
Once the test is complete, your PC will restart, and you will see the test results.
To see the detailed results, open Event Viewer, then Windows Logs > System. Look for events with the source named MemoryDiagnostics-Results.
8. Reinstall Windows
NOTE
Before you proceed with the steps, ensure you have a stable internet connection and an external storage device with at least 8GB of available space. Also, backup your important data to another location.
When the download is complete, open the tool from the desktop and select Yes on the UAC prompt.
The Windows 11 Setup guide will appear, click Accept to agree to the license terms and agreements.
Choose USB drive, and click Next.
Select a language, edition, and architecture (64-bit or 32-bit), then click Next.
Click the USB flash drive you want to choose, then select Next.
Follow the on-screen prompts to complete, then click Finish.
8.2 Reinstall Windows
Connect the USB drive to the affected computer, then press Windows + E to open the File Explorer window.
Choose the drive with the installation media, locate and double-click setup.exe file, and click Yes on the UAC prompt.
Click Next.
Click Accept to agree to the terms of the license.
Select Change to specify what you want to keep or delete. Select one of the following options, then click Next:
Keep personal files and apps – Keep your data, apps, and settings.
Keep personal files only – Keep your data and settings, but the installed apps will deleted.
Keep nothing – Remove all personal data, settings, and apps.
Select Install to initiate the reinstallation of Windows 11 on your computer.
In conclusion, to fix the ATTEMPTED_WRITE_TO_CM_PROTECTED_STORAGE BSoD error, you can restart your computer in safe mode, update device drivers, uninstall recent software, perform a clean boot, run a CHKDSK scan, and more.
In case you want to learn more about BSoD errors and their causes, we have a detailed guide for you; don’t forget to check it out!
CPU Z has already proven its efficiency in gathering your device’s system information but while it’s a great tool, one may need an alternative especially if it doesn’t meet your specific needs.
The old-school way of checking PC specs may not cut it anymore hence why other advanced tools entered the chat.
If our CPU-Z review didn’t convince you to download it, or you’re having trouble using CPU-Z, we curated this rich list of alternatives. Each has its own pros and cons and others are more advanced than others. Whatever you’re looking for, you’re bound to find it in this list.
Features to look out for in CPU-Z alternatives
As you begin your quest to find the best System Information tool, you should have a few key features in mind that should be present in any tool such as:
Comprehensiveness – Just how much detail are we talking about? A tool should be able to give a detailed report on your hardware, software and drivers at minimum.
Compatibility – What’s the compatibility score of the tool with newer OSes, hardware and software? If you were to upgrade your device, would you be able to use it? Cross-platform compatibility is a win especially if it is a subscription-based tool.
Performance – Apart from compatibility and comprehensiveness, your tool of choice should not be another resource-hogger in your system.
Support and updates – The tool might be good but is it well maintained? Does it get regular updates? All this are necessary to seal any security vulnerabilility loopholes.
Real-time monitoring – A tool that informs you of any potential risks as and when they happen is one that needs to be on your radar. These metrics are important because they need to be acted upon immediately.
Cost -What is the cost of the tool? If you’re paying for the advanced features, are they worth it? Is this a bill you can comfortably pay to avoid disruptions when your subscription is up? Make sure to choose one that is cost-effective.
Other factors like an easy-to-use interface, portability and customization options may not be key features but if they’re a priority for you, feel free to include them when choosing the right tool for your device.
HWInfo shows you detailed information about your computer’s CPU, motherboard, monitor, audio setup, network, etc. However, this is not its winning feature as almost all CPU-Z alternatives show you this information.
Its real-time monitoring feature is what may make it your go-to tool. Because it is monitoring your system components, it is also able to predict any failures and notify you beforehand. This means you can troubleshoot and resolve issues before they advance.
It is comprehensive in reporting covering a wide range of areas such as temperatures, voltages, and fan speeds. You can also be sure that this momentum will be maintained because the software gets regular updates to keep up with industry standards.
Aside from these award winning features, you can also extend HWiNFO’s functionality by installing plugins available on the official site.
Belarc Advisor performs similar functions as CPU-Z and its alternatives but it doesn’t come close to HWinfo when it comes to details. You’ll still get a decent report of your installed programs and hardware, network inventory, any missing Microsoft hotfixes, anti-virus status, security benchmarks, and more.
The good thing about it is it notifies you of any security vulnerabilities but on the downside, it is not in real-time.
Another feature of Belarc worth noting is its ability to display product keys of the software you bought a license for. For instance, if you can’t find your Windows activation key, Belarc can help you with this.
You can choose to download the HWMonitor using the installer or the portable version. Once installed, you’ll notice its clean interface with intuitive controls. The UI is not so busy so you’ll notice most operations and controls are right at your fingertips.
With this tool, you’ll get the remote monitoring feature which lets you monitor the sensors of several PCs or Android devices via simple TCP/IP connection. You’ll also be able to generate logging graphs and save them for later use.
Users can track important parameters such as temperature, voltage, and power, preventing potential hardware failures.
You can also save the graphs as a text file and share it with someone else. This are pretty much the features for a basic user which are decent enough. However, if you’re past the novice stage, you may need a little more.
With the paid HWMonitor Pro version you get all these features and more.
AIDA64 Extreme will give you info on your CPU properties, physical information, and CPU manufacturer. It is a beast when it comes to identifying any potential issues with your system. It keeps track of system performance, and ensures your device is stable.
You’ll need to upgrade to the paid version to enjoy advanced features but even on the free tier, AIDA64 Extreme is still a powerful tool for diagnosing and optimizing motherboard-related issues.
The tool gives an extremely comprehensive report on your motherboard, clock speed and the status of your physical memory. If you overclock your system a lot, you know the potential risks associated with it such as system instability, high power consumptions and too much heat generation.
AIDA64 Extreme becomes your trusted partner as it can monitor the clock speed to it is at the recommended speed and prevent potential damage.
Pros
It has a free version
Has a dark mode
Real-time tracking of temperatures, voltages, and fan speeds
SSDs and hard drives are critical system components hence the need to keep them in good shape at all times. Storage devices contain a lot of data so with CrystalDiskInfo it performs a detailed analysis on the state of your drives and reports on any errors, uptime, spin-up time, and temperature.
It is particularly useful in data loss prevention and RAID setups to ensure optimal performance and extend the lifespan of your storage device.
If any issues are detected, CrystalDiskInfo can send you alerts for you to take action. Of course you’ll have to configure this in settings.
One of the major reasons people go out looking for CPU-Z alternatives is because you have to install additional tools to monitor or give you reports on other system components. With SIW, you get an all-in-one deal.
It is a powerful program that details all the information you need on your system and categorizes them into sections named: Software, Hardware, and Network for easier diagnosis and troubleshooting.
What’s more, it comes in a portable version so you don’t have to worry about storage space especially if you’re running low.
In addition to the system information, SIW also reveals details about all the installed applications. You can generate a summary report and SIW allows you to export the info to an HTML file.
Another feature we found that was cool was its ability to generate valuable information on your network configurations and connections. If you’re having connectivity issues, SIW can get down to the root of the problem to help you troubleshoot.
Pros
Accurate info and analysis on your system
User friendly interface
Ability to save reports in different formats for record keeping
Speccy is one of the longest serving system information tools found on the market and for good reason. It does provide the usual system information but aside from that, it’s pretty easy to use.
Installing this software will earn you your first scan and you get to familiarize yourself with your PC specs. Aside from that, it also provides real-time monitoring reports so you can address any issues as and when they occur.
You can also save snapshots and send them to a tech specialist to help you make sense of it if you don’t know how to troubleshoot.
Speccy can also give you reports about the temperature of your CPU, motherboard, and hard drives. This info is crucial to gamers especially when they’re laying GPU intensive games and need to monitor the temperatures.
One added benefit of using Speccy is the easy way to navigate the components tree. You can choose to view the quick summary report or expand to view the detailed report all on one interface.
The above list has provided the top fan-favorite CPU-Z alternatives but it is up to you to select one that meets your needs fully. Some information may be more important to you than to others so if you need specific motherboard information software, we also have a list for that.
That’s it from us but we’d like to get your feedback on these tools. Have you used any of them before? How would you rank them and what do you look for in a SysInfo tool? Let us know in the comment section below.
The AGP_INTERNAL Blue Screen of Death (BSoD), with error code 0x00000115, appears when the Accelerated Graphics Port (AGP) detects a violation. AGP is used to connect the PC’s motherboard to the video card in order to deliver superior graphics.
The AGP Internal BSoD is usually caused due to an incompatible, outdated, or corrupt graphics driver, issues with the system BIOS, and misconfigured Windows settings.
Quick fixes for the blue screen error include restarting the PC, installing pending Windows updates, reconnecting the graphics card, and uninstalling conflicting apps.
How can I fix the AGP_INTERNAL blue screen error?
1. Reinstall the graphics driver
Press Windows + S to open Search, type Device Manager in the text field, and click on the relevant result.
Expand the Display adapters entry, right-click on the active graphics card, and select Uninstall device.
Tick the checkbox for Attempt to remove the driver for this device, and click Uninstall.
Restart the computer, and Windows will automatically install a fresh copy of the driver.
If you are running an incompatible or corrupt graphics driver, remove it and let Windows install a fresh, suitable one that works on your PC.
2. Update the graphics driver
Press Windows + X to open the Power User menu, and select Device Manager.
Double-click the Display adapters entry, right-click on the video card, and select Update driver.
Click on Search automatically for drivers and let Windows install the best available version.
Finally, reboot the PC to apply the changes.
In 2 out of 5 cases, updating the graphics driver will fix the AGP_INTERNAL 0x00000115 blue screen in Windows. If the OS can’t find a better version, go to the manufacturer’s website, locate the newest release in the driver section, and manually install the latest driver!
When a newer version is not available, you can also roll back the driver update and revert to the previous version, which worked fine!
3. Check for issues with the RAM
Press Windows + R to open Run, type mdsched.exe in the text field, and hit Enter.
If Windows Memory Diagnostic can’t detect any problems, I recommend using an advanced RAM testing tool like Memtest86+. It’s an open-source utility that runs a wide array of scans on individual RAM sticks and identifies even the trickiest of faults!
In case a memory module turns out to be faulty, replace it with a new compatible stick, and AGP_INTERNAL shouldn’t appear again.
4. Update the BIOS
An outdated BIOS is just as likely to cause the AGP_INTERNAL BSOD in Windows 10 and newer iterations. So, if you don’t remember installing a new version recently, it’s time to update the BIOS.
Since the update process is extremely critical and vastly differs for each manufacturer, I recommend you check their official website for the exact steps.
5. Reinstall Windows
When nothing else works, you can always reinstall Windows. This will eliminate all software-based conflicts triggering the BSoD. Before you do so, transfer any critical files to external storage in order to avoid data loss.
To reinstall Windows, connect a formatted USB flash drive to the PC > go to Microsoft’s official website > download the Media Creation Tool > use it to create a bootable Windows USB > restart the PC > change the boot order to flash drive > load the bootable drive > follow the on-screen instructions in the Windows setup.
Reinstalling Windows from a bootable USB
If the AGP_INTERNAL blue screen persists, it’s likely a hardware fault to blame, and you must consult the manufacturer’s official support or take the PC to a local repair shop.
While you are here, discover all the causes behind a BSoD and take suitable measures to prevent the error from reappearing!
If you know more fixes for the error, share them with our readers in the comments section.
The VIDEO_SHADOW_DRIVER_FATAL_ERROR BSOD (Blue Screen of Death), with error code 0x00000114, is encountered when the shadow driver detects a violation.
Common causes for Video Shadow Driver Fatal Error include an outdated, corrupt, or buggy graphics driver, issues with the BIOS, corrupted system files, or hardware malfunction.
Before you proceed, restart the PC, install any pending Windows updates, and reconnect the display adapter or graphics card. For most of you, these checks should fix the BSOD!
How do I fix VIDEO_SHADOW_DRIVER_FATAL_ERROR?
1. Reinstall the graphics driver
Press Windows + X to open the Power User menu, and select Device Manager.
Expand the Display adapters entry, and check if there’s a warning sign (yellow exclamation mark) next to the device’s icon.
If so, right-click on the graphics adapter, and select Uninstall device.
Tick the checkbox for Attempt to remove the driver for this device, and then click on Uninstall.
Finally, restart the PC, and Windows will automatically install a fresh copy of the graphics driver.
2. Update the graphics driver
Press Windows + S to open Search, type Device Manager in the text field, and click on the relevant result.
Expand the Display adapters entry, right-click on the active adapter, and select Update driver.
Click on Search automatically for drivers and wait for Windows to install the best locally available version.
Finally, restart the computer to apply the changes.
Running an outdated graphics driver can cause performance slowdown in addition to VIDEO_SHADOW_DRIVER_FATAL_ERROR on Windows 11. Updating the graphics driver will fix both!
If Windows can’t find a better driver version, check the manufacturer’s website, locate the newest releases, and then manually install the latest driver.
3. Roll back graphics driver update
Press Windows + R to open Run, type devmgmt.msc in the text field, and hit Enter.
Double-click on the Display adapters entry, right-click on the problematic graphics adapter, and select Properties.
Go to the Driver tab, and click the Roll Back Driver button.
Pick a reason for rolling back the update or enter one manually using the last option, and click Yes.
When the Roll Back Driver button is greyed out, either the driver wasn’t updated recently, or your PC didn’t store the previous version. In this case, get the older version from the manufacturer’s website.
4. Repair the corrupt system files
Press Windows + S to open Search, type Command Prompt, and click on Run as administrator.
Click Yes in the UAC prompt.
Paste the following DISM commands individually and hit Enter after each: DISM /Online /Cleanup-Image /CheckHealthDISM /Online /Cleanup-Image /ScanHealthDISM /Online /Cleanup-Image /RestoreHealth
Now, execute this command to run the SFC scan: sfc /scannow
Finally, reboot the PC and check for improvements.
If you haven’t manually installed a new BIOS version, it’s time to check the manufacturer’s website and update the BIOS. Because an outdated BIOS is just as likely to trigger the blue screen error!
I recommend you check the manufacturer’s website for the exact steps to update the BIOS since they vary for each.
6. Perform a system restore
Press Windows + R to open Run, type rstrui.exe in the text field, and hit Enter.
Select the Choose a different restore point option, and click Next.
Pick the oldest restore point from the list and click on Next.
Verify the restore details, click on Finish, and confirm the change.
Wait for the process to complete. It may take 10-30 minutes.
If it’s a recent change to the PC that’s causing the VIDEO_SHADOW_DRIVER_FATAL_ERROR BSoD, performing a system restore should do the trick!
7. Reinstall Windows
When nothing else works, the last option is to reinstall Windows. Remember to move critical files to external storage beforehand to avoid data loss.
To reinstall Windows, plug in a USB drive to a working PC > go to Microsoft’s official website > download the Media Creation Tool > use it to create a bootable USB > connect the flash drive to the affected PC > change the boot order to the USB drive > run the setup > install Windows.
Reinstalling Windows using a bootable USB
If the VIDEO_SHADOW_DRIVER_FATAL_ERROR persists, it’s a hardware issue to blame, either with the graphics adapter or its connections. Right now, the best move would be to take your PC to a repair shop and get the hardware inspected for faults.
Before you leave, discover all the causes of BSoD and take precautions to prevent the error from reappearing!
For any queries or to share which fix worked for you, drop a comment below.
Your PC uses various DLL files to work properly, and one of those files is acroiefavclient.dll. So what is this file, and what does it do? This guide will tell you everything you need to know.
What is acroiefavclient.dll and is it safe to use?
What is acroiefavclient.dll?
Acroiefavclient.dll is related to Adobe Acrobat or Adobe Reader. It’s associated with the Adobe Acrobat IE Helper Version.
This file was used to bring PDF integration to Internet Explorer and allow you to view PDFs. It was automatically installed on your PC along with Adobe Acrobat or Adobe Reader.
Is acroiefavclient.dll safe?
Yes, acroiefavclient.dll is safe, as long as it comes from a legitimate source. You can check its legitimacy by doing the following:
Locate the file on your PC.
Right-click it and choose Properties.
Go to Digital Signature. Look for Adobe’s signature. If it’s there, it means that the file is coming from Adobe and that the file is legitimate.
Is acroiefavclient.dll a virus?
It’s unlikely for this file to be malware, but you can scan it by doing the following:
Locate the file.
Right-click it and choose Scan with Windows Defender.
Press the Windows key + X and choose Installed apps.
Next, locate Adobe Acrobat or Adobe Reader.
Click the three dots next to it and choose Uninstall.
Follow the steps on the screen to complete the process.
Lastly, go to the Adobe Acrobat or Reader installation directory and check if the file is gone. If not, remove it manually. You can find the installation directory at the following locations: C:\Program Files (x86)\Adobe\ C:\Program Files (x86)\Adobe\Acrobat Reader DC\Reader\ C:\Program Files\Adobe\Acrobat Reader DC\Reader\ C:\Program Files\Adobe\Acrobat DC\Acrobat\
Acroiefavclient.dll is a legitimate file, but it’s uncommon to see it on modern operating systems since most of them have removed Internet Explorer entirely, so if you notice this file, be sure to check its signature and scan it for malware.
If you’re on older operating systems, such as Windows 7, and you have Adobe Reader installed, you can keep this file, if you plan to use Internet Explorer for viewing PDFs.
This isn’t the only file associated with Adobe software, and we have a guide on what to do if CRClient.dll is not found as well as an article that covers aires.dll is missing error.
Microsoft Teams Direct Routing allows you to integrate your existing telephone system with Teams so you can keep your business telephone numbers.
Teams is an indispensable tool for hybrid work environments that rely on the Microsoft 365 suite of business apps. It allows you to hold virtual meetings, one-on-one video and audio calls, messaging, calendar, blocking meeting rooms, and VoIP phone calls.
However, you might find that the existing telephone numbers are becoming defunct and you’re burdened with sharing new MS Teams phone numbers with clients, contractors, and customers. Here, Direct calling steps in so you can extract enough value from existing phone lines and avoid the need to share new business cards.
Read on until the end to find out everything you need to know to implement Direct Routing in your organization. I’ll explain what it is, its hardware and software prerequisites, the advantages, and how to set it up.
What Is Microsoft Teams Direct Routing?
Teams Direct Routing is a BYOD solution for telephony for small, medium, and large businesses. This feature lets you integrate your prevailing phone systems with MS Teams.
When configured appropriately, you can directly receive and make phone calls using existing business numbers from the app on a whiteboard, digital meeting board, Microsoft Surface Hub 3, computer, tablet, or smartphone.
Also, the telephony will keep using the same Public Switched Telephone Network (PSTN). Furthermore, Direct Routing facilitates the integration of Session Border Controllers (SBCs) with the Teams app.
Here are the major features of this system:
PSTN connectivity: Allows direct connections to the PSTN using existing on-premises infrastructure.
Compatibility: Supports various PSTN trunks and interoperates with third-party telephony equipment.
Codec support: Supports multiple codecs like G.711, G.729, and OPUS for versatile audio handling.
Media bypass: Reduces latency by allowing media traffic to flow directly between SBCs and Teams clients.
SBCs: Ensure secure and reliable connections between the Teams platform and the PSTN.
Technical Requirements
You’ll need the following hardware and software products to create an infrastructure for Teams Direct Calling:
A supported SBC, like Mediant 500 SBC, SBC 5400, Think 365 SBC, etc. You’ll find a complete list of SBCs compliant with Direct Calling on Microsoft’s official site.
You’ll need one or more SIP trunks or telephony trunks to connect the SBC to the PSTN or PBX.
Microsoft 365 Organization installed and configured to host Teams users, SBC configs, and SBC connections.
User Registrar, a component of the Microsoft cloud infrastructure, for user authentication, SIP registration, routing information, and overall calling services.
You’ll also need to set up custom business domains in Microsoft 365. Default domains, like sales.onmicrosoft.com, won’t work. You’ll need domains, like [email protected], [email protected], etc.
A public IP address to communicate with the SBC.
A Fully Qualified Domain Name (FQDN) must be set up and fed into the SBC and MS Teams for successful communications between the hardware and software. If your domain is contoso.com, the FQDN for your SBC could be something like sbc1.contoso.com.
There should be a public DNS entry for the SBC FQDN mapping to the public IP.
A public trusted certificate for the SBC is also required so the SBC device can communicate securely with Microsoft Teams Direct Routing service.
You’ll need to feed the following three default domains into the Direct Routing configurations to function as the connection points for the SBCs:
Primary Global FQDN:sip.pstnhub.microsoft.com
Secondary FQDN:sip2.pstnhub.microsoft.com
Tertiary FQDN:sip3.pstnhub.microsoft.com
Firewall ports and IP addresses for Direct Routing media handling.
Preconfigured media transport profiles, like UDP/RTP/SAVP or TCP/RTP/SAVP.
These are the Microsoft 365 subscription requirements to use Teams Direct Routing:
A Microsoft Teams Phone Standard subscription. It costs $8.00/ user/ month with a monthly billing commitment. The service auto-renews unless you cancel it.
An Audio Conferencing license for GCC High, DoD G5 users, and DoD G3 users.
A Microsoft Teams subscription. You won’t be able to use Direct Routing with the Essentials plans. So, you’ll need to buy Microsoft 365 E5 or a better plan.
Advantages of Teams Direct Routing
Here’s why you should opt for Direct Routing configuration in Microsoft Teams:
Cost savings: You can reduce the need for expensive Microsoft Enterprise Calling Plans. It allows you to use existing SIP trunks for short and long-distance calling.
Global coverage: You can set up affordable global communications with local carriers worldwide.
Flexibility in carrier choice: You can choose your preferred telephony provider, giving you more flexibility and negotiating power.
Advanced call control: Direct Routing supports custom call routing based on your business rules. For example, the emergency telephone will only call 999 or other emergency services. Employees won’t be able to use this phone for personal or business calls to other numbers.
Scalability: Easily scale your telephony infrastructure as your business grows, without relying on Microsoft licenses alone.
Seamless integration: It integrates smoothly with existing on-premise systems like PBX or SBCs, making it easier to maintain continuity.
High availability: You can set up high availability and redundancy for better call reliability by using multiple carriers or SBCs.
Simplified management: You can manage all voice calls from one platform and streamline business operations.
Enhanced security: Direct Routing offers secure connections via Session Border Controllers (SBCs), providing an extra layer of protection.
Improved call quality: By working with local carriers and managing your call traffic, you can optimize call quality across regions.
No lock-in: You’re not locked into Microsoft’s calling plans, offering more freedom to adjust your telephony services.
Regulatory compliance: Meet local telecom regulations by working with regional carriers familiar with those laws.
How To Set Up Microsoft Teams Direct Routing
Here’s how to configure Direct Routing for Teams in a few steps:
1. Connect Your SBC
Establish a secure connection between Microsoft Teams and SBC using the credentials provided by Microsoft. You’ll find all the fields for entering SBC credentials by visiting the Microsoft Teams admin center. Moreover, you can read about advanced settings for SBC on the official website.
2. Enable Users for Direct Routing
You must now assign the required licenses to employees or contractors who will be using Teams Direct Routing. You might also want to set up user settings to enable this feature for voicemail and voice calls. Now, you can assign existing phone numbers while specifying Direct Routing as the phone number type.
3. Configure Call Routing
Now, create voice routes to define how to handle outgoing and incoming calls. At this stage, you should also specify dialed number patterns, priority levels, and associated SBCs for each route. Don’t forget to create PSTN usage records to track call usage and costs.
4. Translate Numbers
Translating numbers is useful for handling toll-free numbers, international calls, or specific dialing patterns. So, configure the translation rules to map phone numbers to different formats or destinations.
5. Test and Verify
Make inbound and outbound test calls to verify call quality, routing, and feature functionality. You’ll be able to address most Team Direct Calling issues and bugs during the testing phase.
Summary
So, now you know all about Microsoft Teams Direct Routing. You can set it up to utilize business phone numbers and avoid buying expensive calling plans from Microsoft.
Feel free to comment below if the article helped you or if you want to leave any suggestions.
Microsoft Rewards Support is now on X (formerly known as Twitter), making it easier to contact them if you have a problem with your Microsoft Rewards points.
The Program is one of the most popular because of its Rewards points, which allow users to gather them and spend them on Game Passes, Xbox consoles, or video games. A while ago, the Redmond-based tech giant introduced the Microsoft Rewards for Xbox specifically, and you can earn points by playing games and completing daily, weekly, and monthly quests.
Welcome to the official Microsoft Rewards Support account! ? We’re here to help you make the most of your Rewards experience – whether it's earning points, redeeming prizes, or answering questions.
However, like any other platform, Microsoft Rewards has its own fair share of issues that sometimes cause confusion among those who want to ensure they have completed their quests.
For example, the monthly Xbox Microsoft Rewards quests for October appeared completed for many users, but before the monthly reset, it confused many users. Ultimately, a bug caused by Microsoft got resolved, but the confirmation happened on Reddit.
With this new X profile, though, updates like these can be streamlined, avoiding further confusion.
Microsoft says users should expect updates, support, and tips on earning points and redeeming prizes.
Welcome to the official Microsoft Rewards Support account! ? We’re here to help you make the most of your Rewards experience – whether it’s earning points, redeeming prizes, or answering questions. Follow along for tips, support, and more!
In other news, Microsoft Rewards will flag suspecting search activity, limiting your chances of completing your quests. The Redmond-based tech giant employs an automatic tool that detects when users are searching or completing tasks too quickly within a short period.
You can follow Microsoft Rewards Support on X now.
The ERROR_CALL_NOT_IMPLEMENTED system error, with code 120 (0x78), appears when running a code, working on an application, or modifying a file/folder, say, deleting a file. The error message reads, This function is not supported on this system.
The error doesn’t appear frequently, but when it does, it’s usually missing permissions, conflicting processes, or a bug in the installed app version to blame.
Before you proceed to the slightly advanced solutions, restart the PC and try performing the same action again. If it’s another process to blame, this should fix ERROR_CALL_NOT_IMPLEMENTED.
How do I fix ERROR_CALL_NOT_IMPLEMENTED?
1. Run the affected program as administrator
Right-click on the program’s launcher, and select Properties.
Go to the Compatibility tab, and tick the checkbox for Run this program as an administrator.
Click on Apply and OK to save the changes.
Relaunch the program and verify whether the 120 (0x78) system error is resolved.
2. Terminate all app-related process
Press Ctrl + Shift + Esc to open the Task Manager, and look for any active processes linked to the affected app.
Select the processes individually and click on End task.
After terminating each process, try performing the operation that earlier triggered the This function is not supported on this system error message.
Sometimes, when you try to delete a file in Visual Studio, ERROR_CALL_NOT_IMPLEMENTED or its error message appears. This is because the file is loaded in another related process, and terminating it will quickly fix things!
3. Take full ownership of the affected file/folder
Right-click on the affected file/folder and select Properties.
Go to the Security tab, and click on Advanced.
Now, click on Change.
Enter the active user profile name in the text field, click on Check Names, and then on OK.
Once added, tick the checkboxes for Replace owner on subcontainers and objects and Replace all child object permission entries with inheritable permission entries from this object.
Click on Apply and OK to save the changes, and do the same for all previous windows.
Again head to the Security tab for the same file/folder, and click on Edit.
Click the Add button.
Now, enter the active user profile’s name in the text field, and then click on Check Names and OK.
Select the current user profile from the list, and tick the Allow checkboxes next to all the permissions.
Finally, click Apply and OK on all the windows to save the changes.
If it’s the missing file/folder level permissions to blame for ERROR_CALL_NOT_IMPLEMENTED, you will have to take full ownership and then proceed with the required actions.
4. Disable conflicting third-party software
In several cases, I saw third-party apps, primarily antivirus software, performance-enhancing utilities, or optimization tools, triggering the 120 (0x78) This function is not supported on this system message.
So, it’s best that you uninstall apps that fall into these categories. Don’t remove them all at once. Uninstall one and check for improvements. Only if the error persists should you move to the next!
5. Reinstall another version of the program
Press Windows + R to open Run, type appwiz.cpl in the text field, and hit Enter.
Select the affected program from the list and click on Uninstall.
Follow the on-screen instructions to complete the process, and then restart the PC.
Now, reinstall an older or newer version of the program from a reliable source, say, the official website or Microsoft Store.
When an FTP server with Filezilla was throwing the ERROR_CALL_NOT_IMPLEMENTED This function is not supported on this system error, downgrading from version 1.8.1 to version 1.8.0 resolved things, indicating a bug in the new version!
The same approach can also be applied to other software in a similar situation to fix error code 120 (0x78).
Windows 10 Build 19045.5070 (KB5045594) update is being rolled out to both the Beta and Release Preview channels for Windows 10 version 22H2.
KB5045594 introduces a new “Start” menu design and a few improvements to hardware settings in the “About” section of the Settings app. The update has also addressed several issues, including one that could cause a stop error when upgrading from Windows 10 to Windows 11.
In Settings > System > About, Windows Insiders in the Beta Channel will now see a revamped hardware specifications experience highlighting key details about their device.
Microsoft says the new top cards should help users stay informed about their hardware and how it impacts their device’s performance. A new FAQ section provides more information about a device’s specs.
If you can’t access them yet, you should be able to uncover them using a special ViveTool command, as spotted by Windows Insider @phantomofearth.
Windows 10's latest Beta/RP update (19045.5070/KB5045594) adds a redesigned About settings page with: – a more Windows 11-like design – graphics card information – new cards at the top to highlight key specs – and FAQs. To enable this, run:
Also new in KB5045594 is the ability for Insiders in the Beta Channel to receive features gradually as they’re rolled out. If you’re in the Beta Channel, you can enable an option in Settings > Updated & Security > Windows Update to get the latest updates as soon as they’re available. The toggle will appear gradually for Windows Insiders.
As for the new Start menu design, Microsoft is making viewing your account and settings easier with a refreshed account manager. Elsewhere, the lock command has been moved to the power menu on the Start menu. The change is rolling out gradually and may not be available to everyone in the Beta Channel and Release Preview Channel immediately.
KB5045594 also includes the following general fixes and improvements:
Addressed an issue that triggered a stop error when you used Load Balancing and Failover (LBFO) teaming with two virtual switches on a VM, one of which used single root Input/Output virtualization (SR-IOV).
Fixed a race condition that could cause a stop error 0x3B when upgrading from Windows 10 to Windows 11.
Added new phone numbers for product activation in multiple regions.
Addressed issues that resulted in a multi-function printer (MFP) printing specific network command text when connected via USB and failing to install a scanner driver over USB.
Updated profiles for certain mobile operators in Country and Operator Settings Asset (COSA).
Fixed an issue where WebView2 apps didn’t detect input from Xbox 360 and Bluetooth controllers.
Although there are no known issues in this build, Microsoft says the company is investigating reports of some users being unable to install the update with error code 0x80070005. If you’re an affected user, Microsoft recommends restarting your PC and then attempting the update again.
Now that the new Start menu design is available in the Beta Channel, it should soon be available in the Release Preview Channel and eventually to the general public.
In other news, despite reaching its EOS in less than a year, Windows 10 is still the most dominant Windows version on the market, with 63% of users still having it as their main operating system. Microsoft introduced ESUs as an official extended period for Windows 10, allowing users to stay on the OS for three more years. However, they come with a price, and many might not like it.
It’ll be interesting to see if the Redmond-based tech giant will come up with a solution for it.
Microsoft has acknowledged a bug related to Windows 11 24H2, released earlier this month. The issue concerns the operating system incorrectly reporting how much disk space Windows’ native Disk Cleanup utility can free up. The bug reportedly shows 8.63 GB of recoverable space in Windows 11, even if there isn’t any.
After using the Windows Disk Cleanup application may display an incorrect amount of disk space that can be freed up in the ‘Windows Update Cleanup’ category. Please note this is a reporting error. When ‘Windows Update Cleanup’ is selected and Disk Cleanup is run for the first time, some or all files in that category (for example, 15 GB) are cleaned up correctly and the related disk space is freed as expected. However, after this initial run, the tool may inaccurately report an amount of space still available for cleanup (for example, 88 GB) in the ‘Windows Update Cleanup’ category. This inaccurate amount of disk space is reported even though the space was already freed in the initial run.
Microsoft says it’s investigating the root cause of the problem and will release a fix once available.
The issue has been present since Windows 11 24H2’s release and doesn’t appear to have been addressed in this month’s Patch Tuesday update, which fixed a bug leading to boot loops and Bluetooth/USB connectivity failures for some users.
If you’ve experienced the Windows 11 8.63 GB bug related to the Disk Cleanup utility, know it’s a false alarm. The utility doesn’t know it yet.
In other news, the 24H2 update seems to deactivate Windows 11 on some devices. Although the issue is not yet widespread, it has affected dozens of users. The Redmond-based tech giant hasn’t updated the Health Dashboard to include this as a known error.
As a user sometimes you might encounter an ERROR_NOT_JOINED error code on your PC. This is a pretty vague error, but there are ways to fix it, and today we’re going to show you how to do it.
How can I fix ERROR_NOT_JOINED?
Restore vCenter Server
Open the vCenter Server and restore the server and PSC from a backup or screenshot.
After doing that, change the password of the SSO administrator. Use something with less special characters.
Next, reattempt the converge.
If successful, reset the SSO administrator password.
The issue can appear on VMware vCenter Service Appliance if the SSO administrator account has too many special characters in its password or if the password is too complex.
ERROR_NOT_JOINED 136 (0x88) is a developer system error, and unless you’re a developer, you most likely won’t see this issue as the end user.
Nevertheless, if the issue appears, you now know how to properly fix it. This isn’t the only error that you can experience, and we covered Resource_Manager_Exception_Not_Handled not that long ago.
Our latest guide covers the ERROR_JOIN_TO_SUBST issue, so don’t miss it for more information. Before you leave, don’t miss our guide on Error_Delete_Pending for more information.
The CRYPTO_SELF_TEST_FAILURE BSoD, also known as 0x00000123 stop code, occurs when the driver that handles encryption is malfunctioning, or is damaged. It usually appears randomly during the system initialization. It’s often encountered on older OS versions such as Windows 7 or 8, but it has been spotted rarely on newer Windows versions as well.
How do I fix the CRYPTO_SELF_TEST_FAILURE BSoD?
1. Reset BIOS to default settings
Restart your computer and press the key indicated during startup (usually F2, F10, DEL, or ESC).
In the BIOS screen look for Load Setup Defaults or Load Default Options. The menu is different, depending on the manufacturer of your system.
Save and exit the new settings (usually, by pressing F10).
If you recently made any modifications to your BIOS, that may be triggering the CRYPTO_SELF_TEST_FAILURE BSoD, so resetting the settings is the first step to fix this issue.
2. Roll back any recently updated drivers
Right-click the Start menu and select Device Manager.
Here, go through all the categories and see if there is any yellow exclamation mark next to any of the drivers. If you find any, right click on it and select Properties.
Next go to the Driver tab and select Roll Back Driver.
If the option is grayed out, click on Update Driver instead.
Next, click on Search automatically for drivers.
Even if you don’t remember updating a driver, Windows updates also come with driver updates that will install automatically. You may also try the Uninstall device option and restart your system to install a default driver for it. If this doesn’t work, you can also visit the manufacturer’s website for that component and download the correct driver for your device and OS.
3. Run SFC and DISM scans
Click the Start button, type cmd and click on Run as administrator from the results.
Type the following command and press Enter to run the SFC scan: sfc /scannow
After the scan is complete, type or paste the following command for the DISM scan: DISM /Online /Cleanup-Image /RestoreHealth
Restart your PC and see if the CRYPTO_SELF_TEST_FAILURE BSoD reoccurs.
The CRYPTO_SELF_TEST_FAILURE BSoD can also be triggered by a corrupt system or image and the SFC and DISM scans can clear these problems.
4. Run a System Restore
NOTE
System Restore will turn back the clock on your Windows OS, so everything you installed since the date of the restored image will be lost.
Click the Start button, type system restore and click on Create a restore point from the results.
Now, click on the System Restore button.
Select a restore point dated before the CRYPTO_SELF_TEST_FAILURE BSoD started to manifest itself and click Next.
Follow the on-screen instructions to restore your system.
Running the System Restore is a great way to patch things up on your system, but for that, you will actually need to have a saved restored point of your OS. If you don’t, this solution won’t work.
Ultimately, a clean Windows reinstallation is the last resort, but hopefully, the solutions above will help you fix your system from the CRYPTO_SELF_TEST_FAILURE BSoD.
If you need more information, you can always check our guide on the causes of BSoD, just to get a better understanding of this interruption. Before you leave, don’t hesitate to check our latest Win32k_Atomic_Check_Failure article for more information.
Let us know in the comments below if our solutions helped you fix the CRYPTO_SELF_TEST_FAILURE BSoD.
It seems that installing the 24H2 Major Update for Windows 11 might cause more issues than the usual installation ones, as once installed, it might deactivate Windows 11 altogether.
According to several Reddit users, this issue has happened to a string of devices that were updated to Windows 11 24H2. After installation, Windows 11 appeared deactivated. However, it seemed that for some, the issue solved itself.
The issue seems to affect Windows 11 devices connected to servers, and according to Reddit users, running a simple troubleshooting fixes them.
I noticed my Windows got deactivated after the update to 24H2, it solve itself. We use Enterprise edition and I looked into the logs but couldn’t find anything related to activation other than the notification banner (source log was from something to do with SSP). Now some of my end users are also reporting that their machines are showing that are not activated. So far all of them have the 24H2 feature update in common and by running the troubleshooting it goes away. Anyone else has experienced something similar?
Fortunately, the issue doesn’t seem widespread, but dozens of users have been affected.
While the issue should go away by itself or by running simple troubleshooting, it seems that some users had to run PowerShell scripts to check if Windows was deactivated following the 24H2 installation and, if so, reactivate it.
Microsoft doesn’t list this issue as a known issue on the Release Health page, so installing 24H2 might deactivate Windows 11 in only a handful of devices. However, this might change in the following days.
Last week, Microsoft released the first official Patch Tuesday updates for Windows 11 24H2 under the KB5044284 pack. However, as with other Patch Tuesday updates, this one had its faults.
Dozens of Windows users reported encountering the error message 0x800736b3 when installing the KB5044284 pack. The error prevented them from installing the patch on their devices.
Fortunately, error message 0x800736b3 is quite common in the world of Windows updates, and there are many ways to fix it, as you can see in our extensive article about it. Yes, it happened in Windows 10, but Windows 11 is no different, so the same solutions will work here, as well.
Alongside the regular solutions, such as running the SFC can, or resetting the Windows Update components, however, it might be worth trying a simple trick before attempting to install the KB5044284 pack again.
Unplug all external peripherals except the mouse, keyboard, and LAN cable to start the installation process.
Disable or even uninstall any third-party antivirus software that you might have installed on your PC. These might interfere with the update installation process.
These two solutions seem to have worked for many Windows users who couldn’t install the KB5044284 pack because of the 0x800736b3 error.
Let us know if it worked for you, too. If not, you can always try the more traditional fixes.
Many reported a message saying python27.dll is missing from your computer, and this error can prevent you from using Python or other applications that rely on it. However, there are ways to fix this problem.
What can I do if python27.dll is missing?
Before trying anything else, ensure that you have Python 32-bit or 64-bit installation, depending on your system.
1. Remove Python leftovers
Ensure that Python 2.7 is uninstalled from your PC.
Press the Windows key + S and type environment variables. Select Edit the system environment variables.
Click the Environment Variables button.
In the User variables section, double-click the Path variable.
Locate the Python 2.7 installation directory.
Navigate to it and remove all files.
Next, check the Path variable in the System variables section.
Look for the Python 2.7 installation directory.
Once you find it, go to it and delete all files.
Try to install the newer version of Python.
2. Reinstall Python
Press the Windows key + X and choose Installed apps.
Next, locate Python, click the three dots next to it, and choose Uninstall.
Follow the instructions on the screen to remove it.
If you have Python 2.7 installed, remove it as well.
Go ahead and download the latest version of Python and install it.
Check the option to add the environment variables during the installation.
This issue occurs when trying to run a new version of Python, as the leftover files or configuration causes the issue to appear.
The RECURSIVE_NMI BSOD (Blue Screen of Death), with error code 0x00000111, appears due to a non-maskable-interrupt (NMI) at a time when a previous NMI is in progress, according to Microsoft.
This is usually caused by faulty hardware, outdated or corrupt drivers, malware infection, conflicting third-party apps, corrupted system files, and misconfigured power settings.
Before you proceed to the solutions, restart the PC, install pending Windows updates, and disconnect any non-critical hardware. For most, this alone should fix the RECURSIVE_NMI blue screen error in Windows!
How do I fix the RECURSIVE_NMI BSoD?
1. Reinstall the corrupt drivers
Press Windows + R to open Run, type devmgmt.msc in the text field, and hit Enter.
Look for any devices with a warning sign next to the icon. The categories these devices are placed under auto-expand upon opening the Device Manager.
Now, right-click on the device, and select Uninstall device.
If available, tick the checkbox for Attempt to remove the driver for this device, and click on Uninstall.
Finally, restart the PC, and Windows will automatically install a fresh copy of the driver.
A warning sign next to the device icon indicates the presence of a corrupt driver, and in such cases, you will have to reinstall the driver.
2. Update the drivers
Press Windows + X to open the Power User menu, and select Device Manager.
Expand the Display adapters entry, right-click on the active graphics adapter, and select Update driver.
Click on Search automatically for drivers and wait for Windows to install the best locally available version.
Similarly, update the other drivers and then restart the computer.
Outdated drivers turned out to be the underlying cause in 3 out of 5 cases of RECURSIVE_NMI, and updating the drivers fixed things in no time!
Also, if Windows can’t find a better version, go to the manufacturer’s website, locate the newest release, and then manually install the driver.
3. Repair the corrupt system files
Press Windows + R to open Run, type cmd, and then hit Ctrl + Shift + Enter.
Click Yes in the UAC prompt.
Paste the following DISM commands individually and hit Enter after each: DISM /Online /Cleanup-Image /CheckHealthDISM /Online /Cleanup-Image /ScanHealthDISM /Online /Cleanup-Image /RestoreHealth
Execute this command for the SFC scan: sfc /scannow
Press Windows + S to open Search, type Control Panel in the text field, and click on the relevant result.
Click on System and Security.
Click on Change what the power buttons do under Power Options.
Now, click on Change settings that are currently unavailable.
Uncheck the Turn on fast startup entry, and then click on Save changes.
Finally, reboot the PC and check for improvements.
5. Scan the PC for malware
Press Windows + S to open Search, type Windows Security, and click on the relevant result.
Click on Virus & threat protection.
Click on Scan options.
Select the Full scan entry and then click on Scan now.
Wait for the scan to complete. It may take 10-30 minutes.
If Windows Security is unable to detect any threats on your PC, I recommend using a top-rated antivirus solution to run a more advanced scan in order to identify and eliminate malware and viruses!
6. Uninstall conflicting apps
Press Windows + R to open Run, type appwiz.cpl in the text field, and hit Enter.
Select any apps recently downloaded apps from the list, and click on Uninstall.
Follow the on-screen instructions to complete the process and then restart the computer.
If the problem remains unresolved, uninstall other similar apps from the list.
Apps like third-party antiviruses, security software, optimization tools, and performance-boosting utilities can often trigger the RECURSIVE_NMI BSoD in Windows 11. And, if their quick removal doesn’t work, you can use an effective software uninstaller to get rid of the leftover files, app cache, and Registry entries.
7. Reinstall Windows
When nothing helps fix the RECURSIVE_NMI blue screen, you will have to reinstall Windows as a last resort. Before you proceed, move any critical files to an external storage drive to prevent data loss.
With one of these solutions, you should have fixed RECURSIVE_NMI if it was a software-based underlying cause to blame. In case of a hardware issue, it’s best that you contact the manufacturer’s official support or visit a local PC repair shop because every component has to be inspected for faults.
Before you leave, discover the causes of BSoD and take suitable measures to prevent such errors from reappearing! We also have a new guide on Error_not_joined, so don’t hesitate to check it out.
For any queries or to share which fix worked for you, drop a comment below.
Datacor ERP is a resource management tool especially built for Process Manufacturing Industry. It’s an excellent software, but you can’t download Datacor ERP for Windows 7. The tool supports Windows 10 version 17763.0 or higher systems. We are still going to provide the means to get the software, but you will need to upgrade your OS to install it.
Click on the Download button and you will be redirected to the Microsoft Store app to get and install the app.
Datacor Mobile is not an application for mobile, it’s a companion application to Datacor ERP. In other words, you still need to get Datacor ERP and implement it on your environment. Datacor Mobile will help you connect to your Datacor ERP app to control it remotely.
2. Get Datacor ERP
Datacor ERP is not available straight away. Open a browser and go to the Datacor ERP dedicated page and click on Request a demo button.
After you supply an email address, you will be contacted by the developers to get a demo and guidance on how to download and implement the app for your environment.
If you want to learn more about Datacor ERP, you can check their resources page and see if the tool meets your requirements.
To conclude this guide, we remind you that Datacor ERP doesn’t work on Windows 7. The minimum OS version is Windows 10 17763.0.
If you’re already using the tool, let us know about your experience in the comments below.